 by eric
Instructor Razuvious
Adds HP: 450,000
Boss HP: 3,100,000
Difficulty: Medium
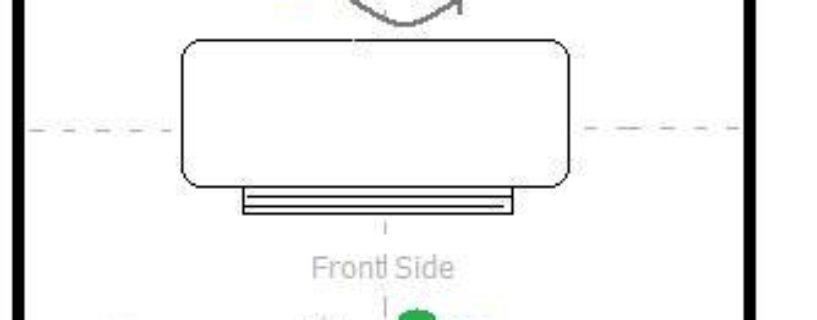
Start Position
the fight
The main object in this fight is how well the tanks can control the adds. Nornally the tank tanks, but here it’s different; the tanks need to control the adds, and the adds will tank. The adds (controlled by the tanks) need to switch aggro whenever their taunts run out. Before taunting, use bone shield which will decrease damage taken alot (can be found on the adds actionbar). So it will go like this:
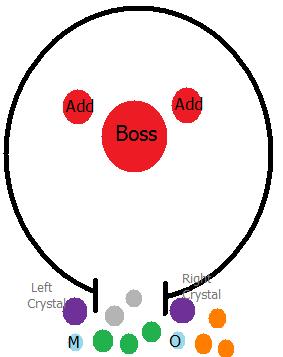
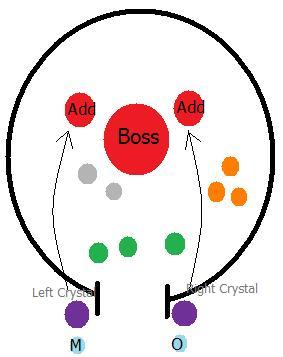
First Pull (the tank that control the crystal to the left):
Bone shield (6)-> Taunt (5)-> Auto Attack (1)-> Damage Dealing ability (4)
When the taunt of the tank controlling the add to the left runs out; the crystal tanker to the right should pop bone shield 1 sec before the first taunt runs out, THEN taunt the boss (same rotation like first pull).
The boss will also cast a heavy DoT on a random target which will deal around 15k damage at all. Every 15 second the boss will cast a AoE which will deal 4-5k damage.
Gothik the Harvester
Boss HP: 830,000
Difficulty: Easy/Medium
Start Position
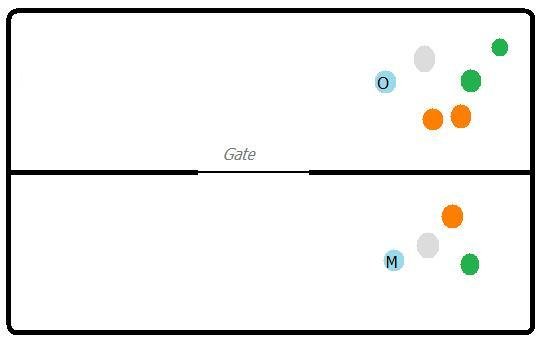
Split your party up in 2 groups (see picture). When someone hits the boss the fight will begin.
Phase 1
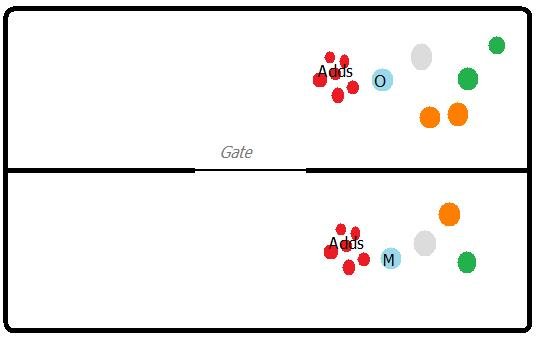
When the boss is attacked, adds spawn on both sides of the room (living side and undead side). There are 3 different adds. A Unrelenting trainee with 10k hp. Shouldn’t be any problem. Unrelenting Death knight – 34k hp, they will randomly intertupt party members. Unrelenting Rider – they have 55k hp and cast *Unholy Aura* which does 350 damage every 2 second.
Phase 2
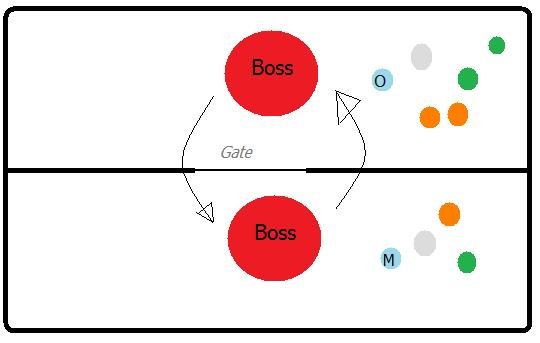
After 4:30 seconds phase 1 will end, and the boss will attack the living side (south on the map). The boss will teleport from side to side and when the boss is at 30%, the gate will open. The boss casts a de-buff every 15 seconds which will decrease all atributes by 10%. Stacks up to 10 times. So actually, you got 2:30 minutes to kill the boss.
The Four Horsemen
Boss HP: 870,000
Difficulty: Medium/Hard
There are several ways to down this boss. I choose this one because I think its the easist way with a basic group setup.
Start Position
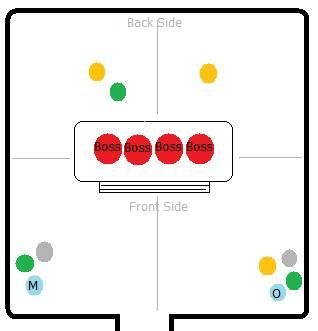
The main object in this fight is how to cordinate the debuffs right. Every boss got a debuff which will cause you damage. The debuffs stack. The first stack won’t give you damage but then the next 500, and the third 3,500 damage. Now, lets take a look at the group setup.
1 tank, 1 DPS (2 in the right corner) , and 1 healer in each of the ‘front side corners’. Then you must have your 2 ranged on each side of the debuff range (45 yards) in the ‘back side corners’. The strongest healer in the raid must be at the backside with the ranged. The backside healer must be in range of both ranged, but NOT in range of both bosses debuff (make sure the ranged DPS’s and healer not pulls aggro from the bosses).
Part 1
When you are in range of the bosses, the four bosses will run to a corner each. Let’s take a look on the frontside:
Thane Korth’azz
The boss will run to the south-west corner on the map.
Meteor – Thane Korth’azz will cast a Meteor on a random player close to him, causing 13,775 to 15,225 Fire damage, split between all players in the ~5 yards range of the meteor. from wowhead
Baron Rivendare
The boss will run to the south-east corner on the map.
Unholy Shadow – Every ~15 seconds Baron Rivendare will use this on the person with highest threat on his list. The ability hits for 4,500 to 5,500 Shadow damage and leaves a magic debuff that deals 1500 Shadow damage per second for 8 seconds. from wowhead
The maintank must tank Thane Korth’azz at the his corner and the Baron Rivendare must be tanked by the offtank in his corner. As mentioned, the bosses will cast a mark which will cause you damage. When the groups get 3 marks (it will happen at same time at the frontside), the groups must run to the middle and switch aggro of the bosses so the offtank gets Thane Korth’azz and the maintank get Baron Rivendare. Then the maintanks group must run with the boss back to the offtanks group original tankspot (and the offtank run to the maintanks group original tankspot). Follow this process untill both bosses at frontside are dead. It’s very sure that one of the bosses will be dead before the other one, because the group to right got one more DPS’s. That means the two strongest DPS’s must be to the left. When one of the bosses dies: The group to the right which is pretty sure the group which will be done first, runs to the other boss at the left and should bring the last add down fast. When the group to the left (which will get 3 marks before the group to right) get three marks, they will run to the right side and the rest of original group from the right keep DPSing until three marks; swap groups once more, keep this up until the last boss is dead on frontside.
Now, let’s have a look on the backside:
The two ranged DPS’s will have to tank a horseman each, the healer need to heal them up. The ranged DPS’s will stand close to max range of the debuff, but NOT in range of both debuffs. The healer (note that the healer still need to heal the ranged DPS on the right side) starts by standing on the left side. When the ranged DPS on left side and the healer got 3 marks, the ranged DPS’s will do like the tanks; switch target and aggro (now they just don’t need to run that long). The healer will keep moving with the ranged DPS that originally was on the left side.
Sir Zeliek
Holy Bolt – Holy Bolts are the primary attack of Sir Zeliek. They hit for 2,357 to 2,643 Holy damage, every ~2 seconds, 45 yards range. This will always be cast on the player closest to him.
Holy Wrath – Every 15 seconds Sir Zeliek will cast Holy Wrath, hitting his target for 900 to 1,100 Holy damage, and jumping to other targets in 10 yards range. Each jump increases the damage done by 50%.
Condemnation – Sir Zeliek will spam this ability if there are no players within 45 yards of him. The spell hits the whole raid for 5,655 to 6,345 Shadow damage every 2 seconds, or until a player enters his range. from wowhead
The boss will run to the north-east corner on the map.
Lady Blaumeux
Shadow Bolt – Shadow Bolts are the primary attack of Lady Blaumeux. They hit for 2,357 to 2,643 Shadow damage, every ~2 seconds, 45 yards range. This will always be cast on the player closest to her.
Void Zone – Every 15 seconds Lady Blaumeux will summon a Void Zone under a player in her range. The Void Zones do 4250 Shadow damage each second to players inside them, and last for 75 seconds.
Unyielding Pain – Lady Blaumeux will spam this ability if there are no players within 45 yards of her. The spell hits the whole raid for 5,655 to 6,345 Shadow damage every 2 seconds, or until a player enters her range.from wowhead
The boss will run to the north-west corner on the map.
Part 2
When both bosses at fronside are dead, the players at fronside must assist backside. The tank and his/her group that tanked to the left will assist on the north-west and the tank and his/her group that tanked to the right will assist on the north-east. While the DPS’s and the healer at backside got their own game running (I’m talking about the marks they got, e.g. maybe they got two marks already and the groups from frontside got 0 when they arrive at the backside). The tanks will now take over the two last bosses, but now the whole groups have to move instead of only the tank and healer.
Alternative Strategy
If you got healing class which is DPS, or a person who wanna duelspec, they can take over on the backside insread of the three-man team in the original strategy. The only thing they have to do is heal them self up; survive. Then you will get more DPS on the frontside.
Example: Our balance druid and our elemental shaman took the backside by healing them self up.
= 2 tanks, 4 healers (two of them were specced DPS, but healed backside with no problems).
On the Gothik the HarvesterOn the Gothik the Harvester fight it might be worth mentioning that the adds pass through the living side, then when killed go over to the dead side. Also if you have any Paladins it is a good idea to put them on the dead side because of abilities like [url=http://www.wowhead.com/?spell=48817]Holy Wrath[/url] which really help when the dead side begins to get a bit busy.
Paladin tanksThis problem is not the case since pallies got [url=http://www.wowhead.com/?spell=62124]Hand of Reckoning[/url] (3.0.8 i believe)…
I’m a holy pally and II’m a holy pally and I usually end up tanking an add at the back on 10 man and sometimes on 25man, with a beacon on the other tank we can keep going at the back as long as is neccessary. So long as we keep swapping over and staying in range that is.
[url=http://www.wowhead.com/?spell=48825]Holy Shock[/url] is your friend when swapping over ;).
Also worth mentioning on theAlso worth mentioning on the Four Horsemen Encounter is that, when you have a paladin, tanking kor’thazz or rivendare, let the pala taunt first, due the nature of their taunt.
And for the love of got, don’t pick 2 palas to tank them.
Thank you jame, nice to seeThank you Jame, nice to see you active again 😉
Once again, awesome jobOnce again, awesome job eric. Bumping your guide to the front page.
Thank you, didn’t know that,Thank you, didn’t know that, I’ve changed it.
It honestly doesn’t matterIt honestly doesn’t matter who is in the back, I usually just have a couple low dps that have healing abilities go in the back. The horsemen don’t hit that hard and paladins have no problem healing through it. Even ret pallies are okay back there.
For your alternativeFor your alternative strategy you suggest 2 paladin healers, paladin healers are probably the worst healers you can have in the back since they got no healing over time heal which is VERY useful when switching sides. We usually have a druid/shaman healer and a hunter in the back on 10 man and 2 druid/shaman healers, me (paladin tank) and a hunter in 25 man.