 by Hairbo
Introduction
Hello, my name is Hairbo. This guide is a continuation of Manovan’s Night Elf Leveling Guide (1-13), and it assumes that you have completed this guide. This guide is designed for Night Elf’s but all races can use this guide. This guide is a great alternative to the normal Westfall/Redridge/Duskwood type of guides you see from 12-20.
Why you should use this guide:
- This guide is a great alternative to the typical human zone based leveling guides you see around this level.
- This guide provides the fastest most optimal circuits in these zones, and grinding is a rarity.
- This guide goes into great detail for every quest, which most guides expect you to figure out what you should be doing
If you have any concerns, tips, comments, or anything useful to say; please leave a comment at the bottom of the page. I am relatively new at writing guides, so anything is helpful! Thanks and enjoy the guide.
Recommended Addons
Addons can come in handy, and I will recommend a few that make my game play easier, faster, and better. Some of these mods might not come in direct use within the guide, but it can help.
- Postal: this addon is great for collecting mail instantly, and mailing between characters easier.
- Koordinator: This mod is if you need coordinates, and its definitely the best on the web.
- Questhelper: This is probably the best mod to keep track of quest objectives. This mod doesn’t have great quest circuits, but it can be useful in finding a quest.
Color Code
* Quests
* Items
* Locations
* Quest objectives to kill
* NPCs
* Locs
The Guide
If you followed Manovan’s Night Elf Leveling Guide (1-13) You should have the quest [11] Grove of the Ancients, if you do not don’t worry about it. You should also be in Darnassus, if you are not in Darnassus head over there.
Level 13
Go to Rut’theran Village (use the portal behind the bank) and take the flight to Auberdine.
Set your hearthstone to Auberdine.

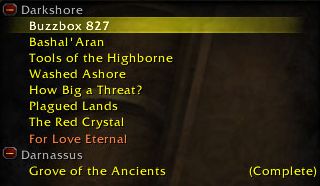
Get all the quests here except:
- [17] Cave Mushrooms
- [18] WANTED: Murkdeep!
- [14] The Family and the Fishing Pole
Your quest log should look like this:
No map required for this circuit, its very short.
Start walking south along the beach while killing Pygmy Tide Crawlers
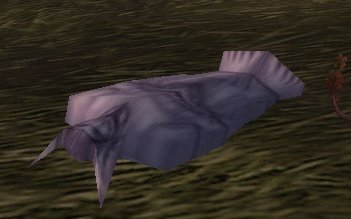
1. Keep walking until you see the Beached Sea Creature (36,51), it should be surrounded by murlocs. Clear the murlocs and loot the Sea Creatures Bones from it.
2. After you have collected the bones, head slightly southeast to the Furbolg Camp (40,53) and fight your way to the center untill you get a complete message for [14] How Big a Threat?
3. Directly south of the camp look for a Rabid Thistle Bear and use your Tharnariun’s Hope near it. Make sure that you get a completion for [14] Plagued Lands before heading back.
4. Now head back to Auberdine make sure to collect the rest of your Crawler Legs that you need for [10] Buzzbox 827
In Auberdine turn in:
- [10] Buzzbox 827
- [14] Plagued Lands
- [14] How Big a Threat?
- [13] Washed Ashore
Get all the follow ups, and also get:
- [15] Thundris Windweaver
- [17] Deep Ocean, Vast Sea
- [15] Cave Mushrooms
Turn in [15] Thundris Windweaver and get the follow up.
—-MAP HERE—-
From now on slay Darkshore Thresher and Rabid Thistle Bears on sight until both [12] Buzzbox 411 and [16] Cleansing of the Infected are complete.
1. Leave Auberdine to the west into the ocean, swim to (32,46) where you should find a Skeletal Sea Turtle on the sea floor. Click its skull and loot the Sea Turtle Remains.
2. Swim back to Auberdine and turn in [14] Washed Ashore
3. Get back into the ocean, this time swim north killing all the Darkshore Thresher you see until [10] Buzzbox 411 is completed.
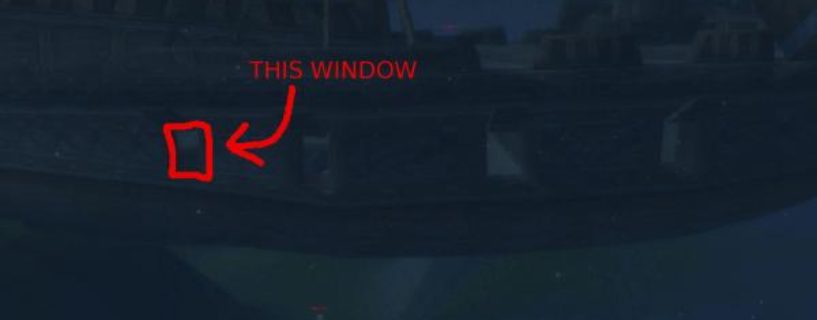
4. Keep swimming north until you run into two have submerged boats (39,29). In the first boat go into the following window (careful these murlocs can be tough):
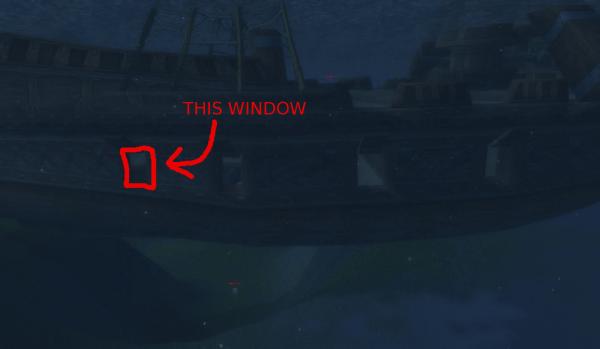
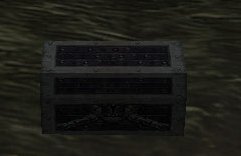
Swim to the bottom of the ship and loot the Silver Dawning’s Lockbox.
Go back up for some air, then go to the next ship and swim through this hole:
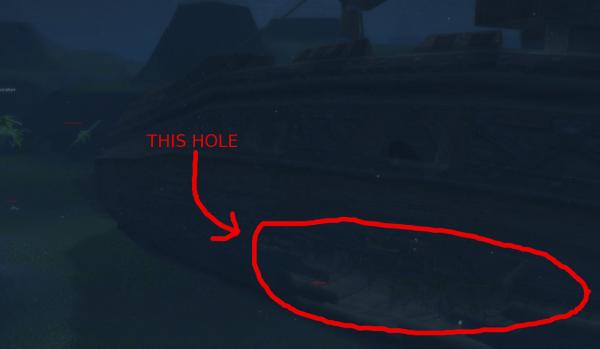
Swim to the far end of the ship and loot the Mist Veils’s Lockbox.
5. Swim up to the beach and turn in [13] Buzzbox 411, get the follow up.
Go slightly south of here along the beach and get the quest [13] Beached Sea Creature
6. Head northeast and slay Rabid Thistle Bears and Moonstalkers, stay here until you complete the following objectives:
- Kill 20 Rabid Thistle Bears
- Collect 6 Moonstalker Fangs
This should level you to 14.
Level 14
7. Go to Cliffspring River Waterfall (51,25) and use your Empty Sampling Tube. Also turn in [14] Buzzbox 323 and get the follow up.
8. Go north along the coast once again, and you’ll find another turtle (53,18). Take its quest [15] Beached Sea Turtle.
9. Follow the coast east and you’ll run into another turtle (53,18). Clear the murlocs out and take its quest [15] Beached Sea Turtle.
Hearth to Auberdine turn in:
- [15] Beached Sea Turtle (x2)
- [13] Beached Sea Creature
- [17] Deep Ocean, Vast Sea
- [16] Cleansing of the Infected
- [15] The Cliffspring River
Get:
- [18] Tharnariun’s Hope
Fly to Rut’theran Village and go into Darnassus.
Once your in Darnassus go to The Temple of the Moon except don’t go inside. Take the right path around the building and you’ll run into a dwarf. Take his quest [14] Trouble in Darkshore?
Go train your level 14 spells and get back to Auberdine.
Restock, sell, repair, etc.

Go across the bridge to Archaeologist Hollee and turn in [14] Trouble in Darkshore? Don’t worry about getting the follow up, we aren’t a high enough level yet.
—MAP HERE—
1. Get out of town and head north along the road. You’ll run into a town filled with demons called Bashal’aran, go up a slope near the road and turn in [12] Bashal’aran and get the follow up. Now go into town and slay Vile Sprites and Wild Grells until you have 8 Grell Earrings.
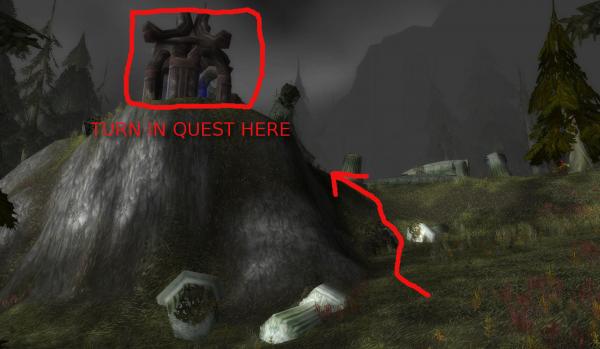
2. After you collected 8 Grell Earrings go back to Asterion and turn in the quest, get the follow up.
Go back into town and look for Deth’ryll Satyr kill them until you get an Ancient Moonstone Seal.
Go back to Asterion again turn in the quest, and get the follow up [13] Bashal’aran.
This should make you ding 15, if not slay animals on the way to our next quest until you are 15
Level 15
3. Head east until you hit the mountainside, follow the mountain side south until you run into a Red Crystal (47,49). Get close to it and get credit for [14] The Red Crystal.
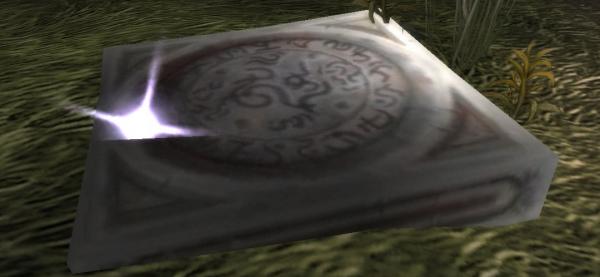
4. Now go east until you reach the road, then go south until you run into Sentinel Tysha Moonblade and get her quest [12] The Fall of Ameth’Aran. Follow the path next to her into Ameth’Aran (43,56), we have to do the following here:
Locate the Two Tablets:
(43,63) – Fall of Ameth’Aran
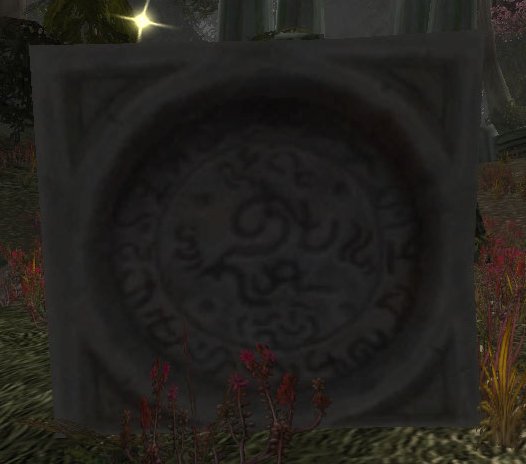
(43,58) – Lay of Ameth’Aran
- Kill ghosts until you have 7 Highborne Relics.
- Kill Anaya Dawnrunner (42,61)
- South of Anaya, you should see a green flame in a gazebo. Right click it to complete [13] Bashal’Aran.
Go back to Sentinel Tysha Moonblade and turn in [12] The Fall of Ameth’Aran
After you have finished all of these things, move to the next step.
5. Get back on the main road and head south, cross the bridge and take a left and follow the river. You should find Grove of the Ancients turn in [11] Grove of the Ancients (if you have it).
6. Now head south and west where you’ll find Grizzled Thistle Bears, slay them until you have 4 Grizzled Scalps.
After this is finished, go to (41,80) and turn in [16] Buzzbox 525.
Hearth to Auberdine
Turn in:
- [17] For Love Eternal (you can watch cool script)
- [14] The Red Crystal, get the follow up.
- [12] Tools of the Highborne
Take:
- [20] The Absent Minded Prospector
- [18] WANTED: Murkdeep!
- [18] The Tower of Althalaxx
- [18] The Blackwood Corrupted
Before leaving Auberdine go the moonwell by the inn and fill your Empty Water Tube and Empty Cleansing Bowel.
—MAP HERE—
1.Head south back the furbolg camp we explored earlier, kill what you need for [14] How Big a Threat?
2. Head northeast back to the Red Crystal we went to earlier. Turn in [14] As Water Cascades and get the follow up.
3. Follow the mountainside north until you see a path going up to a cave at (52,36). Go up the path and look into the cave, you will see a level 19 bear called Den Mother and 4 level 10 bears called Thistle Cubs. Pull one of the Thistle Cubs and they will all run at you, burn one of the cubs down quickly and run away. Rinse and repeat until all 4 cubs are dead. Pull the Den Mother and kill her.
4.Head back down the slope where you’ll find a few furbolg camps, we are going to do the following here:
Make sure your healed up before you take a store, two furbolgs will spawn and attack you.
- Loot Blackwood Grain Stores
- Loot Blackwood Nut Stores
- Loot Blackwood Fruit Stores
- After collecting the stores, use your Filled Cleansing Bowel at the bonfire in the center of the furbolg camp, wait for a second then kill Xabraxxis and loot his bag he drops on the ground.
Also grind here until your level 16, you should be close anyway.
Level 16
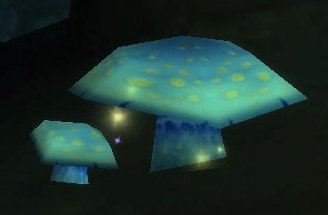
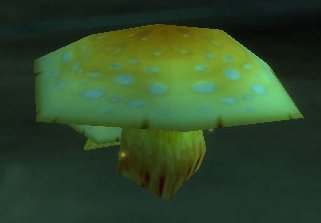
5. Go across Cliffspring River and take the path going up to the cave above the waterfall. Go inside the cave and find loot the mushrooms you need for [17] Cave Mushrooms, the mushrooms look like this:
6. Head north to Tower of Althalaxx where you should find Balthule Shadowstrike, turn in [18] The Tower of Althalaxx and get the follow up.
Head towards the tower and start killing Dark Strand Fanatics, but do not go inside the tower. Continue killing until you have 4 Worn Parchment.
After you finish [18] The Tower of Althalaxx go back to Balthule Shadowstrike and turn it in. Get the follow up.
7. Follow the road south all the way back to Bashal’Aran and find Asterion, when you get there turn in [13] Bashal’Aran.
8. Walk south again until you reach Auberdine turn in all your quests.
Get:
- [17] Onu
- [20] A Lost Master
You should be level 17, or very close. If you aren’t 17 yet, just kill stuff on the way.
Level 17
Fly to Rut’theran Village and go into Darnassus. Go train your level 16 spells and get back to Auberdine.
Restock, sell, repair, etc.
—MAP HERE—
1. Get on the beach and start traveling south. Keep a look out for washed up bones or animals with quests on the way to Murkdeep. You should find a Beached Sea Turtle at (37,62) and a Beached Sea Creature at (36,71). Get both of their quests.
2. You should eventually get to a bunch of 16-17 murlocs. Before you start clearing here is whats going to happen. After you clear the camp out you will stand near the bonfire. The first wave of murlocs will be 3 level 12 coastrunners, no big deal. The second wave will be do level 15 warriors, no big deal. The third and hardest wave is level 19 Murkdeep and a level 16 hunter. Once you drink up, stand near the bonfire and complete the event.
3. Head east to Grove of the Ancients, from now on slay all Moonstalker Sires and Moonstalker Matriarchs on sight until you have 5 Fine Moonstalker Pelts. Don’t go out of your way to slay these monsters, we’ll have time to finish this quest up later.
When you get to Grove of the Ancients turn in [17] Onu, get the follow up but ignore the escort quest from Kerlonian Evershade for now, we’ll do it later.
4. Get back on the road and travel south, you should eventually see a turnoff to an area called The Master’s Glaive. Clear your way down to the glowing area until you get a complete message for [17] The Master’s Glaive. After its complete use your Phial of Scrying on the ground next to you and turn it in, get the follow up. You should a yellow question mark appear, clear your way to it, and turn that in, get the follow up. Finally you should see a yellow exclamation mark, clear your way to it, and accept the quest (its an escort quest), its pretty simple just escort her to the road, no ambushes.
5. Travel around the southern end of The Master’s Glaive while killing all the Moonstalkers you see. Keep traveling around it then go north to Remtravel’s Excavation. Skim the edges of the pit to the northern part of the dig where you should find Prospector Remtravel, turn in [20] The Absent Minded Prospector.
This is an escort quest, and is almost impossible to solo for any class. I suggest asking in general chat for people interested in doing it, or looking for people who are doing it already in the camp but are having trouble. While your waiting move on to the next step.
6. Go west to the beach, and start to go south along the beach. You should find a total of four washed up creatures, coordinates are below, get the quests from all 4 then continue with the next step. Make sure you also pull these murlocs one at a time, they can hurt pretty bad:
- Beached Sea Creature at (33,81)
- Beached Sea Turtle at (32,84)
- Beached Sea Turtle at (31,85)
- Beached Sea Creature at (31,87)
7. Head back to Grove of the Ancients and on the way get the rest of the Fine Moonstalker Pelts you need for [20] A Lost Master. When you get to Grove of the Ancients turn in the quest. Get the follow up [20] Mathystra Relics.
Hearth to Auberdine turn in everything, make sure to get the follow ups. Also get the quest [20] Onward to Ashenvale.
You should easily be level 18 by now.
Level 18
Fly to Rut’theran Village and go into Darnassus. Go train your level 18 spells and also go back to the dwarf we went to earlier. Turn in [20] The Absent Minded Prospector, get the follow up. Get back to Auberdine.
Restock, sell, repair, etc.
Before you leave Auberdine run up the dock leading from the inn. Get the quest from Fiora Longears. Go back to the inn and take the right entrance, go to the beach where you’ll find a dwarf. Get his quest [17] Fruit of the Sea, ignore his other quest.
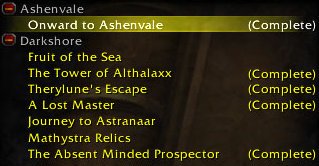
Your quest log should now look like this:
—MAP HERE—
1. Get out of Auberdine and take the road north until you reach Cliffspring River. Once you reach the river head north to the beach.
From now on kill Reef Crawlers and Encrusted Tide Crawlers until you have 6 Fine Crab Chunks.
2. Walk north along the beach while killing crabs. You’ll see a robot named The Threshwhackonator 4100, ignore him and keep walking north until you reach a gnome called Gelkak Gyromast (57,13) who is standing on a rock. Grab his quest.
3. Immediately after accepting his quest jump into the water and swim to the boat wreckage. Kill murlocs here until you find the Middle of Gelkak’s Key. Get back on the beach and kill Raging Reef Crawlers until you find the Bottom of Gelkak’s Key.
Head north of Gelkak Gyromast and slay Giant Foreststrider until you get Top of Gelkak’s Key, go back to Gelkak Gyromast turn in the quest and get the follow up.
4. Go back to The Threshwhackonator 4100 we walked by earlier (56,18). Talk to him and select the option ‘Turn the key to start the machine’. He’ll follow you, so take him back to Gelkak Gyromast, once you get there he will turn aggressive. Kill him and turn in the quest.
Head south down the beach until you’ve finished [17] Fruit of the Sea.
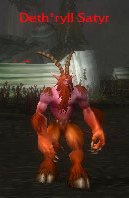
5. Head east to the Ruins of Mathystra and start killing the Nagas there. Look for these relics on the ground:
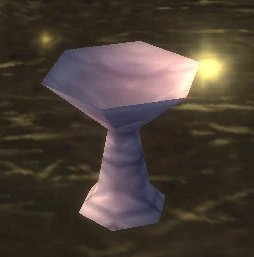
Keep killing here until [20] Mathystra Relics is complete.
Hearth back to Auberdine. Before leaving Auberdine turn in [17] Fruit of the Sea.
You should be level 19 by this point.
Level 19
—MAP HERE—
1. Time for a long walk, head south on the road back to Grove of the Ancients. Turn in [20] Mathystra Relics.
2. Follow the mountainside south and you’ll reach Blackwood Den. Start clearing into the camp, make sure to clear ALL the furbolgs out. Go into the cave and turn in [20] A Lost Master. Get the follow up [22] Escape Through Force, this is a very easy escort… You will get three ambushes, all consisting of two furbolgs.
Escort him to the road and continue with the next step.
==OPTIONAL QUEST==
Go back to Grove of the Ancients and get [20] The Sleeper Has Awakened. Loot the small box next to him.
Get to the road and travel south, occasionally he will start to sleep, just use your Horn of Awakening on him. You’ll face two ambushes, both will consist of three Twilight mobs. They can be very hard to solo, and that is why this is optional. Keep escorting him south along the road until you get to Maestra’s Post.
==END OF OPTIONAL QUEST==
3. Get on the road and head south, into Ashenvale. Keep following the road until you get to Maestra’s Post (26,39), turn in [18] The Tower of Althalaxx, don’t get the follow up, also turn in [20] The Sleeper Has Awakened if you did it (it was optional).
4. Get back on the road and keep heading south, take the dirt path here:
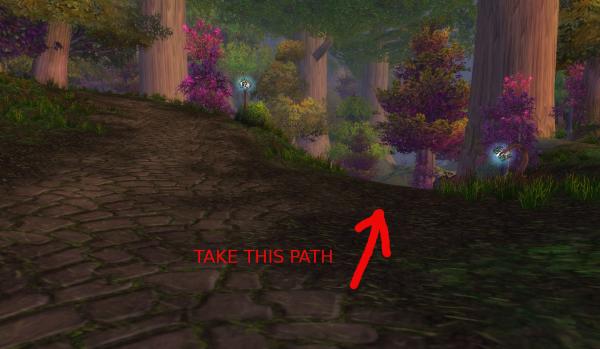
This will take you to The Shrine of Aessina, turn in [18] Therylune’s Escape and take the dirt road back up to the main road.
5. Head east along the road until you reach Astranaar. Once you arrive get the new flight path left as you enter the bridge, then turn in [20] Journey to Astranaar. Go to the inn and turn in [20] Onward to Ashenvale.
Take the flight path to Auberdine and once you arrive turn in [22] Escape Through Force.
It’s time to leave Darkshore. Go inside the inn and then get onto the docks, there should be three extensions from the main dock, take the left one.
If you picked the right boat you should end up in Stormwind City. Take this path below:
Get the flight path from Dungar Longdrink and get to the front gate.
Take this path to Red Redridge Mountain :
Thanks for the guideJust wanted to also say thanks for the guide. Darkshore does make more sense it seems to me than Bloodmist, Goldshire or wherever. I am attempting to convert this guide for use in the new Wow-pro leveling addon, more for experience editing guides… and to make my own progress there easier so I don’t have to Windows key in and out. 🙂 . So far so good. The area seems like it would be tricky without a good guide, so thank you.
Missing ImagesLooking at your guide, the last two images (the path in Stormwind and the path to Redridge Mountain) are missing. Also, you say “Red Redridge Mountain” in the last line. However, the rest of the guide looks just fine. Thank you for writing a guide to this zone- its evil if one doesn’t quest stack right 😛 .