
 by Manovan
This is a guide for fast leveling through Tirisfal Glades as an Undead character. If you’re another race, I recommend that you choose another guide. This guide will take into consideration classes (class quests and talent suggestions) and professions (and alternative circuits for gatherers). This guide will optimize your leveling for your class and profession of choice. The system used is emulating Jame’s because his guides are very detailed and comfortable to play after.
Why you should use this guide:
- This guide takes into account every quest in the zone in the fastest and easiest way possible.
- This guide gives suggestive circuits for your class and profession of choice.
- This guide is carefully planned out and tested to make your leveling process as fun and easy as possible.
IMPORTANT!
- This guide is intended for Undead characters only!
- Everything in this guide can be done solo!
- Don’t bind your hearthstone somewhere unless I tell you to!
- Try to log out in an inn or in one of the major cities!
These notes are important so that you won’t get lost in the guide. If you follow the instructions accordingly, there should be no questions about what you’re supposed to do next.
Recommended AddOns
Using AddOns are optional but there are some I recommend to make your leveling process easier. I will also mention the AddOns I use for personal satisfaction in case you wonder about something you might see in a screenshot:
- Quartz: A very good casting bar AddOn.
- QuestHelper: This is a recommended AddOn which automatically track quests and mark them on your maps. I recommend using the AddOn to make it easier to find the locations of your quests while following my guide. However, I suggest you ignore QuestHelper’s suggestive routes and stick to those I suggest in this guide (NOTE: If you’re using TourGuide’s version of this guide, then QuestHelper can get in the way of the tracking).
- Titan’s Panel: This is a good AddOn which adds panels to the top and bottom of your screen. The highlight of this tool is the fact that it adds coordinates to your map.
- This guide is TourGuide compatible. Visit this link to download the AddOn version of the guide.
Color Code
- Quests
- Items
- Locations
- Quest objectives to kill
- NPCs
- Coordinates
- Profession
Class specific information:
- Mage
- Priest
- Rogue
- Warlock
- Warrior
The color codes might look confusing at first glance but you’ll get used to it in no time.
The Guide!
Level 1
A new Forsaken has risen in the tomb of Deathknell. I suggest you take your time to fix your interface the way you want it and give your skills the proper key bindings. Make sure everything is set and then move out to grab your first quest.
Outside the tomb you should see Undertaker Mordo. Grab his quest [1] Rude Awakening.
Further north you should see a chapel at your left hand side.
Turn in [1] Rude Awakening at Shadow Priest Sarvis and grab his quest: [2] The Mindless Ones.
Now start killing Mindless Zombies and Wretched Zombies just outside the chapel until you’ve killed 8 of each.
You should be about halfway to level 3 by now.
Level 2
Go back to Shadow Priest Sarvis and turn in [2] The Mindless Ones.
A few more quests will now be available in the chapel. Take them all:
- [1] Encrypted Scroll/Glyphic Scroll/Hallowed Scroll/Simple Scroll/Tainted Scroll (depending on your class)
- [3] Rattling the Rattlecages
- [2] The Damned from Novice Elreth.
On the opposite side of the chapel are two houses. Take a minute to sell junk and repair.
- Mage: Turn in your class quest in the chapel (30.66).
- Priest: Turn in your class quest in the chapel (31.66).
- Rogue: Turn in your class quest in the big house across the chapel (32.65).
- Warlock: Turn in your class quest in the chapel (30.66).
- Warrior: Go to the big house across the chapel (32.65).
Warlock: Grab the quest [3] Piercing the Veil from Venya Marthand in the chapel.
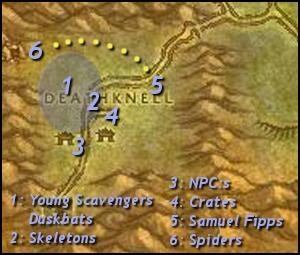
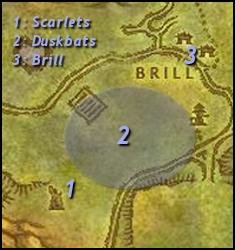
1: Go west until you reach the area colored on the map (30.60). Kill:
- Young Scavengers for Scavenger Paws (6).
- Duskbats for Duskbat Wings (6).
You should definitely be level 3 by now.
Level 3
2: When you’re done or if you run out of mobs to kill, go east to (33.60) and start killing Rattlecage Skeletons until you complete [3] Rattling the Rattlecages.
Warlock: Make sure you get all 3 Rattlecage Skulls for the quest [3] Piercing the Veil.
If you haven’t completed [2] The Damned yet, go back west into the colored area and kill Young Scavengers and Duskbats until you do.
Make sure you are at least 420 EXP (Warlock: 590 EXP) from level 4 before you go back to the chapel. If not, then keep killing mobs until you are.
3: Go back to the chapel and turn in:
- [2] The Damned
- [3] Rattling the Rattlecages
- Warlock: [3] Piercing the Veil
Level 4
Grab the quests:
- [5] Marla’s Last Wish from Novice Elreth.
- [3] Scavenging Deathknell from Deathguard Saltain.
- [4] Night Web’s Hollow from Executor Arren.
Sell junk. Repair. Visit your class trainer.
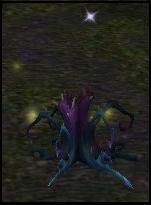
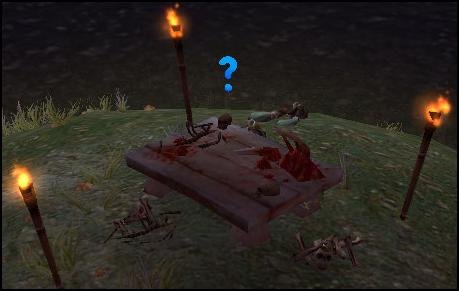
4: Go to the ruined houses east of the chapel. Look for crates like this:
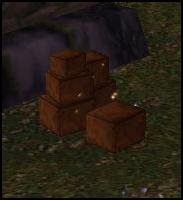
Find 6 of those.
5: Go north to (36.62) where you should find Samuel Fipps. Kill him and loot Samuel’s Remains.
6: Go west towards the cave at (27.59) while killing 10 Young Night Web Spiders.
Inside the cave you’ll find Night Web Spiders. Kill 8 of those.
Keep killing spiders until you’re at least 1130 EXP from level 5.
Hearthstone back to Deathknell.
Run north to the graveyard outside the chapel and click the sparkling pile of dirt next to a tombstone.
Turn in:
- [5] Marla’s Last Wish at Novice Elreth.
- [3] Scavenging Deathknell at Deathguard Saltain.
- [4] Night Web’s Hollow at Executor Arren.
This should make you ding level 5.
Level 5
Take the follow up: [4] The Scarlet Crusade.
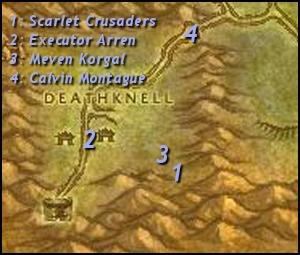
1: Run east to (36.67) and kill Scarlet Converts and Scarlet Initiates until you have 12 Scarlet Armbands.
2: When you’re done, go back to Executor Arren and turn in [4] The Scarlet Crusade. Get the follow up: [5] The Red Messenger.
3: Go back to where you killed the Scarlet Crusaders and look for Meven Korgal (36.68).
NOTE: Attack him from the hill behind the tent if you want to avoid the other mobs.
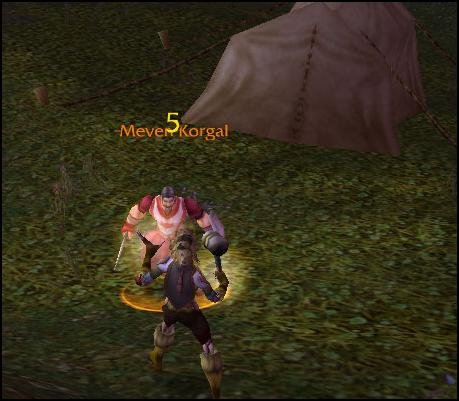
Kill him and loot the Scarlet Crusade Documents.
Go back to Executor Arren and turn in the quest. Get the follow up: [5] Vital Intelligence.
Priest: Grab the quest [4] In Favor of Darkness from Dark Cleric Duesten.
Now it’s time to leave Deathknell.
4: Follow the road north-east to (38.56) and grab Calvin Montague‘s quest [5] A Rogue’s Deal.
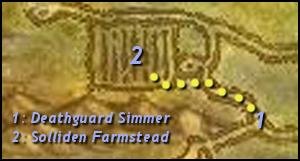
1: Further east as the road forks you will find Deathguard Simmer (40.54). Grab his quest: [7] Fields of Grief.
2: Follow the road north-west to Solliden Farmstead (37.50).
NOTE: This can get tough but as long as you avoid groups and pull single mobs you will be okay. Watch out for Farmer Solliden who’s a rare level 8 mob.
Gather 10 Tirisfal Pumpkins in the fields while killing Tirisfal Farmers and Tirisfal Farmhands until you hit level 6.
These mobs drop Linen Cloth which is used for First Aid and Tailoring. If you plan on becoming a Tailor, I suggest you take an additional circle around the farm to get some extra cloth.
Level 6
Follow the road east to Brill.
Along the way you should encounter a patrolling abomination named Gordo. Take his quest: [5] Gordo’s Task.
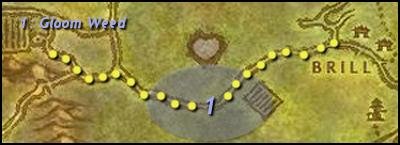
1: Check the woods at the sides of the road for Gloom Weed.
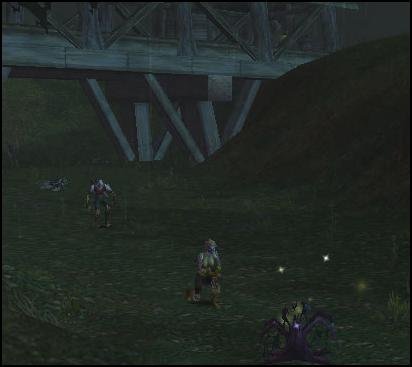
NOTE: A good spot for Gloom Weed is under the bridge (52.54) leading to Brill (but beware of Rotting Deads).
You will have another chance later to get the remaining Gloom Weed. Keep following the road until you reach Brill.
Don’t forget to visit the Tailoring Trainer in the house at Cold Hearth Manor (52.55) if you want to become a Tailor.
When you enter Brill you will pass by Deathguard Dillinger (58.51) outside the cemetary. Take his quest: [6] A Putrid Task.
Enter the first house to the right and turn in [7] Fields of Grief at Apothecary Johaan. Take the follow up [7] Fields of Grief and [6] A New Plague.
The Alchemy Trainer is standing right next to Apothecary Johaan. There’s a Herbalist Trainer outside the house at (54.52).
Turn in [5] Vital Intelligence at Executor Zygand (60.51).
Take the quests:
- [8] At War With The Scarlet Crusade from Executor Zygand.
- [8] Graverobbers from Magistrate Sevren (61.50) in the town hall.
- [10] Wanted: Maggot Eye from the WANTED poster behind Executor Zygand.
Go to the inn.
The First Aid Trainer is right at the entrance.
Turn in the quest [5] A Rogue’s Deal at Innkeeper Renee (61.52).
Make Brill your home.
Go to the basement and complete [7] Fields of Grief.
Priest: Turn in [4] In Favor of Darkness at Dark Cleric Beryl at the top floor of the inn. Get the follow up: [4] Garments of Darkness.
Take your time to sell junk, repair and visit your class trainer. You should also buy some bags if you can afford it. If you have higher level characters on the same realm, now is a good time to log in on them and send some bags over.
The Enchanting Trainer is at the top floor of the inn. The Skinning and Leatherworking Trainers are south-east of Brill at the road. If you want any of those professions, quickly run to (65.60) and then return to town. If you want to be a miner or a cook and can’t wait a while longer, take this time to run south to Undercity for the Mining Trainer and the Cooking Trainer.
Priest: Go north to (59.46). Heal and fortify Deathguard Kel.
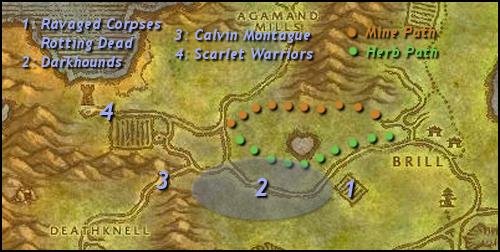
1: Go south-west to Cold Hearth Manor (50.55) while killing Ravaged Corpses and Rotting Deads for Putrid Claws (7).
2: Kill every Decrepit Darkhound and Cursed Darkhound on the way until you get 5 Darkhound Blood.
NOTE: The best place to find Darkhounds is along the colored area next to the road. Don’t forget to pick up the remaining Gloom Weed if you haven’t already.
3: Follow the road west to Calvin Montague (38.56). Take the quest [5] A Rogue’s Deal.
Talk to him again and fight him. Keep in mind that fighting Calvin Montague will trigger you for PVP and make you vulnerable to Alliance players. Defeat him and turn in the quest.
You should be level 7 by now.
Level 7
4: Go north-west to Solliden Farmhand (33.44) and kill 10 Scarlet Warriors.
If you’re a Tailor and wants some extra Linen Cloth, this is a good time to detour with a circle or two around the farm before you continue. If you’re a Herbalist, follow the herb path on the map back to Brill and pick up herbs on the way. If you’re a Miner, go east back to Brill along the mine path. Or if you don’t want to:
Hearthstone back to Brill.
Turn in:
- Priest: [4] Garments of Darkness at Dark Cleric Beryl (61.52).
- [6] A New Plague at Apothecary Johaan (59.52). Get [9] A New Plague.
- [6] A Putrid Task at Deathguard Dillinger (58.51). Get [8] The Mills Overrun.
- [8] At War With The Scarlet Crusade at Executor Zygand (60.51). Get [9] At War With The Scarlet Crusade.
Grab:
- [7] Proof of Demise from Deathguard Burgess (60.52).
- [8] The Chill of Death from Gretchen Dedmar at the top floor of the inn.
- [10] The Haunted Mills and [11] Deaths in the Family from Coleman Farthing in the inn.
Sell junk. Repair. Restock water and food.
1: Go south until you reach the Scarlet Crusade camp at (50.65).
NOTE: Kill every Duskbat on the way. You can stop when you’ve looted 5 Duskbat Pelts.
Kill:
- 3 Scarlet Missionaries.
- 3 Scarlet Zealots.
- Captain Perrine in the tower at (51.67).
NOTE: Grind on Scarlet Zealots and Scarlet Missionaries until you hit level 8. Then kill Captain Perrine. You don’t have to complete [7] Proof of Demise now.
Level 8
2: Kill Duskbats in the colored area if you still need Duskbat Pelts.
3: Run back to Brill.
Turn in [9] At War With The Scarlet Crusade at Executor Zygand (60.51). Get [10] At War With The Scarlet Crusade.
Buy Coarse Thread from Abigail Shiel (61.52).
Turn in [8] The Chill of Death at Gretchen Dedmar (61.52) in the inn.
Sell junk. Repair. Visit your class trainer.
Go north to Junior Apothecary Holland in the cemetary (58.49) and turn in [5] Gordo’s Task. Take [6] Doom Weed.
Go north to (58.31). Along the way:
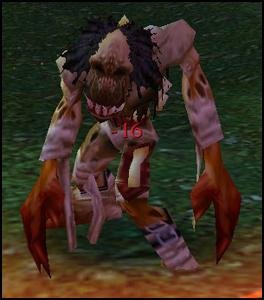
- Kill Rot Hide Graverobbers (8).
- Kill Rot Hide Mongrels (5).
- Loot Embalming Ichors (8) from any gnoll.
- Loot Doom Weed (10).
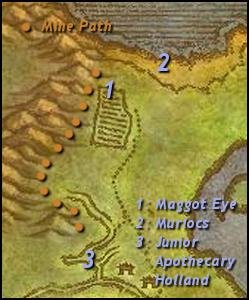
1: Kill Maggot Eye (58.31) and loot Maggot Eye’s Paw.
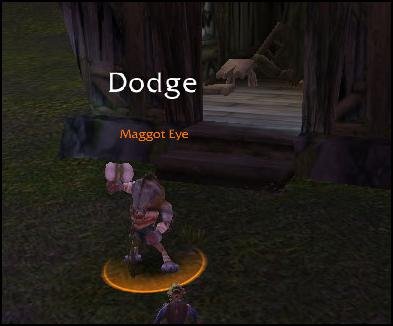
NOTE: Maggot Eye is level 10. Easiest way to kill him is to pull the mobs outside the house one at the time. If you’re a caster: clear the field around the fence and pull him at max range. If you’re melee: fight him inside the house. It shouldn’t be too difficult at level 8.
2: Go north to the coast at (61.27) and kill Murlocs until you have 5 Vile Fin Scales.
Go south and make sure you complete [6] Doom Weed and [8] Graverobbers on the way.
If you’re a Miner, hug the cliff-side as you go south to get some extra ore.
3: Go to Junior Apothecary Holland (57.49) and turn in [6] Doom Weed.
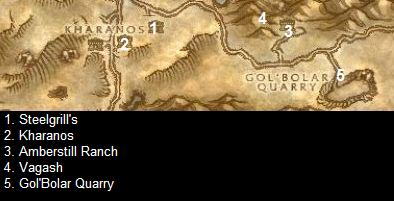
Go north-west to Agamand Mills (45.33).

Follow the mine path if you’re a Miner.
Kill:
- Cracked Skull Soldiers and Rattlecage Soldiers for Notched Rib (5).
- Darkeye Bonecasters for Blackened Skull (3).
1: Look for Devlin Agamand (47.41).
NOTE: Devlin Agamand is a melee fighter despite his appearance.
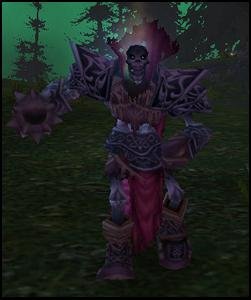
Kill him and loot Devlin’s Remains.
If you aren’t level 9 already. Grind in the area until you are.
Level 9
2: You will find Nissa Agamand in the house to the east at (49.35).
NOTE: You will either find her in the doorway or inside the building. She might be tough for some classes so make sure you clear the area before you attack her.
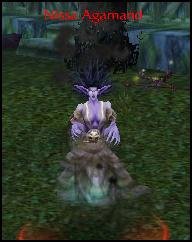
Kill her and loot Nissa’s Remains.
3: Continue north-west to (45.29) where you should find Gregor Agamand.
NOTE: He hits hard but should be soloable if you make sure to pull him alone.
Kill him and loot Gregor’s Remains.
4: Slightly south-west near a windmill you should find Thurman Agamand (43.33).
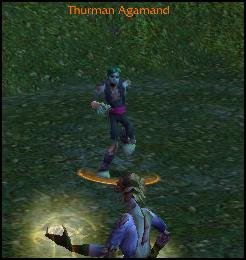
Kill him and loot Thurman’s Remains.
You should have completed [8] The Mills Overrun by now.
If you find A Letter to Yvette. Click it and accept [7] A Letter Undelivered. If you haven’t found it, no worries. We’ll come back to Agamand Mills soon.
Make sure you are at least about 4500 EXP from level 10.
Hearthstone to Brill.
Turn in:
- [7] A Letter Undelivered at Yvette Farthing (61.52).
- [8] Graverobbers at Magistrate Sevren (61.50) in the town hall. Get [8] The Prodigal Lich and [9] Forsaken Duties.
- [8] The Mills Overrun at Deathguard Dillinger (58.51).
- [9] A New Plague at Apothecary Johaan (59.52). Get [11] A New Plague.
- [10] The Haunted Mills and [11] Deaths in the Family at Coleman Farthing (61.52). Get [10] Speak with Sevren
- [10] Wanted: Maggot Eye at Executor Zygand (60.51).
NOTE: Don’t sell the Slumber Sand you get from turning in [9] A New Plague. This will come in handy later.
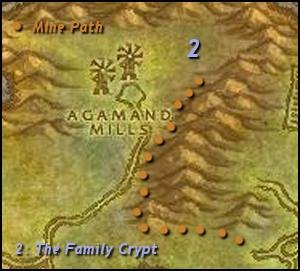
Go to the town hall and turn in [10] Speak with Sevren. Get [13] The Family Crypt.
Congratulations to your first talent point.
- Mage: Put 1 point in either Improved Frostbolt or Improved Firebolt.
- Priest: If you want to heal in dungeons as you level up, Discipline gives some combined damage and healing output. Put 1 point into Twin Disciplines. Would you rather go for straight out face melting, then put your first point in Blackout. Some would argue that Spirit Tap is a better talent, and yes it is, but at these early levels the stun chance will be of great help as you level up.
- Rogue: Put 1 point in Improved Sinister Strike.
- Warlock: Put 1 point in Improved Corruption.
- Warrior: Put 1 point in Armored to the Teeth.
Sell junk. Restock food. Visit your class trainer.
Mage: Grab [10] Speak with Anastasia from Cain Firesong (61.52).
Rogue: Grab [10] Mennet Carkad from Marion Call (61.52).
Warlock: Grab [10] Halgar’s Summons from Ageron Kargal (61.52).
Warrior: Grab [10] Speak with Dillinger from Austil de Mon (61.52).
Go to Deathguard Dillinger (58.51) and turn in [10] Speak with Dillinger. Get the follow up: [10] Ulag the Cleaver.
Go north to a tomb at (59.48).
Click the skull stone trigger and wait for Ulag the Cleaver to come out. Kill him.
Go back to Deathguard Dillinger and turn in the quest. Get [10] Speak with Coleman.
Go back to the inn and turn in [10] Speak with Coleman. Get [11] Agamand Heirlooms.
Go south to Undercity.
This is a good time to pick up your profession. If you didn’t get Mining before (and you want to be a Miner), do it now. Pick up Cooking even if you don’t want to skill it up. It unlocks cooking quests which are used in Jame’s guides. Ask a guard for directions to the Inscription, Engineering or Blacksmithing professions.
Since this is the first time we’re in a city, take your time to visit the AH, train weapon skills, take the flightpath and put stuff you don’t need in the bank.
When you’re done, go to Bethor Iceshard (84.17) in the Magic Quarter. Turn in [8] The Prodigal Lich. Get: [8] The Lich’s Identity.
Mage: Turn in [10] Speak with Anastasia at Anastasia Hartwell in the Magic Quarter (85.10). Get [10] The Balnir Farmstead.
Rogue: Turn in [10] Mennet Carkad at Mennet Carkad in the Rogues Quarter (83.69). Get [13] The Deathstalkers.
Warlock: Turn in [10] Halgar’s Summons at Carendin Halgar in the Magic Quarter (85.25). Get [10] Creature of the Void.
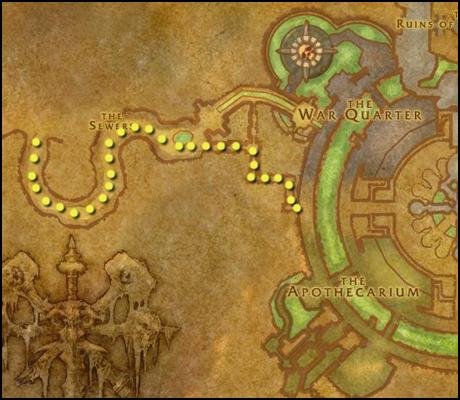
Rogue: Leave Undercity through the Sewers and take the road south to Silverpine Forest. Astor Hadren is patrolling the road. Defeat him, get Astor’s Letter of Introduction and go south to the Sepulcher. Take the bat from there back to Undercity. Return to Mennet Carkad.
Turn in [13] The Deathstalkers. Get [13] The Deathstalkers.
Go to Andron Grant in the Apothecarium (54.75). Turn in [13] The Deathstalkers and get [13] The Deathstalkers.
Take the book from the bookcase behind him. Then go back to Mennet Carkad. Turn in [13] The Deathstalkers. Get [13] The Deathstalkers.
Go to Varimathras in the Royal Chamber (56.92). Turn in [13] The Deathstalkers.
Warlock: Leave Undercity through the Sewers. You’ll end up at the Scarlet tower we were at before. Fight your way into the tower where you’ll find Perrine’s Chest. Loot Egalin’s Grimoire. Go back to Carendin Halgar.
Turn in [10] Creature of the Void. Get [10] The Binding.
Go into the circle and use the Runes of Summoning to summon a Voidwalker. Defeat it.
Turn in [10] The Binding.
Leave Undercity.
If you want to be a Jewelcrafter, take a left turn in the Ruins of Lordaeron and take the translocation orb to Silvermoon. When you’re there, ask a guard for directions to the Jewelcrafting Trainer and follow the mark on the map. When you’re done, take the same way back.
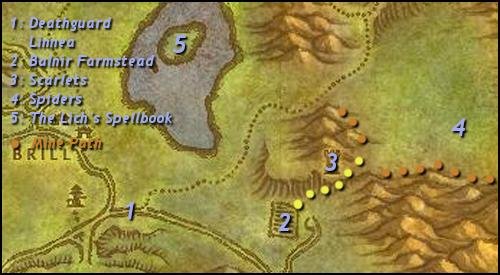
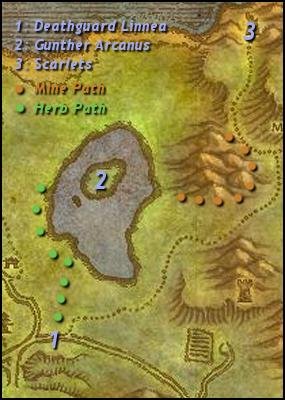
1: Follow the road north-east to Deathguard Linnea (65.60).
Turn in [9] Forsaken Duties.
Get:
- [9] Return to the Magistrate.
- [11] Rear Guard Patrol.
2: Follow the road east until you reach Balnir Farmstead (75.60).
Kill:
- 8 Bleeding Horrors.
- 8 Wandering Spirits.
NOTE: Watch out for Felicient’s Shade. It’s a level 12 rare ghost roaming the fields.
Mage: Loot the Balnir Snapdragons (77.61).
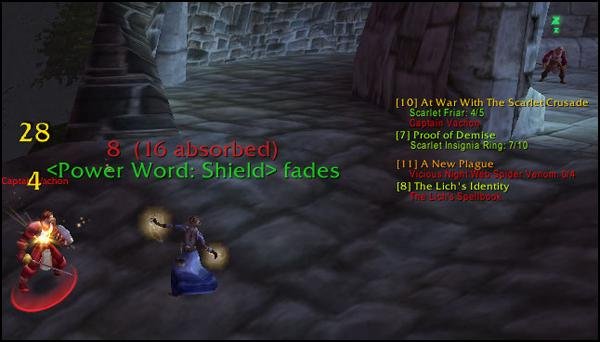
3: Go north to Crusader Outpost at (78.55).
Kill:
- Captain Vachon who’s in the tower.
- Scarlet Friars (5)
NOTE: Captain Vachon is level 11 and can be difficult for some classes. Especially since he has an add who will heal him. Now is a good time to use your Slumber Sand. Put it on your action bar and use it to crowd control the Friar while you kill Captain Vachon. You can either run away from the Friar or kill him when the effect runs off.
Clear around the tower and then kill Captain Vachon. Should you fail, continue with the next step of the guide and come back after you’ve hit level 11.
You should complete [7] Proof of Demise while you’re here.
4: Follow the road north to Venomweb Vale (85.50).
Kill Vicious Night Web Spiders until you’ve looted 4 Vicious Night Web Spider Venom.
If you’re a Miner, take your time to search the cliff-sides for ore while you grind on the spiders.
Grind on spiders or go back and grind on Scarlet Crusaders until you hit level 11.
Level 11
- Mage: Put 1 point in either Improved Frostbolt or Improved Firebolt.
- Priest: Put 1 point into Twin Disciplines or Blackout.
- Rogue: Put 1 point in Improved Sinister Strike.
- Warlock: Put 1 point in Improved Corruption.
- Warrior: Put 1 point in Armored to the Teeth.
5: Go west to Gunther’s Retreat on the island in Brightwater Lake (68.42).
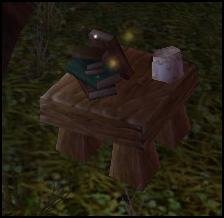
Grab The Lich’s Spellbook from the table.
There’s a Fishing Trainer on the lake’s southern shore. Take some minutes to fish if you want to.
Run to Brill and turn in:
- [7] Proof of Demise at Deathguard Burgess (60.52).
- [9] Return to the Magistrate at Magistrate Sevren.
- [10] At War With The Scarlet Crusade at Executor Zygand. Get [12] At War With The Scarlet Crusade.
- [11] A New Plague at Apothecary Johaan. Get [11] A New Plague.
Go to the basemant of the inn and turn in [11] A New Plague at the dwarf.
Sell junk. Repair. Restock food and water.
Go south to Undercity.
Turn in [8] The Lich’s Identity at Bethor Iceshard in the Magic Quarter (84.17). Get [8] Return the Book.
Mage: Turn in [10] The Balnir Farmstead at Anastasia Hartwell (85.10).
1: Leave Undercity and go north to Deathguard Linnea (65.60). Turn in [11] Rear Guard Patrol.
2: Go north to the island in Brightwater Lake (68.42).
Go through the woods and follow the lake’s western coast north if you’re a Herbalist.
Turn in [8] Return the Book at Gunther Arcanus. Get [12] Proving Allegiance.
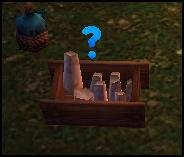
Take a Candle of Beckoning from the crate next to you.
Go slightly south to an altar.
Summon Lillith Nefara.
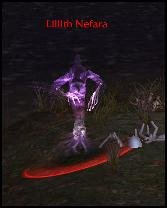
Kill her and then go back to Gunther Arcanus (68.42).
Turn in [12] Proving Allegiance. Get [12] The Prodigal Lich Returns.
3: Go north to the Scarlet Crusade camp at (79.25).
Go along the cliffs if you’re a Miner and wants some extra ore.
Grind on Scarlet Crusaders until you hit level 12.
Level 12
- Mage: Put 1 point in either Improved Frostbolt or Improved Firebolt.
- Priest: Put 1 point into Twin Disciplines or Blackout.
- Rogue: Put 1 point in Dual Wield Specialization.
- Warlock: Put 1 point in Improved Corruption.
- Warrior: Put 1 point in Armored to the Teeth.
Kill:
- 2 Scarlet Bodyguards.
- Captain Melrache.
NOTE: Captain Melrache has the two bodyguards next to him. If you have any Slumber Sand left, use it to crowd control one of them.
Hearthstone to Brill.
Turn in [12] At War With The Scarlet Crusade at Executor Zygand (60.51).
Sell junk. Repair. Restock food and water. Visit your class trainer.
Go north-west back to Agamand Mills (52.28).
Follow the mountain side if you’re a Miner.
NOTE: This is your last chance to find A Letter to Yvette.
1: Go to the north-eastern part of Agamand Mills and enter the crypt.
Kill:
- 8 Wailing Ancestors.
- 8 Rotting Ancestors.
Warrior: Loot:
- Agamand Family Axe.
- Agamand Family Dagger.
- Agamand Family Mace.
- Agamand Family Sword.
You will find Captain Dargol on the bottom floor.
NOTE: He’s a level 13 melee badass surrounded by a couple of mobs. If you’re careful, you should be able to kill all adds in the room without pulling him.
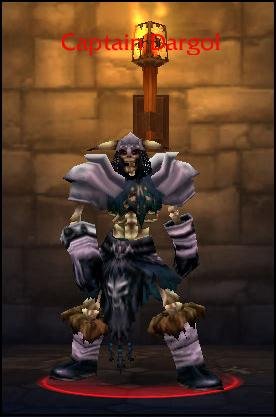
Kill him and loot Dargol’s Skull.
Die and ress at the graveyard in Brill.
Turn in [13] The Family Crypt at Magistrate Sevren (61.50).
Don’t forget to turn in [7] A Letter Undelivered at Yvette Farthing (61.52) if you didn’t find it the first time.
Warrior: Turn in [11] Agamand Heirlooms at Coleman Farthing (61.52). Get [11] Heirloom Weapon and turn it in right away.
Take [10] Delivery to Silverpine Forest from Apothecary Johaan (59.52). We won’t complete that quest in this guide though.
Sell junk. Repair. Restock food and water.
Go south to Undercity.
Turn in [12] The Prodigal Lich Returns at Bethor Iceshard in the Magic Quarter (84.17).
You should be level 13 or close.
Level 13
This concludes our guide. I hope you had as fun using it as I had writing it. If you have any feedback, questions or if you want to share your experiences from using the guide, please write a comment below. I recommend continuing with SilverKnight’s 13-21 Silverpine Guide now.
Thanks for using (andThanks for using (and enjoying) the guide. Did you use the addon version or the text version of the guide? How fast did it take you? I have noticed that the common time without interuptions is about 4 to 4.5 hours. Record being as low as 3 hours with heirloom.
Since it’s your first character, I can imagine it taking a little longer though.
Thank youExcellent guide. I have now taken my first character Filthmonger (undead warrior) through to level 17 thanks to this and Silverknight’s follow-up.
I was also helped immensely by a random higher-level passer-by who decided to give me 40 gold in the lift to the Undercity for an unknown reason, which helps a lot obviously when it comes to buying weapons and armor, but I was stood in that lift because I was following the guide so again, cheers.
I’m also feeling compelledI’m also feeling compelled to write guides for both worgen and goblins, but that would only be if I’m lucky enough to get a beta key. Don’t want to be too late doing it.
That would be awesomeThat would be awesome 😉
CataclysmI just wanted to let you guys know that I’m not dead. I’m currently not playing the game because of studies, but I might come back to update/rework this guide with Cataclysm. Until then, there will be no updates.
9/10, Fantastic!This guide is very helpful for anyone who is new to the Tirisfal scene. I got my Rogue from 1-12 in a total of 8 hours with this guide. The quest circuits are spot-on, and the class/profession sub-guides make it that much easier to burn through the first 12 levels.
The only improvement I could suggest is to spread out the grinding a little bit. Level 11-12 includes several bubbles of grinding on Scarlets. That grind could be shortened greatly by scattering small grinding spots throughout the guide.
Otherwise, this was a fabulous guide. Hats off to you, Manovan.
Manovan’s Undead Leveling Guide (1-13)I’m just getting back into level my horde alts and decided to roll an Undead Warrior and Manovan’s guide was great. Thanks for including the class quests, talent suggestions, and tips on professions.
Awesome 🙂 Thanx for the help…first time with the Undead
Hey thanks.Fatal1ty
For the guide Manovan. It was really helpful and usefull especailly since I decided to start playing as a Forsaken. I got to lvl 10 in about a day thanks to this guide. Keep up the great work.
Thanks, SilverKnight! I canThanks, SilverKnight! I can always brag by saying that it only took three days to write it (but I did nothing else those three days). Feel free to try out the addon version as well. If you scroll up in the comment field you’ll see a link.
Wow.That is one severely awesome guide. Now I have to go reroll another UD of some sort and level through to try it out! 😀
I tried the addon today andI tried the addon today and I love it. However, I found an error in my own guide that I’m editing. Apparantly I wrote that the rogue trainer is in the small house in Deathknell when he’s in the big house. The coords are correct though, but if you plan on updating the lua later, that’s the edit I’m doing.
NewNew version:
http://files.filefront.com/Manovanundead113lua/;13025674;/fileinfo.html
That’s great! I`ll test itThat’s great! I`ll test it as soon as I find the time.
Hey Manovan!I’m done withHey Manovan!
I’m done with the lua file of the guide, only took a weekend. (for the WoW-Pro Addon)
If you wanna try test it:
http://files.filefront.com/Manovanundead113lua/;13016537;/fileinfo.html
Any feedback is welcome 🙂
That’s an interesting point,That’s an interesting point, but I`m still not sure. My initial reaction when I decided to make a priest a few months ago was to use Spirit Tap as first talent of choice, and sure it procced alot and I regenerated quickly because of it. But I still ended up switching talents because I felt that Spirit Tap didn’t save my life in difficult situations. And there are many difficult situations when leveling a priest in the starting zones (it’s hard to get a level or two ahead of the guide for example). I belive that waiting with Spirit Tap until late teen levels (15-16+) is better because you’ve already set up a life-saving foundation in another talent and can now focus on lowering the downtimes and keeping your mana up.
Spirit Tap Absolutely fantastic guide, but there is one thing that I would have to disagree with you on, and this is not using Spirit Tap. As o low level Priest you will often find yourself low on mana – there is nothin else that I hate more, personally. The only thing that keeps me sane while leveling a Priest is a cheap wand, Lesser Magic (Does insance DPs for its level) combined with Spirit Tap = seemingly infinite mana! It genuinally is a *much* more ueful talent for a low level class (Who will be using smite a lot no doubt so Blackout may not even be that useful o.O)
Sorry about the wall of text. If there are typos I apologise – I’m in the UK and all my lights are off so I can barely see my keyboard!
Thanks for telling me aboutThanks for telling me about the coords.
*picking up my editing hammer and starts banging on the guide*
Thank youThanks for the comment. And sure, make a lua file of it. I look forward to testing it myself.
Believe it or not, but I was bored so it only took 3 days to write the guide. 🙂
Stay tuned for Teldrassil.
This is so freaking amazingThis is so freaking amazing for a starter zone guide! Great job!
I can’t believe how much work you put into a lvl 1 – 13 guide like this, with class quests and professions.
Great guide, think I’m going to make a lua file of it and then put it into the WoW-Pro addon if it’s okay with you? 🙂
Regarding my previousRegarding my previous comment I forogt to change the first coord. Its supposed to be [b](36,67)[/b].
Let me start off by sayingLet me start off by saying that I’ve always really enjoyed Jame’s leveling guides (and other amazing guides on WoW-Pro) and thus felt it was time to “return the favor”.
I have volunteered to convert a 1-12 Undead leveling guide to TourGuide. As I think Manovan’s guide is really good covering all classes and professions I picked this one and am now trying to make the TourGuide version be as close to the original guide as possible.
While going through the steps I already “coded” I noticed that when you tell people to “Run east to (35.65) and kill Scarlet Converts and Scarlet Initiates until you have 12 Scarlet Armbands.” Running there I ended up between skeletons and wolfs. I think (35,67) would be better coords. A minor change, but I thought it was worth mentioning it. 🙂
While making a Night ElfWhile making a Night Elf guide, I highly suggest that you combine it with my [url=https://www.wow-pro.com/leveling_guides/maws_alliance_leveling_guide_1220]Alliance Leveling Guide 12-20[/url]. This will enable people to keep following a guide till level 20 (and the following [url=https://www.wow-pro.com/leveling_guides/bostons_20-30_alliance_leveling_guide]Boston’s guide to 30[/url])
ThanksThanks. It’s much thanks to your advice. I worked a lot on shortening paragraphs and making the maps more clear the last couple of days. The process definitely had me wanting to write more guides. The Night Elf guide (1-13) should be up in a couple of days.
Definitely top notch.Definitely top notch.
Thanks for the feedbackThanks for the feedback. I might update the class colors but my goal is to have distinctive colors which aren’t confused with the other color codes. About the follow up Silverpine guide, if you read SilverKnight’s guide you will see that it also adds circuits in the Barrens and in the Ghostlands and you will end up with those good blue items anyway. Snowflake’s guide is great, but I think SilverKnight’s is more interesting as it combines those three zones in a smart way.
Feedback!Hello Manovan. The work you did it here is top notch, no doubt about this. Can’t find mistakes or whatever, I ran atl least 7 times in the starting undead area and I can say with no doubt that this is the ultimate leveling choice for newborn undeads.
Other than that, the formatting is pretty and you provide a lot of useful addition , both at the text and the images. One little thing: you should change the color of class related steps. Yellow for rogues, Light-blue for Mages, Purple for Warlocks, white for Priests and Orange for Warriors. Well, light orange for warriors because druids have a slightly intense orange. That is more intuitive for those who read, I think.
Last thing:
I highly suggest to use Snowflake’s 12-20 leveling guide (Ghostlands) instead of the Silverpine Forest’s one. Being a TBC content, Ghostlands have better quests, USEFUL quest rewards and more gathering spots. Usually, after finishing the Ghostland’s guide, I have a full green equipment with a blue weapon, no matter the class. Silverpine forest is a wonderful place, very dark and all, but it is a bit outdated right now. Then, I’ll just hint players to travel to UC, get the orb of transportation and finally arrive at Silvermoon. Only warriors *can* have some problems by leveling in Ghostlands, because there are no warrior trainers in SC. But then, again, just take the orb to UC and here you are :).
-Benhir
wowWow, amazing guide. Great formatting, I will be sure to run my undead rogue through this.