
 by Shinke
Introduction
I was not sure what I wanted to put here, so my introduction is based on Jame’s leveling guide introduction.
This guide is made for FAST leveling through the use of Optimized Quest Circuits. With this guide, questing will be very efficient and you’ll not waste any second running around and trying to figure out in which order to do your quests. Follow each instruction carefully and you will see for yourself. The quest choices and order to do them are optimal so that you run as few as possible while doing the most possible, turning several quests at the same time. It will be like grinding, because you’ll be killing stuff almost non-stop, besides you’ll also be completing a bunch of quests at the same time!
Everything described in this guide can be done solo (beside when I say otherwise). You can, of course, follow this guide while duoing, grouping, it’s not a problem, it works too.
You’ll realize that I grind a few bars here and there, but that’s merely so you’re able to accept quests I want you to do before heading back into town! (Ex. Breaking Sharptusk, it requires you to be level 3 and if you don’t grind, you’ll be about 6 bars from level 3.)
DISCLAIMER: This guide does NOT take into account tradeskills, class specific quests or PvP. It’s 100% focused on getting the most experience possible in the shortest possible time while doing a lot of quests and enjoying as much content as possible. Any race/class combination can do this guide. Any complaints about PvP, tradeskills, or class specific issues will be ignored.
Basic Rules
- Spend your talent points so that you kill things as fast as possible. (e.g: Priest should specialize in Shadow Talents, Warriors in Arms/Fury, etc.
- Don’t waste your time trying to find groups for questing, you can solo everything that is described in this guide unless I say otherwise. Only group with someone when it’s not gonna be a waste of time (e.g: meeting the person at the other end of the zone to show him the way to where your quest is, that is a waste of time)
- Try to always log out in an inn or in one of the major cities when you take a break.
- When I say you should make an inn your new home location, it’s for a good reason, and it will save you much time.
- Make sure you ALWAYS use a coordinates addon, I use coordinates to keep from hogging up the map with numbers, and it will make your life 100 times easier!!
Useful Addons
To get the most out of my guide, you should get an addon which displays coordinates, because I use them to describe locations in my guide (x,y). You can use any addon you like, but here’s a very simple one I use.
Recommended
- DMiniCoords – A simple box which displays coordinates, left-click it to move it where you like.
Optional
Below is a list of other addons Jame uses, this is 100% optional though, it’s mostly for people who are curious to know which addons Jame uses:
- Bartender4 – A great action bar addon.
- X-Perl UnitFrames – Very nice, highly customizable unit frames.
- Quartz – The best casting bar addon out there, imo.
- Scrolling Combat Text – I just don’t like the default UI Floating Combat Text.
Side Note: In case you don’t know how to install add-ons, simply download an addon from one of the links above and unzip it. Then drag the unziped folder in your Addon folder (full path is c:\Program Files\World of Warcraft\Interface\Addons). Then, restart World of Warcraft and it should be working.
If it isn’t working, you might need to log out to your character selection screen and click on “Addons” in the lower-left corner. Tick the box that says “Load out of date Addons”. Re-launch WoW.
Color Code
- Quests
- Items
- Locations
- Quest Objectives to kill
- NPCs
- Locs
The Guide
Level 1 – 6
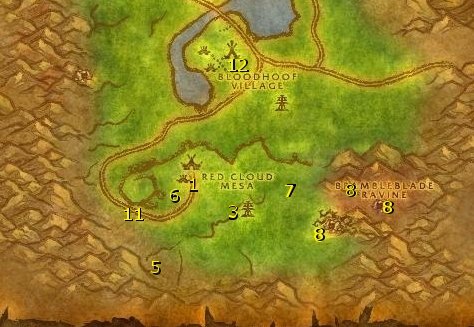
- Talk to Grull Hawkwing (44,77).Accept The Hunt Begins and then go southeast of the area.
Kill Plainstriders until you loot 7 Plainstrider Feathers and 7 Plainstrider Meat.
Run back to Camp Narache, turn it in, and accept:
- The Hunt Continues
- Your Class Quest
- Sell junk so you have at least 10 Copper for your first skill. Talk to your Class Trainer, turn in the quest and train your skill.Talk to Chief Hawkwind and accept A Humble Task.
- Go to (50,81) and turn it in at Greatmother Hawkwind.Accept A Humble Task (part 2).
Click the Water Pitcher on the fountain.
Grind on Plainstriders until you are 650xp or more than 73% into level 3.
Run back to Camp Narache and turn in the quest.
Accept Rites of the Earthmother.
Accept Break Sharptusk! back in Camp Narache. Note: If you didn’t grind you won’t be able to accept this. Go grind!
Sell junk and repair. Hunters make sure to stock up on Ammunition.
- Go south to (44.88).Kill Mountain Cougars until you loot 10 Mountain Cougar Pelts.
Run to (42,92) and talk to Seer Graytongue.
Turn in Rites of the Earthmother.
Accept Rite of Strength.Grind to level 4 on your way back to Camp Narache.(44,77)
Turn in The Hunt Continues
Accept The Battleboars.Sell junk, repair, get skills.
- Go east to (53,81)Kill Battleboars while running towards the Brambleblade Ravine, collecting8 Flanks and 8 Snouts.
- Go to (58,85) and enter the Brambleblade Ravine.Kill Quilboars on your way to the tent at (64,77).
Kill Sharptusk. Loot his head.Run to the cave at (63,82) and on the inside is a Dirt-stained Map. Right-click it to accept Attack on Camp Narache.
Make sure you have 12 Bristleback Belts. If not, kill Quilboars until you do.
- Use your Hearthstone to Camp Narache.Turn in all quests.
Accept Rites of the Earthmother (Part 2).
- You should be close to level 6 now.Sell junk / repair.
- Follow the road out of Camp Narache to (38,81) and speak to Antur Fallow.Accept A Task Unfinished.
Grind to 6 while following the road to Bloodhoof Village.
- Talk to Innkeeper Kauth.
Turn in A Task Unfinished.
Make Bloodhoof Village your home. -
Sell junk and repair.
Get spells / abilities. Also, consider picking up the First Aid profession
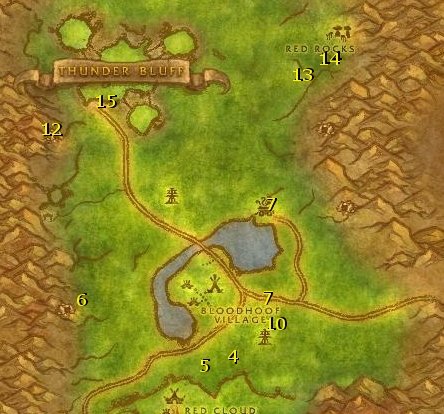
Level 6 – 10
- Talk to Baine BloodhoofTurn in Rites of the Earthmother.
Accept:
- Sharing the Land
- Rite of Vision
- Dwarven Digging
- Accept Poison Water from Mull Thunderhorn (48,60).Talk to Zarlman Two-Moons (47,57)
Turn in Rite of Vision and accept part 2. - Talk to Ruul Eagletalon (47,62).
Accept Dangers of the Windfury. -
Talk to Harken Windtotem (48,59)
Accept Swoop Hunting.Talk to Maur Raincaller (47,57)
Accept Mazzranache. - Now we are going to start questing. While on this run make sure you do the following, whenever you see them:
- Kill Trophy Swoops for 8 Quills.
- Prarie Wolves for 6 Paws.
- Plainstriders for 4 Talons.
- Just kill these when you see them, whenever they come up during the run.
Underneath trees, loot 2 Ambercorns.
Loot 2 Well Stones near the Well at (53,64). - Go to (52,70) and kill the Palemane for Sharing the Land.
- At (33,41) kill Harpies for 8 Windfury Talons.Then go to (31,50) and kill Dwarves to get Broken Tools for Dwarven Digging.
- Then go to (59,62).Accept The Ravaged Caravan from Morin Cloudstalker.
Go to (54,48) and click on the Crates to turn it in.
Accept the second part.
Run back to Morin Cloudstalker (59,62).
Turn it in.
Accept:
- The Venture Co.
- Supervisor Fizsprocket
Make sure you have finished killing:
Trophy Swoops for 8 Quills.
Prarie Wolves for 6 Paws.
Plainstriders for 4 Talons. - Grind to level 8 if you aren’t quite there yet.
- Go back to Bloodhoof Village and turn in all the quests and get all the followups.Sell junk / repair / train skills
- Go to (53,67) and cleanse it using Thunderhorn’s item.Run back to Mull Thunderhorn (49,60)
Turn in both quests.
- Go to (47,57) and drink Water of the Seers in your backpack, then follow the wolf spirit.
- Turn in Rite of Vision (33,36) when the spirit stops.Accept Rite of Wisdom.
- Continue to (59,25) to Lorekeeper Raintotem.Accept A Sacred Burial.
- Go to the Ancestral Spirit (61.5,21.0.).Turn in Rite of Wisdom .
Accept Journey into Thunder Bluff .
Kill 8 Bristleback Interlopers nearby.
Once done speak to Lorekeeper Raintotem (59,25) and turn it in.
- Go to Thunder Bluff to the Forge at (39,55) and destroy the Prospector’s Picks here by clicking on them.
- Go to (69,51) and talk to Cairne Bloodhoof.Turn in Journey into Thunder Bluff
Accept Rites of the Earthmother.
- If not level 10, grind to it. Train skills / sell junk / repair. Do your class quest.
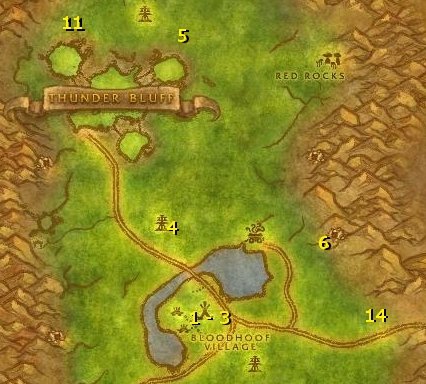
Level 10 – 12
- Hearth to Bloodhoof Village.
Talk to Skorm Whitecloud (46,60)
Accept The Hunter’s Way. - Turn in Dwarven Digging and Thunderhorn Totem.Accept Thunderhorn Cleansing.
- Go to (48,60) and speak to Baine Bloodhoof.
Turn in Sharing the Land. - Go to the Water Well at (44.5, 55.5) and use it to cleanse the totem in your inventory.
- Go to (45,16) and kill Flatland Prowlers until you have 4 Claws. Also, look for Arra’chea for his Horn. I found him at (49,19)
- Go to (61,47) and you should see the Venture Co. Mine.Kill 14 Workers and 6 Supervisors.
Take a right at the first intersection and you should see Fizsprocket, kill him.
- Go to (59,62) and turn in The Venture Co. and Supervisor Fitzsprocket.
- Go to (49,60) and turn in Thunderhorn CleansingAccept Wildmane Totem.
Go to (69,51) in Thunder Bluff and turn in Rites of the Earthmother.
- Go to (46,60) and turn in The Hunter’s Way.
- Go to (38,60) in Thunder Bluff.
You should see Eyahn Eagletalon.
Accept Preparation for Ceremony. - Go behind Thunder Bluff and kill Windfury Matriarchs and Windfury Sorceresses until you have 6 Azure and 6 Bronze Feathers.Run back to (38,60) and turn it in. Sell junk, repair, get new skills.
- Run back towards Bloodhoof Village, make sure you kill Prarie Alphas along the way until you have 8 Teeth.
- Go to (49,60) and turn in Windmane Totem.
- You should be level 12 now, if not grind to it then run into the Barrens following the path to Camp Taurajo.
So you’ve completed my guide! I hope you enjoyed it! TAURENS FTW! You can continue with Guide to The Barrens (12-20). Find the Tauren “Getting to Crossroads” section and go from there! I’m pretty sure I didn’t steal any quests from that guide, but if I did, I apologize! IF I missed anything, had a typo anywhere, please comment and let me know! Thanks for using my guide! Bodyfat ads. Total turn offs!
All credit for this guide goes to:
DMiniCoords for 2.4.3Guys i realy need DMiniCoords for 2.4.3 cant fint anywhere ;/ only 3.1 + versions ;/ could use fast help. Thx in advance.
Good luck.Good luck.
So very sorry..So very sorry to everyone that’s been waiting for me to update the guide to TzTz’s TourGuide version. I’ve recently been foreclosed on and will not be able to play WoW until I can make some money. America is a very bad place to be right now, I’m considering leaving the country. Thanks everyone that’s helped me make this better, I hope you weren’t expecting this update right away.
Expect me to update it probably early to mid April. That is, unless someone else is willing to take over.
I hope to be back so very soon. Once again, sorry for not being able to update the guide.
Happy grinding.
Lvl 1-6, Step 1. Talk toLvl 1-6, Step 1. Talk to both Grull Hawkwind and Chief Hawkwind, Then kill Plainstriders while making your way to the well. That way you don’t have to go forth and back twice, and you gain xp at a faster rate.
Thanks for the coords again,Thanks for the coords again, I got sloppy towards the end with them 😛
Once I get the time, I’ll combine the quests. Thanks!
Great Guide, One More Note on CoordsFinished the 1-12 guide this morning. My time wasn’t too impressive, but that’s not your fault; I’d never played a Tauren or a Druid before, nor had I even played a Horde character beyond level six. A good portion of my time was spent raising money for decent bags.
I found one other questionable set of coordinates, this time in the 10-12 section, for the quest Thunderhorn Cleansing:
[i]4. Go to the Water Well at (49,60) and use it to cleanse the totem in your inventory.[/i]
The Thunderhorn Well is north of town, at (44.5, 55.5). (49,60) is in Bloodhoof Village, near the quest giver.
Also, I don’t know if this would disrupt anything else, but you might be able to save some time by combining “The Hunter’s Way” and “Wildmane Totem,” since the Prowlers and Alphas are in the same area (as far as I can tell, they share spawns.)
Oops my bad! Thanks, fixedOops my bad! Thanks, fixed now 🙂
About splitting the section up, I’ve been meaning to do that for a couple weeks now 😛
I’ve just been too busy to do it. Should have it split up next week, however.
Thanks for the feedback 🙂
Bad Coords in 6-10 Step 14In step 14 of the 6-10 section, you wrote:
[i]Go to the Ancestral Spirit (60,52).[/i]
60,52 is the Venture Co. Mine. The Ancestral Spirit is [url=http://www.wowhead.com/?npc=2994]61.5, 21.0[/url]. The map is correct, but there are so many steps in that section that I couldn’t be bothered to scroll up. I’d suggest splitting this section into two, divided at step 8 where we ding level 8 and return to Bloodhoof Village.
Other than that, everything looks great so far. Thanks for putting this together!
Yes, I have noticed thisYes, I have noticed this while running a few Taurens through in the last few weeks. What I’m going to do… probably put a “To Do” and then start with the next quest.
About First Aid, I realize the top introduction never gets read. But in the Disclaimer it says “This guide does not take into account Tradeskills, etc.” So if you want to level First Aid as you go, that’s fine. I just am too lazy to cover it 😉
Anyways, thanks for your feedback and help 🙂
I found the guide to beI found the guide to be really effective up to level 6. Then we go hunting swoop plainstrider and prairie wolves. The problem is that there are only about 4-5 swoops around the area you mention, while we have to kill 8. I’m grinding there for 30 minutes now and still haven’t finished this quest. Maybe It’d be more effective to do it besides while going ahead with the guide? There are many swoops at other locations. I just don’t know about follow ups right now. Maybe you have a reason to put us through this ^^. But it’s guid besides that. You could also mention to pick up first aid in the inn, i think it’s quite useful for leveling.
T’was a pleasure to writeT’was a pleasure to write for you 😉
Though until I wrote it, I had no idea how much work Jame and others have to put into their guides.. I have new found respect for everyone that writes guides on this site. 🙂
That’s not saying I didn’t respect anyone before, that’s saying I didn’t realize how hard it is to write guides like this. NO PUN INTENDED!
Thank you for this. I foundThank you for this. I found that the old Tauren guide lacked quality, unlike this. 🙂
Thanks for the feedback
IThanks for the feedback 🙂
I updated the 3rd map, so until the GIMP text editing guide comes out this is how the numbers are going to look!
Numbers are much clearerNumbers are much clearer now, pure yellow numbers over a light green image is kinda hard but, with the outlined numbers you make things look clearer and better 🙂
Just a quick note guys… IJust a quick note guys… I uploaded 2 of 3 maps with “somewhat” outlined numbers, I’d like feedback on how they look.
Also, I’m very busy this weekend, I won’t be able to make any improvements to the guide until monday I assume…. Sorry 🙁
Fixing it, thanks!
Not onlyFixing it, thanks!
Not only did I forget to tell you to kill him, I misspelled the quest!
And I’ll look into the Ghost Howl, but for now I’m not going to put it in. Look for it in the near future, though!
Nice work!Very nice guide, includes all the quests. Only things I can point out are:
Between Step 16 of the 6-10 circuit and Step 8 of the 10-12 circuit, unless I’ve missed it, I can’t see anything saying to look for Arra’chea, the kodo involved in the quest.
Also, maybe point out an optional part to kill Ghost Howl, a rare wolf mob who drops an item with a quest start, turned in at Skorm Whitecloud for a nice green item I believe. So long as the player doesn’t go out of their way to pick him up, it’s a nice bonus if he’s seen.
I’m working on a guide forI’m working on a guide for how to do just this, but at the moment school is taking over all my free time, especially this week. So the release date for my guide probably won’t be until sometime after next week. Sorry 🙁
In the mean time, just google it. That’s how I found out, and believe me its a bit complex. Same goes for adding an outline around the text. I mean, come on GIMP – just make it a text formatting option!
We have a professinal job right here.Many thanks to Shinke, this was a guide that really needed to be done (since the other one was outdated-even though the quality was good) and you have brought us a very good job. This area is particular to me, because it is very well done quest-wise, but I never like to run across those vast camps and plains… a true anticipation of Barrens!
While I’m talking about Barrens, I would like to know if anyone is planning a revamp of that guide, since it was published almost 2 and a half years go with small revisions made in march 2007. It is a very good guide indeed, but I think (and I’m pretty sure of this) that Blizzard has changed a lot about questing, routes and drop rates during this years.
Bye 🙂
You can add drop shadows byYou can add drop shadows by rightclicking your selected text, go to filters->lights and shadows->drop shadow.
or something like that, because I have the german version 😉
if you want a contour you probably have to do it somewhat like Anti told you, with new layers and stuff… =/
Very well done.Very well done. 🙂
Hello,
I can’t reallyHello,
I can’t really comment on the guide as I haven’t played a Tauren.
But using GIMP….
again to be honest i’m sure their is an easier way (as im a photoshop man) but you could always duplicate your text layer, select the layer that is underneath (the original text layer) change the colour to black, then using the move tool, and the arrow keys, move the lower layer slightly down and to the left to give the drop shaddow look. Simple yet effective, but again there is probably a better way to do it, i’m just not up with the Gimp =)
Cheers
Anti…
Reply to First comment,Reply to First comment,
Thanks!
Reply to improvement 1,
On it!
Reply to improvement 2,
I use GIMP, still have no clue how to get the drop shadow, but then again I didn’t know what it was called, I’ll go back into it and check it out.
Thanks! 🙂
Looks much better than theLooks much better than the one we currently have, good job.
It could be improved further though:
[list=1]
[*]1. Try to lower the amount of steps per circuits, so that only 3-5 max steps appear on each map. If you put more steps on a map, people have to scroll back up to see the map after every step past the first 5 one. Best is 3-4. 5 is ok.
[*]2. Which program do you use for your maps? Your numbers would look much better if you would add a “drop shadow” effect and “contour” effect to them (like I do on my maps). I use Photoshop, but you can also do this with a free program called GIMP.
[/list]
Besides that, it’s perfect. (Can’t judge the efficiency of the circuits, but I’ll just trust you on that)