 by Jame
Welcome to The Ultimate Top Secrets Guide! As you can see in the screenshot below, I’ve beat this challenge over a hundred times until I found the perfect strategy.
This method is reliable and easily reproduceable, you can follow each step while your game is ultra slowed in Tactical Mode, or you can even pause it completely if you prefer.
I’ll show you exactly how this works Step by Step!
There is a video version of this guide to see the strategy in action, with pop-ups explaining each moves as we go. And further below, there is a very detailed text format of this guide, where I explain everything, the gear and materias choices, the mechanics, the reasoning behind the strategies, you’ll probably learn a few things! But if you don’t have time to read all of that, the video version of the guide will be enough 😉
TOP SECRETS GUIDE: YOUTUBE VIDEO
TOP SECRETS: GEAR SETUP
Cloud:
Mythril Saber
Force Bracelet
Fury Ring
Tifa:
Metal Knuckles
Chain Bangle
Fury Ring
Aerith:
Mythril Rod
Force Bracelet
Fury Ring
TOP SECRETS: MATERIA SETUP
Cloud:
Elemental (linked)
Lightning (linked)
MP Up
MP Up
Skill Master
First Strike
Ice
Fire
Refocus (+Stats)
Refocus (+Stats)
Bahamut
Note: we use Refocus Materias only for the nice stats boost they provide.
Tifa:
Elemental (linked)
Lightning (linked)
Luck Up (+Crit)
Luck Up (+Crit)
ATB Assist
Parry
Magnify
Time
ATB Stagger
Skill Master
Ifrit
Note: Luck Up Materias are only there to increase our crit chance and do more damage with Tifa.
Aerith:
Fire
Ice
Magic Up
Magic Up
Skill Master
First Strike
Lightning (linked)
Synergy (linked)
MP Up
MP Up
Note: Synergy Materia is seriously OP since the Intergrade update (PS5 and PC only). If you’re on PS4, I’m sorry but Synergy Materia isn’t worth it. Also, you will do less damage since you won’t get the extra spells from Synergy Materia with Aerith, so things will be a little harder. I actually recommend following my old Top Secrets guide if you’re on PS4, but you should still check out the new version of my guide because there are some nice tips I didn’t mention in the old PS4 version.
STATS AND WEAPON UPGRADES
Upgrade your weapons to reach these stats:
Cloud: 138 Magic Attack
Tifa: 164 Attack
Aerith: 164 Magic Attack
You can reset your upgrades at Chadley if needed.
3x Fury Ring is mandatory. You can get them quickly in Corneo’s Mansion with Chapter Select 14.
Fury Rings increase our damage output by a lot, which allows us to apply Pressure to bosses when you normally wouldn’t be able to. Don’t worry about taking damage or healing, this strategy makes sure those bosses will never get a chance to hit you, with the exception of Leviathan.
TEAM SETUP: TIFA LEADER
 Set Tifa as Team Leader. Rest doesn’t matter, put them in any order.
We want Tifa as Team Leader for reasons:
- She has the best mobility with Parry Materia, which allows us to avoid damage at the start of fights and get things rolling.
- When she uses Abilities or Spells directed at an enemy, Synergy Materia will trigger and we’ll get a free extra spell from Aerith. And that’s serious damage!
TOP SECRETS STRATEGY – ROUND 1: SHIVA
TOP SECRETS: SHIVA STEP 1
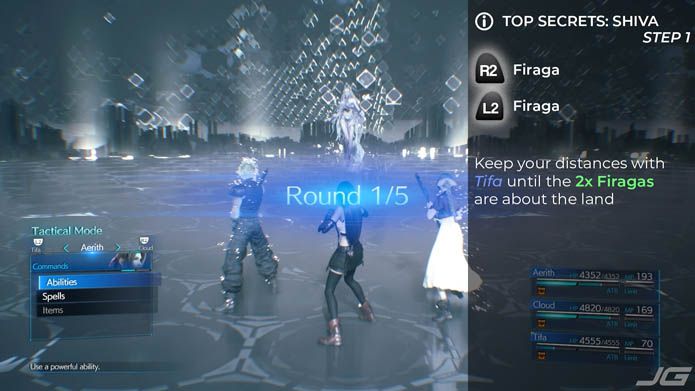
Keep your distance until the 2 Firagas are about to land, then Parry your way quickly to Shiva and start punching!
Shiva will be Pressured from this opening sequence.
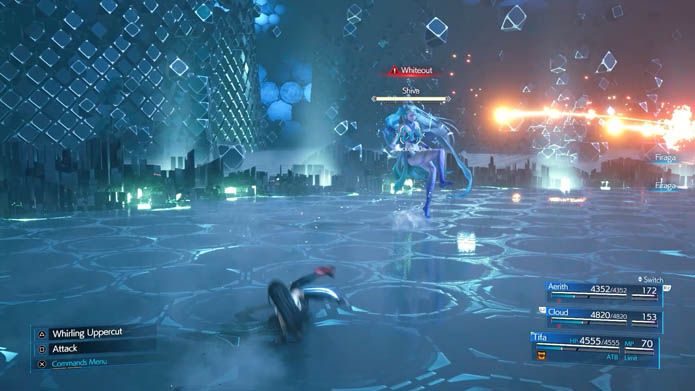
TOP SECRETS: SHIVA STEP 2
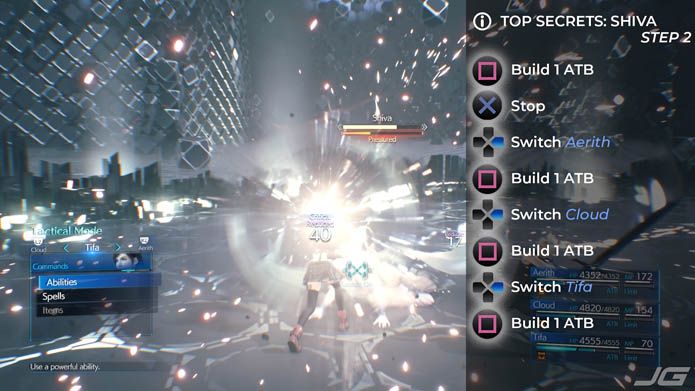
Shiva is not immune to STOP! So we take advantage of that and cast Stop on her while she’s Pressured, which will extend the duration of her Pressure state.
This allows us to cast 2 more Firagas on her while she’s Pressured, which will significantly fill up the Pressure bar and leave her very close to being Staggered.
TOP SECRETS: SHIVA STEP 3
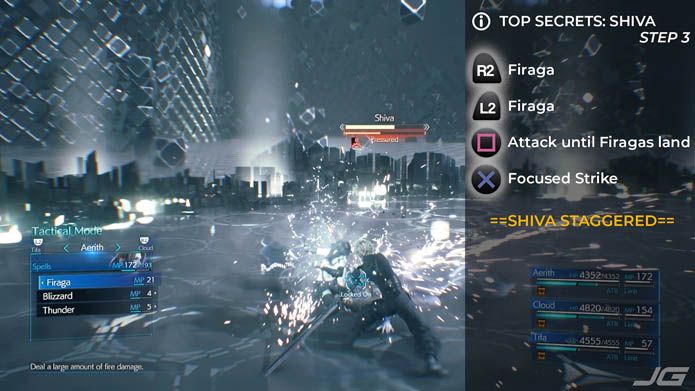
Make sure you wait for the 2x Firagas to land before using Focused Strike. On rare occasions, if you punch Shiva too much before casting Firagas, she might be staggered by the 2nd Firaga, before you get the chance to use Focused Strike. It’s best to Stagger her with Tifa so she fills her ATB Back up thanks to ATB Stagger Materia. But if you mess this up, don’t worry, once Shiva is staggered she’s pretty much toast, just buid ATB with punches and then True Strike twice.
TOP SECRETS: SHIVA STEP 4
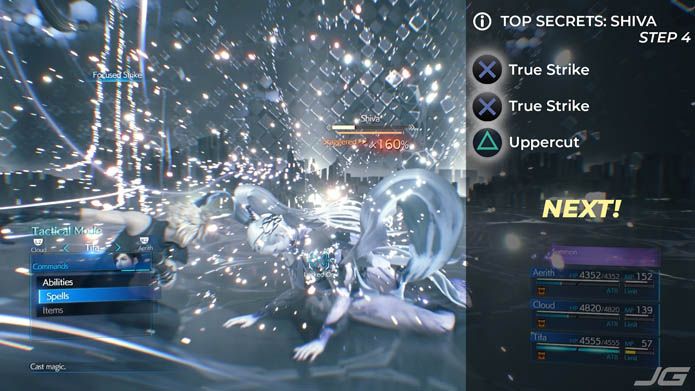
Uppercut might be overkill in most cases, that’s the power of Synergy Materia on Aerith. Anyway, Shiva is a pushover with this setup and strategy, I’ve defeated her over a hundred times without any surprises by following this skill order precisely.
Let’s move on to our next target!
TOP SECRETS STRATEGY – ROUND 2: FAT CHOCOBO
TOP SECRETS: FAT CHOCOBO STEP 1
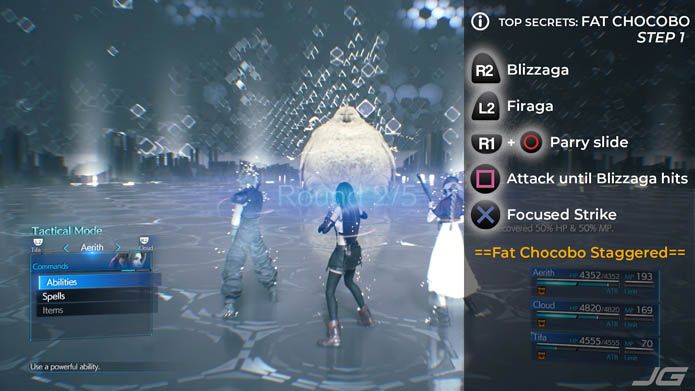
Parry isn’t mandatory, you can just run towards Fat Chocobo, but Parry sliding with Tifa is just the fastest way to move around.
Blizzaga works like this: small damage on impact, then big damage a few seconds later when the Ice breaks. If an enemy is already Pressured when Blizzaga’s ice breaks, it will fill up the Pressure bar by a huge amount. Blizzaga is the highest Pressure building spell, followed by Firaga.
 This spell combo should bring the Pressure Bar up to around 80%, which should be enough for Tifa to do the rest with Focused Strike and get the Stagger.
TOP SECRETS: FAT CHOCOBO STEP 2
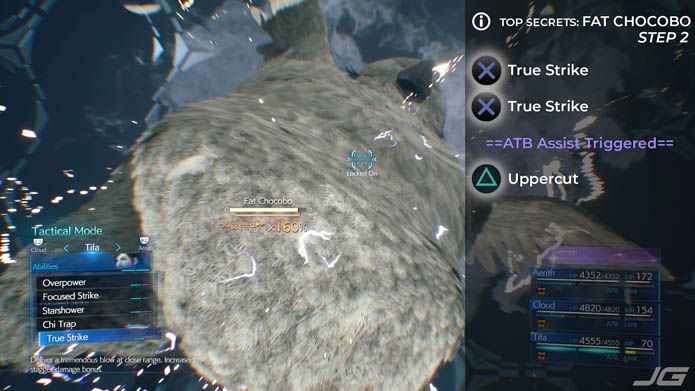
Make sure you use 2x True Strike in quick succession to trigger ATB Assist Materia and fill up ATB on Aerith & Cloud.
TOP SECRETS: FAT CHOCOBO STEP 3
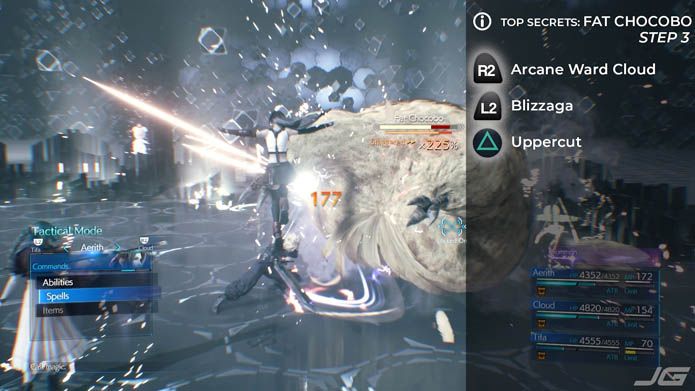
Warning: sometimes the Moogle will summon a Tonberry. If a Tonberry is already summoned at this point, do NOT cast Blizzaga with Cloud or Tonberry will kill him with Doom & Gloom. Instead, use Blade Burst with Cloud targeting the Tonberry to kill it.
TOP SECRETS: FAT CHOCOBO STEP 4
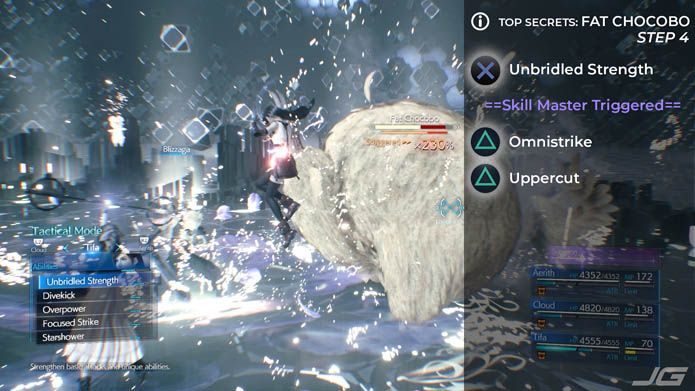
The reason we use Unbridled Strength at this point is only to trigger Skill Master Materia (3 Different Abilities or Spells must be used to trigger it – We used Focused Strike and True Strike already). So we pretty much get a free Unbridled Strength thank to the ATB gained back from Skill Master. This allows us to get Omnistrike as well, which is high damage and stagger % increase.
TOP SECRETS: FAT CHOCOBO STEP 5
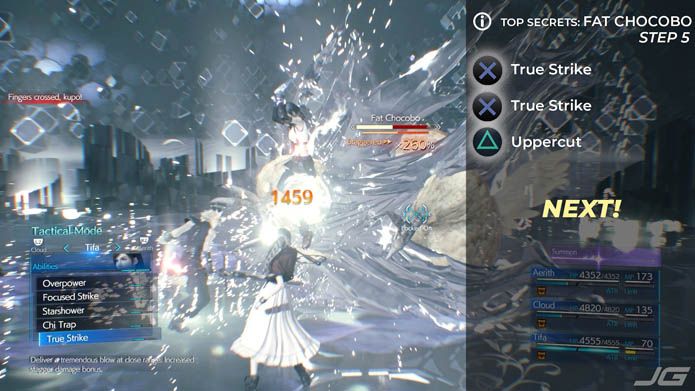 9 times out of 10 this should be enough damage. If not, you should have ATB with Cloud & Aerith, so just cast a quick Fire or Fira and you’ll finish the fight, for sure.
Shiva and Fat Chocobo are really pushovers with this strategy. The tricky ones are Leviathan and Bahamut, so let’s get to that!
TOP SECRETS STRATEGY – ROUND 3: LEVIATHAN
Leviathan is in my opinion the 2nd hardest encounter of the 5 monsters you face in the Top Secrets challenge (Bahamut is the toughest).
And he’s certainly the most random, things can go very wrong if you don’t control the fight right from the start. So that’s why I’ll cover 2 scenarios: Briny Barrage and Briny Bellow, which are one of the two abilities Leviathan will open the fight with.
TOP SECRETS: LEVIATHAN STEP 1 (BRINY BARRAGE)
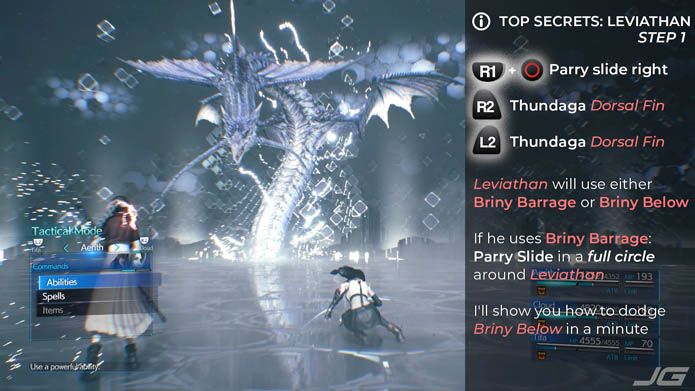
The reason we open this fight with a Parry slide to the right is to make sure Aerith doesn’t take any collateral damage.
Leviathan will use either Briny Barrage or Briny Bellow.
Briny Bellow is easy to dodge, you just have to Parry slide quickly in a straight line until you get behind Leviathan.
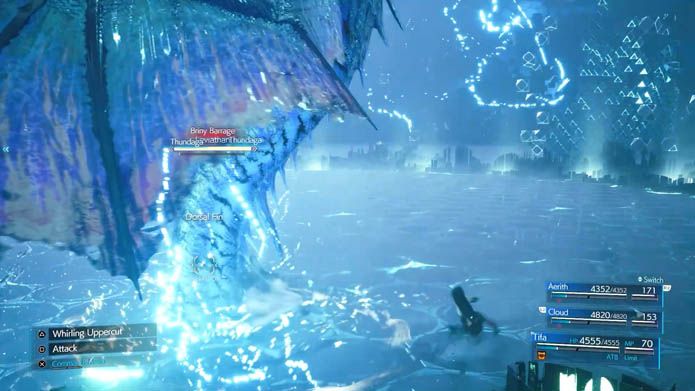
Dodging Briny Barrage requires Parry spamming while circling around Leviathan.
Briny Barrage is trickier, it fires several salvos with very good tracking, so you must spam Parry while doing a full circle around Leviathan to dodge everything. I highly suggest you watch the video for this part, it will be clearer once you see it.
The next steps differ slightly depending if you got Briny Bellow or Briny Barrage, so I’ll cover both scenarios.
TOP SECRETS: LEVIATHAN STEP 2 (BRINY BARRAGE)
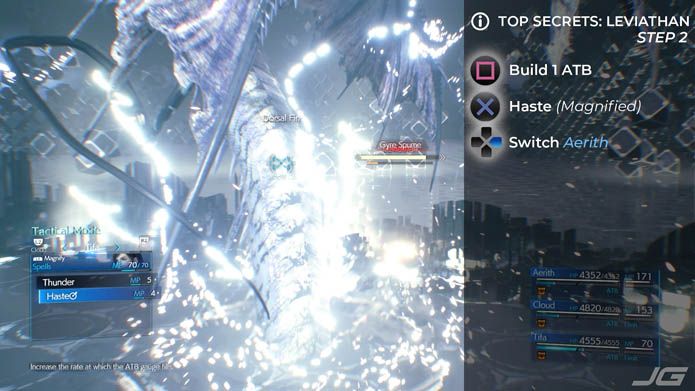
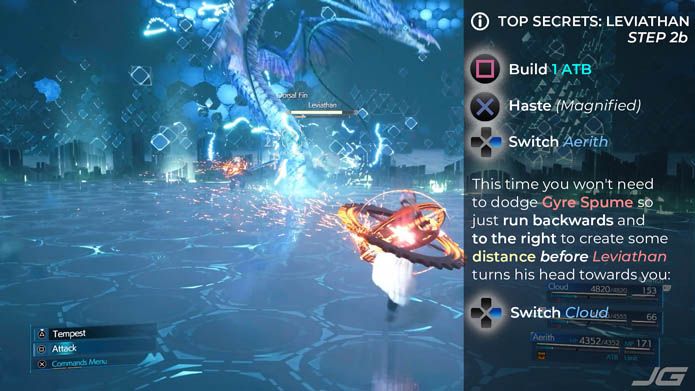
Don’t worry about Gyre Spume hitting Tifa, she can take it. Just build 1 ATB and cast Haste and switch immediately to Aerith.
On rare occasions he’ll use Tail Whip instead of Gyre Spume. If he does, he’ll dive underground and pop back up. If that happens, you’ll have to Switch to Cloud quickly, because Leviathan will quickly target and attack the character you’re controling as soon as he resurfaces. To be on the safe side I suggest switching to Cloud immediately after Leviathan pops back up.
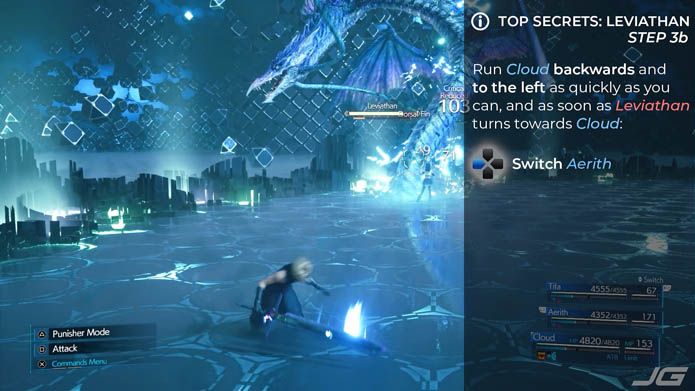
TOP SECRETS: LEVIATHAN STEP 3 (BRINY BARRAGE)
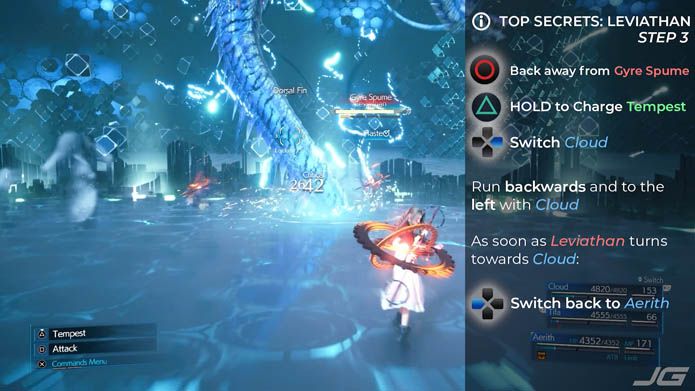
Our goal is to split up Aerith and Cloud to form a Triangle with Leviathan, so:
- Run Aerith backwards and to the right
- Run Cloud backwards and to the left
Keep switching between Aerith and Cloud everytime Leviathan starts to turn its head towards the character you’re currently controling.
If you switch before Leviathan fully turns towards your current character, he won’t be able to cast an ability.
TOP SECRETS: LEVIATHAN STEP 4 (BRINY BARRAGE)
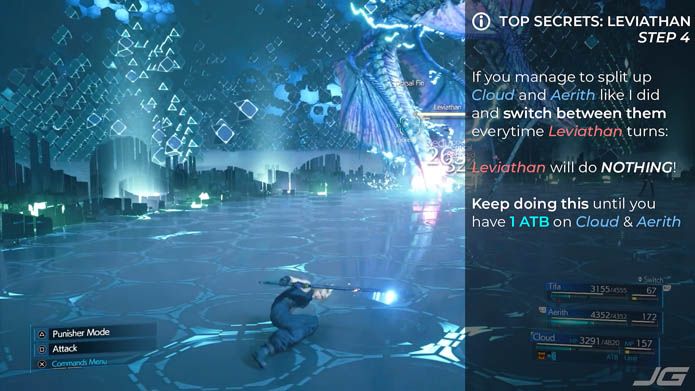
So that’s the biggest trick to beat Leviathan easily: prevent him from doing anything! All you have to do is switch back and forth between Cloud & Aerith before Leviathan gets the time to fully turn his head towards the character you’re controlling. If you do that properly, you can keep Leviathan in this state forever, while your ATB builds up.
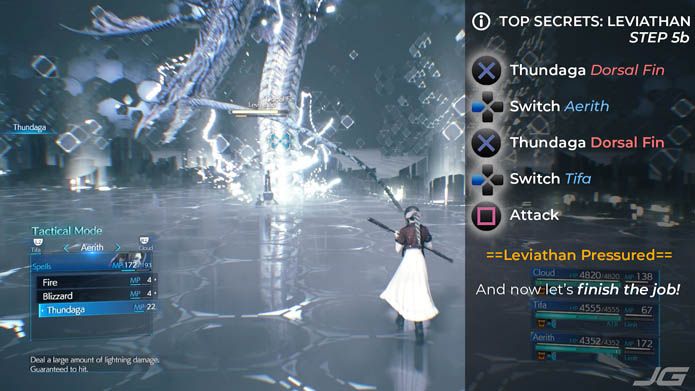
TOP SECRETS: LEVIATHAN STEP 5 (BRINY BARRAGE)

So that’s a total of 4x Thundagas, which is enough to apply Pressure, and after that, Leviathan is pretty much dead, but first let’s go back to Step 1 and see what’s different if you get Briny Bellow at the beginning of the fight.
TOP SECRETS: LEVIATHAN STEP 1 (BRINY BELLOW)
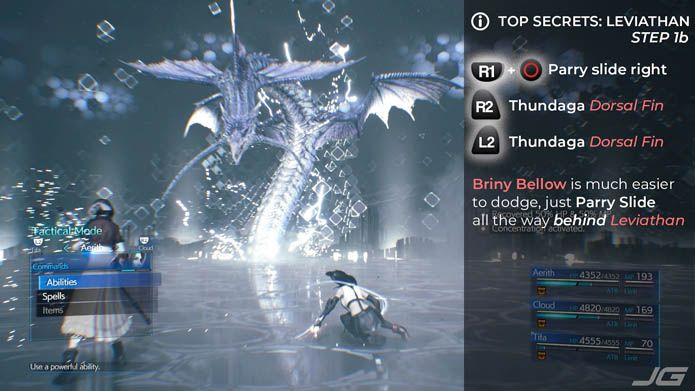
The opening sequence is exactly the same. Briny Bellow is much easier to dodge.
Parry slide in a straight line until you get behind Leviathan to avoid Briny Bellow.
TOP SECRETS: LEVIATHAN STEP 2 (BRINY BELLOW)
Warning: because Leviathan doesn’t get the time to cast Gyre Spume or Tail Whip in this case, he’ll try to acquire a target quicker and turn his head sooner. So you’ll have to Switch to Cloud quicker than in the Briny Barrage scenario. But after that, it’s exactly the same!
TOP SECRETS: LEVIATHAN STEP 3 (BRINY BELLOW)
You know the drill now: Triangle formation, switch back and forth every time the head turns.
TOP SECRETS: LEVIATHAN STEP 4 (BRINY BELLOW)
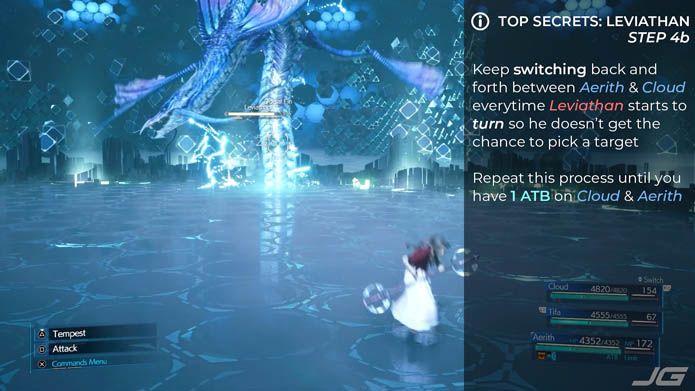
Exactly the same as with the Briny Barrage opening. Keep switching until you get 1 ATB.
TOP SECRETS: LEVIATHAN STEP 5 (BRINY BELLOW)
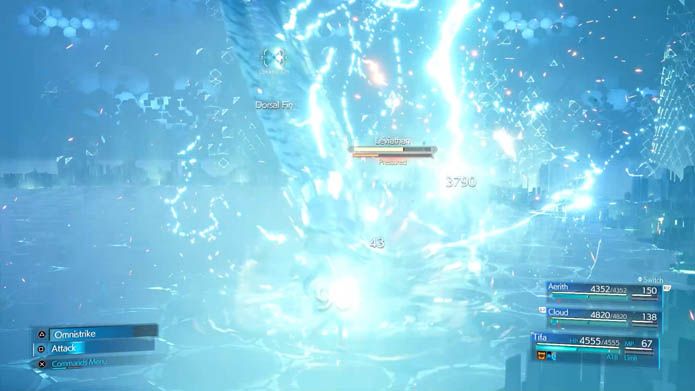
Next step we’ll merge both scenarios. Once Leviathan is Pressured, he’s toast, no matter what ability he started with!
With this setup, 4x Thundagas at the start will always result in a Pressured Leviathan.
TOP SECRETS: LEVIATHAN STEP 6
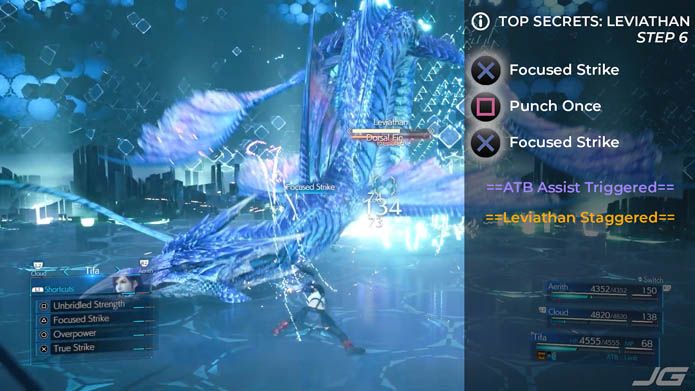
Once Leviathan is Pressured, all it takes to Stagger him is a couple of Focused Strikes.
Why Punch once in between ? To make sure ATB Assist is triggered. Not sure if it’s a bug or intended that way, but ATB Assist doesn’t trigger if you cast 2x Focused Strike in a row quickly. You need to put a punch in between for it to work.
Warning: as Leviathan falls to the ground when Pressured, the hitbox for his Dorsal Fin moves all over the place, which might make you miss with Focused Strike. I highly recommend to just keep punching until Leviathan lands on the ground and then use Focused Strike on his Dorsal Fin.
TOP SECRETS: LEVIATHAN STEP 7

Skill Master should trigger for Tifa after the first True Strikes, which should leave us very close to 1 ATB. A single punch should be enough to get the missing ATB we need to cast a 3rd True Strike.
At this point Leviathan should be dead, but use Thunder with Aerith for good measure.
TOP SECRETS STRATEGY – ROUND 4: BAHAMUT
Bahamut is considered to be the most difficult encounter of the whole Top Secrets Challenge. But he has weaknesses we can exploit to completely NO DAMAGE him.
Bahamut’s Weakness #1: everytime he is hit by a LEVEL 3 Spell (Firaga, Blizzaga, Thundaga or Aeroga), he will be stunned for 2 seconds. This is the case for most enemies in the game, not just Bahamut, but this is very important for this particular case, because Bahamut can quickly dispatch your party if left unchecked. So we’ll keep him Stunned at all times with a rotation of –Aga spells.
Bahamut’s Weakness #2: he has a hidden “Pressure” threshold most people never see. It’s pretty simple: you have to do over 15 000 Damage within 30 seconds and Bahamut will fall to the ground for a very long Pressured state.
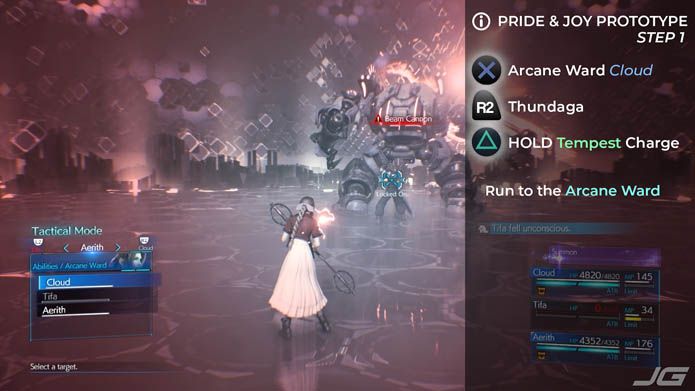
TOP SECRETS: BAHAMUT STEP 1
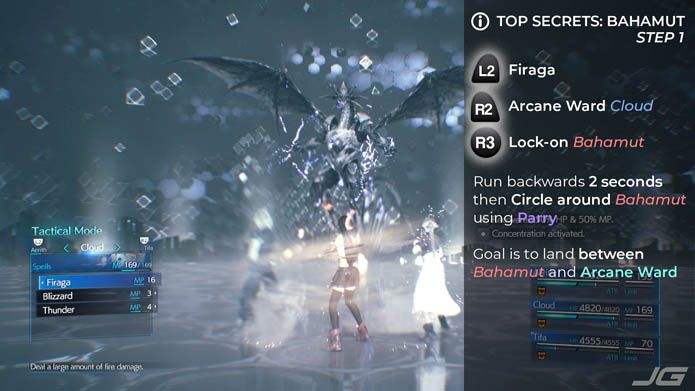
I highly recommend watching the video to see this first step in action. It’s pretty simple once you see it.
Run straight back with Tifa for about 2 seconds. Then circle around Bahamut with a series of Parries, until you land between the Arcane Ward and Bahamut. You should be close enough to attacks immediately and build ATB.
Cloud’s Firaga should land on Bahamut while you’re circling around him safely. Start attacking immediately to build 1 ATB with Tifa, she will be next in the spell rotation.
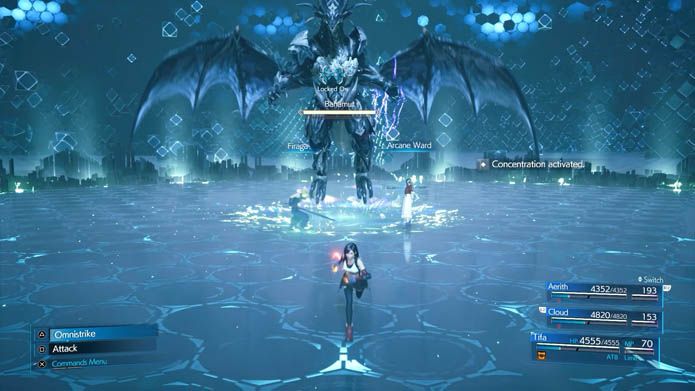
TOP SECRETS: BAHAMUT STEP 2
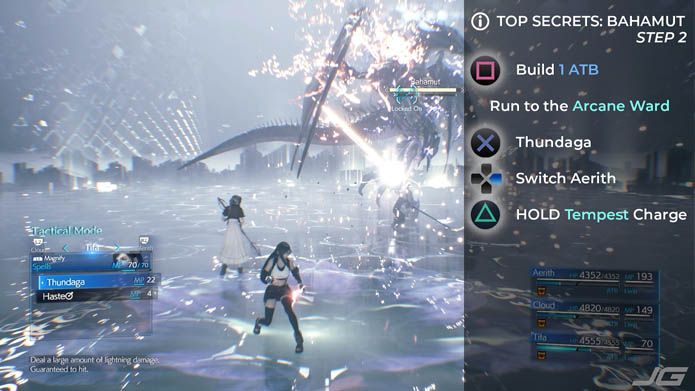
Tifa will keep Bahamut stunned for another few seconds with Thundaga while Aerith builds ATB and then enteres the spell rotation.
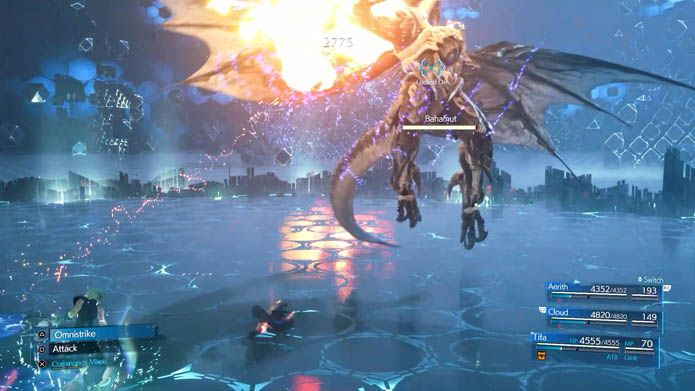
TOP SECRETS: BAHAMUT STEP 3
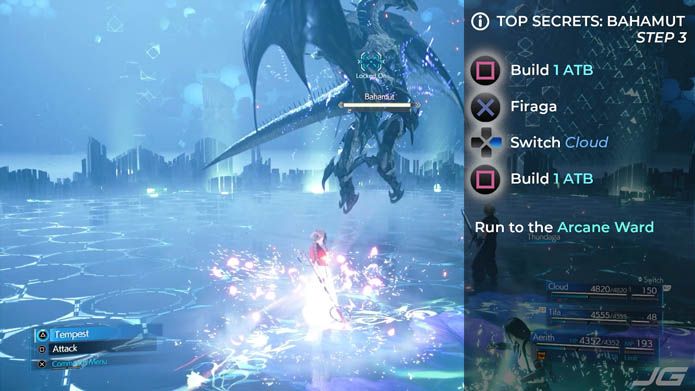
I must stress how strong Tempest is when fully charged. Not only does it dishes a ton of damage (about half the damage a Thundaga would do), but it also builds a LOT of ATB.
TOP SECRETS: BAHAMUT STEP 4
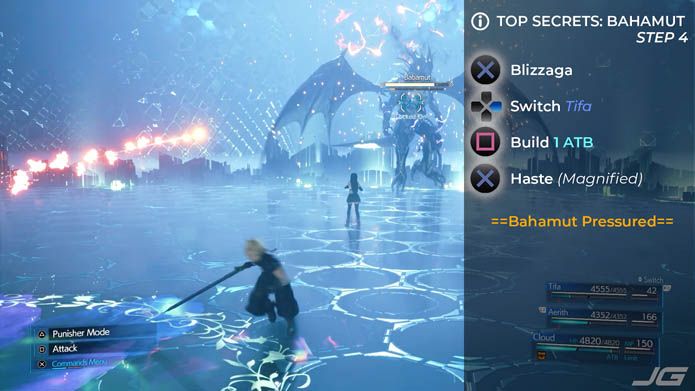
In most cases, Bahamut will become Pressured after Aerith’s 2nd Firaga lands, but if you’re unlucky with RNG you’ll be just short of the 15,000 Dmg needed, so we cast Blizzaga with Cloud to make sure Bahamut becomes Pressured now.
TOP SECRETS: BAHAMUT STEP 5
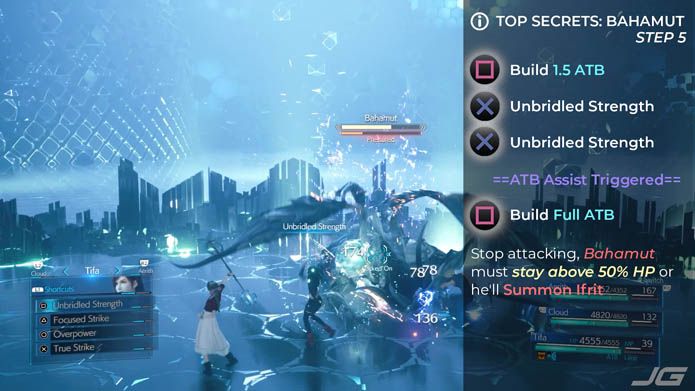
With Haste and ATB Assist, Cloud & Aerith will be back to Full ATB before we start the next sequence. So just stay on Tifa and punch Bahamut until you’re back to Full ATB with Tifa too.
Bahamut should stay above 50% HP. Our goal is to prevent him from Summoning Ifrit, so once we take him down below 50% HP, we’ll make sure he stays stunlocked until we Pressure him again.
TOP SECRETS: BAHAMUT STEP 6
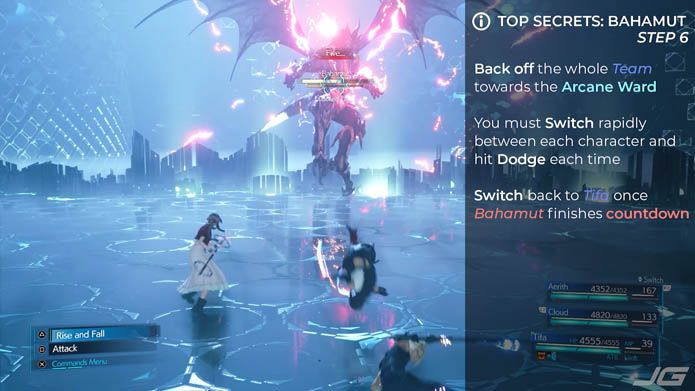
Also, try to position Aerith and Cloud at the back of the Arcane Ward, because the AI will try to move them closer to Bahamut and we actually don’t want that. We want them to stay in the Arcane Ward and to still be inside it for the next 2 Spells we will have them cast.
TOP SECRETS: BAHAMUT STEP 7

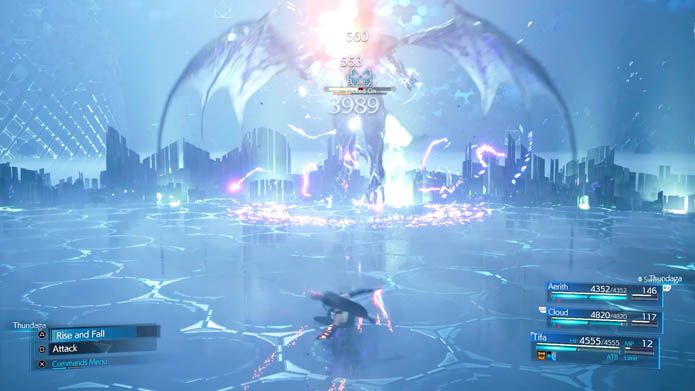
This is the point where Bahamut’s HP goes below 50%, so we blast Thundagas with all 3 party members, as fast as possible and then we follow it up immediately with Firagas from Cloud + Aerith to make sure Bahamut gets Pressured before he gets any chance to Summon Ifrit.
TOP SECRETS: BAHAMUT STEP 8
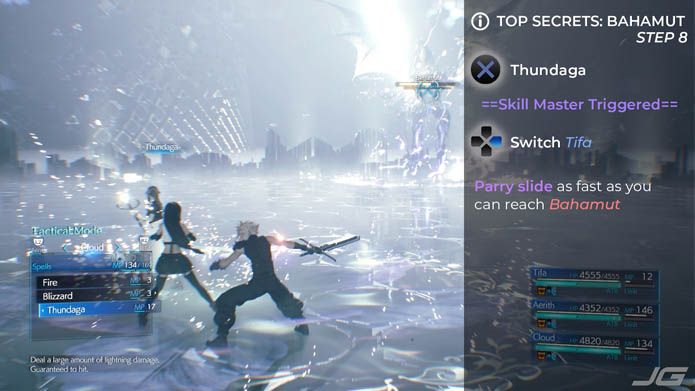
As soon as Cloud starts casting Thundaga, switch to Tifa and dash straight to Bahamut. Enter Tactical Menu as soon as you get in melee range.
As soon as Tifa reaches Bahamut, hit R2 to enter Tactical Mode and be able to queue Firaga on Cloud & Aerith before they move out of the Arcane Ward.
TOP SECRETS: BAHAMUT STEP 9
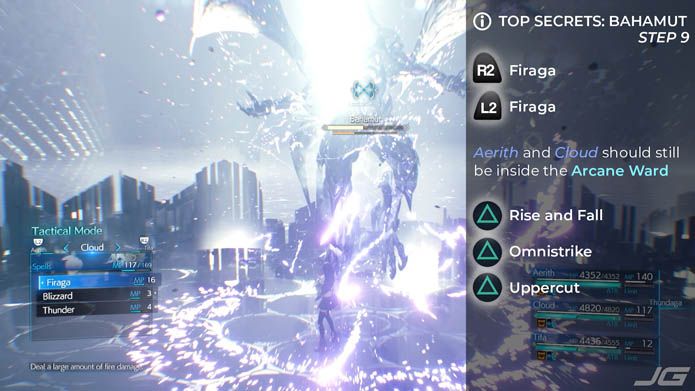
Try to hug Bahamut close before you use Tifa’s Rise and Fall, or you might miss him because -Aga spells have a knockback effect.
TOP SECRETS: BAHAMUT STEP 10
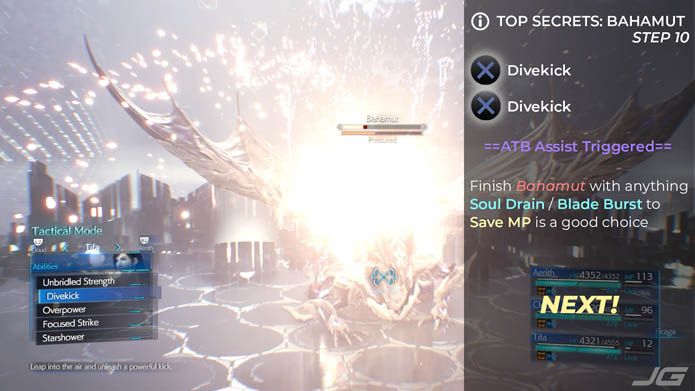
If you’re nervous about not finishing Bahamut here, don’t hesitate to cast another Fira or even Firaga with Aerith and Cloud. We still have plenty of MP left for the final battle.
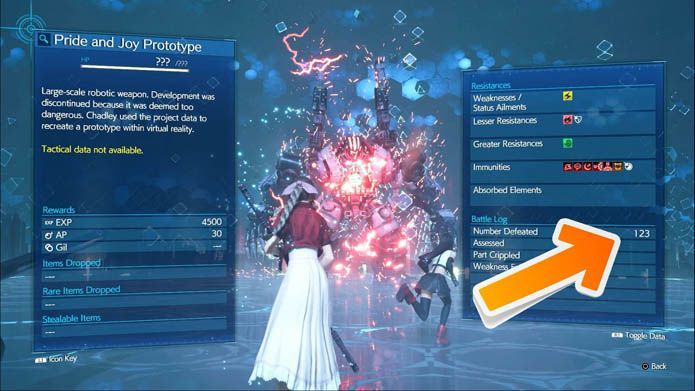
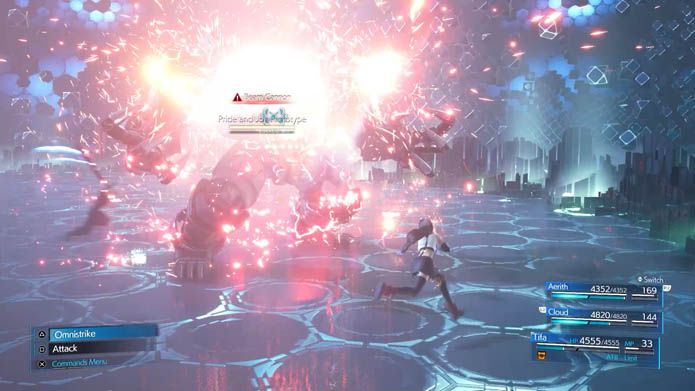
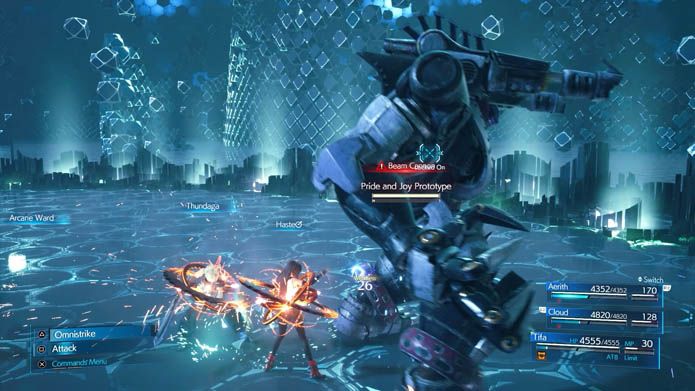
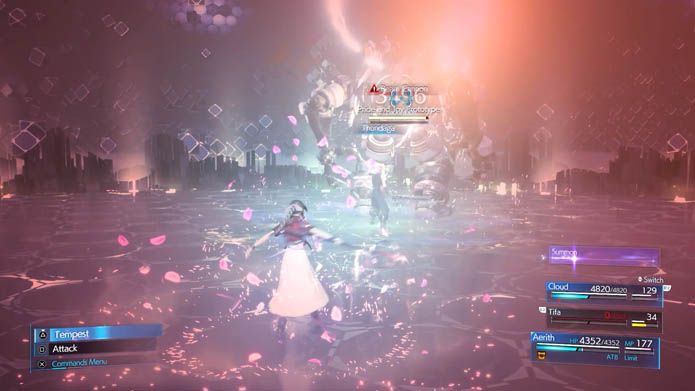
TOP SECRETS STRATEGY – ROUND 5: PRIDE AND JOY PROTOTYPE
Of the last 3 Battles of this challenge, Pride and Joy Prototype is by far the easiest. He’s just a little harder than Fat Chocobo to be honest, and maybe even less dangerous, because Fat Chocobo will sometimes kill one of your party members with a summoned Tonberry.
PRIDE AND JOY PROTOTYPE STEP 1

Yeah, I’m in love with this challenge as you can see ^^
This is where you should use Parry several times until you end up doing a full circle around P&J.
And this is where you should end up. Safe.
Best watch the video to see how I do it once, because it’s pretty simple once you understand the timing of Beam Cannon.
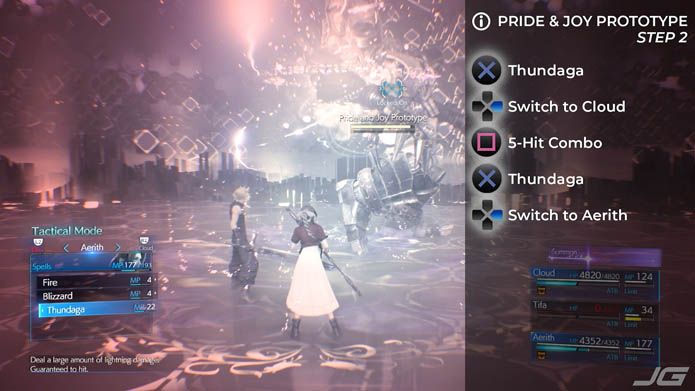
PRIDE AND JOY PROTOTYPE STEP 2
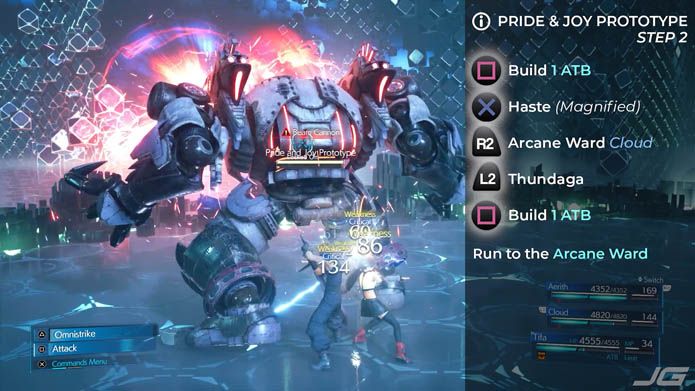
Pride & Joy Prototype has a weakness to Lightning, and after a couple of Thundagas you’ll be able to target its Legs, which can be crippled, repeatedly.
This is the ideal start. P&J still is facing away from us and about to get double blasted by Thundaga.
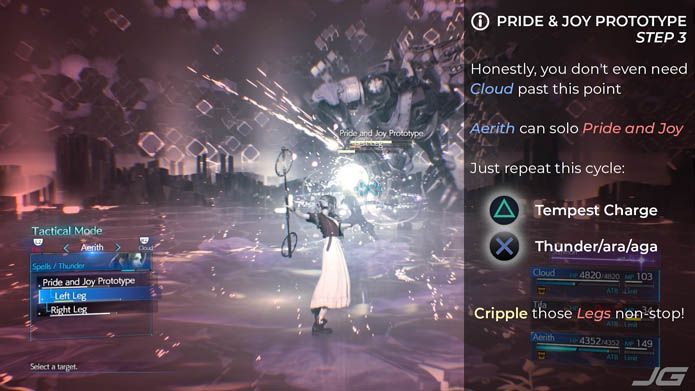
PRIDE AND JOY PROTOTYPE STEP 3
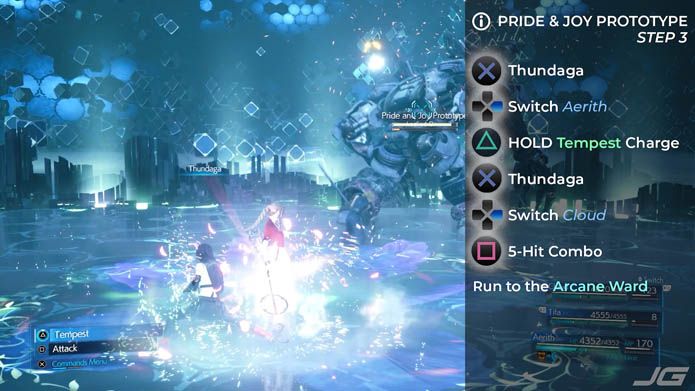
We’ll only cast Thundaga once with Tifa, then she’ll be out of MP and anyway, she’s better used in melee range. She does much more damage that way and can trigger ATB Assist to feed ATB back to our strong spellcasters.
PRIDE AND JOY PROTOTYPE STEP 4
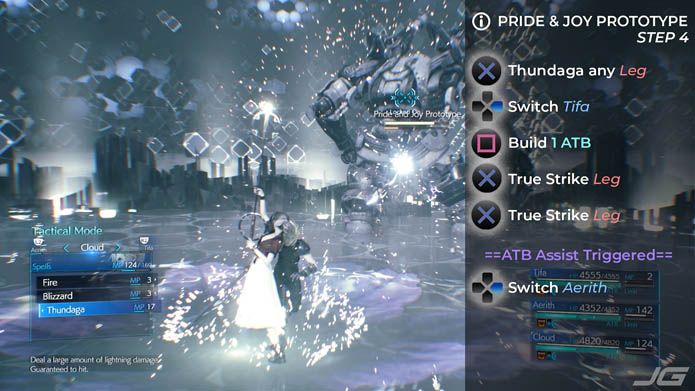
You don’t have to use True Strike specifically here, you can also use 2x Overpower for example. Or even 2x Divekick, which does more damage but is slower, so I don’t recommend it. The objective is to trigger ATB Assist as fast as possible and switch back to Aerith.
PRIDE AND JOY PROTOTYPE STEP 5
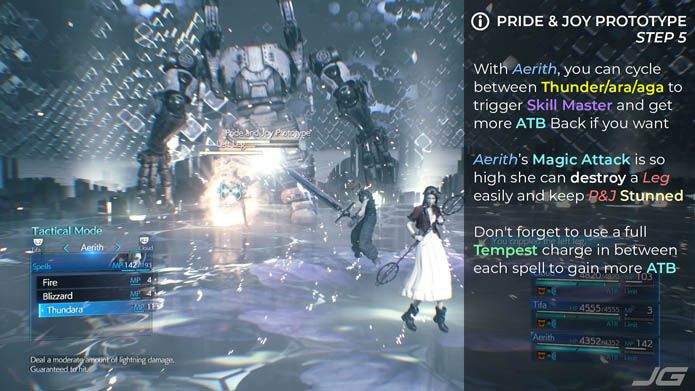
It’s quite simple: just don’t let Pride and Joy stand back up. Whenever you Cripple a Leg, you get a few seconds where you can build ATB up (Tempest is best for that). If Pride and Joy manages to stand back up and is about to attack you, it’s probably best to use Thunder or Thundara instead of Thundaga, because their cast time is much faster. However, keep in mind that 2x Thunder won’t be enough to destroy a full Leg, so only use Thunder on Legs which are already damaged beyond 70%.
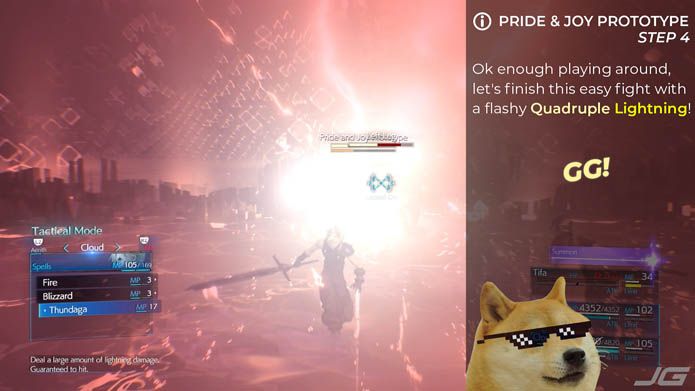
PRIDE AND JOY PROTOTYPE STEP 6
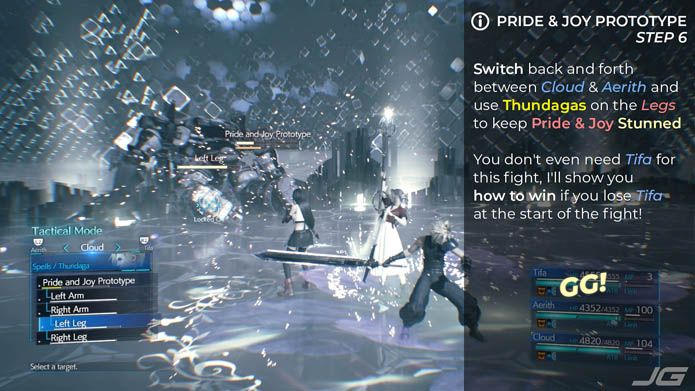
So Pride and Joy Prototype is easy, but I know for a fact that many players (me included) fail to dodge Beam Cannon on their first try, so I’m going to show you that this doesn’t change anything. Pride and Joy Prototype is still just as easy to beat even if you lose Tifa right at the start of the fight.
Beautiful, right? I love the smell of Thundagas in the morning!
PRIDE AND JOY PROTOTYPE STEP 1 (DUO)
Oh no! Tifa is dead! What are we gonna do?
TL:DR version: Arcane Ward + Tempest + Aerith’s high Magic Attack is an unstoppable force.
Tempest is not only powerful as hell, it’s also very pretty!
PRIDE AND JOY PROTOTYPE STEP2 (DUO)
As you can see we still got almost Full MP at this point on Aerith. As long as we keep our ATB up with Tempest + Skill Master, we can keep Pride & Joy stunlocked for days.
PRIDE AND JOY PROTOTYPE STEP 3 (DUO)
Remember that different levels of spells count as different abilities/spells for Skill Master Materia, so you can cycle between Thunder / Thundara / Thundaga to gain even more ATB Back.
Thundara with Aerith is a guaranteed Leg Cripple too. Only Thunder will not Cripple a full HP Leg, unless you crit.
PRIDE AND JOY PROTOTYPE STEP 4 (DUO)
CONCLUSION
If you paid close attention, we didn’t take a single hit on our party during this whole challenge.
The only exception is versus Leviathan when he opens with Briny Barrage and then uses Gyre Spume or Tail Whip. But when he opens with Briny Bellow… we NO DAMAGE this whole challenge!
THANK YOU
I hope you enjoyed this guide.
Please Subscribe to my YouTube Channel: https://www.youtube.com/jamesguides7
Like and leave a Comment to help me get more visibility. YouTube Algorithm isn’t being very nice to my videos so far.
OTHER WAYS TO SUPPORT MY WORK
Leave a tip: https://www.tipeeestream.com/james-guides/donation
Upvote my post on reddit: Top Secrets Ultimate Guide – 2022 Intergrade Edition
Check out my other Final Fantasy 7 Remake Guides:
Yuffie & Sonon vs Top Secrets Full Strategy
Weiss Guide Easy Mode Strategy
FF7 Remake Intermission 100% Walkthrough: YOUTUBE | TEXT FORMAT
Stay tuned for more guides!
-Jame