
 by Charmazazz
Viaggio da Dragonblight a Grizzly Hills
Introduzione
Questa guida è stata create per livellare RAPIDAMENTE tramite l’uso di Circuiti di missioni ottimizzati. Con questa guida le missioni verranno completate con efficacia e non avrete mai l’impressione di girare a vuoto. Seguite tutte le istruzioni con attenzione e ve ne renderete conto da soli. La scelta e l’ordine di esecuzione delle missioni sono stati ottimizzati per farvi correre il meno possibile e, contemporaneamente, di fare molte cose e di consegnare il maggior numero di missioni nello stesso momento. Vi sembrerà di fare del grinding, perché ucciderete un sacco di roba quasi senza pause, ma completerete invece un sacco di missioni!
NOTA: Seguendo questa guida otterrente il Quest Achievement per Dragonblight: Might of Dragonblight. Il 100% delle missioni in Dragonblight sono incluse nella guida, anche quelle opzionali.
Otterrete anche l’Achievement: Veteran of the Wrathgate.
<!–break–>
Tutto quanto descritto nella guida può essere fatto da soli (tranne dove evidenziato). Nulla vieta di fare party con amici, PUGs, ecc., non è un problema, funziona anche così.
DECLINAZIONE DI RESPONSABILITA’: Questa guida NON prende in considerazione tradeskills, missioni specifiche per classi o PvP. E’ unicamente dedicata ad ottenere il massimo dell’esperienza possibile nel minor tempo facendo molte missioni e mettendo il giocatore in grado di sperimentare e divertirsi con il maggior contenuto possibile. Ogni combinazione di razza e classe può seguire questa guida. Qualsiasi lamentela riguardante PvP, tradeskills o problemi riguardanti specifiche classi verrà ignorata.
Regole di base
- b]Spendete i vostri talent points in modo che le abilità acquisite vi diano la possibilità di eliminare i nemici nella maniera più rapida. (e.g: un Priest dovrebbe specializzarsi in Shadow , i Warriors in Arms/Fury, ecc.
- Non sprecate il vostro tempo a cercare dei gruppi per le missioni, potete cavarvela sempre ad affrontare da soli quanto è descritto in questa guida, tranne dove è espressamente evidenziato. Cercate di fare gruppo con un altro giocatore solamente se ciò non comporta una perdita di tempo (ad es.: incontrare un giocatore all’altro estremo della mappa per mostrargli la strada che conduce alla vostra missione).
- Uscite sempre dal gioco quando siete in una taverna o in una delle città principali se dovete fare una pausa.
Addons utili
Per ottenere il massimo dalla mia guida vi consiglio di installare un addon che vi riveli le coordinate, poiché mi serviranno per descrivere i luoghi citati nella guida (x,y). Ce ne sono a bizzeffe in rete ma quello che uso io è molto semplice.
Raccomandato
- DMiniCoords – Un semplice riquadro che mostra le coordinate, cliccando con il tasto sinistro del mouse lo muovete dove volete.
Opzionale
La seguente lista di addons è al 100% opzionale, ve li descrivo unicamente per amore di completezza e soltanto se siete curiosi di sapere che cosa uso abitualmente:
- Bartender4 – Grande addon per le barre dei pulsanti.
- X-Perl UnitFrames – Molto carino, vi permette di customizzare tutti i frames del gioco.
- Quartz – Il migliore addon per le classi che usano incantesimi, a mio parere.
- Scrolling Combat Text – Non mi piace proprio l’UI di default di WoW che riporta l’esito di un combattimento.
- Deathknight.info Runes – Un utile addon che vi permette di tenere traccia dello stato di attività delle vostre rune.
Postilla: Se non sapete come installare un addon, provate a scaricare uno di quelli sopra descritti e scompattatelo (con WinZip o programmi similari). Poi trascinate la cartella appena scompattata nella cartella Addon di WoW (il percorso completo è c:\Programmi\World of Warcraft\Interface\Addons). Fate ripartire World of Warcraft e tutto dovrebbe funzionare.
Se non funziona dovreste fare il log out dal programma e nella schermata del personaggio fare click su “Addons” nell’angolo inferiore sinistro e attivare il box che indica “Load out of date Addons”. Fate ripartire WoW.
Lista della spesa:
Borse – Cercate di avere almeno delle borse con 18 caselle. Faremo lunghi tragitti molto distanti da qualsiasi venditore, quindi avere delle borse spaziose è una necessità. Se non vi potete permettere quelle da 18 caselle, prendete almeno quelle da 16 caselle che costano molto meno.
Codice dei colori:
- Missioni
- Items
- Luoghi
- Obiettivi della missione da uccidere
- Personaggi non giocanti (NPC)
- Informazioni specifiche per la classe
- Coordinate
La guida:
Se avete seguito la mia guida precedente sarete già a Wintergarde Keep, Dragonblight con le seguenti missioni:
- [72] High Commander Halford Wyrmbane
Se non ce l’avete ignoratela, potete comunque ottenerne il seguito.
Incominciamo!
 Ottenete il nuovo Flight Path.
==Attenzione== Nel corso di questo capitolo NON accettate la missione [73] The Hills Have Us. Se lo fate verrete trasportati a Grizly Hills e perderete un sacco di tempo per tornare indietro.
Consegnate [72] High Commander Halford Wyrmbane
Accettate [72] Naxxramas and the Fall of Wintergarde.
consegnate [72] Naxxramas and the Fall of Wintergarde, accettate [72] Flight of the Wintergarde Defender.
 Fate click destro su Wintergarde Gryphon Whistle.
1. Quando siete sul Gryphon usate l’Abilità #3 quando è attiva per aumentare la velocità.
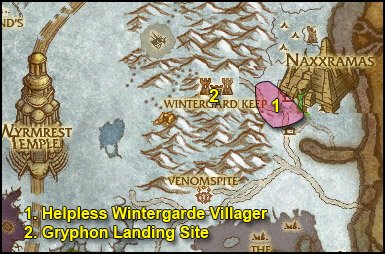
Andate a sudest a Carrion Fields (85,50).
Cercate Helpless Wintergarde Villager (Ha l’icona di Fear sopra la testa).

Atterrategli vicino e usate l’Abilità #1. Dovete rimanere fermi quando l’usate. Se avete avuto successo il Villager sarà sul Gryphon con voi.
Tornate dal Gryphon Master a nordovest e usate l’Abilità #2.
Ripetete per 10 volte.
2. Tornate al punto di atterraggio dei Gryphon.
 Fate click sul pulsante Leave Vehicle e consegnate:
[72] Flight of the Wintergarde Defender, accettate [72] Return to the High Commander.
Andate a sudest e consegnate [72] Return to the High Commander, accettate tutte le missioni disponibili qui TRANNE [73] The Hills Have Us.
Dovreste avere le seguenti missioni nel vostro log:
- [72] Rescue from Town Square
- [72] The Demo-gnome
- [72] The Fate of the Dead
- [72] Imprints on the Past
Andate a sud da Siege Engineer Quarterflash, consegnate [72] The Demo-gnome, accettate i due seguiti:
- [72] The Search for Slinkin
- [72] The Bleeding Ore
Accettate anche [72] Not In Our Mine da Highlord Leoric Von Zeldig che dovrebbe essere apparso accanto a Quarterflash.
Infine andate nella locanda e accettate le 3 missioni dal Wanted Poster:
- [74] Wanted: Kreug Oathbreaker
- [74] Wanted: High Shaman Bloodpaw
- [74] Wanted: Onslaught Commander Iustus
 Fate di questa locanda la vostra base.
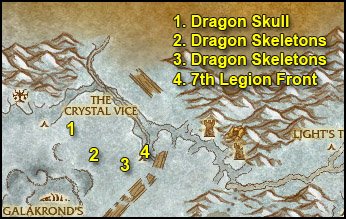
Prima di continuare guardate la mappa dei luoghi con i Mob obiettivo di tutte le Group Quests a Dragonblight.
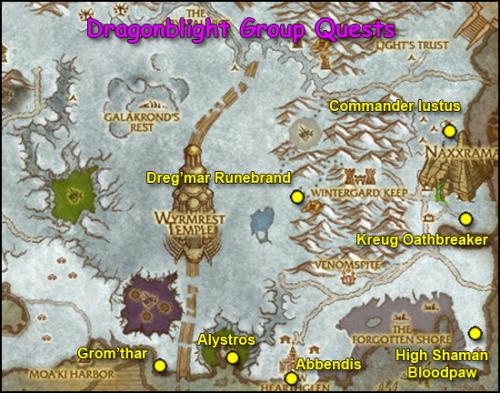
Notate però che a questo punto non avete tutte le missioni di gruppo, avete soltanto le 3 che avete appena accettato. Ignorate il resto per adesso e controllate la mappa di tanto in tanto ogni volta che trovate un gruppo e siete nelle vicinanze.
Al momento l’obiettivo più vicino è Kreug Oathbreaker; se vedete un gruppo che sta facendo la missione partecipatevi, ma non perdete il vostro tempo a cercarne uno, continuate a seguire la guida normalmente ed approfittate di questa opportunità ogni qualvolta si presenta l’occasione.
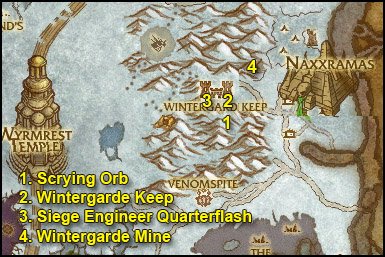
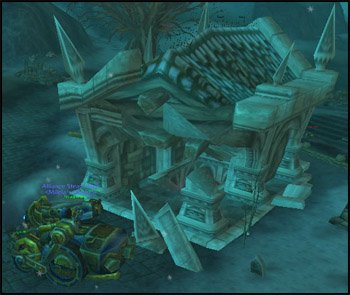
1. Tornate al cancello e prendete il sentiero verso sud. Entrate nel primo edificio alla vostra destra. Salite al piano superiore e cercate Scrying Orb.
Raccoglietelo.
Ora andate da un edificio all’altro e uccidete Vengeful Geists per liberare Trapped Wintergarde Villagers. Continuate così finché non completate [72] Rescue from Town Square e [72] The Fate of the Dead.
2. Tornate a Wintergarde Keep. Consegnate:
- [72] Rescue from Town Square, accettate [72] Find Durkon!
- [72] The Fate of the Dead
- [72] Imprints on the Past, accettate [72] Orik Trueheart and the Forgotten Shore
3. Andate da Siege Engineer Quarterflash.
 Fate click destro su Quarterflash’s Homing Bot e montate in sella.
Seguite il bot, vi porterà a Wintergarde Mine (80,45).
4. Entrate nella miniera e cercate Strange Ore.
Fateci click destro e raccogliete Strange Ores.
Tenetevi a destra e troverete Slinkin the Demo-Gnome (82,42). Consegnate [72] The Search for Slinkin, accettate [72] Leave Nothing to Chance.
Giratevi ed andate a destra in una sala dove trovate Wintergarde Mine Bombs.
Tornate all’ingresso della miniera e vedrete il suolo scintillare.
 Fate click destro su Wintergarde Mine Bomb mentre siete lì.
Andate al condotto superiore della miniera. Troverete un altro punto scintillante. Usate di nuovo Wintergarde Mine Bomb.
Adesso ammazzate e raccogliete Strange Ore nella miniera fino al completamento di [72] The Bleeding Ore e [72] Not In Our Mine.
5. Usate la vostra Hearthstone e tornate a Wintergarde Keep (o andateci con il vostro destriero se Hearthstone non è ancora attiva). Consegnate:
- [72] The Bleeding Ore
- [72] Leave Nothing to Chance, accettate [72] Understanding the Scourge War Machine
- [72] Not In Our Mine
Andate da High Commander Halford Wyrmbane e consegnate [72] Understanding the Scourge War Machine.
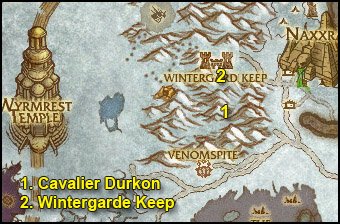
1. Dal cancello prendete la discesa, svoltate a destra, passate davanti all’edifcio nel quale avevamo preso Scrying Orb. Un pochino più a sud trovate Cavalier Durkon (79,53).
Consegnate [72] Find Durkon! e accettate [72] The Noble’s Crypt.
Entrate nella cripta, inoltratevi fino al fondo della stessa e uccidete Necrolord Amarion. Riacquistate mana e salute.
Fate click destro su Flesh Bound Tome che dovrebbe essere sul pavimento dietro al luogo in cui avete incontrato Necrolord Amarion:
Accettate la missione [73] Secrets of the Scourge e uscite dalla cripta più veloci che potete in modo da evitare i Ghouls che stanno per riapparire.
Consegnate:
- [72] The Noble’s Crypt
- [73] Secrets of the Scourge, accettate [73] Mystery of the Tome
2. Ritornate a Wintergarde Keep, consegnate [73] Mystery of the Tome, accettate [73] Understanding the Language of Death.
Prendete il sentiero a nord e svoltate a sinistra ed entrate in Wintergarde Prison dove trovate Commander Eligor Dawnbringer (77,47). Accettate la sua missione [73] My Old Enemy.
Scendete le scale e consegnate [73] Understanding the Language of Death, accettate [73] A Righteous Sermon. Guardate lo script finché non ottenete il messaggio di missione completata.
Uscite dall’edificio. Andate un verso est da Vas the Unstable, accettate [72] A Disturbance In The West.
==Nota== Questa missione non compare nel vostro diario se avete accettato in precedenza [72] Your Presence Is Required at Star’s Rest, non vi ho mai detto di accettarla quindi ABBANDONATE [72] Your Presence Is Required at Star’s Rest e potrete accettare questa missione.
Tornate da High Commander Wyrmbane, consegnate [73] A Righteous Sermon, accettate [73] Into Hostile Territory.
Andate al punto di atterraggio dei Gryphon e consegnate [72] A Disturbance In The West, scendete dal vostro destriero e accettate [72] To Stars’ Rest!
Andrete in volo fino a Stars’ Rest.
Prendete il nuovo Flight Path.
Consegnate [72] To Stars’ Rest! e accettate:
- [72] Rifle the Bodies
- [72] The Liquid Fire of Elune
1. Andate a nord verso la zona dall’altro lato della strada (29,51).
Uccidete Rabid Grizzlies e Blighted Elks, depredateli e:
 Fate click destro su Liquid Fire of Elune sui loro cadaveri.
Continuate fino al completamento della missione [72] The Liquid Fire of Elune.
2. Tornate a Stars’ Rest, consegnate [72] The Liquid Fire of Elune, accettate [72] Kill the Cultists.
3. Tornate alla medesima area e trovate il sentiero che conduce a Icemist Village (24,44).
L’obiettivo è quello di uccidere Anub’ar Cultists. Ripulite gli edifici sul lato sud del villaggio e poi saltate nel bacino sotto agli edifici dove troverete altri Cultists.
Uccideteli fino ad ottenere:
- 5 Functional Cultist Suits
- The Favor of Zangus
 Fate click destro per iniziare la missione [72] The Favor of Zangus.
4. Ritornate a Stars’ Rest. Consegnate:
- [72] Kill the Cultists
- [72] The Favor of Zangus, accettate [72] The High Cultist
1. Andate a nordovest a Pit of Narjun (26,51). Saltate dentro una delle buche e andate da Kilix the Unravaler. Accettate le 3 missioni:
- [74] Death to the Traitor King
- [74] Don’t Forget the Eggs!
- [76] The Faceless Ones
Instance: Azjol-Nerub
Avete tutte le missioni per la versione normale dell’Instance Azjol-Nerub.
- [74] Death to the Traitor King
- [74] Don’t Forget the Eggs!
D’ora in avanti, e se ne avete voglia, cercate un gruppo per Azjol-Nerub (Abbreviazione: AZN). E’ una Instance molto veloce adatta per i giocatori di livello 72-74. Ve la consiglio.
Se non ne avete voglia o non trovate un gruppo abbandonate le missioni. Potrete riottenerle in futuro se cambierete idea.
Instance: Ahn’kahet: The Old Kingdom
Avete inoltre la missione per la versione normale dell’Instance Ahn’kahet: The Old Kingdom.
- [76] The Faceless Ones
D’ora in avanti, e se ne avete voglia, cercate un gruppo per AAhn’kahet. E’ una Instance molto veloce adatta per i giocatori di livello 73-75. Ve la consiglio.
Se non ne avete voglia o non trovate un gruppo abbandonate le missioni. Potrete riottenerle in futuro se cambierete idea.
2. Da Kilix the Unraveler prendete il tunnel di centro che porta a est e troverete High Cultist Zangus. Uccidetelo.
3. Tornate indietro e prendete il sentiero che risale a spirale il pozzo verso la superficie e ritornate a Stars’ Rest.
Consegnate [72] The High Cultist.
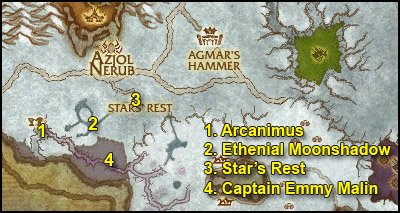
1. Andate a sudovest a Moonrest Gardens. Troverete Ethenial Moonshadow alle coordinate (24,60). Accettate la sua missione [72] Avenge this Atrocity!
Cercate Dead Mage Hunters.
Cercate i loro cadaveri ed ottenete Mage Hunter’s Personal Effects.
 Fate click destro su di essi e prendetene il contenuto. Ripetete fino a che non trovate Moonrest Gardens Plans.
2. Go back to Stars’ Rest, turn in [72] Rifle the Bodies, get [73] Prevent the Accord.
3. Andate all’estremità occidentale di Moonrest Gardens (22,59).
D’ora in avanti uccidete qualsiasi NPC Blue Dragonflight.
Ripulite la strada che porta all’altro lato del cratere.
Cercate e uccidete Wind Trader Mu’fah (18,60). Lo trovate davanti alla porta del grande edificio di pietra.
Raccogliete Wind Trader Mu’fah’s Remains.
Entrate nell’edificio e prendete la salita a sinistra.
Uccidete Goramosh, raccogliete The Scales of Goramosh.
Raccogliete anche Goramosh’s Strange Device.
 Fate click destro per incominciare [72] A Strange Device.
4. Tornate da Ethenial Moonshadow alle coordinate (24,60) e, mentre siete sulla strada del ritorno, uccidete gli NPC Blue Dragonflight che vi servono per completare [72] Avenge this Atrocity!
Consegnate [72] Avenge this Atrocity! e accettate [73] End Arcanimus.
5. Tornate a Stars’ Rest. Consegnate:
- [73] Prevent the Accord
- [72] A Strange Device, accettate [72] Projections and Plans
1. Tornate all’estremità occidentale di Moonrest Gardens, troverete un crepaccio che conduce al cratere all’estremità sudorientale (22,61).
Scendete e uccidete Arcanimus (20,60).
Fate click destro su Surge Needle Teleporter.
Sarete teletrasportati su una piattaforma. Andate verso il centro della piattaforma finché non otterrete il messaggio di missione completata: “Object On the Surge Needle Observed“.
Fate click destro di nuovo su Surge Needle Teleporter.
2. Andate a sudest da Ethenial Moonshadow. Consegnate [73] End Arcanimus.
3. Tornate a Stars’ Rest. Consegnate [72] Projections and Plans, accettate [72] The Focus on the Beach.
4. Andate a sudovest a Glittering Strand.
Cercate Captain Emmily Malin (26,65). Sta incanalando un incantesimo vicino a Ley Line Focus.
Uccidetela e depredatela completamente.
 Avvicinatevi a Ley Line Focus e fate click destro su Ley Line Focus Control Ring.
 Fate click destro anche su Captain Malin’s Letter, accettate la missione [72] A Letter for Home.
5. Tornate a Stars’ Rest. Consegnate:
- [72] A Letter for Home
- [72] The Focus on the Beach, accettate [72] Atop the Woodlands
Accettate anche [72] Strengthen the Ancients da Sarendryana.
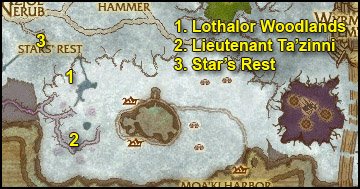
1. Andate a sudest a Lothalor Woodlands (31,60).
DCercate Woodlands Walker, fate click destro su di essi, selezionate il loro testo e questi vi attaccheranno o vi daranno qualche Bark of the Walkers. Ripetete fino ad ottenerne 3.
Dopo aver ottenuto 3 Bark of the Walkers cercate Lothalor Ancients (non quelli Corrupted).
 Avvicinatevi e fate click destro su Bark of the Walkers.
Continuate mentre affrontiamo il prossimo passaggio.
2. Andate ancora più a sud fino a trovare Ley Line Focus (32,71).
Uccidete Lieutenant Ta’zinni. E’ un NPC Troll che pattuglia attorno a Ley Line Focus. Raccogliete Ley Line Focus Control Amulet.
 Fate click destro su di esso mentre siete vicini a Ley Line Focus.
3. Finite le altre missione con Lothalor Ancients e tornate a Stars’ Rest.
Consegnate:
- [72] Strengthen the Ancients
- [72] Atop the Woodlands, accettate [72] Search Indu’le Village
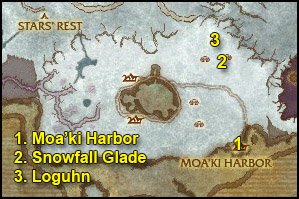
1. Andate in volo a Moa’ki Harbor. Se non avete il Flight Path andateci con il vostro destriero.
Prendete le missioni:
- [72] Let Nothing Go To Waste
- [72] Planning for the Future
Fate di questa locanda la vostra base.
2. Andate a nord e poi leggermente a nordovest a Snowfall Glade (47,65). Completate i 2 seguenti obiettivi:
- Uccidete Wolvars e raccogliete 6 Stolen Moa’ki Goods
- Fate click destro su 12 Snowfall Glade Pups
Tornate a Moa’ki Harbor, consegnate:
- [72] Planning for the Future
- [72] Let Nothing Go To Waste, accettate [73] Slay Loguhn
3. Tornate a Snowfall Glade.
Andate all’ultima capanna a nord (46,60). Uccidete Loguhn.
 Fate click destro su Blood of Loguhn.
Tornate a Moa’ki Harbor, consegnate [73] Slay Loguhn. Adesso ci saranno due nuove missione nel villaggio.
Per il momento accettate soltanto [72] Spiritual Insight da Toalu’u the Mystic.

1. All’esterno della tenda di Toalu’u the Mystic trovate Toalu’u’s Brazier.
 Fate click destro su Toalu’u’s Spiritual Incense.
Non dovete fare niente per questa missione, godetevi il volo fino a che non ottenete il messaggio di missione compleatata.
Turn in [72] Spirittual Insight, get [72] Elder Mana’loa.
2. Salite in sella, seguite la strada a nord e poi a ovest fino all’estremità nordoccidentale di Indu’le Village (37,65). Troverete una statua statue (anche se assomiglia di più ad una roccia) di nome Elder Mana’loa.
Consegnate [72] Elder Mana’loa, accettate [72] Freedom for the Lingering.
3. Ripulite la strada verso il centro di Lake Indu’le dove troverete il cadavere di Mage-Commander Evenstar (40,67).
Consegnate [72] Search Indu’le Village, accettate [72] The End of the Line.
 Avvicinatevi a Ley Line Focus e fate click destro su Ley Line Focus Control Talisman.
Uscite dal lago e uccidete Indu’le Fishermen/Warriors/Mystics fino al completamento di [72] Freedom for the Lingering.
4. Tornate da Elder Mana’loa, consegnate [72] Freedom for the Lingering, accettate [72] Conversing With the Depths.
5. Montate in sella e viaggiate a est alla sporgenza occidentale di Azure Dragonshrine (53,65). Otterrete il messaggio di completamento missione “Azure Dragonshrine Observed“. (Fate attenzione a non confonderlo con il messaggio di scoperta di una nuova area).
6. Tornate a sudovest a Moa’ki Harbor. Accettate la missione [72] Tua’kea’s Crab Traps da Tua’kea.
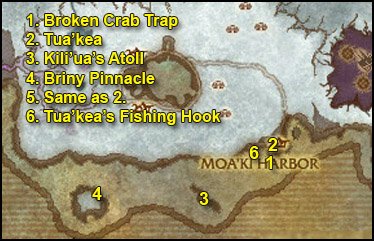
1. Andate fino all’estremità dei moli sudoccidentali dove vedrete un “!” giallo sulla minimappa.
 Fate click destro su Tua’kea’s Breathing Bladder. Ha 6 cariche.
Tuffatevi e accettate la missione [72] Signs of Big Watery Trouble.
==Nota== D’ora in avanti cercate Tua’kea Crab Traps sul fondo del mare mentre affrontate i prossimi passi.
2. Ritornate a nuoto al villaggio e consegnate [72] Signs of Big Watery Trouble a Tua’kea, accettate il seguito [72] The Bait.
3. Nuotate a sudovest verso Kili’ua’s Atoll (44,82).
Raccogliete 8 Tua’kea Crab Traps sul percorso.
Una volta raggiunto Kili’ua’s Atoll uccidete Kili’ua e raccogliete The Flesh of “Two Huge Pincers”.
4. Nuotate e ovest fino a Briny Pinnacle (non cercate Crab Traps, non ce ne sono in questa zona).
Seguite il sentiero in salita fino a trovare The Pearl of the Depth (34,83).
Fate click destro sulla perla e la divinità marina Oacha’noa verrà a parlarvi. Saltate in mare quando vi darà Compulsion Buff.
5. Usate le Hearthstone per tornare a Moa’ki Harbor. Consegnate:
- [72] Tua’kea’s Crab Traps
- [72] The Bait, accettate [72] Meat on the Hook
6. Seguite la lenza (assomiglia di più ad una grossa corda) a sudovest nel mare, fino a Tua’kea’s Fishing Hook (47,78):

 Fate click destro su Tu’u’gwar’s Bait.
Uccidete Tu’u’gwar.
Tornate a nuoto a Moa’ki Harbor, consegnate:
- [72] Meat on the Hook
- [72] Conversing With the Depths
Vendete il bottino inutile, riparate l’armatura e fate rifornimento di cibo e bevande.
Dovreste aver raggiunto il livello 74.
Level 74
Andata in volo a Star’s Rest. Consegnate [72] The End of the Line, accettate [72] Gaining an Audience.
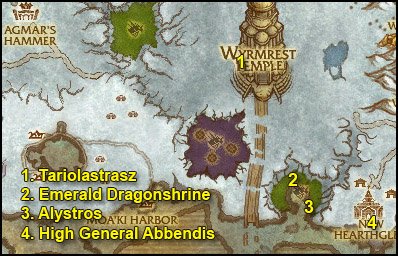
1. Montate in sella, seguite la strada verso est e continuate fino a giungere a Wyrmrest Temple, dove troverete Tariolstrasz (58,54).
Consegnate [72] Gaining an Audience, accettate [72] Speak with your Ambassador.
Chiedetegli di mandarvi in cima al tempio.
In cima, accettate le seguenti missioni:
- [74] Seeds of the Lashers
- [75] Mystery of the Infinite
- [74] The Obsidian Dragonshrine
Andate da Torastrasza e chiedetegli di riportarvi giù al pianterreno.
2. Andate a sud-sudest a Emerald Dragonshrine (63,69). Cercate Nishera the Garden Keeper che è di pattuglia attorno al lago. Accettate la sua missione [74] Cycle of Life.
Dovete uccidere due tipi di mobs in questa radura:
- Emerald Lashers finché non avrete raccolto 3 Lasher Seeds
- 5 Emerald Skytalons (guardate in alto, volano un po’ dappertutto)
Quando avete finito tornate da Nishera e consegnate [74] Cycle of Life, accettate [74] The Plume of Alystros.
3. (Opzionale) [74] The Plume of Alystros richiede l’uccisione di Alystros the Verdant Keeper:
- Livello 74 Elite
- Immune a effetti che impediscono i movimenti, fear, ecc.
- HPs: 118,000
- Colpisce: ~2K su Cloth
La maggior parte delle classi non possono affrontarlo da sole, quando cercate aiuto concentratevi preferibilmente su un Tank e un Healer.
Quando siete pronti andate alla punta sudorientale della radura (65,78).
 Fate click destro su Skytalon Molts ed Alystros vi attaccherà. Fate usare al Tank Skytalon Molts così verrà attaccato per primo.
Raccogliete Plume of Alystros. Tornate da Nishera the Garden Keeper e consegnate [74] The Plume of Alystros.
Se non trovate aiuto per questa missione salvatela per un’altra volta, non ha alcun seguito e non ha importanza quando la farete.
4. (Opzionale) [73] My Old Enemy è un’altra missione elite opzionale nelle vicinanze. Vi viene richiesto di uccidere High General Abbendis:
- Livello 72 Elite Humanoid
- Immune a effetti che impediscono i movimenti, fear, ecc.
- HPs: 96,000
- Colpisce: ~3k su Cloth
Anche qui vi conviene ingaggiare un Tank e un Healer.
La trovate nella grande cattedrale di New Hearthglen (70,76). C’è un elite di livello 80 accanto a lei ma non interviene quando attirate Abbendis, quindi non preoccupatevi.
Se non riuscite a fare questa missione andate avanti con la guida ma date un’occhiata ogni tanto se c’è qualche richiesta di aiuto per [73] My Old Enemy e [74] The Plume of Alystros. Queste missioni non hanno seguito e non ha molta importanza se le fate ora o un’altra volta.
Tornate a Wyrmrest Temple.
Chiedete a Tariolastrasz di mandarvi all’ultimo piano del palazzo.
Consegnate [74] Seeds of the Lashers, accettate [74] That Which Creates Can Also Destroy.
Tornate al piano terreno di Wyrmrest Temple.
Cercate Lauriel Trueblade (60,55).
Consegnate [72] Speak with your Ambassador, accettate [74] Report to the Ruby Dragonshrine.
Andate all’estremità nordoccidentale del tempio e troverete Nethestrasz (60,52).
Prendete il nuovo Flight Path.
Tornate in volo a Wintergarde Keep.
Al punto di atterraggio dei Gryphon fate click destro su Winterguard Gryphons che vi porterà a Thorson’s Post (90,46). Dopo l’atterraggio consegnate in [73] Into Hostile Territory, accettate [73] Steamtank Surprise.
==Nota== Questa zona è vicinissima a Kreug Oathbreaker. Se vedete che qualcuno sta formando un gruppo, unitevi.
1. E adesso una missione divertente. Leggete bene il paragrafo prima di saltare in un Tank.
Salirete su uno Steam Tank e andrete a caccia di Plague Wagons. Stateci vicino e usate l’Abilità #3.
Per difendervi usate prima l’Abilità #2 e poi l’Abilità #1 sui bersagli ghiacciati per danneggiarli ancora di più.
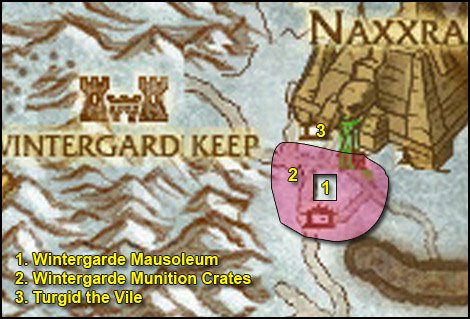
Dopo aver distrutto 6 Plague Wagons andate a ovest a Wintergarde Mausoleum (86,50) e usate l’Abilità #4:
Siete pronti, salite sul Tank e divertitevi!
Scendete nel Wintergarde Mausoleum, consegnate [73] Steamtank Surprise, accettate [73] Scattered To The Wind.
2. Uscite dal Mausoleum e cercate Wintergarde Munitions Crates. Si trovano attorno al Mausoleum.
Raccogliete 8 Wintergard Munitions.
3. Andate alla fortezza in rovina a poca distanza dal Mausoleum in direzione nordovest (86,47). All’interno vi aspetta Turgid the Vile.
 Evidenziatelo e fate click destro su Seeds of Nature Wrath.
Uccidetelo.
4. Tornate a Wintergarde Mausoleum.
Consegnate [73] Scattered To The Wind, accettate [73] The Chain Gun And You.
Guardate a est e troverete due 7th Legion Chain Guns. Fate click destro su una di esse.
Per facilitare questa missione vi suggerisco di zoomare la vista in prima persona, ciò vi faciliterà a prendere la mira (tenete premuto il tasto destro del mouse e mirate con il mouse).
E’ facile: Usate l’Abilità #2 ed un Injured 7th Legion Soldier apparirà nella fossa dei Ghoul e cercherà di correre verso di voi. Quello che dovete fare è abusare dell’Abilità #1 e contemporaneamente mirare sul terreno attorno al soldato. Così facendo ucciderete chiunque cerchi di avvicinarsi al soldato permettendogli di raggiungervi sano e salvo.
Liberate 8 Injured 7th Legion Soldiers con il metodo che vi ho spiegato sopra.
Consegnate [73] The Chain Gun And You, accettate [73] Plunderbeard Must Be Found!
Accettate anche [73] Breaking Off A Piece da Yord “Calamity” Icebeard.
Non è necessaria alcuna mappa per i prossimi passi.
1. Scendete le scale a sudovest. Entrate nella prima porta alla vostra destra, ripulite il fondo di questa stanza e uccidete Necrolors X’avius.
2. Tornate al corridoio principale e andata nella sala opposta. Fate pulizia fino a Necrolord Horus e uccidetelo.
3. Tornate al corridoio principale e proseguite tenendovi sulla sinistra fino alla stanza a sudovest. Ripulite la stanza fino in fondo e sul retro troverete Plunderbeard. Consegnate [73] Plunderbeard Must Be Found! e accettate [73] Plunderbeard’s Journal.
4. Inoltratevi nel tunnel e arriverete in un’altra cripta con Dreadbone Constructs e Wailing Souls.
Uccideteli finché non trovate tutte e 4 Pages of Plunderbeard’s Journal.
5. Tornate dai personaggi che vi hanno dato le missioni e consegnate:
- [73] Breaking Off A Piece
- [73] Plunderbeard’s Journal, get [73] Chasing Icestorm: The 7th Legion Front
Go back to Wintergarde Keep.
Sell junk, repair and re-stock food/drink.
Go to the inn and make it your home location.
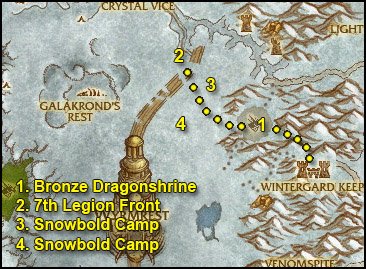
1. Exit Wintergarde Keep by the northern gate, then ride northwest to the Bronze Dragonshrine (72,38). We’re about to trigger an event where you’ll help your “Future You” to defeat waves of dragons.
Just let your Future You tank, and kill things one at a time to be safe. If you die it doesn’t matter, just run back. Your “Future You” will finish the event, you’ll get the quest complete message.
 Right-click the Hourglass of Eternity from your inventory to start the event.
2. Go northwest to the 7th Legion Front (65,28). Turn in [73] Chasing Icestorm: The 7th Legion Front, get [73] Chasing Icestorm: Thel’zan’s Phylactery.
Also get [73] Pest Control from Duane.
==Note== From now on kill any Magnataur or Snobold you see on your way.
3. Go southeast to the snobold camp at (70,31).
Kill all the Snobolds you can find here.
Also look in the skies for a Reanimated Frost Wyrm.
Target it and right-click the Seeds of Nature Wrath, then kill it.
If you don’t see any wyrm here, it means someone else killed it recently, don’t worry though, there are many others southwest of here, along the path of giants, make sure you kill one later when we go back to Wyrmrest Temple.
4. Go southwest to another snobold camp (65,44).
Finish [73] Pest Control here. There’s also a Reanimated Frost Wyrm flying over this area, in case you still need to kill one.
5. Go back to the 7th Legion Front. Turn in [73] Pest Control, get [73] Canyon Chase.
Now we’re going to kill Icestorm, a level 73 elite wyrm. Read the next paragraph before you talk to “Wyrmbait“.
Wyrmbait will fetch Icestorm for you. All you have to do is stand aside and let the NPCs tank for you and let them build some threat.
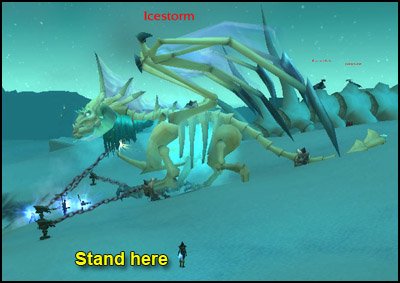
Once Icestorm is down to 50% HP or so, start attacking it. Stay on its side to avoid the breath. If you do this properly, Icestorm should never attack you. If you got an ability to lower or reset your threat, use it, that way you can start attacking Icestorm earlier.
==Note== Icestorm is NOT immune to frost, surprisingly.
You should be ready now, talk to “Wyrmbait“, tell him to go fetch Icestorm.
Kill Icestorm and Thel’zan’s Phylactery should appear on the floor:
Loot it.
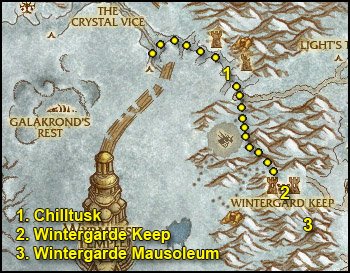
1. Go north to the canyon entrance at (67,24). Follow those running snobolds east and they’ll lead you to their boss, Chilltusk (72,28).
Kill him and loot the Emblazoned Battle Horn.
 Right-click it to start [73] Disturbing Implications.
2. Hearthstone to Wintergarde Keep.
If your stone is not up, just go to the other end of the canyon and then ride south/southeast back to Wintergarde Keep.
Go to High Commander Halford Wyrmbane, turn in [73] Chasing Icestorm: Thel’zan’s Phylactery, get [73] Finality.
3. Go southeast to the Wintergarde Mausoleum at (82,51). Please note that this is not the same mausoleum as the one we went in earlier.
Go inside, turn in [73] Finality. Before you get the follow up, read the following lines.
The next quest will trigger an event. All you have to do is stay behind the guards when the fight begins, and then help them kill the minions of Thel’zan, and after that help them kill Thel’zan himself.
Once you’re ready, get [73] An End And A Beginning.
If you’re sucessful, go back to Wintergarde Keep, turn in [73] An End And A Beginning, get [73] To Fordragon Hold!
Fly to Wyrmrest Temple.
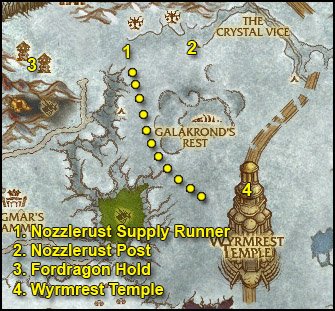
1. Follow the dots on my map until (48,24). There you should find a Nozzlerust Supply Runner, get his quest [74] Return to Sender.
2. From there ride east to Nozzlerust Post (55,24). Turn in [74] Return to Sender, get [74] Stocking Up. Also get the two other quests:
- [74] Shaved Ice
- [74] Nozzlerust Defense
3. Ride west and then south to Fordragon Hold. There’s a narrow path leading up to it at (43,29).
Get the new flight path.
Follow the path west towards the highest tower, there you’ll find Highlord Bolvar Fordragon.
Turn in [73] To Fordragon Hold! and get the follow up [74] Audience With The Dragon Queen.
Go to the gryphon master, fly to Wyrmrest Temple.
Turn in [73] Disturbing Implications, get [73] One of a Kind from Aurastrasza, who resides at the bottom floor of Wyrmrest Temple.
Go to Tariolastrasz and ask him to fly you to the top floor. Turn in:
- [75] Mystery of the Infinite
- [74] Audience With The Dragon Queen, get [74] Galakrond and the Scourge
Turn in [74] Galakrond and the Scourge at Torastrasza and get [74] On Ruby Wings.
4.  Right-click the Ruby Beacon of the Dragon Queen.
A Wyrmrest Vanquisher will fly down to you. Right-click it to climb it.
Now things get fun. See, you can use this Wyrmrest Vanquisher everywhere in the Dragon Wastes, which means we basically have a flying mount for a big chunk of the map, and we’re going to make the most of it. Just remember to always fly low, so that you don’t die if the drake decides to drop you off without a warning and without a parachute (it can happen :p).
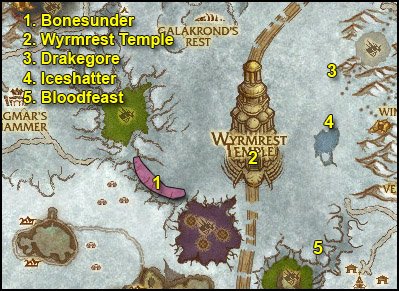
1. Fly west to a canyon at (51,58). Look for Bonesunder, a magnataur who patrols the ledge above this canyon, going in between the above location and the azure dragonshrine.
He’s elite and immune to all forms of cc but he only has 25K HP and doesn’t hit too hard as long as you avoid his special ability: Bone Crack. So just burn him down quickly and you should be fine, use cooldowns and potions if needed. The only dangerous ability he has is Bone Crack. When he casts that, run away quickly and it won’t hit you.
Loot the Emblazoned Battle Horn.
2. Summon your drake again and fly back to Wyrmrest Temple, turn in [73] One of a Kind, get the follow up [73] Mighty Magnataur.
3. Summon your drake, fly northeast to (68,41), there you’ll find a named magnataur called Drakegore, he patrols up and down around this spot.
He’s elite but soloable, doesn’t hit too hard, can be snared, stunned, feared, rooted. He also has an aura which does 300 fire damage to enemies in his melee range, nothing too bad.
4. Ride south to (67,50). There you’ll find another named magnataur, Iceshatter. He roams around the frozen lake in this area.
He’s more tricky to kill than the previous one. He’s immune to movement impairing effects so clothies might have a little bit of trouble, however he doesn’t much hit points so you can burn him down before he kills you.
He periodically casts Pulsing Shards. This is very dangerous and can’t be interrupted. Either run away while he channels it or use something like cloak of shadows, divine shield, ice block.
I personally had no troubles soloing it with my frost mage wearing only quest greens. I sent my water elemental first and let him tank as much as possible, used icy veins and a trinket and burned him down as fast as possible.
5. Summon your drake and fly south to (67,70). There you should find another magnataur called Bloodfeast.
That one is also tricky, immune to all forms of cc. He summons maggots which heal him up. The maggots are immune to AoE abilities, so you’d have to target them and kill them one by one (they got 1000HP). By the time you’d be done with that, he’d summon another round of maggots. So here is the strategy: Ignore the maggots, burn him down as fast as you can.
Worked just fine for me even with characters wearing quest greens.
Summon the drake, fly back to Wyrmrest Temple. Turn in [73] Mighty Magnataur, get [74] Reclusive Runemaster.
Now we’re all set for most of the group quests of Dragonblight. These can’t be soloed by most classes, so look for a group for those quests while you keep on following the guide.
Here’s a list of the quests you need to find a group for:
- [73] My Old Enemy
- [74] The Plume of Alystros
- [74] Wanted: High Shaman Bloodpaw
- [74] Wanted: Kreug Oathbreaker
- [74] Wanted: Onslaught Commander Iustus
- [74] Reclusive Runemaster
Once you finish [74] Reclusive Runemaster (Defeat Dreg’mar), get the follow up [74] Wanton Warlord and also look for a group for it (Kill Grom’thar).
Here is the map of the group quests again, so that you don’t have to scroll up too much.
You can get there quickly thanks to your Wyrmrest Vanquisher, so just keep on following the guide normally and whenever you find a group for one of the above quests, summomn your drake and fly there!
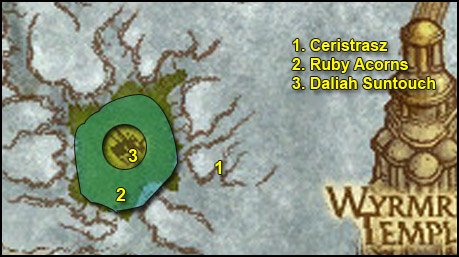
1. Summon your Wyrmrest Vanquisher. Fly northwest to Ceristrasz (52,50).
Turn in [74] Report to the Ruby Dragonshrine, get [74] Heated Battle.
Very easy quest, you simply have to go down in the canyon and help the Alliance forces to kill what’s on the list for your quest. You just have to do a little bit of damage on every mob to get the kill credit. Just stay behind the NPCs and you’ll be fine.
Go back to Ceristrasz, turn in [74] Heated Battle, get [74] Return to the Earth.
2. Summon your drake. Fly to the southern canyon (47,53).
Look for a Ruby Acorn.

Loot it.
Look for a Ruby Keeper (those dead dragons in flames).
 Target it and right-click the Ruby Acorn.
Repeat this step 6 times.
Get out of the dragonshrine, summon your drake and fly back to Ceristrasz. Turn in [74] Return to the Earth, get [75] Through Fields of Flame.
3. Summon your drake, fly west towards the huge tree in the middle of the dragonshrine. The entrance is on the southeastern side of the tree at the bottom of it (48,50).
Inside you’ll find Daliah Suntouch. Kill her.
Loot the Ruby Brooch.
 Right-click the Ruby Brooch, get the quest [75] The Fate of the Ruby Dragonshrine.
Now kill 6 Frigid Necromancers, they can be found all around the tree.
Get out the dragonshrine, summon your drake and fly back to Ceristrasz.
Turn in [75] Through Fields of Flame, get [75] The Steward of Wyrmrest Temple.
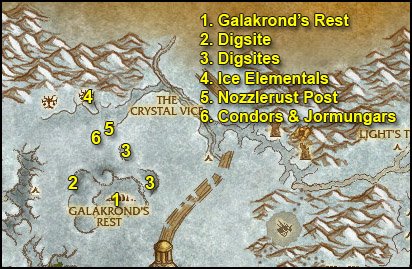
1. Summon your Wyrmrest Vanquisher, fly north to Galakrond’s Rest (56,35). Go down in the pit and use Ability #1 and #2 to kill Wastes Scavengers (you can actually use both at the same time). Whenever your drake needs mana or healing, use Ability #3 while being close to a Wastes Scavenger.
Kill 30 Wastes Scavenger that way.
==Note== Before we go kill Grand Necrolord Antiok, equip your PvP trinket if you got one with you, because he casts a 10 second fear and a 10 second Death Coil, quite annoying and it can potentially get you killed.
Then go to the peak at the northwestern tip of Galakron’s Rest, kill the big giant called Thiassi and then land next to his corpse and dismount. Get ready to fight Grand Necrolord Antiok, a level 75 warlock.
After he dies, the Scythe of Antiok will appear on the floor.
Loot it.
Summon your Wyrmrest Vanquisher again and fly away before the giant respawns.
2. Fly to a digsite just west of Galakron’s Rest (52,31).
Click the Leave Vehicle Button
Kill everything in the camp and look for composite ore.
3. Once you’ve looted all the composite ore from this spot, go northeast to the next digsite (57,28). Kill everything and loot all the ore there. You should normally be done with [74] Stocking Up and [74] Nozzlerust Defense.
If not, there’s another digsite just southeast of this one.
4. Summon the drake again, fly northwest to Coldwind Heights (54,20). Kill Crystalline Ice Elementals until you’ve looted 4 Iceshard Cluster.
5. Go south unil you’re back in the Dragon Wastes, summon the drake, fly east to Nozzlerust Post. Turn in:
- [74] Stocking Up
- [74] Nozzlerust Defense
- [74] Shaved Ice, get [74] Soft Packaging
6. Go to the area southwest of Nozzlerust Post (53,25).
Kill Jormugar Tunnelers / Dragonbone Condors until you’ve looted 12 Thin Animal Hide.
Go back to Nozzlerust Post, turn in [74] Soft Packaging, get [74] Something That Doesn’t Melt.
Also get [74] Hard to Swallow from Xink.
1. Go to the area east of Nozzlerust post and go to the dragon skull at (57,24).
Look for a Splintered Bone Chunk around this skull. They look like this:
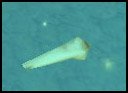
Right-click and loot them.
Also, while in this area, look for a Hulking Jormungar. Bring it down to 80% HP and a message will appear:

 Right-click the Potent Explosive Charges.
This will blow up the Hulking Jormungar and a lot of meat will fly all around its corpse. Loot 6 Seared Jormungar Meat.
2. Go the big dragon skeletons southeast of here (60,27). Loot all the bone chunks you can find around it.
3. Go to the next dragon skeleton further east (63,28). Loot all the bone chunks you can find around it.
4. Go northeast to the 7th Legion Front (64,28). Turn in [73] Canyon Chase.
5. Now just revisit the previous steps until you have 12 Splintered Bone Chunks.
Once you’re done, summon your drake and fly back to Nozzlerust Post, turn in:
- [74] Something That Doesn’t Melt
- [74] Hard to Swallow
Get:
- [74] Harp on This!
- [74] Lumber Hack

1. Go northwest to Coldwind Heights again.
 Right-click Xink’s Shredder Control Device.
Right-click the shredder to take control of it.
Go westwards while doing the following two things:
- Kill harpies on your way (Use Ability #1 and #2 – Also use Ability #4 whenever your shredder lacks 5000 HP or more)
- Look for trees with a cross:
Use Ability #6 while standing close to them.
Ability #3 is just a 10 sec run speed boost, use it at will.
2. Keep going west and then northwest and you’ll find the Mistress of the Coldwind (45,10).
She’s elite but it’s no problem for you and your shredder.
==Note== Should your shredder get destroyed, you can re-summon one again.
Once you’ve killed the Mistress of the Coldwind, finish gathering lumber and killing harpies until you finish both quests.
3. Ride back to Nozzlerust Post, turn in:
- [74] Harp on This!
- [74] Lumber Hack
Get [74] Stiff Negotiations.
4. Go east until you enter the Dragon Wastes, summon your Wyrmrest Vanquisher, fly northeast to Zort (59,18). Easy to spot thanks to the yellow “?” on your minimap. Don’t worry about the warning message you get when you get out of the Dragon Wastes, you should have more than enough time to land next to Zort before your drake drops you.
Turn in [74] Stiff Negotiations, get [74] Slim Pickings.
5. Follow the trail north while avoiding the elite giants and then go northwest to the Ice Heart Cavern, inside the cave you’ll find a Ravaged Crystalline Ice Giant (56,12) close to the entrance.
Right-click it to get a Sample of Rock Flesh.
Get out of the cave, ride back to Zort.
Turn in [74] Slim Pickings, get [74] Messy Business.
Also get [74] Stomping Grounds from Ko’char the Unbreakable.
No map needed for this circuit.
1. Go back to the Ice Heart Cave.
 Put Zort’s Scraper on an action bar.
Kill Ice Heart Jormungar Feeders and use Zort’s Scraper whenever they cast Corosive Spit on you, this will remove the dot and prevent a lot of damage, and it will also complete the other quest.
Kill 8 Ice Heart Jormungar Feeders and remove the Corosive Acid twice, then ride back to Zort.
Turn in:
- [74] Messy Business, get [74] Apply This Twice A Day
- [74] Stomping Grounds
- [74] Apply This Twice A Day
Get:
- [74] Really Big Worm
- [74] Worm Wrangler
[74] Really Big Worm cannot be soloed by most classes. The mob you have to kill, Rattlebore, is at the very end of the Ice Heart Cave. So just add this to your list of group quests and shout for a group regularly.
Rattlebore stats:
- 72,000 HP
- Hits for 2K on clothies
- Immune to all forms of cc
Don’t forget to drink Zort’s Protective Elixir before you fight him, it will make things easier.
I recommend going there with 3 players to make it easier, including a tank type and a healer type.
Anyway, just add this quest to your list of group quests to do in Dragonblight, keep looking for a group for it regularly and continue with the guide in the mean time.
When you find a group for it, don’t forget to do the other quest on the way while you’re in the caves. It’s quite easy, all you have to do is get close to a Jormungar Spawn and then:
 Use the Sturdy Crates on it.
Then just right-click the crate on the floor. Repeat this 3 times. Can easily be done while clearing the way to Rattlebore.
Once you’ve finished those two quests, go back to Zort and turn in:
- [74] Really Big Worm
- [74] Worm Wrangler
1. Follow the trail southwest until you’re back in the Dragon Wastes. Summon your Wyrmrest Vanquisher.
Fly to the Obsidian Dragonshrine towards the cave.
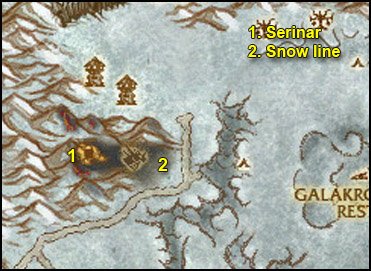
You’ll find Serinar inside the cave called the Maw of Neltharion (35,30).
Turn in [74] The Obsidian Dragonshrine, get:
- [74] No One to Save You
- [74] No Place to Run
2. Clear the way out of the Obsidian Dragonshrine, until the point where the path becomes snowy again (42,32).
Get back to full HP/mana.
 Right-click the Destructive Wards.
Defend the ward until you get the complete message.
Kill what you still need for [74] No One to Save You and go back to Serinar. Turn in:
- [74] No One to Save You
- [74] No Place to Run, get [74] The Best of Intentions
3. Serinar will give you a disguise.
Go west through the cave until you find Rothin the Decaying. You’ll get the complete message, then go back to Serinar.
==Note== If you lose the disguise, go back to Serinar and talk to him for a new one.
Turn in [74] The Best of Intentions, get:
- [74] Culling the Damned
- [74] Defiling the Defilers
4. Clear the way west towards the end of the cave while looking for Necromantic Runes.

Right-click them to destroy them.
Kill what you need for [74] Culling the Damned.
Go back to Serinar. Turn in:
- [74] Culling the Damned
- [74] Defiling the Defilers, get [75] Neltharion’s Flame
5. Go back to Rothin the Decayed at the end of the cave.
 Right-click Neltharion’s Flame.
Kill Rothin the Decayed.
Go back to Serinar, turn in [75] Neltharion’s Flame, get [74] Tales of Destruction.
Hearthstone to Wintergarde Keep.
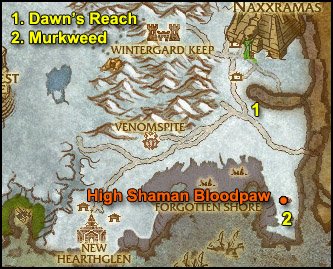
1. Mount up, get out of Wintergarde Keep and ride southeast to Dawn’s Reach (87,57).
Turn in [72] Orik Trueheart and the Forgotten Shore, get [72] The Murkweed Elixir.
Also get [74] The Call Of The Crusade from Tilda Darathan.
2. Ride southeast to Eldritch Heights (90,68). Look for Murkweed.
==Note== While you’re here, try to see if there’s any group up for killing High Shaman Bloodpaw for the quest [74] Wanted: High Shaman Bloodpaw. He’s really close so might as well kill two birds with one stone. Some classes reported being able to solo it, but I wouldn’t risk it, duo’ing is already much more realistic. 3+ is best.
Loot 5 Murkweed.
Go back to Dawn’s Reach.
Turn in [72] The Murkweed Elixir, get [72] The Forgotten Tale.
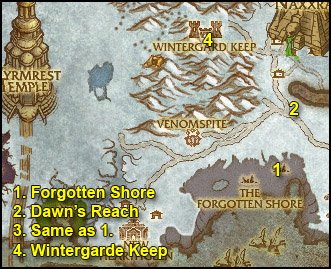
1. Ride southwest to The Forgotten Shore (85,67)
 Right-click the Murkweed Elixir.
Talk to a Forgotten Peasant, a Forgotten Rifleman, a Forgotten Footman and a Forgotten Kinight, in any order.
2. Cancel the Murkweed Elixir buff (it’s called “Binding Life” and looks like a black potion).
Ride back to Dawn’s Reach.
Turn in [72] The Forgotten Tale, get [72] The Truth Shall Set Us Free
3. Ride back to the Forgotten Shore. At (87,66) you should find a blue rune drawn on the floor, called “Forgotten Ruins”.
 Right-click Orik’s Crystalline Orb from your inventory.
Watch the cool script and you’ll complete the quest.
Go back to Dawn’s Reach, turn in [72] The Truth Shall Set Us Free, get the follow up [72] Parting Thoughts.
4. Ride to Wintergarde Keep. Go to Zelig the Visionary and turn in [72] Parting Thoughts, get [73] What Secrets Men Hide.
Two new quests should be available:
- [73] The Return of the Crusade?
- [73] The Path of Redemption
Get them both.
Sell junk, repair and re-stock food/drink.
You should be level 75 by now.
Level 75
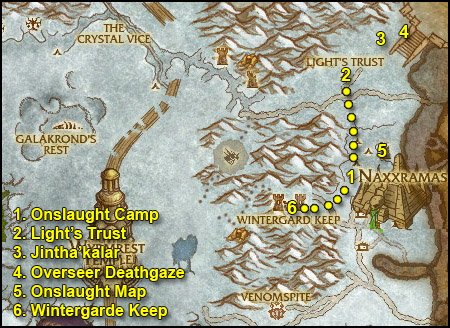
1. Get out of Wintergarde Keep by the eastern gate and ride northeast to Onslaught Base Camp (84,42). Kill Scarlet NPCs while going north through the camp.
Once you’re on the other side of the camp, go to the next step, even if you haven’t killed 20 Scarlet NPCs yet.
2. Ride north to Light’s Trust (84,26). Turn in [74] The Call Of The Crusade, get [74] The Cleansing Of Jintha’kalar.
3. Go northeast to Jintha’kalar (88,20). Kill every scourge on your way.
4. Find Overseer Deathgaze (90,19) at the very eastern tip of this camp.
Target him and right-click the Seeds of Nature Wrath.
Kill him.
Kill stuff in the area until you have 15 scourge kills.
Go back to Light’s Trust, turn in [74] The Cleansing Of Jintha’kalar, get [75] Into the Breach!
5. Ride south back to Onslaught Base Camp. This time clear to the tower in construction, on the eastern side of the camp (88,38).
Inside you’ll find the Onslaught Map.
Loot it.
Kill Scarlet NPCs until you loot The Path of Redemption and have 20 kills.
6. Ride back to Wintergarde Keep. Turn in:
- [73] The Return of the Crusade?
- [73] The Path of Redemption
- [73] What Secrets Men Hide, get [73] Frostmourne Cavern
1. Take the northern exit and go to the Dragon Wastes, summon your ruby drake and fly to Frostmourne Cavern, as shown in the video below (you don’t need to watch the whole video, only until the point where I’m in the cave about to start the script)
Video: [73] Frostmourne Cavern
At the end of the cavern you’ll find the Altar of Frostmourne.
Right-click Zelig’s Scrying Orb.
Enjoy the script, then you’ll get a quest complete message.
2. Get out of the cave, ride back to the dragon wastes, summon your ruby drake. Fly back to Wintergarde Keep.
Turn in [73] Frostmourne Cavern.
Fly to Wyrmrest Temple.
==Warning== We’re about to turn in the quest [74] On Ruby Wings. That means we won’t be able to summon the Wyrmrest Vanquisher to travel anymore. So if you still have some of the group quests unfinished, try to do them now!
Summon your drake. Go to Tariolstrasz on the western side of the temple. Turn in [75] The Steward of Wyrmrest Temple, get [75] Informing the Queen.
Summon your drake and fly to the top floor, where Alexstrasza is. Turn in:
- [74] That Which Creates Can Also Destroy
- [74] Tales of Destruction
- [75] The Fate of the Ruby Dragonshrine
- [75] Informing the Queen, get [74] Report to Lord Afrasastrasz
- [74] On Ruby Wings, get [74] Return To Angrathar
Ask Torastrasza to fly you down to the middle floor.
Turn in [74] Report to Lord Afrasastrasz, get [74] Defending Wyrmrest Temple.
Go on the balcony and talk to a Wyrmrest Defender, click on the text and you’ll ride it.
- Ability #1: Direct damage, use everytime it’s up.
- Ability #2: DoT. Use it once at the start of a fight.
- Ability #3: Self heal
- Ability #4: Use it to escape when you get attacked by several dragons at the same time
- Ability #5: Go inside the big beam in the Azure Dragonshrine (just southwest of Wyrmrest Temple) and use it once.

Fun quest, kill dragons. Not much else to say, it’s rather easy, just escape and heal up if things get dangerous.
This is a daily quest by the way, and you get an achievement if you finish it in under 2 minutes.
When done, go back to Lord Afrasastrasz and turn in [74] Defending Wyrmrest Temple.
Ask him to fly you back to the ground level.
Go to the flightmaster and fly to Fordragon Hold.
Go to Highlord Bolvar Fordragon, turn in [74] Return To Angrathar.
Enjoy the super cool cinematic.
Mount up, ride to the Wrathgate (38,19). If you want to watch the cinematic again, you can talk to Alexstrasza and click on the text.
Get the quest [74] Reborn From The Ashes.
Look for Fordragon’s Shield, it’s on Alexstrasza’s left.
Loot it.
Hearthstone back to a main city and go to Stormwind.
Go to King Varian Wrynn in Stormwind Keep. Turn in [74] Reborn From The Ashes, get [74] Fate, Up Against Your Will.
Talk to Lady Jaina Proudmoore, who stands next to the king. Tell her you’re ready to go to Orgrimmar.
In Orgrimmar, turn in [74] Fate, Up Against Your Will, get [74] A Royal Coup.
Take the portal back to Stormwind.
Turn in [74] A Royal Coup, get [74] The Killing Time.
Take the portal to the Undercity.
Turn in [74] The Killing Time, get [74] The Battle For The Undercity.
Speak to King Varian to activate the event, then wait until the timer starts. Now all you have to do is follow King Varian Wrynn through this amazing quest. You’re pretty much unkillable thanks to the auras you get from King Varian and Jaina, so have fun and help them fight till the end of the event.
Once back in Stormwind, turn in [74] The Battle For The Undercity.
While you’re here, go train your new skills, visit the AH, etc.
Once you’re ready to go again, go to Stormwind Harbor, take the boat to Borean Tundra (northernmost dock) and fly to Wintergarde Keep, Dragonblight.
Try a last time to get a group for the group quests of Dragonblight, if you don’t find one, just abandon those groups quests now, we are done with Dragonblight. You can come back here at level 80 to finish those group quests.
In Wintergarde Keep, go to the gryphon landing site, dismount.
Get [73] The Hills Have Us, it will send you to Grizzly Hills. The chapter ends here, move on to my next chapter: Grizzly Hills.
I hope you enjoyed this guide. If you want to return the favor, please try to contribute!.
-Jame
© 2008 Copyrights www.wow-pro.com All Rights Reserved