 by Jame
Introduction
The aim of this guide is to help you level your Death Knight as fast as possible, while having as much fun as possible and doing as many quests as possible. Thanks to optimized quest circuits, you will get XP at a very high rate and never feel like you’re running around too much. I will also recommend which talents to take, which gear upgrades to get and where to find them. I’ll do my best to help you know your class better. As the Death Knight class is new and in constant evolution, I apologize in advance if some of the information I provide is outdated, and I kindly ask you to leave a comment if you find something that needs updating. I’ll do my utmost to keep this guide as up-to-date as possible, until it reaches perfection.
Basic rules
- Don’t waste your time trying to find groups for questing, you can solo everything that is described in this guide unless I say otherwise. Only group with someone when it’s not gonna be a waste of time (e.g: meeting the person at the other end of the map to show him the way to where your quest is, that is a waste of time)
- Try to always log out in an inn or in one of the major cities when you take a break.
- If I don’t mention a quest, 99% of the time it doesn’t mean I forgot it, it means I consider it a waste of time, so don’t take it thinking I forgot a quest here and there, I most likely didn’t. Also don’t abandon a quest unless I say you should.
- When I say you should bind somewhere (make an inn your home location), it’s for a good reason, and it will save you much time. Don’t change your home location unless I say so.
Useful Addons
To get the most out of my guide, you should get an addon which displays coordinates, because I use them to describe locations in my guide (x,y). You can use any addon you like, but here’s a very simple one I use.
Recommended
- DMiniCoords – A simple box which displays coordinates, left-click it to move it where you like.
Optional
Below is a list of other addons I use, this is 100% optional though, it’s mostly for people who are curious to know which addons I use:
- Bartender4 – A great action bar addon.
- X-Perl UnitFrames – Very nice, highly customizable unit frames.
- Quartz – The best casting bar addon out there, imo.
- Scrolling Combat Text – I just don’t like the default UI Floating Combat Text.
- Deathknight.info Runes – A cool addon to help you track your rune cooldowns.
Side Note: In case you don’t know how to install add-ons, simply download an addon from one of the links above and unzip it. Then drag the unziped folder in your Addon folder (full path is c:\Program Files\World of Warcraft\Interface\Addons). Then, restart World of Warcraft and it should be working.
If it isn’t working, you might need to log out to your character selection screen and click on “Addons” in the lower-left corner. Tick the box that says “Load out of date Addons”. Re-launch WoW.
Shopping List
If you can create a Death Knight, it means you already have another level 55+ character, so I’m assuming you got a little bit of gold aside and that you can do some shopping for your Death Knight. If you’re broke, don’t sweat it, everything listed below is optional, you’ll just have an easier time if you buy it.
Start checking the auction house early and regularly to increase your chances of getting the listed items before it’s time to use them in the guide.
Keep everything on a mule, and mail them to your Death Knight as soon as he’s done with the starting zone quest line. Then leave them in the mail. I’ll tell you when to grab the items from the mailbox.
Bags
Having a lot of bag space is really important. We will go for long xp circuits far from any vendor. You should try to get 18-slot bags, which can be bought from the AH for about 40g. If you can’t afford it, then at least get 16-slot bags, they go for 7g at the AH.
Light’s Hope Chapel Turn Ins
- 30 Crypt Fiend Part for [60] Cryptstalker Armor Doesn’t Make Itself… – Needed at Level 59
- 30 Core Of Element for [60] The Elemental Equation – Needed at Level 59
- 30 Dark Iron Scrap for [60] Binding The Dreadnaught – Needed at Level 59
- 30 Savage Frond for [60] Savage Flora – Needed at Level 59
Aldor Turn ins
- 8 Dampscale Basilisk Eye for [65] Voren’thal’s Visions – Needed at level 64
Where do I farm that?
Equipment
Check this shopping list for gear upgrades you can buy to help you level. It’s 100% optional too of course, but I really recommend buying the Glyphs at least.
Talent Build – Updated for 3.0.8
I’ll be recommending an Unholy build in my guide. I’ve done many tests during the beta and found out that I leveled faster with Unholy (Blood was pretty close though). It’s up to you to follow my advice or not, spec blood if it fits your playstyle better.
I’ll say where and when to take each talent point during my guide, everytime you get them. But here’s an overview:
Color Code
- Quests
- Items
- Locations
- Quest objectives to kill
- NPCs
- Class Specific Information
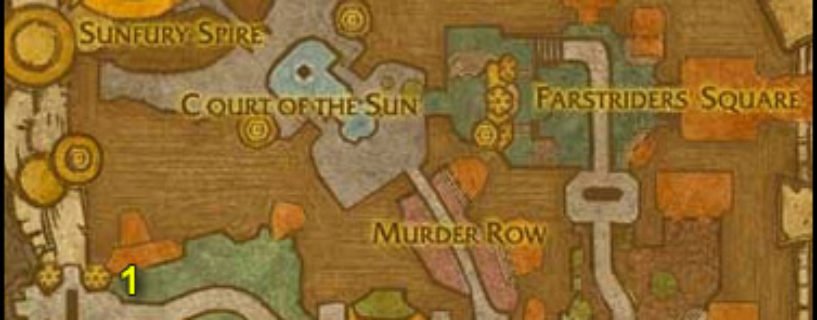
- Locs
The Guide:
Race selection
- My first advice is, pick a race you like, style is important!
- If you only care about fast leveling min/maxing, you can choose Orc for the increased Axe Expertise and the increased pet damage (ghoul). But ultimately, it’s not a big difference and other racials are also good depending on the situation.
Let’s get started!
So you just created your Death Knight and you are now in the Ebon Hold, with The Lich King standing right infront of you. The first thing you must do is type /laugh. Why? Because Death Knight laughs are awesome 😛
Done? Good. Now let’s get serious!
Get the quest [55] In Service Of The Lich King. I suggest to zoom out your minimap to the maximum, that way you’ll see the yellow “?” from far away on your minimap.
Go northwest to Instructor Razuvious, turn in the quest and get the follow up [55] The Emblazoned Runeblade.
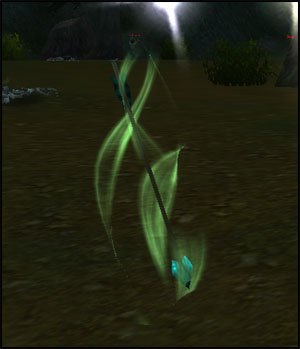
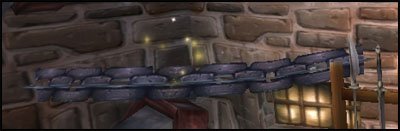
Now look for glowing weapon rack like the one in the picture below:
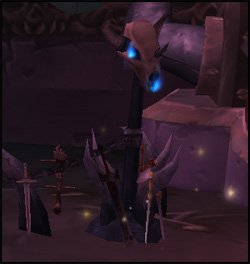
Right-click it to loot a Battle-worn Sword. Open your inventory and right-click the sword while standing next to a runeforge:
Go back to Instructor Razuvious, turn in the quest and get the follow up [55] Runeforging: Preparation For Battle.
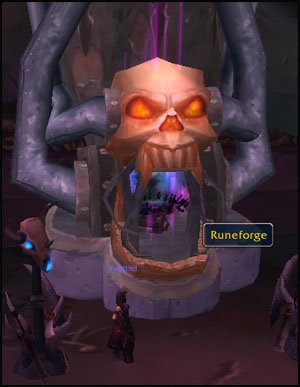
Go to the nearest runeforge, open your spellbook and click on runeforging:
Engrave your weapon with a Rune of Cinderglacier.
Go back to Instructor Razuvious, turn in the quest and get the follow up [55] The Endless Hunger.
Now time for our first fight. It’s pretty straight forward, use your attacks in this order:
Icy Touch –> Plague Strike –> Blood Strike –> Blood Strike –> Icy Touch –> Plague Strike –> Death Coil –> Restart the cycle
If one of your abilities get dodged or misses, keep re-casting it until it works. Your target must always have both the Icy Touch and the Plague Strike disease on before you use Blood Strike on them, that way you get the maximum damage out of Blood Strike.
Go down in the pit, right-click an Acherus Soul Prison, wait for the Unworthy Initiate to become attackable and kill it.
Go back to Razuvious, turn in and get the follow up [55] The Eye Of Acherus.
Go to The Lich King, turn in and get the follow up [55] Death Comes From On High.
To the left and right of The Lich King you should find an Eye of Acherus Control Mechanism. Right-click it.
Your ability bar will be replaced by a new bar with the eye’s abilities.
After a short trip down, you’ll get control on the Eye of Acherus. First, rise higher in the air to be out of firing range of any scarlet mob and then use Ability #3 to become invisible.
After that, find the first location we’re going to analyze: the New Avalon Forge.
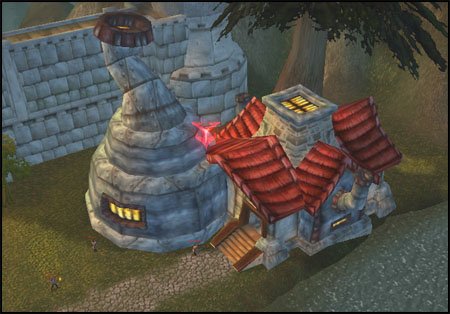
Very easy to spot thanks to the red arrow floating over it.
Use Ability #2 and try to target as many scarlet npcs as you can. This will summon ghouls on each of them to distract them while you use Ability #1 to analyze the building.
When done, rise up in the air and go invisible again. If the Eye of Acherus is low on health, you can wait a little for his HPs to regen.
On to the next building, just south of the forge, you’ll find The Scarlet Hold. Apply the same strategy.
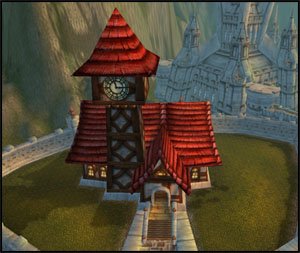
Directly west you’ll find the New Avalon Town Hall, analyze it:
Finally go directly south and you’ll find the Chapel of the Crimson Flame:
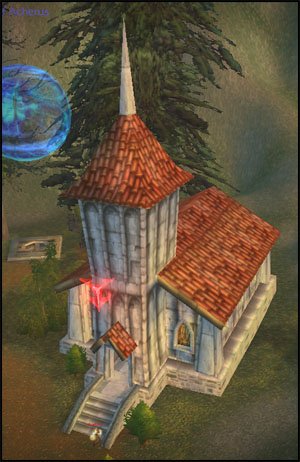
Analyze it and the quest should be complete.
Use Ability #5 and you’ll be back to your character. Turn in the quest, get the follow up [55] The Might of the Scourge.
A few paces behind The Lich King you’ll find a glowing pink teleporter. Step on it and you’ll be teleported to another floor.
Go northwest to Highlord Darion Mograine, turn in the quest and get the follow up [55] Report To Scourge Commander Thalanor.
Equip your new necklace: Bladed Ebon Amulet
Further northwest is another quest called [55] The Power of Blood, Frost and Unholy, complete it immediately.
Go back to the balcony (not the teleporter) and turn in the quest at Scourge Commander Thalanor. Get the follow up [55] The Scarlet Harvest.
Right-click one of the Scourge Gryphons and fly down to Death’s Breach.
Go a few paces south and turn in the quest at Prince Valanar, get the follow up [55] If Chaos Drives, Let Suffering Hold The Reins.
3 other quests should have appeared on your minimap now, get them all.
First thing, we’re gonna look around the camp for Death Knight Initiates:
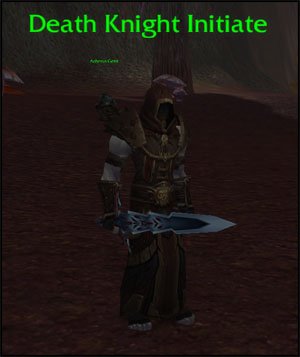
Right-click them, challenge them to a duel and defeat them. You can also challenge other players, but that’s more difficult. Repeat this 5 times. Use the food you have in your inventory if you’re low HP after a duel.
When done, go turn in [55] Death’s Challenge. You’ll get one talent point to spend as a reward. We’ll only put our points in the Unholy tree for now.
Spend your first talent point in Morbidity.
Time to kill stuff, finally!
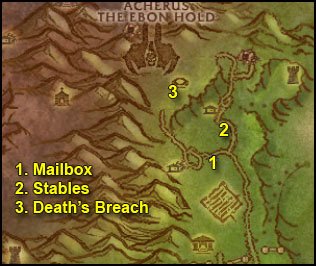
1. Go south down the path and then southeast towards the yellow “!” on your minimap while killing everything on the way and also picking up Saronite Arrows.
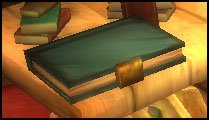
When you get to the yellow “!“, you’ll be infront of a mailbox with a scroll on top.
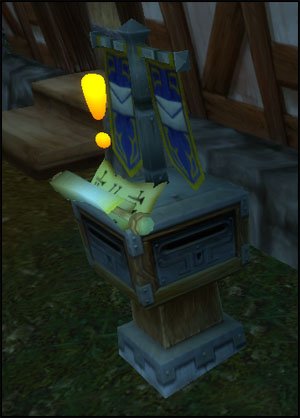
Right-click the scroll and complete the quest. You can then open the mailbox and get a book from it. It’s just lore though, you can read it if you want. I personally read it quickly and destroyed it, it can’t be sold.
After that go back to killing stuff and looting Sardonite Arrows until you finish both quests.
2. Once done, go to the stables, which are located on the northeastern part of the field.
Go to the nearest horse you can find and right-click it to mount it, then go back to Death’s Breach, you can use the horse’s Ability #2 to gallop.
3. Go to Salanar the Horseman, he stands right in the middle of Death’s Breach, then use the horse’s Ability #1 to deliver it to Salanar.
Turn in [55] Grand Theft Palomino and get the follow up [55] Into the Realm of Shadows.
Put your new talent point in Morbidity.
You’ll be in the shadow world after accepting this quest. Go down back in the fields and look for a Dark Rider of Acherus, kill it and then right-click his horse.
Ride back to Death’s Breach and once there, use Ability #1, Horseman’s Call. A few seconds later you’ll be back in the normal world.
 Click on the “Leave Vehicle” button, go to Salanar the Horseman and turn in the quest.
You can now summon your own Deathcharger. To do that, open the character window (“c” key), go to the Pets tab, drag the Acherus Deathcharger icon on a free action bar slot. Click it and voila!
Turn in:
- [55] If Chaos Drives, Let Suffering Hold The Reins
- [55] Tonight We Dine in Havenshire
It doesn’t matter which cloak you pick, I personally like the one with frost resistance, because it fits the rest of the equipment better.
Get the quest [55] Gothik the Harvester from Prince Valanar. Go to Gothik the Harvester and turn in the quest, get the follow up [55] The Gift That Keeps On Giving.
You should be level 56. Equip your newly acquired items:
Cloak: Shroud of the North Wind
Relic: Sigil of the Dark Rider
Ring: Valanar’s Signet Ring
Spend your talent points as follows:
- 1 in Morbidity
- 2 in Vicious Strikes
- 2 in Epidemic
Level 56
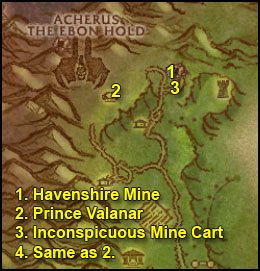
1. This time go down the path north then east and enter the Havenshire Mine (58,31).
 Search your inventory for the Gift of the Havester and put it on a hotbar.
Use the Gift of the Harvester on Scarlet Miners. Repeat this step until you have 5 ghouls under your control.
Go back to Gothik the Harvester, turn in the quest and get the follow up [55] An Attack Of Opportunity.
Equip your new trinket: Soul Harvester’s Charm
Put your talent point in Ravenous Dead.
2. Go to Prince Valanar, turn in the quest and get the follow up [55] Massacre at Light’s Point. Now comes a fun quest, I suggest reading the rest of point 2. before proceeding.
Outside of Havenshire Mine you’ll find an Inconspicuous Mine Car.
When you right-click it, you’ll be taken to a ship and will be facing 3 Scarlet Cannons.
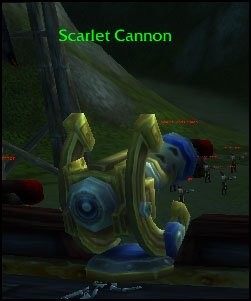
If you right-click one of them, you’ll take control of it and will this window will appear instead of your hotbars:

Ability #1 is your main ability, chain use it to kill as many Scarlet NPCs as you can. To aim, hold your mouse right-click button and move your mouse.
Ability #2 is to protect you. Whenever a few Scarlet NPCs make it close to you, use ability #2 to repell them.
Ability #5 is to escape. Use it once you’ve killed 100 Scarlet Defenders.
==TIP== Aim for the bridge leading to the ship every 2 or 3 shot to prevent them to get to you. If they do, there’s still Ability #2 anyway.
3. You should be more than ready now, go right-click the Inconspicuous Mine Car and have fun!
4. Go back to Prince Valanar, turn in [55] Massacre at Light’s Point, get the follow up [55] Victory At Death’s Breach!
Right-click on a Scourge Gryphon to fly back to Acherus.
Go to Highlord Darion Mograine, turn in and get the follow up [55] The Will Of The Lich King.
Equip your new items:
- Bracers: Plated Saronite Bracers
- Legplates: Engraved Saronite Legplates
Spend talent points as follows:
- 2 points in Ravenous Dead
- 2 points in Necrosis
Go to Lord Thorval (in the room just northwest of Mograine) and train your new skills:
Pestilence, Death Strike and Raise Dead.
Now things are starting to get interesting.
Raise Dead: Not much to explain, it summons a ghoul who fights for you. It’s great, the ghoul can take quite a lot of pain and deals a decent amount too.
Pestilence: this skill is very useful when fighting multiple enemies. Whenever you fight several enemies at the same time, choose a target and do this:
Icy Touch –> Plague Strike –> Pestilence
This will spread all the diseases to other nearby enemies, as long as they are close enough (about 20 yards).
Death Strike: Incredibly good skill. You’re gonna be much harder to kill from now on. The damage you do with it heals you once for each disease on your target. Needless to say, it’s better to use it after having diseased your target with Icy Touch and Plague Strike.
So from now on your attack cycle should look like this:
Icy Touch –> Plague Strike –> Death Strike –> Blood Strike –> Blood Strike –> Death Coil –> Death Strike –> Death Strike –> Blood Strike –> Blood Strike –> Death Coil –> Restart cycle
It might seem complicated, but it’s actually not. You’ll see that this rotation makes perfect sense as it uses all your cooldowns whenever they are up. You can try it on the practice dummies in Death’s Breach, close to the gryphon landing site. Of course, your enemies will die before you finish the full cycle most of the time, but that’s ok. Just try to get used to this, because dps cycles are a big part of the Death Knight class, and being able to perform them well will determine if you’re a good DK or a mediocre DK.
Go back to the Balcony and take a Gryphon ride down. Go to Prince Valanar, he’s at a new location closer to the cliff.
Turn in and get the follow up [55] The Crypt of Remembrance.
Go sell and repair at Hargus the Gimp (53,35), a few steps infront of Prince Valanar . Also buy some Corpse Dust from him (about 5), this will allow you to summon a ghoul even when there’s no corpse available.
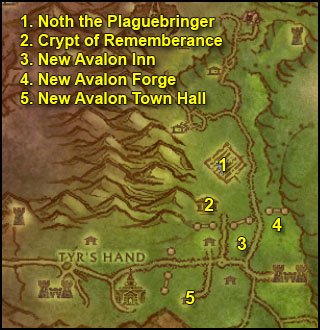
1. Mount up, ride south/southeast to Noth the Plaguebringer (56,52). Take his quest [55] The Plaguebringer’s Request.
2. You should see a yellow “?” on your minimap southwest of where you are. Go there, enter the Crypt of Rememberance (54,58) and turn in the quest.
Get [55] Nowhere To Run And Nowhere To Hide and [55] Lambs To The Slaughter.
3. Get out of the crypt and go southeast to New Avalon.
Kill everything on your way from now on. On your left-hand side after entering you should see a big building, the New Avalon Inn (58,65).
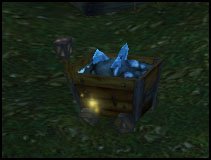
Go inside and go down to the basement cellar where you’ll find an Empty Cauldron, loot it.
4. Northeast of the inn you’ll find the New Avalon Forge (61,61).
Enter the building and loot an Iron Chain.
5. Mount up and ride southwest to the New Avalon Town Hall, a big building with a clock tower (53,71).
Go inside the Town Hall, kill Mayor Quimby and loot the New Avalon Registry.
Now just go out and kill stuff until you finish [55] Lambs To The Slaughter. You’ll find all the Citizens you need right outside the town hall (have some fun with pestilence).
Mount up and ride out of New Avalon.
First stop by Noth the Plaguebringer, turn in and get the follow up [55] Noth’s Special Brew.
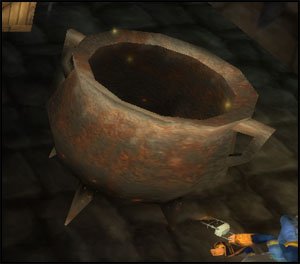
Go to the cauldron next to him and turn in the quest to get 5 of those cool potions. Feel free to overuse them, we’ll get a lot more later on. You should put them on a hotbar, ready for use, just in case (but to tell you the truth, you won’t be needing them much unless you’re suicidal :P).
Go to the Crypt of Rememberance and turn in both quests, get the follow up [55] How To Win Friends And Influence Enemies
Equip your new items:
- Girdle: The Plaguebringer’s Girdle
- Greaves: Greaves of the Slaughter
Spend your talent points as follows:
- 3 points in Necrosis
- 2 points in On a Pale Horse
- 1 point in Shadow of Death
==Note== On a Pale Horse is a great talent. You have to realize that until level 77 in Northrend, you won’t be able to use a flying mount while leveling, so you will stick to ground mounts for 21 more levels starting from now. Now imagine how much time you’re going to save with this 20% extra mount speed. A very significant amount, trust me 😛 The fear and stun 20% reduction is also a nice bonus.

1. Go back in New Avalon, to the Scarlet Hold, it’s that big casern on the east side of New Avalon. When there, open the Ornately Jeweled Box in your inventory and equip the two One-Handed Swords. Then just start attacking people in there until one of them tells you what you want to know.
2. Go back to the Crypt of Rememberance, turn in and get the follow up [55] Behind Scarlet Lines.
Equip your new ring (instead of the green one of course): Keleseth’s Signet Ring
Spend your talent points as follows:
- 2 points in Blood-Caked Blade
3. Get out, mount up and ride a long way south to the Scarlet Tavern (56,80). Go to the upper floor and turn in, get the follow up [55] The Path Of The Righteous Crusader. Also get the other quest [55] Brothers in Death and get out of this building.
4. Ride northeast to the Scarlet Hold. Clear the way up to the upper floor and go to the central main room.
On a table there you’ll find the New Avalon Patrol Schedule.
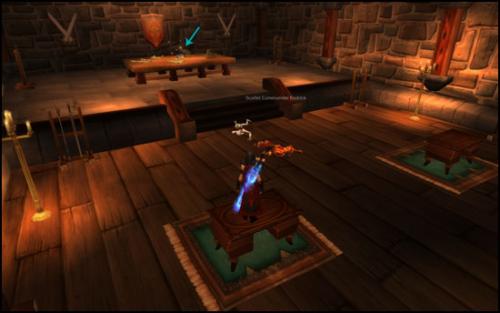
Loot it.
After that, go down all the way to the cellar basement, where you will find Koltira Deathweaver. Turn in your quest, but before you get the follow up, read the next few lines.
Koltira will create an anti-magic barrier, you must fight inside it as much as possible to reduce the damage you’ll take from the acolytes. You can pull them inside with Death Grip as well. After about 2 minutes, High Inquisitor Valroth will come. Pull him inside the barrier with Death Grip and kill him. Mission accomplished. Don’t forget you have potions if things go wrong.
You’re more than ready now, so get the follow up [55] Bloody Breakout and protect Koltira. It doesn’t matter if you die, you’ll get resurected, but Koltira must survive.
Once Valroth is dead, his remains will appear on the floor:
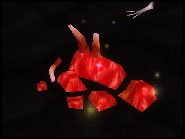
Right-click them to loot Valroth’s Head.
5. Go back to the Scarlet Tavern. Turn in both quests, get the follow up [55] A Cry For Vengeance!
Equip your new items:
- Gauntlets: Bloodbane’s Gauntlets of Command
- Breastplate: Saronite War Plate
You should be level 57 by now.
Level 57
Spend your talent points as follows:
- 1 point in Blood-Caked Blade
- 2 points in Dirge
- 1 point in Summon Gargoyle
- 1 point in Impurity
- 1 point in Master of Ghouls
==Note== You just became godlike. The biggest upgrade here is Master of Ghouls. Now you’ll always have a ghoul fighting for you, until it dies. And if it dies, just re-summon it. You’ll also be able to control your ghoul from now on and will get a pet bar:

Controlling your ghoul properly will be a nice advantage for you in the future. Here are a few tips to get the most out of your ghoul.
- Use Key bindings. The default keybindings are CTRL-1, CTRL-2, etc. I personally prefer to change them to SHIFT-1, SHIFT-2, etc, because I find reaching for CTRL plus a number is uncomfortable. That’s up to you, you can bind any key you like for your pet bar. If you want to change your pet bar key bindings, go to options > key bindings and change your Secondary Action Button 1, 2, 3, etc.Only 4 buttons are very important to bind anyway: Attack, Follow, Gnaw and Huddle.
Gnaw is your pet’s stun, it’s great to interrupt spells and also to stop things from running. Use it smartly.
Huddle is a defensive boost for 10 seconds, use it to preserve your ghoul’s health when he’s taking a lot of damage. - Level your First Aid skill. It might not be very useful for now, but you’ll see in the future, when you solo difficult elites for certain quests, your ghoul will need healing after the fights, and trust me, Death Coil isn’t always enough. So instead, bandage your ghoul! Anyway, leveling first aid also gives you achievement points, so might as well get it done
An amazing skill. It’s a big dps burst, which can last a total of 1 minute if you provide enough runic power. Here are a few tips:
- Build up 100 Runic power before activating this skill
- Don’t even think about using Death Coil while your gargoyle is up. If your runic power goes down to zero, your gargoyle despawns
- Use it at the right time, like when about to fight an elite, it’s kind of a waste in most other cases
Thanks to dirge, you’ll get more runic power now, that means you’ll have to try to squish in some extra death coils in your attack cycles. If you pay attention to your cooldowns, you’ll see there’s often room for an extra death coil here and there during your cycles.
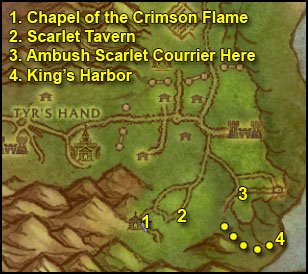
1. Go southwest to the Chapel of the Crimson Flame (53,81). Find Knight Commander Plaguefist, turn in and get the follow up [55] A Cry For Vengeance!
Go inside the long house and find the NPC corresponding to your race. (If you’re orc, find the orc called Kug Ironjaw. If you are Troll, find the troll called Iggy Darktusk, etc.)
Watch that NPC make his speech and you’ll have to kill it at the end. Put your ghoul on passive mode, because you won’t get the kill credit if the ghoul does more damage than you.
Go back to Knight Commander Plaguefist, turn in and get the follow up [55] A Sort of Homecoming.
2. Go back to the Scarlet Tavern, turn in [55] A Sort of Homecoming and get [55] Ambush at the Overlook.
Equip your new trinket (instead of the Insignia of the Scourge): Signet of the Dark Brotherhood
Spend your talent points as follows:
- 3 points in Reaping
Reaping: This converts your blood runes into death runes when you use Blood Strike or Blood Boil (which we’ll get soon). A Death Rune is a universal rune, it counts as any type of rune. Why is that good? For many reasons. It allows you to have more flexibility in your cycles. It allows you for example to re-cast your Bone Shield in fight without messing up your Death Strike cycles. Or better, if you convert both your blood runes into death runes, you’ll then be able to use Death Strike 3 times in a row, and that’s great when you’re having a tough fight and need a lot of lifedrain. Later on, you’ll be using Scourge Strike instead of Death Strike most of the time, and you’ll understand how valuable reaping is, because Scourge Strike is the kind of ability you want to spam as often as possible 😉
3. Mount up and ride east to the Scarlet Overlook (62,77).
Find a clear spot near the path.
 Look for a Makeshift Cover in your inventory
Right-click it, the Scarlet Courrier will appear, kill it and loot everything he has.
Go back to the Scarlet Tavern, turn in and get [55] A Meeting With Fate.
4. You should now be disguised as a Scarlet Courrier. Get out, mount up and ride to the Scarlet Overlook.
This time take the path south leading down to King’s Harbor, where you will find High General Abbendis (65,84).
Turn in and get [55] The Scarlet Onslaught Emerges.
5. Go back to the Scarlet Tavern, turn in the quest, but before your get the follow up, read the following paragraph.
You should have 4 talent points now, spend them as follows:
- 1 point in Impurity
- 3 points in Desecration
==Optional== Before going back to turn in this quest, I recommend killing some more Scarlet NPCs to get Crusader Skulls, which we you can turn in at the cauldron for extra health potions. 20 Crusader Skulls = 5 Potions, and you can carry a maximum of 20 potions. I personally farm 60 Skulls, and then I get out of this place with 20 Potions (including the 5 we got from quest earlier). The fastest way to get skulls is to kill the citizens outside of the town hall, it’s even easier if you put your ghoul on aggressive mode. However those don’t give exp, so you might want to kill other things, it will just take longer. After you have 60 skulls be sure to go back to the cauldron to turn in and get your 20 Potions *BEFORE* going back to the Scarlet Tavern. If you return to Acherus without turning the skulls in there is no way to turn them in later.
Got your 20 potions? Let’s move on then, go back to the Scarlet Tavern.
Get the follow up [55] Scarlet Armies Approach… Orbaz Bloodbane will then open a portal for you, take it and you’ll be back in Acherus.
Go to Highlord Darion Mograine, turn in and get [55] The Scarlet Apocalypse.
Equip your new pauldrons: Blood-soaked Saronite Plated Spaulders
Don’t worry about talents for now, we are not gonna fight for a while.
Go see your trainer, buy Frost Presence and Mind Freeze. Don’t waste money on the rest, Rune of Spellbreaking/Shattering is not useful to us at this point. Of course, if you’re rich, feel free to buy those skills anyway.
Frost Presence: That’s the tanking stance, pretty much like the defensive stance of warriors. We won’t use it much in this guide, it’s mostly for tanking in instances. However, it’s also useful when you’re running away from something, as it increases your armor and spell mitigation, making you much much more survivable. Other than that, stay in blood stance.
Mind Freeze: Our first spell interruption (well argueably the second, because you can interrupt spells with Death Grip too, but that’s not its main purpose). It doesn’t trigger the global cooldown, which is great, because that means you can cast it at any moment without disrupting your attack rotations.
Anyway, enough talking, let’s get back to business.
Take a gryphon ride back to Death’s Breach. Go talk to The Lich King, get the follow up [55] An End to All Things.
 Look in your inventory for a Horn of the Frostbrood.
Right-click it. You’ll climb on a Frostwyrm and your action bars will be replaced by this:

- Ability #1 is your attack. It’s just like with the canon we used before, aim by holding your mouse right-click button.
- Ability #2 is to refill the Wyrm’s mana. Should you need to do that, go find a lone Scarlet Defender and use it on him (have to be within 15 yards range).
You need to kill 150 Scarlet Soldiers (a piece of cake) and to destroy 10 Ballistas. The ballistas are a little more tricky, because their javelins kinda hurt so you must dodge them.
It’s quite straight forward though, you simply have to strafe to the left or to the right every time after you shoot, and the javelin will miss you. Like on the screenshot below:
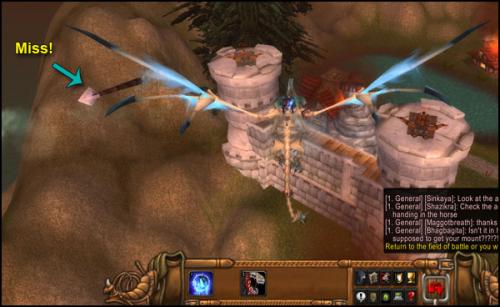
Basically it goes like this: Shoot –> Strafe left –> Shoot –> Strafe Right –> Repeat till ballista is destroyed.
For the 150 Scarlet Soldiers, go behind the walls of New Avalon, you’ll find big packs of them.
When done with that, fly back to The Lich King.
Click on the “Leave Vehicle” button and turn in the quest, get the follow up [55] The Lich King’s Command.
Equip your new helm: Greathelm of the Scourge Champion
Spend your talent points as follows:
- 2 points in Desecration
- 1 point in Bone Shield
- 3 points in Crypt Fever
- 1 point in Impurity
- 1 point in Scourge Strike
- 1 point in Ebon Plaguebringer
You are now officially unkillable.
Bone Shield: A great ability for just 1 Unholy Rune. Re-cast it after every fight if possible. Not only will you take less damage, but you’ll also do more while having this shield on.
Desecration: +5% damage and slows down enemies around you, which is great to escape if things go wrong. We mostly take it for the 5% damage boost.
Scourge Strike: Rejoice. Expect a big improvement in your damage output. This replaces Death Strike in your usual rotation. Only use Death Strike when you need healing.
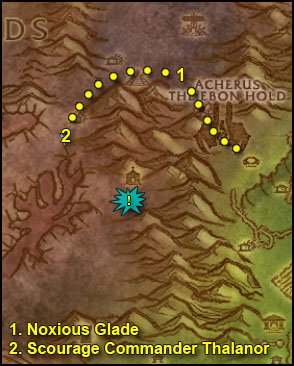
1. Mount up, go northwest through a tunnel, you’ll then be in the Noxious Glade (Eastern Plaguelands).
2. Go west and take the path going down at (40,20), all the way to Browman Mill, where you’ll find Scourge Commander Thalanor (34,30). Turn in and get the follow up [55] The Light of Dawn.
Now all you have to do is take part in a cool event, follow Highlord Darion Mograine and fight with him. You don’t actually have to fight, but I recommend doing it for fun, because you get a buff which makes you almost invincible and also makes you hit like a truck. Don’t be too reckless though, only attack the Defenders of the Light there, avoid the named NPCs such as Korfax, Duke Zverenhoff, etc.
At the end of the script, you can turn in your quest at Highlord Darion Mograine. Choose Sword or Axe, it doesn’t matter (pick axe if your race is Orc though).
Get the follow up [55] Taking Back Acherus.
Open your spell book and cast Death Gate (Unholy). Click the gate to be teleported back to Acherus. I suggest not lingering here too long, because the script will reset soon and all those imba argent dawn NPCs will soon be back to agressive mode and make quick work of you 😛
After teleporting, turn in your quest and get the follow up [55] The Battle For The Ebon Hold.
Equip your new weapon if you haven’t done that already.
Spend your new talent points as follows:
- 2 points in Ebon Plaguebringer
- 3 points in Wandering Plague
- 1 point in Rage of Rivendare
Take the pink teleporter up, kill 10 Scourge and help killing Patchwerk.
Take the teleporter back, turn in the quest at Mograine and get the follow up [55] Warchief’s Blessing.
Behind Mograine to the left you should see a portal to Orgrimmar, take it.
In Orgrimmar, run (yes, you can’t use your mount here for now) to Thrall in the Valley of Wisdom.
Turn in the quest [55] Warchief’s Blessing. Now you can mount and people will stop throwing bananas at you.
1. Visit the auction house, make space in your bags. Also get some better bags, because the 12-slot bags are gonna be a bother in the long run. However, if you’re low on cash, you must at least keep 3gold 50silver to buy your new skills.
You should be level 58 by now.
Level 58
Death Gate back to Acherus. Visit one of the trainers, get Blood Boil and Chains of Ice.
Chains of Ice: A very useful skill to prevent enemies from running away. Can also be used to kite or to escape.
Blood Boil: This will basically replace blood strike when taking on multiple targets.
So from now on, against multiple enemies, your dps cycle will be:
Icy Touch –> Plague Strike –> Pestilence –> Blood Boil –> Death Strike –> Death Coil –> Death Strike –> Blood Boil –> Blood Boil –> Death Strike –> Death Coil –> Death Strike –> Blood Boil –> Blood Boil –> Stuff should be dead.
Spend you talent point as follows:
- 1 point in Rage of Rivendare
Take the pink teleporter up. Go to a runeforge and engrave a Rune of Cinderglacier to your weapon. Also buy some Corpse Dust while you’re here.
Take the teleporter back down.
Fly to The Undercity.
Go to the Apothecarium and pay a visit to Lady Sylvanas. get the quest [56]The Champion of the Banshee Queen.
 Go to the innkeeper and make The Undercity your home location.
Ride out of the Undercity, follow the road east until you find the Bulwark (83,68).
Get the quest Argent Dawn Commission and turn it in instantly. You’ll get an Argent Dawn Commission. When you kill undeads while having this trinket equiped, you can collect Scourgestones from their bodies. This helps you to gain reputation with the Argent Dawn.
This faction is really old though so there’s no interesting reward for you. I suggest destroying the trinket (you can get another one at any time in the future anyway).
Get [53]Scarlet Diversions from High Executor Derrington.
Right-click the Box of Incendiaries next to him and loot the Flame in a Bottle.
Get [58]The So-Called Mark of the Lightbringer from Mehlar Dawnblade. Don’t get the other quests.
1. Ride east along the road and then north to the Scarlet Campment – northeast of Felstone Field – at (41,54). Clear the camp and then right-click on the Command Tent and once it is destroyed right-click the Scourge Banner from your inventory.
2. Ride back to the Bulwark, turn in the quest [53]Scarlet Diversions, get the two follow up [53] The Scourge Cauldrons and [56] All Along the Watchtowers.
Turn it in at Shadow Priestess Vandis and get the follow up [53]Target: Felstone Field.
3. Go east to Felstone Field (37,58). Clear yourself a path to the Cauldron in the middle of the field, when you get close, Cauldron Lord Bilemaw will spawn, kill it and loot the Felstone Field Cauldron Key from him, then go to the cauldron and click it, turn in the quest and get the follow up [53]Return to the Bulwark.
In the Felstone Field, go to the houses on the north side of the field, enter the one which is the most to the west (37,54).
On the 2nd floor of the house you’ll find Janice Felstone, get the quest [52]Better Late than Never. (It’s marked as low level so no exclamation mark)
Go to the next house which (38,55) and find Janice’s Parcel inside it. Click it, turn in the quest, then click it again and get the follow up [52]Better Late than Never. (As the quest is marked as low level, you’ll have to click the box twice.)
4. Ride back to the Bulwark, turn in [53]Return to the Bulwark and get the follow up [55]Target: Dalson’s Tears.
5. Ride east to Dalson’Tears (45,52), it’s the field directly east of Felstone Field. Clear yourself a path to the Scourge Cauldron, when you get close Cauldron Lord Malvinious will spawn, kill it and loot his key, go to the Cauldron and click it, turn in the quest and get the follow up [55] Return to the Bulwark.
Go to the houses on the north side of Dalson’s Tears, enter the right one (47,51). Clear what’s inside and look on the floor for Mrs. Dalson’s Diary, get the quest and complete it.
Get out of the barn and look around for a Wandering Skeleton, there is only one of this kind and he roams around the barn, so keep killing stuff around the barn until you find it, kill it and loot “Dalson Outhouse Key“. Go behind the barn, you’ll find an Outhouse (48,49). Open it, kill Farmer Dalson, loot Dalson Cabinet Key.
Go to the other house now (47,50), on the 2nd floor of it you’ll find a “Locked Cabinet“, click it and turn in the quest.
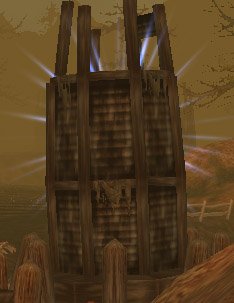
6. Get out of Dalson’s Tears and go southwest to the Ruins of Andorhal. In Andorhal try to avoid the roads as much as possible, as level 56 elite abominations roam them. So just clear yourself a path through the destroyed houses. Also avoid the center of the town of course, there’s a huge bunch of mobs there and Araj the Summoner (lvl 61 elite).
7. Clear yourself a path to the first tower you see on your right-hand side (42,66). Look for the “beacon torch” in your inventory and click it while standing next to the tower’s door. You should get the message “Tower Two Marked“.
8. Go southwest to the next tower (40,71). Place the beacon and you should get the message “Tower One Marked”
9. Go southeast and then east – avoid the center of the town – till you find the next tower (47,71). Place the beacon torch and you should get the message “Tower Four Marked“.
10. Go north and then northwest to the last tower (45,64), place the beacon torch and you should get the quest message “Tower Three Marked“.
11. Get out of Andorhal and ride back to the Bulwark.
- Turn in [56]All Along the Watchtowers, get the follow ups [55]Scholomance and [60] Alas, Andorhal.
- Turn in [55]Scholomance at Apothecary Dithers and get the follow up [57]Skeletal Fragments.
- Turn in [55]Return to the Bulwark and get the follow up [55]Target: Writhing Haunt.
1. Ride east and then south to the Writhing Haunt (52,66). Clear a path to the Scourge Cauldron, when you get close to it, Cauldron Lord Razarch will spawn, kill it and loot the key. Clear what’s around the Cauldron and go click it, turn in the quest and get the follow up [55]Return to the Bulwark.
Directly north of the cauldron in a small house you should find a tauren lying down on the floor, Mulgris Deepriver. Get his quest [54]The Wildlife Suffers Too.
**From now on kill any diseased wolf you find on your way until you have completed [54]The Wildlife Suffers Too**
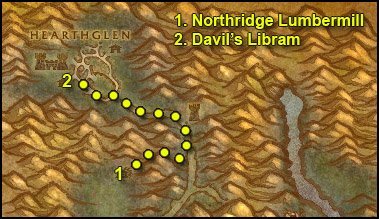
2. Go north/northwest to an area just north of Dalson’s Tears (45,40), where you will find plenty of wolves to complete the quest. Kill everything in this area until you have 8 Diseased Wolf Kills. Also note that the spiders in this area are placeholders for wolves, so you have to kill spiders too if you need more wolves. If needed, you can go grind on the Scarlet Lumberjacks just north of this spot while waiting for the wolves to respawn.
3. Go north to the Northridge Lumbermill, when you are next to the lumbermill, go northeast of it, follow a trail going down to a destroyed wagon. You’ll find Kirsta Deepshadow there (51,28), get the quest [56] Unfinished Business.
4. You can find the Scarlet Knights and Mages you need to kill for the quest just southeast of Kirsta, on the road to Hearthglen.
5. For the Hunters and Medics go to the camp further south(51,44).
6. When you completed the kill list, go back to Kirsta and turn in [56] Unfinished Business, get the follow up.
7. Go back on the road just east of Kirsta.
At (54,34) the road forks off to the left and right. Go right and up the slope you will find Huntsman Radley (57,35). She can be pulled solo if you do it at the right moment, just wait for the mage next to her to move far enough.
8. Get back on the main road and this time at the fork go north, keep going north until you hit the watch tower (53,24). Kill the 2 guards infront of it, clear the 1st floor of the tower carefully, then wait for Cavalier Durgen to show up. He goes to the top of the tower then walks back to the entrance. Wait for him to come down, you can’t kill him when he’s on top, he has 3 guards with him there.
After killing Durgen, clear the way to the top of the tower and prepare for a tough fight: there are 3 scarlet mages on top of the tower, you can actually pull just 1 or 2 if you take your time and body pull carefully. Anyway, make sure you got all your cooldowns ready for this fight. After you have cleared the top of the tower, you should find a Holy Coffer, right-click it and loot the Mark of the Lightbringer.
CAREFUL: Sometimes there is a high-level rare elite on top of the tower in addition to the above mentioned mobs.
9. Go directly back to where Kirsta is by going southwest and jumping down in the crater where she is. Turn in the quest [57] Unfinished Business, get the follow up.
10. Mount up and ride to Hearthglen (46,18).
Clear the way to the tower (45,18). Go to the top of the tower and you’ll get a quest complete message.
Ride back to Kirsta Deepshadow, turn in [58] Unfinished Business.
Hearthstone to the Undercity.
Right after warping to the Undercity you should see a yellow question mark on your minimap labelled as “Royal Overseer Bauhaus”.
Go to him and turn in the quest [52]Better Late than Never, get the follow up [52]The Jeremiah Blues. You can turn this quest just a few steps away, under the stairs leading to the bank. Get the follow up get the follow up [52]Good Luck Charm.
==Note== You should have a few Bone Fragments in your inventory, don’t sell them, we’ll need them for a quest later on.
Sell junk and repair.
Ride out of the Undercity and back to the Bulwark.
- Turn in [55]Return to the Bulwark, get the follow up [58]Target: Gahron’s Withering.
- Turn in [58]The So-Called Mark of the Lightbringer, get the follow up [58]Defiling Uther’s Tomb.
1. Ride to Uther’s Tomb (52,81). Uther’s Tomb is guarded by a level 58 elf npc, pvp flagged. If you attack it you’ll be pvp flagged, if you don’t want that you can just wait for him to do his patrol behind the statue. Equip the Corrupted Mark of the Lightbringer in your off-hand slot and wait for the 30 second cooldown, get close to the statue and right-click the Corrupted Mark of the Lightbringer directly from your off-hand slot.
2. Go back the way you came from to the Bulwark. Turn in [58]Defiling Uther’s Tomb.
3. Go east to the Felstone Field, go into the left house (38,54) on the 2nd Floor. Turn in the quest [52] Good Luck Charm at Janice Felstone and get the follow up [54] Two Halves Become One.
Get out of the house and look for a Jabbering Ghoul.
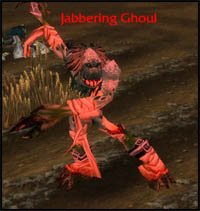
This ghoul patrols all over the field. So just keep the area clean until it spawns, especially the Scarlet Patrol, as they might kill the Jabbering Ghoul before you even see it.
Once you find the Jabbering ghoul, kill it and it will drop a “Good Luck Other-Half-Charm”.
Once you have the other half charm, go back to Janice Felstone, right click on the other-half-charm in your inventory. Turn in the quest.
4. Get back on the road and ride east, then go southeast to the Writhing Haunt. Clear the way to the house with the tauren lying down on the floor, turn in [54]The Wildlife Suffers Too, get the follow up [56]The Wildlife Suffers Too.
**From now on kill any Diseased Grizzly you see until you have killed 8 (at 54,48 you’ll find a lot of them)**
5. Go northeast to Gahron’s Withering (62,57). Clear a path to the Scourge Cauldron, when you get close Cauldron Lord Soulwrath will, appear, kill it. He’s harder than the other cauldron lords, he knockbacks and silences, so be careful where you fight him. Loot his key then go to the Cauldron, turn in the quest and get the follow up [58] Return to the Bulwark.
6. Go to the area which is in between Garon’s Withering and the Writhing Haunt. There should be plenty of bears there. Kill everything in this area until you have 8 Diseased Grizzly Kills, then go turn in [56]The Wildlife Suffers Too at the Writhing Haunt. Get the follow up [56]Glyphed Oaken Branch.
7. Ride east until you hit Thondroril River, go north along the river bank, then cross the river so you are on the eastern bank and ride north until you find a house. In front of it you’ll see Tirion Fordring, get his 3 quests:
- [56] Demon Dogs
- [56] Blood Tinged Skies
- [56] Carrion Grubbage
**From now on, kill on sight the following mobs**
- Plaguehound Runt
- Plaguebat
- Carrion Worm – loot Slabs of Carrion Meat from them
8. Go south along the river and then east into Eastern Plaguelands.
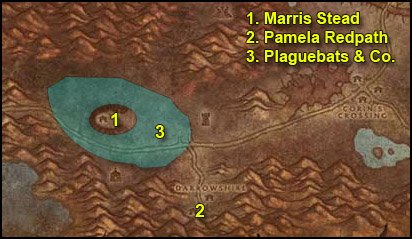
1. Go southeast while killing everything on the way. Find the Marry’s Stead. You should find Nathanos Blightcaller there (27,75). Turn in [56]The Champion of the Banshee Queen. Get the follow ups:
- [58]To Kill With Purpose
- [58]Un-Life’s Little Annoyances
- [60]The Ranger Lord’s Behest
**Add the following two mobs to your kill-on-sight list**
- Noxious Plaguebat
- Monstrous Plaguebat
2. Go southeast to Darrowshire, keep killing everything on sight that you need for quests, there should be plenty.
Inside Darrowshire, find a small destroyed house on the western side of Darrowshire. You should find Pamela Redpath there.
Get the quest [55] Pamela’s Doll.
Now you must find the 3 parts of pamela’s doll, they can be in any of the other houses in Darrowshire, mostly on the 2nd floor of it. Look on the floor for some brown object. Everytime you get close to one of the doll parts, a level 55 ghost spawns and attack you.
Once you have Pamela’s Doll’s Left Side, Right Side and Head. Right click them in your inventory to combine them. Go to Pamela and turn in the quest. Get the two follow up quests:
- [56] Uncle Carlin
- [56] Auntie Marlene
3. Go back towards the Marry’s Stead and keep doing circles around it killing everything until you got 30 Plaguebat and 20 Plaguehound Runts slain and have looted 15 Slabs of Carrion Worm Meat. This is the best area to find them.
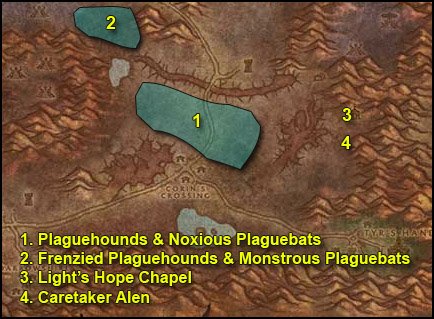
1. Go east to the area north of the Infectis Scar and Corin’s Crossing. Kill everything around until you have 5 Plaguehound Kills and 20 Noxious Plaguebat Kills.
2. Once you’re done with the above, go to the area which is north of Blackwood Lake (51,41). You should find Frenzied Plaguehounds and Monstrous Plaguebats around this area, kill 5 Frenzied Plaguehounds and 10 Monstrous Plaguebats.
3. Ride to Light’s Hope Chapel (81,59).
Turn in [56] Uncle Carlin, get the follow up [55] Defenders of Darrowshire.
Get the following items from the mailbox (see shopping list):
- 30 Crypt Fiend Part
- 30 Core Of Element
- 30 Dark Iron Scrap
- 30 Savage Frond
Get the following quests and turn them in immediately:
- [60] Savage Flora at Rayne
- [60] Cryptstalker Armor Doesn’t Make Itself… at Huntsman Leopold
- [60] The Elemental Equation at Archmage Angela Dosantos
- [60] Binding The Dreadnaught at Korfax, Champion of the Light
Also get [60] Bonescythe Digs from Rohan the Assassin, we’ll finish that one later.
4. Just a bit south of Light’s Hope Chapel find Caretaker Alen (79,63). Get the two quests from him:
- [55] Zaeldarr the Outcast
- [60] The Restless Souls
You should be level 59 by now.
Level 59
Death Gate to Acherus. Visit the trainer, buy Blood Strike (Rank 2) and Strangulate.
Blood Strike (Rank 2): More damage, cheers.
Strangulate: A 5 second silence, can be cast from 30 yard range. Great against casters.
Spend your talent point:
- 1 point in Rage of Rivendare
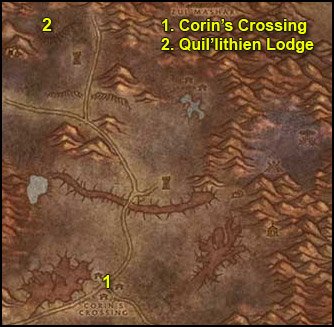
1. Ride west/southwest to Corin’s Crossing (57,60).
Whenever you kill a Gibbering Ghoul, a Spirit of Darrowshire will appear, right-click it to free it. We’ll finish this quest later though so don’t wait on respawns.
Kill every undead you find there until you have 7 Living Rot. You must be quick because the living rot only lasts 10 minutes.
 As soon as you have 7, right-click the Mortar and Pestle from your inventory, you should receive some Coagulated Rot.
2. Ride north to the Quel’Lithien Lodge (51,22). Clear yourself a path to the main building, and clear towards the right-hand wing. You should find two level 60 Quel’Lithien Protectors, kill them and then loot the Quel’Thalas Registry, which should be lying on a bench.
Kill as many elves as needed to complete the quest [60]The Ranger Lord’s Behest.
Hearthstone to the Undercity and ride back to the Bulwark.
Turn in [58]Return to the Bulwark. Get the quest [55]A Plague Upon Thee from Mickey Levine. Go to High Executor Derrington and turn in the quest “Mission Accomplished!“.
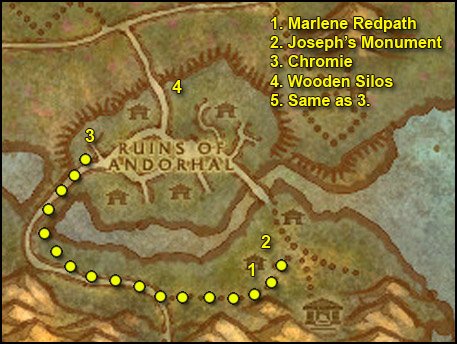
1. Ride southeast to Sorrow Hill and find Marlene Redpath in the house (49,78).
Turn in [56] Auntie Marlene and get the follow up [56] A Strange Historian.
2. Search the graveyard just north of the house where Marlene Redpath is, look for “Joseph Redpath’s Monument” among the graves (49,76). Click the grave and get Joseph’s Wedding Ring.
3. Go back towards Chillwind Camp and take the other path to Andorhal, go inside the Ruins of Andorhal by the western entrance.
Inside Andorhal go to the house to the north, it’s the only house around with a floor and not totally destroyed (39,68). Inside the house go to the 2nd floor, in one of the rooms you’ll find Chromie. Turn in [56] A Strange Historian, get the follow up [56] The Annals of Darrowshire. Also ge the other quest [56] A Matter of Time.
4. Go to the northern gate of Andorhal, and east of the first watch tower you’ll find two wooden silos (45,62) which look like this:
Get close to a silo and click your Temporal Displacer (the icon is actually a horn).
1 to 3 lvl 57 worms will spawn and attack you. Kill them. Move on to the next silo and repeat. Keep doing that until you have 10 Temporal Parasites slain. The worms only appear when the silo is sparkling blue. They take a while to sparkle again after you use them. However there’s 3 more silos just a bit more to the east in case you need.
5. Go back to Chromie, turn in [56] A Matter of Time and get the follow up [56] Counting Out time.
Now what you have to do is check destroyed houses in Andorhal and look for Small Lockboxes like this:
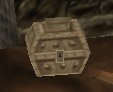
Loot the Andorhal Watch from it. Keep doing this until you have 5 Andorhal Watches.
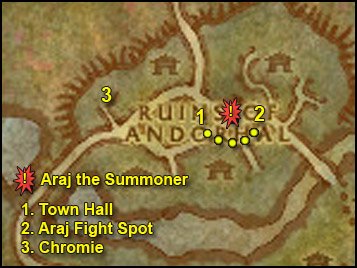
1. Go to the town hall (with a tower clock) which is in the middle of Andorhal, close to where Araj the Summoner is, you can sneak in the town hall without having to fight any of the bunch of mobs around it, just hug the walls.
Inside the town hall you’ll find several “Musty Tome” lying on the floor. When you click one, there is a chance you will find the Annals of Darrowshire, but there is a higher chance that you will get a “Ruined Tome” and 1 or 2 level 57 mobs will attack you. They give no loot and no exp. Hoewever there is a trick to know which tome is the right one. There is a slight graphical difference. The pages of the fake tomes have two-tone colored pages, lightbrown and white, like this one:
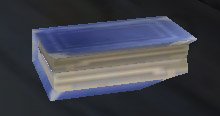
The good tome looks “newer”, and its pages only have one color tone, like this one:

You can easily see the difference if you zoom in 1st person view and put your mouse pointer over the books to highlight them. Loot the Annals of Darrowshire.
2. Time for a little challenge. Let’s solo Araj the Summoner. Here’s how:
Fight your way around Araj, so that you end up on the east side of him, like on the screenshot below.

We’ll pull from here, and you have to pull all the stuff I marked with a dot, because if you don’t, they’ll add when you attack Araj, and we want him solo.
- 1. The first pull will be 4 mobs at least, some of them are Skeletal Acolytes, you need to kill those first because they heal. Pull one with Death Grip, use Strangulate on another so that he comes in your melee range. Icy Touch –> Plague Strike –> Pestilence –> Blood Boil –> Death Strike. Etc.
- 2. Next, pull the 3 Spectral Attendants. This should be easy.
- 3. North of Araj there should be a Skeletal Warlord and two ghouls. Pull those carefully, it should be an easy fight too.
- 4. South of Araj should be 1 Skeletal Warlod and 1 Ghoul. Pull those and then you’ll only have Araj the Summoner left to kill.
Pull Araj from this spot, to make sure you don’t get jumped by respawns or by a patrol while fighting him:
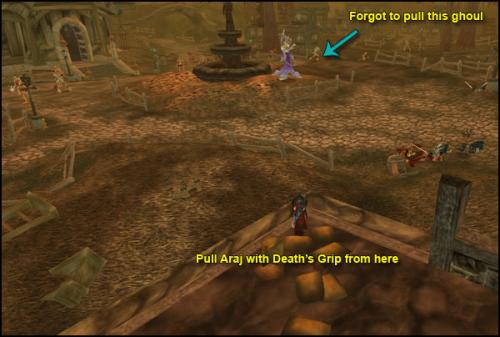
As you can see on the screenshot, I forgot to pull one ghoul, it will add when I pull Araj. However, I managed because Death Knights are imba. Don’t do this at home though!
When you’re ready, pull Araj with Death Grip, then Strangulate him and pull him backwards a little more (to where I stand on the screenshot below), to be 100% safe from the respawns/patrols. Then just fight him normally, interrupt his spells with Mind Freeze and use Summon Gargoyle as soon as you have 100 Runic Power. You also have potions if things go wrong.
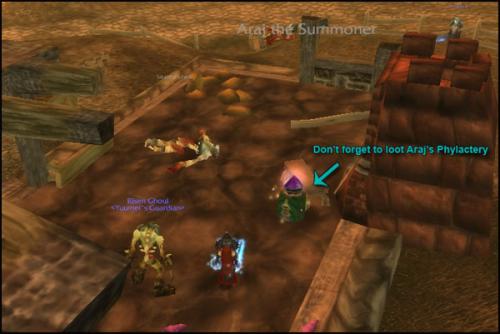
Loot Araj’s Phylactery.
3. Go back to Chromie, turn in [56] Counting Out time. The Attuned Dampener you get as a reward is only useable on Araj the Summoner, so you don’t care about that, destroy it. Yes I’m evil and made you kill Araj without using this on him, but it really wasn’t necessary, was it? 😛
Turn in [56] The Annals of Darrowshire, get the follow up [56] Brother Carlin.
Now you should also have finished [57] Skeletal Fragments and be close to finish [60] Bonescythe Digs. Kill some more skeletons in Andorhal until you have 30 Bone Fragments.
Get out of Andorhal by the north gate, then go east till Thondroril River and ride north to Tirion Fordring (7,43).
Turn in:
- [56] Demon Dogs
- [56] Blood Tinged Skies
- [56] Carion Grubbage
Get the follow up [56] Redemption.
Right-click Tirion and go through his text.
Turn in the quest and get the follow up [57] Of Forgotten Memories.
You should be level 60 by now.
Put your talent point in Unholy Blight.
Unholy Blight: Our ultimate. It’s basically extra AoE power, great for taking on multiple enemies. However, 60 Runic Power is a bit pricy, so it’s not worth casting Unholy Blight on easy fights (single target or two monsters only), simply because by the time you build up 60 Runic Power, one of your target will already be dead and the other one will follow quickly, and the majority of your Unholy Blight will be wasted while you run to the next monster. Use it only on big fights, 3+ mobs, preferably more. You can chain kill packs of 5,6 or 7 mobs now.
If you want to know how, check out my AoE tutorial videos:
How to AoE with a Death Knight
Mount up and go to the Eastern Plaguelands.
Ride southeast to the Marris Stead. Turn in:
- [58]To Kill With Purpose
- [58]Un-Life’s Little Annoyances
- [60]The Ranger Lord’s Behest
Get:
- [60] Duskwing, Oh How I Hate Thee…
- [60] The Corpulent One
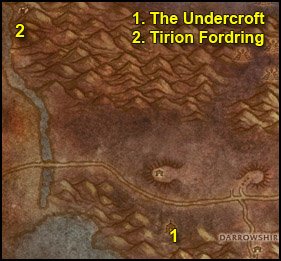
1. Go southeast to the Undercroft, which is directly south of the Marris Stead.
Behind the crypt in the Undercroft you’ll find Tiron Fordring’s Grave (28,86). Next to it should be a “Loose Dirt Mound”.
Click the dirt mount, Mercutio Filthgorger and 3 Dwarf Graverobbers will spawn. Kill them and loot Taelan’s Hammer.
Go inside the crypt (22,78), clear the way down, kill Zaeldarr the Outcast and loot his head.
In the same room look for a “Torn Scroll” on the floor, click it and get the quest [60] Hameya’s Plea.
2. Go back to Tiron Fordring, turn in [56] Of Forgotten Memories, get the follow up [58] Of Lost Honor.
Death Gate to Acherus. Visit your trainer, train Rune of Lichbane, Death and Decay and Plague Strike (Rank 2).
Rune of Lichbane: This will be great for our final circuits in the plaguelands, as there are plenty of undeads just waiting to be whacked. Go engrave it on your weapon (unless you bought a better enchant like Executioner). Also buy some Corpse Dust and sell junk while you’re up there.
Death and Decay: It’s an AoE skill, but it’s not as efficient as the Pestilence/Blood Boil/Death Strike combo. It’s main use is to build a lot of threat when you’re tanking several mobs.
Fly to Light’s hope Chapel. Turn in:
- [60] Bonescythe Digs
- [56] Brother Carlin, get [57] Villains of Darrowshire and [56] Heroes of Darrowshire
Go south to Caretaker Alen and turn in [55] Zaeldarr the Outcast.
You should have the following quests at the moment:
- [55] Defenders of Darrowshire
- [56] Glyphed Oaken Branch
- [56] Heroes of Darrowshire
- [57] Villains of Darrowshire
- [58] Of Lost Honor
- [60] Hameya’s Plea
- [60] The Restless Souls
- [55] A Plague Upon Thee
- [57] Skeletal Fragments
- [60] Alas, Andorhal
- [60] Duskwing, Oh How I Hate Thee…
- [60] The Corpulent One

1. Ride west to Corin’s Crossing (57,60), kill all the Gibbering Ghouls you can find while going east through the town. Right-click the Spirits of Darrowshire that appear.
2. Go west to the Infectis scar by passing Corin’s crossing by the south side. Go down the Infectis Scar at (44,69), then go to (49,59) where you’ll find the “Shattered Sword of Marduk”, as marked on the map. It looks like this:

Loot it.
Get out of the Infectis scar the same way you came in.
3. Go north to Blackwood Lake (46,44). Take a dive, in the middle of the pool at the bottom you’ll see Ghosts of Darrowshire fighting each other, amongst them you should see a glowing violet skull named “Horgus Skull” (46,44), it looks like this:

Loot it.
4. Go west to the Plaguewoods. In the plaguewoods look around for Large Termite Mounds and loot them.
While looking for those termite mounds, hunt for Cannibal Ghouls. Anytime you kill one of these, a Spirit of Darrowshire will appear, right-click it to free it. The Cannibal Ghouls are not so numerous though, so don’t stay here trying to finish the quest, we’ll kill more later.
Keep killing stuff in this area until you are done with [55] A Plague Upon Thee. If you have more than 100 Termites, destroy the extras.
5. Go west to Egan (11,29).
Turn in [60] The Restless Souls, don’t get the follow up.
Get the quest [55] Augustus’ Receipt Book from the other npc.
The book is very easy to find, just go a little east and enter the inn type building.

The book is on the 2nd floor.
Make sure you kill all the Cannibal Ghouls you find in the house and to free their spirit. You should also check the other house on the opposite side of the street, it probably has a couple of ghouls inside.
Once you got Augustus’ Receipt Book, go back to Augustus and turn in the quest.
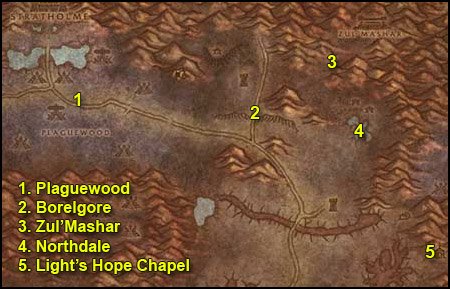
1. Go back to the Plaguewoods, kill Cannibal Ghouls until you finish [55] Defenders of Darrowshire while going east.
2. Go east and look for Borelgore. He can be found patrolling in this area:
Kill him.
3. Go northeast to Zul’Mashar (64,24).
Clear the way up the slope.
==Tip== Death Grip the scouts and Chains of Ice them, it prevents them from getting help, making this step much less annoying.
Keep clearing the way and you’ll soon face a big pyramid. At it’s base you should see some tombs with some trolls roaming about them. One of them is Infiltrator Hameya.
Pull him and kill him, then loot Hameya’s Key.
4. Clear your way out of Zul’Mashar then go southeast to Northdale, take a dive in the pool which is just south of Northdale. Clear the elementals in the way. At (66,29) underwater, next to a cage you should see a white flag with a blue runed on it named Symbol of Lost Honor:

Loot it.
5. Ride southeast back to Light’s hope Chapel.
Turn in:
- [55] Defenders of Darrowshire
- [57] Villains of Darrowshire
Get [56] Heroes of Darrowshire if you forgot to take it earlier.
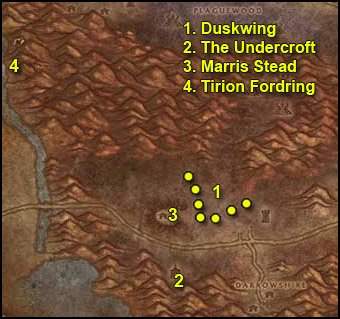
1. Ride west/southwest and find Duskwing. He patrols in the area east of the Marris Stead, as shown on the map.
Kill Duskwing.
2. Ride southwest to the Undercroft. Right behind the crypt in the Undercroft you should find a “Mound of Dirt”. Not the one next to Tiron’s grave, the other one close to a charriot at (28,86).
Click it, turn in [60] Hameya’s Plea.
3. Ride north to the Marris Stead, turn in:
- [60] Duskwing, Oh How I Hate Thee…
- [60] The Corpulent One
Don’t get any follow up.
4. Ride northwest to Tirion Fordring, turn in [58] Of Lost Honor and get the follow up [58] Of Love and Family.
Go south and then west back into the Western Plaguelands.
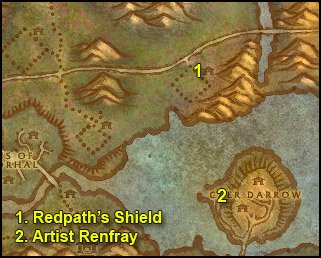
1. First make a stop at Gahrron’s Withering. There in front of the first building when you arrive from the north you’ll see a glowing shield looking like this:
Clear the mobs around it then loot the Redpath’s Shield.
2. Go south and swim to Caer Darrow Isle. On the western side of Caer Darrow, find Artist Renfray in a wooden house (65,75). Turn in [58] Of Love and Family, don’t get the follow up.
Go back to the Bulwark, turn in:
- [57] Skeletal Fragments
- [60] Alas, Andorhal
- [55] A Plague Upon Thee, take the follow up [55] A Plague Upon Thee
1. Ride east and then north to Northridge Lumber Camp.
Go straight to the lumber mill which is at the northeastern tip of the lumber camp.
Inside the lumber mill you should find a big crate named “Northridge Lumber Mill Crate”.
Click it and place the Termite Barrel on it. A barrel with green smoke should appear, click it and get the follow up [55] A Plague Upon Thee.
2. Mount up and ride to Hearthglen. Clear your way into the village until you see the townhall:
Clear your way inside and loot the Davil’s Libram from the table.
Ride back to The Bulwark. Turn in [55] A Plague Upon Thee.
Death Gate back to Acherus.
Fly down to Light’s hope Chapel. Turn in [56] Heroes of Darrowshire, don’t get the follow up.
Hearthstone to Undercity.
Take the zeppelin to Orgrimmar.
Fly to Thunder Bluff.
In Thunder Bluff, go to the Elder Rise and find Nara Wildmane (75,31).
Turn in [56] Glyphed Oaken Branch.
You should be close to level 61 now. Congratulations, you are ready to go to Outland. You’ll be ahead of the outland guide in levels and will ding level 70 with a lot of quest circuits left to do, which is a very good thing. If you finish my whole Outland guide, you’ll most likely ding 71 before going to Northrend, which is great, because it will make everything easier for you. You can go to Northrend as soon as you hit level 70 though, it’s perfectly fine, but I strongly recommend to not go there at level 68 or 69.
Please note that the Outland guide is not Death Knight specific guide, it’s a general guide that works for all classes. So you’re on your own for all the Death Knight specific stuff from now on.
I will write a Death Knight Leveling Guide all the way to level 80 in the future however, so keep checking the wow-pro news if you don’t want to miss it!
Anyway, in the meantime, here is how you should spend your talent points on your way to level 80.
Talents 61-80
Level 61: Rage of Rivendare 4/5
Level 62: Rage of Rivendare 5/5
Level 63: Impurity 4/5
Level 64: Impurity 5/5
Level 65: Butchery 1/2
Level 66: Butchery 2/2
Level 67: Subversion 1/3
Level 68: Subversion 2/3
Level 69: Subversion 3/3
Level 70: Two-Handed Weapon Specialization 1/2
Level 71: Two-Handed Weapon Specialization 2/2
Level 72: Bladed Armor 1/5
Level 73: Bladed Armor 2/5
Level 74: Bladed Armor 3/5
Level 75: Dark Conviction 1/5
Level 76: Dark Conviction 2/5
Level 77: Dark Conviction 3/5
Level 78: Dark Conviction 4/5
Level 79: Dark Conviction 5/5
Level 80: Bladed Armor 4/5
Final Build: 16/0/55
Please note that is also an excellent build for farming/questing at level 80.
Which Runeforging enchant to use up to level 80
61-62: Rune of Cinderglacier
63-69: Rune of Swordshattering
70-80: Rune of the Fallen Crusader
I hope you enjoyed this guide as much as I enjoyed writing it.
Time to go to Outland now, follow my Outland Leveling Guide from here. The fastest way to go there from Thunder Bluff is to fly to Ratchet, take the boat to Booty Bay and then fly to Stonard.
-Jame
© 2008 Copyrights www.wow-pro.com All Rights Reserved
4.0.1 DK Leveling Build?First of all thanks a lot for the great guides! I really enjoyed them as well as all the other guides here.
Now with 4.0.1 being out I wonder if you have a recommendation already for the best DK leveling build. Still Unholy? I was pretty disappointed when I saw that the mount speed increase is now in the Frost tree…
Anyway, it would be great to get some feedback about this.
Cheers,
Thunderbeef
Ignore this arrogant shitjust ignore this idiot.
I agree with Jiy, and notI agree with Jiy, and not only cause shoe’s a admin :P, i found all of these guides very fast leveling wise and very convenient to have, i don’t have fun leveling in old world and therefore these actually helped have fun playing the game because i could skip the old world part really quickly and do what i wanted to do.
I’m kind of curious why youI’m kind of curious why you even decided to use a guide, based on your opinion of what makes the game fun. I’m not trying to be snarky here, I’m just honestly curious.
Our guides are targeted…. well, to people who want to use a guide! Not to people who prefer to figure it out on their own. I, too, very much enjoyed learning and leveling all on my own the first time through, or even the second time through. But by now I’ve done all that. I still learn to use my character as I level up, but I want something to help make it easier and faster for me. I think that is the situation of most of our users.
In terms of Outland quests yielding better experience – this is definitely true. Blizzard modified the experience rewards in Outland and they are definitely worth heading there right at 58, *especially* as a death knight who can AoE grind if he runs out of quests.
I’m not going to try to argue that staying in the old world is better experience wise compared to Outland. I will argue that doing easier quests worth a bit less XP that get done faster is, *in general*, better. It might not be as fun for you in particular, and if that’s the case by all means do harder quests! You can continue to use the guides if you wanted to, and simply follow a section a level or two ahead of where you are. As you said, everyone plays the game differently and has fun with different things.
What I don’t like is you seem to imply that your way is the *best* way to play the game and that someone wanting an easier, less brain-intensive leveling experience is somehow inferior. You specifically said to me “You don’t enjoy the game” when that is simply not true, and presuming to understand my feelings toward the game and my enjoyment of it is… well… pretty arrogant. It’s just a *different* way of playing, and a *different* way of enjoying the game. Please try to open your mind and see things from other people’s perspective 🙂
The point of any game…
I have already found my way into the Outland because I was looking for the quest that provides the Chest item listed in the Shopping Guide.
I left the guide after turning in the Glyphed Oaken Branch.
Up to this point, I had followed the guide from the point where I left Ebon Hold.
The point of any game is fun. For each of us that can be something different. Pure leveling to me is pointless. There is a HUGE game here and I’m enjoying it as I level.
Challenge is another aspect that makes games and gaming fun.
Your comment about gear not making any difference leads me to a couple of thoughts.
One, you don’t enjoy the game. Yes, I could kill everything in this guide with a skinning knife because I so far above and more powerful than any of the suggested targets. Purely unimportant to the person who is bored by the game and just wants an 80 to play with in the endgame content.
Two, you are missing a crucial point in my comments. The experience being gained by following this guide is FAR less that what a DK is capable of earning. Having skipped to the Outland I can tell you that even those quests are proving to be nothing of a challenge and yet I am earning 6,000 more experience per quest. What’s more, is that the Outland quests are taking far less time to complete! I would estimate that my Exp/hr is nearly tripled by skipping ahead.
There is one more thing to consider. The player who follows a guide that runs at the lowest possible challenge will not learn the full capability of their character. I realize that this is not important to the person who is making their 4th Deathknight but then again, if you are on your 4th character of any type, you probably don’t need the guide.
Ye, I can see how hundreds if not thousands of people would follow and praise this guide. It takes all the guess work, challenge, and difficulty out of the game. You will gain experience, and it will seem to go fast. Mindlessly. That pretty much fits our social norm.
But this game is brilliantly written to challenge the mind. It is a shame that this guide teaches you to skip that in favor of ease.
By now, you should have a good feel for what I’m looking for.
Thanks again.
Before you give up on theBefore you give up on the guides, I would try the Outland and Northrend ones. We have hundreds of satisfied users with extremely fast leveling times, so I’m not sure exactly what’s going wrong for you, but I’ll do my best to respond to your concerns:
For gear: Keep in mind that this guide was written BEFORE the Wrath expansion was released. The idea was to be able to get as much crap for your DK ahead of time, including gear and quest items. I completely ignored the shopping list when I created my DK. It’s just not important at all at this stage in the game.
As far as doing easier quests – Have you tested this to see if you are really leveling slower (not just compare exp gains from quests, actual xp over time)? Jame has done many tests and has found that easier quests are the best way to level – they are done very quickly, no deaths, and while you gain less experience than you might for a higher level quest, it is still enough. Plus, this leaves more quests to be completed at level 80 for money.
Also keep in mind that these guides were written before the dungeon finder and some other changes that made leveling faster and easier.
That said, the guides are also not set in stone. If you level more quickly than the guide indicates (and many do), it’s perfectly reasonable to skip ahead to the next portion of the guide.
Hope this helps with your enjoyment of these guides, and thank you for your polite feedback.
Oh, as an afterthought – if you find the guides too wordy, try the addon version. They are very concise notes for each step that you might find more to your liking. Some people enjoy the more wordy paper guides and like to have things more explained. I’m surprised you thought they didn’t have enough information though – most people seem very impressed by the explanations for how to do each quest.
I’m not enjoying these guidesI am finding that there is a lot that is not said in these VERY long and wordy guides.
I am also finding that many of them are written such that you perform quests that are at the lowest difficulty for your level and often times the loot, gear, and shopping guides put me in position that is well below my level or need.
For example, the shopping list for this guide includes the Battlemaster’s Breastplate and suggests arming it at level 60. But nothing tells you that you will have to complete 5 quests in a chain that will put you WELL past level 60 if you begin as soon as it is available. The leveling guide does not even mention the breastplate nor the chain to get it.
I followed this particular guide and found that I was earning lower experience at level 58 than my Rogue was earning in other areas at level 56.
How is this a “Leveling Guide” if you don’t get decent experience with which to level?
Gear:
So I have to buy everything from the AH or leave the guide for a few hours in order to get the gear listed in the shopping list? Again, this destroys the idea behind leveling, does it not?
🙁
this guide is very outdated,this guide is very outdated, it was last updated just after 3.0.8 and DKs have had talent and ability changes in every patch since. Most notably patch 3.1 where the talents in all trees got rearranged (e.g. Morbidity used to be first tier), Unholy Blight was also nerfed(i forget in what patch) and is now an effect from Death Coil and is no longer an AoE, along with countless other changes.
another change unrelated it DKs is two new flight points at Thondroril(sp?) River and The Bulwark added in 3.3
Killing Diseased Wolf for Wildlife Suffers TooI rode around for half an hour (not very efficient leveling) before I realized that the Carrion Lurker’s share the same spawn/respawn as the wolves. So if you see a lot of lurkers as you move north, kill a bunch of them. Then come back later to get the wolves.
I killed 10 lurkers to get 4 more Wolves.
Talent build needs to be updated.The first talent point can not be in Morbidity because it requires 5 points in unholy.
I am fairly new to WoW so I don’t know if this was a change implemented since this guide was written, but it is not possible now.
Talent build needs to be updated.The first talent point can not be in Morbidity because it requires 5 points in unholy.
I am fairly new to WoW so I don’t know if this was a change implemented since this guide was written, but it is not possible now.
Shopping list???Where is the shopping list?
I maybe I’m dumb.
reasonthat isbecause there have been a few patches since the guide was made ;D
LevellingHey Jame,
First of all, I LOVE YOUR GUIDES!!!
Second, I made a Death Knight, and immediately started using this guide, because I have used your guides for my main! Anyway, I queued in BG on the side all the time, because I love PvP, and I just got to level 60 and I am more than one level in front of your guide! What do you think I should do?? Should I keep following this guide or should I start on your 60-65 guide for all horde?? 😕
spelling errorit’s not “The Marry’s Stead” it’s “The Marris Stead”
New leveling Build foe 3.2.2Does anyone have a patch 3.2.2 build for fast leveling please? All the builds I can find are prior to patch 3.2.
Cheers
Talents30 min ago i started yours guide but i dont understand how u spending talents, because u wrote: ‘Spend your first talent point in Morbidity.’ but i can add to this if i already have 5 point in unholy.
(btw. sorry for my english if its wrong ;p)
Great Guide Jame!I loved your guide, it leveled my Orc DK up from 55 to 61 in almost 11 hours of /played time. Amazing! And as for the revised talent tree magnificent. These are truly some amazing guides you’ve got up here Jame!
As a sort of bare bones guide for first timers when it comes to playing a death knight, i started a blog, by a n00b, for a n00b as I see it. I will unashamedly promote it (i have no ads, i just want to help people :]) on your site and if you like it please help sponsor it :D.
http://deathbypickle.wordpress.com/
i was wondering about whichi was wondering about which presense i should use?
Sorry wouldn’t let me edit.Corpse Explosion also works on other peoples ghouls, including the ones summoned from Army of Dead. It works while the are alive, and that should be the only time you use it, or it takes a massive dive in damage.
Looks good, but personally ILooks good, but personally I like Corpse Explosion and Imp. Unholy Presence more then Annihilation. The faster runes cd the faster you can throw out more skills, which could make up for 3% lost to your melee attacks. Plus you shouldn’t be using Obliterate in your rotations.
Also I like Corpse Explosion for the massive amount of damage it can give out. Say you also the the Glyph of the Ghoul your ghoul would have more stamina then you. You use Corpse Explosion on him and he explodes doing 25% of his max hp, like the Explode skill. If you are geared enough this is a good 5k+ (20k hp) more damage (and it can crit up to 22k), but you lose your pet for 30 seconds.
Also I think this is the newAlso I think this is the new unholy DPS monster for raiding. 0/13/58
With my old unholy spec (17/0/54 classic) I got 3,3k Attack power and 33% crit.
With the spec just listed I got 2,8k Attack Power and 30% crit but much more damage!
Sad that no one wan’t me in raids anymore ’cause of low stats 🙁
Raventiger’s SpecHere is the spec Raventiger posted on the Alliance guide, but these are in link form. He tried to make these as close to the old specs Jame created.
Level 58
http://www.wowhead.com/?talent#jZZfMhoLfdrcq0csub
Levle 59
http://www.wowhead.com/?talent#jZZfMhoLfdrcq0csuh
Level 60
http://www.wowhead.com/?talent#jZZfMhoLfdrcq0csuu
Level 70
http://www.wowhead.com/?talent#jrZZfMhoxfdgcq0csut
Level 80
http://www.wowhead.com/?talent#jfcMmZZfMhoxfdgcq0csut
I would reccomend, forI would reccomend, for glyphs:
Major:
the Ghoul
Bone Shield
Plague/Scourge Strike (I would say Plague unless you are having troubles with your diseases staying on)
Minor:
Raise Dead
Pestilence
Horn of Winter
Thank YouThis guide is awesome. I had been looking for a good spec for my Death knight and you provided the best one I could find.
Now, with a DK lvl 63 I was able to solo a lvl 69 MOB! (Using a potion and with 1% health remaining… I’m still learning 🙂 ).
Thank you for sharing your experience. The guide is awesome and easy to follow, even in the addon form.
Also, I want to ask if you’re going to post a guide for warriors (I have a lvl60 one and it’s ok, but I feel I could squeeze some more here and there from it).
Thank you Jame!
This is because of theThis is because of the changes made with patch 3.1. The talents have just been moved around in the tree they are mostly the same talents, so you can just skip ahead and put the points in the talents that Jame says too, but you can’t do it in the order that he says to in the guide.
Mistake in guide?Hi Jame, at the beginning of your guide you say to ‘Spend your first talent point in Morbidity’, yet at that point in the guide you’d have had to first spend 5 talent points to open up Morbidity to spend a talent point there, so you may want to change that part of your guide as you’d only be able to spend your first talent point in one of the first three talents in unholy.
Awesome, thanks…Thoughts on glyphs? I’m gonna keep Ghoul but what should I replace Death Strike glyph w/? Scourge Strike doesn’t really do anything for me cause no target lasts that long for me to be worried about reapplying. From my research my only real choices are between Dark Death and Unholy Blight. I’m leaning towards UB glyph unless I should be doing a better job of dumping rp…
“If you use this build“If you use this build 0/10/61” & “14/0/57 this one worked well” both link to the same build.
3.1 changesAfter checking specs today its pretty much the same as what jame has recommended in his guide here. The biggest nerf I think has been the healing power of Death Strike. So I just use Scourge Strike in its place. IT, PT SS, is how i start on a single mob. Scourge strike also procs Desecration which is important for AoEing big packs for mob. Overall my DK still feels OP, at least in DPS. Well see how the survivability is. I wonder if we can still solo MC and other stuff with the Death Strike healing nerf??
Unholy still worksYou can still use unholy for leveling. If you use this build [url=http://www.wowhead.com/?talent#jfcMmZZfMohxfdgcq0csut]0/10/61[/url] I would take the 2 points out of “Improved Unholy Presence” and put it in “On A Pale Horse” for faster leveling.
[url=http://www.wowhead.com/?talent#jfcMmZZfMohxfdgcq0csut]14/0/57[/url] this one worked well for me in BG’s and instances even with my green and blue leveling gear I was coming in top 3 for Damage
– AOE & Heal
– Increased mount speed and “Path of Frost” for faster questing
– Controlable PET helps alot for leveling
– Good DPS
– the rotation isn’t to complex
– Most of all Unholy is a fun build IMHO. I still enjoy the AOE and Having fun while killing MOBS makes Leveing way easier.
“No one impedes us…no one denies us….and if need be….no one survives us…,”
Leveling Spec for 3.1.1?I tried reading ElitistJerks, WoW forums, ArenaJunkies, etc. But no one has given me a solid spec for leveling w/ reasoning behind it. I’m lvl 74 and I’m sure I could get to 80 on my own but would appreciate some guidance on getting there efficiently. Thanks.
This seems to be the unholyThis seems to be the unholy build right now [url=http://talent.mmo-champion.com/?deathknight=00000000000000000000000000003200500000000000000000000000230230335003215103150203133151&glyph=000000000000&version=9806]0/10/61[/url]
http://www.deathknightbuilds.net/
“No one impedes us…no one denies us….and if need be….no one survives us…,”
“Pet dancing” is old bug“Pet dancing” is old bug affecting all pets (hunter, warlock too). I am surprised you haven’t had it before.
Another hotfixThey thankfully made changes to DS again. Now it will heal 5% HP per disease up to 15%. That puts Frost in big disadvantage compared to Unholy (3 diseases) or Blood (Imp. DS talent) but should be enough to use it.
I am not sure if this is a buff or nerf for leveling compared to old version but I am sure all DK tanks are happy that it scale off HP now instead of damage done (and should finally scale with Unholy third disease).
I have noticed that “DeathI have noticed that “Death Strike” is Broken. I can get more healing from being in ” Blood Presence” and getting a good hit.
I have also noticed that my ghouls have become slightly touched in the head. When fighting multiple Mobs. If the ghoul gets agro it will turn and run away more than 10 yards (usualy toward more mobs the run straight back to me with more in tow). This is a new on for me.
I still have fun playing this build but it is not as Uber as before.
“No one impedes us…no one denies us….and if need be….no one survives us…,”
Watch out – DS is deadDue to recent Death Strike [b]murder[/b] – which cause DS to heal for “funny” amount, making it completely useless for Unholy and Frost builds – posted spec may not work well in aoe leveling.
Hopefully Blizzard will come to their senses as they destroyed main favor of the class (at least for me) and until then I would advise heavy Blood build as you can grab extra healing tools there (Rune Tap, Vendetta, Bloodworms etc.).
Going for Unholy or Frost at the moment will make you feel like Arms Warrior – no healing tools.
talent build DKI think this build is a little bit closer to James.
http://www.wowhead.com/?talent#jfcMmZZfMohxfdgcq0csut
It takes a few more points to do the same thing. It’s 14/0/57 I took a few points out of morbidity seeing as i don’t normaly use death coil to heal my ghoul.
He doesn’t usualy come close to dying and if he does that usualy means I’m coming fairly close too. So right before he dies I cast “death pact” then “raise dead” right away. It’s like a little restart
Those 2 builds are the same.Those 2 builds are the same.
Re Talent treeOn the old talent tree we had master of ghouls. On the new one i notice it hasn’t been included. Will this affect the leveling speed as i used my ghoul alot and was much faster killing mobs with it.
Cheers
a talent treethanks for the talent trees. hopefully jame could get his recommended one up to sometime
Unholy spec? You mean aUnholy spec? You mean a decent spec for leveling.
I have two over here:
1.[url=http://talent.mmo-champion.com/?deathknight=23050215300033032012231013500000000000000000000000000000230230302003210000000000000000&glyph=251008040506&version=9757#]Blood Build[/url]
2.[url=http://talent.mmo-champion.com/?deathknight=23050215300033032012231013500000000000000000000000000000230230302003210000000000000000&glyph=251008040506&version=9757#]Unholy Build[/url]
You can use those for now until some leveling builds emerge, note that 3.1 has only been released today and will take some time before any solid leveling builds come out.
Hey Jame, do you have a 3.1Hey Jame, do you have a 3.1 unholy spec to show us?
Death Knights have theDeath Knights have the sickest XP rate in the plaguelands. They level about 25% faster in the plaguelands at level 58 than in Outland.
There are many reasons why it is so, but I don’t feel like listing them so I’ll just tell you this: trust me on that. I clocked 170K xp/hour on my DK in the plaguelands, but only 130K xp/hour in Hellfire.
There are a lot of reasonThere are a lot of reason Jame gives. Mostly:
[list][*]Things in Azeroth are lower level = easier to kill
[*]People go to Outland at 58 and then complain that they are too low to pick up some quests – you may need to grind.
[*]Old world quests and mobs may give a little less XP, but you should be able to burn through them much more quickly = overall faster XP rate.[/list]
Now, on a death knight this may not be much of a factor since you guys are so OP for leveling, and while you may have to grind a bit to catch up to the guide’s level and get all the quests, it’s easy for you. So overall it’s up to you, but those are the reasons that Jame usually gives. [url=http://jamewowpro.blogspot.com/2008/11/going-to-northrend-at-level-68-is-it_25.html]This blog post of his[/url] is about Northrend, not Outland, but it’s the same principle.
Is the Undercity and E Plaugeland’s stuff really neccessary?I’ve made an awesome DK and im now level 58,
When my hunter was 58 in TBC I immeadiatly went to the Outlands and was shocked at the exp given by the mobs.
Is there any secret bonus to leveling 58-61 in Azeroth? I mean I find leveling in Outland WAAAAY faster.
Nerfing Death Knights.I just created my first Death Knight last night so am obviously new to the game. I know there is a lot of talk about Nerfing Death Knights. I am unclear if this has already happened or is about to happen. Here is my question. Is there any changes to the talent tree spec or the attack sequence you would make based on these changes (if there are any)?
As always thanks for making the game a lot more fun. I am a religious follower of your guide. One thing that might be nice would be a guide for those who are leveling with a friend. I have a person I sent a invite to and we are both leveling getting 3X exp for kills and quests (there was a circuit that we turned in 4 delivery quests in the 51-60 guide and received 64k XP, it was sick in a good way). The challenge we face is we keep having to skip major portions of the guide. Would love to see one (it would be a lot shorter) for 1 – 60 with a friend. Just whip that together in your spare time ok :-).
No! Not Boogie-Jame!No! Not Boogie-Jame! 🙂
*argh* My brain! Sorry but I*argh* My brain! Sorry but I didn’t understand a word. 😀 Please try to write “I” instead of “i” and (!) do never write “u” instead of “you” on wow-pro or Boogie-Jame will get you.
It’s nice of you that you want to point out mistakes in the guide, but please try to make an effort on your spelling the next time. Thanks
…First off amazing guides i wouldnt of gotten my pally to 80 without you.
I noticed that when u say
After you have 60 skulls be sure to go back to the cauldron to turn in and get your 20 Potions *BEFORE* going back to the Scarlet Tavern. If you return to Acherus without turning the skulls in there is no way to turn them in later.
but i past the guy with the cauldron when doing the next quest and i dismounted turned em in and finished the quest
so i dont know if u said that for a reason but i thought i would tell u
Thx again