
 by Jame
Chapter 5 – [Level 60 – 65]
Journey from Hellfire Peninsula to Terokkar
Introduction
This guide is made for FAST leveling through the use of Optimized Quest Circuits. With this guide, questing will be very efficient and you’ll not waste any second running around and trying to figure out in which order to do your quests. Follow each instruction carefully and you will see for yourself. The quest choices and order to do them are optimal so that you run as few as possible while doing the most possible, turning several quests at the same time. It will be like grinding, because you’ll be killing stuff almost non-stop, besides you’ll also be completing a bunch of quests at the same time!
Everything described in this guide can be done solo (beside when I say otherwise). You can, of course, follow this guide while duoing, grouping, it’s not a problem, it works too.
DISCLAIMER: This guide does NOT take into account tradeskills, class specific quests or PvP. It’s 100% focused on getting the most experience possible in the shortest possible time while doing a lot of quests and enjoying as much content as possible. Any race/class combination can do this guide. Any complaints about PvP, tradeskills, or class specific issues will be ignored.
Basic rules
- Spend your talent points so that you kill things as fast as possible. (e.g: Priest should specialize in Shadow Talents, Warriors in Arms/Fury, etc.
- Don’t waste your time trying to find groups for questing, you can solo everything that is described in this guide unless I say otherwise. Only group with someone when it’s not gonna be a waste of time (e.g: meeting the person at the other end of the zone to show him the way to where your quest is, that is a waste of time)
- Try to always log out in an inn or in one of the major cities when you take a break.
- When I say you should make an inn your new home location, it’s for a good reason, and it will save you much time.
Useful Addons
To get the most out of my guide, you should get an addon which displays coordinates, because I use them to describe locations in my guide (x,y). You can use any addon you like, but here’s a very simple one I use.
Recommended
- DMiniCoords – A simple box which displays coordinates, left-click it to move it where you like.
Optional
Below is a list of other addons I use, this is 100% optional though, it’s mostly for people who are curious to know which addons I use:
- Bartender4 – A great action bar addon.
- X-Perl UnitFrames – Very nice, highly customizable unit frames.
- Quartz – The best casting bar addon out there, imo.
- Scrolling Combat Text – I just don’t like the default UI Floating Combat Text.
Side Note: In case you don’t know how to install add-ons, simply download an addon from one of the links above and unzip it. Then drag the unziped folder in your Addon folder (full path is c:\Program Files\World of Warcraft\Interface\Addons). Then, restart World of Warcraft and it should be working.
If it isn’t working, you might need to log out to your character selection screen and click on “Addons” in the lower-left corner. Tick the box that says “Load out of date Addons”. Re-launch WoW.
Level 60-70 XP Curve Changes
As of patch 3.0, it takes much less XP to level from 60 to 70. That means you will probably ding much faster than what my guide says. That’s not a problem at all though, just keep following the guide normally. I strongly recommend achieving level 70 before going to Northrend, I’ve explained many times why on my blog. In a nutshell, it’s much more efficient and easy to go to Northrend at level 70. You’ll level faster that way and also get more gold. I actually recommend going until the very end of my Outland guide before moving to Northrend, even if that means going there at level 71 or 72. That’s if you want more gold. However it’s up to you, going to Northrend at level 70 is fine too, you’ll just get less gold in the end.
Color Code
- Quests
- Items
- Locations
- Quest objectives to kill
- NPCs
- Locs
The Guide
I assume that you haven’t done any quests in the Outlands before level 60. If you have it’s not a big deal, just jump in the guide somewhere where you still haven’t done all the quests and go from there.
Level 60
Let’s get started!
Go to the Blasted Lands. Go all the way south in the zone until you find the Dark Portal. Take the quest [61] Through the Dark Portal from Warlord Dar’toon.
Zone through the portal. In Hellfire Penninsula, go down the stairs, turn in [61] Through the Dark Portal, get the follow up [61] Arrival in Outland. Go directly north to the flight master, turn in [61] Arrival in Outland, get the follow up [61] Journey to Thrallmar.
Ask the flight master to send you to Thrallmar.
In Thrallmar, turn in the quest [61] Journey to Thrallmar, get the follow up [60] Report to Nazgrel. Go turn it in and get the follow up.
Now gather the 2 other quests you can find in Thrallmar, this is easy to do if you look for yellow “!” on your minimap. You should have 3 quests:
- [60] Bonechewer Blood
- [61] Eradicate the Burning Legion
- [61] I Work… For the Horde!
Go to the inn and make it your home location.
1. Exit Thrallmar, follow the path east and shortly you should find Sergeant Shatterskull (58,41). Turn in [61] Eradicate the Burning Legion, get the follow up [61] Felspark Ravine.
2. Go east to Felspark Ravine (62,39). Kill what’s on the list of [61] Felspark Ravine until you finish it. !Beware of the Fel Reaver passing by!
3. Go south until you hit the barricades overlooking the Path of Glory (62,48). Go westwards, staying on top of the hill, killing orcs as you go and picking up Salvageable Wood and Salvageable Metal
Keep doing this until you finish [60] Bonechewer Blood
and [61] I Work… For the Horde!
4. Go back to Sergeant Shatterskull, turn in [61] Felspark Ravine, get the follow up [61] Forward Base: Reaver’s Fall.
Go to Thrallmar and turn in all quests and get the 3 follow ups:
- [61] Burn It Up… For the Horde!
- [60] Apothecary Zelana
- [62] Falcon Watch (Blood Elves won’t be able to take this quest yet but when you come back next time to Thrallmar a BE NPC outside the main building will have it available, it won’t be too late to take it then)
Sell junk, repair, re-stock food/drink.
1. Exit Thrallmar, go east/southeast till you reach Reaver’s Fall (66,44). Turn in the 2 quests, get the follow ups:
- [62] Disrupt Their Reinforcements
- [60] Spinebreaker Post
2. Go east/southeast to The Legion Front, where you should find Portal Xilus (70,46)
Kill demons around this portal until you got 4 Demonic Rune Stones. Then go inside the portal and right-click it to disable it.
3. Go north/northeast while killing demons on your way, until you reach Portal Kruul (74,40). Kill demons until you got another 4 Demonic Rune Stones, then disable the portal.
4. Go back to Reaver’s Fall, turn in [62] Disrupt Their Reinforcements, get the follow up [62] Mission: Gateways Murketh and Shaadraz.
Look in your inventory for Seaforium PU-36 Explosive Nether Modulator, put it on one of your hotkeyed buttons. Talk to Wing Commander Brack and tell him “Im on a bombing mission…”. While flying, use the Seaforium PU-36 Explosive to aim and destroy Gateway Shaadraz and Gateway Murketh, they look like the portals we destroyed in the previous quest, just slightly bigger.
Turn in [62] Mission: Gateways Murketh and Shaadraz, get the follow ups:
- [62] Mission: The Abyssal Shelf
- [61] Return to Thrallmar
Find the bombs in your inventory – they are called Area 52 Special – and put them on the same hotkey you used in the previous bombing mission.
Go talk to Wing Commander Brack and ask him to send you to The Abyssal Shelf.
You can complete this bombing mission in several runs, so it’s not a problem if you don’t manage to kill everything required on the first run.
When done with the bombing mission, turn in [62] Mission: The Abyssal Shelf.
Wing Commander Brack should have a quest for you now, but don’t take it unless you want to re-do the bombing mission for fun, it won’t give exp though.
5. Talk to Wing Commander Brack, ask him to send you to Spinebreaker Post.
In Spinebreaker Post, turn in the quest you have and get all the available quests:
- [60] Boiling Blood
- [60] Wanted: Worg Master Kruush
- [61] Make Them Listen
- [61] Preparing the Salve
- [61] The Warp Rifts
Also get the new flight path.
==Note== From now on, gather all the Hellfire Spineleaf you can find on your way. They can be found mostly close to mountains, all around Zeth’Gor and north of it.
1. Go northeast to Zeth’Gor, you can enter it through a gate on the southern side of it at (66,74). Clear the way to the stables which are directly east the gate you just entered (68,74). Kill everything near the stables, because the two worgs inside the stables will run around and call for help after you kill their master. Once you’ve cleared the area, go to the stables, kill Worg Master Kruush and loot his head.
Stay in this area and kill orcs while gathering as many Hellfire Spineleaves as you can, check every hill and mountains surrounding Zeth’Gor. Keep killing orcs in this area until you got 12 Bleeding Hollow Blood.
2. Once you have 12 Bloods, you must find the Cursed Cauldron (65,71) which is just outside of the gate where we entered Zeth’Gor earlier.
Stand next to the cauldron and right-click it. This will summon a bunch of scarabs, you don’t have to kill them, just run a little north and wait for them to despawn, it takes about 20 seconds. Rinse and repeat until you’ve 12 Boiled Blood. The fastest way to do this is to click the cauldron twice in a row as fast as possible, and then move away and wait for them to despawn. If you try to stay and click a 3rd time, you’ll get interrupted by scarabs as they turn agressive.
3. Gather the last few Hellfire Spineleaves you need, check the map to see the area in which they can be found.
4. Go back to Spinebreaker Post, turn in:
- [60] Wanted: Worg Master Kruush
- [60] Boiling Blood
- [61] Preparing the Salve
Get all follow ups:
- [61] Apothecary Antonivich
- [61] Investigate the Crash
- [61] Zeth’Gor Must Burn!
- [62] The Eyes of Grillok
5. Fly to Thrallmar. Go to the main building, turn in [61] Return to Thrallmar. Get the 3 quests in this building:
- [61] Forge Camp: Mageddon
- [62] The Assassin
- [62] Weaken the Ramparts
Find Apothecary Antonivich, he’s in the tower building in the northwestern part of Thrallmar, turn in [61] Apothecary Antonivich, get the follow up [61] A Burden of Souls.
Also get the quest [60] Hellfire Fortifications, which should appear as a blue “!” on your minimap.
1. Get out of Thrallmar, ride northeast to Forge Camp: Mageddon (64,31). Kill 10 Gan’arg Servants and Rasorsaw, a big demon who roams all across the camp. Loot the Head of Forgefiend Razorsaw and the Burning Legion Missive. Right-click the missive to start [61] Vile Plans.
2. Go back to Thrallmar, turn in [61] Forge Camp: Mageddon, get the follow up [61] Canons of Rage.
Also turn in [61] Vile Plans.
You can destroy the Burning Legion Missive if it’s still in your inventory.
3. Right behind the inn of Thrallmar you should see a small path going up the hills. Follow it and go north/northeast till you reach Forge Camp: Rage (59,32)
Kill fel canons there until you finish [61] Cannons of Rage.
4. Go back to Thrallmar, turn in [61] Cannons of Rage, get the follow up [61] Doorway to the Abyss.
5. Take the same path going up the hills behind Thrallmar, but this time go northwest until you reach Invasion Point: Annihilator (54,27). Locate Warbringer Arix’Amal in the northern part of the camp. Clear to him, kill him and loot the Burning Legion Gate Key.
Now clear the way to the demon gate which is directly in front of where Warbringer Arix’Amal was.
Stand in front of the Forge Camp: Portal Glyph, which is inside the gate, right-click the Burning Legion Gate Key and left-click on the glyph. This should shut down the gate.
6. For classes with some sort of levitation spell, go to the western edge and jump off the cliff, levitate down. For others, hearthstone back to Thrallmar, and then go northwest until you reach Foreman Razelcraz (51,30). Get his quest [61] Outland Sucks!
7. Go to the little canyon south of Foreman Razelcraz (49,36), kill Marauding Crust Bursters and look for Shredder Parts. Gather 6 of them.
If you’re lucky, one of the worms should drop an Eroded Leather Case. Right-click it to start [61] Missing Missive. If you aren’t lucky, no problem, we’ll be killing more worms at another spot in the future. So don’t bother killing more here if you already got 6 Shredder Parts.
8. Go back to Foreman Razelcraz, turn in [61] Outland Sucks!, get [61] How to Serve Goblins.
1. Go southwest till you reach one of the shattered hand orcs camp next to the Northern Rampart, and locate Manni’s Cage at (45,41), free him.
2. Go south to another camp on the other side of the road, locate Moh’s Cage (46,45), free him.
3. In the next camp south of this one you should find Jakk’s Cage (47,46). Free him.
4. Mount up, follow the road west through the ramparts and keep going until you see wooden spikes on each side of the road, go through them and turn right right after. Go along the mountain until you find a Fel Orc Corpse (34,44). Turn in [62] The Assassin, get the follow up [62] A Strange Weapon.
5. Go south/southwest to Falcon Watch (27,61). Turn in [62] Falcon Watch and get all 7 quests available in Falcon Watch.
==Note== If you’re 61+, there will be more quests available, here are the ones you should NOT take yet:
- [61] Helping the Cenarion Post
- [63] Trueflight Arrows
- [61] Report to Zurai
Get the new flight path.
While we are here, if you wish to train your First Aid skill past level 300, you can buy the Master First Aid book from Aresella, who stands under a tent.
1. Go east to The Great Fissure (30,62). Start to ask in general channel if anyone is interested in doing the quest [63+] Wanted: Blacktalon the Savage, she is in the cave in the same area. In the meantime, kill Stonescythe Whelps and Stonescythe Alphas while heading towards the cave (34,63).
Once you are done with killing whelps and alphas, you can try to go and solo Blacktalon the Savage if you haven’t found a partner yet. Pretty much all ranged classes can kite it to death, just make sure you clear the way before you engage it.
If you can’t solo it and can’t find a partner, no problem, we’ll come back to this place one more time for another quest.
2. Go southeast until you find the Southern Ramparts (44,62). Kill orcs in this area until you complete [61] A Burden of Souls.
3. Go southeast until Zeppelin Crash (49,75). Turn in [61] Investigate the Crash, get [61] In Case of Emergency… and [61] Ravager Egg Roundup.
4. Ride southwest until you get back on the trail and follow it until you reach an area called Razorthorn Trail (42,83). Start killing all ravagers you see while looking for Ravager Eggs on the ground.
5. Once you have 12 eggs, ride back to Zeppelin Crash and turn in [61] Ravager Egg Roundup, get the follow up [61] Hellboar, the Other White Meat.
6. Go northeast of the zeppelin and you should find an area with a lot of Deranged Helboars and Marauding Crustbursters (51,69). If you already got the Eroded Leather Case, no need to kill the Crustbursters.
Kill Helboars (and Crustbursters if needed), whenever they drop Tainted Helboard Meat, right-click the Purification Mixture in your inventory.
Stay in this area and kill stuff until you finish [61] Helboar, the Other White Meat and have found an Eroded Leather Case and started the quest [61] Missing Missive.
7. Go back to Zeppelin Crash, turn in [61] Helboar, the Other White Meat, get the follow up [61] Smooth as Butter.
8. Go southeast to the Expedition Armory (55,76), kill Unyielding Knights until one drops A Mysterious Tome. Right-click it and start the quest [61] Decipher the Tome.
9. Go northeast till you find the entrance to the Valley of Bones (56,73). Kill Bonestripper Buzzards and gather Zeppelin Debris while going eastwards along the valley.
==Warning== Be careful when you kill a buzzard, if you kill it close to another buzzard (about 20 yard range), it will come to feed on the corpse and attack you, this can result in chain pulling if you are close to several buzzards, so pull back about 30 yards from any other buzzard if you need a break.
10. You should be about halfway done with [61] In Case of Emergency… and [61] Smooth as Butter when you reach the other end of the Valley of Bones.
We’ll do the other half soon, but for now, mount up and go north until you hit the Path of Glory, then go westwards and find the Eastern Cannon (61,52). Stand next to it right-click the Flaming Torch in your inventory.
11. Go further west along the Path of Glory and find the Western Cannon (55,54). Burn it.
Hearthstone to Thrallmar.
Turn in [61] Burn It Up… For the Horde!
Go to the main building, turn in all quests and get the 3 follow ups:
- [61] The Agony and the Darkness
- [62] The Warchief’s Mandate
- [63] Cruel’s Intentions
Get out of the building and turn in [62] The Warchief’s Mandate, get the follow up [62] A Spirit Guide.
Go to the tower building northwest, turn in [61] A Burden of Souls, get the follow up [61] The Demoniac Scryer.
Sell junk, repair, re-stock food/drink.
Fly to Spinebreaker Post. Turn in [61] Decipher the Tome, get [61] The Battle Horn.
1. Head north until you reach the Valley of Bones. Go westwards while killing buzzards and gathering Zeppelin Debris. You should be done with [61] In Case of Emergency… and [61] Smooth as Butter when you reach the western end of the valley.
2. Go south to Expedition Armory (55,76). Clear the way to the southern part of it, where you should find Lieutenant Commander Thalvos (55,83). Kill him and loot the Unyielding Battle Horn.
3. Go northwest to Zeppelin Crash (49,75). Turn in the 2 quests, get the follow up [61] Voidwalkers Gone Wild.
4. Go south to The Warp Fields (50,82). Right-click the Unstable Warp Rift Generator from your inventory and left click on the floor to create a warp rift. Kill voidwalkers as they come out of your rift, keep killing in this area until you complete [61] The Warp Rifts and [61] Voidwalkers Gone Wild.
5. Go back to Zeppelin Crash, turn in [61] Voidwalkers Gone Wild.
6. Ride back to Spinebreaker Post.
Turn in [61] The Battle Horn, get [61] Bloody Vengeance.
Turn in [61] The Warp Rifts, get [61] Void Ridge.
Sell junk and repair.
1. Go northeast until you find an old destroyed Alliance siege tower, with an Unyielding Banner infront (63,78 )
Right-click the Unyielding Battle Horn from your inventory and kill Urtrak.
2. Go to Zeth’Gor, this time we’re gonna enter it by the northern gate (68,70).
First of all, find a Bleeding Hollow Peon, kill it and loot a Bleeding Hollow Torch from it.
Once you have a torch, go to the Bleeding Hollow Forge, which is directly on your left after you enter the gate. Stand next to the Heated Forge and right-click the torch, this should light it. It only stays lit for 5 minutes, so you have to hurry. However, the first objective is the building right next to the forge, stand close to it and use the lit torch, this should set fire to the Eastern Hovel.
Now here’s what we’re gonna do: gather 3 more torches, light them all up, and hurry up to the next 3 building we must set on fire, within 5 minutes.
Do them in this order:
Go west to the Stable (68,74), set it on fire.
Go further west to the Western Hovel (67,76), set it on fire.
Go south to the Barracks (biggest building)(69,76), set it on fire.
3. Now before we leave Zeth’Gor, we must find an Eye of Grillok and use Zezzak’s Shard on it. Once you have done that, you should have a 5 minute buff called Eye of Grillok.
Get out of Zeth’Gor and ride back to Spinebreaker Post as fast as you can before the buff runs out. In Spinebreaker Post, go next to Zezzak’s Cauldron:
Turn in:
- [62] The Eyes of Grillok, get the follow up [62] Grillok “Darkeye”.
- [61] Bloody Vengeance, get the follow up [61] Honor the Fallen.
- [61] Zeth’Gor Must Burn!
4. Go northeast, around Zeth’Gor and then east until you find Spinebreaker Pass (72,67).
5. Go through the pass and you’ll end up in an area called Void Ridge (75,64). You’ll find two types of voidwalkers there:
Collapsing Voidwalker: melee type, casts “collapse” when below 10% HP, it’s a self destruction which does 1000-1500 shadow dmg. You can interrupt it, but if you do, they will still explode upon death.
For melee classes, the best way to do it is to get them down below 10% HP and then run away while they cast collapse, if you’re quick enough, you’ll be out of the explosion radius.
For caster classes it’s easier, just nuke them down from range.
Vascillating Voidwalker: caster type. They become resistant to the magic school of the first spell you cast on them. So if the first spell you cast on them is a frostbolt, they will be resistant to frost spells.
For melees it’s easy, just melee them down and interrupt their shadowbolts.
For casters, the best way to do it is to first cast a spell of one school and then only use spells from other school. For example, if you’re a frost mage, open with a fireball and then only use frost spells. If you’re a Blood Elf Paladin, open with a mana tap, this will trigger the Arcane Resistance on the Voidwalker, and then you can use your holy spells.
Keep killing voidwalkers until you have 40 Void Ridge Soul Shards.
Hearthstone back to Thrallmar.
Sell junk, repair and re-stock food/drink.
Go northwest to Foreman Razelcraz (51,31). Turn in [61] How to Serve Goblins. This should make you ding level 61. Get the follow up [61] Shizz Work.
Level 61
Click the Felhound Whistle from your inventory while standing next to Foreman Razelcraz. This should summon a Fel Guard Hound who will follow you around. Go kill the helboars west of here. Each time you kill a boar, your Fel Hound will eat them and then leave some Felhound Poo behind him. Right-click the poo, if you are lucky you will find the Shredder Key, if not, keep killing boars until your Fel Hound produces the right type of poo.
Go back to Foreman Razelcraz, turn in the quest and get the follow up [61] Beneath Thrallmar.
Now enter the mine just a few steps away from Foreman Razelcraz, find and kill Urga’zz at the bottom of the mine.
Go back to Foreman Razelcraz and turn in [61] Beneath Thrallmar.
1. Ride southwest, through the northern ramparts, all the way to the Pools of Aggonar (40,43).
Start asking in general channel for a group to do [63] Cruel’s Intentions.
The mob you have to kill to complete this elite quest is in the same area, so look for a group to kill it while you do the other two quest. I recommend having a tank, a healer and some DPS class or killing Arazzius the Cruel will be a pain. Anyway, once you got a group together, go to the next paragraph and read infos about Arazzius the Cruel.
In the meantime, kill Terrorfiends until you complete [61] The Agony and the Darkness and [62] In Need of Felblood. The terrorfiends cast fel flames and it kinda hurts, so interrupt it or move away from it.
You also need to do [62] Arelion’s Journal in this area, you can find Arelion’s Knapsack hanging from a tree branch with a blood elf corpse near it (40,37)
Loot it and open the knapsack to find Arelion’s Journal.
2. [63] Cruel’s Intentions: This quest is not mandatory, but completing it early is very nice because the reward is worth it and will help you through leveling up to 70. If you really can’t find people to help you, it’s not a big deal, you can always come back later and try again.
Anyway, Arazzius the Cruel is at the end of the canyon in the Pools of Aggonar. He is guarded by two mistresses of doom, make sure you pull both before you engage Arazzius himself. Arazzius casts Pyroblast, Shadow Bolt Volleys and Inferno. You must absolutely interrupt inferno, or he will summon Infernals and things will get hectic. You can just heal through Pyroblast and Shadowbolt Volleys. However if you got plenty of classes with interrupts in your group, you might as well interrupt all his spells. But just make sure Inferno is kicked, pummeled or shield bashed, counterspelled or even earth shocked.
3. Get out of the Pools of Aggonar, get back on the road and ride west to the Fel Orc Corpse we checked before (34,44). Right-click the Ancestral Spirit Wolf Totem in your inventory and follow the wolf. He’ll lead you to Gorkan Bloodfist (32,28). Turn in [62] A Spirit Guide, get the follow up [62] The Mag’har.
4. Ride back to Thrallmar.
Turn in:
- [61] The Agony and the Darkness.
- [62] The Mag’har, get the follow up [62] Messenger to Thrall.
- [63] Cruel’s Intentions (optional), we can still do that one later.
Fly to Falcon Watch, turn in all quests and get all the follow ups:
- [62] Marking the Path
- [62] Arelion’s Secret
- [62] The Cleansing Must Be Stopped
Also get all the new quests available since level 61:
- [61] Helping the Cenarion Post
- [63] Trueflight Arrows
- [61] Report to Zurai
Set Falcon Watch as your new home location
Now we’re gonna do a little circuit. Our main objective is to find Magister Aledis, you can see his route on the map below. He’s a blood elf riding a hawkstrider. Simply put, follow the next steps while always checking for him on the road. When you find him, get back to full health before you talk to him, because when you do he’ll turn agressive. He’s no real threat, but try to interrupt his pyroblast, it does more than 2k damage. You have to get him below 30% HP and then you’ll be able to turn in [62] Arelion’s Secret, get the follow up [62] The Mistress Revealed.
1. Follow the trail, until you see a camp of Bonestripper Vultures north of the trail (29,56). Kill every vultures in this camp, always keep an eye on the trail while killing vultures. If you run out of vultures to kill, get back on the trail, we’ll move to another camp. If not, stay here until you finish [63] Trueflight Arrows.
2. Keep following the trail until you reach the main road, follow it west, until you find the second vulture camp north of the road at (26,49). Kill vultures there until you finish [63] Trueflight Arrows, but watch out for the fel reaver passing by.
3. Get back on the road and go west until you reach Cenarion Post. Turn in the two quests you have and get the 4 quests available:
- [63] Colossal Menace
- [63] Keep Thornfang Hill Clear!
- [63] Demonic Contamination
- [62] The Cenarion Expedition
==Note== From now on, kill every Hulking Boar you find on your way.
If you still haven’t found Magister Aledis, go west, all the way to Thornfang Hill. If you still haven’t found him, turn around and follow the road east all the way to Falcon Watch, you should find him then unless you’re extremely unlucky. In any case, keep looking for him until you find him.
Now we’re gonna ride to Shattrath. The reason we do this is that you’ll then have the flight path to Shattrath, which is quite handy when you need to go to a main city to train new skills (For those who have never been to Shattrath before, there are 4 free portals in the central room. You can use those portals anytime you want to go to Orgrimmar, the Undercity, Thunder Bluff or Silvermoon City).
If you don’t know the way to Shattrath from Hellfire, here is how: zone to Zangarmarsh, then go south until you enter Terokkar, then just follow the road south/southwest and you should see Shattrath soon.
After you arrive in Shattrath, first you must find the flight master (63,41) and get the new flight path.
Then go take the portal to Orgrimmar. In Orgrimmar, go to Thrall’s Chamber. Turn in [62] Messenger to Thrall, watch thrall do his speech, then take the follow up [63] Envoy to the Mag’har.
While you’re here, go train your new skills, visit the auction house, make space in your bags, etc.
Hearthstone back to Falcon Watch. If it’s not up, ride back to Spinebreaker Post and fly to Falcon Watch. Turn in:
- [62] The Mistress Revealed, get the follow up [62] Arelion’s Mistress
- [63] Trueflight Arrows
1. Go to (28,40). Kill as many Hulking Helboars as you see in this area. !Watch out for the fel reaver passing by!. It doesn’t matter if you run out of boars and still haven’t finished [63] Demonic Contamination, we’ll finish it later. Proceed to the next step
2. Go to Mag’Har Post, the entrance is at (30,33), go all the way to the top and turn in [63] Envoy to the Mag’har. A new quest should be available behind you. Get [63] A Debilitating Sickness.
3. Go back down and go back to the area with the Hulking Boars, once again kill as many as you see. Once again it doesn’t matter if you don’t finish [63] Demonic Contamination. Go to the next step.
4. Get back on the road and ride east to the Pools of Aggonar.
==Note== For those who didn’t do [63] Cruel’s Intentions yet, now is your last chance. We won’t be coming back to the Pools of Aggonar in the guide. If you really can’t find help though, just save this quest for later or for level 70.
Clear the way until you reach the Altar of Aggonar (39,40). Clear the area around it, get back to full HP/mana and have your cooldowns ready if possible. When ready, use the Signaling Gem from your inventory, after 30 seconds or so, 3 draeneis will attack you, you just need to kill the Draenei Anchorite fast, you can then run away and ignore the other two, but feel free to kill them if you prefer.
Ride back to Falcon Watch.
Turn in [62] The Cleansing Must Be Stopped.
Sell junk, repair and re-stock food/drink.
1. Go east to the Great Fissure.
==Note== For those who didn’t do [63] Wanted: Blacktalon the Savage yet. Now is your last chance. If you can’t solo it and can’t find help, just abandon this quest and come back to do it at level 70.
First go to the Western Beacon (30,61), kill any nearby Stonescythe Whelp and then right-click the beacon. If you don’t kill nearby mobs, they will all attack you when you light the beacon.
2. Go directly east of this beacon and you should find the Central Beacon (34,60). Kill nearby whelps and then right-click the beacon.
3. Go south and enter the cave, find a Drycap Mushroom and loot it.
4. Get out of the cave and go southeast, you should soon find the Southern Beacon (36,65). No need to clear around this one, just light it up, one or two whelps will come only.
Southeast of this beacon you should see a path going up, take it to exit the great fissure.
5. Mount up, ride southeast to Expedition Armory and clear to the guard tower at the entrance of the town (57,77). Turn in [61] Honor the Fallen.
Melee classes: choose the sword, it will be useful later, so don’t sell it either until I say you can.
Now kill what you still need for [61] Make Them Listen.
Tip: there’s a lot of Unyielding Footmen nicely lined up on the hill behind the tower we just visited.
6. Go southeast to Spinebreaker Post (61,82). Turn in:
- [61] Make Them Listen.
- [61] Void Ridge, get the follow up [63] From the Abyss.
7. Go to the cave northwest of Zeth’Gor, inside the cave you should find Grillok “Darkeye” (66,71).
Clear the two necrolytes guarding the cave. Then when inside the cave, pull one of the Bleeding Hollow Grunts with a ranged attack, so that they come without Grillok.
When there’s only Grillok left, if you’re a melee class, equip the Blade of the Unyielding. Then attack Grillok, two Unyielding Knights will come to your aid if you attack him with the blade equiped.
After Grillok is dead, loot Grillok’s Eyepatch.
The Blade of the Unyielding can be vendored now if you wish so.
==Note== I’m aware that you can pull Grillok solo with a ranged attack, without killing his two bodyguards. However Grillok runs away in fear when low on health, resulting in aggroing those two guards if you’re unlucky, that’s why I have you kill the two guards first.
8. Get out of the cave, mount up and ride east/southeast and through the path leading to Void Ridge. Go all the way south in Void Ridge until you find two big violet crystals at (81,79):
Get full HP/Mana, and you’d better have your cooldowns and potion timer ready. Void Baron Galaxis will spawn with 2 adds, kill them first, they die very fast and if you don’t kill them, they will heal Galaxis for 5000HP each.
When you’re ready, right-click the Warp Rift Generator in your inventory. Kill him and loot Galaxis Soul Shard.
Hearthstone back to Falcon Watch. Turn in [62] Marking the Path
Sell junk, repair and re-stock food/drink.
1. Go southwest to the Den of Haal’esh (26,71). Kill every bird and birdman you find on your way while also look for Kaliri Nests
Open the nests and if a Female Kaliri Hatchling spawns, use your Empty Birdcage to capture it. You just need to do this once.
Go down the slope and stay on the main path until you see a little rocky path lit by torches on the left side. Take this path and go up, then cross the wooden bridge and turn left. You should soon find a big birdman named Avruu. Try to pull him solo and interrupt his Dark Mending spell if possible, then loot his orb. Right-click Avruu’s Orb and accept the quest [63] Avruu’s Orb.
2. Go back down the main path and this time go southeast instead of taking the rocky path, you will soon enter Haal’eshi Gorge (26,78 ). Keep going southeast, until you find a small hut. Next to it you should see a shining orb, get full HP/Mana before you click it. When you click it, an elemental will spawn and attack you. Beat him down to lower then 30% HP and then you should be able to turn in the quest [63] Avruu’s orb.
3. Go back the way you came from and you should soon see a yellow “!” on your minimap. Go there and you should find a a Wounded Blood Elf Pilgrim (24,77).
Before you take the escort quest, it would be best to find that Female Kaliri Hatchling and finish [62] Birds of a Feather, because the escort will take you all the way back to Falcon Watch, and you should easily get the remaining Haal’eshi Scrolls you miss during the escort.
About the escort itself, just remember these things:
- Let the NPC walk ahead of you, to make sure he helps on every fight.
- The NPC has a lot of hit points and can pretty much solo a single birdman. So if there’s just one mob on the npc, use it as an opportunity to eat/drink or loot corpses.
There will be an ambush at the exit, but nothing too difficult.
When ready, get the escort quest [63] The Road to Falcon Watch. After escorting your NPC succesfully, you’ll be right in front of the NPC ending this escort.
Turn in:
- [63] The Road to Falcon Watch, get the follow up [63] A Pilgrim’s Plight
- [62] Birds of a Feather
- [62] Magic of the Arakkoa
4. Go southwest to Dustquill Ravine, clear the way to the southern most part of the Ravine, where you should find a Torn Pilgrim’s Pack (22,68).
Loot it.
5. Mount up, go northwest to Cenarion Post (16,52). Kill the few Hulking Boars you might still be missing for [63] Demonic Contamination. Then turn in [63] Demonic Contamination, get the follow up [63] Testing the Antidote. Find a hulking boar, there are plenty around the camp and east of it. Get the boar to low health (under 50%HP is enough) and then click the Cenarion Antidote – some red flask – from your inventory. The boar will grow and be renamed to Dreadtusk. Finish it off and you should get a quest complete message.
Go back to Cenarion Post and turn in the quest [63] Testing the Antidote.
6. Go southwest to the Ruins of Sha’naar (14,55). Kill Taskmasters – just ignore the Dreghood Brutes, they will stop attacking once you kill the taskmaster linked to them. Avoid Azreth the Merciless, he roams up and down the path in the middle of the ruins.
In one of the houses to the left you should find Akoru the Firecaller (15,59), easy to find thanks to the yellow “!” on your minimap. Go to him and get his quest [62] Naladu.
To find Naladu, first you have to wait for Arzeth the Merciless to take a walk away from the stairs. Then move up those stairs and go left, you should find Naladu in a small hut at the end of this path (16,65). Turn in the quest [62] Naladu and get the follow up [62] A Traitor Among Us.
Once again wait for Arzeth the Merciless to be away from the stairs and then go to the main hut infront of the stairs. Inside the hut you should find a Metal Coffer, open it and receive the Sha’Nar Key.
Return to Naladu, turn in the quest [62] A Traitor Among Us and get the follow up [62] The Dreghood Elders.
Wait for Arzeth to walk away from the stairs, then go down and turn left, in the first hut to the left you should find Morod the Windstirrer, talk to him and free him.
About 50 yards directly north of the hut you should find Aylaan the Waterwaker, free him too.
Go east to the hut where we found the first quest giver ealier, Akoru the Firecaller. Free him.
Go back to Nadalu and turn in the quest, get the follow up [62] Arzeth’s Demise.
Now time to payback that big demon for all the time he made us wait down those stairs!
Get close enough to Arzeth to use your Staff of the Dreghood Elders, this will turn Arzeth into a non-elite monster, easy to solo.
==Note== He will still be immune to movement impairing effects like Frostbolt, so don’t try to kite him, just take the beating and kill him before he kills you.
Go back to Naladu and turn in [62] Arzeth’s Demise.
Before leaving the Ruins of Sha’naar, kill as many taskmasters as you need to finish [63] Source of the Corruption.
7. Get out of the ruins. Go northwest to Thornfang Hill (12,50) and start to kill Thornfang Ravagers and Thornfang Venomspitters. At the same time, ask in the general channel if someone wants to team up to do [63+] Colossal Menace. The giants you need to kill for this quest are a few steps north of thornfang hill, but are too hard to solo for most classes. Keep killing Ravagers until you find help to do [63+] Colossal Menace. This quest is really worth it, you will get nearly 20000XP from it.
8. Go north of Thornfang Hill and start to kill giants. The first colossus you kill will drop a Crimson Crystal Shard, right-click it to get the quest [63] Crimson Crystal Clue.
The colossus splits into 3 smaller colossi when you damage them, I recommend killing the small ones as soon as they spawn. They do almost as much damage as the big one but have much less hit points.
9. Once you have completed both [63] Keep Thornfang Hill Clear! and [63] Colossal Menace, go back to Cenarion Post and turn in:
- [63] Keep Thornfang Hill Clear!
- [63] Colossal Menace
- [63] Crimson Crystal Clue, get the follow up [63+]The Earthbinder
Now turn in right away [63] The Earthbinder.
After turning it in, Earthbinder Galandria Nightbreeze will move off the earth mound and plant a seed. Shortly after, an elite colossus will spawn, it is easily soloable if you let Earthbinder Galandria tank for you, just let her get sufficient aggro before you start to attack.
After the colossus is dead she will have another quest for you [63+] Natural Remedies. You may choose to do this quest or not, it is optional. It gives 13550 XP and some decent rewards, but it is harder than the previous one because you have to go in the middle of the colossus fields this time, clear a lot of space around the big red crystal and then use your Seed of Revitalization on it. A big colossus will spawn and you’ll have to kill it, he does knockback (that’s why we clear the area around him). Most classes can’t solo this, so you’ll have to find a partner to do it. If you can’t be bothered with that, just don’t take this quest and save it for level 70.
8. Ride west, go through Thornfang Hill and enter Zangarmarsh. Keep going until you reach Cenarion Refuge.
Get the following quests:
- [62] The Umbrafen Tribe
- [63] Plants of Zangarmarsh
From the wanted poster on the first house to the left:
- [64] Leader of the Darkcrest
- [63] Leader of the Bloodscale
Go to the inn, get [62] The Dying Balance. Turn in [62] The Cenarion Expedition and get [63] Disturbance at Umbrafen Lake and [64] Warden Hamoot. Go to the innkeeper and check his goods, he should have Cenarion Spirits on the 3rd page. Buy one.
Go to the other building, move to the top of it and turn [64] Warden Hamoot, get the follow up [64] A Warm Welcome.
9. Go northeast until you find Swamprat Post (85,55). Get the new flight path, turn in [61] Report to Zurai.
Fly to Falcon Watch. Turn in:
- [63] Source of the Corruption
- [63] A Pilgrim’s Plight
Go to the npc with the blue “?” above her. Accept her quest and turn it in, follow her, and when she stops and says “I can’t wait to try this wine!”, use Carinda’s Scroll of Retribution on her. You should get a quest complete message for [62] Arelion’s Mistress.
Go turn it in inside Falcon Watch.
Sell junk, repair and re-stock food/drink.
1. Go northeast and then down the ravine west of Hellfire Citadel. Go all the way down till you’re in the area called Hellfire Basin (45,49).
Get full HP/Mana and read the next paragraph before you start this event.
This is definitely soloable, I’ve done it with pretty much every classes, and even with very poorly equipped characters.
You will have to defend a crystal for about 4 minutes. Waves of imps will come, they are quite weak but there are a lot of them. At some point a fel warden will spawn, those hurt a lot more than the imps, so kill it immediately. As time passes, some dark smoky objects will spawn around the crystal and shoot a beam towards it. When there are 4 of them, it means you’re almost done. Hold about 30 more seconds and mobs will stop spawning, the crystal will start to shoot dark crystal smokes upwards. This means you’re done, right click the crystal and click on the dialog line to complete the quest.
Tip: If you run low on HP or Mana, back off a little and eat/drink. You can let the crystal take a beating, he won’t die so easily.
When you’re ready, right-click the Demoniac Scryer in your bag.
2. Get out of this ravine and go northwest to Mag’Har Post. Go all the way to the top and turn in [63] A Debilitating Sickness, get the follow up [63] Administering the Salve. Go look for Debilitated Mag’Har Grunts, they can be found scattered across the Mag’Har grounds, mostly inside buildings, on the second floor, and around most buildings. Use the Healing Salve on 10 of them.
Go back to Earthcaller Ryga and turn in [63] Administering the Salve.
3. Hearthstone back to Falcon Watch, fly to Thrallmar.
Make Thrallmar your home location.
Go turn in [61] The Demoniac Scryer on the northwestern hill of Thrallmar, get the follow up [61] Report to Nazgrel. Go to the main building and turn in [61] Report to Nazgrel, get the follow up [63] The Foot of the Citadel.
Now here’s what we’re gonna do. Start looking for a group to do [63] The Foot of the Citadel and/or a Hellfire Rampart group. Hellfire Rampart is a very quick instance and the XP is actually quite nice, not to mention the nice rewards from the bosses and the quest.
While you look for a group for either of those things, if you feel like it, you can do the pvp quest now, all you have to do is stand inside the objectives until they become controlled by the Horde (this can’t work if it’s already controlled by the Horde, so you might have to come back later). This quest only gives 5000 experience, but it gives reputation and marks which you can use as currency to buy some rewards at the Thrallmar quartermaster. And a little bit of PvP is a nice break from questing/grinding. However this is optional, so it’s your choice! I personally did that quest on my rogue while looking for a healer who wanted to team up to do [63] The Foot of the Citadel (explained below).
4. [63] The Foot of the Citadel. So you found a group to do this quest? Go to the foot of Hellfire Citadel (49,50). There you should find a path between the walls, and you should see Force-Commander Gorax there.
Pull to the spot shown on the map, wait till Gorax walks up and then pull the first 2 orcs who are practicing on dummies. Then wait for Gorax to walk down and pull him solo. Kill him at the spot shown on the map.
He does blade fury, so if your group is composed of several melees, they will need a lot of healing, or will have to back off to bandage up. He also charges people randomly, but it doesn’t knockback.
All in all he’s an easy job for a 3-man team if you have a healer. Without a healer, you’ll need probably need to do some kiting.
After Gorax is dead, let everyone get back to full HP/mana. Stand where you killed Gorax and have someone use the Challenge From the Horde banner on the corpse of Gorax.
The Hand of Kargath and 2 guards will spawn at the entrance of the gate. If you were positioned correctly, they shouldn’t aggro you, so you can prepare your pull carefully.
Here is what I advise:
- If you got a mage or druid: Polymorph or Root the Hand of Kargath. Kill the 2 guards first, they are not elite, so they die fast, but they charge people and it’s annoying, so it’s best to take them out first.
Then kill the Hand of Kargath. When he’s solo he’s no problem, he can be stunned, rooted, kited. Just be careful not to aggro any nearby orc. - If you have neither of these classes: Just burn down the adds first as quick as you can, and then focus on the Hand of Kargath.
==Warning== the Hand of Kargath also does Blade Fury, so melees should stun him when he activates it, or back off for a while until it’s off. (Or just heal through it if your healer has the mana).
After you kill the Hand of Kargath, don’t forget to loot his head.
If you really can’t find help for this quest, abandon it and save it for level 70.
Go back to Thrallmar (use Hearthstone if it’s up). Turn in [63] The Foot of the Citadel.
5. At this point, if you haven’t done the Hellfire Ramparts instance, now would be the right time to do it. So if you feel like it, try to get a group and do the instance. You can follow it up with a Blood Furnace run, which is also a nice instance to do at level 61-62. It’s a plus to level up doing instances, it means you’ll have more quests left to do when you hit level 70, and thus more easy gold!
6. Fly to Spinebreaker Post, turn in [62] Grillok “Darkeye” and [63] From the Abyss. This should easily make you ding level 62 (if you aren’t 62 already).
Level 62
Fly to Shattrath, take a portal to a city and go train your new skills, visit the AH, make space in your bags, re-stock consumables, etc.
When ready, hearthstone back to Thrallmar and fly to Swamprat Post.
Get all the quests from here (there should be 6), and you should now have 13 quests listed under Zangarmarsh in your quest log.
Zangarmarsh tips:
- If you kill a spore bat while being in melee range the moment it dies, you will get a 5 minute buff: +30 to all stats. So just kill spore bats whenever they are on your way and get this nifty buff.
- Don’t sell Fertile Spores if you find any. They drop from the following mobs: Sporebats, Greater Sporebats, Fen Striders, Marsh Walkers. So kill those mobs on sight, you will need 6 Fertile Spores for a quest later on.
- Don’t sell Unidentified Plant Parts, they can be found on all non-humanoid creatures in Zangarmarsh.
==Note== From now on, while following the circuits, kill these creatures on sight:
- Marshfang Rippers
- All 4 types of “Giant Bees” (Umbraglow Stinger, Fenglow Stinger, Marshlight Bleeder, Bogflare Needler)
- Fen Striders, Marsh Walkers, Spore Bats, Greater Spore Bats, until you have 6 Fertile Spores, then you can stop killing them on the way.
1. Go southwest to Cenarion Refuge.
Go to the inn, make it your home location.
2. Go west until you hit Umbrafen Lake. Do a full anti-clockwise circle around the lake (as shown on map), while killing Mire Hydras. You don’t have to go in the water to find them, they are all pretty close to the shore, sometimes they are underwater and can’t be seen, but you can target them easily using your tab key, and pull them out with a ranged ability (you’ll also have to interrupt their poison spit for them to come to you). Also kill Nagas and Umbrafen Eels who get in your way.
3. Keep going south until you reach the steam pump at (71,79). You should get a quest update message for the [63] Disturbance at Umbrafen Lake quest.
4. ==Note== It doesn’t matter if you haven’t finished the [62] Thick Hydra Scales quest at this point.
Use the Potion of Water Breathing which you should have in your inventory, dive in the lake and hunt Umbrafen Eels until you have 8 Eel Filet and 10 Unidentified Plant Parts. Arm yourself with patience, this may take a while.
5. When you’re done with the eel hunting, exit Lake Umbrafen on the east side and go southeast to the spot marked on the map (82,74). You should find Boglash, a named bog strider, he roams up and down the shallow waters in this area.
He is elite but can be soloed by pretty much any class, even with average gear. Make sure your long cooldown abilities and potion timers are ready and it should be ok. He is immune to fear and movement impairing effects, however he can be interrupted and stunned, so make sure you interrupt his forked lightning spell.
Tip: Before attacking Boglash, find a Spore Bat and get the spore buff.
6. Go south to Umbrafen Village (83,80). Kill every Broken in the village, then move south to the next village, clear it too.
7. Move further southeast to the main village. Clear it and enter the main building (85,90). On the top floor you should find Kataru, kill him.
Now go kill what you still need to complete [62] The Umbrafen Tribe.
8. When you are done, move to the middle village (83,85), and you should find Kayra Longmane in one of the huts.
If she’s not there it means someone else is currently doing the escort quest, so just kill stuff in the area while waiting for her to come back. When you’re ready to start the escort quest, talk to Kayra and get the quest [63] Escape from Umbrafen.
Escort her back to Cenarion Refuge.
9. In Cenarion Refuge turn in:
- [62] The Umbrafen Tribe, get the follow up [62] A Damp, Dark Place
- [63] Plants of Zangarmarsh. This NPC should now have a repeatable quest: [64] Identify Plant Parts.
Whenever you get 10 more plant parts, turn them in here for extra reputation (you can only repeat this quest until Honored)
It is possible to get [63]Uncatalogued Species from the Package of Identified Plants you get, if you are lucky enough to get one accept the quest but wait with turning it in until you are honored with Cenarion Expedition. - Get the quest [62] Saving the Sporeloks from the same NPC
- Right behind you, there should be a new quest available, [62+] Safeguarding the Watchers, get it
- Go to the Inn and turn in [62]The Dying Balance
- Turn in [63] Disturbance at Umbrafen Lake, get the follow up [63] As the Crow Flies
- Turn in [63] Escape from Umbrafen
Now right-click the Stormcrow Amulet from your inventory. You don’t have to do anything, just enjoy the ride. When it’s over, turn in the quest [63] As the Crow Flies, get the follow up [64] Balance Must Be Preserved.
Sell junk and repair, re-stock food/drink.
1. Mount up, go westwards until you reach Zabra’jin (33,50).
Turn in [62] Report to Shadow Hunter Denjai, on the 2nd floor of the inn.
Get all the quests available in this village.
Get the new flight path.
==Note== From now on, gather Burstcap Mushrooms whenever you see one on your way (they are only found around Zabra’jin).
Also gather Glowcap mushrooms, those can be found on the whole western side of Zangarmarsh, you’ll need 10 for a quest later on, and you’ll need even more if you want to buy certain things from the Sporeggar vendors, because it’s their currency.
And you’re still supposed to be killing the mobs I mentioned before on your way.
2. Go north of Zabra’jin and follow the road, you should soon enter an area filled with ogres, called Hewn Bog. Keep going further north and you should find Boss Grog’ak on the side of the road (35,35). He’s an easy fight, but be careful with his knockback, position yourself so you don’t end up knocked into more ogres. Kill him and loot Boss Grog’ak’s Head.
3. Go back to Zabra’jin, turn in [64] WANTED: Boss Grog’ak, get the follow up [64] Impending Attack.
4. Go west of Zabra’jin and make a half circle around the western bank of the lake (as shown on the map), kill as many Marshlight Bleeders as you can.
5. If you follow the arrow I drew on the map, you should end up at the Ango’rosh Grounds. Go to the tower at (19,27), at the top of it you should find the Ango’rosh Attack Plans.
Loot them.
6. Go back the way you came from, follow the arrow on the map backwards, kill Marshlight Bleeders until you finish [62] There’s No Explanation for Fashion and [64] Stinging the Stingers. Then go back to Zabra’jin.
Turn in:
- [64] Stinging the Stingers, get the follow up [64] The Sharpest Blades
- [64] Impending Attack, get the follow up [64] Us or Them.
- Also get [64] Message to the Daggerfen
==Note== We no longer need to kill “Giant Bees” on the way. The kill list is now:
- Marshfang Rippers
- Marshfang Slicers
- Fen Striders, Marsh Walkers, Spore Bats, Greater Spore Bats, until you have 6 Fertile Spores
- And of course gather the 2 type of mushrooms I mentioned above
7. Go northeast to Serpent Lake. Swim in, use a charge of your Water Breathing Potion and look for Fenclaw Trashers. There’s plenty of them close to the steam pump in the middle of the lake. If needed, you can eat and drink on one of the pump’s steel tubes. Stay here until you’ve killed 10 Fenclaw Trashers and have also finished [62] Thick Hydra Scales.
8. Hearthstone back to Cenarion Refuge.
9. Go to Swamprat Post, turn in:
- [62] Thick Hydra Scales, get the follow up [62] Searching for Scout Jyoba
- [61] No More Mushrooms! get the follow up [62] A Job Undone
- [62] There’s No Explanation for Fashion
Sell junk, repair and re-stock food/drink.
1. Go north to the Dead Mire, and find Scout Jyoba at (81,36).
Turn in [62] Searching for Scout Jyoba and get the follow up [62] Jyoba’s Report.
Now kill Withered Giants – they can be found everywhere in the Dead Mire – until you find Scout Jyoba’s Report and a Withered Basidium. Right-click it to start the quest [62] Withered Basidium.
==Note== Don’t sell Bog Lord Tendrils, they’ll be needed for a quest later on.
2. Go southwest until you are at (77,45). You should find a named sporebat called Sporewing in this area. Kill Sporewing.
3. Go west to Bloodscale Grounds (65,41). You should find a named naga there, Rajis Fyashe. She is elite and most classes probably can’t solo her, she casts frostbolts for 800dmg, tosses you in the air, summons a small elemental and she is immune to root and snare effects. So try to find a partner to duo this quest while you grind on nearby nagas. While grinding on those nagas, you might find Drain Schematics. If you don’t find them, no problem, we’ll get them later.
If you really can’t find help for [63] Leader of the Bloodscale, just abandon the quest. Come back to do it at level 70.
4. Just slightly west you should find a steam pump at the eastern tip of Serpent Lake (62,41). Go next to the controle console and use your Ironvine Seeds.
5. Hunt Marshfang Rippers until you finish [62] Menacing Marshfangs. They can be found pretty much everywhere in between this naga village and Cenarion Refuge.
==Note== No need to kill Marshfang Rippers on the way anymore.
6. Go back to Swamprat Post, turn in:
- [62] Menacing Marshfangs, get the follow up [62] Nothin’ Says Lovin’ Like a Big Stinger
- [62] A Job Undone
- [62] Jyoba’s Report
- [62] Withered Basidium
7. Go to Cenarion Refuge, turn in [63] Leader of the Bloodscale if you did it. If not, abandon it.
Sell junk and repair, re-stock food/drink.
1. Head south/southwest to Funggor Cavern (75,90) which is southwest of Umbrafen Village, there is small path going up to access it.
Enter the cave. At the 1st fork, go right. At the 2nd fork, go right, then go down the slope and look for Ikeyen’s Belongings, it’ a small box on top of a flat rock, loot it.
Go further down the slope and this time go left. Go to the end of that tunnel and you should find Lord Klaq. He is guarded by 3 other fungal giants, but it’s still manageable if you go your cooldowns and pot timers ready. Just kill Lord Klaq first and run away if you can’t handle them all, wait until they get attacked by sporeloks and Lord Klaq should come solo as long as you don’t do damage to the other fungal giants. They will link later once they’ve killed the sporeloks, but you should be far away already. Anyway, I’ve managed to solo Lord Klaq + his 3 guards with every class I’ve played at this level, so you should be able to.
==Note== They can also be splitted, I managed quite often to pull 1-2 guards without Lord Klaq first.
Keep killing stuff in this cave until you finish [62] Saving the Sporeloks.
2. Get out of the cave. Mount up, go northwest to the Umbrafen Lake Steam Pump (71,81). There should be a Steam Pump Overseer guarding it. Kill it and if you’re lucky, it will drop Drain Schematics, loot them and right-click them to start the quest [63] Drain Schematics. If he doesn’t drop them, no problem, just read the rest of this paragraph.
Go next to the control console and click the Ironvine Seeds in your inventory. Another Steam Pump Overseer should spawn and attack you. Kill it, loot the schematics if you don’t have them. If he still didn’t drop the schematics, keep using your Ironvine Seeds to spawn more Steam Pump Overseers, until you get the schematics.
3. Go northwest to the Darkcrest Enclave (65,69). Now we’re gonna kill an elite naga called Rajah Haghazed. He can be found in the middle of the naga village under at gazebo structure directly southeast of the steam pump. Most classes can’t solo this, so look for a partner to duo it with while killing nagas in the area. If you really can’t find help to kill Rajah, just abandon the quest.
4. Go west to the steam pump next to the lake called The Lagoon. Clear the way to the Steam Pump (63,65) and disable it with your Ironvine Seeds.
5. Clear the way southwest until you’re out of the naga area.
Mount up and ride west around the southern bank of the lake, until you reach Feralfen Village (50,62). Kill feralfen mobs there until you have 10 Feralfen Protection Totems. If you run out of mobs to kill, there is another camp just a little west and another one further southwest.
6. On the northerneastern side of Feralfen Village you should find a named bee called Blacksting (50,60). Kill her and loot Blacksting’s Stinger.
7. Ride north to Serpent Lake, swim towards the middle of the lake until you reach the big steam pump at (50,41). You will have to swim down a little to get the quest update message for [63] Drain Schematics.
8. Hearthstone back to Cenarion Refuge.
Turn in:
- [63] Drain Schematics, get the follow up [64] Warning the Cenarion Circle
- [64] Leader of the Darkcrest (if you did it, if not, abandon it)
- [62] Saving the Sporeloks
- [62] A Damp, Dark Place
- [62] Safeguarding the Watchers
Also turn in all the extra Unidentified Plant Parts you got. You should now be Friendly with the Cenarion Expedition.
Get the quest [64] Blessings of the Ancients and go talk to the two big walking trees in town: Ashyen and Kelth, ask them for their marks.
Turn in [64] Blessings of the Ancients. From now on, you can always go talk to the two trees to get their blessing, which is a nice 30 minute buff, one gives +spell damage, the other gives +attack power.
Go to the inn, get the quests [63] Watcher Leesa’oh and [63] What’s Wrong at Cenarion Thicket?
9. Mount up and ride east all the way to Hellfire Peninsula. Go to Cenarion Post (16,52) and turn in [64] Warning the Cenarion Circle and get the follow up [63] Return to the Marsh.
Ride back to Cenarion Refuge.
Turn in [63] Return to the Marsh, get the follow up [65] Failed Incursion. This quest leads you to the Coilfang Reservoir instances, so if you don’t plan on doing them before level 70, you should abandon the quest for now. However, if you do want to do the instances, you can start looking for a Slave Pens group from now on. Don’t hesistate to join the first group you see forming up, cause it’s rather hard to get instance groups going at this level.
Sell junk, repair, re-stock food/drink.
When ready to go again, ride to Swamprat Post and turn in [62] Nothin’ Says Lovin’ Like a Big Stinger. Then fly to Zabra’jin.
Turn in:
- [62] Spirits of the Feralfen, get the follow up [64] A Spirit Ally?
- [64] Angling to Beat the Competition, get the follow ups [64] The Biggest of Them All and [64] Pursuing Terrorclaw
Make Zabra’jin your home location.
==Note== Remember, we’re still gathering Burstcap Mushrooms and Glowcap mushrooms and still killing Marshfang Slicers on sight.
Same thing goes for Fen Striders, Marsh Walkers, Spore Bats, Greater Spore Bats, if you still don’t have 6 Fertile Spores.
1. Follow the road southwest until you find Watcher Leesa’oh, turn in [63] Watcher Leesa’oh, get [63] Observing the Sporelings.
2. Go west until you find a sporelok named Fahssn (19,63). Get his 2 quests: [63] The Sporelings’ Plight and [64] Natural Enemies.
3. Go further west to the area called the Spawning Glen.
Kill every giant you on your way and look for Mature Spore Sacs.
You should also get a “Investigate the Spawning Glen” message.
Stay in this area until you have at least 6 Bog Lord Tendrils and 10 Mature Spore Sacs.
4. Go back to Fahssn, turn in the two quests.
5. Go to Watcher Leesa’oh, turn in [63] Observing the Sporelings, get the follow up [64] A Question of Gluttony.
6. Head east to the Quagg Ridge (27,63). Kill giants in the way while looking for Discarded Nutriments on the ground:
==Warning== The giants spawn unstable mushrooms at their feet. Move away from them before they are fully grown or you’ll get hurt. Just a few steps away is enough.
7. Once you have 10 of them, go back to Leesa’oh and turn in [64] A Question of Gluttony, get the follow up [63] Familiar Fungi.
8. Go back to the Quagg Ridge, and this time clear the way east until you exit it. You should end up in a swamp area with Marshfang Slicers and Sporebats (33,60). Kill stuff in this area until you find a named nether ray called Count Ungula. Kill it and loot “Count” Ungula’s Mandible. Right-click it and start the quest [64] The Count of the Marshes.
Stay in this area and kill Marshfang Slicers until you finish [64] The Sharpest Blades
9. Go southeast to the Boha’mu Ruins (44,66). Stand at the bottom of the first set of stairs and right-click the Feralfen Totem in your inventory. A level 64 Feralfen Serpent Spirit will spawn, kill it.
10. Go to the area around Zabra’jin and gather Burstcap Mushrooms until you finish [64] Burstcap Mushrooms, Mon! if you haven’t already done that.
==Note== You no longer need to kill anything on the way besides Fen Striders, Marsh Walkers, Spore Bats, Greater Spore Bats, if you still don’t have 6 Fertile Spores, we’ll need those soon.
Also gather Glowcap mushrooms.
Go to Zabra’jin, turn in:
- [64] Burstcap Mushrooms, Mon!, get [64] Have You Ever Seen One of These?
- [64] A Spirit Ally?
- [64] The Sharpest Blades
Sell junk, repair, re-stock food/drink.
1. Go north to the Hewn Bog (32,38). Kill ogres there until you finish [63] Familiar Fungi. Also stay in this area until you have 10 Glowcap Mushrooms.
2. Head southeast, enter Serpent Lake and swim to the small isle at (42,42). On the northeastern tip of the isle, you should find Mragesh just under the surface of lake. Kill it.
Hearthstone to Zabra’jin, turn in:
[64] The Biggest of Them All
This should make you ding level 63.
Level 63
3. Go southwest to Watcher Leesa’oh. Turn in:
- [63] Familiar Fungi, get the follow up [64] Stealing Back the Mushrooms
- [64] The Count of the Marshes
4. Go to the Spawning Glen. Kill giants and gather mature spore sacs until you complete either of the following objectives:
- Reputation Unfriendly 2250/3000 with Sporeggar and have 6 Bog Lord Tendril + 10 Mature Spore Sacsor
- Reputation Unfriendly 1500/3000 with Sporeggar and have 12 Bog Lord Tendril + 10 Mature Spore Sacs
Basically, susbstract 750 faction needed for every 6 Bog Lord Tendril or 10 Mature Spore Sacs you have.
5. Go back to Fahssn, turn in everything you have. You should now at least be 750/3000 in Neutral with Sporeggar. If you aren’t, go kill more giants/gather more spore sacs.
Get the quest [64] Sporeggar from Fahssn.
6. Go north to Sporeggar.
Get the quest [64] Glowcap Mushrooms, turn it in instantly.
Get the quest [64] Fertile Spores, turn it in instantly.
And lastly turn in [64] Sporeggar.
Now you should be friendly with Sporeggar and a new quest should be up. [64] Now That We’re Friends…, get this quest.
You can sell junk and repair at the Sporeggar Quartermaster, in the southwestern hut of the village.
1. Go northeast and swim to the southermost isle of Marshlight Lake (23,45). Kill every Bogstrok on the isle besides Terrorclaw. Kill him last because he casts fear and you don’t want to fight him plus 2 or 3 extra crabs.
2. Go northeast to the Steam Pump (25,43) and disable it with your Ironvine Seeds.
3. Now go to the naga village called Bloodscale Enclave (26,43) and kill nagas until you finish [64] A Warm Welcome and [64] Now That We’re Friends…
==Warning== Beware of the “Freezing Circle” ability cast by the Bloodscale Enchantresses. It does 2200 frost damage if you don’t get away from its radius in time.
4. Go north to Daggerfen Village. First, go to the main building at (25,26). Clear to the top of it and kill Chieftain Mummaki. Loot Chieftain Mummaki’s Totem.
Go to the northeastern part of Daggerfen Village, and find a flat grey stone at (27,23)
Stand next to it and use the Murloc Cage from your inventory. This should complete [64] Have You Ever Seen One of These?
Now kill stuff in Daggerfen Village until you finish [64] Message to the Daggerfen.
5. Go northwest to the ogre island, you can find a bridge to access it at (17,13). Cross the bridge and turn right (don’t enter the cave). Go up the hill and to your left you should see a small ogre building, Overlord Gorefist is in there. Kill him.
Keep grinding in the area until you have completed [64] Us or Them and [64] Stealing Back the Mushrooms.
The mushrooms can drop from any ogres but can also be looted from crates, scattered all across the ogre camp.
Hearthstone back to Zabra’jin.
Turn in:
- [64] Message to the Daggerfen
- [64] Us or Them
- [64] Wanted: Chieftain Mummaki
- [64] Pursuing Terrorclaw
- [64] Have You Ever Seen One of These?
Go southwest to Watcher Leesa’oh, turn in [64] Stealing Back the Mushrooms.
Go nortwest to Sporeggar, turn in [64] Now That We’re Friends…, don’t get the follow up, it’s just a repeatable quest to get reputation with Sporeggar.
If you intend to do the Coilfang Reservoir instances, get the quests:
- [65] Bring Me A Shrubbery!
- [65] Oh, It’s On!
- [65] Stalk the Stalker
==Note== From now on, if you see a group forming for The Underbog or the Salve Pens instance, you should join it.
Go back to Zabra’jin, fly to Swamprat Post.
Ride to Cenarion Refuge, turn in:
- [64] Balance Must Be Preserved
- [64] A Warm Welcome
Fly to Shattrath. Mount up and exit through the eastern bridge.
1. Follow the road east to Cenarion Thicket (44,26). Find Earthbinder Tavgren and turn in [63] What’s Wrong at Cenarion Thicket? Get the follow ups [63] Clues in the Thicket and [63] Strange Energy.
2. Enter Cenarion Thicket, follow the path and turn left, you should find Warden Treelos on the way, get his quest [64] It’s Watching You!
Go inside the tower and clear the way up. Get full HP/Mana before you get to the top, then go and kill Naphthal’ar (be careful he does a little knockback, so fight with a pillar behind your back).
Go to the other building on the other side of the path, in the middle of it, in front of the counter you should see a Strange Object:
Right-click it and examine it.
Find Warden Treelos and turn in [64] It’s Watching You!
Kill Vicious Teromoth until you have 4 Vicous Teromoth Samples.
Get out and turn in [63] Clues in the Thicket.
3. Now kill Teromothes south of the road until you have 4 Teromoth Samples.
Go back to Earthbinder Tavgren and turn in [63] Strange Energy, get the follow up [63] By Any Means Necessary.
4. Now we need to find Empoor, he patrols in between Shattrath and Tuurem, and also on the pathes going north and south of Shattrath, check the orange path I drew on the map to see his route exactly. Be full HP and ready when you find him, because when you talk to him he’ll attack you and so will his friend. You just need to get Empoor below 30%HP and he will stop attacking, then you will be able to turn in the quest [63] By Any Means Necessary. Get the follow up [63] Wind Trader Lathrai.
5. Go southeast to Stonebreaker Hold (50,44). Turn in [62] News from Zangarmarsh.
Get all the quests, there should be 9.
Get the new flight path.
Sell junk, repair, re-stock food/drink.
Fly to Shattrath.
After landing, look on your minimap for a yellow “!” showing the location of a Haggard War Veteran, get his quest [65] A’dal. Ride straight to the center of Shattrath, turn in the quest [65] A’dal.
Now get the quest [65] City of Light from Khadgar and follow his servant around until you get a complete message.
Go back to Khadgar and turn in [65] City of Light and now comes a choice you have to make: become an ally of the Scryers or of the Aldor? In my opinion it doesn’t really matter, it’s up to personal preferences. Here are the rewards you can get from each faction:
http://www.wowwiki.com/Comparison_of_Aldor_and_Scryer_rewards
==Note== From now on I will be using the following color code for Aldors and Scryers.
Aldors
Get the quest [65] Ishanah.
On the Aldor Rise, ride further northwest to the main building, turn in [65] Ishanah, get the other quest [64] Restoring the Light.
Go to the innkeeper (28,49) and set Shattrath as your home location.
Scryers
Get the quest [65] Voren’thal the Seer.
Head south and take the lift to the Scryers’ Tier.
Go up to the main building and turn in [65] Voren’thal the Seer.
Find the Scryers’ inn.
Make it your home location.
==Note== The following paragraph in italic seems to have been removed since patch 2.4.0, so if Magister Falris doesn’t have the quest [65] Losing Gracefully, skip to the next paragraph.
Get the quest [65] Losing Gracefully from Magister Falris, who stands outside the main building on the Scryers Tier.
Take the lift and go down back to the Terrace of Light. Go a little bit northeast and find the Marksman Regiment’s Cooking Pot (61,51), which should be next to the aldor npcs which hang out close to the Scryers’ bank. Click the cooking pot, turn in the quest. A script will take place, but you don’t have to watch it.
Both
Go to the central room and take a portal to a main city and train your new skills, sell stuff, re-stock consumables.
Hearthstone back to Shattrath City (or get a teleport to Shattrath if your Hearthstone is still on cooldown).
Now before we start with the quests in Terrokar, there is one last thing we can still do in Zangarmarsh: instances.
Try to get a group going for the Slave Pens and The Underbog and do all the quests if you haven’t done them already. Hopefully you’ll get some decent upgrades.
If you can’t or don’t want to do those instances it’s ok, we’ll just need to grind a bit at the end of this chapter. Once you’re done with The Slave Pens and The Underbog, move on to the next paragraph.
1. Go to the nothern part of Shattrath, in the Lower City. Find the inn (64,16) and get the quest [64]Rather Be Fishin’ from Seth.
Aldors: Get the quest [64] A Cure for Zahlia from the same building.
2. Go west to the Skettis area, move up to the tree house and get [65]The Outcast’s Plight from Vekax.
3. Get down, turn in [63] Surrender to the Horde and get [62] The Eyes of Skettis from Rilak the Redeemed (53,21).
4. Mount up and ride out of Shattrath by the northeastern tunnel. You should find Silmyr Lake (38,13). Use a charge of your water breathing potion if you still got one. Dip in and hunt Shimmerscale Eels until you complete [64] Rather Be Fishin’.
Go back to Shattrath, take a flight path to Stonebreaker Hold.
==Note== From now on, kill every Timber Worg/Alpha or Warp Stalker on your way and also look for Olemba Seeds. They can be found in every forest area in Terrokar and look like this:
1. Head north/northeast, kill stuff on the way and gather some Olemba Seeds. Go all the way to Veil Shienor (59,27).
Enter Veil Shienor, clear the way to the eastern tree and enter the front door. Go up, then cross the bridge to the next tree and loot the Eye of Veil Shienor:
Go back down and find Ayit in a small hut in between the two trees. Kill him.
2. Go west and then north to Veil Reskk (50,20). Clear the way inside the village until you find the wooden bridge going up to the tree house, Ashkaz should be on top of the tree house, if he’s not there, someone killed him recently, so wait for him to respawn. Cross the bridge to the 2nd tree house and loot the Eye of Veil Reskk.
Aldor: Find the 3 altars and right-click them.
Northern Altar: (51, 17)
Eastern Altar: (49, 20)
Western Altar: (48, 14.5)
Both: Now kill Arakkoas until you’ve completed [62] Arakkoa War Path.
3. Go back to Shattrath (Hearthstone if it’s up).
Sell junk, repair, re-stock food and drink.
Aldors: Go to the main Building on the Aldor Rise and turn in [64] Restoring the Light
Both: Go find Rilak the Redeemed in the northwestern part of Lower City, turn in [62] The Eyes of Skettis, get the follow up [63] Seek Out Kirrik. Go east to the inn, turn in [64] Rather Be Fishin’.
Go southeast to the Lower End Tavern, located on the east side of Lower City and find Wind Trader Lathrai (72,31), turn in [63] Wind Trader Lathrai and get the follow up [64] A Personal Favor.
Take the southeastern tunnel to exit Shattrath.
1. Go southeast to Scout Neftis (39,43), who is located just south of Grangol’var Village. Turn in [64] Speak with Scout Neftis, get the follow up [65] Who Are They?
You’ll get a disguise, and you need to be unmounted before taking the quest, or you won’t get it.
Don’t attack anything from now on or you’ll lose your disguise. If you do lose it, go talk to Scout Neftis and he’ll disguise you again.
2. The entrance to Grangol’var Village is just a few steps north of here. Enter the village, make sure you stay far away from the Shadowy Hunters, they see through the disguise.
Tip: Turning on NPC name titles is very helpful for this part, as you can then easily see the hunters amongst the crowd of green titled NPC’s.
Talk to an initiate, there is one by the pond in the middle of the village. Enter the main building and talk to the Shadowy Advisor inside. Get out of the building and find a Shadowy Laborer, they can be anywhere in the village.
Go back to Scout Neftis , turn in the quest and get [65] Kill the Shadow Council!
Go back into the village, this time kill everything on the list. Shadowmaster Grieve is inside the big building.
3. Exit the village by the western gate and then go south to the Refugee Caravan (37,50). Turn in:
- [63] Seek Out Kirrik, get [64] Veil Skith: Darkstone of Terokk
- Get [63] Before Darkness Falls
- Get [64] Missing Friends
- Get [65] The Infested Protectors
4. Head northwest to Veil Skith (31,42). Find the Darkstone of Terokk in the middle of the camp. Use your Rod of Purification and destroy the stone. Just a few steps west of the stone you should find a wooden bridge going up to the tree houses. Clear to the last tree house and kill Urdak.
Now kill birdmen until they drop Veil Skith Prison Keys, and use those keys on the Prison Cages to free children – make sure there are children in the cages before you use a key.
Keep killing birdmen and freeing children until you complete [64] Missing Friends, [65] The Outcast’s Plight, [64] A Personal Favor and [64] Stymying the Arakkoa.
5. Head back to the caravan – kill a couple of treants on the way.
Turn in:
- [64] Veil Skith: Darkstone of Terokk, get the follow up [64] Veil Rhaze: Unliving Evil
- [64] Missing Friends
- Get [65] The Tomb of Lights
- Get [65] The Vengeful Harbinger
6. Head southeast to The Shadow Stair (40,56). Kill fel orcs there until you finish [63] Before Darkness Falls and find Cabal Orders on one of them. Right-click them to start the quest [64] Cabal Orders.
7. Head east – kill as many Bonelashers as you can on the way – until you find the Tomb of Lights (47,55). Start looking for help, as most classes won’t be able to solo [65] The Vengeful Harbinger. Kill ethereals and bonelashers while looking for people willing to team up.
Once you have found help (or want to try your luck solo), go inside the tomb, go to the eastern room, clear the whole room. Stand on the circle at the end of the room and click your Draenei Tomb Relic. An arcane guardian will spawn, then 4 waves will attack you:
– 2 Vengeful Draeneis
– 3 Vengeful Draeneis
– 3 Vengeful Draeneis
– 1 Vengeful Harbinger
All non-elite, so it should be relatively easy to duo unless you get a lot of respawns in the room at the same time. If you are successful, your guardian will move up and die. Then some purple energies will gather in the middle of the circle and a shade will materialize, right-click it to turn in the quest [65] The Vengeful Harbinger. ==Warning== it’s rather hard to see the shade, so look up and search around with your mouse pointer.
Clear the way out and finish [65] The Tomb of Lights.
8. Head back to the caravan while killing Bonelashers.
Turn in:
- [65] The Tomb of Lights
- [63] Before Darkness Falls
- [64] Cabal Orders, get the follow up [64] The Shadow Tomb
- A new quest should be up at another npc from the caravan: [65] Recover the Bones, get it.
This should easily make you ding level 64 unless you skipped all instances, I’ll suggest a couple of grinding locations later on if you want to catch up.
Level 64
==Note== From now on, look for Restless Bones on the floor. They look like this:
9. Go kill Bonelashers southwest of the caravan until you finish [65] Wanted: Bonelashers Dead.
Go back to Shattrath.
Sell junk, repair and re-stock food/drink.
Go see Vekax (46,18 ) on the arakkoa tree in the northern part of Lower City.
Turn in [65] The Outcast’s Plight, no need to take the follow up, it’s just a repeatable quest for faction.
Go see Wind Trader Lathrai (72,31) infront of the tavern on the east side of lower city. Turn in [64] A Personal Favor, get the follow up [64] Investigate Tuurem.
Go train your new skills if you wish to do so, then hearthstone back to Shattrath.
Fly to Stonebreaker Hold, turn in:
- [62] Arakkoa War Path
- [64] Stymying the Arakkoa
- [65] Kill the Shadow Council!
- [65] Wanted: Bonelashers Dead!, get the follow up [65] Torgos!
1. Exit Stonebreaker Hold by the bridge northeast, go east and then southeast while killing Worgs, Warp Stalkers and gathering Olemba Seeds.
You should find an orc fortress at (65,50) and a lot of worgs around it. Kill every Timber Worg Alpha, then kill 12 Warped Peons, then kill all the Worg Alphas again (they should have respawned). You don’t have to finish the worg pelt quest now.
2. Go northwest to Stonebreaker Camp (63,43). Turn in [63] An Unwelcome Presence, get the follow ups [64] The Firewing Liaison and [64] What Happens in Terokkar Stays in Terokkar.
3. Go back to the orc fortress, kill all the Timber Worg Alphas if you still need some pelts for [64] Vestments of the Wolf Spirit. Clear the way to the main building, enter it and kill Lisaile Fireweaver. After that, look on the floor next to where she was standing, you should find some Fel Orc Plans. Loot them, right-click them and accept the quest [64] An Unseen Hand.
Clear the way out and finish the quest [64] What Happens in Terokkar Stays in Terokkar.
4. Go back to Stonebreaker Camp, turn in [64] The Firewing Liaison and [64] What Happens in Terokkar Stays in Terokkar.
5. Now go back to the forest, kill Warp Stalkers, Timber Worg Alphas and gather Olemba Seeds until you complete the 3 quests:
- [63] Olemba Seed Oil
- [64] Magical Disturbances
- [64] Vestments of the Wolf Spirit
6. Go west, back to Stonebreaker Hold. Turn in all 4 quests, get the follow ups [65] And Now, the Moment of Truth and [64] Patriarch Ironjaw.
Go talk to Grek, the orc which stands in front of the wanted poster. Ask him to try the new oil, wait about 10 seconds until you get the complete message.
Turn in [65] And Now, the Moment of Truth.
Sell junk, repair, re-stock food/drink.
7. Leave Stonebreaker Hold and follow the road north/northwest until you hit Tuurem (53,35).
Clear the way towards the northeast island of Tuurem.
Once you’re on the northeastern island, look for a hut with a Firewing Courier inside (54,30). Kill the courier and loot the Sealed Box.
Clear the way west and get out of Tuurem.
8. Follow the road west until you find Earthbinder Tavgren (44,26). Turn in [64] Investigate Tuurem, get the follow up [64] What Are These Things.
9. Ride back to Stonebreaker Hold.
Turn in [64] What Are These Things?, get the follow up [64] Report to Stonebreaker Camp.
1. Ride east to Stonebreaker Camp. Turn in [64] Report to Stonebreaker Camp, get [64] Attack on Firewing Point.
2. Go northeast and you should soon reach Firewing Point (70,39). Kill Blood Elves there until you complete [64] Attack on Firewing Point.
3. Once you have completed it, go northwest of firewing point and look for Ironjaw (69,32), a named wolf which roams in the area shown on the map.
Just kill stuff in the area while looking for him. Kill Ironjaw and loot Ironjaw’s Pelt.
Aldor: Also look for Stonegazer, you can see his route on the map above.
It’s an elite basilisk, who will be quite hard to solo for most classes, as he is immune to movement impairing effects (snares and roots), to fear and to blind. However, he can be stunned and hibernated. Clear the area around to make sure you don’t get any adds.
If you can’t solo it, try to find someone to duo [64] A Cure for Zahlia with you. If you don’t find help, just go to the next step, but keep asking for help regularly, we will stay near this area in the next few steps.
4. Go back to Stonebreaker Camp, turn in [64] Attack on Firewing Point, get the follow up [65] The Final Code.
5. Go back to Firewing Point. Clear the way to the northeastern building (74,36), it’s the building with the highest tower. You should find Isla Starmane in it. But for now ignore her.
Go to the top of the tower and kill Sharth Voldoun (he has a lot of HP and heals when low health, so watch out for that, it can be a tough fight). Loot The Final Code. Use the orb of translocation and you should be back in the room with Isla Starmane. When you’re full HP/mana, start her escort quest [64] Escape from Firewing Point. It’s easily soloable, just make sure you stay behind Isla and let her get attacked first or sometimes she might just walk past and not help you.
6. Clear the way to the Mana Bomb
Kill the 4 warlocks around it, right-click the mana bomb and watch it explode.
Aldors: Now is your last chance to find and kill Stonegazer. If you can’t, abandon the quest [64] A Cure for Zahlia and save it for level 70.
7. Ride back to Stonebreaker Hold. Turn in:
- [64] Escape from Firewing Point!
- [65] The Final Code, get the follow up [63] Letting Earthbinder Tavgren Know
- [64] Patriarch Ironjaw, get the follow up.
In the same hut where you turned in [64] Patriarch Ironjaw, right-click the Ceremonial Incense (looks like a bundle of wooden logs) from your inventory. Watch the script with the spirit wolf, and then turn in [64] Welcoming the Wolf Spirit.
Sell junk, repair and re-stock food/drink.
1. Exit Stonebreaker Hold by the southern gate. As you exit the woods you should find a few Infested Root-Walkers and Rotting Forest Ragers (48,53). Make sure you kill the Wood Mites which spawn after you kill those. Stay in the area until you finish [65] The Infested Protectors.
==Note== Don’t forget to pick up Restless Bones on the way!
2. Go northwest and find a named vulture called Trachela at (43,51). She is immune to movement impairing effects but still manageable solo, so make sure you clear some space around her and get full HP/mana before you attack. Kill her and loot Trachela’s Carcass.
3. Head west to the Refugee Caravan and turn in [65] The Infested Proctectors.
4. Ride west/southwest to Veil Rhaze (28,56). Kill what’s on the list for [64] Veil Rhaze: Unliving Evil.
Start looking for players interested in doing [65] Torgos!
Most classes can’t solo this one. It’s a level 65 Elite bird, immune to movement impairing effects and hits for 800 on cloth. It should be manageable to duo it for most class combos.
While you look for help, you can go grind at the Shadowtomb northeast of there.
Once you got a group for [65] Torgos!, go back to Veil Rhaze and find a big scarecrow named “Torgos’s Bane” (27,56). Use Trachela’s Carcass next to it and Torgos will swoop down and attack you. Kill Torgos and loot his tail feather.
If you can’t find help for Torgos, just abandon the quest, it’s not a big deal, you can do it at level 70.
5. Go northeast to the Shadow Tomb (32,53), enter it. Go to the western room first, clear it and find a Cabal Chest.
Loot the Gavel of K’alen.
Go to the eastern room, clear it, find the cabal chest and and loot the Drape of Arunen.
Go to the northern room, clear till the end of it, find the cabal chest and loot the Scroll of Atalor.
Now go back to the entrance of the northern room, where Akuno should be. When you are full HP/Mana, take his quest [64] Escaping the Tomb.
Always stay behind Akuno and let him take the first hit to make sure he engages the mobs. He can pretty much solo mobs as long as they are only one on him at a time. There will be 2 ambushes of 2 mobs during the escort, and once you defeat the 2nd one, Akuno will start running towards the caravan, so be ready for that.
6. Go back to the Refugee Caravan. turn in:
- [64] Veil Rhaze: Unliving Evil, get the follow up [64] Veil Lithic: Preemptive Strike
- [64] The Shadow Tomb
- [64] Escaping the Tomb
7. Head southwest to Veil Lithic (26,71). Remember to gather bones on the way. In Veil Lithic, look for Cursed Eggs:
Keep opening eggs until you are done with [64] Veil Lithic: Preemptive Strike.
8. Go southeast to Sha’tari Base Camp (31,76). Get the following quests:
- [65] An Improper Burial
- [66] The Dread Relic
- [65] Taken in the Night
And lastly take the escort quest: [65] Digging Through Bones. Follow the dwarves and protect them till you complete the quest, it’s very easy.
Go back to Sha’tari Base Camp, turn in the escort quest and get the follow up [65] Fumping.
9. If you still need Restless Bones to complete [65] Recover the Bones, go get them now.
Once you got them, go to Auchindoun, enter through the west gate (33,66). Go up the stairs and to the left, drop down from this point (36,64) very carefully so you don’t die from falling damage.
10. Once you are down, enter the lower western gate.
Get the quest [67] I See Dead Draenei from Ha’lei. Go to Ramdor the Mad and turn in:
- [67] I See Dead Draenei, get the follow up [67] Ezekiel
- [65] Recover the Bones, get the follow up [65] Helping the Lost Find Their Way
Hearthstone back to Shattrath.
Now you need to find Ezekiel, he walks clockwise on the outer terrace of Shattrath city, so just move anti-clockwise and you’ll find him soon. Turn in [67] Ezekiel, take the follow up [67] What Book? I Don’t See Any Book.
Now look for help to do this quest. You have to beat up 3 npcs in the westernmost part of Lower City in Shattrath (43,29). Most classes can’t solo this (I soloed it with frost mage and warlock, couldn’t with warrior and rogue), so try to find help, it shouldn’t be difficult considering the amount of people who hang out in Shattrath.
Once you got some help, go find Dirty Larry and talk to him, he will become attackable and about 10 seconds later he and his 2 friends will attack you.
My advice is to polymorph, freeze trap or fear larry while killing his 2 friends, they are easy.
Then kill larry, he is elite, hits quite hard and has a lot of HP, so I suggest kiting him unless you have a healer.
If you can’t polymorph or something similar, I suggest burning larry down fast. As soon as he is down to 1% they will all stop attacking you.
Warning: Apparently, if Dirty Larry is feared when he hits 1%, you will not receive credit for the quest. So be careful with that.
==Note== If you can’t find help to do this quest, just move on and try again later everytime we make a stop by Shattrath. But you need to have this quest finished before the next chapter.
Turn in the quest [67] What Book? I Don’t See Any Book and get the follow up [67] The Master’s Grand Design.
Aldor: Go turn in [64] A Cure for Zahlia at Sha’nir (64,15), on the northern side of the Lower City.
Both
Sell junk, repair, re-stock food/drink.
1. Exit Shattrath by the eastern gate and follow the road till you find Earthbinder Tavgren. Turn in [63] Letting Earthbinder Tavgren Know.
2. Go southwest to the Refugee Caravan. Turn in [64] Veil Lithic: Preemptive Strike, get the follow up [65] Veil Shalas: Signal Fires.
Go to the western edge of the caravan, just at the point where the subzone changes to “The Bone Wastes” (36,51).
Use your Fumper and a gnome or a Sifter should spawn. Get closer to the guards and they should help you kill them. If it’s a gnome, just let the guards kill them, they give no xp and no loot. If it’s a Sifter, just make sure you do more damage than the guards or you won’t be able to loot them.
Rinse and repeat until you got 8 Mature Bone Sifter Carcass.
==Note== From now on while in the bone wastes, kill all Lost Spirits or Broken Skeletons on sight, until you have 10 of each.
3. Head south/southwest to Sha’tari Camp. Turn in [65] Fumping, get the follow up [65] The Big Bone Worm.
4. Go east and use your Sha’tari Torch to burn those draenei corpses until you finish [65] An Improper Burial.
Go back to Sha’tari Camp, turn it in and get the follow up [65] A Hero is Needed.
5. Head east while killing Auchenai Initiates and Auchenai Doomsayers. You don’t need to finish the quest linked to them already, we’ll pass by this area again. Keep going east until you find the Derelict Caravan (44,76). Look for a big chest labelled “Massive Treasure Chest“.
Clear the area around the chest, there are many invisible ghosts nearby. When you right-click the chest, you will loot the Dread Relic and about 30 zombies will spawn and attack you. They got about 500HP, so if you got any AoE abilities it’s easy to take them all down. If you don’t, you can just run away, all that matters is that you looted the dread relic.
6. Go north and find the entrance to the eastern tunnel of Auchindoun (44,73). Read this whole paragraph before you do anything.
We’re gonna solo the elite quest [63] The Big Bone Worm, which is normaly impossible, but there’s a trick. Here’s how:
- Find a Decrepit Clefthoof close to the tunnel, kill it
- Use your Fumper on its corpse, if two bone worms spawn just run away, they don’t give exp and they’ll despawn eventually. If three gnomes spawn, you have to kill them, they don’t give up and you can’t run away from them, sadly
- Keep doing this until the elite worm Hai’shulud spawns. When he spawns, run to the tunnel mentioned above, go down the first slope and turn the first corner so that the worm can’t have a line of sight on you, as shown on the screenshot below:
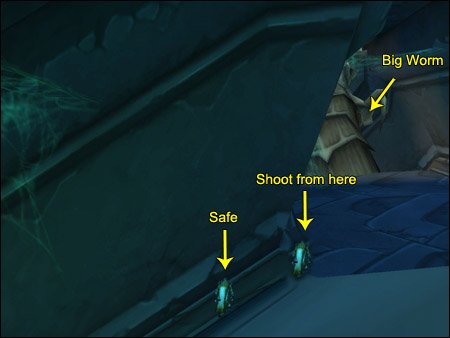
Now try to do as much damage as you can to the worm with ranged attacks, playing with line of sight to avoid getting hit by his poison bolts. Healing yourself / bandaging yourself also helps to give you the credit for the kill. I’ve done it many times sucessfully with the worm still being at 99% HP from simply throwing daggers with a rogue. I bandaged twice and used a health pot, that was enough. After about 2 minutes he will die automatically. Loot the “Enormous Bone Worm Organs” off him. Well done.
==Note== You can also check how it’s done on this video, made by Ahrinule from Zul’Jin.
7. From the tunnel, go east/southeast until you find Vindicator Haylen (50,76). Get his quest [65] For the Fallen.
8. Go east to Netherweb Ridge (52,77). Kill spiders and destroy cocoons to free Sha’tar Warriors. When you’re done with both quests, go back to Vindicator Haylen, turn in [65] For the Fallen and get the follow up [65] Terokkarantula.
9. (Optional) Most classes cannot solo Terokkarantula, because this spider is immune to movement impairing effects and to fear. She can be stunned though. So if you can solo her or got someone to help you, go to the southeastern tip of the forest and you’ll find Terokkarantula there (53,81). I you can’t find help and can’t solo her, just abandon the quest and come back to do it at level 70. It’s about 20000xp worth of quest exp, so that’s a nice sum of cash at level 70. If you kill Terokkarantula, go back to Vindicator Haylen, turn in the quest and get the follow up [65] Return to Sha’tari Base Camp.
10. Go northeast, you should find a bird named Skywing at (54,72). Rebuff and get full HP/mana before you take his quest, it’s an escort, and the nice thing about this escort is that you do 75% of the [65] Veil Shalas: Signal Fires quest. So read this whole paragraph before you start.
==Note== It appears that this quest bugs out sometimes. Skywing bugs out and freezes after he jumps down to the lower tree house. Try it anyway and hope you’re lucky.
ps: If you clear the platform that Skywing jumps to, before you accept the escort quest, the bird will not freeze. Try this if the quest failed the first time.
It’s definitely soloable if you are careful about two things:
- Let Skywing infront so he takes the first beating. He has quite a lot of HP so you can actually eat/drink while he starts killing stuff, just make sure you always stay relatively close to him though
- When up the tree house, do NOT fight with your back close to the edges, because some of those birdmen knockback, and if you get kicked off the tree house you’ll fail the quest for sure and you might also die
While following Skywing, turn off the fires when you get near them. The first fire is called “Bloodstone Signal Fire“.
The 2nd fire is called “Violet Signal Fire“.
This is when it gets a little more difficult.
Skywing will jump down to a lower platform, follow him across a bridge and shortly after he’ll stop and Lunga the Imprisoner will spawn and attack him. Lunga is elite and immune to movement impairing effect, but he doesn’t melee hard. His chain lightning hurts so try to interrupt them, but if you burn him down quick you should be ok. Use a potion if needed.
After that, the escort quest should be complete and right next to where you fought Lunga you should find the 3rd fire: “Emerald Signal Fire“.
You’re ready to start the escort quest now. After you’re done with the escort, come back to this point and read the rest of the paragraph. With that said, let’s get started. Once you’re ready, take the quest [65] Skywing.
Jump off the platform’s northeastern side. Then follow the way north and up until you find a wooden bridge taking you up the tree house (57,65). Cross the bridge to the other tree house, the last brazier: “Sapphire Signal Fire” is on the lower floor of this last tree house.
Once you’ve extinguished all 4 fires and successfully escorted Skywing, get down the platform, take the northern path leading down and exit Veil Shalas.
No map needed for the rest of this circuit, you already went to those locations at least once.
11. Ride southwest and then west back towards Sha’tar Base Camp. Kill stuff on the way until you finish [65] A Hero is Needed and [65] Helping the Lost Find Their Way.
In Sha’tari Base Camp turn in:
- [65] Taken in the Night
- [65] A Hero is Needed, get the follow up [65] The Fallen Exarch
- [65] The Big Bone Worm
- [66] The Dread Relic, don’t get the follow up [65] Evil Draws Near. I recommend saving that quest for level 70 unless you really want the quest rewards now. Most classes can’t solo this quest at this level
- [65] Return to Sha’tari Base Camp (that one was optional)
This should easily make you ding level 65 if you did the Zangarmarsh instances. If you didn’t, no worries, I’ll mention two nice grinding spots soon.
Level 65
Even though the guide should be over now, we’re still going to finish this circuit for the sake of efficiency 🙂
12. Go north to Auchindoun, enter through the west gate (33,66). Up the stairs you should see a chest called “Auchenai Coffin“. Kill the 4 Auchenai Death-Speakers around it then get close to the coffin and click it. A Reanimated Exarch will spawn, kill it.
13. Go back to Sha’tari Base Camp, turn in [65] The Fallen Exarch.
14. Ride to the Refugee Caravan, turn in [65] Veil Shalas: Signal Fires, get the follow up [65] Return to Shattrath. Also turn in [65] Helping the Lost Find Their Way.
15. (optional) If you completed the quest [66] Torgos! ride northeast to Stonebreaker Hold and turn it in.
Hearthstone to Shattrath City.
For those who skipped the instances and aren’t level 65 yet:
If you are Aldor, go to the Shadow Tomb (31,53) and grind the cabal agents there until you are level 65 with 50000XP in the level. This spot is quite decent for money making, but most importantly you’ll get a lot of Marks of Kil’Jaeden for your Aldor faction. I suggest to turn them all in immediately when you get back to Shattrath, because they will become useless once you’re honored with the Aldors. They can be turned it at the Aldor’s tier, the quest is called [65] Marks of Kil’jaeden.
If you are Scryers, go to Firewing Point (70,39) and grind on the blood elves until you are level 65 with 50000XP in the level. This spot is quite decent for money making, but most importantly you’ll get a lot of Firewing Signets for your Scryers faction. I suggest to turn them all in immediately when you get back to Shattrath, because they will become useless once you’re honored with the Scryers. They can be turned it at the Scryers’ tier, the quest is called [65] Firewing Signets.
Go to a main city, train your new skills, visit the auction house and re-stock consumables. And most importantly, get ready for the next chapter!
End of Chapter V
I hope you enjoyed this guide. If you want to return the favor, please try to contribute.
-Jame
© Copyrights www.wow-pro.com All Rights Reserved
Terror of TerokkarJame,
You are SO the man. I recommend your guide to every pug group quest i do. Not to digress, but i was doing group quests in Dragonblight i believe, and as usual i recommended your guide. The smug response was ‘i use quest helper’. And then a minute later, ‘i cant find enough quests for the acheivement, do you know where any are?’ Meanwhile, i got the acheivement 5 quests ago and was just mopping up the last of my group quests. Nuff said. Anywho, do you know of any other quests in Terokkar? All my toons seem to be stuck at 66/68 and i can’t find any more. Seems like the Shattrath quests don’t count. Just figured I’d ask since you know all. 2 80s so far and another at 69 bout to go to Northrend (all curtesy of Jame’s Guide o/c) Thank you thank you thank you and keep up the good work!
As long as the quests youAs long as the quests you are doing and the mobs you are killing are green you should continue with the level 61 part. This way you will most probably level faster and you will make loads of money in Northrend.
My level is too highHi,
I’ve been following your guide since the beginning and i got to 63 very easy. I started this part of the guide when i was 58 ( i know jame’s suggestions but all my friends are over 60 and i wanted to play with them). Now I’m level 63 and but I’m doing the level 61 chapter of your guide, pretty big jump. I don’t know if is better to keep going with the guide or move to the chapter “level 63”.
Suggestions are wellcome.
P.S. considering that a lot of people would make me pay for a guide well written like this one …a big big big thank you!!!!
Thanks!Thanks a lot for teh help, guys! Extremely appreciated 😀
I think I’ll stick with the guide like normal to harvest all the extra gold I’ll be missing on if I skip areas. Yes I need that 5000 gold for the epic flying mount =.=
Thanks again!, Haytred
Level 67 in Terokkar isLevel 67 in Terokkar is GREAT.
Normally I would say justNormally I would say just stick with the guide until the quests turn gray. However that’s getting pretty significantly ahead. Honestly at that point I would say it’s up to you. If you care about the quest achievements, I would say definitely stay in Outland since the quests will be more benefit to you there for now. If you are sick of Outland and want to head to Northrend though, I think you should do that.
Hey Jame, I’ve just dingedHey Jame, I’ve just dinged 72 and am still in Nagrand, do you think I should carry on levelling or drop everything and head too Northrend?
Jame’s advice is usually: AsJame’s advice is usually: As long as you aren’t killing gray mobs or doing gray quests, just stick with the guide. I also suggest that, if you are really ahead of the guide, it gives you freedom to skip areas that you really don’t like. For example I skipped Winterspring and Silithus entirely on my last character since I just don’t like those zones.
Level 67?I know people have said this before: that it’s alright to be like 2 levels ahead or so. But is it all right if I’m Level 67 and I’ve only just started the Cenarion Thicket quests in Terokkar? I’ve followed all your guys down to every sentence but I’m just wondering.
Thanks in advance :D, Haytred
You don’t have to skipYou don’t have to skip anything at this point. As long as the quests are green, it’s fine.
But if it bothers you, you can skip and go straight to the part where we go to Nagrand and you’ll do quests closer to your level.
the questhey James i cant get the quest The Assassin form Nazgrel
might that be because i’m a Death knight or blood elf ?
help please! 🙂
Thanks again!Hey Jame, again perfectly done! 70 at the end of this guide with my DK, got both hellfire instances boosted for quest/gear, rested most of the time, really awesome! Going to finish whole outlands (quest achievements) and than I’ll start in Northrend arround 76 (if my calculations are right 😛 )
Leveled my shaman, mage, pala all the way to 80 with your guides, Love it! You are really amazing 😉
Cannot thank you enough for the hard work you put into these guides.
Maurice
ok im really considering skippingim on the zangarmarsh quests in the level 62 part of the guide, i have one little problem though, im level 67…
im really considering skipping to further on in the guide what do you think i should do?
ThanksThanks man thought i grabbed them all will check it out
i may have double posted this if i did sorry
Thanks for the guides been my lifesaver
Noob here Quote:)
3. Get down, turn in [63] Surrender to the Horde and get [62] The Eyes of Skettis from Rilak the Redeemed (53,21).
you say to turn in Surrender to the Horde i may of missed it but you never told us to pick it up
first time leveling your guides have helped me sooo much thanks 🙂
It’s in the very firstIt’s in the very first terokkar circuit. You missed this:
5. Go southeast to Stonebreaker Hold (50,44). Turn in [62] News from Zangarmarsh.
Get all the quests, there should be 9.
Get the new flight path.
Emphasis on “get ALL the quests”. One of those 9 quests is [url=http://www.wowhead.com/?quest=10862]Surrender to the Horde[/url]. And you can’t get this quest if you already have The Eyes of Skettis in your quest log (which shouldn’t be the case if you followed the guide carefully)
OK Noob here lost lol3. Get down, turn in [63] Surrender to the Horde and get [62] The Eyes of Skettis from Rilak the Redeemed (53,21).
ok i do not have the quest surrender to the horde and i can’t find in your guide were we are suppose pick up that quest have checked thottbot and found were i need to go but just wondering if i missed smoething in here 🙂
Thanks
have followed all your guides very helpful i am 65 3/4 at this stage 🙂
Thanks for your feedbackThanks for your feedback 🙂
There is only one word coming to my mind: AWESOMEThank you very much for your awesome guides. I had already 2 lvl 70 and a lvl 66, beside a couple of lower chars, when I started a Death Knight and found your guide. I followed your DK guide and switched to this one when I was high enough (actually already higher :)). My DK is now lvl 67 and I have still a couple to do from this guide (thanks to the xp changes).
Anyway, you saved me SO MUCH TIME with your guides, thanks a lot. I bet it took you a crap load of time/work to get them so far. Awesome job!
Sky
Just finished this guideAfter I followed your Death Knight guide I switched to this one and I love them both. I did only 2 quests in a group, everything else solo. It sure helped that I was somewhat ahead in level, thanks to the xp changes, but the xp went still fast. I am now lvl 68, already half way trough 69, and will now start your next guide.
Thanks again for the good work!
Sky
Outland Rate of ProgressI’ve just finished the first half of the Outland guide (as a rogue, no less), and I’m already probably 40% of the way through level *69* — so it’s completely doable in terms of whether you’ll get enough XP. The only question I would have is, are there going to be enough quests that you can handle while you’re catching up to the Guide.
Since I followed the Old World guide until completion, I actually wound up around 61-62 when I got to Outland, so I couldn’t really judge. If you’re well-funded, and hence well-equipped, I imagine it would be perfectly okay.
Sure that works.
However,Sure that works.
However, just now that you actually level fater while following my plaguelands circuits than my outland circuits. About 180K xp / hour in Plaguelands, 130k xp /hour in Hellfire.
At least it was that way for me when I leveled my Death Knight recently.
Going to Outland at 59?I have a Rogue at 58 currently, and since Outland leveling has been sped up a bit, I was wondering if it is viable to go to Outland at 59 now and still get to 70 when the 65-70 guide ends, or even before? Personally I don’t care about saving Outland quests for 80 for gold, so that’s not an issue for me.
I’m just kind of antsy to get out of the Old World. =X
Thank you!I rolled a DK, did your DK and 60-65 guides and am 68.5, its been awesome, i dont like questing but being able to do them so effectively makes it a little different. Would you go to northrend at 70/71? or would you suggest me finish outland? i dont need the gold, just need the exp, but i want to be most efficient. thank again
Skywing WarningYou may want to add a little tip on the Skywing escort quest, that the Oracles (I believe that’s what their called) have a knock-back. I was doing this earlier and got knocked off the platform causing me to fail the quest.
Once again, thanks for the guides.
Hmm no this is normal, it’sHmm no this is normal, it’s the last fight of the escort and it’s supposed to be tough. You’ll have to use everything you got. It might be too hard depending on your class and gear, so you’ll either have to find help for the quest or simply abandon it.
Skywing QuestI am not sure if maybe I am jinxed, but as I was doing the skywing quest, right at the last platform a level 63 elite spawned (not once but three times) and each time killed skywing even with my help. Do you suposse this is a bug, or was it missed in the guide? Thanks for all of your help!!
Yea, very good pointYea, very good point 🙂
Hearthstone overdose!Well, this is just something I picked up. After the trip to Orgrimmar in the Hellfire section, the guide has us use our Hearthstone three times within 30-40 minutes (once in Orgrimmar, once in Pools of Aggonar, once in Void Ridge). If any of those should be removed, perhaps the middle one since the Pools are very close to Falcon Watch as it is (probably around 1 min riding on epic mount).
About turning your quest in at Falcon Watch… 🙂 5. Go south/southwest to Falcon Watch (27,61). Turn in [62] Falcon Watch and get all 7 quests available in Falcon Watch.
When you get into the area where the question mark is for turning in this quest… you’ll notice a transporter much like the one in Undercity or in Silvermoon City… you need to take this transporter in order to turn in this quest.
This has probably been said before and I didn’t catch it, but I figured it may help.
Found a Mistake“Hearthstone back to Falcon Watch. If it’s not up, ride back to Spinebreaker Post and fly to Falcon Watch. Turn in:”
Since you just rode to Shattrah and ported to Orgrimmar, it’s not really possible to ride back to Spinebreaker Post. Love your guides by the way. 🙂
thanks againim currently using this guide to lvl my dk. im currently at 64 (while the guide is only 3/4ths of the way through 61). once again, im amazed. before this guide, my strategy was to walk into an area, take all the quests i could find, complete them and then id be lost because there would be no quests left to take. this guide takes me from point A to point B without any confusion.
I havent skipped anything, yet. Sometimes I have a hard time finding groups for those group quests, but I just come back to those when I find someone who needs it. This guide also helps me do everything else (besides professions). I’m already honored with UC and Hellfire while almost completing the exploration achievement for this area without actually having to roam around to find it (it just so happens most of the areas are where quests are anyway). I already have 300 gold (id have more but there was a few times where i got aggroed to death and had to spend gold on repairs, plus talents cost more around this level :D).
Where to startI have just made a Tauren Death Knight, and im wondering should i start the guide at lvl 60 or would i be missing out on alot of chain quests done previously in the lower level guides?
GuideHey Jaina,
I decided to follow your guide on my paladin who was 29 when I started the guide. Its been awesome and very fast but I have 1 side node regarding the outland guide.
The moment I dinged 60 I finished the quests I had completed but dropped the rest and went off to Outland.
I just finished hellfire peninsula and dinged 64 while you mentioned you should be 62. Whats up with that? I barely use any rested but do have the Tattered Dreadmist Mantle which gives 10% extra xp on mobs but thats hardly worth 2 levels if you’d ask me 🙂
What i didWhat i did when i reached lvl 63 is that instead of going into Zangarmash, i stayed in HFP i made the achievement there and until like level 64 1/2 i went into Zangarmash.
Then at level 66 i went to Nagrand and my first quest was Ring of Blood. At level 68, I went to Netherstorm and went for other 2 levels. I did this in one week or less. :jawdrop:
Now I’m leveling with my brother in Howling Fjord following your guide too much 😀 Thanks for all your guides really thanks
Nope, you didn’tNope, you didn’t misunderstand. Thank you for pointing out this mistake, fixed it 🙂
He heHe he, I ran this as my Death Knight and he got to 64 before he was even done with Hellfire. Most likely am going to keep following it to get to 71/72 by the time it’s over.
Great guideI followed the guide at lvl 18 on my pally to get to 55 to make a death knight, it went really fast. Now I feel things slowing a lot though XD I’m lvl 66 now. Anyways, I think it’s a great guide, although sometimes I skip lines and it messes me up XD (unintentional)
“Go southeast to Dustquill Ravine, clear the way to the southern most part of the Ravine, where you should find a Torn Pilgrim’s Pack (22,68).” (near Falcon Watch) I think you meant southwest, unless I missunderstood something? (I’m french so it’s kinda possible)
Thank you, fixedThank you, fixed 🙂
At the accept instructionAt the accept instruction for quest “Rather Be Fishin\'”, the quest text colouring extends to the next couple of words (from Seth)
Also, Arakkoa War Path is misspelled as Arrakoa War Path (and Arakkoas and Arrakoas).
Thank you, fixing it rightThank you, fixing it right away.
just a quick editI noticed that right underneath the picture of Ironjaw step 4. says “Go back to Stonebreaker Post, turn in [64] Attack on Firewing Point, get the follow up [65] The Final Code.”
It should be “Stonebreaker Camp” I know, I know, it’s just a typo, but I thought I would give you a heads up.
Thanks again for all your hard work on this guide!
Cheers, thank you for yourCheers, thank you for your feedback 🙂
Well , I did try them withWell , I did try them with my Death Knight , and to be honest , I did ding far more faster than with my Paladin , I did about 3 lvls in about 3.5hours. And Playing on 2 PCs at the same time ( One for WoW , one for the guide ) pwns LoL. I’d say this guide is Wonderfull. ByTheWay , went hasty and started this guide on lvl 58 on half way….. And its still a piece of cake }:) . Nice :jawdrop: JoB!
I don’t know the exact time,I don’t know the exact time, it has changed a lot recently and I haven’t tested it.
All I can tell you is: It will be FASTER than any other guide or addon out there. I’m not trying to sound pompeous or anything, but this is what everyone who tried my guide and the other guides says: My guides are faster and better.
And yes, you can jump in the guide at any point, just pick an area where you haven’t done all the quests and start from there.
You will be much ahead of the guide in levels by the way, I warn you, but that’s a GOOD thing, so don’t skip anything.
Hello .I found out aboutHello }:) .I found out about this guides quite soon and I’d like to ask few question: Whats the usual time of getting from level 60-65 using this guide?And would you recomend to start using this guide from my lvl 63 paladin to ding 65?
}:) Lucifer }:)
————————————————————————————–
…Feel the razorblades on your skin
See your sparking blood
Let me drink your life…
(No subject)<3
Jame’s new guides have evenJame’s new guides have even better and clearer formatting, which helps solve some of those “oops forgot that quest” problems. He plans to come back and reformat his old ones when he has time, but trust me he is a very busy person! 😉
It’s natural that you will ding a little earlier than the guide – they changed the XP rates in Outland so it’s MUCH easier to level there now. Don’t worry that you are ahead, it’s a good thing! Only skip sections if the quests are gray or make you kill gray mobs.
And yes, Jame rocks my socks too 🙂
Multiple times getting lostabout 5 times just in this chapter (ive been leveling with ur guide since the start) I have been following the guide to my knowledge perfectly reading anything and everything but ive been missing that one last quest everytime because i missed something I didnt really check but i WoWhead the cord quest starter and its usually were the camps are my suggestion is to make the quest color a different color or when you need to go back to hand in 1 quest to get another bold it or CAPSLOCK it because I missed it about 5 or 10 tens now
Also i used ur Death Knight guide and went straight to this one and well when u say were suppose to ding 65 I ding’d 68 is that huge problem i didnt do anything extra i did Ramparts once but that is all i did just letting you know for death knight
other then those two concerns this guide has been really helpful and most of my guildies look at my and ask how im leveling so fast and i just shout JAMES FTW and now i got about half my guild using ur guide for there alts!
[color=#4169e1][i]Admin’s note: Please do an effort with your spelling next time. Proper capitalization. Use “you” instead of “u”, and “your” instead of “ur”. Thanks in advance.[/i][/color]
3. Keep going south until[i]3. Keep going south until you reach the steam pump at (71,79). You should get a quest update message for the [63] Disturbance at Umbrafen Lake quest.[/i]
‘quest’ in [63] Disturbance at Umbrafen Lake quest is colored along with the rest of the text.