 by Snowflake
Caelestis‘s Alliance Leveling Guide
Level 12-20
Introduction
This guide will focus on optimised questing. There will of course be some grinding but that is usually because this guide will let you visit a city every 2 level. Sometimes I also recommend that you grind in the end of the level (especially between every 2 level) this is because you’ll need new talents every now and then, so when you are at a boring grind session just remember that there is most likely a very xp given session around the corner
I’ve chosen to follow the same layout as Jame simply because it works (and overall, it helps people reading the guides if they all resembles each other).
Mods
Mods are pretty essential if you want to find places and track your xp/hour. I would recommend the following mod:
TitanBar – It got both logs and an xp/hour tracker
Dwarfs and Gnomes) Do the main quests in Dun Morogh, when done grind your way to level 12 (which is best done by killing Troggs). If you don’t like grinding then go to Ironforge, take the Tram (remember to do the rat quest, and take the follow up) and head for Stormwind. Upon arrival you should head for Goldshire where there should be plenty of quests.
Humans) Basiclly the same strategy as with Dwarfs and Gnomes, only this time you start in Elwynn Forrest (so you’ll just have to inverse the route). When you’re done with the quests in Elwynn you can choose to grind your way to 12 by killing the Gnolls in the southwest part of Elwynn or you can go to Stormwind, take the tram to Ironforge and then complete most of the quests in Dun Morogh.
Night Elfs) Night elfs is a bit more complicated as if they want to visit the other races starting zones it will have a lot of travelling involved. Night Elfs should be doing the quests in Teldrassil, when done, grind Bloodfeather harpies in northwest Teldrassil. You could travel to Dun Morogh as you will eventualy end up there no matter what (if you follow this guide, that is). Go to Darnassus, go through the portal in the middle of the city, take the boat or fly to Darkshore, take the other boat to Menethil Harbor and run from Menethil to Loch Modan (remember to take the Flight Paths) and then to Dun Morogh where you have plenty of quests at your disposal.
For a full guide about leveling in the Night Elf starting zone, I recommend Taralom’s Night Elf 1-12 Guide https://www.wow-pro.com/node/960
Draeneis) Draeneis should have a fairly easy time getting to level 12 as they got two zones to quest in. Do the quests on Azuremyst isle, which should guide you to Bloodmyst isle. It’s a good idea to do these quests as the rewards, compared to those of all the original alliance races, are superior in every sense. Another possibility is to go to Eastern Kingdom, where you’ll be going later, if you are to follow this guide that is. To do so just follow the explanation I’ve given in the Night Elfs part as the only difference is that the Draenei boat to Darkshore is located just south-west of the Exodar, and not in Teldrassil.
Level 12
You should be standing in Ironforge, if not, get there by using one of the descriptions above. In Ironforge go to Tinker’s Town and get the following quest
[15] Find Bingles
Make Ironforge your home(get its flight path if you’re Human or Night Elf) and then go from Ironforge to Loch Modan. Either fly (if you have the FP) or run. If you decide to run, you should run out of Ironforge and run east until you meet a gate (South Gate Outpost). Run through the tunnel connecting Dun Morogh with Loch Modan and then go north until you reach Thelsamar. Take the flight path.
In Thelsamar, get the following quests:
- [11] Thelsamar Blood Sausages
- [11] Rat Catching
- [15] Mountaineer Stormpike’s Task]
Then go south to Valley of Kings and get:
Move further to the north to log (28,45) and kill Tunnel Rats until you’ve completed [11] Rat Catching.
Now go north to the north tower at log (28,18) and turn in [15] Mountaineer Stormpike’s Task get the follow up [14] Stormpike’s Order and [15] Filthy Paws. If you haven’t completed [11] Thelsamar Blood Sausages then go hunt for the creeps you need.
When done, run back to Thelsamar and turn in the quests. Then head to the Valley of Kings and turn in the rest of the quests and get the follow up (be aware that the follow up is not given by the same NPC as before. Look inside the tower and you should find it). If you completed [12] The Trogg Threat turn that in as well, if you didn’t complete it, you sure will in the next step.
That should make you ding 13 (or really close). If you didn’t ding start off the next passage by grinding the low level Troggs
Level 13
Now head north until you see a gap in the hills at log (28,65) Go through them and you should find yourself in a pretty Trogg crawled area. From here, go southeast to some hills that should crawl with Seers and Skullthumpers. When you’ve killed 10 of each and completed [12] The Trogg Threat, return to Valley of Kings and turn the quests in. Get the follow up [17] In Defense of the King’s Lands (located inside the tower) and run to Thelsamar. Repair and go north to Silver Stream Mine at log (35,18).
Go inside the mine and look for boxes stacked together labelled miner’s gear. This might be a hard part, but it is doable. Use bandages between every fight (unless you can heal) to minimize your downtime as the tunnel rats have a rather high spawn rate. When you’ve completed [15] Filthy Paws go back to mountaineer Stormpike and turn it in
You should be getting close to dinging 14, so go grind on either tunnel rats or Troggs… I’ll let you decide . When you are level 14 fly to Ironforge. Repair and learn new skills.
Level 14
When done go to Stormwind either by tram, or by taking a flight.
In Stormwind, head for the dwarven district and turn in [14] Stormpike’s Order
Go to the Cathedral and at the town hall (49,30), get the quest [15] Humble Beginnings from Baros Alexton. Make Stormwind your home.
Go out of Stormwind and turn southeast until you reach Westfall
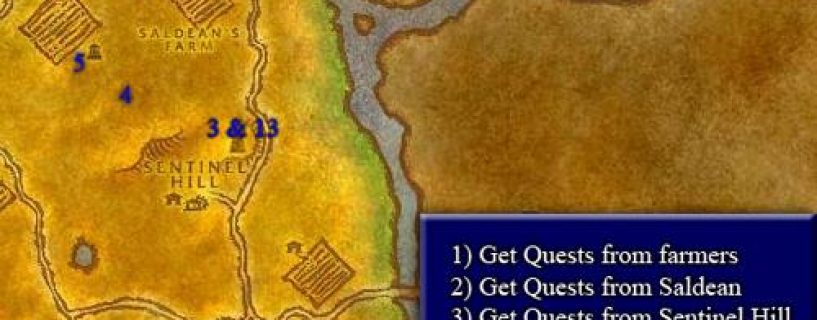
Westfall:
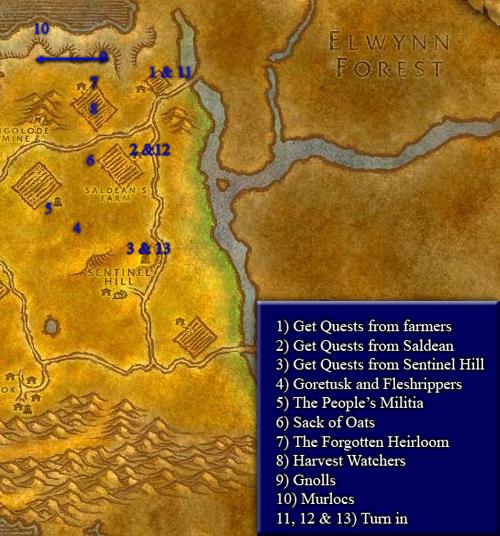
1) On the border of Westfall, just across the river, get the quests
- [10] The Westfall Stew
- [10] Report to Gryan Stoutmantle
- [12] The Forgotten Heirloom
- [14] Poor Old Blanchy
Follow the road south and as it forks just keep running forward towards the house.
2) At the house turn in [10] The Westfall Stew, get the follow up and get the following quests as well:
- [12] Goretusk Liver Pie
- [15] The Killing Fields
3) Head towards the road and run south until you reach Sentinel Hill. Get the flight path and the following quests:
- [15] Red Leather Bandanas from Scout Galiaan at the inn
- [14] Patrolling Westfall from from Captain Danuvai at the tower
- [12] The Peoples Militia from Gryan Stoutmantle
And turn in [10] Report to Gryan Stoutmantle
4) Go a bit west to log (44,46) and kill Goretusks and Fleshrippers until you got 3 Goretusk snouts, 3 Stringly Vulture Meat and 8 Goretusk livers
5) Go north to The Molsen Farm at log (46,38).
Kill 15 Defias Trappers and 15 Defias Smugglers
Remember: if you find any Sack of Oats loot them
6) If you haven’t found 8 Sack of Oats then go to Saldean’s Farm at the windmills and look for some Oats there.
7) When done, go north to Furlbrow’s Pumpkin farm at log (50,21) killing every Harvest Watcher that passes your way. At the pumpkin farm kill every Defias in the area infront of the little house. Be careful not to aggro the mobs inside the house. This quest might be a bit hard as you have to kill a level 12 and a level 15 in order to loot Furlbrow’s pocket watch . It’s doable, but if you’re having problems ask if anybody wanna help you complete it. You can start killing the Harvest Watchers while looking.
![]() Kill Harvest Watchers until you’ve completed the quest, got 5 Flasks of Oil and Hops, and 3 Okra
Kill Harvest Watchers until you’ve completed the quest, got 5 Flasks of Oil and Hops, and 3 Okra
9) Then go north until you encounter a gnoll camp at log (52,15). Clear the camp and go east to find some more Gnolls. Kill these until you:
Find 8 Gnoll Paws
Ding level 15
Level 15
10) Go north to Longshore at log (42,10). This place is crawling with murlocs, so kill them until you’ve collected 3 Murloc eyes
11) When done, go back to the Farmer couple at the border of westfall and turn in all the quests.
12) Then run to Saldean’s farm and turn in the quests.
13) Finally, run to Sentinel Hill and turn in the last few quests. Get the follow up for [12] The Peoples Militia and the quest [18] The Defias Brotherhood. Phew, that was a long run….
Sell and repair, and then head west to Alexton Farmestead at log (37,54). West of the barn there should be a burned down house. Inside this house there is a box, so clear the area around the building and loot the box for a Simple Compass
Then go southwest to the Westfall Lighthouse at log (30,86)
Get the quest [16] Keeper of the Flame from Captain Grayson and turn it in immediately (since you should have the 5 Flask of Oil. Then go east to the city of Moonbrook at log (43,69). This place should be crawling with Defias Pillagers and Defias Looters. So grind this place until the following requirements has been achieved:
Kill 15 Defias Pillagers
Kill 15 Defias Looters
Get 15 Red Leather Bandanas (if you haven’t done the quest already)
Ding level 16
Note: if Moonbrook is crowded just go to Alextons Farmstead. The amount of Defias mobs available is a bit lower than in Moonbrook, but not if Moonbrook is crowded that is ![]()
Then go back to Sentinel Hill and turn in [14] The Peoples Militia and get the follow up
Level 16
From Sentinel Hill, go southeast to the bridge that leads to Duskwood. Go over it and stick to the road leading east. When you reach Darkshire, get the flightpath and go to the inn. Inside the inn, find the bartender and buy a Bottle of Moonshine and continue north by the road until you reach Redridge Mountains. On the border of Redridge you should meet Guard Parker. Get the quest [16] Encroaching Gnolls from him. Then go north by the road and you should soon after be in Lakeshire. Get the flight path and go to the inn across the river. Go to the first floor and talk with Wiley the Black. Complete [18] The Defias Brotherhood and get the follow up. Get the quest [18] The Price of Shoes as well. Run back to the flight master and take a flight to Westfall. In Westfall, go to Gryan Stoutmantle and complete [18] The Defias Brotherhood. Get the follow up and heart to Stormwind.
In Stormwind go sell, repair, AH and learn new skills. When done, run to the Old Town district and in the southeastern part of the district you should find Mathias Shaw. Turn in [18] The Defias Brotherhood and get the follow up. Then go to Baros Alexton at the Cathedral Square and turn in [15] Humble Beginnings .
Go to Ironforge either by the tram or by flight, make it your home, and then from Ironforge, fly to Loch Modan.
When you arrive, run directly east from Thelsamar, swim across the lake and you should see Bingle standing with his crashed plane at log (64,48). Turn in [15] Find Bingles and get the follow up: [15] Bingles Missing Supplies. Then run southeast to the Farstrider Lodge at log (82,62) and get the following quests in the following order:
- [15] Crocolisk hunting
- [16] A Hunter’s Boast
As soon as you’ve accepted the quest at timer will start. You now have 15 minutes to kill 6 Mountain buzzards. This isn’t too difficult. Run southwest to log (77,74) and kill Buzzards until you’ve completed the quest. Then run back to the lodge and turn in the quest and get the follow up.
When you accept this a new timer showing 12 minutes will appear. Now, instead of running southwest as before, run northwest towards the place where you found Bingle. It should be pretty easy to find and slay 5 boars, and when done, run back to the lodge, complete the quest and run back to Bingle.
Stand at Bingle and look at the lake. You should see 2 islands. One with trees on it another without. Go to the island without trees at log (55,54) and kill Crocolisks until you’ve completed [15] Crocolisk hunting. Then swim north to the two most northern islands in the lake. Start by clearing the camp on the small island at log (48,29) and loot Bingle’s Toolbucket for Bingle’s Wrench. Go to the western part of the big island at log (48,21); clear the camp and loot Bingle’s Screwdriver. Then go to the middle part of the island at log (52,24), clear the place and loot Bingle’s Hammer. Finally go to the most eastern part of the island and loot Bingle’s Blastencapper. You should grind this place until the following objectives are done:
Kill 10 Bonesplitter Bonesnappers
Kill 10 Bonesplitter Shamans
Ding level 17
Level 17
Go north to Stonewrought Dam at log (47,13) and get the quest [18] A Dark Threat Looms then go east down the ramp and turn around. You should see two level 17 Dark Iron Sappers. Kill them and click on the suspicious barrel. Complete the quest and get the follow up. Go back to the middle of the Dam and complete the quest. Don’t get the follow up.
Go back to Bingle and turn in [15] Bingles Missing Supplies. Then run to the lodge and turn in [15] Crocolisk hunting. Sell and Repair. Then head west to Ironbands Excavation Site at log (65,67). Get the following quests:
[15] Excavaiton Progress Report
[18] Gathering Idols
The Troggs that drops the Idols are located inside the excavation site to east, so go in there and gather 8 Carved Stone Idols. Once done, turn it in and go to Thelsamar and turn in [15] Excavaiton Progress Report. Get the follow up. Go south to the Valley of Kings and turn in [15] In Defense of the King’s Lands. Do not get the follow up.
Now you should be over halfway to level 18 so I recommend some grinding. So go back to the excavation site and kill Stonesplinters until you ding level 18.
Level 18
Warp to Ironforge, and go to the Hall of Explorers. Talk with Prospector Stormpike and complete the quest. Don’t get the follow up. Now go to Stormwind, train, repair and sell then head to the Trade District at log (52,67) and buy a Cask of Merlot. Then run to Goldshire and turn in the quest [18] The Price of Shoes ang get the follow up. Go to the inn and buy a Skin of Sweet Rum from the barkeeper. Then go to Westfall. In Westfall turn in the quest at Gryan Stoutmantle and get the follow up.
The messenger is patrolling between Gold Coast Quarry and Moonbrook. Run to Gold Coast Quarry and run south by the road until you reach Moonbrook. If you encounter The Messenger on the way, kill him and loot him. If you do not encounter him then wait in Moonbrook until he spawns and then loot A Mysterious Message.
Now run east to Dagger Hills at log (53,72) and kill the Defias in this area until you’ve completed [17] The Peoples Militia. Work your way up the hills heading south-west to log (44,80) and you’ll see a dwarf. Get his quest and turn it in immediately since you got the 5 Hops. Go back to Sentinel Hill and turn in [17] The Peoples Militia and [18] The Defias Brotherhood. Then go to the defias traitor and get the follow up.
Note: As soon as you accept this quest you will have to escort the traitor through Moonbrook. This isn’t hard, as the Traitor generally assist you on every mob you attack. The quest ends at the entrance to the Deadmines near the town square of Moonbrook
When done, run west to the Westfall Lighthouse. Get the quests:
- [19] The Coast isn’t Clear
- [20] The Costal Menace
The Murlocs can be found along the shore, so run back and forth until you’ve completed both quests. Old Murk-eye wanders around just east of the lightshouse
Turn in both quests and head back to Sentinel Hill. Turn in the [18] The Defias Brotherhood, get the follow up and fly to Redridge Mountains
In Redridge, get the following quests:
- [14] Dry Times
- [15] Hillarys Necklace
- [15] Elmore’s Task
- [15] A Free Lunch
- [16] The Lost Tools
- [18] Redridge Goulash
- [21] Blackrock Menace
- [21] Selling Fish
And turn in the following quests:
[14] Dry Times
[16] Encroaching Gnolls and get the follow up [17] Assesing the Threat
[18] Return to Verner and get the two new quests: [20] A Baying of Gnolls and [18] Underbelly Scales
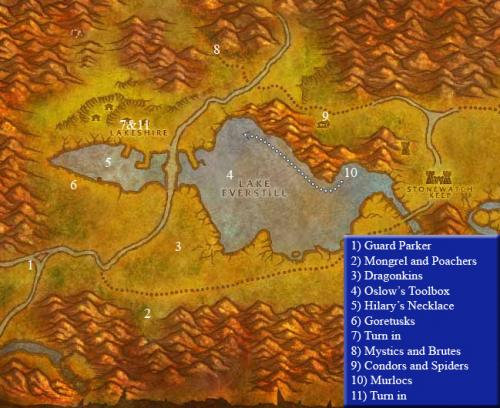
From now on kill every Goretusk, Condor and Spider you meet in order to complete [18] Redridge Goulash
1) Start by running south to the edge of Redridge at log (16,71). Here you should find Guard Parker. Turn in the quest and get the follow up.
2) Run east to Lakeridge Highway at log (28,81) and kill 10 Mongrels and 6 Poachers.
3) Then run north and kill Black Dragon Whelps until you’ve collected 6 Underbelly Whelp Scales.
4) Go even further north and into the lake. Scout through it until you find a crashed boat and a box next to it at log (42,55). Dive down, carefully avoiding the murlocs, and loot Oslow’s Toolbox from the box
5) Swim west to the other side of the bridge. Now look for what looks like a pile of mud labelled: Glinting Mud. When you find it loot Hilary’s Necklace.
6) If you need any more goretusks then go east to log (16,54). Be carefull though, as Bellygrub (a level 24 mob) is roaming the area so try to pull the goretusks to you. (Thanks to Rothselm for this tip)
7) Return to Lakeshire and turn in:
[15] Visit the Herbalist, get the follow up and turn that in as well (in the Inn)
[15] Hillarys Necklace
[18] Underbelly Scales
[17] Assesing the Threat
[16] The Lost Tools and get the quest [20] The Everstill Bridge from him as well
That should make you ding 19, or really close to.
Level 19
7) Go north from Lakeshire to Redridge Canyons at log (36,36). Kill Gnolls until you’ve:
Killed 8 Redridge Mystics
Killed 10 Redridge Brutes
Collected 5 Iron Pikes
Collected 5 Iron Rivets
![]() Once done, run east to Alther’s mill at log (53,42) and kill as many Goretusks, Condors and Spirders you need in order to complete [18] Redridge Goulash.
Once done, run east to Alther’s mill at log (53,42) and kill as many Goretusks, Condors and Spirders you need in order to complete [18] Redridge Goulash.
9) Then head south and jump down the cliffs killing every murloc you encounter on your way down.
Swim west until you see a Murloc camp at log (41,45). Now kill these Murlocs until you’ve collected 10 Spotted Sunfish and 8 Murloc Fins.
Note: If the place is crowded you can go to log (48,70), there should be plenty of Murlocs there.
10) Then go back to Lakeshire and turn in:
[21] Selling Fish.
[18] Redridge Goulash
[20] The Everstill Bridge
[20] A Baying of Gnolls
You should be level 20 by now (if not, grind on Gnolls).
When you’re level 20, return to Lakeshire and get the quest [20] Murloc Poachers and instantly turn it in.
And this concludes my guide. You can still level on and if you decide to do so, I recommend that you go to the Deadmines (you got the main quest, and the other quests are pretty easy to get). You can follow Jame’s Deadmines guide for information and tactics for the various boss encounters the instance has to offer.
I hope you enjoyed reading my guide, and I would love if you would leave some kind of feedback
Caelestis, over and out!
© Caelestis and WoW-Pro
Funny thatThats strange. 😕 Cos when i did this q with my rogue ‘Redridge Goulash’, every condor apart from two dropped the meat. 😀 But with my main char, I agree with you. It’s one hell of a low drop-rate. 😉
Replace most “East” withReplace most “East” with “West”
Great for me : WarriorThis guide was great. I easily leveled from 12 to 20 and i did it fairly easy with my warrior without any outside support.. thanks alot!
Terrible for WarriorDid level 12 ok. Level 13 sucks big time. Needed a group for the trogg cave. Didn’t have a group for silver mine and I died over and over and over again in there. Too many mobs, too fast respawn, too long of a corpse run. I’m sure the guide is fine for high-DPS classes or self-healing classes. Warrior is neither.
Thank YouThanks so very much for this guide. I started this guide at 13 and ended at 21. From 1-20 Took me only 19 hours, this was a great help thank you.
Very very goodAn excellent guide that I used religiously from 14-21. I’ve never used a guide before and that wasnt a problem with this guide. You will learn to trust this guide as every quest not on this guide isnt worth doing imho. Sometimes I get carried away if I find an area where I can get 3/4 quests completed without reading the guide and when I check the guide it did the same as me. Very flexible guide – A+++.
Comments:
*IMHO the condors are worth it – if you just grind to keep the area despawned you get some seriously fast xp while you search.
*Some detail missing on npc locations like referencing them by name but not saying where they are but easily fixed by having thottbot open.
*I couldnt do Baying of Gnolls as a 21 Warlock so how a 19 say priest is suppose to do it I have no idea :s Maybe drop it?
*Some notes mentioning where the murlocs are for the lighthouse quests would be nice – I know it says theyre next to it but one of the types is at the far north of the shore on the other side of the zone.
Avoid getting RedridgeAvoid getting Redridge Goulash…done this guide three times now and the drop rate of condor meat just isn’t worth the hassle. You can go through 10 condors without a drop and condors are scarce.
Tiga WooodsMy character is almost level 20 but with just over 7 hours of playing time and 3 hours power napp, your guide help cut through all the BS and get down to “business.” leveling has always been a pain, but with this guild has made playing WoW more fun! Thank You
Is there any reason that 😕
Is there any reason that this isn’t a ‘printer friendly’ guide? I have had to copy and paste into Word in order to use this guide AND, I have had to make several modifications just in order to use it. Please let me know. Thx.
BTW: These lvlg guides ROCK!
I belive it might be yourI belive it might be your own fault that you missed some of the quests. I think the problem might be that you didn’t read the guide well enough… no offence.
You claim that I leave out quests, which you find out that I don’t, and then you have to travel back and get ’em… Am I correct? Problem is though, that every time you come to turn in a quest, I write whether or not to take the follow-up… Did you by any chance miss these parts, because if you didn’t, I really have no clue to what might’ve gone wrong
Caelestis
augh..Thank God I finished this guide. Joans and others would be better imo. He leaves out alot of follow through quests and you dont find out untill its too late. You end up in a different zone and have to come back because he leaves out quests that you are supposed to pick up.
This was very helpfulUsing this guide I got 12-20 in about only 10 hours play time
Thanks : ]
Amazing guideJust wanted to say I am currently lvling a shaman and a mage with this guide. Both are at 17 right now. Started this about two days ago. AMAZING! I am lvling really quick. Shockingly, I had more trouble with my Shaman at lvl 12 starting than my Mage at lvl 12 starting. Never died with my Mage, Shaman died twice. Other than that, great stuff. Perfect guide, very easy to understand. The only thing I would tell people, be prepared for Duskwood. That is tough going. Both toons got attacked by spiders and wolves. They are anywhere from lvl 20-25 and they are really close to the road. Other than that, great guide, loved it and recommended to friends!
P.S.- I am actually a lvl higher on each character than the guide says I should be, and I haven’t grinded anything yet. All quests!!!!
Hehe, seems like you were aHehe, seems like you were a bit unlucky 😉
By the way, thanks for pointing out the ‘getting the follow up’ I must’ve missed, I’ll correct that soon 🙂
Caelestis
good guide anywayssince im a rogue i had a bit of trouble then since even though i ran behind solid objects the spells would still hit me and if i try to pull them into a safe spot id already be too damaged and get killed one on one. But I just found ones that were alone took awhile but got it done and the rest of the guide was easy to follow. OH and that part when it sayd turn in the price of shoes you might want to add ” get the follow up” so we dont miss it. Overall good guide, nice job.
Yes, the troggs can beYes, the troggs can be somewhat hard to kill, but I don’t think it’s that big of a problem. The reason why, is that the casting trogg can easily be pulled by a ranged weapon and then just running the opposite direction till you feel you’ve got the mob in a safe spot. I think this is a fairly common method, and if you make sure you proceed with caution, this part of the guide shouldn’t be that hard 🙂
Caelestis
sosothose damn troggs are waaaay to hard at lvl 13 for any other class besides hunters and locks i died about 15 times b4 i got it finished
Awsome guidei used your guide to level my shaman from 12-20, now im at level 47 doing jame’s guide, and so far your guide is the best ive found, i hope you decide to make a level 20-70 guide, that would definately be awsome.
Good guide!Hey Caelestis. Awesome guide, lvl 16 15 hours played thanks 😀 your guide toke me through my hate lvls :).
I will try itRight now February 25, 2007 8:34 A.M. my server is down! But once I’m able to get back on I will try this guide! I just made a new character… Well it looks cool and I hope to see you make some more =)
Flight Path QuestI think by the time you are level 12 that most people should have done the flight path quest. Each race has their own version of it. I was a bit confused when I first started that part. I’m only in Redridge for a little bit and then back to Thelsamar! I’ll let you know what level I get to once I’m done. 🙂
EDIT: Started this guide at 12 and a half, finished it at level 22 with one run through VC.
Thanks for the commentsThanks for the comments 🙂
I have edited the guide a bit after going through it with my Draenei alt.
The Watch for the Forgotten Heirloom quest can’t be looted through the window anymore (so nothing’s wrong Alyni 😉 ). I guess this was a bug which probably is the reason why Blizzard changed it. The only way to get the quest done now, is to actually fight the two mobs inside the house, which can be quite hard depending on your class 🙁
I’ve also deleted the flight path quest. Since my Draenei couldn’t get the quest i figured it was limited to Dwarfs and Gnomes. I think it’s better to have a guide that fits all races, than one where different quests are only available to certain races. After all, accessibility is the goal 😉
Caelestis
Thank you!I started this guide yesterday at level 12½ and I’m now 17 just getting into Redridge Mountains.
I’d also like to add that I could not get the heirloom for the quest The Forgotten Heirloom through the window like your guide suggest. Just a little heads up. It might have just been a problem with me. Besides that, I’m loving this guide!
Truely AwesomeAbsolutely wonderful guide, picked up on it at lvl 15 and was very easy to get into. Hopefully going to get to 20 on my Draenei shaman XD. Tyvm for making this guide.
*Just got to 20, thank you for the guide :).
-Ged
Thank youFirst and foremost, thank you for your comment. 🙂
The updated questlog capacity is definately a nice thing, and I’ll try to alter the guide a bit to fit with this game adjustment.
As for the Thunderbrew Lager quest, it was to my experience that it did not yield any xp, though giving you an item used in a quest in Redridge. After looking up the quest though, it seems like it would be quite possible to do the particular quest, seeing it fits nicely with the rest of the guide. I’ll definitely try to add that quest to the guide soon.
Last but not least, I want to inform that the guide has been updated with the flight path quest.
Caelestis
Great guideI really appreciated this guide. Some suggestions on how to make it even better; Since you can hold 25 quests now I suggest you get the quests from the lighthouse when you’re out there the first time so you don’t have to run up north just to kill Murloc Warriors and Murloc Coastal Runners later on.
If you gather 5 Hops at the same time as you gather oil etc. you can complete the Thunderbrew Lager quest roughly at loc 45,80 while killing Defias guys under your lvl18 section near Dagger Hills
Thanks once again for a great guide – now I’m off to continue your guide in Redridge 🙂
—————————————————————
I know, if I were you I’d like to nerf me as well…
Something else.I remembered that was another point I wanted to make and I jus t recalled it.
[quote]Note: As soon as you accept this quest you will have to escort the traitor through Moonbrook. This isn’t hard, just let the traitor be in front and get the initial aggro or he’ll just wander away.[/quote]
Since I wanted to critique your guide I followed it to the letter. The traitor does not ‘walk away’ if it he has initial aggro. In fact, even if a completely unrelated player engages a Defias mob near the road he’ll still run and join in. By allowing him to gain initial aggro I actually failed the question once because he got attacked by two mobs at once. For this reason I strongly recommend changing it to advise players to gain initial aggro themselves.
You’re welcome.You’re welcome. Your guide helped me from 12-20, so the least I can do is give what advice I can in order to help the next player who uses this guide to level a little more efficiently.
On the Goretusks, the area is a ‘U’ shape. Bellygrub tends to only wander around one ‘end’ of this U-shape so is fairly easy to avoid, compared to the Condors and Spiders which have the unfortunate habit of spawning on top or directly behind you when you’re attack a boar.
Thanks again for the great guide.
Thank you for the feedbackThank you for the feedback, it’s nice to hear some comments 🙂
The flight path quests are something I didn’t even spare a thought. I’ll see if i can work it into the guide 😉
To be honest, the whole Redridge part was one big mess in the start. I had a hard time figuring out some of the paths and quest orders, and in a bit of a hurry, some faults might have ended up in the guide. I’ll correct that!
As for the Goretusks, it’s definitely a nice area. The only problem thought, is that Bellygrub is not a neutral mob and it’s a lot easier to survive a condor attack, than a charging Bellygrub 😉 I’ll add it to the guide 🙂
On the server i played on, the murlocs where never crowded, though if it’s your experience, i’ll add the other spot as an optional place to find the murlocs.
I’ve been thinking about making a guide for level 20-30, but it’s not a option at the moment. I might give it a try next month, so don’t expect anything soon 😉
Finally I just want to thank you for the feedback, it’s nice to hear people enjoying the guide and experiencing the same great results as me.
FeedbackI’ve just finished levelling up my new Warlock using this guide. It was excellently written and easy to follow, and there was not a single point where I was confused as to what I had to do next. In terms of how the results described in the guide match up with my own experiences, it was perfect. I reached level 20 in about 15 hours played; 5 of those were 1-12, so this guide took me approximately 10 hours from start to finish.
Most of it is fine, but there are a few points I want to pick up on. Firstly in both Loch Modan and Westfall there are quests designed to introduce new players to the flight system. These are actually reasonable experience (1000+) so it might be worth seeing if you can work these into your guide. My second point is very minor; in the list of quests you’ve put as getting in Redridge, you’ve included [18]The Price of Shoes which has already been done and handed in just before this.
My next point of feedback is mainly around level 19. I do not have the co-ordinates on me, but after finishing with the brutes/mystics it is best if you move to near where Bellygrub is as there are plenty of boars there with no risk of being ganged up on by condors/spiders. I found this the best place to get the snouts before moving onto Alther’s Mill for the condor and spider meat. Often you can also find a group who might help you kill Bellygrub which is an added bonus.
A final point is in relation to the Murlocs. The camp you mentioned is typically overcamped (when I visited there were 4 individuals hunting there), but directly south is a camp that almost never has anyone there (at least, not where I visited.) It drops the same stuff, and additionally has a ‘safe spot’ where mobs will not spawn on you if you need to eat or drink.
Overall, an excellent guide. Is there any chance of you doing one from 20-30 to bridge the gap between this guide and Jame’s?
Oh snap!This guide freakin’ works! 1-17 in 17 hours. 15 hours 12-17.
Very nice! I’ll definitelyVery nice! I’ll definitely try it out and give feedback, but it looks amazing!
That guide looks awesomeThat guide looks awesome Caelestis, I’ll try it out as soon as I can, thank you for all that work 🙂