
 by Jiyambi
This is the Kalimdor Instances section of my Retro Raiding Guide.
With the implementation of instance and raid achievements, many players want to head back and complete old content on their level 80 characters. This guide will help you speed through old world and Burning Crusade dungeons and raids to get those dungeon master achievements! Keep in mind that this guide is directed to level 80 players. Those attempting the instances at the appropriate level should check out some of the other great instance guides on WoW-Pro.
Since there is so much content to cover, I will be releasing this guide in parts. Each section will be tested out by my guild before release to be sure they are accurate and effective. Please feel free to leave a comment with any advice or corrections!
Note: Wrath of the Lich King instances will not be covered in this guide.
Other Sections
- Overview
- Classic Kalimdor Instances – Coming in July
- Classic Eastern Kingdoms Instances – Coming in August
- Burning Crusade Instances – Coming in September
- Classic Raids – Coming in October
- Burning Crusade Raids – Coming in November
Table of Contents
- Ragefire Chasm
- Wailing Caverns
- Blackfathom Deeps
- Razorfen Kraul
- Razorfen Downs
- Zul’Farrak
- Maraudon
- Dire Maul
 Ragefire Chasm
Recommended group:
-
- 1 (any class) / Max 5
Expected time needed: 15 min
Mob levels: 13-16
Required Bosses:
Getting there
-
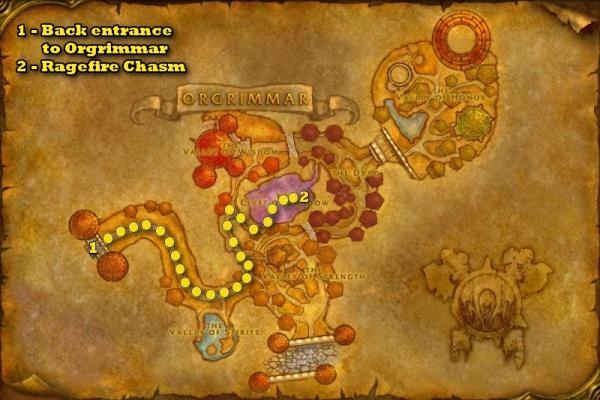
- Ragefire Chasm is located inside Orgrimmar, in the Cleft of Shadow. This is very convenient for Horde players, but somewhat problematic for Alliance.
 Horde:
-
-
- Just fly or teleport to Orgrimmar and head to the Cleft of Shadow.
-
 Alliance:
-
-
- Alliance can best make their way here from Talrendis Point in Azshara. They can then swim south along the river to the back bridge leading into Orgrimmar. It may be necessary to corpse hop to get to the instance once you enter Orgrimmar – make sure you take off all your armor if this is the way you plan to do it, to avoid damage.
-
The map below shows the instance’s location inside Orgrimmar, and the best path for Alliance to take to get there.
Walkthrough
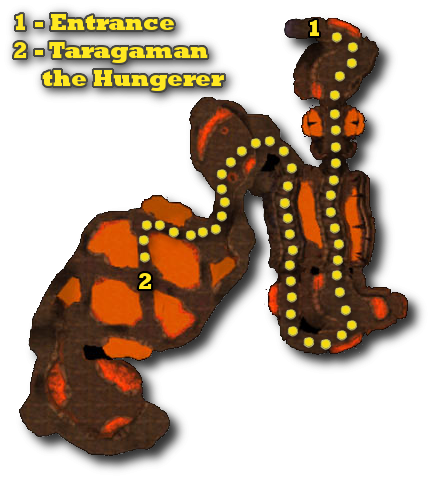
When you enter, just follow the path. The mobs here will be a joke for you at level 80, mostly you should be able to walk past them without aggroing any. Keep going until you come to a long path sloping down with lots of Troggs. At the end you can go left, right, or hard right. take the middle (right) path.
Keep going, it twists and turns but you should eventually come out into a large cavern with lava and two little bridges spanning it. Cross one bridge, then cross another leading into the center. You should find Taragaman here. Kill him (one or two hits should do it).
 Wailing Caverns
Recommended group:
-
- 1 (any class) / Max 5
Expected time needed: 30-45 min
Mob levels: 15-20
Required Bosses:
Getting there
-
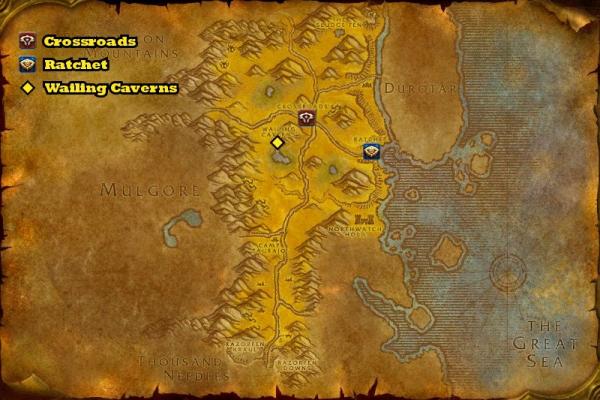
- The Wailing Caverns are found in the Barrens.
Horde:
-
-
- Fly into the Crossroads and head south.
-
Alliance:
-
-
- Use the flight path to Ratchet if you have it. Alternatively, you can run south from Ashenvale or take the boat to Ratchet from Booty Bay.
-
Walkthrough
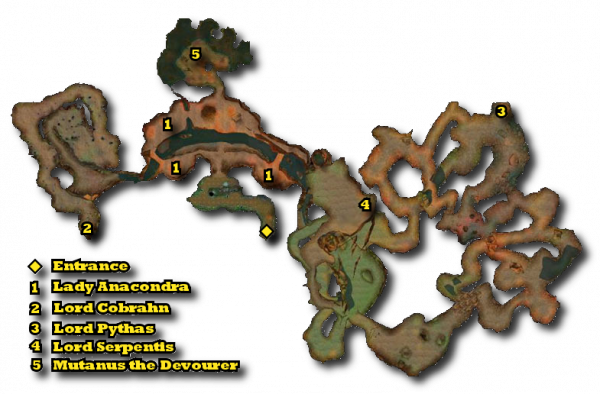
You are going to need to kill all four serpent lords in order to start the end event and fight the last boss. Unfortunately this means pretty much doing the entire instance. Luckily at this level it’s relatively easy to avoid most of the mobs (or, if you aren’t a mana user, you can just destroy them).
-
- Lady Anacondra
- Our first objective is Lady Anacondra. She spawns at one of several points in the first room of the instance, up along the cliffs.
- Lord Cobrahn
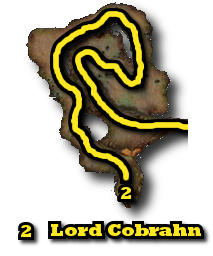 Next up is Lord Cobrahn. Jump down into the ravine and head west. You’ll travel up a slope and eventually come to him. You can jump down from the ledge next to him if you are careful and land on the platforms.
 - Lord Pythas
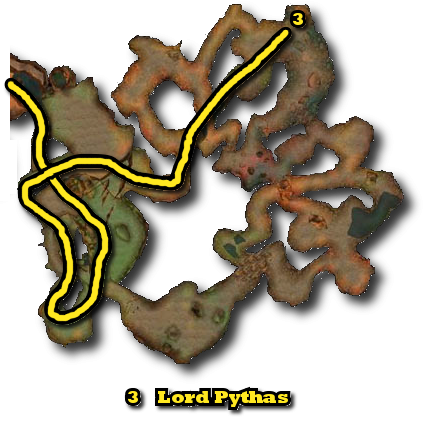 Head back to the first room and go the other way (east) down the ravine. Follow the path as it curves up. When the path comes to a fork, take the right path. Go straight through the next intersection. Shortly after should be the room with Pythas in it (he’s along the north wall).
 - Lord Serpentis
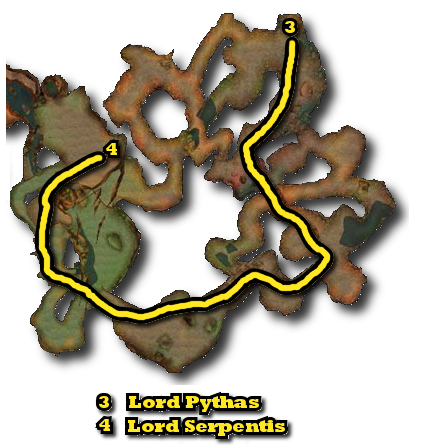 From here, head out the south-east exit from Pythas’ room. At the four-way fork, take the south path. You’ll find yourself in a large room with the thunder lizard Skum. You can kill him or skip him. Take the south-west exit from the room, past Skum’s cage. Keep heading south-west. You should come to a cliff, which you can jump over. Keep going down the path and you will reach Serpentis.
 - Mutanus the Devourer
-
- Now, you CAN skip that walking green shaggy carpet in the corner, but he’s guarding the fastest way back to the entrance, so you might as well kill him. Jump down the hole behind him and swim out, you should be back in that crocolisk area. Head west back to the main room and go back to the entrance. Unfortunately, you have to do an event now which involves following a slow NPC around. Talk to the Tauren to start it and protect him. He’ll lead you up to a new room north of that first big room, and eventually Mutanus will show up. Kill him.
Note: I have seen this event bug out before and Mutanus never showed up. I’m not sure what causes this, but the only way to fix it seems to be an instance reset. If you know more details about this, please post a comment.
-
- Lady Anacondra
 Blackfathom Deeps
Recommended group:
-
- 1 (any class) / Max 5
Expected time needed: 20-30 min
Mob levels: 20-24
Required Bosses:
Getting there
-
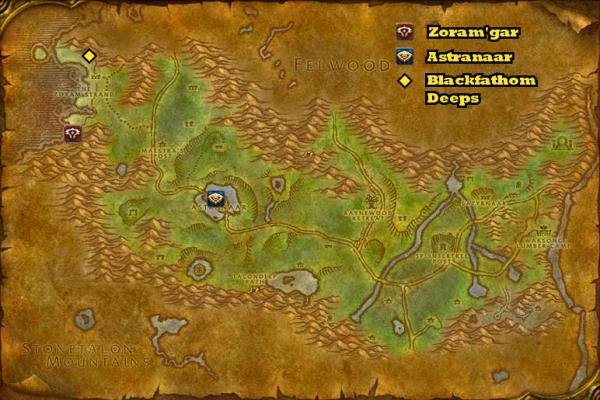
- Blackfathom Deeps can be found in the far north-western corner of Ashenvale.
Horde:
-
-
- Fly in to Zoram’gar Outpost.
-
Alliance:
-
-
- Fly in to Astranaar and head west to the beach from there.
-
Follow the beach north until you find a structure with water inside it. Swim down through the water – you will come to a cave complex. The instance portal is inside.
Walkthrough
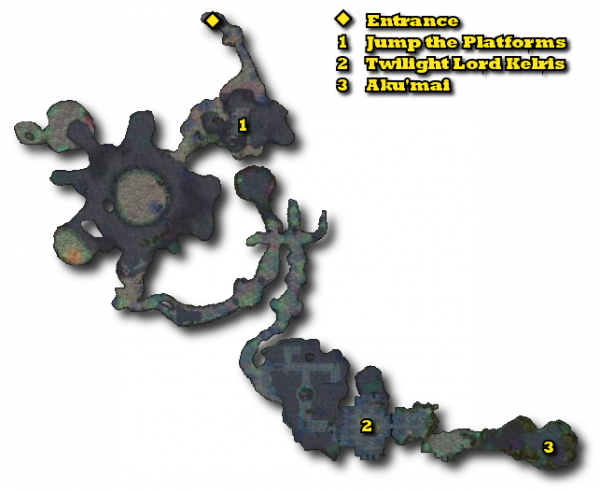
To get to Aku’mai, you’ll need to work your way to the back of the instance. You won’t need to take out all of the bosses along the way, so they won’t be covered here. There are a few tricky spots along the way, as are marked on the map above.
-
- Jump the Platforms
- In this room, you need to jump from platform to platform to reach the opposite side. This can be kind of a pain in the butt, and might take a few tries.
- Twilight Lord Kelris
- The Twilight Lord himself is very easy to kill. However, there is a trick to opening the next room. You’ll need to right-click each of the four candles in order to open the door. Clicking each candle summons waves of monsters, but they should be no problem for you at level 80.
- Aku’mai
- Once the door is open, it should be very easy to get to and dispatch the last boss.
- Jump the Platforms
 Razorfen Kraul
Recommended group:
-
- 1 (any class) / Max 5
Expected time needed: 20 min
Mob levels: 25-27
Required Bosses:
Getting there
-
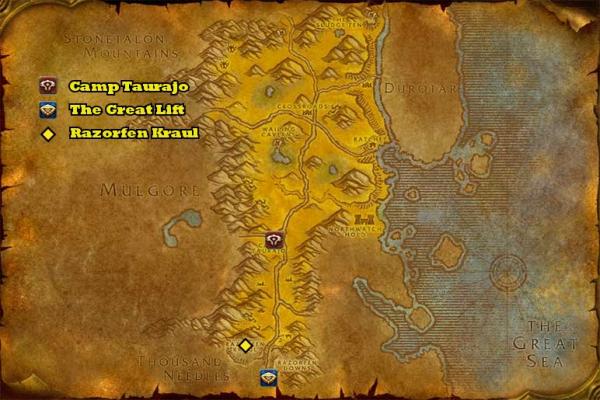
- Razorfen Kraul can be found at the southern tip of the Barrens.
Horde:
-
-
- Fly to Camp Taurajo and ride south.
-
Alliance:
-
-
- Fly into Thalanaar and head north to the lift into the Barrens, though you’ll have to dodge a few guards. Alternatively, Alliance can ride south from Ratchet, but this is most likely a longer route.
-
There are two instances here; Razorfen Kraul is to the west.
Walkthrough
-
- ***MAP OF RFK***
- OVERALL DESCRIPTION + SPECIFIC BOSS LOCATIONS AND DETAILS
 Razorfen Downs
Recommended group:
-
- 1 (any class) / Max 5
Expected time needed: 20 min
Mob levels: 34-37
Required Bosses:
Getting there
-
- Razorfen Kraul can be found at the southern tip of the Barrens.
Horde:
-
-
- Fly to Camp Taurajo and ride south.
-
Alliance:
-
-
- Fly into Thalanaar and head north to the lift into the Barrens, though you’ll have to dodge a few guards. Alternatively, Alliance can ride south from Ratchet, but this is most likely a longer route.
-
There are two instances here; Razorfen Downs is to the east.
***MAP OF RFD LOCATION***
Walkthrough
-
- ***MAP OF RFD***
- OVERALL DESCRIPTION + SPECIFIC BOSS LOCATIONS AND DETAILS
 Zul’Farrak
Recommended group:
-
- 1 (any class) / Max 5
Expected time needed: 30 min
Mob levels: 38-46
Required Bosses:
Getting there
-
- Zul’Farrak can be found in north-western Tanaris. Fly to Gadgetzan, then ride west. The instance is located in the troll ruins in the north-western corner of the zone.
***MAP OF ZF LOCATION***
Walkthrough
-
- ***MAP OF ZF***
This is another instance where you won’t be able to run straight to the last boss. For this one, you’ll need to do an event involving a mob of trolls. You can choose either the right or left path, it doesn’t matter – just get to location 1 on the map. Once you arrive, release the prisoners at the top of the stairs. Wait there for the even to start. Eventually (it takes quite a while), trolls will start running up the stairs. Keep killing them, eventually you will kill all the trolls and reach the bottom of the stairs.
Once you’ve cleared the trolls, the NPCs you released should line up. Ignore the rest of them, talk to the goblin. He will run off and blow up the gate blocking the way to the last boss. Head through the gate and kill Chief Ukorz Sandscalp (marked as 2 on the map), and you’re done!
 Maraudon
Recommended group:
-
- 1 (any class) / Max 5
Expected time needed: 45 min
Mob levels: 42-48
Required Bosses:
Getting there
-
- Maraudon is located in western Desolace.
Horde:
-
-
- Fly into Shadowprey Village and head north-east from the village exit. Very soon you should come to a path leading into the mountains. Follow the path and you will encounter a structure.
-
Alliance:
-
-
- Fly to Nigel’s Point and head south along the road. After going through the Manaroc Coven, turn north until you find a path leading into the mountains. Follow the path and you will encounter a structure.
-
Once you reach the structure, you’ll need to navigate the cave network until you find one of the two entrances. Follow the map for the route.
***MAP OF MARA LOCATION AND CAVE NETWORK***
Walkthrough
-
- ***MAP OF MARA***
***DESCRIPTION OF ROUTE TO THE PRINCESS***
 Dire Maul
Recommended group:
-
- 3 (any class, one healer is good) / Max 5
Expected time needed: 1 hour
Mob levels: 42-48
Required Bosses:
Getting there
-
- Dire Maul is located in central Feralas. This is one of the more difficult 5-mans you will do for these achievements, and is by far the longest. I recommend taking three people to help speed up the process, though it probably is solo-able.
Horde:
-
-
- Fly into Camp Mojache and follow the road west to Dire Maul.
-
Alliance:
-
-
- Fly to Thalanaar and follow the road west to Dire Maul. You’ll have to ride through Camp Mojache, but this shouldn’t be too hard if you just ride straight through. Alternatively, you can try to sneak around the Horde camp. Or you can ride east from Feathermoon Stronghold, but it will be slower.
-
***MAP OF DM LOCATION***
Walkthrough
-
- Dire Maul is probably the longest and most complex of the instances we’ll be doing. You need to clear all three wings to complete the achievement.
***GUIDE AND MAP FOR EACH WING***
That’s it for the Kalimdor instances. Check out the Eastern Kingdom instances next, or head back to the Retro Raiding main page.
Heh, thanks This is justHeh, thanks 😉 This is just the same problem I always have with stuff I do – I get distracted by many projects and never finish any!
I’ve you’re gettingI’ve you’re getting scattered you’re getting scattered amazingly well 😛
To be really honest with you you impress me, you write stuff at such a high pace while keeping such a high quality. Please never go away haha 😉
Hah, yep. My guild isHah, yep. My guild is holding weekly Retro Raid nights 🙂 Hardest challenge so far was Dire Maul just because it’s so big, luckily we had someone who knew where we were going! That one will need a detailed guide, since you have to clear each wing and several keys and event triggers are needed.
I’m afraid I am getting scattered tho, not sure which of these projects will be coming out first. My resto gear guide is taking priority at the moment.
Oh snap, you really AREOh snap, you really ARE working on a “Retro” raiding guide!
I really thought it was a typo you made instead of “Resto Raiding Guide” haha. And I corrected it in the needed guides wiki page :/
Anyway, looks like pure awesomeness so far 😛