
 by gobi_todic
Kapitel II (40-50) – Von den Düstermarschen ins Hinterland
Anmerkungen des Übersetzers
Dies ist die deutsche Version von Jame’s alliance leveling guide – chapter II. Ich habe sie nach besten Wissen und Gewissen übersetzt, erhebe aber keinen Anspruch auf komplette Fehlerlosigkeit. Falls ihr also etwas entdeckt, schickt mir eine PN oder schreibt einen Kommentar.
Ich habe versucht, möglichst eng am Original zu bleiben. Manche englischen Begriffe habe ich beibehalten, weil es nur ungenügend äquivalente deutsche Wörter dazu gibt, z.B. grinden, Aggro, porten etc., ich denke, jeder weiß trotzdem, was gemeint ist. 😉
Versionshinweise
Dies ist v2.0 des Guides. Wie in dieser News erwähnt, wurde er überarbeitet, um den Änderungen mit Patch 2.3 gerecht zu werden. Die alte Version des Guides kannst du weiterhin hier finden. Gleichzeitig gab es viele weitere Verbesserungen:
- Einleitung/Addons-Abschnitt ist aktualisiert worden
- Die „Töte-alles-auf-deinem-Weg“-Regel ist aufgehoben worden, es sei denn, es mangelt dir im Vergleich zum jeweiligen Zeitpunkt im Guide an Erfahrungspunkten
- Grinding-Abschnitte entfernt, außerdem sind Instanzen kein Bestandteil des Levelvorgangs mehr (keine Abhängigkeit von Gruppen/Suche)
- Schwere Gruppen- oder Elitequests, die keine mehr sind, sind integriert worden
- Neue Inhalte aus Patch 2.3 sind integriert worden (Morastwinkel etc.)
- Karten sind neu erstellt worden und eine Menge Fehler sind korrigiert worden
- Düstermarschen-Runde ist hinzugefügt worden
- Es sollte möglich sein, einen Schritt schneller zu leveln als vorher
Einleitung
Dieser Guide beginnt ab Level 40. Ich hoffe aber, du bist dem ersten Kapitel dieses Guides ebenfalls gefolgt. Darin werden nämlich eine Menge Vorquests und Flugpunkte abgearbeitet, die wir für dieses Kapitel brauchen werden. Es ist nicht so schlimm, wenn du es nicht gemacht hast. Du wirst nur selbst herausfinden müssen, an welchem Punkt des Guides du anfängst. Falls du in EP hinterher hinkst, wird es optionale Runden geben, die du machen kannst, um aufzuholen. Falls du Anleitungen für einen anderen Levelbereich (z.B. von 1-40) benötigst, schau bitte auf dieser Seite nach.
Dieser Guide ist auf SCHNELLES leveln ausgelegt, indem Optimale Quest-Runden benutzt werden. Mit diesem Guide wird questen sehr effizient und du wirst keine Sekunde damit verschwenden, herumzulaufen um herauszufinden, in welcher Reihenfolge du welche Quests machen müßtest. Folge sorgfältig jeder Anweisung und du wirst es erleben. Die Wahl der Quests und die Reihenfolge sind optimal gewählt, sodass du so wenig wie möglich herumläufst und so viel wie möglich erreichst, indem mehrere Quests auf einmal abgegeben werden. Es wird wie grinden sein, weil du ununterbrochen Sachen töten und erledigen wirst und gleichzeitig einen Haufen Quests im vorbeigehen abschließt!
Alles in diesem Guide kann alleine geschafft werden (außer ich sage etwas anderes). Natürlich kann man dem Guide auch zu zweit oder als Gruppe folgen, es ist ein Problem und funktioniert genauso.
DISCLAIMER: Dieser Guide berücksichtigt KEINE Berufe, Klassenquests oder PVP-Angelegenheiten. Er konzentriert sich zu 100% darauf, die meiste Erfahrung in schnellstmöglicher Zeit zu verschaffen, indem du eine Menge Quests erledigst und soviel Spielinhalt wie möglich genießen kannst. Jegliche Rasse/Klasse-Kombination kann diesen Guide benutzen. Alle Beschwerden bezüglich PVP, Berufen oder auf Klassen bezogene Angelegenheiten werden ignoriert.
Grundregeln
- Verteile deine Talentpunkte so, damit du den höchstmöglichen Schaden austeilst. (z.B. Priester sollten sich auf Schatten spezialisieren, Krieger auf Waffen/Furor, Schurken auf Kampf/Meucheln, etc.)
- Verschwende deine Zeit nicht damit, Gruppen fürs Questen zu suchen, alles was in diesem Guide beschrieben ist, kannst du allein schaffen.
Schließe dich nur mit anderen zusammen, wenn es keine Zeitverschwendung ist. (z.B.: sich mit der Person am anderen Ende der Zone zu treffen um ihm den Weg zu deiner Quest zu zeigen – das ist Zeitverschwendung) - Versuche immer in einem Gasthaus oder einer Hauptstadt auszuloggen, wenn du eine Pause machst.
- Wenn du deinen Ruhestein irgendwo binden solltest (ein Gasthaus zu deinem Heimatort machen), dann geschieht dies aus einem guten Grund und wird dir viel Zeit ersparen.
Nützliche Addons
Um am besten mit meinem Guide zu arbeiten, solltest du ein Addon installieren, welches Koordinaten anzeigt, weil ich sie benutze um Ortsangaben zu beschreiben (x,y). Du kannst jedes Addon benutzen, das du möchtest, hier ist ein sehr einfaches, das ich selbst benutze.
Empfohlen
- DMiniCoords – Ein simples Kästchen, das Koordinaten anzeigt. Mit einem Linksklick kannst du es verschieben.
Optional
Für alle die neugierig sind, welche Addons ich sonst benutze: Unten ist eine Liste mit weiteren Addons, aber sie sind 100% optional.
- Bartender4 – Ein großartiges Aktionsleisten-Addon.
- X-Perl UnitFrames – Sehr schöne, höchst anpassbare Einheitenfenster.
- Quartz – Das beste Zauberleisten-Addon, das es gibt, imo.
- Scrolling Combat Text – Ich mag einfach den Standard-Kampftext nicht.
Notiz:
Für den Fall, dass du nicht weißt wie man Addons installiert, lade einfach eins von den oberen Addons herunter und entpacke es. Verschiebe den entpackten Ordner in den WoW-Addon-Ordner (voller Pfad wäre standardmäßig:\Programme\World of Warcraft\Interface\AddOns). Starte danach World of Warcraft neu und es sollte funktionieren.
Wenn du ins Spiel einsteigst und deine Addons nicht geladen worden sind, dann musst du eventuell ausloggen und in der Charakterauswahl auf „Addons“ in der unteren, linken Ecke klicken. Aktiviere das Kästchen vor „Veraltete Addons laden“. Starte dann WoW neu.
Einkaufszettel:
- Level 41: Gemusterte bronzene Armschienen — Falls du sie im Auktionshaus nicht finden kannst, frage einen Schmied, ob er sie für ein kleines Trinkgeld baut. Dafür werden 5 Bronzebarren und 2 Grobe Schleifsteine benötigt.
- Level 41: Frostöl – Hergestellt von Alchemisten. Komponenten sind 4x Khadgars Schnurrbart, 2x Wintersbiss, 1x Verbleite Phiole
- Level 41: Gyrochronatom – Hergestellt von Ingenieuren. Komponenten sind 1x Eisenbarren, 1x Goldkraftkern
- Level 44: Alle Seiten für die Quest Die Grünen Hügel des Schlingendorntals. Du kannst sie oft in den Auktionshäusern der Hauptstädte und in Beutebucht finden.
- Level 49: 2x Elixier der Seelenstärke – Hergestellt von Alchemisten. Komponenten sind 1x Wildstahlblume, 1x Golddorn, 1x Verbleite Phiole
Diese Gegenstände mögen nicht immer im AH verfügbar sein, also schau frühzeitig genug nach.
Farblegende
- Quests
- Gegenstände
- Gebiete/Orte
- Questziele zum töten
- NPCs
- Koordinaten
Der Guide
Level 40
Du solltest noch immer in Theramore sein.
Verkaufe Krempel, stocke deine Vorräte auf.
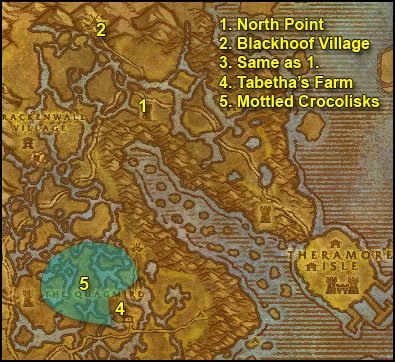
1. Wenn du fertig bist, folge dem Weg nordwestlich aus Theramore heraus, bis du ???North Point erreichst. Gib [38] Der entscheidende Grimmweis bei Hauptmann Darill ab und akzeptiere beide Folgequests.
2. Gehe von dort aus nach Norden bis (42,15). Du wirst das Dorf der Schwarzhufe erreichen, wir sind dort schon im vorherigen Guide gewesen. Dort musst du Waffen der Schwarzhufe aufheben, welche so aussehen:
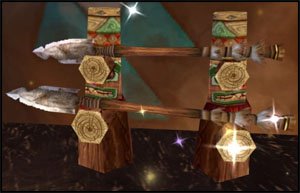
Du brauchst 7 Stück. Töte gleichzeitig die Ältesten der Grimmtotem, bis du 4 Notizen der Grimmtotem geplündert hast. Füge diese zum Schlachtplan der Grimmtotem zusammen.
3. Kehre danach zum ???North Point zurück und gib beide Quests ab, nimm die Folge an.
4. Gehe in das “The Quagmire” genannte Gebiet. Finde dort Tabethas Hof bei (46,57) und gib [39] Tabethas Unterstützung ab. Starte die Folge [39] Brennt den Grollhornposten nieder! und alle anderen Quests von hier:
- [38] Die Waffe der Grimmtotem
- [39] Der Reagenziendieb
- [39] Räuber des Grollhornpostens
- [40] Der Zeppelinabsturz
** Töte von jetzt an jeden Giftigen Schredder und Dunkelzahnkrabbler auf deinem Weg**
5. Suche nach Scheckigen Staubsuhlerkrokolisken. Wann immer du einen Haufen von ihnen zusammen siehst, rechtsklicke das Erbeutete Totem in deinem Inventar. Pass auf, dass du die Krokolisken immer in der Nähe des Totems tötest, ansonsten wird es dir nicht für die Quest angerechnet.
Es gibt bei dieser Quest ein spezielles Problem für Jäger und Hexenmeister. Du musst die Krokos im Moment ihres Todes tanken, damit sie angerechnet werden. Für Hexenmeister ist es leichter zu lösen, beschwöre einfach deinen Wichtel und du wirst durch deine Dots schnell Aggro bekommen. Für Jäger aber ist es etwas anders, besonders wenn du Tierherrschaft geskillt hast und deine Waffe nicht ausgeskillt ist. Gehe in diesem Fall folgendermaßen vor:
Stelle dich mit deinem Pet neben das platzierte Totem. Stelle dein Pet auf passiv, bleiben und deaktiviere Knurren. Pulle ein Krokodil mit ablenkendem Schuss aus möglichst weiter Ferne und versuche, es so oft wie möglich zu treffen, bevor es dich erreicht. Lass dein Pet angreifen, sobald es dich neben dem Totem in den Nahkampf verwickelt. Normalerweise sollte dein Pet keine Aggro mehr bekommen. Wenn es aber doch passiert, beende die Angriffe deines Pets (klicke dazu auf das Passiv-Symbol), gehe weit genug weg für einen ablenkenden Schuss und erledige das Biest mit weiteren Schüssen oder im Nahkampf. Allerdings erst, wenn du die Aggro hast.

1. Bewege dich in Richtung (53,57), wenn du fertig bist. Dabei solltest du einige Giftige Schredder finden (töte so viele, wie du brauchst). Sprich mit Moxie Stahlgrill, sobald du angekommen bist. Beende [40] Der Zeppelinabsturz, nimm [40] Korrosionsschutz und [39] Bergt die Fracht! von ihr an.
Du hast wahrscheinlich schon bemerkt, dass blaue Lichtstrahlen auf dich abgeschossen werden. Öffne dein Inventar und suche nach einem Brühschlammblaster. Lege ihn auf einen Hotkey. Damit werden die Brühschlammer um das Zeppelinwrack herum zersetzt. Du kannst den Blaster nur einsetzen, wenn du von den blauen Strahlen aufgeladen bist (die von den Kraftkern-Fragmenten ausgehen). Das Fragment neben Moxie schießt immer Strahlen auf dich, also bleibe möglichst in seiner Umgebung und pulle Brühschlammer dorthin. Benutze den Brühschlammblaster, sobald sie nah genug sind. Der Schlammer wird zersetzt und du bekommst eine Questaktualisierung. Erledige 10 Schlammer auf diese Weise.
Sammle gleichzeitig 8 Zeppelinfrachten aus den kleinen Kisten, die überall verstreut sind. Wenn dir die Brühschlammer/Kisten neben Moxie ausgehen kannst du einfach zu den anderen Kraftkern-Fragmenten wechseln. Der einzige Nachteil bei den anderen ist, sie schalten sich alle 30 Sekunden für 30 Sekunden aus. Warte also einfach kurz, bis dein Fragment sich wieder einschaltet und zersetze dann weiter die Brühschlammer. Kehre zu Moxie Stahlgrill zurück, wenn beides erledigt ist und gib die Quests ab. Starte die Folgequest [39] Lieferung für Drazzit.
2. Östlich von dir sollten ein paar Berge sein. Folge ihnen in nord-nordwestliche Richtung, bis du ein Taurenlager namens Grollhornposten erreichst. Töte dort 12 Grimmtotem (egal welche). Während der Metzelei wirst du über einen untoten NPC namens Apothekerin Cylla stolpern. Töte sie und plündere den “Versiegelten Brief“.
Rechtsklicke ihn für eine Quest.
Gleichzeitig musst du die Fackel aus deinem Inventar benutzen, um die folgenden drei Zelte nieder zu brennen:
Nördliches Zelt: (46,45)
Nordöstliches Zelt: (47,46)
Östliches Zelt: (47,47)
3. Kehre danach zu Tabethas Hof zurück. Beende alles was du fertig hast und nimm die Folgequest von Tabetha an: [39] Gerechtigkeit im Namen der Familie Hyal.
4. Hearthstone to Theramore. Turn in [39] Justice for the Hyals at Captain Garren Vimes (68,48). Take the follow up. Go to the graveyard just outside of Theramore and use the Wreath from your inventory on the grave at (63,42). Once done, return to Captain Garren Vimes and turn the quest in.
5. Fly to Mudsprocket. Turn in [39] Delivery for Drazzit. Gather all quests here:
- [39] Bloodfen Feathers
- [39] WANTED: Goreclaw the Ravenous
- [40] Catch a Dragon by the Tail
==Note== You can abandon [40] … and Bugs, if you have the quest in your questlog.
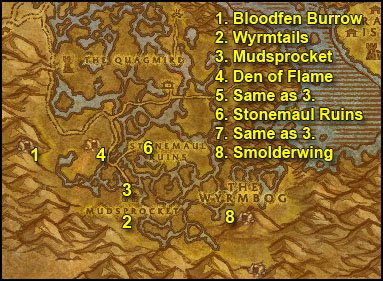
1. Go northwest until you get to an area called The Bloodfen Burrow. Kill every raptor on your way while going west to the cave. There you should see a big named raptor Goreclaw the Revenous. Kill raptors in this area until you have 5 Bloodfen Feathers.
2. When you are done, go south of Mudsprocket and loot 8 Wyrmtails. They look like this:
3. Go back to Mudsprocket and turn in all your quests. Get the two follow ups [39] Banner of the Stonemaul and [39] The Essence of Enmity.
4. Ride northwest to the area named The Den of Flame, which you can enter by the main gate on the southeastern side of it at (40,67). From now on kill every dragonkin you see. After killing a Firemane Scout, Ash Tail or Scalebane, use your Brogg’s Totem from your inventory on their corpses to get a Black Dragonkin Essence. You’ll need to do this 10 times.
Go inside the cave and keep to the left side until you see a banner with a tiger pelt. Loot the Stonemaul Banner.
5. When you are done and when you aren’t more than 8200 EXP away from leveling, return to Mudsprocket. Turn in both quests and get the follow up. Congratulations on level 41.
Level 41
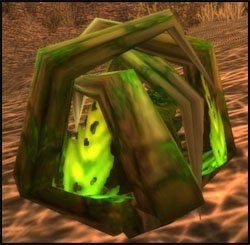
6. Go northeast to Stonemaul Ruins (43,66). Look for Ogre Remains:
Right-click them and Stonemaul Spirits will spawn which you need to kill. You’ll need to free 10 spirits like this.
7. When you are done, return to Mudsprocket and turn the quest in, get the follow up.
8. Go southeast to the area called Wyrmbog. Further southeast towards the mountain you’ll see the entrance to Onyxia’s Lair. Pick one side of the entrance and clear all around it, then plant the Stonemaul Banner from your inventory. After a few seconds a dragon called Smolderwing will spawn. Kill it. Return to Mudsprocket. Turn in at Brogg and fly to Theramore. From there take the boat to Menethil Harbor and fly to Ironforge.
Set your hearthstone in Ironforge.
Get the Patterned Bronze Bracers, the Frost Oil and the Gyrocronatom from your bank (or buy them now if you didn’t yet). I suggest you buy 4 stacks of food/drink at least before leaving.
Go to the Hall of Explorers and get the quest [37] Ironband wants you! from Prospector Stormpike.
From Ironforge, fly to Thelsamar, if you don’t have the flight path, run out of Ironforge, follow the road east and take the tunnel at the South Gate Outpost (86,51) You will be in Loch Modan then, follow the road northeast to Thelsamar.
In Thelsamar get the quest [39] Badlands Reagent Run from Ghak Healtouch in the alchemy supplies house. Then go southeast to Ironband’s Excavation Site (65,65). Get the follow up quest from Prospector Ironband, [38] Find Agmond. Then go southwest to Badlands.
==Note== In Badlands kill any Buzzard or Coyote you find on your way.
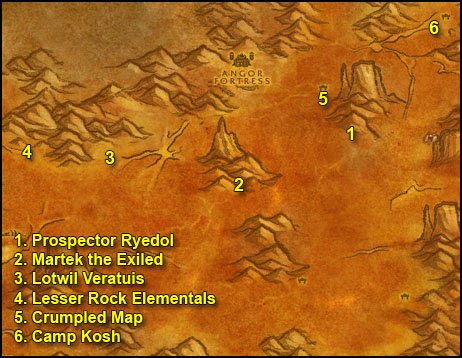
1. Go south, past Hammertoe’s Dig Site, until you find Prospector Ryedol and Sigrun Ironhew (53,43). Get the quests:
- [35] A Dwarf and His Tools
- [38] Mirages
2. Go southwest and find Martek the Exiled (42,52)
Turn in the quest [35] Martek the Exiled and get follow up [39] Indurium. Also get quest [40] Barbecued Buzzard Wings from Rigglefuzz.
==Note== Whenever you need to sell or repair, go to this spot. There is a goblin smithing supplier and it’s the only vendor and repairer in Badlands.
3. Then go west and a bit to the north until you find Lotwil Veriatus’s Camp (25,44). Get the quest [37] Study of the Elements: Rock.
Get [37] Coolant Heads Prevail, turn it in, get the follow up [37]Gyro…What? and turn it in.
4. Just west of Lotwil Veriatus you will find a lot of Lesser Elementals. Stay at this spot until you get 10 Small Stone Shard. Go turn in [37] Study of the Elements: Rock at Lotwil Veriatus and get the follow up.
5. Go east and a bit to the north to Hammertoe’s Digsite.
At (53,34) under a tent next to a big keg you will find a Crumpled Map on the floor. Click it and get the quest [35] A Sign of Hope. Then keep on killing Dark Dwarves until you get Ryedol’s Lucky Pick.
6. Then go northeast to Camp Kosh where you can find the Supply Crate (67,22).
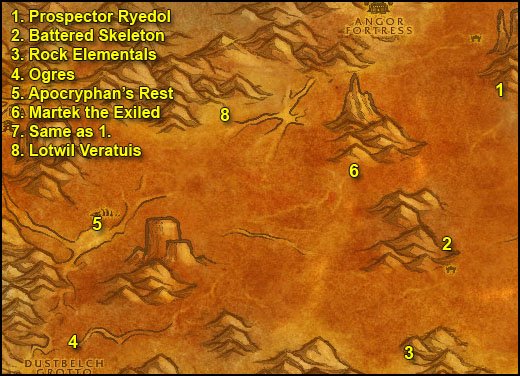
1. When you got the crate, go back to Prospector Ryedol south of Hammertoe’s Digsite and turn in the quests.
Get the follow up [39] Scrounging from Sigrun Ironhew.
2. Go south to Agmond’s End and find a Battered Dwarven Skeleton (50,62), click it and complete the quest and get the follow up [42] Murdaloc.
Kill 12 Stonevault Bonesnapper and Murdaloc, you can find him inside the camp next to the Dwarven Corpse. Keep killing those Troggs until you get 10 Indurium Flakes as well.
3. Once both quests are complete go south into the mountains and kill Rock Elementals at (40,73) until you get 3 Large Stone Slabs.
4. Go west to the ogre area named Camp Cagg (10,72), kill ogres there until you get 7 Scrap Metal. This may take a while. (If you grind here for more that 15 minutes without finishing the quest, just abandon it, it has no follow ups)
5. Go north to Apocryphan’s Rest (16,60) and kill Buzzards / Coyotes until complete [40] Barbecued Buzzard Wings and [39] Badlands Reagent Run.
6. When that is done, go east/northeast to Martek the Exiled (42,52) and turn in [39] Indurium and get the follow up [38] News for Fizzle. Turn in [40] Barbecued Buzzard Wings at Rigglefuzz as well. Repair and sell junk while you are here.
7. Go northeast and turn in [40] Scrounging at Sirun Ironhew.
8. After that go west to Lotwil Veriatus and turn in the quest, get the follow up [42] Study of the Elements: Rock.
You should be level 42 by now, if you aren’t grind on coyotes and lesser rock elementals until you ding.
Level 42
Warp to Ironforge, train skills, repair, auction house, etc.
When ready to go, fly to Thelsamar, turn in [39] Badlands Reagent Run. Go to Prospector Ironband (65,65) and turn in [42] Murdaloc. Then go back to the Badlands.
1. Go to the southwestern part of the map (17, 83) and kill Greater Rock Elementals until you get 5 Bracers of Rock Binding. There’s another camp of Greater Rock Elementals further to the west past the Ogres (6,83).
This will be hard because some of the elementals are level 44. Try to find level 42 or 43 ones if the level 44 are too hard for you.
2. Go to Lotwil Veriatus, turn in [42] Study of the Elements: Rock and get the follow up [42] This is Going to Be Hard. Then go talk to his assistant Lucien Tosselwrench. Get quest [42] Stone is Better than Cloth and complete it, as you should still have the patterned bracers.
Complete [42] This is Going to Be Hard and get the follow up. Talk to Lotwil and complete the quest but BEFORE you accept the next step away from Lotwil, be warned: A level 45 Elemental will spawn and you will have to defeat it. At level 42 this is hard but possible for every class. Just use every long cooldown ability you have. Loot “Lotwil’s Shackles of Elemental Binding” from the Fam’retor Elemental and go turn in the quest to Lotwil.
==Note== For the instance fans, now would be a great time to do Uldaman. If you do Uldaman, try to get to the very end of it and make sure you get the quest [47] The Platinum Discs in the treasure chamber.
Hearthstone to Ironforge and fly to Stormwind.
Go to the Dwarven District and get the quest [43] In Search of the Temple from Brohann Caskbelly inside a house in the Dwarven District (63,24).
Next go to just south of the entrance of The Stockades and talk to Mazen Mac’Nadir and get the quest [41] Mazen’s Behest (40,63). Walk upstairs and get the follow-up quest from Acolyte Dellis.
Stranglethorn Vale:
Fly to Booty Bay, make the inn your home location and get the quests:
- [37] Goblin Sponsorship from Baron Revilgaz in Booty Bay Inn (Top Floor)
- [41] The Bloodsail Buccaneers from First Mate Crazz just past the “Old Port Authority” building (First big building when getting off the Boat).
- [42] Skullsplitter Tusks from Kebok in the Booty Bay inn (2nd Floor).
- [43] Akiris by the Bundle from Privateer Bloads next to the Bank.
- [43] Zanzil’s Secret from Crank Fizzlebub inside the Booty Bay Inn.
- [45] Tran’Rek from Krazek in Booty Bay Inn (2nd Floor).
- [45] Stranglethorn Fever from Fin Fizracket who is under the boat in front of the inn.
In the Stranglethorn Vale category you should also already have:
- [38] Kurzen’s Mystery
- [38] Panther Mastery
- [39] “Pretty Boy” Duncan
- [41] Raptor Mastery
- [41] Scaring Shaky
- [41] Venture Company Mining
Make space in your bags, repair and buy 2 stacks of food/drink (if you don’t have that already, of course).
For those who didn’t finish the Stranglethorn Pages yet: This is your last chance, check the Booty Bay AH and ask in general channel for missing pages. If you got them all, take them with you.
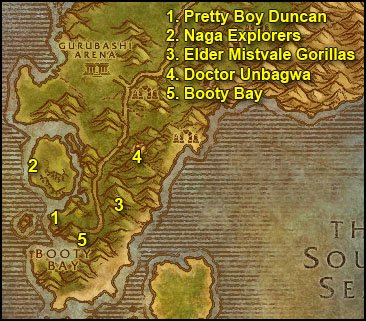
1. Run out of Booty Bay and take the first way left until the Bloodsail Encampment by the shore. Pretty Boy Duncan should be there (28,69). if not, keep clearing the camp until he appears. Kill Pretty Boy Duncan and loot Catelyn’s Blade from him. While you have the camp cleared, look for a map named “Bloodsail Correspondence” on one of the barrels, click it and get the follow up quest.
2. Go northwest across the bridge and keep going along the shore until you find some Nagas. Kill Naga Explorers at (24,65) until you get 10 Akiris Reed.
3. Then go back to the exit of Booty Bay but this time follow the trail to the north. A bit further on the right hand side of the road you will find Elder Mistvale Gorillas (31,67). Kill Gorillas there until you get 5 Mistvale Giblets and 1 Gorilla Fang.
4. Go north to (35,61) where you’ll find a cave with Witch Doctor Unbagwa. Once you speak to him, 3 waves of 1 gorilla will spawn, with 10 seconds in between. You have time to eat/drink between the waves, don’t loot though, you can do that afterwards. So after about 10 seconds an Enraged Silverback Gorilla (level 43) will attack you. After killing that gorilla you have another 10 seconds until Konda spawns (also level 43). Kill him as well. Then after another 10 seconds Mokk the Savage will run into the cave (Level 44). Kill him and loot the Heart of Mokk.
5. Run back to Booty Bay.
- Turn in [41] Scaring Shaky at “Shaky” Philippe on the peer and get the follow up.
- Turn in [45] Stranglethorn Fever at Fin Fizracket under the boat in front of the inn.
- Turn in [41] Return to MacKinley to “Sea Wolf” MacKinley in the house right next to the inn. Get the follow up [44] Voodoo Dues.
- Turn in [41] The Bloodsail Buccaneers at First Mate Crazz a bit further towards the inn. Get the follow up.
- Turn in [43] Akiris by the Bundle at Privateer Bloads next to the bank. Get the follow up.
- Turn in [39]”Pretty Boy” Duncan at Catelyn the Blade inside the inn. Don’t get the follow up, Get the quest [41] Up to Snuff from Deeg on the 2nd floor of the inn.
- Turn in and get the follow up [43] The Bloodsail Buccaneers from Fleet Master Seahorn on the 2nd Floor of the Inn.
Get the quest [38] Excelsior from Drizzlik at the leatherworking hut (top floor).
Finally get the quest [42] Keep an Eye out from Dizzy One-Eye who stands to the right of the Booty Bay blacksmith house. (Left when entering Booty Bay from the tunnel).
Repair, sell and restock food/drink up to 3 stacks.
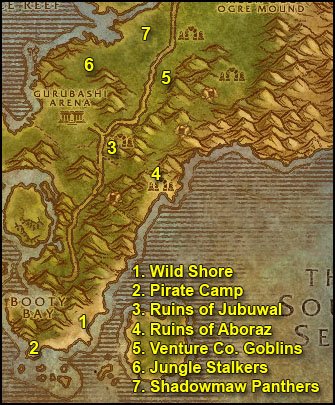
1. Get out of Booty Bay and go east towards the shore named Wild Shore. From there, go southwards while killing any Bloodsails on the way until you reach the 1st camp (29,80). Clear the camp and look for a map thingy named “Bloodsail Charts” or “Bloodsail Orders”, If you don’t find either, move on further south until you find a small boat ashore, check it for maps as well. Careful, the Bloodsail Warlocks really hurt, make sure you interrupt their shadowbolts if you can, and kill them fast then deal with their pets. If you are Rogue or Mage though, I suggest sap / polymorph on the warlock first, kill the pet and then the warlock.
2. Now go further south until you find a bigger camp (27,82). This camp will be harder to clear, but it’s possible if you do it carefully.
Check the camp for Bloodsail Orders or Charts. Basically, the Bloodsail Charts and Orders can spawn at any of the two camps or at the boat. So check all three until you got both.
Then wander up and down the shore where you came from and kill Bloodsails until you get :
- 10 Bloodsail Swashbuckler Kills
- 15 Snuff (can drop from any Bloodsail)
- 1 Dizzy’s Eye (can drop from any Bloodsail)
3. Get back on the road and ride north until you reach the Ruins of Jubuwal (33,51). Clear the camp until you can pull JonJon The Crow, he should come with an add, could be a hard fight but it’s doable. Loot Jon-Jon’s Golden Spyglass, then clear yourself some space around the little ruins just behind where Jon-Jon was, there stands Maury ‘Club-Foot” Wilkins with two Zanzil Something.
Now you probably can’t take all 3 at the same time, so try to kill one of the minions fast then run away, rinse and repeat until you are left with just Maury Wilkins. Kill him and loot “Maury’s Clubbed Foot”.
4. Go back on the road and just a bit south until (33,53), go east through a breached wall and keep going until you hit the Ruins of Aboraz (40,57) and kill Zanzil Minions there until you find
Chucky “Ten Thumbs” inside the ruins and loot “Chucky’s Huge Ring” from him. Keep killing Zanzil dudes until you get 12 Zanzil’s Mixtures, avoid Zanzil the Outcast himself though. If you run out of mobs to kill, go back and forth from this camp to the other. Any Zanzil Something can drop the Mixture.
You should be level 43 by now.
Level 43
5. When done with both [44] Voodoo Dues and [44] Zanzil’s Secret, get back on the road and ride north until you reach (39,41).
** From this point on, if you find any Shadowmaw Panther (they are stealthed) make sure you kill them **
At (39,41) go east and you will find Venture Co. Goblins uphill. Kill them until you get 10 Singing Blue Crystals.
6. Go west to the other side of the road, you should find Jungle Stalkers (34,37). Kill 10.
7. Then go northeast to (36,35) and kill Shadowmaw Panthers until you got 10 kills. You can find them in the area all around that big hill next to the tribal leatherworking troll NPC. They can be a bit hard to find sometimes because they are stealthers so I suggest you hit “Tab” key while running around and open your eyes well (humans use your racial ability perception). 🙂 Keep doing circles around that big hill and you will find 10 panthers quickly.
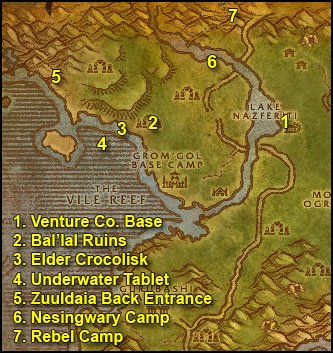
1. Once you’re done get back on the main road and go north until you get to the Venture Co. Base at Lake Nezferiti, go to the Operations Center which looks like an oil rig platform (42,18 ). Go on top of it and kill Foreman Cozzle, loot his Key.
Jump down and go to the small house next to the lumber mill, open the chest and get the Fuel Regulator Blueprints.
2. Now go west across the lake and keep going west until the Bal’lal Ruins (29,20), clear the camp and click the big tablet named “Moon Over the Vale” and loot the scroll.
3. Go west till you hit the coast. You must find an Elder Saltwater Crocolisk. If you don’t see one, just clear the coast while going northwest, until an elder croc spawns. Loot the Elder Crocolisk Skin.
4. Go west into the sea, until (24,22). Dive underwater at this spot and you should find the tablet named “Gri’lek the Wanderer” lying against the outer wall of the underwater ruins. You don’t need to kill any of the murlocs there, the tablet can be accessed safely. Loot the 2nd scroll.
5. Then go north to the Zuuldaia Ruins and take the western entrance ( 21,10) to the Ruins of Zul’Kunda. Clear the way through the first corridor until you reach a fork, go left up the ramp. From there, face north and you should see the 3rd tablet “The Emperor’s Tomb”. Clear the way to it and loot the 3rd Scroll. Then go back to the fork and this time take the ramp up to the right, then take a u-turn to the right and go west until the last ruin (23,11). The last tablet named “Fall of Gurubashi” is inside there. Loot the 4th Scroll and then go back on the main path to the east and clear the way eastwards and out of Zul’Kunda ruins.
6. Keep going east to Camp Nesingwary (35,10).
Turn in:
- [38] Panther Mastery., get the follow up.
- [41] Raptor Mastery, get the follow up.
- and the pages quest if you didn’t do that already before.
7. Then ride north to the Rebel Camp, turn in [38] Kurzen’s Mystery, get the follow up [40] Troll Witchery.
Also get the quest [40] Colonel Kurzen if you don’t already have it.
Fly to Booty Bay, turn in:
- [44] Voodoo Dues, wait 10 seconds, then get the follow up [44] Cracking Maury’s Foot
- [41] Venture Company Mining and [44] Zanzil’s Secret at Crank Fizzlebub in the Booty Bay inn.
- [42] Up to Snuff at Deeg on the 2nd Floor of the inn.
- [37] Goblin Sponsorship at Baron Revilgaz, 2nd Floor of the inn. Get the follow up.
- [42] The Bloodsail Buccaneers at Fleet Master Seahorn, 2nd Floor of the inn, get the follow up.
[38] Excelsior, at Drizzlik in the leatherworking hut (top floor). - [42] Keep an Eye out at Dizzy One-Eye to the right of the Blacksmith house.
This should make you ding level 44
Level 44
Sell junk, repair and re-stock food/drink. Put the Fuel-Regulator Blueprints in the bank.
If you wish, you can fly to Stormwind and go train your new skills, then hearthstone back to Booty Bay.
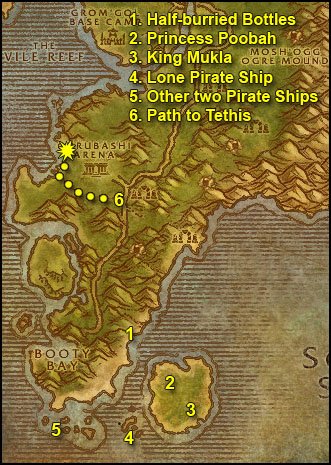
1. Get out of Booty Bay and ride east to the shore. Now we’re going to look for a Half-Burried Bottle, which can be found anywhere along the beach if you keep going northeast. Keep opening bottles until one yields a Carefully Folded Note, right-click it to start [42] Message in a Bottle.
2. Swim southeast to Jaguero Isle and find Princess Poobah at (39,81). Turn in the quest and get the follow up [42] Message in a Bottle.
3. Go to the southeastern part of the island, where you should find a big gorilla named King Mukla (40,84). Kill it and loot the Shackle Key.
Go back to Princess Poobah and turn in [42] Message in a Bottle.
4. Now we’re gonna do [42] The Bloodsail Buccaneers.
Go to the southwestern tip of the island and swim southwest to a lone pirate ship (34,88)
You should see 2 other pirate ships if you look west:
Let’s start with the lone ship.
Instead of describing step by step how everything is done, I made a video, with explanations inside (the video was made before patch v2.3 but it’s still more or less the same, beside that there are less mobs and they are lower level):
Bloodsail Buccaneer Video
Note: The parchment I looted at the bottom of the ship – Cortello’s Riddle – can spawn in any of the three ships, so you’ll have to check the bottom floor of each ship until you find it. It can also spawn in other parts of the ship, so check every corner of each ship carefully, but it mostly spawns on the bottom floor.
When you pull the middle floor, don’t fight in the stairs. As soon as you aggro something, get off the stairs, or you might aggro something from the captain’s cabin through the floor, it’s an annoying bug but it’s easily avoided if you don’t fight on the stairs.
5. Do the same for the other two ships and you should have [42]The Bloodsail Buccaneers complete and have Cortello’s Riddle. Right click it and get the quest [43]Cortello’s Riddle.
Note: Ignore Brutus, that iron golem standing at the top of the eastern ship. He doesn’t drop anything particular and is a pain to kill.
6. Swim back to the mainland, get back on the road and ride north. Right before Gurubashi Arena, turn left, follow the little path west/northwest until you hit the shore, then go north until you find a named raptor, Tethis (29,43). Kill it.
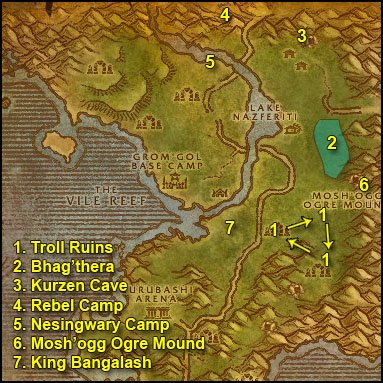
1. Go north through the raptors and then northeast to Ziata’Jai Ruins (42,36) and clear the camp of trolls. Be careful to avoid the patrols. When it’s cleared, follow the little path northeast until you reach Balia’mah Ruins (45,33). Kill all the trolls there as well. When this camp is clear, follow the path southeast and then south until you reach the ruins of Zul’Mamwe (47,38 ) and kill all the trolls you find in the ruins (Though avoid the southernmost one up the plateau, the trolls there are higher level)
If you run out of trolls go back to the first ruins of Ziata’Jai and repeat this cycle until you get 18 Skullsplitter Tusk and 4 Skullsplitter Fetish. The fetishes can only drop from Skullsplitter Mystics and Witch Doctors.
2. Go northeast towards Zul’Gurub. Just south of the path leading to Zul’Gurub (49,20), look for a panther called Bhag’thera, kill her and loot the Fang of Bhag’thera.
3. Go north/northwest to the Kurzen Cave at (46,8). Mobs in there should be grey to you, so try to avoid as many as possible. Inside the cave stick to the right and at some point you’ll start to encounter Kurzen Elites and Kurzen Subchiefs, which you must kill.
==Warning for melee classes== Subchiefs have an ability called Violent Shield, when they cast it, stop attacking or you’ll get hurt. Just wait till it stops.
Keep sticking to the right and you’ll find Colonel Kurzen at the end of the cave, he has one Kurzen Subchief as guard, you’ll have to take them both at the same time, just use your cooldowns if necessary.
Clear the way out of the cave while killing what you need for [40] Colonel Kurzen.
4. Ride west/northwes to the rebel camp, turn in [40] Troll Witchery and [40] Colonel Kurzen, get the follow up [46] Mai’Zoth.
5. Go southwest to Nesingwary’s Expedition, turn in [43] Raptor Mastery and [40] Panther Mastery, get the follow up [43] Big Game Hunter.
Sell junk.
6. Go southeast to the Mosh’ogg Ogre Mound (49,28). Clear the way till the end of the cave, where you should find Mai’Zoth. This won’t be an easy fight, because Mai’Zoth is guarded by two other ogres. My advice is to burn Mai’Zoth, use everything you got, and interrupt his spells because he hurts the most, by far. Use a health potion if needed, then finish the other two ogres. Loot the Mind’s Eye.
Now stay in this area and kill ogres until one of them drops Maury’s Key. If you already got it, just go to the next step.
7. Optional. We’re going to kill King Bangalash. Some classes can’t solo it and will have to find help, 2 people of any class mix should do. If you want to do this quest, head to (38,34) at the top of the hill. Clear any tigress or panthers around, you don’t want them to add while you’re fighting King Bangalash. When he’s at 50% health, he summons to panthers to his help, so watch out for that. My advice is to just burn Bangalash and ignore the panthers (or CC them).
Loot the Head of King Bangalash.
Hearthstone to Booty Bay.
Go to the top floor of the inn, turn in [42] Skullsplitter Tusks and [42] The Bloodsail Buccaneers.
Jump down and turn in [44] Cracking Maury’s Foot at “Sea Wolf” MacKinley, get the other quest [45] Stoley’s Debt.
Repair, sell and refill up to 3 stacks of food/drink.
Fly to the Rebel Camp, turn in [46] Mai’Zoth.
Optional: If you did the [43] Big Game Hunter quest, ride to Nesingwary’s Expedition and turn it in, then go back to the rebel camp.
Fly to Darkshire (Duskwood)
From Darkshire go east, enter Deadwind Pass, go east through Deadwind Pass until you enter the Swamps of Sorrows.
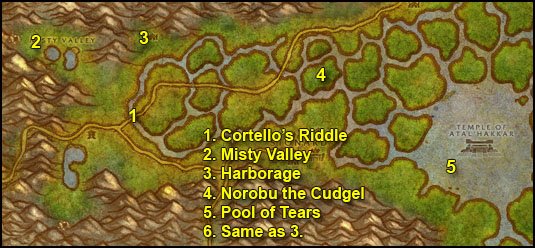
1. When in Swamps of Sorrows, follow the road east until you find a bridge at (23,49). Look under the bridge for a Soggy Scroll. (You’ll see a question mark on your minimap)
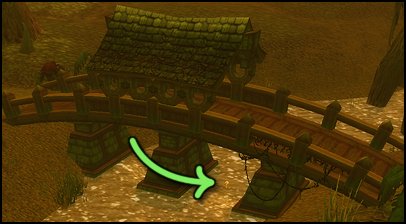
Click the scroll, turn in the quest and get the follow up [43]Cortello’s Riddle.
2. Go north to the Misty Valley (13,35). Kill Swampwalkers, Swampwalker Elders and Tangled Horrors until you complete [41] Mazen’s Behest. The drop rate on the Essays you need is pretty low, so be patient, you might have to kill a lot of those elementals if you’re unlucky.
3. Go east to the Harborage (26,31), get the quest [43] Pool of Tears.
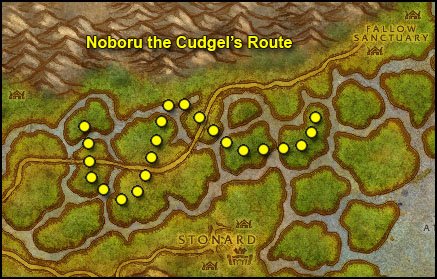
4. Find and kill Noboru the Cudgel.

You can see his route on the picture below, it’s quite accurate, just follow it and you’ll find him. Kill him and loot Noboru’s Cudgel, right-click it to start [39] Noboru The Cudgel.
5. Ride southeast to the Pool of Tears (65,45), swim down in the pool and look for Atal’ai Artifacts, gather 10 of them. A full turn around the pool should be enough. You should also get a message for [43] In Search of the Temple while swimming around in this pool.
6. Ride northwest to the Harborage, turn in [43] The Pool of Tears and [39] Noboru The Cudgel, this should make you ding level 45.
Level 45
Go southeast to the Blasted Lands.
In Blasted Lands go immediately east to Nethergarde Keep.
Find Watcher Mahar Ba, he’s in the big tower on the east side of the village, turn in [41] Mazen’s Behest.
Find the Gryphon Master and fly back to Stormwind.
Repair, sell, check the auction house and go talk to Brohann Caskbelly in the Dwarven District and get the follow up [43] To the Hinterlands.
Go to Stormwind Harbor.
If you don’t have the flight path to Auberdine (which should normally be the case for everyone besides Night Elves and Draeneis), take the boat to Auberdine, this boat is at the southwestern pier in Stormwind Harbor. Once in Auberdine, get the flight path from the Hippogryph Master, then take the boat back to Stormwind.
Take the Deeprun Tram to Ironforge.
==Note== If you are leveling First Aid (most classes should), now would be the perfect time to raise it to 225 and take the quest [45] Alliance Trauma from the first aid trainer in Ironforge, who is inside a house close to the gryphon master.
Fly to Menethil Harbor, go to the southern pier and take the boat to Theramore.
In Theramore on the docks turn in the quest [43] Akiris by the Bundle at Privateer Groy. Talk to the Gryphon Master if you don’t have this flight path for whatever reason.
*If you have First Aid, you can do the quest to become master in First Aid there. You need to have a skill 225 and be level 35+. Go talk to Doctor Gustaf VanHowzen in the Foothold Citadel and do the little quest where you have to bandage patients and get 3900 easy XP.*
Find the inn and make it your home location.
Fly to Mudsprocket.
Go northwest until you get to an area called The Bloodfen Burrow. Go west, clear your way into the cave and you should see a scroll on a stone with a question mark over it. Click it, turn in the quest and get the follow up [51]Cortello’s Riddle.
Hearthstone back to Theramore, then fly to Gadgetzan.
In Gadgetzan:
Turn in [45] Tran’Rek, don’t get the follow up.
Get quests:
- [43] Wastewander Justice
- [44] Water Pouch Bounty
- [47] Handle with Care from Curgle Cranklehop
- [46] Wanted: Caliph Scorpidsting and [45] Wanted: Andre Firebeard from the wanted poster.
Go to the inn and make it your home location.
General info about Tanaris, Feralas and Hinterlands:
While killing stuff in Tanaris if you find an item named [OOX-17/TN Distress Beacon]. Right click it and keep the quest. You’ll find beacons in Feralas and Hinterlands as well, proceed equally with those. Each of those beacons start a quest where you will have to find a Homing Robot and escort it. The beacons won’t always drop for you, they are kinda rare. The escort quests are hard to do solo especially for certain classes. But if you are lucky to find all 3 beacons you should really put the effort and finish all 3 rescue quests, it will be described when to do them in the guide later on. Anyway, if you don’t get a distress beacon, or if you don’t manage to complete the rescue quests, it’s not a big deal, this is optional, it’s a nifty exp bonus but it’s not that important
Sell, Repair, re-supply food/drink (3 stacks).
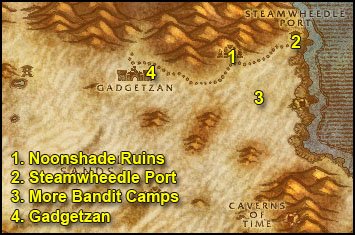
1. Get out of Gadgetzan, ride east until Noonshade Ruins (61,24), kill all the Bandits you can find there (If it’s crowded just skip this part and keep riding east).
2. Then go further east to Steamwheedle Port even if you still haven’t completed Wastewander Justice yet.
In Steamwheedle port get:
- [45] Pirate Hats Ahoy!
- [44] Screecher Spirits
- [45] Southsea Shakedown
Turn in [45] Stoley’s Debt and get the follow up [46] Stoley’s Shipment.
3. Ride back towards Gadgetzan, make a stop at Noonshade Ruins and kill bandits / thieves there until you finish Wastewander Justice and Water Pouch Bounty. If the place is crowded, there are more wastewander camps southeast of here (63,30).
4. Go back to Gadgetzan and turn in [44] Water Pouch Bounty and [43] Wastewander Justice, get the follow up [44] More Wastewander Justice.
Go to the bank and get the Fuel Regulator Blueprints.
Ride north to Thousand Needles and to the Shimmering Flats (80,75).
Turn in [38] News for Fizzle at Fizzle Brassbolts.
Get quest [50] Gahz’Rilla (Dungeon) from Wizzle Brassbolts if you plan to do the Zul’Farrak instance in the future.
Turn in [36] Part for Kravel at Kravel Koalbeard, don’t get the follow up.
Turn in [37] Goblin Sponsorship at Pozzik don’t get the follow up but on the other hand get the quest [41] Keeping Pace from Pozzik.
Then go talk to Zamek who is just south of Pozzik, he should have a blue question mark over the head. Start his quest, follow him, he will set up an explosive and distract Rizzle Brassbolt out of his house. While Rizzle is away go quickly loot the Unguarded Plans. Complete the quest, get the follow up [41] Rizzle’s Schematics and turn it in at Pozzik. You can destroy the Sample of Indurium Ore from your bags.
Hearthstone if it’s up, or ride back to Gadgetzan and fly to Thalanaar (Feralas). You should have this flight path if you followed the previous chapter.
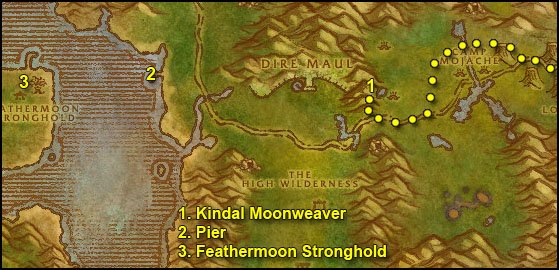
1. In Feralas, ride west, follow the road, but carefully avoid Camp Mojache (by the north) or the guards will make a quick deal of you. Find the Grimtotem Camp at (65,47), then locate Kindal Moonweaver at (65,45), she is on the mountain overlooking the Grimtotem camp. There is a path going to her just a little west of the grimtotem camp (65.6,47).
Once you know where Kindal is, don’t take the quest yet, go back to the Grimtotem Camp and clear the area around the bamboo cage with the Sprite Darters in it, and don’t be shy, clear a wide radius around it.
When you feel that you’ve cleared enough, go quickly to Kindal and start the quest, jump down and run straight to the bamboo cage, open the cage and escort the sprites out, at least 6 of them must survive. Once you get the “6 Sprites escaped (Complete)” message, help Kindal finish off whatever she is attacking. When Kindal is not being attacked by anything, she will vanish, go find her at her initial spot, turn in the quest. If you and/or Kindal die after getting the “quest complete” message, just run back fast to where you initially found Kindal and turn in the quest before the end of the 6 min countdown.
Now Jer’Kai Moonweaver (that elf right next to Kindal) will have a quest for you,[47] Doling Justice. Take the quest, go back down to the Grimtotem Camp and kill as much as the quest requires you to. When done, go back to her and get the follow up [47] Doling Justice.
2. Get back on the road, keep going west following the road and go to the shore at (44,42).
3. Take the boat to Feathermoon Stronghold, or just swim there if the boat isn’t in sight, it’s faster.
In Feathermoon Stronghold get those quests:
- [46] The Mark of Quality
- [43] The Ruins of Solarsal
- [43] The Missing Courier
- [44] The High Wilderness
- [47] In Search of Knowledge
Then go talk to Ginro Hearthkindle, he is on the 2nd floor of a house at (31,45) get the follow up [43] The Missing Courier from him.
Talk to the Hippogryph master, make Feathermoon Stronghold your home location. Sell and Repair, re-supply food and drink (3 stacks)
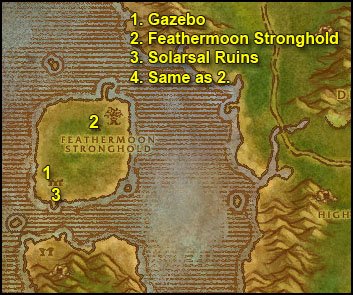
1. Go southwest to the Ruins of Solarsal, at (26,52) you’ll find a Gazebo (a pavilion structure opened on all sides) named “Solar Gazebo” , it’s easy to discern it as it is the only “dark” building. Click it and get the follow up quest [43] Return to Feathermoon Stronghold.
2. Go back to Feathermoon Stronghold and get the follow up from Shandris Feathermoon [43] Against the Hatecrest. Talk to Latronicus right next to her, get the follow up.
3. Go back to the Solarsal Ruins, kill Nagas until you have 10 Hatecrest Naga Scales.
4. Go back to Latronicus, turn in the quest and get the follow up [45] Against Lord Shalzaru. You should be level 46 by now.
Level 46
Sell, repair and re-supply food/drink (3stacks).
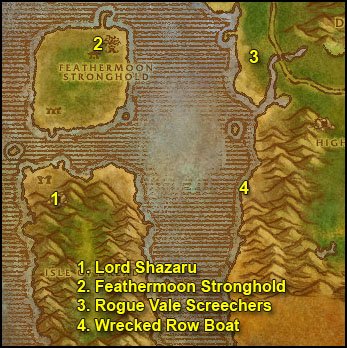
1. Go south past the Ruins of Solarsol and across the water to the Isle of Dread. On the Isle of Dread, clear a path to the cave at (26,67).
Inside the cave, go straight ahead and under a small white arch. Lord Shalzaru is up there on the other side of the pond. Kill Lord Shazaru, there are 2 other nagas close to him but you can pull them one by one or just 2 at a time. Use your long cooldown abilities and potions if needed. Loot the Mysterious Relic from him.
2. Clear the way out and go back to Feathermoon Stronghold.
Turn in the quest at Latronicus and get the follow up [45] Delivering the Relic. Go talk to Vestia Moonspear in the same building and turn in the quest.
3. Then take the boat, back to Feralas, from there go south following the shore while avoiding the Water Elementals / Giants. Kill any Rogue Vale Screechers you find on the way and use Yeh’Kinya’s Bramble on their corpses, then talk to their spirit to free them. Finish [44] Screecher Spirits while going southwards.
4. Cross a small river, then keep going south until you find a Wrecked Row Boat at (45,65), it’s underwater but very close to the shore, you can see the yellow “?” on your minimap anyway. There will probably be an elemental or two around it that will aggro if you get close, you can try killing them (but some of them are 49) or you can run in, click the quest, get the follow up and run away. (What I did :p)
Once you have the follow up [44] Boat Wreckage, go back to Feathermoon Fortress (use Hearthstone if it’s up).
In Feathermoon Fortress talk to Ginro Hearthkindle and get the follow up [44] The Knife Revealed, go talk to Quintis at the top of the tower north of this building. Get the follow up [44] Psychometric Reading and go back to Ginro, get the follow up [44] The Woodpaw Gnolls.
Sell, Repair, buy up to 4 stacks of food/drink.
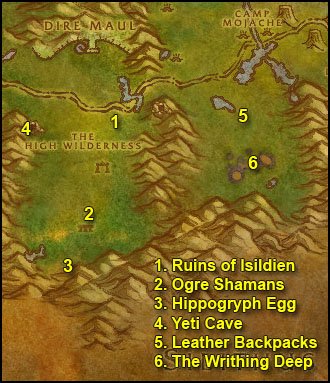
1. Go east across the sea, back to Feralas, follow the road east until you reach Ruins of Isildien (61,53). Kill ogres there until you have killed 8 Brutes and 8 Warlocks.
2. Then for the Ogre Shamans you will have to go much further south to the big temple at (59,73). Keep doing circles around the temple until you got 8 Shamans dead (there’s also shamans inside the building, sometimes you gotta kill the placeholders for them to respawn).
3. When you are done with Shamans, go further to the south and as far up the hills as you can, you will find Hippogryph Eggs on the floor at (56,76). Get a Hippogryph Egg.
4. Go northwest to the Yeti Cave (55,56). Kill Yetis, ignore the Homing Robot OOX-22/FE for now. Keep killing yetis until you get 10 Thick Yeti Hides.
When you got 10 Yeti Hides, go to the Homing Robot. (53,55)
Now, at this point you should normally have gotten a Distress Beacon with all the stuff you’ve killed in Feralas already. If you don’t, it’s not a big deal, just go to the next step. For those you did get a Distress Beacon, right click it to get the quest [45] Find OOX-22/FE! if you haven’t already. Turn in the quest.
Don’t take the escort quest if you are solo, it’s too hard for almost every class. If you are two or more, read the following warnings before taking the escort quest:
- 1st Warning: The Chicken robot is stupid and doesn’t assist you all the time if you get attacked. Let him in the front so he gets the first hit. He has a decent amount of HPs and heals back to full after each fight is over. You can even eat/drink a bit after a fight and let the chicken walk in the front (not too far away though). Don’t even think about looting, you don’t have time. Don’t let the chicken tank more than one at a time, and don’t let him tank too long either.
- 2nd Warning: When out of the Yeti cave, the chicken will take a left turn and go towards the road, at some point 3 yetis will ambush him. Don’t panic, you can let one of the yetis be tanked by the chicken at the beginning and deal with the other 2. Just check the chicken’s health regularly. There will be a 2nd and a 3rd ambush, be prepared for them. Especially the last one is composed of 4 Gnolls.
5. Get back on the main road and follow it east until (71,48). You should be directly north of a small lake. Go to the southeastern tip of that lake and a bit more to the south try to locate a small gnoll camp next to a huge tree. (73,56). Clear the camp and look for “Large Leather Backpacks” hanging at the trunk of that huge tree. Click it and get the follow up quest [46] The Writhing Deep.
Also check your inventory for a bag named “Undelivered Parcel”, click it and start the quest [44] Thalanaar Delivery.
6. Go further south to the Writhing Deep and find the hole at (74,63), go down the spiralling ramp until you reach the bottom. There enter the tunnel towards the west, inside the tunnel at the first fork go to the right. At the end of this corridor you’ll find a circular room with the Zukk’Ash Pod inside. Clear the insects in the room. (if you are lucky, “Qirot”, a rare spawn insect will be there. Kill it for and extra green item). When the room is clear, click the Zukk’Ash Pod, complete the quest, and after Raschal the Courier is done with his speech, warp back to Feathermoon Stronghold.
Turn in all quests and get the following quests:
- [46] A Hero’s Welcome
- [48] Improved Quality
- [51] The Sunken Temple
Go to Shandris Feathermoon, turn in [46] A Hero’s Welcome and get the follow up [46] Rise of the Slithid.
Fly to Auberdine (Darkshore), takes about 7 minutes. Or just fly directly to Rut’theran Village if you got the flight path.
In Auberdine go on the peer and take the boat to the right, it will take you to Rut’theran Village outside of Darnassus.
Turn in the quest [47] Handle with Care at Erelas Ambersky. Get the quest [47] Favored of Elune?.
Go talk to Daryn Lightwind on the upper floor, turn in [47] In Search of Knowledge. Go luck for a green book on the floor, next to the little bookshelf to the north (55,91). Get the quest and talk again to Daryn and get the follow up [48] The Borrower.
Go inside Darnassus (for those who never went there, you have to step in the pink haze at (56,90))
Inside Darnassus, go to the Temple of the Moon.
Turn in [46] Rise of the Silithid there and [47] Doling Justice. This should make you ding level 47.
Level 47
While you are in Darnassus, go to your class trainer (if you are Shaman, Paladin, or Warlock you will have to go to Auberdine and take the boat to Stormwind. Mages can just go learn the Portal to Darnassus and warp to a big city to train).
Visit the Auction House, sell and repair.
Then go back to Feathermoon Stronghold (Use Hearthstone if it is up — If it’s not up, there is a Hippogryph Master in Rut’theran Village, fly to Auberdine, then fly to Feathermoon.)
From Feathermoon, fly to Thalanaar. Turn in the quest [44] Thalanaar Delivery at Falfindel Waywarder. Then Fly to Gadgetzan.
In Gadgetzan, turn in the quest [48] The Borrower at Curgle Cranklehop, get the follow up [48] The Super Snapper FX.
Right next to Curgle, click on the Egg-O-Matic. Complete the quest and you will get an Egg Crate, open it then talk to Curgle again and complete the quest corresponding to the egg you got.
Sell, Repair, get up to 3 Stacks of Food/Drink.
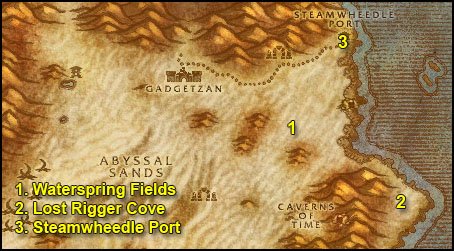
1. In Tanaris ride to the southeast until you reach Waterspring Field (63,37).
You will find numerous Wastewander camps there. Kill Wastewander Rogues (stealthers), Assassins and Shadow Mages. You can also find Caliph Scorpidsting, he wanders between the tower structures, so you should go kill from a tower structure to another until you find him. He has 2 stealthed bodyguards, it will be a hard fight, burn him down quick and run away is my advice, use long cooldown abilities and potions if needed. Then go back and loot his head.
If you don’t find Caliph it’s not a problem though, it’s just some bonus XP quest, not too important.
2. Once you got [44] More Wastewander Justice completed, go east towards Lost Rigger Cove. You’ll find a cave entrance at (68,41). Go through this tunnel.
Now you have a lot of work to do, check the kill list of [45] Southsea Shakedown and start killing Pirates!
Clear your way south toward the main camp with the 3 houses , 2 ships ashore and the boat under construction.
Andre Firebeard spawns at the campfire right in the center of the camp. He has 3 Dock Workers close to him but you can pull those 3 without him if you pull the back one, then you have Andre solo. Or you can burn him down fast and run away (or take them all :p^^). Anyway, this place is usually crowded because it is a good grinding spot, so you shouldn’t have trouble getting help to kill Andre Firebeard if needed.
Then go inside the first house to the right when entering the camp. You might get pulls of 3 at a time inside the house, you will maybe have to use the “Kill one and run away” tactic to get to the top floor of the house if you can’t take 3 at a time.. On the top floor are crates, click them to get Stoley’s Shipment.
Then keep on killing pirates until you complete Southsea Shakedown and Pirate Hats Ahoy!
Bonus: There is a rare spawn named Kregg Keelhaul on the boats ashore. Check for it.
If you find a Captain’s Key off one of the pirates, the chest is at the bottom level of the ship which is the most to the east. Another thing, while killing pirates by the dozen you might find a pirate footlocker on one of them (1% chance to drop approximately). In the footlocker you might find a note named “Ship Schedule”, right click it to start the quest [45] Ship Schedules, which you turn in in Steamwheedle Port for an extra 4850 XP. However, you might be unlucky and never get a footlocker, so don’t worry if you miss it, it’s optional.
3. When done, get out of Rigger Cove and go north to Steamwheedle Port.
Turn in:
- [45] Andre Firebeard
- [45] Southsea Shakedown
- [45] Stoley’s Shipment and get the follow up [45] Deliver to MacKinley
- [45] Pirate Hats Ahoy!
- [44] Screecher Spirits and get the follow up [47] The Prophecy of Mosh’Aru (Dungeon)
Ride west to Gadgetzan and turn in:
- [44] More Wastewander Justice
- [46] WANTED: Caliph Scorpidsting
Also turn in any stacks of 5 Wastewander Water Pouch at Spigot Operator Luglunket (he has a blue question mark overhead)
Go to Ironforge (Fly to Theramore, take the boat to Menethil Harbor and then fly to Ironforge)
In Ironforge: Sell, repair, check auction house.
Optional: If you did Uldaman and [47] The Platinum Discs quest, then go to the Hall of Explorers, talk to High Explorer Magellas, get the quest [50] Portents of Uldum, then talk to Historian Karnik further inside the Hall of Explorers and get the follow up [50] Seeing what Happens.
Fly to Southshore, turn in [40] Down the Scarlet Path (if you did the Scarlet Monastery instance, you probably don’t have this quest anymore, so just ignore this).
Go northeast to the Hinterlands (84,32). In Hinterlands go northeast to Aerie Peak (14,47).
Get the quests:
- [44] Preying on the Predator
- [46] A Gesture of Goodwill
- [46] Featherbeard’s Endorsement
- [45] Troll Necklace Bounty
- [48] Skulk Rock Clean-up
- Turn in [43] To the Hinterlands at Falstad Wildhammer and get the follow up:
[43] Gryphon Master Talonaxe
On your way up to the top get the flight path for Aerie Peak.
Talk to Gryphon Master Talonaxe and get the follow up:
[43] Rhapsody Shindigger. Also get [45] Witherbark Cages from him.
Then make Aerie Peak your home location. (the innkeeper can be hard to find, he wanders about on the top floor inside the inn)
** Reminder: If you find a Distress Beacon on mobs in Hinterlands, right click it and get the quest**
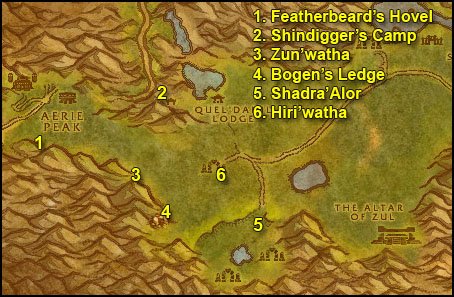
1. Go south to Featherbeard’s Hovel (13,54), inside the house you’ll find a book, right-click it, turn in the quest and get the follow up [46] In Pursuit of Featherbeard.
**While in the Hinterlands look for Wilkdkin Feathers, they are big white/brown feathers you can find on the ground throughout Hinterlands. They don’t drop off the Owlbeasts. I found most of them in between Aerie Peak and Quel’Danil Lodge. Start gathering them from now on while doing the quest circuit**
**Also kill Mangy Silvermane and Silvermane Wolves on your way**
2. Go north and then follow a small path east of Aerie Peak while staying close to the mountain to your left. You will find Shindigger’s camp (26,48).
Talk to Rhapsody and get the follow up [43] Rhapsody’s Kalimdor Kocktail
3. Go south/southwest to the troll ruins of Zun’watha (23,58), clear the camp and check the first and second Witherbark cages.
4. Go southeast to the cave called Bogen’s Ledge (25,66). Inside the cave, kill Witch Doctor Mai’jin and Tcha’kaz.
5. Go east until you find the entrance to Shadra’Alor at (36,64). Clear the way to the top of the eastern pyramid, where you should find Featherbeard’s Remains (37,71.5).

Turn in the quest and get the follow up [46] Reclaiming the Eggs.
From Featherbeard’s Remains, face precisely southwest and move in this direction for about 30 yards, you’ll find 3 eggs next to an incurved wall (36,73), loot the 3 Gryphon Eggs.
Go southwest, staying close to the mountain to your left, soon you should see a yellow “!” on your minimap. Go there and you should find another 3 Gryphon Eggs (34,75). Loot 2 of them to finish [46] Reclaiming the Eggs.
Optional: If you plan to do the Sunken Temple instance in the future, you should take the quest given by the Atal’ai Exile.
6. Get out of Shadra’Alor and go northwest to the troll ruins of Hiri’watha (32,57). Clear some space inside and check the “Third Witherbark Cage”.
Kill trolls until you get 5 Troll Tribal Necklaces.
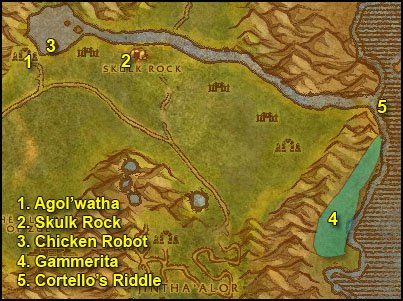
1. Go northeast to Agol’Watha (46,40) and kill 10 Green Sludges.
2. Go east to Skulk Rock (56,44) and kill 10 Jade Ooze. Beware of the wolf stalkers there though, they are stealthed, so be prepared for unexpected adds.
You should be level 48 by now.
Level 48
3. Optional: If you got the Distress Beacon OOX-09/HL, go to the lake northwest of Skulk Rock and find the Homing robot there (49,37). Turn in the quest. Before you accept the rescue quest, here is what you must know:
- This quest, unlike the Feralas one, is more likely to be done solo. It’s still not a walk in the part of course. So if you got a partner to duo it, all the better for you.
- Let the chicken run in front of you, let it get the first hit. If it’s not getting hit, it won’t fight back. Sometimes mobs are actually chasing the chicken and failing to get a hit on it, so they give up.
- You’ll have to face 2 ambushes of 3 mobs each, make sure you are full health/mana and with long cooldown abilities up when you start the escort. When the 3 ambushers attack, stand back until the chicken gets hit. Then let the chicken tank one of the 3 adds, deal with the 2 others as quick as you can, then help the chicken finish off the 3rd add.
If you don’t have the beacon, you can come back later when you get one. We’ll come back to the Hinterlands in a few levels anyway. Ride southeast until you reach The Overlook Cliffs (71,65), then go down the slope.
4. Search your bags for the Super Snapper FX and make a hotkey out of it. Then ride along the shore and search for a named turtle named Gammerita. She is easy to discern from the rest because she’s the only aggressive turtle (red name). She roams a lot, so you’ll find her anywhere between the waterfall (82,47) and Revantusk Village (77,77). She will attack you when you take her picture, you can kill her or run away, as you prefer. You should now normally have a Snapshot of Gammerita in your inventory.
5. Mount up and go north until you reach the waterfall named The Overlook Cliffs (79,48).
Dive in the water and look for Cortello’s Chest at the bottom of the sea, close to where the waterfall hits the bottom.

Click it and turn in the quest for 8800 xp and a 14-Slot bag.
Hearthstone back to Aerie Peak.
Turn in the quests:
- [45] Troll Necklace Bounty
- [48] Skulk Rock Clean-up
- [46] A Gesture of Good Will
- [46] Reclaiming this Eggs
Go to the top floor of Aerie Peak to Gryphon Master Talonaxe and get the follow up:
[48] The Altar of Zul
You can destroy Featherbeard’s Map from your inventory.
Sell, repair, buy up to 3 stacks food/drink.
==Note== From now on, kill on sight the following: Mangy Silvermanes and Silvermane Wolves as long as you still need them for [44] Preying on the Predators. Also gather as many Wildkin Feathers as you still need for [47] Favored of Elune?.
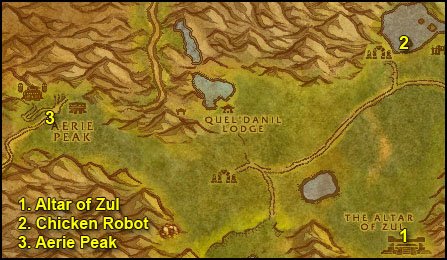
1. Go east/southeast to the Altar of Zul (49,64) and kill trolls / wolves there. On top of the temple of Zul you’ll find 2 level 50 mobs. Qiaga and Morta’gya.. Get full HP/mana, kill them both, try to interrupt their spells as much as possible and use your cooldowns/potions if needed.
Loot the “Sacred Mallet” from Qiaga. Then walk on top of the altar in the middle of it and you’ll get a quest update for [48] The Altar of Zul.
2. If you haven’t done the robot chicken escort quest yet but got the Distress Beacon OOX-09/HL, go to the lake northwest of Skulk Rock and find the Homing robot there (49,37) and do the escort.
If you still don’t have the Distress Beacon, well first of all you’re not lucky. If you can stomach it, go grind at some troll ruins (any will do) until you get the beacon, because it’s much more efficient to do this escort now (you’ll see later why). If you really don’t wanna grind, then forget it, we’ll get another chance to do this quest in a later circuit, it will just require one extra trip to Booty Bay at a later point.
3. Go back to Aerie Peak, turn in [44] Preying on the Predators.
Go to the top of Aerie Peak and speak with Gryphon Master Talonaxe. Turn in the quest and get the follow up:
[47] Thadius Grimshade
Keep Aerie Peak as your home location, we’ll hearthstone there in a couple of circuits.
Fly to Ironforge. Sell, repair, visit your class trainer, check the AH. you really have to buy the 2 Elixirs of Fortitude if you didn’t already (See shopping list).
==Note== If you want to do the Zul’Farrak instance, now would be a good time to do it. If you do the instance, make sure you do the following:
- Before going to Zul’Farrak, fly to Nethergarde Keep (Blasted Lands), turn in [47] Thadius Grimshade, get the follow up [47] Nekrum’s Medaillon.
- When inside Zul’Farrak, Kill Theka the Martyr (Loot 1st Tablet)
- Do the Temple script (Loot Nekrum’s Medaillon)
- Kill Hydromanther Velratha (Loot 2nd Tablet)
Take a portal to Darnassus or if you don’t find a mage, go to Stormwind Harbor, take the boat to Auberdine, then fly to Rut’Theran village.
In Rut’theran Village turn in the quest [47] Favored of Elune? at Erelas Ambersky (55,92).
In the same house on the 1st floor turn in [48] The Super Snapper FX. Get the follow up [48] Return to Troyas.
Fly to Gadgetzan. In Gadgetzan get:
- [46] Gadgetzan Water Survey from Senior Surveyor Fizzledowser (he’s on a mound of earth behind the houses on the west side of Gadgetzan)
- [49] The Thirsty Goblin from Maren Noggenfogger
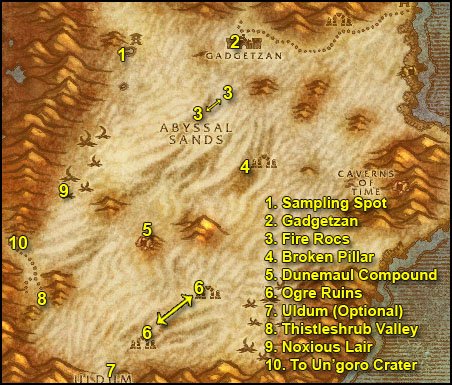
- [49] The Dunemaul Compound from Andi Lynn (behind the Inn)
- [50] Thistleshrub Valley from Tran’Rek
1. Go west to the pool of water by the Sandsorrow Watch (38,29). Stand by the western tip of the pool and get full health/mana. Search your bag for a black vial named “Untapped Dowsing Widget” and right click it. Two level 48 insects will pop and attack you, kill them or run away from them. It doesn’t matter.
2. Go back to Gadgetzan. Talk to Senior Survery Fizzledowser and get the follow up [47] Noxious Lair Investigation.
Now we’ll do a long circuit, so repair and re-stock food/drink.
3. Get out of Gadgetzan and go south until you find the skeletal remains of some huge animal (50,35). Kill all the Fire Rocs you find there. The Hyenas actually share the same spawn points as the Fire Rocs, so if you run out of Fire Rocs, kill Hyenas until Fire Rocs spawn instead. There’s another of those huge skeletal remains to the southwest. Cycle between those 2 spots until you get the 3 Roc Gizzards you need for [43] Rhapsody’s Kalimdor Kocktail.
4. Go southeast to the area named “Broken Pillar” (52,45) and talk to Marvon Rivetseeker. Turn in [51] The Sunken Temple and get the follow up [51] The Stone Circle. Also get [48] Gahz’ridian.
5. Go southwest to the Dunemaul Compound and clear a path to the cave there (40,56). In that cave you’ll find Gor’marok the Ravager, kill him. (lvl 49 – soloable at lvl 47 without a problem)
6. Go southeast to the Eastmoon Ruins (48,64) (yes, even if you didn’t finish [49] The Dunemaul Compound yet.) Start killing ogres there and look on the floor for Gahz’Ridian pieces. They look like white upside down plates. If it’s too crowded, there is another camp similar to this one further to the southwest named “Southmoon Ruin” (41,72). When you got 30 Gahz’Ridian ornament you should also be done with [49] The Dunemaul Compound. If not, kill some more ogres :p
7. Optional: If you went to Uldaman and did the quest [47] The Platinum Discs, go southwest to Uldum (38,79). The Dune Smashers have a small aggro range, you can hug the left wall and reach the Stone Watcher of Norgannon, just be careful of the one roamer. The Stone Watcher of Norgannon is at (37,81). Click the Uldum Pedestal under him and get the follow up, then talk to the Stone Watcher of Norgannon who just appeared on the pedestal. Go through his dialogue and you will complete the follow up. Then click the Uldum pedestal again, complete the quest and get the follow up [50] Return to Ironforge.
8. Go west (northwest if you went to Uldum) to Thistleshrub Valley (28,67). Kill Gnarled Thistleshrubs and Thistleshrub Rootshapers until you get 8 kills of each. Also kill Thistleshrub Dew Collectors until a Laden Dew Gland drops (rare drop).
This should easily make you ding level 49.
Level 49
9. Go north to the Noxious Lair (31,51). Kill Centipaars there, Stingers, Wasps, Tunnelers.. until you get 5 Centipaar Insect Parts.
10. Ride southwest to the slope going down to Ungoro Crater (27,57).
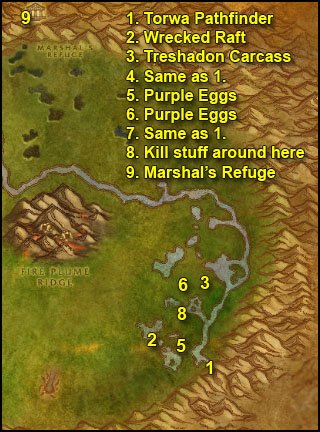
1. Go down the slope and find Torwa Pathfinder to the right up a small hill (71,75). Get the 2 quests:
- [53] The Fare of Lar’korwi
- [55] The Apes of Un’Goro
==Note== While in Ungoro Crater look around for crystals. There is 4 types of crystals:
Red, Blue, Yellow and Green crystals. Loot them anytime you see them until you got 7 of each color.
Also kill every dinosaur you find on your way and normally you should find a Mangled Journal at some point (if you don’t you will later on in Ungoro, don’t worry). Right click the journal and get the quest [50] Williden’s Journal.
2. Go northwest until you find “A Wrecked Raft” at (63,68). Right click it and accept the quest [52] It’s a Secret to Everybody.
Take a dive right next to where the wrecked raft is and look underwater for yellow bag called “A Small Pack”. Click it, turn in and get the follow up. You should receive a small pack in your inventory but don’t open it for now, it will save you some bagspace.
3. Go northeast from here until (68,56), where you will find a big dinosaur carcass on the floor. Right click it to get the Piece of Threshadon Carcass.
4. Once you have your “Piece of Threshadon Carcass”, go back to Torwa Pathfinder, turn in the quest and get the follow up [53] The Scent of Lar’korwi.
5. Go west back into the Marshlands until you find some purple eggs on the floor (67,73). Clear the ravasaurs around it, then step up on the egg pile, a Lar’korwi mate should appear and attack you, kill her and loot the Ravasaur Pheromone Gland (75% drop rate).
6. Then go to the next pile of eggs north of this one (66,67), do the same thing. Go back and forth between these 2 egg piles until you got 2 Glands.
7. Go back to Torwa Pathfinder and turn in the quest, get the follow up [56] The Bait for Lar’korwi.
8. Go back to the Marshlands and kill Dinosaurs while looking for crystals until you got 7 Power Crystals of each color and found the Mangled Journal.
9. Ride north then northwest to Marshall’s Refuge (46,13).
Turn in [50] Williden’s Journal, don’t get the follow up.
Open the “small pack” in your inventory and loot all the items from it, then turn in [52] It’s a Secret to Everybody at Linken (he’s inside a tree trunk south of Williden Marshal), get the follow up. You can destroy the Faded Photograph from your inventory.
Go inside the cave at Marshall’s Refuge and go to the end of it where you’ll find a little gnome named J.D. Collie.
Get her quest [53] Crystals of Power and turn it in. Then get the 3 follow up quests she gives you:
- [53] The Eastern Pylon
- [53] The Northern Pylon
- [53] The Western Pylon
Fly to Gadgetzan and turn in:
- [49] The Thirsty Goblin at Marin Noggenfogger. Get the follow up [49] In Good Taste.
- [49] The Dunemaul Compound at Andi Lynn
- [50] Thistleshrub Valley at Trank’Rek
- [49] In Good Taste at Sprinkle, get the follow up [49] Sprinkle’s Secret Ingredient.
- [47] Noxious Lair Investigation at Alchemist Pestlezugg
Get the quest:
[48] The Scrimshank Redemption from Senior Surveyor Fizzledowser.
Sell/repair/restock food-drink (3 stacks).
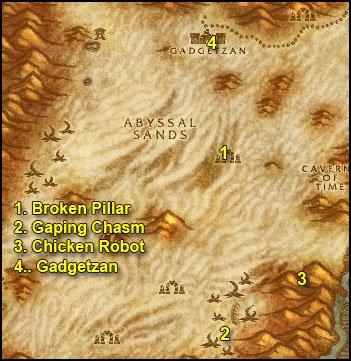
1. Go south to the Broken Pillar and talk to Marvon Rivetseeker, turn in [48] Gahz’ridian.
2. Go further south to the Gaping Chasm (56,61), clear yourself a path through the insects southwards until you find the entrance spiralling down at (55,70). Take the 2nd tunnel you see when going down the spiral, the one going north (55,69). Inside the tunnel at the first fork go right. Then go through the circular room. After the circular room at the first fork go right. You will enter a big square room. The Scrimshank’s Surveying Gear (55,71) is at the western corner of the square room.

Loot it and then go back the way you came from, and then go north until you are out of the Gaping Chasm.
If you don’t have the Distress Beacon, go back to Gadgetzan.
3. If you do have the Distress Beacon for Tanaris:
Go east and inside the mountain at (60,64). You will find the Homing Robot OOX-17/TN there. Turn in the quest. Get full health/mana, refresh buffs. Check if your long cooldown abilities are up. For some classes this will be hard to solo, so if you don’t manage it better find someone to duo it with. If you don’t manage that, just abandon the escort quest, it’s optional anyway.
Things to know about this escort quest:
1. Let the chicken in front, let him get hit first. Sometimes mobs will aggro him but not manage to hit him while he walks and they will just give up.
2. The first part of the escort is the hardest as you will run into lvl 46-47 mobs. And at some point you will get an ambush of 3 level 46 scorpions. Use your long cooldown abilities there. After this, it gets easier.
3. Later on you will get a 2nd ambush, 3 humanoids lvl 42 (green). One will be a shadow mage though, kill it first.
==Note== For those who did Zul’Farrak, go to Steamwheedle Port, turn in [47] The Prophecy of Mosh’aru, get the follow up [50] The Ancient Egg. For the others, if you don’t plan to do Zul’Farrak, just abandon the quest [47] The Prophecy of Mosh’aru.
4. Ride back to Gadgetzan, talk to Senior Surveyor Fizzledowser and get the follow up [48] Insect Part Analysis.
Go talk to Alchemist Pestlezugg, get the follow up and get back to Surveyor Fizzledowser. Turn in the quest and get the follow up [49] Rise of the Slithid
.
Fly to Thalanaar, Feralas.

1. Mount up, ride west/northwest, carefully avoiding Camp Mojache. Keep going west until the grimtotem camp (66,46). Go talk to Kindal Moonweaver (those two elven females we already helped back then with freeing sprite darters). Get the quest [47] An Orphan Looking for a Home.
2. If you haven’t done the Feralas chicken escort quest, go west and back to the Yeti Cave (55,56) and try to escort the Homing Robot. At level 49 it shouldn’t be too hard to solo it. Anyway, one advice, just ALWAYS let the chicken get hit first before you do anything.
If you don’t manage to solo this quest or can’t find a person to duo it just abandon it. It’s really optional, but do try hard though, because the final exp reward is juicy.
3. Get back on the main road and ride north/northeast towards the Yeti Cave (51,32). On the way there also kill every Ironfur Bear and Groddoc Thunderer you find. You need 3 livers of each for [43] Rhapsody’s Kalimdor Kocktail.
4. Kill Rage Scar Yetis until you get 10 Rage Scar Yeti Hide.
5. When done with the above, get out and kill more Ironfur Bear and Groddoc Thunderer until you finish [43] Rhapsody’s Kalimdor Kocktail.
6. Ride to the pier and take the boat to Feathermoon Stronghold (or swim if you miss the boat ):
Turn in :
- [48] Improved Quality
- [48] Return to Troyas, don’t get the follow up.
Fly back to Gadgetzan. Get your 2 Elixirs of Fortitude from the bank in Gadgetzan. Then ride north to the Thousand Needles.
Go to the Mirage Raceway and talk to Quentin (78,74). Turn in the quest [47] An Orphan Looking for a Home. Get the follow up, turn it in instantly (as you already have the 2 Elixirs of Fortitude).
Get the quest [47] The Newest Member of the Family. A timer window will appear, we have plenty of time though, so just follow the next few steps carefully and don’t go AFK for too long 😛
Ride back to Gadgetzan, fly to Ratchet. After landing, go directly south of the flight master to the yellow “!” labeled Liv Rizzlefix (62.5, 38). Don’t take the quest, but loot Marvon’s Chest, which is right outside of this hut. You’ll receive a Stone Circle.
Take the boat to Booty Bay. In Booty Bay take the left ramp going up, keep going east/southeast and shortly you’ll find Oglethorpe Obnoticus (28,76). Turn in all the Rescue OOX-Chicken Robot quests you completed. They give between 6900 XP and 7850 XP each.
If you completed all 3 rescues you get and extra quest [50] An OOX of your own. You’ll get a mechanical chicken pet (which I usually sell for 50gold at the AH ^^) and 10200 XP as well! Which is why going through the pain of doing those 3 escort quests is in the end worth it.
Turn in [45] Deliver to MacKinley at “Sea Wolf” MacKinley (close to the inn).
You should be level 50 by now.
Level 50
Fly to Darkshire (Duskwood). In Darkshire go talk to Watchmaster Sorigal (he’s just down the path from the gryphon master), get the quest [45] Supplies for Nethergarde.
Fly to Nethergarde Keep, Blasted Lands.
If you didn’t do the Zul’Farrak instance:
- Turn in [45] Supplies for Nethergarde at Quartermaster Lungertz.
- Turn in [47] Thadius Grimshade at Thadius Grimshade, he’sinside the big tower, on the highest floor. Don’t get the follow up.
If you did Zul’Farrak:
- Turn in [45] Supplies for Nethergarde at Quartermaster Lungertz.
- Turn in [47] Nekrum’s Medaillon at Thadius Grimshade, he’sinside the big tower, on the highest floor. Get the follow up [47] The Divination. Turn it in, get the follow up [47] Return to the Hinterlands.
Hearthstone to Aerie Peak. Go talk to Agnar Beastamer, he is inside the inn on the lower level. Turn in [47] The Newest Member of the Family, get the follow up [47] Food for Baby.
If you did Zul’Farrak, go to Gryphon Master Talonaxe at the very top of Aerie Peak, turn in [47] Return to the Hinterlands, get the follow up [51] Saving Sharpbeak.
End of Chapter II.
I hope you enjoyed this guide. If you want to return the favor, please try to contribute.
-Jame
Text formatting: Snowflake & Jame
© Copyrights www.wow-pro.com All Rights Reserved