
 by Maw
Table of Content
- Introduction
- Level 1-6
- Level 6-10
- Level 10-12
Introduction
This guide shows how to level a Human character from level 1-12, and in a very fast way. Any other race on the Alliance faction can also use this leveling route. Though, these will have to run from their starting location to Northshire Abbey.
I will in some cases mention to sell, repair and restock, but not always. Be aware of this yourself, and try to empty your bag and repair when you are in town. However, I mention when it’s best to learn new skills.
For general leveling tips, click here.
There will be a follow-up on this guide, including level 12-20 content, and perhaps a guide with level 20-30 content.
Colour Codes
Quests: blue
Collected or looted items: red
Usable items: green
 Back to the top
Level 1-6
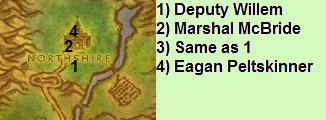
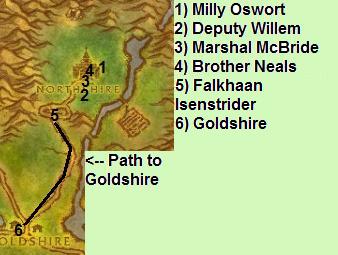
1) Talk to Deputy Willem
- Accept “A Threat Within”
2) Talk to Marshal McBride
- Turn in “A Threat Within”
- Accept “Kobold Camp Cleanup”
3) Talk to Deputy Willem
- Accept “Eagan Peltskinner”
4) Talk to Eagan Peltskinner
- Turn in “Eagan Peltskinner”
- Accept “Wolves Across the Border”
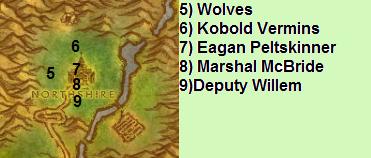
5) Kill wolves and get 8 Tough Wolf Meat
6) Kill 10 Kobold Vermins
7) Talk to Eagan Peltskinner
- Turn in “Wolves Across the Border”
 Sell and repair at Godric Rothgar
8 ) Talk to Marshal McBride
- Turn in “Kobold Camp Cleanup”
- Accept “Investigate Echo Ridge”
- Accept your class quest. Turn this in when you go for training later on.
9) Talk to Deputy Willem
- Accept “Brotherhood of Thieves”
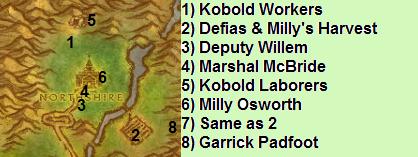
1) Kill 10 Kobold Workers
2) Kill Defias mobs and get 12 Red Burlap Bandanas
-Use Hearthstone–
3) Talk to Deputy Willem
- Turn in “Brotherhood of Thieves”
- Accept “Milly Osworth”
- Accept “Bounty on Garrick Padfoot”
4) Talk to Marshal McBride
- Turn in “Investigate Echo Ridge”
- Accept “Skirmish at Echo Ridge”
-Learn new skills-
5) Kill 12 Kobold Laborer
6) Talk to Milly Osworth
- Turn in “Milly Osworth”
- Accept “Milly’s Harvest”
7) Click Milly’s Harvest barrels and get 8 Milly’s Harvest
8 ) Kill Garrick Padfoot and loot his head.
-Grind on Defias mobs in this area until you are just above halfway to level 6-
1) Talk to Milly Osworth
- Turn in “Milly’s Harvest”
- Accept “Grape Manifest”
Sell and repair at Godric Rothgar
2) Talk to Deputy Willem
- Turn in “Bounty on Garrick Padfoot”
3) Talk to Marshal McBride
- Turn in “Skirmish at Echo Ridge”
- Acceot “Report to Goldshire”
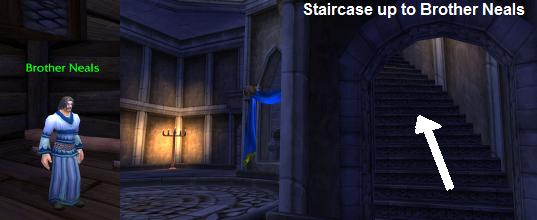
4) Go inside the church and follow the spiral staircase to the top. Talk to Brother Neals
- Turn in “Grape Manifest”
5) Talk to Falkhaan Isenstrider
- Accept “Rest and Relaxation”
6) Run to Goldshire
Back to the top
Level 6-10
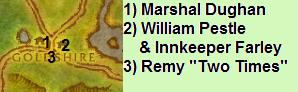
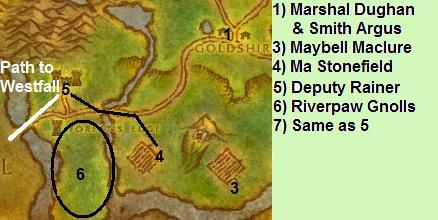
1) Talk to Marshal Dughan
- Turn in “Report to Goldshire”
- Accept “The Fargodeep Mine”
2) Talk to William Pestle
- Accept “Kobold Candles”
Talk to Innkeeper Farley
- Turn in “Rest and Relaxation”
- Make this inn your home
-Learn new skills-
3) Talk to Remy “Two Times”
- Accept “Gold Dust Exchange”
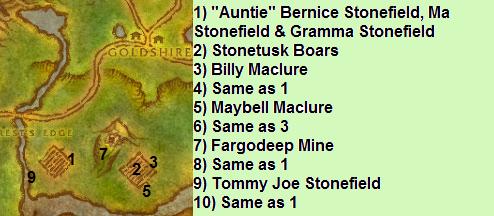
1) Talk to “Auntie” Bernice Stonefield
- Accept “Lost Necklace”
Talk to Ma Stonefield
- Accept “Princess Must Die!”
2) Kill Stonetusk Boars and get 4 Chunk of Boar Meat
3) Talk to Billy Maclure
- Turn in “Lost Necklace”
- Accept “Pie for Billy”
4) Talk to “Auntie” Bernice Stonefield
- Turn in “Pie for Billy”
- Accept “Back to Billy”
5) Talk to Maybell Maclure
- Accept “Young Lovers”
6) Talk to Billy Maclure
- Turn in “Back to Billy”
- Accept “Goldtooth”
7) Kill Kobold Tunnelers, get 8 Kobold Candles and 10 Gold Dust.
-Get to level 7-
Kill Goldtooth. You get to him fastest by entering the cave via the lower entrance.
Hint: Kill the Kobold Tunneler next to him first, and then run out of combat. Return to Goldtooth and kill him while he’s alone.
8 ) Talk to “Auntie” Bernice Stonefield
- Turn in “Goldtooth”
9) Talk to Tommy Joe Stonefield
- Turn in “Young Lovers”
- Accept “Speak with Gramma”
10) Talk to Gramma Stonefield
- Turn in “Speak with Gramma”
- Accept “Note to William”
-Run back to Goldshire-

1) Talk to William Pestle
- Turn in “Kobold Candles”
- Accept “Shipment to Stormwind”
- Turn in “Note to William”
- Accept “Collecting Kelp”
2) Talk to Remy “Two Times”
- Turn in “Gold Dust Exchange”
- Accept “A Fishy Peril”
3) Talk to Marshal Dughan
- Turn in “A Fishy Peril”
- Accept “Further Concerns”
- Turn in “The Fargodeep Mine”
- Accept “The Jasperlode Mine”
Sell, repair and restock.
4) Kill Murlocs and get 4 Crystal Kelp Frond
-Grind until you are one bar away from level 8, then use Hearthstone–
5) Talk to William Pestle
- Turn in “Collecting Kelp”
- Accept “The Escape”
-Learn new skills-
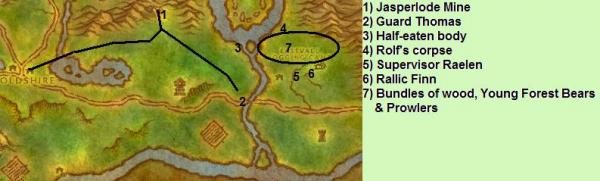
1) Run to The Jasperlode Mine. Explore the mine by running into it until the message below appears.

2) Talk to Guard Thomas
- Turn in “Further Concerns”
- Accept “Find the Lost Guards”
- Accept “Protect the Frontier”
3) Kill Young Forest Bears on your way to this location.
Talk to A half-eaten body
- Turn in “Find the Lost Guards”
- Accept “Discover Rolf’s Fate”
4) Kill Young Forest Bears and Prowlers on your way to this location.
Talk to Rolf’s corpse
- Turn in “Discover Rolf’s Fate”
- Accept “Report to Thomas”
Hint: Rolf’s corpse is guarded by two Murlocs, and several other Murlocs patrol this area. Kill the Murlocs patroling the area around Rolf’s corpse first. Then, pull the two Murlocs standing next to his corpse. Go all out with cooldowns and potions on the weakest one (lower level, less HP), and the run. Come back and kill the remaining Murloc
5) Kill Young Forest Bears and Prowlers on your way to this location.
Talk to Supervisor Raelen
- Accept “A Bundle of Trouble”
6) Sell and repair at Rallic Finn.
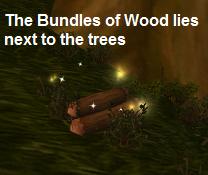
7) Kill Young Forest Bears and Prowlers while picking up 8 Bundle of Wood.
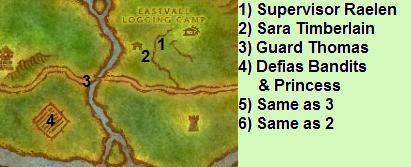
1) Talk to Supervisor Raelen
- Turn in “A Bundle of Trouble”
2) Talk to Sara Timberlain
- Accept “Red Linen Goods”
3) Talk to Guard Thomas
- Turn in “Report to Thomas”
- Accept “Deliver Thomas’ Report”
4) Kill Young Forest Bears on your way to this location.
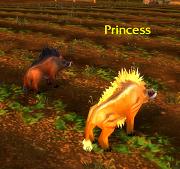
Kill Defias Bandits and get 6 Red Linen Bandanas
Kill Princess and get Brass Collar
5) Talk to Guard Thomas
- Turn in “Protect the Frontier”
- Accept “Report to Gryan Stoutmantle”
6) Talk to Sara Timberlain
- Turn in “Red Linen Goods”
-Use Hearthstone–
1) Talk to Marshal Dughan
- Turn in “Deliver Thomas’ Report”
- Turn in “The Jasperlode Mine”
- Accept “Westbrook Garrison Needs Help!”
Talk to Smith Argus
- Accept “Elmore’s Task”
Sell, repair and restock.
3) Talk to Maybell Maclure
- Turn in “The Escape”
4) Talk to Ma Stonefield
- Turn in “Princess Must Die!”
5) Talk to Deputy Rainer
- Turn in “Westbrook Garrison Needs Help!”
- Accept “Riverpaw Gnoll Bounty”
6) Kill Riverpaw Gnoll and get 8 Painted Gnoll Armband
7) Talk to Deputy Rainer
- Turn in “Riverpaw Gnoll Bounty”
Run west to Westfall
Back to the top
Level 10-12
1) Talk to Farmer Furlbrow
- Accept “The Forgotten Heirloom”
3) Talk to Verna Furlbrow
- Accept “Westfall Stew”
- Accept “Poor Old Blancy”
2) Pick up any Handful of Oats you see while going to this location, and at this location.
Talk to Farmer Saldean
- Accept “The Killing Fields”
Sell and restock.
Talk to Salma Saldean
- Turn in “Westfall Stew”
- Accept “Goretusk Liver Pie”
- Accept “Westfall Stew”
3) Talk to Thor
- Get the Sentinel Hill flight path
4) Talk to Scout Galiaan
- Accept “Red Leather Bandanas”
5) Talk to Innkeeper Heather
- Make this inn your home
6) Talk to Gryan Stoutmantle
- Turn in “Report to Gryan Stoutmantle”
- Accept “The People’s Militia”
Talk to Captain Danuvin
- Accept “Patrolling Westfall”
Talk to Quartermaster Lewis
- Accept “A Swift Message”
7) Talk to Thor
- Turn in “A Swift Message”
- Accept “Continue to Stormwind”
- Buy a flight to Stormwind
-Learn new skills-
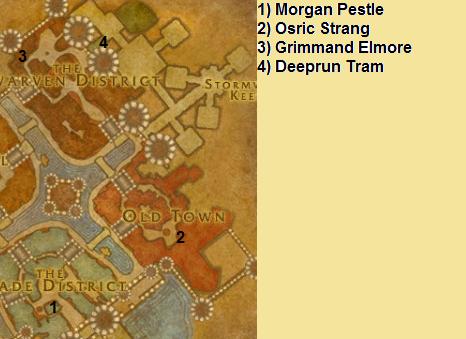
1) Talk to Morgan Pestle
- Turn in “Shipment to Stormwind”
2) Talk to Osric Strang
- Turn in “Continue to Stormwind”
- Accept “Dungar Longdrink”
3) Talk to Grimmand Elmore
- Turn in “Elmore’s Task”
- Accept “Stormpike’s Delivery”
4) Go to Deeprun Tram
- Wait for the tram to come, and then take it to Ironforge

5) Talk to Monty
- Accept “Deeprun Rat Roundup”
6) Use Rat Catcher’s Flute on Deeprun Rats, and catch five of them.
7) Talk to Monty
- Turn in “Deeprun Rat Roundup”
Run out of Deeprun Tram, and enter Ironforge
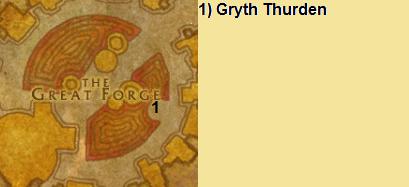
1) Talk to Gryth Thurden
- Get the Ironforge flight path
2) Run to The Gates of Ironforge, and exit the city.
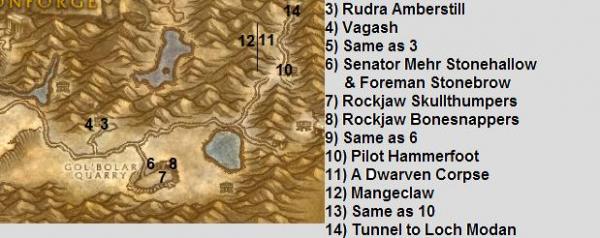
3) Talk to Rudra Amberstill
- Accept “Protecting the Herd”
-Walk up the hill behind her-
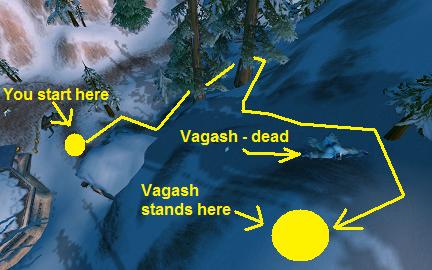
4) Kill Vagash, and loot Fang of Vagash
5) Talk to Rudra Amberstill
- Turn in “Protecting the Herd”
6) Talk to Senator Mehr Stonehallow
- Accept “The Public Servant”
Talk to Foreman Stonebrow
- Accept “Those Blasted Troggs!”
7) Kill 6 Rockjaw Skullthumpers
8 ) Kill 10 Rockjaw Bonesnappers
9) Talk to Senator Mehr Stonehallow
- Turn in “The Public Servant”
Talk to Foreman Stonebrow
- Turn in “Those Blasted Troggs!”
10) Talk to Pilot Hammerfoot
- Accept “The Lost Pilot”
11) Talk to A Dwarven Corpse
- Turn in “The Lost Pilot”
- Accept “A Pilot’s Revenge”
12) Kill Mangeclaw, and loot Magny Claw
13) Talk to Pilot Hammerfoot
- Turn in “A Pilot’s Revenge”
14) Run through the tunnel, and enter Loch Modan.
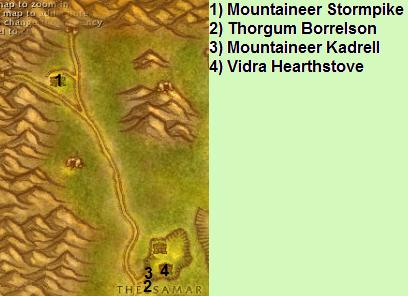
1) Talk to Mountaineer Stormpike
- Turn in “Stormpike’s Delivery”
- Accept “Filthy Paws”
- Accept “Stormpike’s Order”
2) Talk to Thorgrum Borrelson
- Get the Thelsamar flight path
3) Talk to Mountaineer Kadrell
- Accept “Rat Catching”
4) Talk to Vidra Hearthstove
- Accept “Thelsamar Blood Sausages”
Sell, repair and restock
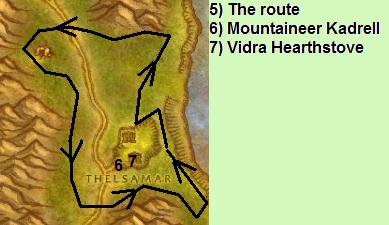
5) Follow this route until you get the items listed below:
- 3 Boar Intestines. Kill Mountain Boars
- 3 Spidor Ichor. Kill Forest Lurkers
- 3 Bear Meat. Kill Elder Black Bears
- 12 Tunnel Rat Ear. Kill Tunnel Rats
6) Talk to Mountaineer Kadrell
- Turn in “Rat Catching”
7) Talk to Vidra Hearthstove
- Turn in “Thelsamar Blood Sausages”
-You should now be a couple of bars into level 12-
Back to the top
nvmsorry i found it never mind about my last post thanks 🙂
next part of the guideI have completed the 1-12 part of this guide..how do i get the next section?
Awesome guideI just started leveling a human paladin, I actually hate leveling, but with this guide it made it much more enjoyable, especially because it is going fast, and with the 2 heirlooms for extra xp and the weapon I’m always 1 or 2 levels ahead, which makes the questing go much faster, and more fun.
I’m skipping quests, notI’m [i]skipping[/i] quests, not missing them 😛
If a quest is not worth doing, it is better to skip it than wasting your time on it.
Liked it I liked it though I noticed you missed a few quests
We’ll need a bit more infoWe’ll need a bit more info about what’s going wrong in order to help. Have you unzipped the addons into your addon folder? Does it show up in game? Do you have it enabled? Do you have TomTom? Check the troubleshooting page for the addon for ideas.
Addonwhen i try an addon, it doesnt work
Well, the addon-versionWell, the addon-version isn’t my doing, so don’t look to me for that. However, as I recall from doing that section in the addon, there was no such error. Make sure you have the newest version of tomtom, lightheaded, tourguide and the guide itself.
Not so clear in the addonHi,
Just started a Human paladin, and on reaching Goldshire (and accepting a few other quests) the addon reports ‘! Lost Necklace’ and the suggestion is ‘Talk to Billy Maclure’. Not only is this suggesting the wrong person (as can be seen in the guide here) but there’s no tomtom arrow/waypoint, and the farms aren’t the sort of place you’ll just happen across.
I appreciate the guides, but it seems I’ll have to revert back to this version 😕
Nearly 4h lvl 12 oO3h 55 minutes, lvl 12 10%
Although I have 2 completed quests in my log, I’m slowing down way more than Jame =[
Oh that’s cool =DWell, that’s cool
Considering it’s my first time I level alliance side and first time I lvl a paladin, I’m happy =]
I will check out the leveling tips.
Thanks for the help
For leveling tips, check outFor leveling tips, check out our [url=https://www.wow-pro.com/wiki/leveling_tips_wiki]leveling tip wiki[/url].
2h 25min is indeed a good leveling time for 1-10 – pretty much anything under 3 hours is good time for those first 10 levels.
HiHey guys, I created a new character today after a 10-month break (Had a lvl 70 druid).
I made human paladin. I wanted to see how fast I could lvl him up.
lvl 10: 2h 25 minutes 26 seconds.
I used questhelper but not this guide, I just came across this few hours ago when I lvl’d him already.
Well, 3 questions:
1. What are some things you should always do when lvl’ing?
2. How do I get better at lvl’ing?
3. is 2h 25 minutes 26 seconds good for someone who created a new char after not playing 10 months on the other side?
Greetings,
Humba
Thank Ya Kindly!dunno how i kept ending up in those tunnels, but after reading your reply decided it was time to stop indulging in madness–doing the same thing over and over expecting different result–and try slicing just a tad to the right…or left or…well, you get the idea.
found the npcs just where you said they’d be.
fab guide maw and thanks for replying!
Nope, that’s the tunnelNope, that’s the tunnel to/from Wetlands, and you’ll not go there until around level 23 in Boston’s 20-30 Alliance Leveling Guide.
Just follow the steps in this guide correctly and look at the maps, and you should have no problems coming to Thelsamar.
Question About This Great Guideand it is a terrific guide! however, on the road to Thesalmar (sp?), should i be encountering lvl 20 npc orcs at the entrance/exit to some of the tunnels?
Thank you!Just wanted to say thanks for a fantastic guide, very easy to follow – very clear & precise! My only two suggestinos might be
a) Co-ordinates wouldn’t hurt 🙂 (but not necessary)
b) The drop rate on the last quests is tediously low! Very slow! Took a LONG time to get those!!!
The time for usingThe time for using Hearthstone for the second time, is now changed from after clearing The Fargodeep Mine, till after “Collecting Kelp” is completed. This has been done because you can have cleared The Fargodeep Mine, and all quests in that section, and still have Hearthstone on a cooldown of more than 15 minutes.
Actually it does practicallyActually it does practically tell you to go to Loch Modan. It says to follow the 10-12 section of this guide at the start of that one, and in that section we have this phrase:
14) Run through the tunnel, and enter Loch Modan.
Of course, if you had followed the whole 1-12 guide you’d already be in Loch Modan as it is (or maybe Ironforge if you went to train, but still). Since the guide never says to leave Loch Modan, one can probably figure out we’re supposed to still be there.
What about looking at theWhat about looking at the map?
The 12-20 it’s wrong at the startwhy nobody mention it, it says:
) Talk to Mountaineer Cobbleflint
* Accept “In Defense of the King’s Lands”
2) Talk to Captain Rugelfuss
* Accept “The Trogg Threat”
3) Kill 10 Stonesplinter Troggs and 10 Stonesplinter Scouts, and get 8 Trogg Stone Tooth.
Hint: Use the Explosive Rockets when you have to fight two of them at once.
4) Talk to Mountaineer Cobbleflint
* Turn in “In Defense of the King’s Lands”
5) Talk to Mountaineer Gravelgaw
* Accept “In Defense of the King’s Lands”
6) Talk to Captain Rugelfuss
* Turn in “The Trogg Threat”
He doesn’t mention to go Loch Modan and accept those quests (I know where the NPC are and I know very well those quests, but a new player can be confused).
I see
Great guide by theI see
Great guide by the way 🙂
Those quests is turned inThose quests is turned in later, in the 12-20 Guide (reply to “mnbv”).
To all the people complaining about bad drop rates at the last quests in Loch Modan, I really can’t agree in that 😛
I never have to spend alot of time on that part. It really depends on how good you are at grinding, and following the correct route.
confusionAs I was going through this guide I noticed that the guide doesn’t tell you to turn in some of the quest, like “The Forgotten Heirloom”. Are you supposed to do them anyway and turn in them in, or are you not supposed to them?
Awesome Guide.It’s fantastic, but I had a little trouble in the last quest 🙁 took ages to get it finish.
Glad you liked it! TheGlad you liked it! The Tourguide 12-20 of maws guide should be up tomorrow by the way 😉
Ok.I tested this guide in tourguide addon. Very very good, as I state some post below. I took my time to level a bit my professions, even though on the new realm mineral veins were so farmed that it was hard to find a free spot to mine. I finished the guide and was 82% into level 12 because of the horrible drop rate of Thelsmar Sauge and Rat Catching, then I did the class quest (I’m a Paladin too… I think that Jame’s blog post has incresead the number of paladins by A LOT) and I’m actually 30% into level 13. I will now wait to test the second chapter of this guide, already knowing that is good in e-paper shape 🙂
5 stars!
-Benhir
In my defense I took aboutIn my defense I took about 20 minutes of time buying a Guild Charter, talking to the few US players that rolled on Fenris with me, and on top of that….
THE LAST 2 QUEST DROP RATES WERE TERRIBLE 😛
But yeah, Holyjame is the man!
Mwahah, Holyjame is the man!Mwahah, Holyjame is the man!
awesome guide. just dinged 9awesome guide. just dinged 9 at less than 1h30m played
[b]EDIT:[/b] Just finished guide. Played time just over 3 hours. Couldn’t beat Holyjame. 🙁
Very nice guide. IVery nice guide. I personally stay to Westfall a while when levelling humans, but you got the best cycle. I’ve found that this guide usually takes me almost a level higher due to 200% xp on kills (rested bonus). For faster levelling, people should add “park character for a week and go farm deathcharger” then continue with guide for xp bonus. Just Saying. lol
Jenkins isn’t a title, it’s a way of life.
Really great guide!This leveling guide was really fun to play through, there were some quests in it I hadn’t even considered doing but they ended up giving some fast experience. At the end of the guide, I was nearly halfway through 13! I guess this gives me a head start into your 12-20 guide. 😀
Great Job!I enjoyed reading the guide, and it follows so much the route I run with my human alts. Very easy on the eyes, and excellent information!
To do is to be – Socrates
To be is to do – Voltaire
Do be do be do – Sinatra
much Appreciatedthanks maw, very nice of you to offer that 🙂 i let you know how its going and im early awaiting whatever you decide to write in the future
all the best 🙂
That’s great!
There areThat’s great! 🙂
There are some parts of the guide that I thought might be a bit difficult for especially warriors (they are the worst class to level 1-12). Let me know if you get stuck at some hard areas. I have Goldtooth and Rolf’s Corpse particular in mind when saying this.
well set out 🙂
very nice guide just about to try it out with a human warrior now 🙂
excellently set out, easily one of the easiest guides to read. your colour coding seemed very Appropriate and very easy to relate to.
all the best with any guides in the future 🙂
Yeah I agree, although IYeah I agree, although I haven’t personally leveled an Alliance character, Boston’s guide should be fine, no need for a 20-30 guide.
BTW NICE GUIDE going to level a human soon. 🙂
Very nice, very nice indeed.Very nice, very nice indeed. I will have to make another Human just to try this out! Great job.
I’m going to make anI’m going to make an Alliance 12-20 guide, a Night Elf 1-12 guide, and a Dwarf/Gnome 1-12 guide. Will take some time, but I guess it’ll all be done within a month or so.
OMG!This is the very same route I do for leveling human characters :jawdrop:
Wonderful formatting and map editing, thumbs up. Anyway, I suggest you to do only the 12-20 version of the guide because Boston’s 20-30 leveling guide is good enough for every alliance race. Even though it is a little outdated right now, there are no problems while following it, just remember that there is the SW Harbor for quicker traveling ;). Maybe some good writer should update that guide, but it is definitely good!
I don’t play alliance butI don’t play alliance but this is very nice work.
Good job 🙂
Wow, seems to be top notchWow, seems to be top notch quality. Thumbs up! 😉