
 by daxinator
Sholazar Basin to The Storm Peaks
Well, here’s my first guide, so if you have any corrections you can give me would be nice! I will be writing the Sholazar Basin, Storm Peaks, and Icecrown guides for you to use to level your characters as FAST as possible to level 80!
I don’t have the addon DMiniCoords, but I will look up locations and NPCs’, etc. using wowhead.com, I will put down the coords down on the guide for you to find the objectives or whatever.
Let’s get down to the rules!
Rules
1. Log out in a city or an inn, so your bars are blue, for rested XP bonus!
2. When I say look for a group for a certain quest, then look for a group, at most times you might be able to solo some group quests so its ok!
3. Its ok if your like already level 80 following this guide, as you could just level for reputation.
4. I will NOT be doing PvP or Class quests in this guide so don’t message me about how I didn’t add PvP or any class quests.
Color Codes
-
- Quests
-
- Items
-
- Locations
-
- Quest objectives to kill
-
- NPCs
-
- Coordinates
While your using this guide we’ll complete Into the Basin
Level 78
1. You should be the city of Dalaran,look for Archmage Pentarus(69.5, 43.1) and take his quest Where in the World is Hemet Nesingwary?.
When your ready talk to Archmage Pentarus again, and choose the only option available. Just watch the little dialog while your flying and then you’ll eventually end up in Wildgrowth Mangalwhich is in Sholazar Basin.
2. Go to the ? minimap and turn in Where in the World is Hemet Nesingwary? at Monte Muzzleshot. Take his follow up Welcome to Sholazar Basin.
3. Go to northwest Nesingwary Base Camp.
Turn in Welcome to Sholazar Basin to Hemet Nesingwary.
Get the following quests:
It Could Be Anywhere!
Venture Co. Misadventure
Need an Engine, Take an Engine
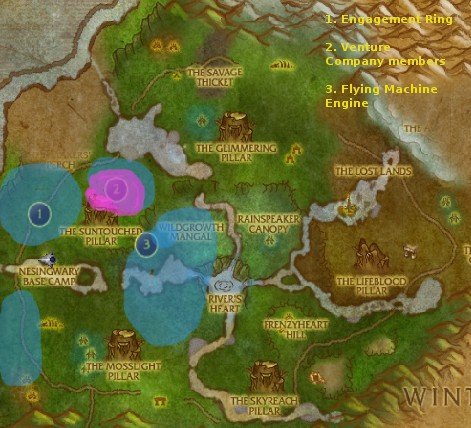
1. Go to where the light blue transparent areas are and kill various creatures until one drop the Golden Engagement Ring.
2. Once done with the first objective go to where the pink transparent area is at (36.7, 49.9) where you’ll find Venture Co. members kill 15 of them.
2 1/2. You should see a quest on your minimap. Take it, Engineering a Disasterfrom Engineer Helice(35.6, 47.3). The escort quest will start, escort her to the end of the mining thing and you’ll get the quest credit.
3. Now let’s move on, were going back to the location where we came in the flying machine, back to Wildgrowth Mangal, you’ll find the Flying Machine Engine at (38.6, 56.7). Loot it!
Return back to Nesingwary Base Camp, and turn in the following quests:
It Could Be Anywhere!
Venture Co. Misadventure, get the followup Wipe That Grin Off His Face
Need an Engine, Take an Engine, get the followup
Have a Part, Give a Part
And also turn in, Engineering a Disaster to Hemet Nesingwary.
While your still at the camp, talk to Purser Boulian to bind your Hearthstone here. As well repair/sell/restock food/drink.
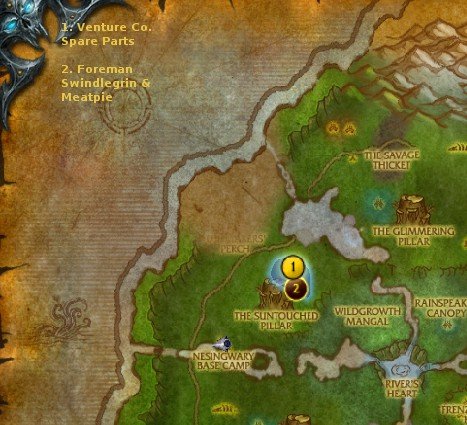
1. Go back to Swindlegrin’s Dig and pick any Venture Co. Spare Parts until you have 7 of them.
2. Foreman Swindlegrin & Meatpie are always walking around the dig.
Once done, return the camp and turn in:
Have a Part, Give a Part now you should see a yellow “!” appear upon Professor Calvert head, get her quest Aerial Surveillance.
Also, you will see a “!” appear where Spirit of Gnomergan, get the Flight Path.
Turn in: Wipe That Grin Off His Faceto Debaar.
Now you’ve unlocked more quests, get all of them!
Kick, What Kick? from Drostan,
Rhino Mastery: The Test from Hemet Nesingwary, Dreadsaber Mastery: Becoming A Predator from Buck Cantwell.
Sell any items you don’t want, check mail, etc.
No map needed for the first objective!
1.  Find RJR Rifle in your bags and right click it. After a couple of shots you’ll knock the apple off of the gnome’s head. He has funny transcripts if you miss!
Turn in, Kick, What Kick? get the followup The Great Hunter’s Challenge. Now the quest starts and you’ll have to kill 60 Game Creatures Good Luck! Again no map needed for this objective as well just kill 60 random creatures.
As well while doing this quest you might stumble against some creatures for other quests so its ok if you kill them now so you complete your quests faster. Also after you kill a couple of creatures Drostan spawns and talks to you just a little saying and he despawns.
Once done turn in, The Great Hunter’s Challenge.
Even if you did finish your hunt quests don’t turn them in just yet we still need to complete the others.
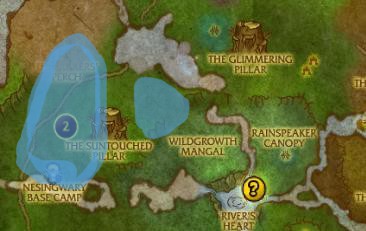
1. I apologize for not add the objective on the map. Anywho where the light blue transparent areas are where the Shardhorn Rhinos are kill 15 of them.
2. Dreadsabers can be found anywhere in Sholazar Basinkill 15 of them if you havent already done so during the hunt quest.
Go back to the camp and turn in:
Dreadsaber Mastery: Becoming A Predator, and get the followup Dreadsaber Mastery: Stalking The Prey.
Rhino Mastery: The Test, and get the followup Rhino Mastery: The Chase.
When you take that quest above ^ you unlock 3 more quests take them!
A Steak Fit For A Hunter from Korg the Cleaver.
Some Make Lemonade, Some Make Liquor from Grimbooze Thunderbooze.
Crocolisk Mastery: The Trial from Debaar.
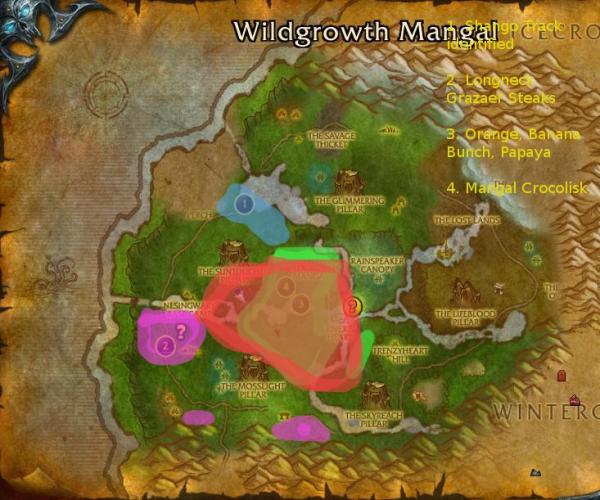
1. Go northeast to Bittertide Lakeyou should see footprint on the sandy surface of this area, right click them to examine them and you’ll get a quest update. You’ll have to move your cursor to them to see if the tooltip says “Shango’s Tracks”. Once done we’ll move on!
2. Now where going to where there should be Longneck Grazers kill them until you get 5 Longneck Grazer Steaks.
2 1/2. If you stumble upon a “?” on minimap then its Oracle Soo-rahm turn in Rhino Mastery: The Chase, and get his followup An Offering For Soo-rahm. As the objective #2 you can find Longneck Grazers.
3. We’ll be looking for 1 Orange, 2 Banana Bunches, and Papaya, these are found where the green transparent areas show any of the 3 items. You should see vines hanging from the trees click on them and the fruits fall.
4. & 4 1/2. While doing the above objective also look for Mangal Crocolisks kill 15 of them and Emperor Cobras kill these until you loot 5 Intact Cobra Fangs.
Use your Hearthstone to return back to camp and turn in:
Dreadsaber Mastery: Stalking The Prey and get the followup Dreadsaber Mastery: Ready To Pounce.
A Steak Fit For A Hunter
Some Make Lemonade, Some Make Liquor get the followup Still At It.
Crocolisk Mastery: The Trial and get the followup Crocolisk Mastery: The Plan.
Go across the stream and go to Oracle Soo-rahm and turn in An Offering For Soo-rahm and get his followup Bones of Nozzron.
No map needed for this quick quest!
Go up a few steps to a pile of bones. Right click the Incense into the bowl and then the Voice of Nozronn talks to you. Then return to the camp and turn in: Bones of Nozzron to Hemet Nesingwary get the followup Rhino Mastery: The Kill.
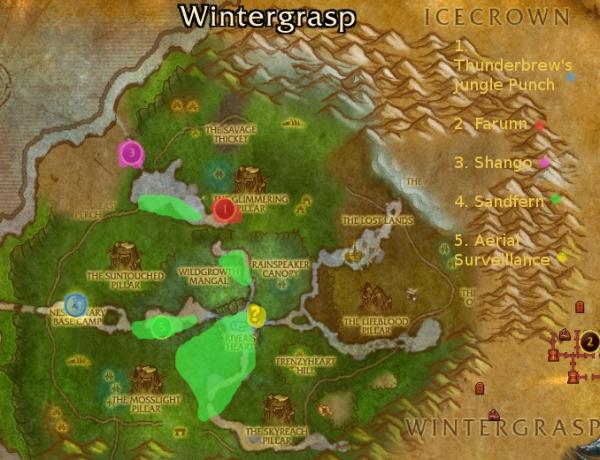
1. This is a fun exciting quest, I love its one of favorite talk to “Tipsy” McMagus to start the quest. Just follow what he tells you and you’ll do fine once done, a cask will appear loot it! Turn it into Grimbooze Thunderbrew and get the followup The Taste Test, for now just target each of these guys, Hemet Nesingwary & Hadrius Harlowe and right click Jungle Punch Sample and you’ll get a quest update!
2. Look around the watery edges of the stream next to the camp, loot any Sandfern you see until you have 5.
3. Go to The Glimmering Pillar and look for Farunn kill the rhino and loot Farunn’s Horn. Its not hard to kill Farunn he’s a non-elite and only has 11k HP.
4. Go to Bittertide Falls and look for the dreadsaber Shango kill him and loot Shango’s Pelt.
5. Go to River’s Heart and look for Tamara Wobblesprocket and right click the Jungle Punch Sample and you’ll get the quest update.
6. While here get Tamara Wobblesprocket quest, The Part-Time Hunter.
7. Go a couple steps to the left and turn in Aerial Surveillance to Pilot Vic. Get his two quests, An Embarrassing Incident and Force of Nature.
8. Just jump in the lake and look for the keys, there’s no map needed for this objective anyway its simple.
9. Turn in An Embarrassing Incident back to Pilot Vic. Get the followup Reconnaissance Flight.
10.You automatically jump into a plane you dont move until you reach The Avalanche and the engine will blow up then you move and ride back to Lakeside Landing. Once done turn it in.
Now, Hearthstone back to the camp.
Turn in:
Dreadsaber Mastery: Ready To Pounce to Buck Cantwell.
Crocolisk Mastery: The Plan to Debaar and get her followup Crocolisk Mastery: The Ambush.
The Taste Test to Grimbooze Thunderbrew.
Rhino Mastery: The Kill.
Sell/Repair/Restock Food/Drink
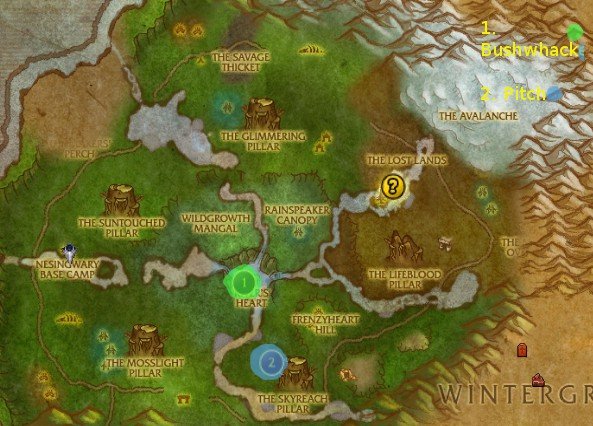
1.  Sanfern Disguise by a big log half of the log is in the water so use the disguise and you’ll be stunned until Bushwacker a big white crocolisk appears he’ll attack you first then you can kill him, loot Bushwhacker’s Jaw.
2. Go southeast to The Skyreaching Pillar and jump down for Pitch kill him and loot Pitch’s Remains.
3. Then a wolvar talks and a “!” appears get his quest Playing Along.
You should now be Neutral with The Frenzy Heart Tribe!
Ride/Fly to Frenzy Heart Hill and find High Shaman Rakjak at (55, 69.2), turn in Playing Along and get the followup The Ape Hunter’s Slave.
1. When accept the followup Goregek the Gorilla Hunter spawns take his quest Tormenting the Softknuckles. If he dies or despawns always right click the Goregek’s Shackles.
2. You’ll find Hardknuckle Foragers are the white ones, and Hardknuckle Chargers are the black gorillas these all around this area, mostly you’ll find most of the gorillas by the Frenzy Heart camp, kill them until you complete Goregek the Gorilla Hunter.
3. Go by Hardknuckle Clearing and you’ll find Softknuckle Gorillas which are baby ones in this area and use Softknuckle Poker then the Hardknuckle Matriarch will spawn kill her and you’ll get the quest credit.
Return back to the Frenzyheart Tribe camp and turn in:
The Ape Hunter’s Slave.
Tormenting the Softknuckles.
Once done with this those you unlock two new quests get them, The Wasps Hunter’s Apprentice and The Sapphire Queen from Elder Harkek.
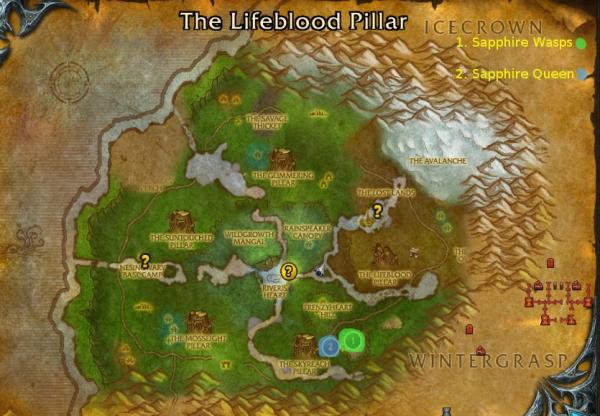
1. Go southeast to Sapphire Hive, and kill 6 Sapphire Hive Wasps and 9 Sapphire Hive Drone.
2. In that same area go into the hive and look for The Sapphire Queen kill her and loot Stinger of the Sapphire Queen.
Use your Hearthstone if its up!
Turn in:
Crocolisk Mastery: The Ambush
You unlock a new quest!
In Search of Bigger Game from Hemet Nesingwary.
1. Fly to River’s Heart and turn in The Part-Time Hunter at Tamara Wobblesprocket
Once turned in fly back to Frenzyheart camp and get Flown The Coop all you have to do is catch 12 Chicken Escapee(s) and turn in it.
Get these quests,
The Underground Menace, and Mischief in the Making.
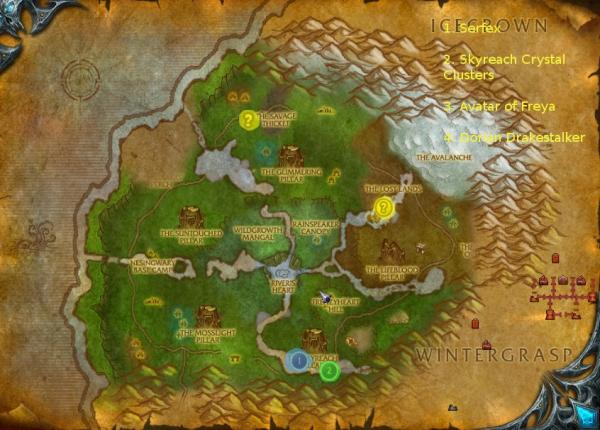
1. Go across the Wintergrasp River and you should see like dirt rocks flying step in that area and you should aggro Serfex the Reaver kill him he only has 11770 HP not hard really.
2. Now look around this area for Skyreach Crystal Clusters their these little greyish crystals loot 8 of them!
3. Ride/Fly to Avatar of Freya at (64.4, 48.6) and turn in Force of Nature and get the followup An Issue of Trust.
4. Ride/Fly to Dorian Drakestalker in Dorian’s Outpost at (42.3, 28.8) and turn in In Search of Bigger Game and get the followups,
Sharpening Your Talons, and
Securing the Bait.
Also get Burning To Help from Colvin Norrington.
Turn in:
The Underground Menace
Mischief in the Making
And so you unlock a new quest from the high shaman of the wolvar, you should also turn Hated with The Oracles.
Get his quest A Rough Ride, you’ll recieve Hunting Horn so you can right click it incase Zepik despawns.
Go northeast but still be in the Frenzyheart camp you’ll find a Captive Crocolisk talk to it, and chose the one and only option and you’ll get on its back.
When you arrive Zepik the Gorloc Hunter and turn in A Rough Ride and get the 2 followups Lighting Definitely Strikes Twice and The Mist Isn’t Listening.
No map needed for the two following objectives.
1. Kill 12 of any Mistwhisper Gorlocs.
2. Go a couple of steps until you reach this big stone pillar then use Skyreach Crystal Clusters and something happens dont forget to back up when you do this.
Now turn them both into him, Lighting Definitely Strikes Twice and The Mist Isn’t Listening.
Get the followup Hoofing It.
1. Go back to Frenzyheart Hill and turn in Hoofing It to High Shaman Rakjak.
Take his followup Just Following Orders
This one is quite fun, no map needed for this very fast objective.
Go to Rainspeaker Rapids, now he’s on that little island just gotta find body of a Gorloc thats it right click it and choose the only option there is. A Ravenous Mangal Crocolisk appears and you’ll need to kill it to get the quest credit.
Now talk to the oracle to turn in Just Following Orders and get the followup Fortunate Misunderstandings and now your vise versa, your Friendly with The Oracles and Hated with The Frenzyheart Tribe.
Then he says “We wait until you ready.” so then just talk to the oracle again click the only option available, then you start the escort quest, all you do is escort him back to his camp.
Go turn in Fortunate Misunderstandings to High Oracle Soo-Say get his followup Make the Bad Snake Go Away.
Lafoo spawns so get his quest Gods Like Shiny Things.
Also, to summon Lafoo right click on Lafoo’s Bug Bag.
Let’s just continue to the quests that are on the map picture above!
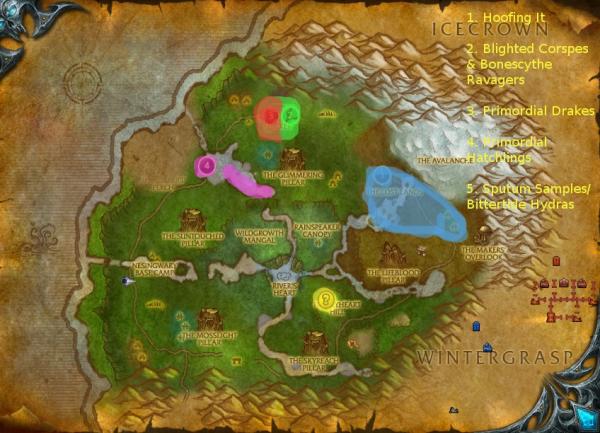
2. Go northeast until you reach The Lost Lands and kill 6 Blight Corpses and 10 Bonescythe Ravagers until you complete the quest. Turn it in get the followup Returned Sevenfold.
3. & 4. Now move northwest to The Savage Thicket and kill 6 Primordial Drakes and also look for 6 Primordial Hatchlings until you complete both of these quests.
5. Then head southwest to Bittertide Lake and kill 5 Bittertide Hydras and also right click Sample Container to collect 5 Sputum Samples.
6. Turn in the following Burning To Help, Securing the Bait, and Sharpening Your Talons.
You unlock three new quests!
Get Reagent Agent, A Mammoth Undertaking, and My Pet Roc.
1. Quick little objective just to get rid of look for any Shattertusk Mammoth and use Mammoth Harness on one and ride it back to Dorian’s Outpost.
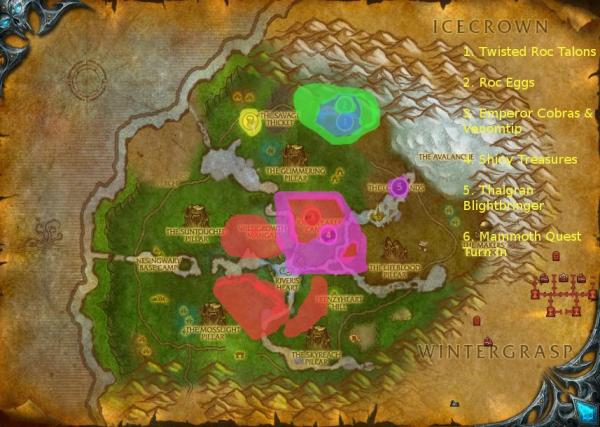
1. & 2. Kill any Goretalon Roc you find and loot 5 Twisted Roc Talon. On the way also look for 7 Roc Egg and loot them.
3. Go back to Rainspeaker Canopy and kill 10 Emperor Cobra and kill Venomtip.
4. Stay in Rainspeaker Canopy and look sparkles on the ground make sure you have Lafoo right click on Lafoo’s Bug Bagto call him out. He’ll dig up holes for you and you’ll automatically loot 6 Shiny Treasures.
5. Ride/Fly to The Lost Lands and kill Thalgran Blightbringer.  Freya’s Ward use it to deflect his Deathbolt very simple you can solo it as any class.
6. Once done turn in Returned Sevenfold, get the followup The Fallen Pillar.
7. Take her other quest Salvaging Life’s Strength.
8. Fly/Ride to Rainspeaker Canopy and turn in the two Gorloc quests, and get the followup Making Peace.
9. Fly/Ride to Dorian’s Outpost and turn in all 3 quests there, get the followup from Dorian Drakestalker, Post-partum Aggression.
10. You’ll automatically jump on a mammoth and so you head north in The Savage Thicket find Broodmother Slivina and kill her.
Before you ride into the area read this paragraph below!
Signal Hemet to Attack Use this ability to mark Broodmother Slivina and Hemet will begin to attack her.
Charge Use this to charge at Broodmother Slivina.
Gore To do damage on our target.
Stampy’s Stomp Stomp Use this ability to hurt all nearby enemies that add on you.
Use any of the abilities when the cooldowns are up.
Just do Abilities 3 & 4 when their up also Hemet lays some fire traps back up to lure her into them for more damage, if your mammoth dies then just kill her like you would to any monster on your feet.
Once done, turn in Post-partum Aggression.
Congratulations! You just earned the achievement The Snows of Northrend!
From where you are go to Lifeblood Pillar, and look on top for a Cultist Corpse.
You turn in the quest, and get the followup Cultist Incursion.
1. While here look in your bags for Lifeblood Gem and kill Lifeblood Elemental and loot the corpses and use Lifeblood Gem its always great to put the item on your action bars as you probably dont want to go into your bags each time you kill one of the mobs, on them to get the quest update. Continue to do this until you have 8 of them.
2. Return back to the Avatar of Freya and turn in, Cultist Incursion and Salvaging Life’s Strength. Get the followups Exterminate the Intruders and Weapons of Destruction.
3. Go northwest until you see tents set up on top of a earth platform also know as Death’s Hand Encampment now were doing two objectives here, kill 8 Cultist Infiltrator and destroy 4 Ustable Explosives.
4. Now that were done here, fly to River’s Heart. Climb the mountains and you’ll find a wolvar named Shaman Vekjik talk to him and click the option available and just keep going through his dialogue. Then you get the quest update and he blows you off the cliff and you land in the middle of the lake.
5. Look on your map and fly back to Rainspeaker Canopy and turn in Making Peace. Get the followup Back So Soon?. Now when you accept this quest you’ll recieve Jaloot’s Favorite Crystal you use this to summon or dismiss him.
Repair/Sell, Restock Food/Drink
1. Ride/Fly back to The Lost Lands and turn in both of those cultist quests, and get the followup, The Life Warden’s Wrath.
2. When accept the quest you get Freya’s Horn now ride/fly to The Glimmering Pillar, and ride/fly to the very top and use Freya’s Horn next to the big crystal. And you should complete the quest.
3. Now ride/fly down to Mistwhisper Refuge and turn in your quest to Mistcaller Soo-gan and get the 2 followups The Lost Whisper Treasure and Forced Hand.
4. Move up north until you reach Spearborn Encampment, were doing two objectives here kill 8 Frenzyheart Spearbearer and 6 Frenzyheart Scavangers, and the final objective here is still to find Warlord Tartek and kill him and loot Mistwhisper Treasure. Good Luck!
When done head back to the Mistcaller and turn both quests, get Home-Time.
And now you should be Honored with the Oracles!
1. Ride/Fly back to Rainspeaker Canopy and turn in Home-Time. Get the followup The Angry Gorloc. When you accept the quest you recieve Moodle’s Stress Ball to summon or dismiss Moodle.
2. Go to The Lost Lands and turn in The Life Warden’s Wrath. And get the followup Freya’s Pact. Talk to her and go through her dialogue and you’ll get the quest update.
3. Turn in Freya’s Pact and get the followup, Powering the Waygate – The Maker’s Perch.
4. Fly/Ride to Mosswalker Village and you’ll get the quest credit! Find a safe spot and summon Moodle using Moodle’s Stress Ball and turn in The Angry Gorloc and get the followups The Mosswalker Savior and Lifeblood of Mosswalker Shrine.
5. There is two objectives here, kill 6 Blighted Corpse and talk to the Gorlocs he drops that are I guess dead, and you’ll get the quest update, also when you check their pulse to see if their alive they drop a sack right click to see if you any 10 Lifeblood Crystal keep doing these quests until they are complete! It seems that Lifeblood Crystal have a low drop rate so be patient.
6. Use Moodle’s Stress Ball to summon Moodle and turn in, Lifeblood of Mosswalker Shrine and The Mosswalker Savior get the followup A Hero’s Burden.
7. Fly northwest to The Maker’s Perch and find the Activation Gamma Switch. The key is right inside the building. Right click it, and you’ll get the quest update.
8. Ride/Fly back to Avatar of Freya and turn in, Powering the Waygate – The Maker’s Perch get the followup, Powering the Waygate – The Maker’s Overlook.
9. Also on the platform outside of the tunnel there’s a chest with a “!” on it take the quest, A Timeworn Coffer. Kill any Sholazar Guardian until one drops Huge Stone Key loot it.
10. Fly/Ride east to The Maker’s Overlook, and go inside the tunnel and right click Activation Switch Theta and you’ll get the quest update.
11. Go back to the coffer and turn in A Timeworn Coffer.
Fly/Ride back to Avatar of Freya in The Lost Lands and turn in Powering the Waygate – The Maker’s Overlook and get the followup The Etymidian.
1. Fly/Ride Lifeblood Pillar and go into a cave, and find & kill Artruis the Heartless. Before you read the above sentence, just to let you know he is an elite and will require at least 3 people to kill but, if you think you can solo him might as well go ahead, though you should probably ask in General Channel to see if someone can group up with you to help you, if no one is available you can come back and complete this quest at level 80.
Artruis the Heartless
HP: 136K
Note: Around when he’s like 35% HP he’ll summon both a gorloc and a wolvar youve killed in the past these guys each have 45.6k. So good luck.
Turn in A Hero’s Burden. And then Jaloot appears complete his quest Hand of the Oracles.
When you turned in A Hero’s Burden, you also should’ve achieved, Into the Basin.
1. Last but not least fly/ride to the southern end of Sholozar Basin. Keep fly until you reach Waygate fly right inside the thing with white light lines.
2. You go into the little circle and you end up in Un’ Goro Crater.
3. Go up the set of stairs and you’ll see a giant named The Etymidian turn in your quest The Etymidian. Get the followup The Activation Rune.
4. Go up the other set of stairs and kill everyone thats an NPC, or Horde if their bothering you, and run into the tunnel, kill High Cultist Herenn and loot Omega Rune.
5. Turn in The Activation Rune and get the followup Backthrough the Waygate.
6. Go back through the waygate, and you’ll end up back in Northrend, now go back to The Etymidian and turn in Backthrough the Waygate.
7. Get the followup Reclamation.
8. Go northeast to The Avalanche and right click Omega Rune in your bags, to deploy the titans’ weapon, now use him to kill 200 Scourge Minion, Bythius the Flesh-Shaper, Urgreth of the Thousand Tombs, and Haliscorn.
Ok, so the abilities 3 & 4 regen HP and Mana, ability 5 is a protect shield, ability 1 & 2 are attack spells. Very simple good luck! If you die you end back in some graveyard alive, just go back and do the things you were doing.
Once done then leave the titan weapon and fly/ride back to Avatar of Freya and turn in Reclamation.
Level 79
Well, were done here! Hearthstone back to Nesingwary Base Camp, and sell everything you had that you dont want, repair.
Now fly to Dalaran, if you have a ground just take the flightpath there, if you can fly either do the same or just fly there yourself.
I’ll see you guys in my next guide, The Storm Peaks!
UPDATE: I forgot to let everyone know that if you want to switch between the The Oracles to The Frenzyheart Tribe you need to kill Pitch again. If you want to switch from The Frenzyheart Tribe to The Oracles you need to help the Injured Oracle.
Re: 1. You should be the cityGuide has been fixed. It was missing the Z tag for Dalaran, and it defaulted to Scholazar instead.
1. You should be the city1. You should be the city of Dalaran,look for Archmage Pentarus(69.5, 43.1) and take his questWhere in the World is Hemet Nesingwary?. in the addon for some reason tom tom pointed me all the way to shol to pick up this quest.
Thanks for the kind comment,Thanks for the kind comment, alisonnic!
There are addon versions of guides for all of Northrend for both factions, though sadly we don’t currently have “paper” guides for anything past this one.
Hope that helps!
Hey, I hope you get back toHey, I hope you get back to writing guides pretty soon, Dax! I am working my way through Jame’s guides with my main. I’m about to finish Dragonblight and move on to Grizzly Hills, so it won’t be long before I reach your guide for Sholazar Basin.
I’m so addicted to these guides now that I don’t know what I’ll do if there’s no Storm Peaks guide when I get done with Sholazar! LOL!
A thousand thanks to Jiyambi for creating the WoW-Pro add-ons, and to Jame and everyone on the team for creating all these wonderful guides. What a difference they are making for me! The game is so much more fun when I am following the guides. Thank you thank you thank you!!!
Cleared this at lvl 77. ThisCleared this at lvl 77. This is pretty easy stuff if you know what you are doing. I started Sholozar Basin at 74.
Thanks for the commentThanks, for the comment Jiyambi I really appreciated I started on the Storm Peaks, guide but I’m take a break I’m going to level my warlock to 40 then I’ll be back on the guide asap
Continuing OnThanks Ji 😛
Also Dax, you can remove ‘alliance’ from the title if you like, this zone is entirely faction neutral.
[list]
[*]Now [color=#33ccff]we’re[/color] going to where there should be Longneck Grazers[color=#33ccff].[/color] Kill them until you get 5 Longneck Grazer Steaks.
[*]If you stumble upon a “?” on minimap then its Oracle Soo-rahm
[color=#33ccff]. T[/color]urn in Rhino Mastery: The Chase.
[*]We’ll be looking for 1 Orange, 2 Banana Bunches, and [color=#33ccff]a[/color] Papaya, these are found where the green transparent areas show any of the 3 items. You should see vines hanging from the trees
[color=#33ccff]. C[/color]lick on them and the fruits fall.
[*]While doing the above objective also look for Mangal Crocolisks
[color=#33ccff]. K[/color]ill 15 of them and Emperor Cobras
[color=#33ccff]. K[/color]ill these until you loot 5 Intact Cobra Fangs.
[*]Then return to the camp and turn in: Bones of Nozzron to Hemet Nesingwary[color=#33ccff]. G[/color]et the followup Rhino Mastery: The Kill.
[*]This is a fun exciting quest, I love [color=#33ccff]it it’s one of my favourites. T[/color]alk to “Tipsy [color=#33ccff]McManus[/color] to start the quest. Just follow what he tells you and you’ll do fine[color=#33ccff]. O[/color]nce done, a cask will appear[color=#33ccff]. L[/color]oot it!
[*]Go to The Glimmering Pillar and look for Farunn[color=#33ccff]. K[/color]ill the rhino and loot Farunn’s Horn. [color=#33ccff]It’s[/color] not hard to kill Farunn[color=#33ccff]. H[/color]e’s a non-elite and only has 11k HP.
[*]Go to Bittertide Falls and look for the dreadsaber Shango[color=#33ccff]. K[/color]ill him and loot Shango’s Pelt.
[*]You automatically jump into a plane[color=#33ccff]. Y[/color]ou don[color=#33ccff]\'[/color]t move until you reach The Avalanche[color=#33ccff]. T[/color]he engine will blow up[color=#33ccff]. T[/color]hen you move and ride back to Lakeside Landing.
[*][color=#33ccff]Use[/color] San[color=#33ccff]id[/color]fern Disguise by a big log[color=#33ccff]. H[/color]alf of the log is in the water so use the disguise and you’ll be stunned until Bushwacker a big white crocolisk appears[color=#33ccff]. H[/color]e’ll attack you first[color=#33ccff]. T[/color]hen you can kill him, loot Bushwhacker’s Jaw.
[*]Go southeast to The Skyreaching Pillar and jump down for Pitch[color=#33ccff]. K[/color]ill him and loot Pitch’s Remains.
[*]Then a wolvar talks and a “!” appears[color=#33ccff]. G[/color]et his quest Playing Along.
[*]When [color=#33ccff]you[/color] accept the followup Goregek the Gorilla Hunter spawns[color=#33ccff]. T[/color]ake his quest Tormenting the Softknuckles. If he dies or despawns always right click the Goregek’s Shackles.
[*]You’ll find Hardknuckle Foragers are the white ones, and Hardknuckle Chargers are the black gorillas [color=#26c426]*[/color] all around this area, mostly you’ll find [color=#26c426]*[/color] the gorillas by the Frenzy Heart camp, kill them until you complete Goregek the Gorilla Hunter.
[*]Go by Hardknuckle Clearing and you’ll find Softknuckle Gorillas[color=#33ccff],[/color] which are baby ones in this area[color=#33ccff],[/color] [color=#26c426]*[/color] use Softknuckle Poker[color=#33ccff]. T[/color]he Hardknuckle Matriarch will spawn[color=#33ccff]. K[/color]ill her and you’ll get the quest credit.
[*]Once done with [color=#33ccff]these[/color] you unlock two new quests[color=#33ccff]:[/color]The Wasps Hunter’s Apprentice and The Sapphire Queen from Elder Harkek.
[*]In that same area go into the hive and look for The Sapphire Queen[color=#33ccff]. K[/color]ill her and loot Stinger of the Sapphire Queen.
[*]Use your Hearthstone if [color=#33ccff]it’s[/color] up!
[*] Flown The Coop[color=#33ccff]. A[/color]ll you have to do is catch 12 Chicken Escapee(s) and turn [color=#33ccff]it in.[/color]
[*] Go across the Wintergrasp River and you should see [color=#ff0000]like!!!!!! REMOVE PLEASE :P[/color] dirt rocks flying[color=#33ccff]. S[/color]tep in that area and you should aggro Serfex the Reaver[color=#33ccff]. K[/color]ill him he only has 11770 HP not hard really.
[*]Now look around this area for Skyreach Crystal Clusters[color=#33ccff]. They’re[/color] these little greyish crystals[color=#33ccff]. L[/color]oot 8 of them!
[*] Get his quest A Rough Ride, you’ll [color=#33ccff]recieve[/color]recieve Hunting Horn so you can right click it incase Zepik despawns.
I before E except after C my friend 😛
[*] Go northeast but [color=#33ccff]stay[/color] in the Frenzyheart camp [color=#33ccff]. Y[/color]ou’ll find a Captive Crocolisk
[color=#33ccff]. T[/color]alk to it, and [color=#33ccff]choose[/color] the one and only option and you’ll get on its back.
[*]When you arrive [color=#33ccff]go to[/color] Zepik the Gorloc Hunter and turn in A Rough Ride
[*] Go a couple of steps until you reach this big stone pillar[color=#33ccff],[/color] then use Skyreach Crystal Clusters and something happens[color=#33ccff]. Don’t[/color] forget to back up when you do this.
[*]Go to Rainspeaker Rapids[color=#33ccff]. R[/color]ight click the dead Gorloc and choose the only option there is.
[*]Now talk to the oracle to turn in Just Following Orders and get the followup Fortunate Misunderstandings[color=#33ccff]. Now you’re[/color] Friendly with The Oracles and Hated with The Frenzyheart Tribe.
[*]Then he says “We wait until you ready.” [color=#33ccff]S[/color]o then just talk to the oracle again[color=#33ccff]. C[/color]lick the only option available, then you start the escort quest, all you do is escort him back to his camp.
[*]Turn it in [color=#33ccff]and[/color] get the followup Returned Sevenfold.
You need to add another line space here.
[*]Quick little objective just to get rid of
[color=#33ccff]. L[/color]ook for any Shattertusk Mammoth and use Mammoth Harness on one and ride it back to Dorian’s Outpost.
[*]Stay in Rainspeaker Canopy and look [color=#33ccff]for[/color] sparkles on the ground[color=#33ccff]. M[/color]ake sure you have Lafoo [color=#33ccff](right click on Lafoo’s Bug Bag to call him out)[/color]. He’ll dig up holes for you and you’ll automatically loot 6 Shiny Treasures.
[*]You’ll automatically jump on a mammoth and so you head north [color=#33ccff]into[/color] The Savage Thicket[color=#33ccff]. F[/color]ind Broodmother Slivina and kill her.
[*]Just do Abilities 3 & 4 when [color=#33ccff]they’re[/color] up
[*]loot the corpses and use Lifeblood Gem[color=#33ccff]on them. It’s[/color] always great to put the item on your action bars as you probably [color=#33ccff]don’t[/color] want to go into your bags each time you kill one of the mobs[color=#26c426]*[/color].
[*]Go northwest until you see tents set up on top of a earth platform also know[color=#33ccff]n[/color] as Death’s Hand Encampment[color=#33ccff]. N[/color]ow [color=#33ccff]we’re[/color] doing two objectives here, kill 8 Cultist Infiltrator and destroy 4 [color=#33ccff]Unstable[/color] Explosives.
[*]Climb the mountains and you’ll find a wolvar named Shaman Vekjik[color=#33ccff]. T[/color]alk to him
[*]Now when you accept this quest you’ll recieve Jaloot’s Favorite Crystal[color=#33ccff]. Y[/color]ou use this to summon or dismiss him.
[*]When [color=#33ccff]you[/color] accept the quest you get Freya’s Horn[color=#33ccff]. N[/color]ow ride/fly to The Glimmering Pillar, and ride/fly to the very top and use Freya’s Horn next to the big crystal. And you should complete the quest.
[*]Move up north until you reach Spearborn Encampment, [color=#33ccff]we’re[/color] doing two objectives here
[*]There [color=#33ccff]are[/color] two objectives here, kill 6 Blighted Corpse and talk to the Gorlocs [color=#33ccff]they[/color] drops that are I guess dead, and you’ll get the quest update, also when you check their pulse to see if [color=#33ccff]they’re[/color] alive they drop a sack[color=#33ccff]. R[/color]ight click to see if you [color=#33ccff]get[/color] any [color=#26c426]*[/color] Lifeblood Crystal[color=#33ccff]. K[/color]eep doing these quests until they are complete!
http://www.wowhead.com/item=39063#comments You may wish to add to the guide that this can also be obtained from objects on the nearby pillar.
[*]Use Moodle’s Stress Ball to summon Moodle and turn in, Lifeblood of Mosswalker Shrine and The Mosswalker Savior[color=#33ccff]. G[/color]et the followup A Hero’s Burden.
[*]Ride/Fly back to Avatar of Freya and turn in, Powering the Waygate – The Maker’s Perch[color=#33ccff]. G[/color]et the followup, Powering the Waygate – The Maker’s Overlook.
[*]Kill any Sholazar Guardian until one drops Huge Stone Key[color=#33ccff]. L[/color]oot it.
[*]Note: Around when he’s like 35% HP he’ll summon both a [color=#33ccff]gorloc[/color] and a wolvar [color=#33ccff]you’ve[/color] killed in the past[color=#33ccff]. T[/color]hese guys each have 45.6k. So good luck.
[*]Keep [color=#33ccff]flying[/color] until you reach Waygate[color=#33ccff]. F[/color]ly right inside the thing with white light lines.
[*]Go up the set of stairs and you’ll see a giant named The Etymidian[color=#33ccff]. T[/color]urn in your quest
[*]kill everyone thats an NPC, or Horde if [color=#33ccff]they’re[/color]bothering you
[*]Turn in The Activation Rune and get the followup [color=#33ccff]Back Through[/color] the Waygate.
[*]Well, [color=#33ccff]we’re[/color] done here!
[/list]
Brune you crack me up Brune you crack me up 🙂 thanks for doing this.
As for formatting… I have never used an addon for it. I know, people think I’m crazy, I’ve just never bothered! 😀 It’s funny considering how much I like modding my UI and such, but yeah. Perhaps it’s because I’ve had issues with those formatting tools in the past (on sites were they are enabled by default) – I prefer to just work with the code myself.
Spell checks, yay!Very nice, looks like something Jame would’ve done. Also, if you’re doing storm peaks you might want to see if you can scavenge anything from my hodir rep guide, probably some useful stuff in there.
An [color=#ff0000]*[/color] just means add a space. Blue writing is missing words or punctuation or capitalisation (basically corrections)and removed words are a green asterisk.
Since the text formatting toolbar for FF doesn’t work with 3.6.3, anyone got any replacements?
[list]
[*]but I will look up locations and [color=#ff0000]NPCs\'[/color], etc.
Should be no apostrophe on NPCs.
[*]you might be able to solo some group quests so [color=#ff0000]its[/color] ok!
it’s
[*] [color=#ff0000]Its[/color] ok if [color=#ff0000]your like[/color] already level 80
It’s, you’re, and please remove like or I will be forced to strangle you over the internet 😛
[*]While [color=#ff0000]your[/color] using this
you’re
[*]1. You should be [color=#33ccff]in[/color] the city of Dalaran,[color=#ff0000]*[/color]look for Archmage Pentarus(69.5, 43.1) and take his quest Where in the World is Hemet Nesingwary?.[color=#ff0000][/color]
[*]When [color=#ff0000]your[/color] ready talk to Archmage Pentarus again, and choose the only option available. Just watch the little dialog while [color=#ff0000]your[/color] flying and then you’ll eventually end up in Wildgrowth Mangalwhich is in Sholazar Basin.
From here on in, incorrect ‘your’s just get highlighted 😛
[*]Once done with the first objective go to where the pink transparent area is at (36.7, 49.9)[color=#33ccff],[/color] where you’ll find Venture Co. members[color=#33ccff].[/color] [color=#33ccff]K[/color]ill 15 of them.
[*] You should see a quest on your minimap. Take [color=#26c426]*[/color] Engineering a Disaster[color=#ff0000]*[/color]from Engineer Helice(35.6, 47.3). The escort quest will start, escort her to the end of the mining thing and you’ll get the quest credit.
[*] Now let’s move on, we[color=#33ccff]\'[/color]re going back to [color=#26c426]*[/color] Wildgrowth Mangal, you’ll find the Flying Machine Engine at (38.6, 56.7). Loot it!
[*]While [color=#ff0000]your[/color] still at the camp, talk to Purser Boulian to bind your Hearthstone here. As well repair/sell/restock food/drink.
[*]Go back to Swindlegrin’s Dig and pick [color=#33ccff]up[/color] any Venture Co. Spare Parts until you have 7 of them.
[*]Once done, return the camp and turn in:
Have a Part, Give a Part [color=#33ccff]. N[/color]ow you should see a yellow “!” appear upon Professor Calvert [color=#33ccff]’s[/color] head, get her quest Aerial Surveillance.
[*]Also, you will see a “!” appear where [color=#33ccff]the[/color] Spirit of Gnomer[color=#33ccff]e[/color]gan [color=#33ccff]is[/color], get the Flight Path.
[*]Turn in: Wipe That Grin Off His Face[color=#ff0000]*[/color]to Debaar.
[*]Now the quest starts and you’ll have to kill 60 Game Creatures[color=#33ccff].[/color] Good Luck!
[*][color=#33ccff]Also[/color] while doing this quest you might stumble [color=#33ccff]upon[/color] some creatures for other quests so its ok if you kill them now so you complete your quests faster. Also after you kill a couple of creatures Drostan spawns and [color=#33ccff]tells[/color] you just a little saying and he despawns.
[*]Once done[color=#33ccff],[/color] turn in[color=#26c426]*[/color] The Great Hunter’s Challenge.
[*]Even if you did finish your hunt quests don’t turn them in just yet we still need to complete the others.
Remove that line entirely, as it doesn’t actually matter.
[*] I apologize for not add[color=#33ccff]ing[/color] the objective on the map. Anywho where the light blue transparent areas are
[color=#33ccff]is[/color] where the Shardhorn Rhinos are
[color=#33ccff]. K[/color]ill 15 of them.
[*]Dreadsabers can be found anywhere in Sholazar Basin[color=#33ccff]. K[/color]ill 15 of them if you haven[color=#33ccff]\'[/color]t already done so during the hunt quest.
[*]When you take that quest above ^ you unlock 3 more quests take them!
‘Take the three newly unlocked quests’ probably flows better.
[*]Go northeast to Bittertide Lake[color=#ff0000]*[/color]you should see footprint[color=#33ccff]s[/color] on the sandy surface of this area, right click them to examine them and you’ll get a quest update. You’ll have to move your cursor to them to see if the tooltip says “Shango’s Tracks”. Once done we’ll move on!
Will finish this off later, getting a bit sleepy.
Looks great at first glance,Looks great at first glance, Dax! I’ll read it in more depth later, thanks for the hard work!