
 by Jame
Chapter III (41-51) – Journey from the Grom’Gol to Tanaris
Changelog
This is v2.0 of the guide. It has been revamped as mentioned in this news post to adapt to patch v2.3 changes. You can still find the old version of the guide here. At the same time, many other improvements have been made:
- Introduction/Addons section has been updated
- Kill everything on your way rule has been lifted unless you lack experience compared to the progress described in the guide
- Grinding sessions removed and instances aren’t part of the leveling process anymore (no dependancy on groups)
- Quests that aren’t elite anymore have been integrated
- New patch 2.3 content has been integrated (Mudsprocket quests etc.)
- Maps have been remade and a lot of errors have been corrected
- Dustwallow Marsh circuits have been added
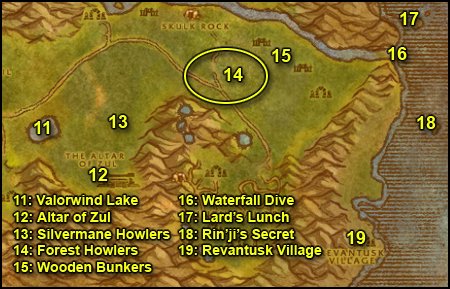
- Leveling should be possible at a faster pace than before
Courtesy to Wowhead for some of the images!
Big thanks to Subere for his beautiful map/picture editing 🙂
Introduction
This guide starts at level 41. However I hope that you followed the 1st chapter and the 2nd Chapter of this guide as well. Because a lot of pre-questing and flight path gathering is done in it and we will need it for this chapter. If you didn’t, it’s not that bad, just jump in the guide somewhere close to your level and ignore the quests you can’t get, if you are behind in levels it’s ok, you’ll catch up eventually later, the guide is made that way. If you need guides for any other level range (from 1-41 for example) please take a look at this page.
This guide is made for FAST leveling through the use of Optimized Quest Circuits. With this guide, questing will be very efficient and you’ll not waste any second running around and trying to figure out in which order to do your quests. Follow each instruction carefully and you will see for yourself. The quest choices and order to do them are optimal so that you run as few as possible while doing the most possible, turning several quests at the same time. It will be like grinding, because you’ll be killing stuff almost non-stop, besides you’ll also be completing a bunch of quests at the same time!
Everything described in this guide can be done solo (beside when I say otherwise). You can, of course, follow this guide while duoing, grouping, it’s not a problem, it works too.
DISCLAIMER: This guide does NOT take into account tradeskills, class specific quests or PvP. It’s 100% focused on getting the most experience possible in the shortest possible time while doing a lot of quests and enjoying as much content as possible. Any race/class combination can do this guide. Any complaints about PvP, tradeskills, or class specific issues will be ignored.
Basic rules
- Spend your talent points so that you kill things as fast as possible. (e.g: Priest should specialize in Shadow Talents, Warriors in Arms/Fury, etc.
- Don’t waste your time trying to find groups for questing, you can solo everything that is described in this guide unless I say otherwise. Only group with someone when it’s not gonna be a waste of time (e.g: meeting the person at the other end of the zone to show him the way to where your quest is, that is a waste of time)
- Try to always log out in an inn or in one of the major cities when you take a break.
- When I say you should make an inn your new home location, it’s for a good reason, and it will save you much time.
Useful Addons
To get the most out of my guide, you should get an addon which displays coordinates, because I use them to describe locations in my guide (x,y). You can use any addon you like, but here’s a very simple one I use.
Recommended
- DMiniCoords – A simple box which displays coordinates, left-click it to move it where you like.
Optional
Below is a list of other addons I use, this is 100% optional though, it’s mostly for people who are curious to know which addons I use:
- Bartender4 – A great action bar addon.
- X-Perl UnitFrames – Very nice, highly customizable unit frames.
- Quartz – The best casting bar addon out there, imo.
- Scrolling Combat Text – I just don’t like the default UI Floating Combat Text.
Side Note: In case you don’t know how to install add-ons, simply download an addon from one of the links above and unzip it. Then drag the unziped folder in your Addon folder (full path is c:\Program Files\World of Warcraft\Interface\Addons). Then, restart World of Warcraft and it should be working.
If it isn’t working, you might need to log out to your character selection screen and click on “Addons” in the lower-left corner. Tick the box that says “Load out of date Addons”. Re-launch WoW.
Shopping List
- Level 44: Patterned Bronze Bracers — If you can’t find them on the auction house, find a blacksmith willing to do them for a small tip. The components needed are 5x Bronze Bars, 2x Coarse Grinding Stone
- Level 44: Frost Oil – Made by alchemists. Components are 4x Khadgar’s Whisker, 2x Wintersbite, 1x Leaded Vial
- Level 44: Gyrochronatom – Made by engineers. Components are 1x Iron Bar, 1x Gold Power Core
- Level 45: All the Pages for the Green Hills of Stranglethorn quest. They can be found at the auction house in the main cities and also at the booty bay auction.
These items might not always be available at the AH, so start checking early.
Color Code
- Quests
- Items
- Locations
- Quest objectives to kill
- NPCs
- Locs
The Guide
Level 41
First of all, go to Orgrimmar, go to the inn and make it your home location.
Take the Zeppelin to Grom’gol outpost.
In Grom’gol, get the following quests if you don’t have them already (if you didn’t follow my last chapter):
- [41]Mok’thardin’s enchantment – the one where you must get 10 Jungle Stalker Feathers
- [41]Bloodscalp Clan Heads
- [42]Split Bone Necklace
From the previous chapter :
Turn in [35] The Troll Witchdoctor at Kin’Weelay.
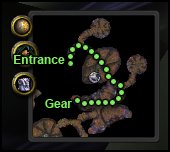
From Grom’gol ride north, find a small plateau in between Tkashi Ruins and Bal’lal Ruins (31,17). On top of this plateau you should find Sin’Dall, a level 37 named tiger. Kill it, loot the Paw of Sin’Dall.
Ride northeast to Nesingwary’s Camp. Turn in [37]Tiger Mastery.
Go east back on the main road, follow it north, until you enter Duskwoods. Our next stop is Stonard in Swamps of Sorrows.
Follow the road north, turn right at the crossroads, follow it as shown on the map below, make sure to avoid the alliance town of Darkshire.
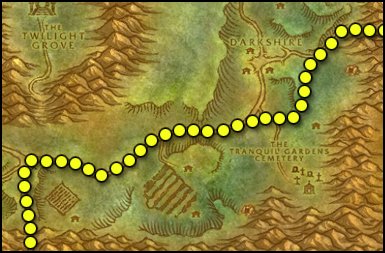
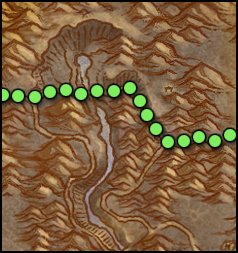
Go through Deadman’s Crossing, follow the path shown on this map:
You should be in Swamp of Sorrows now, follow the road, go right at the crossroads, and keep going until you find Stonard (43,55). Get the flight path and the following quests:
- [35] Neeka Bloodscar (no exclamation mark will appear for this one because it’s marked as low level – Given by Helgrum the Swift at the top of the biggest building).
- [40] Lack of Surplus
- [43] The Pool of Tears
They can all be found inside the buildings in Stonard. Don’t get the other quests.
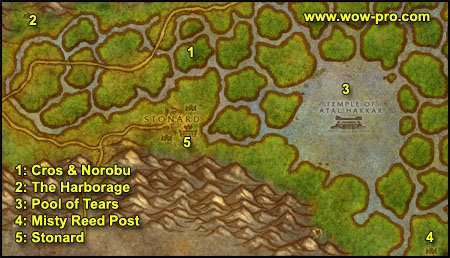
1. Go north to the small “isle” shown on map (48,41), stay in this area, kill everything in a wide radius until you have 8 Unprepared Sawtooth Flanks and found Noboru the Cudgel. Noboru is a level 39 “lost one”, he wanders in Swamps of Sorrows but always comes to this spot every now and then, you’ll find him eventually if you stay in this area, kill him, loot his cudgel, right click it to start the quest [39]Noboru the Cudgel.
2. Ride west to the Harborage(25,31). Turn in [39]Noboru the Cudgel.
3. Ride southeast to the Pool of Tears (65,45), swim down in the pool and look for Atal’ai Artifacts, gather 5 of them. A full turn around the pool should be enough.
4. Get back on your mount, ride southeast to Misty Reed Post (80,80), turn in the quest [40]Lack of Surplus and get the follow up [42]Lack of Surplus.
5. Ride west back to Stonard.
Turn in:
[43]The Pool of Tears, don’t get the follow up.
Your quest log should look like this:
- [38] Return to Krog
- [45] Deadmire
- [38] Excelsior
- [40] Panther Mastery
- [41] Bloodscalp Clan Heads
- [41] Mok’Thardin’s Enchantment
- [41] Raptor Mastery
- [42] Split Bone Necklace
- [35] Neeka Bloodscar
- [42] Lack of Surplus
- [35] Martek the Exiled
- [37] Goblin Sponsorship
If you didn’t follow my last chapter, you probably don’t have all quests. It’s not a big deal though, just ignore the ones from Thousand Needles and Arathi Highland. However, try to get the ones you miss from Stranglethorn Vale, most of them can be obtained in Booty Bay (beside raptor and panter mastery).
Fly to Kargath, Badlands. If you don’t have this flight path, check the level 41 section of the previous chapter, you’ll find maps and explanations on how to get there.
Sell, repair, restock food/drink.
Turn in [35]Neeka Bloodscar (he’s at the top of the guard tower). Get the follow up [40]Report to Helgrum, also get the other quest [40]Coyote Thieves from Neeka Bloodscar and [40] Unclaimed Baggage from Advisor Sarophas at the bottom of the tower.
Go to the inn and get [39]Badlands Reagent Run
From now on, kill every coyote and buzzard you find on your way.
Start of XP Circuit:
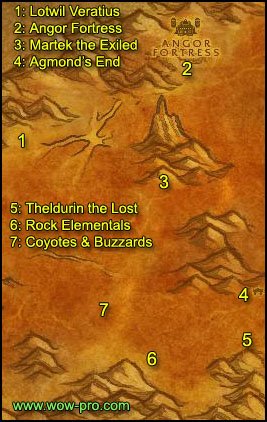
1. Ride east to Lotwil Veratius, get the quest [39]Study of the Elements:Rock
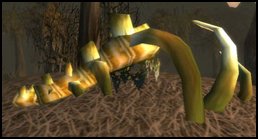
2 Ride further east / northeast until you reach Angor Fortress. Fight your way to the entrance and from there enter on the right side. Fight your way through straight until you reach a room. You should find a weapon rack in this room looking like this :
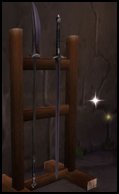
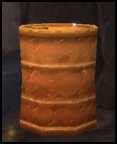
Loot it. Go back outside to the entrance and this time go left. Fight your way straight through until you hit a room similar to the one we found the weapon rack in. There you should find a barrel looking like this :
Loot it as well. Fight your way back outside.
3. Ride south, around the hill to the Valley of Fangs and find Martek the Exiled (42,52). Turn in the quest [37]Martek the Exiled and get the follow up [39]Indurium.
Talk to the goblin next to Martek, get the quest:
[40]Barbecued Buzzard Wings
4. Go south to Agmond’s End (50,65), kill the troggs there until you have 10 Indurium Flakes.
You should be level 42 by now.
Level 42
5. If you plan on going to Uldaman : Go a bit further south, along the mountain you should find Theldurin the Lost (50,76), get his quest [40]Solution to Doom (Dungeon).
6. Just a little to the west you’ll find the Mirage Flats, with a lot of Rock Elementals (40,78). Kill rock elementals there until you have 5 rock elemental shards, 3 large stone slabs. You can go kill coyotes, buzzards and troggs too if the elementals are overcrowded.
7. Go northwest of the elementals, there is a vast area with a lot of coyotes and some buzzards (35,72). Kill stuff there until you have 30 Coyote Jawbones and 10 Crag Coyote Fangs.
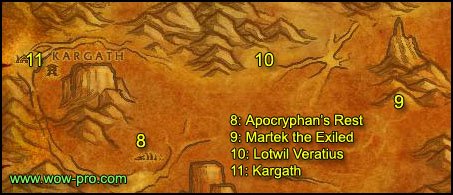
8. If you still need some Buzzard Wings or Gizzards, go north to Apocryphan’s Rest (16,60), there are plenty buzzards there.
9. Ride east to Martek the Exiled (42,52). Turn in [39]Indurium and [40]Barbecued Buzzard Wings. Get the follow up from Martek: [38]News for Fizzle.
10. Ride northwest to Lotwil Veratius (25,44), turn in [39]Study of the Elements: Rock and get the follow up [42]Study of the Elements: Rock.
11. Ride west to Kargath, turn in [40]Coyote Thieves, [40] Unclaimed Baggage and [39]Badlands Reagent Run. Don’t get any of the follow ups.
End of XP Circuit:
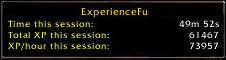
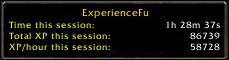
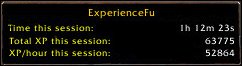
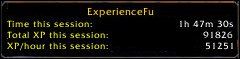
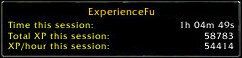
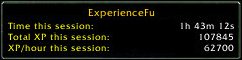
Note: I had some rested bonus during the first 10 minutes of the circuit. So you can chalk off about 10000XP from the screenshot. However, that still makes about 63000XP in 50 minutes, not too shabby :p.
Fly to Booty Bay.
Get out of the inn and get the quest [43]Akiris by the Bundle from Privateer Bloads in front of the bank.
While you are there check the Booty Bay auction house for any Stranglethorn Page you might still be missing.
From the bank, go up the pier, turn left in the first house on your right-hand side you should find “Sea Wolf” MacKinley, get the quests [41]Scaring Shaky and [45]Stoley’s Debt from him.
Head towards Booty Bay’s exit and get [45] Stranglethorn Fever from Fin Fizracket who is under a broken boat right on the way. Get a last quest on the way from First Mate Crazz, [41]The Bloodsail Buccaneers.
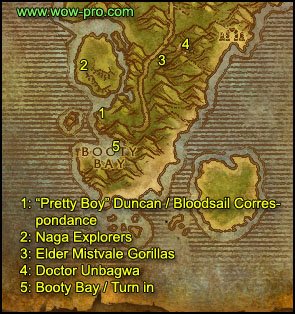
1. Exit Booty Bay and go left, until you reach a pirate camp by the cove. Clear the camp and find the Bloodsail Correspondence on one of the barrels.

Click it, turn in the quest and get the follow up [41]The Bloodsail Buccaneers.
2. Go northwest across the bridge and further northwest along the coast until you find some nagas. Kill those nagas until you have 10 Akiris Reed.
3. Ride back to the entrance of Booty Bay, this time go on the other side, follow the road north just a little while until you have Mistvale Gorillas on your right (31,68). Kill gorillas until you have gathered 5 Mistvale Giblets and until you get 1 Gorilla Fang.
4. Go north to (35,61) where you’ll find a cave with Witch Doctor Unbagwa. Once you speak to him, 3 waves of 1 gorilla will spawn, with 10 seconds in between. You have time to eat/drink between the waves, don’t loot though, you can do that afterwards. So after about 10 seconds an Enraged Silverback Gorilla (level 43) will attack you. After killing that gorilla you have another 10 seconds until Konda spawns (also level 43). Kill him as well. Then after another 10 seconds Mokk the Savage will run into the cave (Level 44). Kill him and loot the Heart of Mokk.
5. Go back to Booty Bay. Down the first slope you’ll find “Shaky” Phillipe, turn in the quest and get the follow up [41]Return to MacKinley. Further towards the inn, turn in [45] Stranglethorn Fever at Fin Fizracket and [41]The Bloodsail Buccaneers at First Mate Crazz, get the follow up.
Up the slope right after First Mate Crazz, go to the house to your left and find Sea Wolf MacKinley, turn in the quest and get the follow up [44]Voodoo Dues. Go to the top floor of the inn and turn in [41]The Bloodsail Buccaneers at Fleet Master Seahorn, get the follow up.
In the room just before Fleet Master Seahorn get the quest [41]Up to Snuff from Deeg. At the bank turn in [43]Akiris by the Bundle.
Before leaving Booty Bay, find Dizzy One-Eye and get his quest [42]Keep an Eye Out. Dizzy is behind a big building close to the forge, which is actually quite close to the exit of Booty Bay, on the highest floor.
1. Get out of Booty Bay and go east towards the shore named Wild Shore. From there, go southwards while killing any Bloodsails on the way until you reach the 1st camp (29,80). Clear the camp and look for a map thingy named “Bloodsail Charts” or “Bloodsail Orders“, If you don’t find either, move on further south until you find a small boat ashore, check it for maps as well. Careful, the Bloodsail Warlocks really hurt, make sure you interrupt their shadowbolts if you can, and kill them fast then deal with their pets. If you are a Rogue or a Mage though, I suggest sap / polymorph on the Warlock first, kill the pet and then the Warlock.
2. Go further south until you find a bigger camp at (27,82). This camp will be harder to clear, but it’s possible if you do it carefully.
Check the camp for Bloodsail Orders or Charts. Basically, the Bloodsail Charts and Orders can spawn at any of the two camps or at the boat. So check all three until you got both.
2b. (not shown on map) Swim southeast to the pirate ship at (33,88).
Go to the top deck and kill Brutus.
Loot Dizzy’s Eye.
Go back to the shore and kill Bloodsails until you get :
- 10 Bloodsail Swashbuckler Kills
- 15 Snuff (can drop from any Bloodsail)
If you have a hard time finishing the snuffs, you can swim to the ships which are close to the shore. The Bloodsails there drop them too.
3. Ride back to Booty Bay.
You should be level 43 or close by now.
Level 43
Go to the top floor of the inn, turn in [41]The Bloodsail Buccaneers, get the follow up [42]The Bloodsail Buccaneers. Turn in [41]Up to Snuff and get the quest [42] Skullsplitter Tusks from Kebok. Sell and repair, restock food/drink.
Go turn in [42]Keep an Eye Out at Dizzy One-Eye on your way out of Booty Bay.
Get out of Booty Bay and ride east to the shore. Now we’re going to look for a Half-Burried Bottles, which can be found anywhere along the beach if you keep going northeast. Keep opening bottles until one yields a Carefully Folded Note, right-click it to start [42] Message in a Bottle.
Swim southeast to Jaguero Isle and find Princess Poobah at (39,81). Turn in the quest and get the follow up [42] Message in a Bottle.
Go to the southeastern part of the island, where you should find a big gorilla named King Mukla (40,84). Kill it and loot the Shackle Key.
Go back to Princess Poobah and turn in [42] Message in a Bottle.
Now we’re gonna do [42] The Bloodsail Buccaneers.
Go to the southwestern tip of the island and swim southwest to a lone pirate ship (34,88)
You should see 2 other pirate ships if you look west:
Start with the lone ship.
Instead of describing step by step how everything is done, I made a video, with explanations inside (the video was made before patch v2.3 but it’s still more or less the same, beside that there are less mobs and they are lower level):
Bloodsail Buccaneer Video
Note: The parchment I looted at the bottom of the ship – Cortello’s Riddle – can spawn in any of the three ships, so you’ll have to check the bottom floor of each ship until you find it. It can also spawn in other parts of the ship, so check every corner of each ship carefully, but it mostly spawns on the bottom floor.
When you pull the middle floor, don’t fight in the stairs. As soon as you aggro something, get off the stairs, or you might aggro something from the captain’s cabin through the floor, it’s an annoying bug but it’s easily avoided if you don’t fight on the stairs.
Do the same for the other two ships and you should have [42]The Bloodsail Buccaneers complete and have Cortello’s Riddle. Right click it and get the quest [43]Cortello’s Riddle.
Note: Ignore Brutus, that iron golem standing at the top of the eastern ship. He doesn’t drop anything particular and is a pain to kill.
Once done, go back to Booty Bay.
Turn in [42]The Bloodsail Buccaneers.
Fly to Stonard, Swamps of Sorrows.
From Stonard, follow the road west and then go north to the bridge at (23,48). Look under the bridge for a Soggy Scroll. (You’ll see a question mark on your minimap)
Click the scroll, turn in the quest and get the follow up [43]Cortello’s Riddle.
Hearthstone to Orgrimmar.
Visit the class trainer, the auction house, check for Stranglethorn Pages you might still miss. Also check for the other items on the shopping list, we’ll only come back once to Orgrimmar before we need the first few.
Fly to Brackenwall, Dustwallow Marsh. If you don’t have that flight path, fly to Camp Taurajo in the Barrens. From Camp Taurajo go south along the road and then east at the first crossroad. Enter Dustwallow Marsh and then go north to Brackenwall Village (36,32).
Start of XP Circuit:
Turn in [38] Return to Krog.
Get the quest [43]Overlord Mok’Morokk’s Concern from Overlord Mok’Morokk next to the bonfire, [43]Army of the Black Dragon from Tharg next to the eastern exit of the village, and [43]Identifying the Brood from Draz’Zilb inside the cave.
Fly to Mudsprocket. Get the following quests:
- [40] Catch a Dragon by the Tail from Gizzik Grimgurgle
- [39] WANTED: Goreclaw the Ravenous from the wanted poster
- [39] Bloodfen Feathers from the ogre inside the inn
1. Go south of Mudsprocket and while killing all Searing Whelps/Hatchlings on your way. Loot Wyrmtails until you gather 8 of them.
2. Go northwest until you get to an area called « The Bloodfen Burrow ». Kill every raptor on your way while going west to the cave. There you should see a big named raptor Goreclaw the Revenous. Kill him then clear your way into the cave behind him and you should see a scroll on a stone with a question mark over it. Click it, turn in the quest and get the follow up [51]Cortello’s Riddle.
3. Once you have 5 Bloodfen Feathers, ride back to Mudsprocket and turn in all the quests you got. From the ogre inside the inn get [39] Banner of the Stonemaul and [39] The Essence of Enmity.
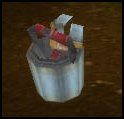
4. Ride northwest to the area named The Den of Flame, which you can enter by the main gate on the southeastern side of it at (40,67). From now on kill every dragonkin you see. After killing a Firemane Scout, Ash Tail or Scalebane, use your Brogg’s Totem from your inventory on their corpses to get a Black Dragonkin Essence. You’ll need to do this 10 times. At the cave entrance you should find Mok’Morokk’s Grog (39,66), which looks like a big pot.
Go inside the cave and keep to the left side until you see a banner with a tiger pelt. Loot the Stonemaul Banner. Now go the other extremity of the cave you should find Mok’Morokk’s Strongbox on the floor, which is a rectangular black/steel box.
Loot it and then get out of the cave. Continue killing Firemanes here until you finish [39] The Essence of Enmity and got 5 Firemane Scalebane kills.
5. Go back to Mudsprocket and turn in both quests at Brogg. Get the follow up [41] Spirits of Stonemaul Hold.
6. Go northeast to Stonemaul Ruins (43,66). Kill as many searing whelps/hatchlings as you can find to complete [41] Identifying the Brood. At the same time look for Ogre Remains:
Right click them and Stonemaul Spirits will spawn which you need to kill. You’ll need to free 10 spirits like this.
You should find Mok’Morokk’s Snuff dead center of the fortress in plain sight on a metallic floor texture, located at (44,65).
7. Once [41] Spirits of Stonemaul Hold, [41] Identifying the Brood and [41] Army of the Black Dragon are completed go north slightly until you reach this area:
Follow the trail on the wowhead map to find Deadmire (named croc) and kill him.
8. Go back to Mudsprocket. Turn in [41] Spirits of Stonemaul Hold and get the follow up.
9. Go southeast to the area called « Wyrmbog ». Further southeast towards the mountain you’ll see the entrance to Onyxia’s Lair. Pick one side of the entrance and clear all around it, then plant the Stonemaul Banner from your inventory. After a few seconds a dragon called Smolderwing will spawn. Kill it. Return to Mudsprocket. Turn in at Brogg and fly to Brackenwall Village.
Turn in [43]Overlord Mok’Morokk’s Concern, [43]Army of the Black Dragon and [43]Identifying the Brood, get the follow up [41] The Brood of Onyxia. Turn it in at Overlord Mok’Morokk and get the follow up. Go back to Draz’Zilb and turn in a last time, don’t get the follow up.
Fly to Thunderbluff and turn in [45] Deadmire on the Hunter Rise.
End of XP Circuit:
You should be level 44 by now or close.
Level 44
Hearthstone to Orgrimmar and train/sell/restock on consumables. Also this is your last chance to get the Patterned Bronze Bracers, the Frost Oil and the Gyrochronatom. If any of these isn’t available on AH, ask a crafter to make them for you and buy the mats.
Take the Zeppelin to Grom’gol base camp, fly to Stonard, Swamp of Sorrows.
Get the quest [38]Little Morsels from the Blood Elf female inside the biggest building. On the top floor of this building, turn in [40]Report to Helgrum.
Start of XP Circuit:
1. Go northeast until you find the “Fallow Sanctuary” at (54,28). Look for caged animals of the following type: Captured Crocolisk, Tarantual and Jaguar. Target them and feed them the Fel-tainted morsels you should have in your inventory.
When you have fed all 3 animals, go further east to (63,18) where you will find a destroyed caravan, right next to the caravan you will find Galen Goodward inside a cage, before you get his quest, clear the ‘lost ones’ camps to the southwest of the cage. Then get the quest [38]Galen’s Escape and escort him out.
You should preceed Galen and attack anything that could jump on him because Galen is rather weak. After you have escorted him successfully, go southwest to (47,39). There you will find a small tent and Galen’s Strongbox next to it. Open it, complete the quest.
2. Go east until you find Sawtooth Snappers (75,15), they are the bigger version of the crocolisks we killed in this zone last time. Go south from that location to find more crocs, just be careful not to run into those elite dragons. Keep killing those crocs until you have 6 Sawtooth Snapper Claws.
3. Ride south to Misty Reed Post (81,81) and turn in the quest [42]Lack of Surplus at Tok’Kar, get the follow up. Go turn in this follow up immediately at the other orc npc just a bit east of the camp, looking over the shore. Get the follow up [43]Threat from the Sea.
4. Get down on the shore and start killing murlocs. Kill 10 Marsh Murlocs and 10 Marsh Inkspewers, then move north along the shore, where you should find Murloc Flesheaters. Keep killing until you have 10 Murloc Flesheater kills.
5. Go back to Misty Reed Post and turn in the quest [44]Threat from the Sea, get the follow up, turn it in immediately at the other orc in the camp, Tok’Kar.
6. Ride back to Stonard, turn in [38]Little Morsels.
Fly to Kargath, Badlands.
1. From Kargath, go south/southeast to (13,85), where you will find Greater Rock Elementals. Kill them until you have 5 Bracers of Rock Binding. If you run out of elementals to kill, there is another camp to the west of this one (7,80).
2. Ride to Lotwil Veratius (26,45). Turn in [42]Study of the Elements: Rock. Get the other quest from Lotwil, [37]Coolant Heads prevail, turn it immediately – as you already have the Frost Oil from the shopping list. Get the follow up [37]Gyro…What? and turn it in too – you should have the Gyrochronatom from the shopping list as well – Get the follow up [42]This is Going to Be Hard. Talk to Lucien Tosselwrench, who stands behind Lotwil. Get his quest [42]Stone is Better than Cloth and turn it in – as you have the Patterned Bronze Bracers already.
4. Make sure all your cooldown abilities and your potion timers are up, then turn in [42]This is Going to Be Hard, get the follow up and turn it in at Lotwil, get the follow up [45]This is Going to Be Hard. A level 45 Fam’retor Guardian will spawn, kill it and loot Lotwil’s Shackles of Elemental Binding. Turn in the quest at Lotwil, congratulations on your first trinket!
End of XP Circuit:
5. Go back to Kargath and fly to Booty Bay.
Get inside the inn and get the quest [45]Tran’rek.
Go down to the 1st floor of the inn and get the quests [41]Venture Company Mining and [44]Zanzil’s Secret.
Set your Hearthstone to the Booty Bay inn. While here also check the Auction House for any Stranglethorn Pages you might still be missing :
Here is the list:
- 1. Chapter I: page 1,4,6,8
- 2. Chapter II: page 10,11,14,16
- 3. Chapter III: page 18,20,21,24
- 4. Chapter IV: page 25,26,27
We’ll be needing them soon, so I advise you start offering 50s or even 1 gold for the pages you miss in the trade channel. We still have some killing to do though before we actually go turn in the page quest.
Start of XP Circuit (Optional Circuit included):
1. Get out of Booty Bay and ride north, stay on the road until you reach (39,41), slightly long ride.
At (39,41) go east and you will find Venture Co. Goblins uphill. Kill them until you get 10 Singing Blue Crystals.
2. Go west to the other side of the road, you should find Jungle Stalkers (34,37). Kill those raptors until you have 10 Jungle Stalker Feathers.
3. Ride to Grom’gol, turn in [41]Mok’thardin’s enchantment and get the follow up.
4. Ride north along the shore until you find an Elder Saltwater Crocolisk. Kill it and loot the Elder Crocolisk Skin off it.
5. Ride further northwest/north along the shore until you find the back entrance of the big troll ruins (21,11). Look at this zoom of the minimap to know what path to follow:
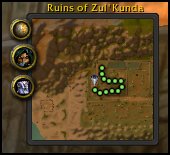
You should find Nezzliok the Dire at (24,10) if you followed the map above. Kill him and loot his head. Just a bit further north you should find Gan’zulah, the troll boss of those ruins (23,8 ). Kill him and loot his head.
6. Ride out of the ruins of Zul’Kunda, go east towards Nesingwary’s Expedition (36,10).
Turn in [41]Raptor Mastery, don’t get the follow up. Also abandon [40]Panther Mastery (elite), because that named panther can sometimes take way too long to be found.
Get the quest [40]The Green Hills of Stranglethorn and then take the four other quests named Chapter I, II, III and IV. Turn them all in then turn in the quest [40]The Green Hills of Stranglethorn.
== OPTIONAL CIRCUIT FOR THOSE WHO WANT TO DO THE MASTERY QUESTS ==
It can take some time to find these mobs, especially if someone else killed them before you so if you don’t want to waste time on this, just skip this circuit. However if you lack exp, this might be a nice way to catch up.
Take [43] Raptor Mastery and retake [40] Panther Mastery.
Tethis has three spawn points (31,43 | 28,43 | 31,40) and roams in the back (west) of the Gurubashi Arena. Kill and loot him.
Bag’thera has three spawn points (48,20 | 48,28 | 46,28) and roams around in this area after he spawns. Kill and loot him.
Go back to Nesingwary’s Expedition Camp and turn the two quests in.
== END OF OPTIONAL CIRCUIT ==
You should be level 45 by now.
Level 45
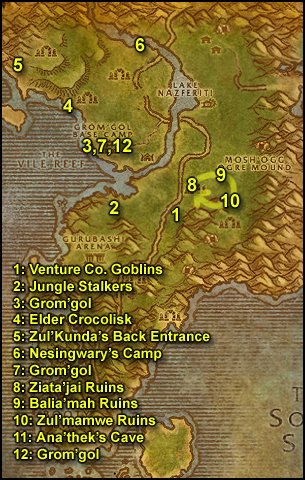
7. Ride south/southwest, back to Grom’gol.
Next to the troll npc named Nimboya you should find a Bubbling Cauldron, get close to it and right click it to have a quest window appear. Turn in [41]Bloodscalp Clan heads, click the cauldron again and take the two quests: [40]Speaking with Neezzliok and [45]Speaking with Gan’zulah.
8. Sell and repair, then ride southeast, across the river, to the Ziata’jai Ruins (42,37). Clear the camp, beware of the patrols roaming this area, there are 2 of them and each contain 3 trolls level 39-40. Once the camp is clear, click on the Ziata’jai Trophy Skulls which stand in the middle of the ruins and loot the Ziata’jai Trophy.
9. Follow the little path northeast until you reach Balia’mah Ruins (45,33). Kill all the trolls there as well. When this camp is clear, loot the Balia’mah Trophy Skull.
10. Follow the path southeast and then south until you reach the Ruins of Zul’Mamwe (47,38), you should find the Zul’Mamwe Trophy Skulls there, loot it.
Now kill all the trolls you find in the ruins (Though avoid the southernmost ones up the plateau, the trolls there are higher level).
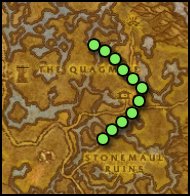
If you run out of trolls go back to the first ruins of Ziata’Jai and repeat this cycle – as shown by the arrows on the map – until you get 18 Skullsplitter Tusk, and 25 Splitbone Necklaces.
11. Go back to the Ruins of Zul’Mamwe. Our objective is to complete the quest [46]Speaking with Gan’zulah. All the quest objectives are in the ruins of Zul’Mamwe, so let’s just go there and kill everything in the way. Just be careful, there are many patrols and you can get easily overwhelmed if you don’t pull carefully.
Skullsplitter Headhunters and Berserkers can be found in the southeastern part of the ruins (48,43) – which we avoided until now – go there and kill what you need for the quest, be careful to avoid the named elite Mogh the Undying.
Now comes the difficult part, we have to kill a level 45 named with two level 44 guards. You can find that named – Ana’thek the Cruel – inside the cave at the end of the path going through the ruins (45,44). Ana’thek and his guards sometimes come out of the cave for a walk, but don’t attack them then, you will probably get adds and die. It’s safer to wait for Ana’thek to be back in the cave and attack him inside it.

Wait for your long cooldown abilities and your potion timers to be up, clear the area around the cave entrance to have some space, then charge in, kill the named fast, loot him and run away. If one of the guards is a Spiritchaser and you have no way to crowd control it – Polymorph or sap – kill it first, run away and then come back for the named. It’s safer this way, because the Spiritchasers tend to heal the named and then things get ugly. I tried it with a rogue – even though I could have just used sap – to evaluate the difficulty, and it was no problem, I could easily take one down, run away and come back for the named without dying.
Once you have looted the Broken Armor of Ana’thek, make sure you don’t miss anything on the kill list of [46]Speaking with Gan’zulah (you might be missing a few hunter kills).
12. Ride northwest, back to Grom’gol.
Turn in [42]Split Bone Necklace. Click on the Bubbling Cauldron and turn in the two quests. Then click on the cauldron again and take the quest [45]The Fate of Yenniku. Speak with Kin’weelay, turn in the quest and get the follow up [45]The Singing Crystals.
Hearthstone to Booty Bay. At the inn, turn in [41]Venture Company Mining, then go to the top floor of the inn, turn in [42]Skullsplitter Tusks. Exit the inn by the top floor side-door, go turn in [38]Excelsior at the “Tan-Your-Hide Leatherworks” (you should see the yellow question mark on the minimap when you come out of the inn).
End of XP Circuit:
Start of XP Circuit (with Optional Circuit included):
1. Restock/repair/etc. Get out of Booty Bay, go to Mistvale Valley and kill the same gorillas we killed earlier in this chapter at (32,68). Kill gorillas until one of them drops an Aged Gorilla Sinew.
2. Get back on the road and ride north for a while, until you reach the Ruins of Jubuwal (33,51). Clear the camp until you can pull JonJon The Crow, he should come with an add, could be a hard fight but it’s doable. Loot Jon-Jon’s Golden Spyglass, then clear yourself some space around the little ruins just behind where Jon-Jon was, there stands Maury “Club-Foot” Wilkins with two Zanzil Something.
Now you probably can’t take all 3 at the same time, so try to kill one of the minions fast then run away, rinse and repeat until you are left with just Maury Wilkins. Kill him and loot “Maury’s Clubbed Foot“.
3. Go back on the road and just a bit south until (33,53), go east through a breached wall and keep going until you hit the Ruins of Aboraz (40,57) and kill Zanzil Minions there until you find Chucky “Ten Thumbs” inside the ruins and loot “Chucky’s Huge Ring” from him. Keep killing Zanzil dudes until you get 12 Zanzil’s Mixtures, avoid Zanzil the Outcast himself though. If you run out of mobs to kill, go back and forth from this camp to the other. Any Zanzil Something can drop the Mixture.
4. Get back on the road and ride north and then go northeast at the crossroads of Gurubashi arena. Just after that you should pass a big gate and to the right you should see a small path going into the jungle (37,49). That’s our next stop, clear the way towards the cave at the end of that path, the basilisks we need to kill are named Ironjaw Basilisks and are higher level than the ones outside. Enter the cave at (42,50) and kill Ironjaw Basilisks until you have 3 Pulsing Blue Shards. The shards are rather rare, I estimate them to drop about 30% of the time. When you’re done, hearthstone back to Booty Bay.
In Booty Bay’s inn, turn in [44]Zanzil’s Secret. Get out of the inn and turn in [44]Voodoo Dues at Sea Wolf MacKinley, get the follow up [44] Cracking Maury’s Foot if you plan to do the optional circuit later.
Fly to Grom’gol.
In Grom’gol turn in the quest [41]Mok’thardin’s enchantment, don’t get the follow up. Turn in [45]The Singing Crystals, get the follow up if you are interested in the following items (optional circuit) :
http://www.wowhead.com/?item=4134
http://www.wowhead.com/?item=6723.
== OPTIONAL CIRCUIT ==
From Grom’gol ride straight east until you see an ogre camp/cave (Mosh Ogg Ogre Mound) at (50,28). Clear your way inside the cave until you see Mai’Zoth. Pull him his right guard first then deal with the rest. Once Mai’Zoth is dead, loot Mind’s Eye from him. Clear your way out of the cave. Check if you’ve already looted Maury’s Key from one of the ogres. If you didn’t, continue killing ogres until it drops.
Ride back to Grom’gol and fly to Booty Bay. At “Sea Wolf” McKinley turn in [44] Cracking Maury’s Foot. Fly back to Grom’gol and turn in The [46] Mind’s Eye at Kin’Weelay. Take the follow up [46] Saving Yenniku.
Ride to the Ruins of Aboraz and find Yenniku at (38,57). Use the Soul Gem from your inventory on him (which will stun him) and talk to him to fill the gem up. Once done, ride back to Grom’gol and turn the quest in at Nimboya.
== END OF OPTIONAL CIRCUIT ==
End of XP Circuit:
You should be level 46 by now.
Level 46
Take a Zeppelin to The Undercity, train / sell / repair / restock consumables.
In Undercity, go to the Apothecarium and get [45] Errand for Apothecary Zinge from Apothecary Zinge, who is located right in the middle of the outer circle in the Apothecarium.
Go to the inner circle of the Apothecarium and find Alessandro Luca (58,55), turn in the quest and get the follow up.
Go back to Apothecary Zinge, turn in the quest and get the follow up [46] Into the Field.
Hearthstone to Booty Bay, take the boat to Ratchet and fly to Gadgetzan, Tanaris. If your hearthstone isn’t up, just take a zeppelin to Orgrimmar and fly to Gadgetzan.
In Gadgetzan:
Turn in [45]Tran’rek, don’t get the follow up.
Turn in [46] Into the Field, get the follow up [46] Slake That Thirst.
Get the other quests:
- [43]Wastewander Justice
- [44]Water Pouch Bounty
- [45]WANTED: Andre Firebeard and [46]WANTED: Caliph Scorpidsting from the wanted poster.
Set your hearthstone to Gadgetzan.
General info about Tanaris, Feralas and Hinterlands:
While killing stuff in Tanaris if you find an item named OOX-17/TN Distress Beacon. Right click it and keep the quest. You’ll find beacons in Feralas and Hinterlands as well, proceed equally with those. Each of those beacons start a quest where you will have to find a Homing Robot and escort it. The beacons won’t always drop for you, they are kinda rare. The escort quests are hard to do solo especially for certain classes. But if you are lucky to find all 3 beacons you should really put the effort and finish all 3 rescue quests, it will be described when to do them in the guide later on. Anyway, if you don’t get a distress beacon, or if you don’t manage to complete the rescue quests, it’s not a big deal, this is optional, it’s a nifty exp bonus but it’s not that important.
Sell, Repair, re-supply food/drink (3 stacks).
No map needed for this very short part.
Get out of Gadgetzan, ride east until Noonshade Ruins (61,24), kill all the Bandits you can find there (If it’s crowded just skip this part and keep riding east).. Then go further east to Steamwheedle Port even if you still haven’t completed Wastewander Justice yet.
In Steamwheedle port get:
- [45]Pirate Hats Ahoy!
- [44] Screecher Spirits
- [45] Southsea Shakedown
Turn in [45]Stoley’s Debt and get the follow up [46]Stoley’s Shipment.
Ride back towards Gadgetzan, make a stop at Noonshade Ruins and kill bandits / thieves there until you finish Wastewander Justice and have 10 Wastewander Water Pouches. If the place is crowded, there are more wastewander camps southeast of here (63,30).
Go back to Gadgetzan and turn in:
- [46] Slake That Thirst, don’t take the follow up.
- [44]Water Pouch Bounty
- [43]Wastewander Justice, get the follow up [44]More Wastewander Justice.
Ride north to Thousand Needles and to the Shimmering Flats at the Mirage Raceway (80,75).
Turn in [38]News for Fizzle at Fizzle Brassbolts.
If you want to go to Zul’Farrak later on get the quest [50]Gahz’Rilla (Dungeon) from Wizzle Brassbolts.
Turn in [37]Goblin Sponsorship at Pozzik don’t get the follow up but on the other hand get the quest [41]Keeping Pace from Pozzik. Then go talk to Zamek who is just south of Pozzik, he should have a blue question mark over the head. Start his quest, follow him, he will set up an explosive and distract Rizzle Brassbolt out of his house. While Rizzle is away go quickly loot the Unguarded Plans. Complete the quest, get the follow up [41]Rizzle’s Schematics and turn it in at Pozzik.
You can destroy the Sample of Indurium Ore in your bag.
Hearthstone back to Gadgetzan and fly to Camp Mojache, Feralas. You should already have this flight path if you followed the first chapter of my guide (21-31). If you don’t have it, fly to Freewind Post, Thousand Needles, then follow the road west until you reach Camp Mojache.
In Camp Mojache get the quest [45] A New Cloak’s Sheen from Kreug Skullsplitter near the eastern entrance to the village. Get [43]Gordunni Cobalt from Orwin Gizzmick, a goblin near the wyvern master.
Get [42]War on the Woodpaw from Hadoken Swiftstrider, [46]The Mark of Quality from Jangdor Swifstrider inside the big tent building in front of the wyvern master. [45]A Strange Request from Witch Doctor Uzer’l right outside that tent building.
Go to the Inn and set your hearthstone there.
Get [43]The Ogres of Feralas from Rok Orhan, a roaming orc npc with red armor.
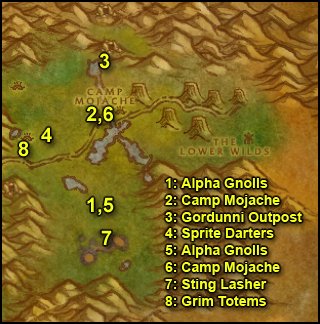
Ride southwest, to the lower wilds, you should soon encounter some gnolls. There are many camps around (71,54). Kill them until you have 10 Woodpaw Gnoll Manes.
Ride north, get back on the road and then go to Camp Mojache, do NOT turn in [42]War on the Woodpaw.
Fly to Orgrimmar and go speak to Neeru Fireblade in the Cleft of Shadow, he stands right next to the Ragefire Chasm instance portal. Turn in the quest [45]A Strange Request and get the follow up [45]Return to Witch Doctor Uzer’i.
Optional: If you did Uldaman and [47]The Platinum Discs quest, then fly to Thunderbluff and talk to Sage Truthseeker on the lower rise, close to the auction house. Turn in the quest and get the follow up [50]Portents of Uldum. Go to the elder rise and turn in the quest at Nara Wildmane and get the follow up [50]Seeing What Happens.
Hearthstone to Camp Mojache, turn in [45]Return to Witch Doctor Uzer’i, wait for him to do his little script and then get the follow ups : [47]Testing the Veesel and [50]Natural Materials.
Finally turn in [42]War on the Woodpaw, get the follow up [43]Alpha Strike, a quest timer will appear.
Start of XP Circuit:
1. Ride southwest back to the gnoll camps. You have to kill 5 Woodpaw Alpha and go back to Camp Mojache before the timer runs out. A very easy task at this level. The camps with Alpha Gnolls are at the following locations: (73,57) (72,57) and (72,56). Also kill any wandering treant on sight.
2. Once you have 5 Woodpaw Alpha kills, ride back to Camp Mojache and turn in the quest [43]Alpha Strike, get the follow up [43]Woodpaw Investigation.
Sell and repair.
3. Ride north of Camp Mojache, follow the eastern bank of the river. At the end of it you should find a path going up the mountain, that’s Gordunni Outpost (75,36). Start to explore the whole outpost, kill every ogre you find on your way, and look for the following two things:
– On the floor you should find blue glows scattered everywhere in the outpost. Look in your bags for Orwin’s Shovel and put it on a hotkey. Whenever you find a blue glow, click the shovel over it. A Gordunni Dirt Mound should appear, loot it. Keep doing this until you find 12 Gordunni Cobalt.
– The Gordunni Scroll, which can spawn at various places in Gordunni Outpost. I mostly find it in the biggest camp with the cages and the bonfire (75,30), it looks like this:
Loot the scroll and right-click it to start the quest [43]The Gordunni Scroll.
Complete those two objectives and also kill enough ogres to complete the quest [43]The Ogres of Feralas.
4. When done with that, get out of Gordunni Outpost, cross the river and go southwest to the field with Sprite Darters (70,47). Kill them until you have 10 Iridescent Sprite Darter Wings. You can go kill stuff in the Grimtotem Camp West of the sprite darters while you wait for them to respawn, in case you need to.
5. Ride south/southeast to the same gnoll camps where you killed the alpha gnolls. Go to the western alpha camp which is at (71,57), clear it and look for the Woodpaw Battle Map on top of a wooden crate. (72,56)
Click it, turn in the quest and get the follow up [43]The Battle Plans.
6. Ride back to Camp Mojache. Turn in [43]The Ogres of Feralas and get the follow up [44]The Ogres of Feralas, turn in the [43]The Gordunni Scroll and get the follow up [46]Dark Ceremony. Turn in [43]Gordunni Cobalt. Turn in [43]The Battle Plans and get the two follow ups [45]Zukk’ash Infesation and [47]Stinglasher. Turn in [45]A New Cloak’s Sheen and get the follow up [45]A Grim Discovery.
Sell, repair and restock food/drink.
7. Ride south/soutwhest to the Writhing Deep, there are two cave entrances. Go to the eastern one (75,60) and you should find Stinglasher there roaming in and out of the entrance, kill all the insects in the area until you find Stinglasher. Kill it and loot Stinglasher’s Glands.
Keep on killing every insect in the area until you have 20 Zukk’Ash carapaces.
8. Ride north/northwest to the Grimtotem Village (67,46). Kill the grimtotems there until you have 20 Grimtotem Horns.
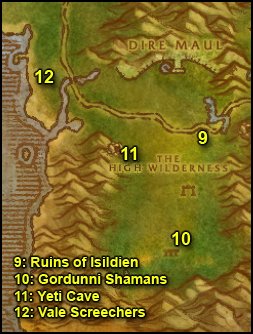
9. Get back on the main road and ride west, cross the stone bridge and shortly after to your left you should see some ogres, this area is named Ruins of Isildien (62,54). Kill ogres there until you have killed 5 Maulers and 10 Warlocks.
10. For the Ogre Shamans you will have to go much further south to the big temple at (59,73). Keep doing circles around the temple until you got 10 Shamans dead (there’s also shamans inside the building, sometimes you gotta kill the placeholders for them to respawn).
Also kill Gordunni Mage-Lords until you find a Gordunni Orb on one of them, they can be found in the same area as the shamans.
11. Go northwest to the Yeti Cave (55,56). Kill Yetis, ignore the Homing Robot OOX-22/FE for now. Keep killing yetis until you get 10 Thick Yeti Hides.
When you got 10 Yeti Hides, go to the Homing Robot. (53,55)
Now, at this point you should normally have gotten a Distress Beacon with all the stuff you’ve killed in Feralas already. If you don’t, it’s not a big deal, just go to the next step. For those who did get a Distress Beacon, right click it to get the quest [45]Find OOX-22/FE! if you haven’t already. Turn in the quest.
Don’t take the follow up if you are solo, it’s an escort quest and it’s too hard for almost every class. We will come back to Feralas later on with a couple of levels more and then you’ll be able to solo it, so don’t worry. If you are a duo or more, read the following warnings before taking the escort quest:
1st Warning: The chicken robot is stupid and doesn’t assist you all the time if you get attacked. Let him in the front so he gets the first hit. He has a decent amount of HPs and heals back to full after each fight is over. You can even eat/drink a bit after a fight and let the chicken walk in the front (not too far away though). Don’t even think about looting, you don’t have time. Don’t let the chicken tank more than one at a time, and don’t let him tank too long either.
2nd Warning: When out of the Yeti cave, the chicken will take a left turn and go towards the road, at some point 3 yetis will ambush him. Don’t panic, you can let one of the yetis be tanked by the chicken at the beginning and deal with the other 2. Just check the chicken’s health regularly. There will be a 2nd and a 3rd ambush, be prepared for them. Especially the last one is composed of 4 Gnolls.
12. Go west to the shore (you should already be there if you successfully did the escort quest), and look for Rogue Vale Screechers – those red flying snakes – you should find plenty of them at (46,47). Look into your bag for Yeh’kinya’s Bramble and put it on a hotkey. Whenever you kill a Vale Screecher, target its corpse and right click the bramble, a screecher spirit should appear, right click it and you should get a quest update. Do this 3 times.
You should be level 47 or close by now.
Level 47
Hearthstone to Camp Mojache. Get the quest [51]The Sunken Temple from Witch Doctor Uzer’i. Turn in the following quests:
- [46]The Mark of Quality, get the follow up [48]Improved Quality
- [45]Zukk’ash Infestation
- [47]Stinglasher, get the follow up [48]Zukk’ash Report
- [44]The Ogres of Feralas
- [46]Dark Ceremony, get the follow up [47]The Gordunni Orb
- [45]A Grim Discovery, get the follow up [45]A Grim Discovery
End of XP Circuit:
Fly to Gadgetzan. Sell, repair and restock food/drink (3stacks).
Set your hearthstone to Gadgetzan.

Start of XP Circuit:
1. In Tanaris ride to the southeast until you reach Waterspring Field (63,37).You will find numerous Wastewander camps there. Kill Wastewander Rogues (stealthers), Assassins and Shadow Mages. You can also find Caliph Scorpidsting, he wanders between the tower structures, so you should go kill from a tower structure to another until you find him. He has 2 stealthed bodyguards, it will be a hard fight, burn him down quickly and run away is my advice, use long cooldown abilities and potions if needed. Then go back and loot his head.
If you don’t find Caliph it’s not a problem though, it’s just some bonus XP quest, nothing important.
2. Once you got [44]More Wastewander Justice completed, go east to find a tunnel entrance at (68,41). Go through this tunnel which takes you to Lost Rigger Cove.
Now you have a lot of work to do, check the kill list of [45]Southsea Shakedown and start killing Pirates!
Clear your way south toward the main camp with the 3 houses, 2 ships ashore and the boat under construction.

3. Andre Firebeard spawns at the campfire right in the center of the camp. He has 3 Dock Workers close to him but you can pull those 3 without him if you pull the back one, then you have Andre solo. Or you can burn him down fast and run away (or take on all of them :p^^). Anyway, this place is usually crowded because it is a good grinding spot, so you shouldn’t have trouble getting help to kill Andre Firebeard if needed.
Then go inside the first house to the right when entering the camp. You might get pulls of 3 at a time inside the house, you will maybe have to use the “Kill one and run away” tactic to get to the top floor of the house if you can’t take 3 at a time. On the top floor are crates, click them to get Stoley’s Shipment.
Then keep on killing pirates until you complete Southsea Shakedown and Pirate Hats Ahoy!
Bonus: There is a rare spawn named Kregg Keelhaul on the boats ashore. Check for it.
If you find a Captain’s Key off one of the pirates, the chest is at the bottom level of the ship which is the most to the east. Another thing, while killing pirates by the dozen you might find a pirate footlocker on one of them (1% chance to drop approximately). In the footlocker you might find a note named “Ship Schedule” (You might also find the Captain’s Key inside the locker), right click it to start the quest [45]Ship Schedules, which you turn in in Steamwheedle Port for extra XP. However, you might be unlucky and never get a footlocker, so don’t worry if you miss it, it’s optional.
4. When done, get out of Rigger Cove and go north to Steamwheedle Port.
Turn in:
[45] Andre Firebeard
[45] Southsea Shakedown
[45] Stoley’s Shipment and get the follow up [45] Deliver to MacKinley
[45] Pirate Hats Ahoy!
[44] Screecher Spirits and get the follow up [47] The Prophecy of Mosh’Aru (Dungeon)
5. Hearthstone to Gadgetzan and turn in:
[44]More Wastewander Justice
[46]WANTED: Caliph Scorpidsting
Also turn in any stacks of 5 Wastewander Water Pouch at Spigot Operator Luglunket (he has a blue question mark overhead)
End of XP Circuit:
Sell, repair, restock food/drink (4 stacks).
==Note== Now would be a good time to get a group and do Zul’Farrak. Most importantly to finish the quest [47] The Prophecy of Mosh’aru. If you do, go back to Yeh’kinya at Steamwheedle Port and turn it in, get the follow up [50] The Ancient Egg. All of this is however, optional. You don’t have to do the instance. But it’s a nice exp bonus and it can be great fun. Anyway, when you’re done, go back to Gadgetzan.
In Gadgetzan, get the quests:
- [46]Gadgetzan Water Survey from Senior Surveyor Fizzledowser (he’s on a mound of earth behind the houses on the west side of Gadgetzan)
- [49]The Thirsty Goblin from Maren Noggenfogger
- [49]The Dunemaul Compound from Andi Lynn (behind the Inn)
- [50]Thistleshrub Valley from Tran’Rek
Start of XP Circuit (without the optional step):
1. Ride west to the pool of water by the Sandsorrow watch (38,29). Stand by the western tip of the pool and get full health/mana. Search your bag for a black vial named “Untapped Dowsing Widget” and right click it. Two level 48 insects will pop and attack you, kill them or run away from them. It doesn’t matter.
2. Go east back to Gadgetzan. Talk to Senior Survery Fizzledowser and get the follow up [47]Noxious Lair Investigation.
You should be level 48 by now or close.
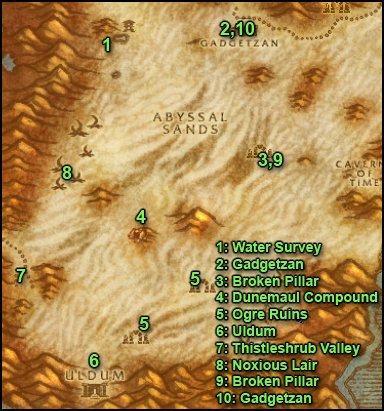
Level 48
3. Go south to the area named “Broken Pillar” (52,45) and talk to Marvon Rivetseeker. Turn in [51]The Sunken Temple and get the follow up [51]The Stone Circle. Also get [48]Gahz’ridian.
4. Go west / southwest to the Dunemaul Compound and clear a path to the cave there (40,56). In that cave you’ll find Gor’marok the Ravager, kill him.
5. Go southeast to the Eastmoon Ruins (48,64) (yes, even if you didn’t finish [49]The Dunemaul Compound yet.) Start killing ogres there and look on the floor for Gahz’Ridian pieces. They look like white upside down plates. Kill ogres in that camp until you got 30 Gahz’Ridian Ornament. If it’s too crowded, there is another camp similar to this one further to the southwest named “Southmoon Ruin” (41,72). When you got 30 Gahz’Ridian ornaments you should also be done with [49]The Dunemaul Compound. If not, kill some more ogres!
6. Optional: If you went to Uldaman and did the quest [47]The Platinum Discs, go southwest to Uldum (38,79). The Dune Smashers have a small aggro range, you can hug the left wall and reach the Stone Watcher of Norgannon, just be careful of the one roamer. The Stone Watcher of Norgannon is at (37,81). Click the Uldum Pedestal under him and get the follow up, then talk to the Stone Watcher of Norgannon who just appeared on the pedestal. Go through his dialogue and you will complete the follow up. Then click the Uldum pedestal again, complete the quest and get the follow up [50]Return to Thunder Bluff.
7. Go west (northwest if you went to Uldaman) to Thistleshrub Valley (28,67). Kill Gnarled Thistleshrubs and Thistleshrub Rootshapers until you get 8 kills of each. Also kill Thistleshrub Dew Collectors until a Laden Dew Gland drops (rare drop).
8. Go north to the Noxious Lair (31,51). Kill Centipaars there, Stingers, Wasps, Tunnelers.. until you get 5 Centipaar Insect Parts.
9. Ride east to Broken Pillar and talk to Marvon Rivetseeker, turn in [48]Gahz’ridian.
10. Hearthstone back to Gadgetzan.
In Gadgetzan turn in:
- [49] The Thirsty Goblin at Marin Noggenfogger, get the follow up [49] In Good Taste.
- [49] The Dunemaul Compound at Andi Lynn
- [50] Thistleshrub Valley at Trank’Rek
- [49] In Good Taste at Sprinkle, get the follow up [49] Sprinkle’s Secret Ingredient
- [47] Noxious Lair Investigation at Alchemist Pestlezugg
Get the quest:
[48]The Scrimshank Redemption from Senior Surveyor Fizzledowser.
End of XP Circuit:
==Note== This circuit should have yielded much better results, because I got slowed down a lot at the ogre camps and in thistleshrub valley, which were both extremely crowded.
If you didn’t do the Uldaman instance, skip to the next paragraph. If you did Uldaman, fly to Thunder Bluff. Go to the Elder Rise and find Nara Wildmane, turn in [50] Return to Thunder Bluff, get the follow up [50] A Future Task. Now find Sage Truthseeker (35,48), he is on the Lower Rise, directly west of the wyvern tower. Turn in the quest.
Fly to Orgrimmar, sell, repair, restock consumables.
Visit your class trainer.
Go to the Darkbriar Lodge, find Uthel’nay, a troll standing inside the mage building and turn in [47]The Gordunni Orb.
Go to the drag, take the stairs to the left immediately after entering the drag and keep going until you see a yellow question mark on your minimap, go there to turn in your quest [48]Zukk’ash Report.
While you are in the drag, go find Dran Droffers, he is in the house named “Droffers and Son Salvage”, which is close to the path to the Valley of Honor. Get the quest [48]Rippled Recovery from Dran Droffers, turn it in at Malton Droffers and get the follow up [48]Rippled Recovery.
Go to the Valley of Honor, find Belgrom Rockmaul (75,34), he’s standing infront of the battleground masters’ building. Turn in [45]A Grim Discovery.
Leave Orgrimmar, take the Zeppelin to the Undercity.
In the Undercity go to the Magic Quarter, find Oran Snakewrithe, she stands next to some bookshelves close to the inner circle of the Undercity (73,33). Get the quest [47]Lines of Communication.
Fly to Tarren Mill, Hillsbrad Foothills.
Ride southeast to the pass which leads to the Hinterlands (84,32).
Ride northeast to enter the Hinterlands.

1. Our first stop is Shindigger’s Camp. To access it, you must go directly east of Aerie Peak, follow a small path while staying close to the mountain to your left, just be careful not to aggro the Aerie Peak guards. You will find Shindigger’s camp at (26,48).
Talk to Gilveradin Sunchaser and get the follow up [48]A Sticky Situation.
Ride south to get off the cliff, then east. Whenever you find an owlbeast on your path, kill it, loot it then target the corpse and right click the Wildkin Muisek Vessel, which you should have in your inventory, put it on a hotbar.
Keep going east while doing that. You can stop once you have 10 Wildkin Muisek.
2. Mount up and go east/northeast, along the river until you reach the waterfall named The Overlook Cliffs (79,48).
Aim for the water down there and jump, you won’t take any falling damage if you hit the water first. Dive and look for Cortello’s Chest at the bottom of the sea, close to where the waterfall hits the bottom.

Click it and turn in the quest for 8800 xp and a 14-Slot bag.
3. Swim south and get back on dry land. Ride south along the shore. and keep going until you find Revantusk Village (77,77).
Get ALL quests beside [51] Wanted: Vile Priestess Hexx and Her Minions, [51] Job Opening: Guard Captain of Revantusk Village, [50] Separation Anxiety, [51] Kidnapped Elder Torntusk! and [50] Dark Vessels.
Get the flight path at the end of the pier.
Sell and repair, restock food/drink (4 stacks, very long circuit)
Start of XP Circuit:
1. Go north of Revantusk Village, kill Saltwater Snapjaws, 15 of them. At the same time look for Gammerita, a level 48 named turtle that roams the shore. Kill her as well.
2. Go up the path at (77,61).
3. Once you are up, go north towards Shaol’watha (73,54).
** Kill any silvermane stalker – they are stealthed – and silvermane howler you find on your way from now on. To find the stalkers easily, I suggest to turn the sound on, you should hear the stealth sound effect everytime a wolf is nearby, then use the tab key while looking around to find it. **
At Shaol’watha, look around in the ruins to find Slagtree’s Lost Tools. They look like this
They can spawn at various locations though, so if you don’t find them, move on, we’ll find them in the other camps.
4. Kill all the trolls you find in and around the wooden bunker just slightly north of Shaol’watha.
There’s another bunker just northwest of this one, go there and clear it.
5. Southwest of that bunker is a forest area (60,50) with 3 types of monsters we need to kill:
– Savage Owlbeasts
– Silvermane Stalkers
– Razorbeak Skylord (kinda rare)
Kill everything in a wide radius in that area. If you run out of things to kill, move on to the next step, we’ll come back later to that “forest area”.
6. Go north to Skulk Rock (58,43). Clear the slimes and go to the top of this mound, look amongst the ruins for Slagtree’s Lost Tools. Don’t worry if it’s not there, we’ll check the other areas.
7. West of Skulk Rock you should find another of those wooden bunkers (54,40), clear it.
8. Go west to Agol’watha (46,40), clear the Oozes and look for Horde Supply Crates.
Keep doing this until you have 10 Hinterlands Honey Ripples. One of the crates can sometimes be found outside ot the ruins by the lake.
Also look for Slagtree’s Lost Tools if you don’t have them already. They should be by one of the abandoned huts. If you don’t find them here it means you must have missed them, so you will have to check the other camps – Shaol’watha and Skulk Rock – again when you get close to them later on.
You should be level 49 or close by now.
Level 49
9. Go west to Quel’danil lodge (34,48), make sure you kill any Silvermane Howler that crosses your path.
Don’t enter the lodge yet, go behind it to the western corner of it. Kill every Highvale on your way. Next to a well you should find the Highvale Notes (30,49).

Right-click them once to burn them.
North of the well, under a gazebo structure you should find the Highvale Report (29,46), burn it.
Now go to the lodge, enter by the main gate. Clear the way to the end of the eastern wing, and you should find the Highvale Records on the floor next to some barrels (32,47). Burn them.
Inside the lodge you should also find a caged troll with a quest, Rin’ji. Before you take his quest – which is an escort quest – clear as much as possible and as fast as possible in front of the lodge. Get full HP/Mana, make sure your long cooldowns are up, then start the quest.
Note: Rin’ji doesn’t tank too bad and you can heal him.
After Rin’ji passes the arch right outside the lodge, he’ll get ambushed by 3 elves. This shouldn’t be a problem if you cleared the area before starting the quest. Let Rin’ji tank one of the 3 elves and take out the 2 others fast.
Then comes the harder part, Rin’ji will go through the woods and at some point 3 other elves will attack him, however this time you’ll most likely have one or two adds, an owlbeast or a wolf.
This is when you use all your cooldowns. Let Rin’ji tank one and kill the rest as fast as you can.
After that, Rin’ji will walk to the road and you should get a quest complete message.
Go back to Quel’danil Lodge and kill all the elves you still need to complete [48]Message to the Wildhammer.
10. Go turn in the quest [48]A Sticky Situation at Shindigger’s Camp (27,48), the only way to get there is through that path you took earlier, east of Aerie Peak. Get the follow up [48]Ripple Delivery.
11. Ride southeast to Valorwind Lake (40,61). Dive down and look for a mushroom named “Violet Tragan“. Righ-click it and loot it. Warning: Don’t eat the violet tragan, let it in your bag.
12. Go southeast to the Altar of Zul (48,67), kill every troll in the area, but avoid the top of the Altar, there are 2 level 50 mobs you might not be able to handle. Stay in this area until you have 10 Vilebranch Soothsayer kills (we’ll get the Scalper kills elsewhere).
13. Go northeast, kill any Silvermane Howler on your way, you should find plenty in this area. So stick around and kill stuff in this area till you have 10 silvermane howler kills.
14. Go further northeast to the “forest area”. Kill any Savage Owlbeasts, Silvermane Stalkers and Razorbeak Skylord you find.
15. When the “forest area” is clear, go northeast to the troll bunkers of Shaol’watha (65,45), it does NOT matter at this point if you still miss some Savage Owlbeasts / Silvermane Stalkers kills or if you still lack the Skylord Plume from Razorbeak Skylords. We will kill more when we come back to the “forest area” again.
Clear both bunkers, you should be done or almost done with the 15 Vilebranch Scalper kills. If you’re not done just go back and forth to the “forest area” and the bunkers until you got 15 scalper kills.
At this point, you should be done with all the Hinterlands quest besides (maybe)[48]Hunt the Savages, (maybe) [48]Stalker the Stalkers and [49]Lard Lost his Lunch. We will finish those three in the next circuit.
16. Ride to the Waterfall (80,48) and jump down into the water.
17. Swim northeast to an island with a few trees on it (84,41). Somewhere on the island you should find Lard’s Picnic Basket.

When you click the basket, 2 level 49 trolls will spawn. You don’t have to kill both, just one is enough, they can all drop Lard’s Lunch. It’s actually quite easy to get one solo. You just have to run away until 1 of them give up and then kill the 3rd. Levitate or water walking makes this easier of course, but its not necessary. Here is a short video of how I did it:
Lard’s Lunch Video
==Note== It used to be 3 trolls back then, they’ve changed it down to 2 trolls, so the video is kinda irrelevent now, because most classes can just kill 2 trolls easily I suppose. I’ll still let the video in for the fun factor and the memories!
18. Swim south back to the main land, after a little walk you should see another isle off shore, with a stone arch on top of it. Swim to that island (86,59). On top of that island you should find a big tablet labelled “Rin’ji’S Secret“, righ-click it, turn in the quest and get the follow up [47]Rin’ji’s Secret.
19. Swim back to the shore and ride to Revantusk Village.
Turn in all the quests and get all other quests available beside [48p] Another Message to the Wildhammer.
End of XP Circuit:
Sell, repair and restock consumables (3 stacks).
You should be level 50 by now or close (If you turned in the Silvermane Stalkers and the Owlbeast quest). If you are, fly to Undercity and zeppelin to Orgrimmar to train if you wish, then come back.
Start of XP Circuit:
Ride back up and go to the forest area again, kill the last remaining Silvermane Stalkers and Savage Owlbeasts you need.
At this point, you should have the OOX-09/HL Distress Beacon unless you are really unlucky – like I was on the rogue – so what you can do is grind for a while on the elves at the Quel’danil Lodge or on the trolls at the Alter of Zul, or anywhere you like in the Hinterlands. Any monster in the zone can drop the beacon, but it’s a 1% chance. So if you really don’t feel like grinding, don’t bother and move on to the next part of the guide. However, keep in mind that if you finish the 3 distress beacon quests (Tanaris, Feralas and Hinterlands), a huge xp reward awaits you at the end.
If you got the Distress Beacon OOX-09/HL, go to the lake northwest of Skulk Rock and find the Homing robot there (49,37). Turn in the quest. Before you accept the rescue quest, here is what you must know:
1. This quest, unlike the Feralas one, is more likely to be done solo. It’s still not a walk in the park of course. So if you got a partner to duo it, all the better for you.
2. Let the chicken run in front of you, let it get the first hit. If it’s not getting hit, it won’t fight back. Sometimes mobs are actually chasing the chicken and failing to get a hit on it, so they give up.
3. You’ll have to face 2 ambushes of 3 mobs each, make sure you are full health/mana and with long cooldown abilities up when you start the escort. When the 3 ambushers attack, stand back until the chicken gets hit. Then let the chicken tank one of the 3 adds, deal with the 2 others as quick as you can, then help the chicken finish off the 3rd add.
One you have successfully escorted the robot chicken, go back to Revantusk Village. Turn in [48]Hunt the Savages and [48]Stalking the Stalkers.
This should make you ding level 50 if you weren’t level 50 already before.
Level 50
Repair and get ready for a semi-long circuit.
Mount up and ride to Jintha’Alor (66,64), using the passageway from before. Start killing everything on the way and clearing to the top of the temple. There is nothing you need on the first two floors, so skip as much as possible. On the third floor you’ll start to find the trolls you need for [51] Job Opening: Guard Captain of Revantusk Village (Vilebranch Berserkers), so kill as many as you can find while also searching for shimmering kettles called “Vessel of Tainted Blood†(Next to the Vilebranch Shadowcasters). Loot them and kill 10 Berserkers in total (so you don’t have to come back later). On the 4th floor you’ll find Vilebranch Shadowhunters, kill five of them and search for more vessels. Go up to the 5th floor and kill 5 Vilebranch Blood Drinkers (you should also be able to find some souleaters). On the left side of the stairs, you should see a pit with oozes. Fight your way through to the heart of the pit where you should see a pile of bones. Loot the pile.
Go further to the next stairs (you should be able to find a few more Blood Drinkers and Vessels). Go up to the next floor and go right (while getting the rest of the Blood Drinkers / Soul Eaters / Vessels you need) until you see an altar with a troll lying on it.
Don’t go down into the pit yet but go around it until you see a stone gate with a path leading to the other pair of stairs and a cave. Follow that way until the very end where you should see an area shielded by stone walls (there should be two more of those on your way). You should see wolves in there. Kill them and loot the pile of bones inside.
Go back to the big stone pit with the quest npc. Clear your way into the pit and check next to the altar, there should be Vile Pristress Hexx (If she isn’t there, she roamed into the cave but she’ll come back). Single pull and clear as many trolls in that altar area as possible. The priestess casts an annoying polymorph spell, which doesn’t break on damage, so watch out for that, try to interrupt it and burn her down quick. When you are full mana pull the priestess. Kill her then turn in your quest at Elder Torntusk and get the follow up [51] Recover the Key!.
Now comes a rather difficult part, if you are confident that you can handle 3 mobs alone you can proceed solo, if you think you’d have difficulties, try to group up with someone. Go inside the tunnel behind the altar and fight your way through to the southernmost tip of the tunnel structure. There you should see Hitah’Ya the Keeper patrolling with two guards. Get full mana/hp. The trick here is to use crowd control (if you have, like ice trap, sheep, sap) and at the same time burn down Hitah’Ya as fast as possible (she has very little HP). Also pop your cooldown skills to burn down one of the guards as fast as possible. Once that is done you just need to deal with the other guard. Loot Hitah’Yah.
==Note== For those who have the quest [50] The Ancient Egg, don’t forget to loot the egg, it is in the same room as Hitah’Yah. And go turn in the quest whenever you get close to Tanaris. The follow up is a Sunken Temple quest, which you should take if you plan to do this instance.
Go back to the altar.
Turn in [51] Recover the Key! at Elder Torntusk and get the follow up. Now time for a suicide run. Mount up and jump down from terraces to terraces, if you survive, great! If you die, that’s great too! Just release your spirit and take the spirit raise. Go back to Raventusk Village.
Turn in all your quests (grats on the extremely fat loot).
Fly to the Undercity, go to the Magic Quarter and turn in the 2 following quests at Oran Snakewrithe:
[47]Lines of Communication
[47]Rin’ji’s Secret
Another quest will be up, you can turn that one in right away too.
Hearthstone to Gadgetzan.
Turn in [49]Sprinkle’s Secret Ingredient, get the follow up [49]Delivery for Marin. Turn it in at Marin Noggenfogger on the other side of the town. Take his follow up, wait 5 seconds and turn it in.
End of XP Circuit:
Now you’ll be able to buy Noggenfogger Elixir from Marin as much as you want.
(Kudos to the original artist, whose name I don’t know unfortunately)
Sell, repair, buy 3 stacks of food/drink.
Go south to the Gaping Chasm (56,61), clear yourself a path through the insects southwards until you find the entrance spiralling down at (55,70). Take the 2nd tunnel you see when going down the spiral, the one going north (55,69). Inside the tunnel at the first fork go right. Then go through the circular room. After the circular room at the first fork go right. You will enter a big square room. The Scrimshank’s Surveying Gear (55,71) is at the western corner of the square room.
Loot it and then go back the way you came from, then go north until you are out of the Gaping Chasm.
If you don’t have the Tanaris Distress Beacon, go back to Gadgetzan.
If you do have the Distress Beacon for Tanaris:
Go east and inside the mountain at (60,64). You will find the Homing Robot OOX-17/TN there. Turn in the quest. Get full health/mana, refresh buffs. Check if your long cooldown abilities are up. For some classes this will be hard to solo, so if you don’t manage it better find someone to duo it with. If you don’t manage that, just abandon the escort quest, it’s optional anyway.
Things to know about this escort quest:
1. Let the chicken in front, let him get hit first. Sometimes mobs will aggro him but not manage to hit him while he walks and they will just give up.
2. The first part of the escort is the hardest as you will run into lvl 46-47 mobs. And at some point you will get an ambush of 3 level 46 scorpions. Use your long cooldown abilities there. After this, it gets easier.
3. Later on you will get a 2nd ambush, 3 humanoids lvl 42 (green). One will be a shadow mage though, kill it first.
Ride back to Gadgetzan, talk to Senior Surveyor Fizzledowser and get the follow up [48]Insect Part Analysis.
Go talk to Alchemist Pestlezugg, get the follow up and get back to Surveyor Fizzledowser. Turn in the quest and get the follow up [49]Rise of the Slithid.
You should be level 51 by now.
LEVEL 51 — End of Chapter III
I hope you enjoyed this guide. If you want to return the favor, please try to contribute.
– Original guide: Jame
– Revamp & Picture editing & Text formatting: Snowflake
– Picture editing: Subere
© www.wow-pro.com All Rights Reserved