 by Jame
Jame’s Alliance Leveling Guide – Chapter V (65-70)
Introduction
This guide is made for FAST leveling through the use of Optimized Quest Circuits. With this guide, questing will be very efficient and you’ll not waste any second running around and trying to figure out in which order to do your quests. Follow each instruction carefully and you will see for yourself. The quest choices and order to do them are optimal so that you run as few as possible while doing the most possible, turning several quests at the same time. It will be like grinding, because you’ll be killing stuff almost non-stop, besides you’ll also be completing a bunch of quests at the same time!
Everything described in this guide can be done solo (beside when I say otherwise). You can, of course, follow this guide while duoing, grouping, it’s not a problem, it works too.
DISCLAIMER: This guide does NOT take into account tradeskills, class specific quests or PvP. It’s 100% focused on getting the most experience possible in the shortest possible time while doing a lot of quests and enjoying as much content as possible. Any race/class combination can do this guide. Any complaints about PvP, tradeskills, or class specific issues will be ignored.
Basic rules
- Spend your talent points so that you kill things as fast as possible. (e.g: Priest should specialize in Shadow Talents, Warriors in Arms/Fury, etc.
- Don’t waste your time trying to find groups for questing, you can solo everything that is described in this guide unless I say otherwise. Only group with someone when it’s not gonna be a waste of time (e.g: meeting the person at the other end of the zone to show him the way to where your quest is, that is a waste of time)
- Try to always log out in an inn or in one of the major cities when you take a break.
- When I say you should make an inn your new home location, it’s for a good reason, and it will save you much time.
Useful Addons
To get the most out of my guide, you should get an addon which displays coordinates, because I use them to describe locations in my guide (x,y). You can use any addon you like, but here’s a very simple one I use.
Recommended
- DMiniCoords – A simple box which displays coordinates, left-click it to move it where you like.
Optional
Below is a list of other addons I use, this is 100% optional though, it’s mostly for people who are curious to know which addons I use:
- Bartender4 – A great action bar addon.
- X-Perl UnitFrames – Very nice, highly customizable unit frames.
- Quartz – The best casting bar addon out there, imo.
- Scrolling Combat Text – I just don’t like the default UI Floating Combat Text.
Side Note: In case you don’t know how to install add-ons, simply download an addon from one of the links above and unzip it. Then drag the unziped folder in your Addon folder (full path is c:\Program Files\World of Warcraft\Interface\Addons). Then, restart World of Warcraft and it should be working.
If it isn’t working, you might need to log out to your character selection screen and click on “Addons” in the lower-left corner. Tick the box that says “Load out of date Addons”. Re-launch WoW.
Level 60-70 XP Curve Changes
As of patch 3.0, it takes much less XP to level from 60 to 70. That means you will probably ding much faster than what my guide says. That’s not a problem at all though, just keep following the guide normally. I strongly recommend achieving level 70 before going to Northrend, I’ve explained many times why on my blog. In a nutshell, it’s much more efficient and easy to go to Northrend at level 70. You’ll level faster that way and also get more gold. I actually recommend going until the very end of my Outland guide before moving to Northrend, even if that means going there at level 71 or 72. That’s if you want more gold. However it’s up to you, going to Northrend at level 70 is fine too, you’ll just get less gold in the end.
Color Code
- Quests
- Items
- Locations
- Quest objectives to kill
- NPCs
- Locs
The Guide
Level 65
If you followed my previous chapter you should be level 65 and your quest log should look like this:
Go north to Lower City and find Oloraak (58,16), get his quest [69]Can’t Stay Away.
Aldors: Get the quest [64] A Cure for Zahlia from from Sha’Nir (64,15) in Lower City.
Both:
Fly to Allerian Stronghold, turn in:
- [64]What Are These Things?, get the follow up [64]Report to the Allerian Post.
- [63]Vessels of Power
1. Ride northeast to Allerian Post (70,44), turn in:
- [64]The Firewing Liaison
- [64]Thinning the Ranks
- [64]Report to the Allerian Post, get the follow up [64]Attack on Firewing Point
2. Go directly north and you should soon reach Firewing Point (70,39). Kill Blood Elves there until you complete [64]Attack on Firewing Point.
3. Once you have completed [64]Attack on Firewing Point, go northwest of firewing point and look for Ironjaw (69,32), a named wolf which roams in the area shown on the map. Just kill stuff in the area while looking for him. Kill Ironjaw and loot Ironjaw’s Pelt.
Aldor: Also look for Stonegazer, an elite basilisk, which will be quite hard to solo for most classes, as he is immune to movement impairing effects (snares and roots), to fear and to blind. However, he can be stunned and hibernated. Clear the area around to make sure you don’t get any adds.
If you can’t solo it, try to find someone to duo [64] A Cure for Zahlia with you. If you don’t find help, just go to the next step, but keep asking for help regularly, we will stay near this area in the next few steps.
4. Go back to Allerian Post, turn in [64]Attack on Firewing Point, get the follow up [65]The Final Code.
5. Go back to Firewing Point. Clear the way to the northeastern building (74,36), it’s the building with the highest tower. You should find Isla Starmane in it. But for now ignore her.
Go to the top of the tower and kill Sharth Voldoun, loot The Final Code. Use the orb of translocation and you should be back in the room with Isla Starmane. When you’re full HP/mana, start her escort quest [64]Escape from Firewing Point. It’s easily soloable, just make sure you stay behind Isla and let her get attacked first or sometimes she might just walk past you and not help you.
6. Clear the way to the mana bomb
Kill the 4 warlocks around it, right-click the mana bomb and watch it explode.
Aldors: Now is your last chance to find and kill Stonegazer. If you can’t, abandon the quest [64] A Cure for Zahlia and save it for level 70.
Scryer: Grind in the area until you have 10 Firewing Signets.
7. Ride back to Allerian Stronghold. Turn in:
- [65]The Final Code, get the follow up [63] Letting Earthbinder Tavgren Know.
- [64]The Elusive Ironjaw
- [64]Escape from Firewing Point
Sell junk and repair.
1. Exit Allerian Stronghold by the southwestern gate. As you exit the woods you should find a few Infested Root-Walkers and Rotting Forest Ragers (52,58). Make sure you kill the wood mites which spawn after you kill each treant. Stay in the area until you finish [65]The Infested Protectors.
==Note== Don’t forget to pick up Restless Bones on the way!
2. Go northwest and find a named vulture called Trachela at (43,51). She is immune to movement impairing effects but still an easy kill. Kill her and loot Trachela’s Carcass.
3. Head west to the Refugee Caravan and turn in [65]The Infested Proctectors.
4. Ride west/southwest to Veil Rhaze (28,56). Kill what’s on the list for [64]Veil Rhaze: Unliving Evil.
Start looking for players interested in doing [65]Torgos!
Most classes can’t solo this one. It’s a level 65 Elite bird, immune to movement impairing effects and hits for 800 on cloth. It should be manageable to duo it for most class combos.
While you look for help, you can go grind at the Shadowtomb northeast of there.
Once you got a group for [65]Torgos!, go back to Veil Rhaze and find a big scarecrow named “Torgos’s Bane” (27,56). Use Trachela’s Carcass next to it and Torgos will attack you. Kill Torgos and loot his tail feather.
If you can’t find help for Torgos, just abandon the quest, it’s not a big deal.
5. Go northeast to the Shadow Tomb (32,53), enter it. Go to the western room first, clear it and find a cabal chest
Loot the Gavel of K’alen.
Go to the eastern room, clear it, find the cabal chest and and loot the Drape of Arunen.
Go to the northern room, clear till the end of it, find the cabal chest and loot the Scroll of Atalor.
Now go back to the entrance of the northern room, where Akuno should be. When you are full HP/Mana, take his quest [64]Escaping the Tomb.
Always stay behind Akuno and let him take the first hit to make sure he engages the mobs. He can pretty much solo mobs as long as they are only one on him at a time. There will be 2 ambushes of 2 mobs during the escort, and once you defeat the 2nd one, Akuno will start running towards the caravan, so be ready for that.
6. Go back to the Refugee Caravan. turn in:
- [64]Veil Rhaze: Unliving Evil, get the follow up [64]Veil Lithic: Preemptive Strike.
- [64]The Shadow Tomb
- [64]Escaping the Tomb
7. Head southwest to Veil Lithic (26,71). Remember to gather bones on the way. In Veil Lithic, look for Cursed Eggs:
Keep opening eggs until you are done with [64]Veil Lithic: Preemptive Strike.
8. Go southeast to Sha’tari Base Camp (31,76). Get the following quests:
- [65]An Improper Burial
- [66]The Dread Relic
- [65]Taken in the Night
And lastly take the escort quest: [65]Digging Through Bones. Follow the dwarves and protect them till you complete the quest, it’s very easy.
Go back to Sha’tari Base Camp, turn in the escort quest and get the follow up [65]Fumping.
9. If you still need Restless Bones to complete [65]Recover the Bones, go get them now.
When you got them, go to Auchindoun, enter through the west gate (33,66). Go up the stairs and to the left, drop down from this point (36,64) very carefully so you don’t die from falling damage.
10. Once you are down, enter the lower western gate.
Get the quest [67]I See Dead Draenei from Ha’lei. Go to Ramdor the Mad and turn in:
- [67] I See Dead Draenei, get the follow up [67] Ezekiel
- [65] Recover the Bones, get the follow up [65] Helping the Lost Find Their Way
11. Go to the lower eastern gate and find Isfar (44,65), turn in [69]Can’t Stay Away, don’t get the follow up.
Hearthstone back to Shattrath. Sell junk and repair.
Aldor: Go turn in [64] A Cure for Zahlia at Sha’nir (64,15), on the northern side of the Lower City.
Scryer: Go to the Scryer’s Tier, get the quest [65] Firewing Signets and turn it in.
Both:
Now you need to find Ezekiel, he walks clockwise on the outer terrace of Shattrath city, so just move anti-clockwise and you’ll find him soon. Turn in [67] Ezekiel, take the follow up [67] What Book? I Don’t See Any Book.
Now look for help to do this quest. You have to beat up 3 npcs in the westernmost part of Lower City in Shattrath (43,29). Most classes can’t solo this (I soloed it with frost mage and warlock, couldn’t with warrior and rogue), so try to find help, it shouldn’t be difficult considering the amount of people who hang out in Shattrath.
Once you got some help, go find Dirty Larry and talk to him, he will become attackable and about 10 seconds later he and his 2 friends will attack you.
My advice is to polymorph, trap, sap or fear larry while killing his 2 friends, they are easy.
Then kill larry, he is elite, hits quite hard and has a lot of HP, so I suggest kiting him unless you have a healer.
If you can’t polymorph or something similar, I suggest burning larry down fast. As soon as he is down to 1% they will all stop attacking you.
==Note== If you can’t find help to do this quest, just move on and try again later everytime we make a stop by Shattrath.
Turn in the quest [67] What Book? I Don’t See Any Book and get the follow up [67]The Master’s Grand Design.
1. Exit Shattrath by the eastern gate and follow the road till you find Earthbinder Tavgren. Turn in [63] Letting Earthbinder Tavgren Know.
2. Go southwest to the Refugee Caravan. Turn in [64]Veil Lithic: Preemptive Strike, get the follow up [65]Veil Shalas: Signal Fires.
Go to the western edge of the caravan, just at the point where the subzone changes to “The Bone Wastes” (36,51).
Use your Fumper and a gnome or a Sifter should spawn. Get closer to the guards and they should help you kill them. If it’s a gnome, just let the guards kill them, they give no xp and no loot. If it’s a Sifter, just make sure you do more damage than the guards or you won’t be able to loot them.
Rinse and repeat until you got 8 Mature Bone Sifter Carcass.
==Note== From now on while in the bone wastes, kill all Lost Spirits or Broken Skeletons on sight, until you have 10 of each.
3. Head south/southwest to Sha’tari Camp. Turn in [65] Fumping, get the follow up [65] The Big Bone Worm.
4. Go east and use your Sha’tari Torch to burn those Draenei corpses until you finish [65] An Improper Burial.
Go back to Sha’tari Camp, turn it in and get the follow up [65] A Hero is Needed.
5. Head east while killing Auchenai Initiates and Doomsayers. You don’t need to finish the quest linked to them already, we’ll pass by this area again. Keep going east until you find the Derelict Caravan (44,76). Look for a big chest labelled “Massive Treasure Chest“.
Clear the area around the chest, there are many invisible ghosts nearby. When you right-click the chest, you will loot the relic and about 30 zombies will spawn and attack you. They got about 500HP, so if you got any AoE abilities it’s easy to take them all down. If you don’t, you can just run away, all that matters is that you looted the dread relic.
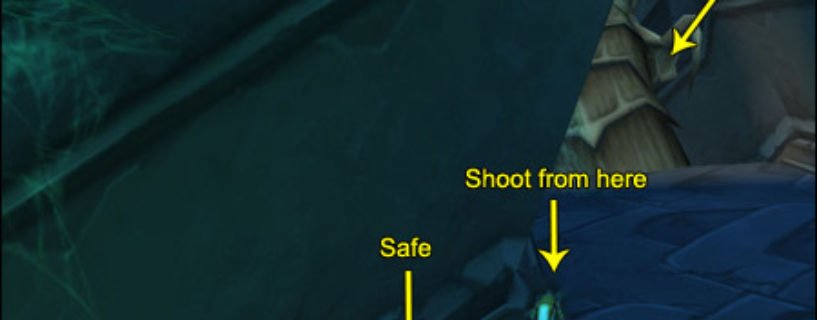
6. Go north and find the entrance to the eastern tunnel of Auchindun (44,73). Read this whole paragraph before you do anything.
We’re gonna solo the elite quest [63] The Big Bone Worm, which is impossible, but there’s a trick. Here’s how:
- Find a decrepit clefthoof, kill it.
- Use your Fumper on it, if two bone worms spawn just run away, they don’t give exp and they’ll despawn eventually. If three gnomes spawn, you have to kill them, they don’t give up and you can’t run away from them, sadly.
- Keep doing this until the elite worm Hai’shulud spawns. When he spawns, run to the tunnel mentioned above, go down the first slope and turn at the first corner. You should be safe if you position yourself like on the screenshot below:
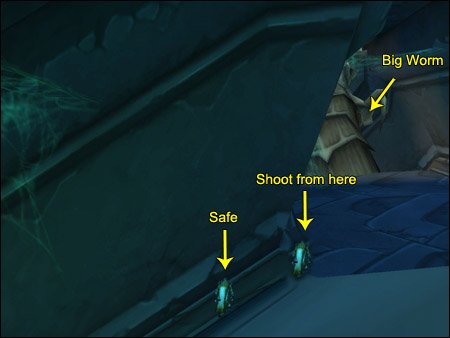
Now try to hit the worm with ranged attacks every now and then, playing with line of sight to avoid getting hit by his poison bolts. Healing yourself / bandaging yourself also helps to give you the credit for the kill. I’ve done it many times sucessfully with the worm still being at 99% HP from simply throwing daggers with a rogue. I bandaged twice and used a health pot, that was enough. After about 2 minutes he will die automatically. Loot the “Enormous Bone Worm Organs” off him. Well done.
==Note== You can also check how it’s done on this video, made by Ahrinule from Zul’Jin.
7. From the tunnel, go east/southeast until you find Vindicator Haylen (50,76). Get his quest [65]For the Fallen.
8. Go east to Netherweb Ridge (52,77). Kill spiders and Netherweb Victims to free Sha’tar Warriors. When you’re done with both quests, go back to Vindicator Haylen, turn in [65]For the Fallen and get the follow up [65] Terokkarantula.
9. (Optional) Many classes cannot solo Terokkarantula, because this spider is immune to movement impairing effects and to fear. She can be stunned though. So if you can solo her or got someone to help you, go to the south eastern tip of the forest and you’ll find Terokkarantula there (53,81). If you can’t find help and can’t solo her, just abandon the quest and come back to do it at level 70. It’s about 20000xp worth of quest exp, so that’s a nice sum of cash at level 70. If you kill Terokkarantula, go back to Vindicator Haylen, turn in the quest and get the follow up [65] Return to Sha’tari Base Camp.
10. Go northeast, you should find a bird named Skywing at (54,72). Rebuff and get full HP/mana before you take his quest, it’s an escort, and the nice thing about this escort is that you do 75% of the [65] Veil Shalas: Signal Fires quest.
==Note== If you’re having troubles to solo it, try to find a partner, but it’s definitely soloable if you are careful about two things:
- Let Skywing infront so he takes the first beating. He has quite a lot of HP so you can actually eat/drink while he starts killing stuff, just make sure you always stay relatively close to him though.
- When up the tree house, do NOT fight with your back close to the edges, because some of those birdmen knockback, and if you get kicked off the tree house you’ll fail the quest for sure and you might also die.
With that in mind, let’s get started. Once you’re ready, take the quest [65]Skywing.
While following Skywing, turn off the fires when you get near them. The first fire is called “Bloodstone Signal Fire“.
The 2nd fire is called “Violet Signal Fire“.
This is when it gets a little more difficult.
Skywing will jump down to a lower platform, follow him across a bridge and shortly after he’ll stop and Lunga the Imprisoner will spawn and attack him. Lunga is elite and immune to movement impairing effect, but he doesn’t melee hard. Make sure you interrupt his “Piercing Armor” ability and let him cast his chain lightnings, they don’t hurt as much as his melee. If you burn him down quick you should be ok. Use a potion if needed.
After that, the escort quest should be complete and right next to where you fought Lunga you should find the 3rd fire: “Emerald Signal Fire“.
While standing next to the emerald signal fire, if you face directly north you should see a rock. Mount up and jump on it, then from this rock you can jump to the next treehouse further north. On the lower floor of this treehouse you can find the last brazier: “Sapphire Signal Fire“.
Once you’ve extinguished all 4 fires and successfully escorted Skywing, get down the platform, take the northern path leading down and exit Veil Shalas.
No map needed for the rest of this circuit, you already went to those locations at least once.
11. Ride southwest and then west back towards Sha’tar Base Camp. Kill stuff on the way until you finish [65]A Hero is Needed and [65]Helping the Lost Find Their Way.
In Sha’tari Base Camp turn in:
- [65] Taken in the Night
- [65] A Hero is Needed, get the follow up [65]The Fallen Exarch
- [65] The Big Bone Worm
- [66] The Dread Relic, don’t get the follow up. I recommend saving that quest for level 70 unless you really want the quest rewards now. Most classes can’t solo this quest at this level.
- [65] Return to Sha’tari Base Camp (that one was optional)
12. Go north to Auchindoun, enter through the west gate (33,66). Up the stairs you should see a chest called “Auchenai Coffin“. Kill the 4 Auchenai Death-Speakers around it then get close to the coffin and click it. A Reanimated Exarch will spawn, kill it.
13. Go back to Sha’tari Base Camp, turn in [65] The Fallen Exarch.
14. Ride to the Refugee Caravan, turn in [65] Veil Shalas: Signal Fires, get the follow up [65] Return to Shattrath. Also turn in [65] Helping the Lost Find Their Way.
15. (optional) If you completed the quest [66] Torgos!, ride east to Allerian Stronghold and turn it in.
Hearthstone to Shattrath City. Go see Rilak the Redeemed in the northern part of Lower City (53,21). Turn in [65] Return to Shattrath and [65] Skywing.
Right next to Rilak stands Defender Grashna, he should have a quest now: [65] The Skettis Offensive. Certain classes probably can’t solo it, but you can give it a try. There are 4 waves: 2 birds, 2 birds, 3 birds, 1 big bird. The normal birds hit reasonably hard but have very few HPs. Make sure you eat/drink or bandage in between waves. Save your potion and cooldown abilities for the big bird. He hits for 1000 on cloth but he can be kited, polymorphed, hibernated, stunned, feared, etc. If you can’t manage it, ask for help, there’s a lot of people in Shattrath doing nothing but standing there and looking pretty 😛
Turn in [65] The Skettis Offensive for 16000xp and a decent necklace.
Sell junk and repair. Get out of Shattrath, ride southwest to Nagrand (20,56).
1. In Nagrand follow the road northwest and then west until you find a goblin on the left side of the road called Wazat (62,67). Get his quest [66]I Must Have Them!.
==Kill List== From now on, kill any Air Elemental you see. At some point, one of them should drop an item called “Howling Wind“. Right-click it and start the quest [67] The Howling Wind. It would be nice to get this quest as soon as possible, so make sure you kill every air elemental on sight, even if that means making a detour.
Also kill any Wild Elekk on sight, they drop tusks which will be needed in a later quest.
2. Follow the road west until you find the alliance town of Telaar (55,71). In Telaar, get all the quests, they should be easy to spot on your minimap:
- [65]Do My Eyes Deceive Me
- [65]The Nesingwary Safari
- [67] Fierce Enemies
- [66] Wanted: Giselda the Crone and [66] Wanted: Zorbo the Advisor from the Wanted Poster
Turn in:
- [64] A Message to Telaar
Go through the first building on the right and on the balcony get [66] The Throne of the Elements.
Southwest of the Inn, in the center of the town you should find more quests, get [67] Solving the Problem and [67] Stopping the Spread. Also get the quest [67] The Ravaged Caravan from a roaming npc.
Lastly, get the new flight path.
You should have 11 quests right now:
Note: Maybe 12 quests if you already have [67] The Howling Wind, which we will need pretty soon, so keep killing those air elementals on the way!
3. Exit Telaar by the northern bridge and go straight north, you should find a draenei building called The Abandoned Armory (51,57). Go inside, turn in [67] The Master’s Grand Design? and get the follow up [67] Vision of the Dead.
4. Go east till you get back on the road and follow the road north and then northeast, all the way to Nesingwary Safari (72,41).
Turn in the quest [65] The Nesingwary Safari and get the 3 mastery quests: [65] Talbuk Mastery, [65] Windroc Mastery and [66] Clefthoof Mastery.
Start to kill Windrocs, Clefthooves, Talbuk Stags and Dust Howlers in the area. Stay close to the Nesingwary Safari and keep checking if a gnome NPC named Kristen Dipswitch shows up. When she comes, she will get attacked by an undead NPC, defend her and she will have a quest for you: [65] I’m Saved!, turn it in immediately for 11000 easy XP. She might already be in the camp with her quest available when you arrive, but she might also take 30 minutes to show up, so just grind on the mobs around here and keep checking on Nesingwary Camp regularly.
If Kristen still hasn’t shown up when you are done with the objectives listed below, just give up. She’s just one quest, no follow up, so it doesn’t matter.
Keep killing everything in the area until you get a Howling Wind, right-click it and start the quest [67]The Howling Wind.
5. Go northwest and swim across the lake all the way to the Throne of the Elements (61,23).
Turn in:
- [67] The Howling Wind, get the follow up [67] Murkblood Corrupters
- [66] The Throne of the Elements
Get the other quests:
- [65] A Rare Bean
- [66] Muck Diving
- [65] The Underneath
There’s a big rock giant called “Gordawg” at the throne of the elements. Go talk to him and turn in [65]The Underneath, get the follow up [65] The Tortured Earth.
6. Now go back to the area around Nesingwary Safari and kill everything there until you complete the following objectives:
- Finish the 3 mastery quests
- Find 3 Air Elemental Gas
- Finish [65]The Tortured Earth
- Hit Level 66
Level 66
Go to Nesingwary Safari and turn in the 3 mastery quests, get the 3 follow up.
Ride northwest, cross the lake and go to the Throne of the Elements. Turn in [65] The Tortured Earth, get the follow up [66] Eating Damnation.
Hearthstone to Shattrath, take a portal to a main city and go train new skills. Visit the auction house, restock consumables and make space in your bags.
Since you’re level 66 and in a main city, this would be the perfect time to get a group and go to Mana Tombs. Get some good rewards, XP, reputation and take a break from all the questing we’ve been doing.
If you really don’t want to do an instance then just go to the next paragraph and go on with the guide. However, that means you’ll have to do a bit of grinding later on.
When you’re ready to go again, get a teleport back to Shattrath (or use your hearthstone if it’s ready again). Fly to Telaar, Nagrand.
==Note== From now on, if you see a Caverns of Time: Old Hillsbrad group forming up, try to join it. This is the right level for it and it’s fun. You’ll have to do it someday anyway to get attuned to Karazhan.
1. Exit Telaar by the eastern bridge. Then face east and go to the ogre mound (61,71) while killing ALL the Clefthoof Bulls and Talbuk Thorngrazers you see on the way. Kill Boulderfist Hunters there until one drops the Boulderfist Plans.
2. Go to the goblin just north of the ogre mound (62,67). Turn in [66] I Must Have Them!, get the follow up [66] Bring Me The Egg!.
Now you must find help to do the follow up, because you’ll have to fight a level 66 elite bird, and most classes can’t solo it, he’s immune to slowing effects like frostbolts, but he can be frost novaed. 2 players should be enough.
While you look for help, go back to the previous area and kill Bulls and Talbuks. If you can’t find help, just abandon the quest and skip the rest of this paragraph to step 3. You can come back later on at level 70 for this quest, as the rewards are quite nice.
Once you got help, go back to the goblin, and now you have to use the Jump-a-tron 4000 to land on that tree branch with the big egg called “Mysterious Egg“.
The trick is to position yourself exactly in the middle of the Jump-a-tron and have your character face the middle of the nest. Then click the Jump-a-tron 4000, change your camera view so you can see below and as soon as you’re almost above the nest, click off the levitation buff. It should take a few tries to get the timing right and you might die from falling if you click it off too early, so be careful with that.
If you really can’t manage it, there is another way, but it requires a 100% speed mount:
http://video.google.com/videoplay?docid=-4546574312878450602
3. Go back to Telaar, turn in [65] Do My Eyes Deceive Me, get the follow up [65] Not On My Watch!.
4. Go back to the same ogre mound where we found the boulderfist plans, remember to kill bulls and talbuks on the way.
Clear the way up the ogre mound and you should find a sleeping ogre called Lump (62,72). Attack him and get him down to below 20% HP and he’ll become friendly. Talk to him until you get the quest complete message for [65] Not On My Watch!.
5. Go back to Telaar, turn in the quest and get the follow up [65] Mo’mor the Breaker, check your minimap and you should see a yellow question mark – that’s where Mo’mor the Breaker is. Go to him and turn in the quest, get the follow up [65] The Ruins of Burning Blade.
6. Mount up, go east, follow the road east and then southeast at the fork. Keep going and you should find the Burning Blade Ruins (74,72). Clear the way inside the village and to the left you should find an NPC in a caged called Corki. Get his quest [65] HELP!.
Kill ogres in the area until one drops a Boulderfist Key. When you loot it it will automatically go to your keyring, so make sure to check for in there. Once you have the key, go right-click Corki’s Prison to free him.
Kill ogres until you finish [65] The Ruins of Burning Blade, then go back to Telaar.
Turn in:
- [65] HELP!, get the follow up [66] Corki’s Gone Missing Again!
- [65] The Ruins of Burning Blade, get the follow up [66] The Twin Clefts of Nagrand
Get the new quest [68] He Called Himself Altruis…. This quest only becomes available at level 66, and is given by the same roaming npc which gave us the caravan quest earlier.
Sell junk and repair, but be careful not to sell Ogre Warbeads or Ivory Tusks.
1. Exit Telaar by the western bridge, you should find a quest npc at (51,70), get his quest [66] The Consortium Needs You!.
Right next to the npc you should see two Enraged Crushers, kill them.
==Note== From now on, if you see Murkblood Invaders (3 Murkblood invaders riding elekks), kill them. You don’t have to kill all 3, you just need to kill one and loot the Murkblood Invasion Plans from them. Check the minimap below to see their patrol route. We don’t need those plans right now, so don’t go looking for them, just kill them if you see them while doing other quests.
2. North of here you should find large plains with a lot of Ravenous Windrocs (49,62). First kill the 3 Enraged Crushers near the northern ledge of the plains (they are marked on the map). Then stay in this area and kill 30 Ravenous Windrocs and kill the 3 Enraged Crushers a second time when they respawn.
3. Go to (47,40), and follow the ledge as shown on the map, kill every Enraged Crusher, Talbuk Thorngrazer and Clefthoof Bulls on the way. Also try to see if the Murkblood Invaders are there when you get close to the northern road. Repeat this loop until you finish the 2 following quests:
- [66] Eating Damnation
- [67] Clefthoof Mastery
4. Go towards the western tip of the lake north of Garadar (50,26). Gather 15 Digested Caracoli. They are glowing piles of dung, easy to spot 😛
Finish [66] Talbuk Mastery while you are here.
5. Go east to the Throne of the Elements, Turn in:
- [65] A Rare Bean, get the follow up [65] Agitated Spirits of Skysong (Keep the Nagrand Cherries, they will be useful soon)
- [66] Eating Damnation, get the follow up [67] Shattering the Veil
Destroy Gordawg’s Imprint, it’s useless now and just takes inventory space.
6. Go dive in the lake south, use a Nagrand Cherry and kill 12 Lake Spirits.
Go back to the throne of the elements, turn in [65] Agitated Spirits of Skysong, get the follow up [65] Blessing of Incineratus.
7. Head southeast across the lake, go to Nesingwary Safari and turn in:
- [66] Talbuk Mastery
- [67] Clefthoof Mastery
- [67] Windroc Mastery
Get all 3 follow ups.
8. Go south to Windyreed Village (72,50). Set the four huts on fire with your Living Fire, which should be in your inventory. You have to stand inside the huts and in the middle of them for it to work.
9. Go back to the throne of the elements, turn in [65] Blessing of Incineratus, get the follow up [66] The Spirit Polluted.
1. Ride west / southwest to the ogre cave at (40,32) just north of Halaa. Clear the way to the cave. Go to the northernmost part of the cave, where you should find Corki. Right-click the cage to free him, you should already have the key. If you don’t have it, kill some more ogres until one drops it.
Once Corki is free, clear the way out and kill all the ogres you still need to finish [66] The Twin Clefts of Nagrand.
2. Go south to Halaani Basin (41,38). Kill Muck Spawns until you get 5 Muck-ridden Cores.
3. When you’re done, find the exit on the northwestern side of the basin (37,38). Mount up and go south to Lake Sunspring (35,43). Dive in, pop a Nagrand Cherry and complete the following 3 objectives :
- Kill 10 Lake Surgers
- Kill Watoosun’s Polluted Essence, a big elemental in the middle of the lake (33,50)
- Use your Torch of Liquid Fire on 10 Sunspring Villager corpses, which can be found floating underwater near the northern bank of the lake
4. Go north to Sunspring Village. Follow the main path in the middle of the village, and clear the way to the 2nd house on your right-hand side. Inside the house should be 2 Murkblood Brutes next to a Kurenai Captive (33,42). Kill the two brutes and the captive should have a quest for you. Before you accept the quest, clear everything around the house and get full health, because as soon as you accept the quest [67] The Totem of Kardash you’ll get ambushed by 2 Murkblood Raider and 1 Murkblood Putrifier. Kill the putrifier first. Make sure you don’t let the Kurenai Captive die, as he is rather weak, compared to the usual escort quest npc. Don’t even think about looting, you probably won’t have time, bandage or drink right after you finish the first fight and follow the captive.
There will be a 2nd ambush further up the road, so save your cooldowns and pot timers for that one, it will be the most difficult part. If you manage this 2nd ambush you’ll finish the escort sucessfully.
This escort is rather hard compared to other escort quests, so if you don’t manage it, try to find help. If you can’t find help and don’t manage to solo it, just abandon it, save it for later for some easy cash at level 70.
Before leaving Sunspring Village, kill murkbloods until you finish [67] Solving the Problem and [67] Murkblood Corrupters.
==Note== From now on, kill Aged Clefthoofs and Greater Windrocs on sight until they drop what you need for the quest [67] Vision of the Dead. We’ll get the Mountain Gronn Eyeball later, so don’t bother with that.
5. Follow the road southwest until you find Altruis the Sufferer (27,43). Turn in [68] He Called Himself Altruis…, get the follow up [68] Survey the Land. Enjoy the ride and turn in the quest at the end. Do not get the follow up, this is one of those quests you should save for level 70. However, if you already have a group willing to do the chain, please do so.
6. Mount up, get back on the road and follow it south until you find Aeris Landing (31,58). Get the following quests:
- [66] Matters of Security
- [67] Gava’xi
Turn in:
- [66] The Consortium Needs You!, get the follow up [66] Stealing from Thieves
- [66]A Head Full of Ivory, which you can return in immediately, since you’ve been killing Elekks on sight for a while now and should have 3 tusks at least. If you don’t have them it’s no problem, you can turn that quest in later, but you better get serious on the Elekk hunting from now on ! :p
If you got extra 3x tusks, you can turn in more of them for Consortium faction.
Find the Consortium Quartermaster, sell junk and repair.
7. Go south to the Spirit Fields (34,65). The first thing you’re gonna do is look for a group to kill Banthar, a named clefthoof you need for the last clefthoof mastery quest. You can see his patrol route here:
Most classes can’t solo it, but you can always try. He’s immune to movement impairing effects and fear, but can be stunned.
In the meantime, you have plenty of things to do in this area :
- Kill 12 Voidspawns
- Gather 10 Oshu’gun Crystal Fragments
- Look for the Murkblood Invaders (there is a map of their pathing above), kill one of them and loot the Murkblood Invasion Plans. Right-click it and start the quest [67]Murkblood Invaders.
If after that you still haven’t found help for Banthar, do the next steps, and keep looking for help, they are still relatively close.
8. Go southeast of Oshu’gun and kill Gava’xi, who spawns at (42,72) and walks to the top of the nearby hill.
9. Go southwest until you reach the edge of the zone (38,82). You can find Shattered Rumblers all along the edge if you go northwest from here. Use your Gordawg’s Boulder on them and they will split into several Minions of Gurok. Kill 30 of them.
10. Go back to Telaar, turn in all the quests and get all the follows ups:
- [66] Diplomatic Measures
- [67] Corki’s Ransom
- [67] Ortor My Old Friend…
Your quest log should look like this at the moment:
1. Follow the road east to the Burning Blade Ruins. This time we’re not here to kill ogres, but to find Lantresor of the Blade, who is located at the northernmost point of the ruins at (74,63). When you find him, listen to his tale and then turn in the quest [66] Diplomatic Measures, get the 2 follow ups:
- [66] Armaments for Deception
- [66] Ruthless Cunning
2. Exit the ruins and go southwest to Kil’sorrow Fortress (70,76). In this fortress, complete those 4 objectives:
- Kill 15 Kil’sorrow Agents
- Plant 20 Warmaul Banners on Kil’sorrow agent corpses
- Gather 20 Kil’sorrow Armaments, they are big crates scattered everywhere in the fortress
- Kill Giselda the Crone, she can be found inside the biggest building in the southern part of the fortress.
3. Go back to Lantresor and turn in the two quests, get the two follow ups:
- [66] Body of Evidence
- [66] Returning the Favor
4. Go to the Throne of the Elements, turn in all the quests, get the follow up [67] Gurok the Usurper. This should make you ding level 67, if it doesn’t, it means you skipped the mana tombs instance, but it’s not a problem, because we’re gonna go to a very good grind spot soon.
Level 67
5. Go west to the Laughing Skull Ruins (50,22). Kill ogres and plant Kil’sorrow Banners on their corpses.
First, clear the way to the Warmaul Pyre (46,24). Use the Damp Woolen Blanket from your inventory, 2 ogres will spawn, defend them while they do their thing until you get a complete message.
Now clear the way towards the northernmost cave of Laughing Skull Ruins, which can be found higher up the hills at (46,19). Inside the cave you should see Zorbo the Advisor, kill him.
Kill ogres and plant banners into their corpses until you finish [66] Wanted: Zorbo the Advisor and [66] Returning the Favor.
6. Next part is probably the funniest, quickiest and most rewarding quest line of all times, but it is also difficult even for a full group for 65-67: The Ring of Blood. You can find the quest giver for this 5-man quest line just west of the Laughing Skull Ring (43,21).
You will have to complete 6 quests, each consisting in defeating a boss mob in the pit just below the quest giver. You will need a full group for level 65+, including a decent tank and a healer. Setting up such a group can take time, so we’re gonna do other things while we try to build up a group for this event. First of all, for those not level 67 yet, grind on ogres until you reach level 67. Go to the next paragraph, and keep looking for a group for the Ring of Blood event.
You also need to finish your mastery quests now, and the last two mobs we need to kill can’t be soloed by most classes, but can be duo’d by any class mix. So look for help for those last two mastery quests while also looking for a Ring of Blood group. The map below shows where Gutripper (windroc mastery) and Bach’lor (Talbuk Mastery) are. So this is the time to call help from your guild and friends, since you’ve got plenty of elite quests to do, you could do them all in one bunch.
In the meantime, grinding on those ogres is a good thing because they give good money, cloth, kurenai reputation and ogre warbeads (for consortium reputation).
Aldors: You should grind at the Kil’sorrow Fortress for more Aldor faction.
Both:
If you really can’t find help and are tired of grinding, go to the next paragraph and proceed with the guide, but keep looking for help for the above elite quests!
==Note== You can also try doing the Auchindoun: Sethekk Halls instance from now on. The two quests can be picked up in front of the instance. So if you see a group forming up, feel free to join it.
1. Head west of the Laughing Skull Ruins, to an area with Greater Windrocs and Aged Clefthoofs (36,19). Kill them all, luckily one of them will drop what we need for [67] Vision of the Dead. If not, just move on, we’ll kill more of them later on.
2. Head further west to another area with Windrocs and Clefhoofs (33,22), kill them too if you still need either of their drops. Still no luck? No problem, move on.
3. Go south, stay close to the mountain on your right-hand side, kill windrocs and clefthoofs as you go (if you still need them). You should soon find a path going up to Warmaul Hills (30,32). You should find a Mountain Gronn roaming up and down that path. Kill one, they are elite but can be soloed rather easily. Loot a Mountain Gronn Eyeball from it.
4. Move up the slope, kill ogres while looking for Telaar Supply Crates.
After a little while, on your right-hand side you should see a path going up and northwest. Follow it.
5. You should soon reach a plateau, on the southern side of it is a cave entrance (27,23), that’s where we need to go for [67] Corki’s Ransom. To the left of the cave is a path going up, that’s where the giant you need to summon and kill for [67] Gurok the Usurper. However you need 2 or 3 people for Gurok the Usurper, so check if there are any people interested for it. In the meantime, go inside the cave and save Corki, he’s at the southeasternmost point of the cave. He’s guarded by an elite ogre but he’s easy enough to solo, or you can porlymorph, sap, fear him while freeing Corki. Up to you. Turn in [67] Corki’s Ransom and get the follow up [67] Cho’war the Pillager.
6. Now all you have to do is finish gathering 20 Telaar Supply Crates while looking for people interested in doing either [67] Cho’war the Pillager or [67] Gurok the Usurper. Cho’war requires 2 or 3 people and is in the last cave on top of the mountain, to access it you have to go back to the previous plateau and go through the nothern cave.
One thing about Gurok if you do it, make sure to tell your group to fight with their backs to the mountain, because Gurok likes to knockback, and it will throw you off the mountain to a certain death.
In any case, if you can’t find help for those two quests, just forget it and save them for level 70. Proceed to the next step.
==Note== You should already have 10 Obsidian Warbeads for the quest [67] Fierce Enemies at this point. If you don’t, kill ogres in this area and finish it before you leave.
7. Get off the mountain, kill Windrocs if you still need their drop.
8. If you still need the drop from the Aged Clefthoof, a couple of them can be found near Forge Camp: Fear and Forge Camp: Hate.
9. Go to Sunspring Post (32,40). Clear the way to the main big building and kill Ortor. He has two guards, you can either kill Ortor fast and run away, or you can polymorph/sap him and kill his guards first. Both methods work.
==Note== Kill Aged Clefthoofs on the way if you still don’t have the drop, this is our last chance to finish the quest. It is rumored that Aged Clefthoofs share their spawn locations with Living Cyclones. So kill cyclones if you are having troubles to find Aged Clefthoofs, and they should spawn eventually.
10. Mount up and go to Aeris Landing (31,58). Turn in the three quests.
11. Go back to Telaar, turn in all quests.
Get the following new quests:
- [67] Wanted: Durn the Hungerer
- [67] Visions of Destruction
Don’t get the other quest.
1. No map needed for this short circuit, we already know the locations. Exit Telaar by the northern bridge and go to the abandonned armory (52,57). Turn in [67] Vision of the Dead, get the follow up [67] Levixus the Soul Caller. We won’t be doing this quest in the guide, save it for level 70.
2. (optional) If you did the quest [67] Gurok the Usurper, go to the Throne of the Elements and turn it in. If not, save it for level 70.
3. Go to the Nesingwary Safari, turn in all the quests, get the last quest of the chain: [68] The Ultimate Bloodsport.
4. Go to the Burning Blade Ruins, clear to Lantresor of the Blade and turn in both quests, get the follow up [66] Message to Telaar.
5. Ride back to Telaar, turn in Turn in [66] Message to Telaar.
6. We are gonna do one last thing in Nagrand: kill Tusker and possibly Durn the Hungerer.
Tusker is easily duoable (and can even be soloed by some classes). Durn the Hungerer on the other hand requires at least 3 people, including a tank and a healer.
Tusker can be found on top of a hill northeast of Oshu’gun at (43,65).
Durn the Hungerer makes a full circle around Oshu’gun.
If you can’t find enough people for Durn the Hungerer, just move on and save it for level 70.
You should really do tusker though, it’s quite easy with two people and the rewards are quite nice.
7. Go turn in Durn the Hungerer at Telaar (if you did it) and then go to Nesingwary Safari, turn in Tusker. We are done with Nagrand! Time to move to the next zone: Blade’s Edge Mountains.
Hearthstone to Shattrath. Sell and repair, make space in your bags, etc.
When you’re ready to go again, fly to Orebor Harborage, Zangarmarsh. Get the quest [65] No Time for Curiosity.
Follow the path east going up to the mountains. Get the quest [65] Killing the Crawlers at the entrance to the tunnel. Go through the tunnel while killing 6 Cavern Crawlers.
After the tunnel, stay on the path until you reach Sylvanaar (37,67). Turn in your quests and get all the quests available. You should have 6 quests listed under Blade’s Edge Mountains in your quest log. Also get the new flight path and make this inn your home location.
1. Head south, kill as many Groverstalker Lynx as you can on the way. Follow the road until you see a path going up on your right-hand side (37,75). Enter Veil Lashh, go towards the tree house and kill birdmen until you have 18 Plucked Lashh’an Feathers. Once you got them, go up the tree house and find this book:
Open it, turn in the quest, get the follow up [66] Scratches.
Now just under the treehouse you should find a green arcane circle on the floor:
Stand on it and use the Fistful of Feathers from your inventory, you should receive a 10 minute buff.
2. Mount up, go back to Sylvanaar quickly. Go next to Darnelle, a dryad standing in front of the biggest building. Shortly after the quest will be complete and you can turn in the quest.
3. Go back outside and kill Lynxs until you finish [66] The Encroaching Wilderness, then go back to Sylvanaar, turn it in and get the follow up [66] Marauding Wolves.
4. Head east across the bridge, you should enter some woods called Jagged Ridge (51,65). Kill 4 Thunderlord Dire Wolves to complete [66] Marauding Wolves.
5. Head south to the tunnel entrance at (52,75). You should find a big black wolf called Rema there, kill it.
Hearthstone back to Sylvanaar, turn in the two quests, get the follow up [66] Protecting Our Own.
6. Go right outside Sylvanaar and look for Grove Seedlings:
Right-click five of them. Go back to Sylvanaar, turn in the quest and get the follow up [66] A Dire Situation.
7. Go southeast and find the path (39,74) leading down to the Bloodmaul Ravine. Clear the way towards the southern part of the ravine, and use Rina’s Diminution Powder on every Bloodmaul Dire Wolf you see (you have to be in melee range). Also look for Bloodmaul Brew Kegs on the way.
8. At the end of the ravine you should find a cave entrance (43,80). Enter it, and look for Draenethyst Mine Crystals:
Gather 5 of them. Get out of the mine and finish the 3 other quests: [66] Strange Brew, [66] The Bloodmaul Ogres and [66] A Dire Situation.
9. Go back to Sylvanaar, turn in all quests, get all the follow ups:
- [66] The Bladespire Ogres
- [66] Getting the Bladespire Tanked
1. Go back down to Bloodmaul Ravine, this time go north and keep going for a while until you find Vindicator Vuuleen on the left side of the road (44,52). Get her quest [65] The Trappings of a Vindicator.
2. Clear the way west/southwest inside Bladespire Grounds to a rather large building at (39,54). There are 5 ogres inside the building, 2 non elite, 2 elites and the named you need: Droggam.
First, kill the 2 non elites. Then to pull Droggam solo, get as close as you can without entering their aggro radius, and use a charge of your Bloodmaul Brutebane Keg. Droggam will come solo, kill him and loot Vindicator Vuuleen’s Blade. The radius of attraction of the beer seems to be 30 yard, which is more than enough since those ogres have an aggro range of 15 yards or so.
3. Clear the way southeast to another big building at (42,57). This is the same scenario as the previous building, kill 2 non elite ogres, lure Mugdorg with a beer and kill him. Loot Vindicator Vuuleen’s Shield.
4. Go back to Vindicator Vuuleen, turn in the quest and get the follow up [67] Gorr’Dim, Your Time Has Come…
5. Clear the way west/northwest to another of those big buildings (40,49). Kill the 2 non elites, lure Gorr’Dim with booze, kill him, you know the drill. Go back to Vindicator Vuuleen, turn in the quest and get the follow up [67] Planting the Banner.
6. Clear the way southwest towards a 2-story building (39,58). Go to the 2nd floor (the stairs leading up are actually outside the building) and kill a Bladespire Champion, loot the Bladespire Clan Banner.
Now get 2 more ogres drunk to complete [66] Getting the Bladespire Tanked and kill a few more ogres to complete [66] The Bladespire Ogres.
7. Go east and get out of Bladespire Grounds, mount up and go south to (46,74) where you should see a tower. Go to the top of the tower, and before you plant the Bladespire Clan Banner, here are a few tips:
- This quest is soloable by pretty much every class, but it can be difficult.
- After you plant the ogre banner, you’ll have to fight 4 waves of ogres (2 Ogres, 3 ogres, 3 ogres, 1 Named ogre), non elite.
- You can actually go down halfway on the tower and eat/drink between waves. The ogres won’t notice you there while they are going to the top of the tower, because they only become agressive once they are on top.
- Save your pots/cooldowns for wave 2 and 3. The named, Gurn, isn’t that hard. He comes solo and can be kited, feared, stunned, etc.
- I haven’t tried it, but it is rumored that if you die and run back quickly from the graveyard, you can continue the event where you left off.
Good luck!
When you finish it, loot the Helm of Gurn Grubnosh.
Hearthstone to Sylvanaar.
Turn in the 3 quests, get the follow up [67] Where Did Those Darn Gnomes Go?.
1. Mount up, head east across the bridge, then go southeast until you find R-3DO (55,73). Turn in and get the follow up [67] Follow the Breadcrumbs.
2. Now follow the bread crumbs (they look more like little white stones) and you should find Toshley’s Station (60,68). Turn in the quest and get all the quests available here as well as the new flight path. You should have 4 quests listed under Blade’s Edge Mountains in your quest log.
Find Rally Zabnapper, he stands next to one of those big machines. Talk to him and tell him you’re ready for a flight. Go back to the station and turn in, get the follow up [64] Test Flight: The Singing Ridge.
Go to the Inn, set it as your new home location.
3. Go north until you find the ogre camp called Bladespire Outpost (58,61). Look for Power Converters, they are scattered all over the camp.
When you right-click one, an electroelemental will spawn, use your Protovoltaic Magneto Collector on them and kill them. It’s better to get the electroelementals down to low HP before using the Magneto on them, because they do more damage afterwards. Repeat this 5 times to complete [67] Picking Up Some Power Converters.
4. Go back to Toshley’s Station, turn in [67] Picking Up Some Power Converters, get the follow up [67] Ride the Lightning. Two new quests should be available now: [67] Ridgespine Menace and [67] Cutting Your Teeth. Get both of them.
Right-click Tally’s Waiver in your inventory and talk to Rally Zapnabber, take a flight to Singing Ridge. You will land in an area where we need to quest, how convenient!
5. There are 3 types of mobs we need to kill in this area:
- Scalewing Serpents, but don’t forget to activate your Repolarized Magneto Sphere when you fight serpents. You can deactivate the sphere by right clicking the buff when you need to move.
Tip for healers: Just activate the sphere, attack one serpent and heal yourself while he nukes you 25 times, much easier this way. - Ridgespine Stalkers, those are a bit tricky to find, they are stealthed and can mostly be found near the edges.
- Daggermaw Lashtails
WARNING: Beware of Maggoc, a big gronn who roams around here, he hits for 3K+ on cloth. Watch your back 😛
Don’t go in the blueish area south of here for now, you won’t find the mobs we need there. Go northwards and kill as many mobs as needed to complete the 3 quests:
[67] Ridgespine Menace, [67] Cutting Your Teeth and [67] Ride the Lightning.
6. Go south to the nether drake area (67,75). Kill Crystal Flayers and look for Nether Drake Eggs. When you open the egg, a whelp will spawn. Use your Temporal Phase Modulator on it and it will turn into one of the 3 types of nether drakes you need for [67] What Came First, the Drake or the Egg? Kill it and loot its essence.
Tip: You can use the modulator several times on the same drake, until you get the type of drake you need. You just have to wait 10 seconds for the cooldown. In the meantime, you can CC the drake (root, hibernate, trap, or just tank it).
Go west/northwest while opening eggs and killing stuff until you finish [67] What Came First, the Drake or the Egg? and [67] Crystal Clear. Then go back to Toshley’s Station. You should be level 68 by now.
Level 68
At Toshley’s Station, turn in all the quests, get all the follow ups:
- [64] Test Flight: Razaan’s Landing
- [67] Gauging the Resonant Frequency
- [67] More than a Pound of Flesh
- [67] Trapping the Light Fantastic
Sell junk and repair.
1. Go to Rally Zabnapper, take a flight to Razaan’s Landing. Clear the way inside the camp (67,45) and use your Multi-Spectrum Light Trap at various places, it will catch those purple fireflies if they are close enough. You can find a lot of them near the “stargate” at (67,42):
Also kill Fiendling Flesh Beasts and loot their Ether-Energized Flesh.
Stay in this area until you finish [67] More than a Pound of Flesh and [67] Trapping the Light Fantastic.
2. Go north of Razaan’s Landing and kill Fel Corrupters until one drops a Damaged Mask. Right-click it to start the quest [68] Damaged Mask.
3. Hearthstone back to Toshley’s Station, turn in all the quests, get the follow up [68] Show Them Gnome Mercy!.
4. Mount up, ride south to the singing ridge (61,76). Clear a large area (about 5-7 mobs should do), and then plant your Oscillating Frequency Scanners like on the picture shown below. You can’t plant a scanner within 25 yard of another, and you will see a red negative debuff when you are too close. Your goal is to be standing in the middle of 5 scanners at the same time. It’s easy but you must hurry up because each scanner only lasts 3.5 minutes. Basically try to draw a pentagon, and then stand in the middle of it and you’ll get a quest complete message.
Go back to Toshley’s Station, turn in the quest. Go see the gnome and ask him to send you to Razaan’s Landing again.
5. This time go to the middle of the camp at (66,44), where you should see a stargate. Kill a lot of Razaani agents in this area and Nexus-Prince Razaan will come through the stargate eventually. There’s a trick to know approximately how much more you need to kill. Behind the gate is a tube with white smoke in it. When the tube is full, that means the prince is about to come.
Kill him, and then a cube will appear above his corpse, loot it and you’ll receive a Collection of Souls.
6. Go back to Toshley’s Station, turn in [68] Show Them Gnome Mercy! Sell junk and repair, get the last test flight quest [64] Test Flight: Ruuan Weald.
Before you take the last flight, you must know one thing. This time while flying, you need to right-click the Nether-weather Vane in your inventory, or the quest will not be completed.
7. You will land in Evergrove. Turn in the quests you have and get all the other quests as well as the new flight path. You should now have 8 quests listed under Blade’s Edge Mountains in your log:
- [66] Creating the Pendant
- [67] A Date with Dorgok
- [67] A Time for Negotiation…
- [67] Crush the Bloodmaul Camp!
- [67] Culling the Wild
- [67] From the Ashes
- [67] Little Embers
- [68] Felsworn Gas Mask
Make Evergrove your new home location. You can fly to Shattrath, take a portal and go train if you wish to do so. When you’re ready to go again, hearthstone back to Evergrove.
1. First we’re going to find Overseer Nuaar, an NPC who walks up and down the path west of Evergrove, and also south of evergrove. Talk to him and go back to Evergrove, turn in the quest and get the follow up [67] …and a Time for Action. Also get [67] Poaching from Poachers from Samia Inkling.
2. Start west of the town and go north, killing every Wyrmcult Poacher and Wyrmcult Hewer on your way. You should also find a meeting note on one of the Wyrmcult agents, right-click it to start the quest [67] Did You Get The Note?.
3. When you’re done with [67] …and a Time for Action and [67] Poaching from Poachers, go to Veil Ruan (65,31), which is just northeast of Evergrove. Kill arrakoas there until you got 6 Ruuan’ok Claws. Then go to the arcane circle in the middle of the pond, clear the mobs around it, get full HP/mana and use the claws. A Harbinger of the Raven will fly down and attack you, kill it and loot the Harbinger’s Pendant.
4. Go west/northwest and find a path leading down at (62,30). Go all the way down, kill any ogres standing in your way. When you reach the bottom of the ravine, go northwest and clear the way to a two-story ogre building at (55,25). Go to the 2nd floor and kill Dorgok. Loot Gorgrom’s Favor off his corpse, right-click it and start the quest [67] Favor of the Gronn.
Kill the remaining ogres you need for [67] Crush the Bloodmaul Camp!.
5. Hearthstone back to Evergrove. Turn in all the quests, get all the follow ups:
- [68] Whelps of the Wyrmcult
- [68] Whispers of the Raven God
- [67] Pay the Baron a Visit
- [67] Wyrmskull Watcher
6. First of all, go to Wildlord Antelarion and ask him for a new Gas Mask. Destroy the old one if you still have it, they have a one hour duration.
East of Evergrove you should see a path going up the mountains, take it.
==Note== From now on, kill Felsworn Daggermaws, Felsworn Scalewings and Fel Corrupters on sight, until you finish the quest [67] Culling the Wild.
When you’re up on the plateau, go east/southeast to Forge Camp: Anger. Clear the way to the legion communicator (73,40)
You must not be on your mount and you must not be in any shapeshifted form before you put on the Gas Mask. Put on the gas mask and a question mark should pop above the Legion Communicator. Right-click it, turn in the quest and get the follow up [68] Deceive thy Enemy.
Now kill 4 Doomforge Attendants and 4 Doomforge Engineer, go back to the Legion Communicator, re-equip the Gas Mask (if you unequipped it), turn in the quest and get the follow up [68] You’re Fired!
You can re-equip your normal helm now. Kill 5 Anger Guards, they can mostly be found on the front area of Forge Camp: Fear and they always drop a Camp Anger Key. Once you got 5 keys, locate the 5 Legion Obelisks
Once you know where they are, you must activate all 5 as fast as you can. I suggest to start with the southernmost one. If you are fast enough, the 5 obelisks will activate a demon gate and Doomcryer will come through it. Kill her, she’s elite but can be soloed by most classes, she can be kited, stunned, rooted, etc. Just make sure you fight her solo.
Once she’s dead, get out of Forge Camp Anger.
7. Go north while killing everything you still need for [67] Culling the Wild. When done with that, go further north to Skald (73,24). In skald, you must find the 3 Fertile Volcanic Soils and right-click them.
The southern one is at (72,22), the central one is at (72,20), the northern one is at (72,19).
When done with that, kill Scorch Imps until you finish [67] Little Embers.
Hearthstone back to Evergrove.
Turn in all quests, get the follow up [68] Death’s Door.
Sell junk and repair.
1. Follow the way south of evergrove and get down the mountain. When you’re down in the ravine, go west until you reach the Circle of Blood, where you should find Baron Sablemane (53,41). Turn in the quest and get the follow up [67] Into the Churning Gulch.
2. Go southwest to the Churning Gulch (50,42). Kill Crust Bursters until you got 7 Crust Burster Venom Glands.
Go back to Baron Sablemane, turn in and get the follow up.
3. Go southeast of the circle of blood till you see a big gronn called Grulloc (61,47). You should see Grulloc’s Sack at his feet. Target Grulloc and use the Sablemane’s Sleeping Powder, this will put him to sleep. You have 30 seconds to loot Grulloc’s Sack and run away.
Warning: he might resist the sleeping powder, but you can re-cast it immediately and there is 3 charges on it, so it should be no problem.
4. Go back to Baron Sablemane, turn in the quest get the follow up [67] It’s a Trap!
5. Ride back to Evergrove, turn in, get the follow ups [68] Gorgrom the Dragon-Eater and [68] Slaughter at Boulder’mok.
Sell junk and repair.
1. Follow the path west of Evergrove and cross Wyrmskull Bridge. At the other end of it you should find Watcher Moonshade (50,36). Turn in and get the follow up [67] Longtail is the Lynchpin.
Enter the tunnel. Clear the way through it and find Draaca Longtail, kill her.
Go back to Watcher Moonshade, turn in [67] Longtail is the Lynchpin, get the follow up [68] Meeting at the Blackwing Coven.
2. Go back in the tunnel and go through it until find the exit. Then go north/northwest to Grishnath (42,23). Kill arrakoas until you receive a 2 minute buff called Understanding Ravenspeech. With that buff, you should be able to see where the prophecies are on your minimap. The prophecies look like this.
- The 1st Prophecy is at (39, 17) on top of one of the treehouses.
- The 2nd Propecy is at (42, 22) on top of one of the treehouses.
- The 3rd Prophecy is on the ground near the pond at (41,19).
- The 4th Prophecy is on the ground in the southern part of the camp (40, 23).
While gathering prophecies, you should find an Orb of the Grishna on one of the arrakoas. Right-click it to start the quest [68] The Truth Unorbed.
3. Go southwest and follow the road towards the cave at (32,31). Kill Wyrmcult Agents and enter the cave. Inside the cave always keep right, kill wyrmcult agents and use your Blackwhelp Net on the Wyrmcult Blackwhelps to trap them. You can also walk near the eggs on the floor to spawn more whelps.
Keep to the right and clear the way and you should eventually find Kolphis Darkscale.
!!Don’t attack him or get too close to him!!, you must first disguise yourself. You should already have 5x Costume Scraps (if you don’t, go kill more wyrmcult agents), right-click the costume scraps, an Overseer Costume should appear in your bags. Use it, go talk to Korphis Darkscale, go through is dialog quickly because you only have 3 minutes until your disguise wears off.
Now gather the last few Wyrmcult Blackwhelps you might still need (using the net breaks the disguise, so be careful).
4. Hearthstone back to Evergrove. Turn in all 4 quests, get the follow ups:
- [68] Maxnar Must Die!
- [68] Treebole Must Know
Sell junk and repair.
1. Go back through the tunnel, exit it and follow the road until you find Treebole (37,23), he should appear on your minimap. Turn in [68] Treebole Must Know, get the follow up [68] Exorcising the Trees.
2. Go northeast to Grishnath, gather 5 Grishnath Orbs
3. Go southwest to the area shown on the map (37,29) and look for Dire Ravens. Kill them until one drops a Dire Pinfeather. Right-click your Grishnath Orbs and it will combine it with a Dire Pinfeather to create an Exorcism Feather. Use this Exorcism Feather on a Raven’s Wood Leafbeards (found in the same area) and kill the Koi-Koi Spirit which spawns.
Repeat this step 5 times to complete [68] Exorcising the Trees.
4. Go back to Treebole, turn in [68] Exorcising the Trees.
5. Go west to Boulder’mok (31,24). Locate Gorgrom’s Altar.
Clear all the ogres in a large radius around it and keep killing ogres until you got 3 Grisly Totems.
Then right-click Gorgrom’s Altar. Gorgrom himself will show up and die to the trap you laid. When Gorgrom is dead, go next to his corpse and drop the 3 Grisly Totems you gathered earlier.
Keep killing ogres until you finish [68] Slaughter at Boulder’mok. Destroy any extra grisly totem you might have.
6. Go south to the wyrmcult cave. Enter the cave and keep going right, you can hug the left wall so that you don’t have to fight Kolphis Darkscale. If you managed to gather another 5 costume scraps, use them and disguise yourself, this will save us much time. Go to the end of the cave and kill Maxnar the Ashmaw (34,36).
Hearthstone back to Evergrove. Turn in the all 3 quests, get the follow up [67] Baron Sablemane Has Requested Your Presence.
Sell junk and repair. Destroy any extra costume scraps you might have.
1. Go to Baron Sablemane. Turn in [67] Baron Sablemane Has Requested Your Presence, get the follow up [67] Massacre at Gruul’s Lair. You can solo this next step but it will be much less painful if you get a group for it. Not to mention the next step has to be done in a group (minimum 2 players, easier with 3+), so better get one now and do the follow up quest with them. The rewards of the follow up quest are really nice so it’s worth it.
2. Go north to Soulgrinder’s Barrow (58,25). Kill what you need for [67] Massacre at Gruul’s Lair besides Fingrom.
3. Go kill Fingrom, he can be found on the 2nd floor of the house at (66,20).
4. Go back to Baron Sablemane, turn in [67] Massacre at Gruul’s Lair, get the follow up [70]Showdown.
5. Go back to Gruul’s Lair and locate the altar at (64,18). Wait till your group is full HP/Mana and ready then use Sablemane’s Signet. Goc will spawn, do NOT attack him, let Baron Sablemane take the aggro and tank him. Goc is Level 70 and has around 130k HP so you need to burn him down quick before he kills Sablemane, without pulling aggro. You can’t heal Baron Sablemane.
When done, go back to Baron Sablemane, turn in [70]Showdown, which should make you ding level 69.
Level 69
1. Go back to Evergrove, fly to Shattrath, take a portal to a city and go train new skills, re-stock consumables, make space in your bags, etc.
When ready, hearthstone back to Evergrove.
2. Fly to Toshley’s Station.
3. If your class can levitate, just levitate down to Death’s Door. If your class doesn’t have any sort of levitation spell, mount up and ride to the cave at (54,62). Clear the way through the cave and you should be in Death’s Door.
4. In Death’s Door, right-click the Druid Signal in your bags, an Evergrove Druid should fly down to you. Turn in [68] Death’s Door, get the follow up [68] Harvesting the Fel Ammunition.
Start killing everything besides Void Terrors (those ugly demon dogs) while going south. Keep killing stuff until you got 5 Fel Cannonballs.
When done with that, use your Druid Signal again, turn in [68] Harvesting the Fel Ammunition, get the follow up [68] Fire At Will!
5. Clear the way to the southern fel cannon (65,68). Once you’ve located it, read the next paragraph before you take control of the cannon.
To destroy the warp-gate, you have to take control of a fel cannon. When you use your Naturalized Ammunition, you will take control of the cannon and a pet bar will appear (this also means hunters, frost mages and warlocks cannot use their pets).
The pet bar looks like this:
We will mostly use the ability #4 “Artillery on the warp gate”.
As soon as you take control of the cannon, use it. It is on a 15 second cooldown and you must use it everytime it is ready. That’s the easiest way to succeed.
Imps will come out of the warp-gate and suicide-bomb the cannon. Each time an imp manages to explode on the cannon, it will take out about 6-7% of the cannon’s total health. So you can let about 15 imps reach the cannon, which is more than enough, since you should be able to kill most of them beore they reach it anyway.
The imps’ explosion is mitigated by armor, so warriors in def stance, bears and paladins shouldn’t have much troubles surviving them.
The imps have about 475HP. If you one-shot them, they don’t explode. Basically it’s simple, kill as many imps as you can, try to one-shot them, and keep firing the Artillery everytime it’s up. Another tip, especially for melee classes, if you get low on health, you can back off and bandage/eat, the cannon can take a beating. The only real difficulty is when a dog spawns instead of an imp, dogs have a lot more HP than imps. Warlocks can banish the dog, but for other classes the best option would be to kill it fast and let the cannon take a beating from the imps.
Tips:
Mages: Scorch / Fireblast is enough to kill imps. Easy job.
Shamans: One earth shock is enough. You can also drop a stoneclaw totem near the gate, the imps will suicide on it. You can also use your earth elemental if the coolodwn is ready, of course 😛
Rogues: If dagger specced, you can just stand infront of the cannon, wait for the imps to come and backstab them whenever you have enough energy.
If not dagger specced, try to oneshot them with sinister strike, if you get low health, move away, bandage up, get back in.
Warriors: Victory Rush!
Paladins: Put on some +dmg gear, shock, exorcism, consecration, easy job for paladins.
Druids: Balance druids, just moonfire away. Resto druids, you can heal the cannon with Rejuv and Lifebloom. Ferals, just go bear and take the explosions, swipe away. Back off and heal if needed.
Warlocks: Searing Pain
Hunters: Drop a frost trap in front of the gate at the start, then just bow shoot away
Priests: You can either mind flay/shadow word: death the imps, or you can just keep the cannon alive with Prayer of Mending, Renew and PowerWord:Shield
When you’re ready, clear around the cannon, get full HP/mana and right-click your Naturalized Ammunition.
6. Go to the northern cannon (62,60) and do the same thing. When done, call your druid and turn in [68] Fire At Will!, get the follow up [68] The Hound-Master.
7. Clear to the demon portal northeast of the canon, and when only Baelmon the Hound-Master is left, get full HP/mana, target Baelmon the Hound Master and use the Evergrove Wand. Two treants will attack him, let them tank and help them kill Baelmon, just be careful not to pull aggro from them and it will be an easy fight.
When Baelmon is defeated, hearthstone back to Evergrove.
Turn in [68] The Hound-Master.
We’re done with Blade’s Edge Mountains!
Sell junk and repair. Mount up, follow the road east, and then north, all the way to Netherstorm.
1. In Netherstorm, while crossing the bridge, get the quest [68] Off To Area 52. (If the quest doesn’t appear, check your quest log to see if you have [67] A Mystifying Vision or [67] Report to Spymaster Thalodien. If you do, abandon it and the quest should now be available)
2. Ride southeast to Area 52 (32,66). Turn in [68] Off To Area 52 and get all the quests. You should have 7 quests listed under Netherstorm in your quest log.
Go to the inn and make it your home location.
Get the new flight path.
3. Go southeast to (35,74). You should find plenty of Shaleskin Flayers in this area, kill them till you got 5 Shaleskin Shale. Then go back to Area 52, turn in and get the follow up [68] That Little Extra Kick.
4. Go southeast to the Arklon Ruins and clear the way to (41,72) where you should see a brazier.
Clear the mobs around it and then use your Conjuring Powder, which will summon Ekkorash the Inquisitor. Kill her and loot Archmage Vargoth’s Staff.
Just a little further east in the ruins you should find Pentatharon (43,72). Kill him and loot Arklon Crystal Artifact.
5. Just east of where you fought Pentatharon you should find Nether Rays (45,72). There should be half a dozen of them here, kill them all, it doesn’t matter if you don’t complete [68] That Little Extra Kick. Don’t wait on respawns.
Hearthstone back to Area 52. Turn in all the quests and get all the follow ups.
==Note== Green is for Scryers / Orange is for Aldors
1. Scryers: Go west and find Captain Arathyn. He’s on a small hill with 2 ballistas at (28,65). Kill him and loot the B’Naar Personnel Roster.
Aldors: Go west to Manaforge B’naar (27,65), kill 8 Sunfury Magisters and 8 Sunfury Bloodwarders.
Both: While near Manaforge B’naar, if you find an Arcane Annihilator, try to kill it and loot an Annihilator Servo from it. It is elite ranged classes can kite it to death. For other classes, it might be more difficult, try to get help and kill one. If you can’t find help, no worries for now, we’ll have more opportunities to kill one later.
2. Go southeast to The Heap (29,78). Kill Zaxxis agents until you have 10 Zaxxis Insignias and gather up 10 pieces of Ethereal Technology
3. (Optional) While in the area, you might see Netherock, a big elite rock giant. He roams goes back and forth along the southern edge of this island, in between The Heap and the Arklon Ruins. Most classes can solo him. He’s immune to movement impairing effects but doesn’t hit that hard. He can also be kited to Area 52 where the guards will help you. At 75%/50%/25% HP he spawns an add, ignore them and just burn Netherock down. Just make sure you don’t attack him if there’s any thunder elemental or rock elemental near him, because they will link.
4. Ride back to Area 52, turn in all quests and get all follows ups.
No map needed for the next circuit.
1. Scryers: Go to Manaforge B’naar (25,67). Kill Sunfury Magisters until one drops a Bloodgem Shard and also kill what you need for [68] High Value Targets. The warp-masters and warp-engineers can mostly be found inside the building. The geologists are mostly on the southeastern side of the manaforge (26,70).
Once you got a Bloodgem Shard, go near one of those big floating red crystals
Use the Bloodgem Shard, this should complete [68] Blood Gem Crystals.
Finish [68] High Value Targets too before you move on to the next paragraph.
Aldors: Go back to Manaforge B’naar, clear the way till you’re inside the manaforge. Find the controle console in the center of the room, it is a big purple crystal, can’t miss it. Right-click it and you should get a quest complete message for [68] Naaru Technology.
When done with that, get out of the Manaforge and go to the 4 pipelines around it and use your Warp-attuned Orb.
Here are the locations of the 4 pipelines:
- Northern Pipeline (25,60)
- Eestern Pipeline (28,71)
- Southern Pipeline (20,71)
- Western Pipeline (20,67)
Both:
2. (optional) Southeast of Manaforge B’Naar you should find a goblin at (26,77) with a quest [68] It’s a Fel Reaver, But with Heart. Normally you can’t solo it, but there’s a trick. Here’s how: go next to the Scrapped Fel Reaver and use the Fel Zapper, then go back quickly to the goblin. Wait there and do not attack the fel reaver or the zaxxis ambusher and after about 5-6 minutes they will despawn. Then just kill the Scrapped Fel Reaver and loot its heart. Simple enough? You can even kill the Zaxxis agents east of the goblin while waiting, since you need them for the next step, but don’t go too far though. Another thing, you must not get out of combat once you’ve attacked the Fel Reaver, or it will reset the whole thing.
The only problem with this strategy is that if anyone else attacks the fel reaver during that time, you won’t complete the quest, so this is not really viable during peak time. However, during peak times you might find people to group with and do it. In any case, if you don’t feel like waiting 5 minutes, just leave that quest for now, you can come back and do it at level 70.
3. Just a little southeast of the goblin tent you should find Warp-Raider Nesaad (28,79). Kill him.
4. Hearthstone back to Area 52, turn in all quests, get all the follow ups.
1. Go north to the Ruins of Enkkat (31,57) where you should find two quest givers. Don’t take the quest given by the robot yet, just take [68] Recharging the Batteries. Read this paragraph first. The quest given by the robot is an escort, and the cool thing is, you can pretty much complete the 2 following quests while doing the escort:
- [69] Rebuilding the Staff by killing ghosts during the escort and looting their crystals.
- [68] You’re Hired! by looting Etherlithium Matrix Crystals which are scattered all across the ruins.
Just let the robot go infront and take the first hit, he’s pretty tough and you can let him tank stuff while looting crystals.
Knowing that, get full HP/Mana and start the escort quest [68] Mark V is Alive!.
After completing the escort, turn it in.
2. Go north until you hit the edge (31,51). You should find Phase Hunters and Nether Rays there. You have to kill both, however, you must use your Battery Recharging Blaster on the Phase Hunters when they are below 30% HP before killing them.
Go west/southwest while staying close to the edge and killing phase hunters and nether rays, as shown on the map.
Keep doing this until you finish [68] Recharging the Batteries and [68] That Little Extra Kick.
3. You should be rather close to Manaforge B’naar after finishing the two quests above. So go further south/southeast and enter the Manaforge building.
Find Overseer Theredis, he is in the southeastern wing. Kill him and loot the B’naar Access Crystal.
Go to the B’naar Control Console, it’s that big purple crystal in the middle of the building
Kill any nearby sunfury agent, get full HP/mana.
Right-click the crystal and choose “Begin Emergency Shutdown”. Sunfury Technicians will come and try to abort the shutdown, attack them quickly to interrupt their channeling and after 2 minutes or so you should get a complete messsage.
4. Hearthstone back to Area 52. Turn in all quests and get all follow ups.
Use Archmage Vargoth’s Staff, turn in [68] Curse of the Violet Tower, get the follow up [69] The Sigil of Krasus.
Sell junk and repair. Make as much space as you can in your bags, this will be a long circuit.
1. Go north to (33,59) where you’ll find a long crack with Mana Wraiths around. Kill them until you got 7 Mana Wraith Essences.
2. Go northwest to Bot-Specialist Alley (31,57), turn in [68] Recharging the Batteries.
3. Go back to Area 52, turn in and get the follow up [68] Elemental Power Extraction.
4. Go south of area 52, all the way down to the cliff edge (36,78). Kill Sundered Rumblers and Warp Aberrations and use your Elemental Power Extractor on them before they die. After their death, look for a blue shard next to their corpse and loot it.
Do this 5 times and you should complete [68] Elemental Power Extraction.
5. Go northeast to the Ruins of Arklon (40,73). Look for the following 4 items and right-click them:
- Multi-Spectrum Terrain Analyzer (40,73)
- Servo-Pneumatic Dredging Claw (41,72)
- Hyper Rotational Dig-A-Matic (41,74)
- Big Wagon Full of Explosives (42,72)
They are rather big and easy to see.
6.
Scryers:
6.a Hearthstone back to Area 52. Go talk to Veronia, who stands next to the flight master. Tell her you’re ready. This will make you fly to Manaforge Coruu. Turn in [69] Behind Enemy Lines, get the follow up [68] A Convincing Disguise.
==Note== If you didn’t kill an Arcane Annihilator yet, now is your chance, there is one roaming inside manaforge Coruu, try to kill one while doing the following steps.
6.b Go kill Sunfury Arcanists just northwest of where you landed, until one of them drops a Sunfury Arcanist Robes. Then go kill Guardsmen and Researchers until they drop their respective item. Guardsmen are mostly found guarding the doors of Manaforge Coruu. Researchers are mostly found inside the building. Once you have completed [68] A Convincing Disguise, go back to Caledis at the previous landing spot (48,87) and turn in, get the follow up [68] Information Gathering.
6.c Use your Sunfury Disguise, go back inside the Manaforge and go listen to the conversation between Arcanist Ardonis and Commander Dawnforge, who are in the southwestern wing (48,84). Beware of the Arcane Annihilators, they can see through the disguise. When you got the quest complete message, go back to Caledis, turn in the quest, get the follow up [69] Shutting Down Manaforge Coruu.
Aldors:
6.d Go southeast across the bridge and further southeast to Manaforge Coruu (47,84)
==Note== If you didn’t kill an Arcane Annihilator yet, now is your chance, there is one roaming inside manaforge Coruu, try to kill one while doing the following step.
Both:
7. Go inside Manaforge Coruu. Find and kill Overseer Seylanna, who can generally be found near the center of the building. Loot the Coruu Access Crystal from her. Clear any nearby mob, get full HP/mana, and then right-click the Controle Console, start the emergency shut down. Kill technicians as they come until you get a complete message.
Scryers: Go back to Caledis, turn in [69] Shutting Down Manaforge Coruu, get the follow up [68] Return to Thalodien.
Both:
8. Exit Manaforge Coruu by the eastern gate, find Spellbinder Maryana (52,82), she’s in the camp just northeast of the eastern gate. Loot the Sigil of Krasus from her.
Use Archmage Vargoth’s Staff, turn in [69] The Sigil of Krasus, get the follow up [69] Krasus’s Compendium.
9. Go east/southeast to the Violet Tower (58,86). Take all 6 quests:
- [68] A Fate Worse Than Death
- [68] Malevolent Remnants
- [69] Indispensable Tools
- [69] Needs More Cowbell
- [69] The Unending Invasion
- [69] The Sunfury Garrison
1. Go southwest of the tower, to the area called Wizard Row (56,87). Kill 10 Mana Seekers and 10 Mageslayers. Also pick up the Mana Bomb Fragment on the floor at (55.7,87.3).
2. Go southeast to the area called Town Square, you should find Krasus’s Compendium – Chapter 2 inside a one-room house at (57.5,89.6)
Kill every Severed Spirits on your way, as well as Abjurist Belmara if you find her.
Find and loot the other two chapters, they are also inside one-room houses at the following locations:
- Chapter 1: 58.6, 89.2
- Chapter 3: 58.8, 88.0
Kill stuff in this area until you find Abjurist Belmara, she roams in this area. Kill her, loot her book and right-click it to start the quest [69] Abjurist Belmara.
3. Go east/northeast until you find a town hall building at (60,87). Kill stuff in the area infront of it until you find Cohlien Frotweaver and Conjurer Luminrath. They both walk up and down the path leading to the town hall.
Loot their item and right-click them to start the following quests:
- [69] Cohlien Frostweaver
- [69] Conjurer Luminrath
4. Go further east/northeast until you see a smith-house (61,85). Kill Kirin’Var Apprentices there until one drops a Smithing Hammer.
Now kill Severed Spirits until you finish [68] Malevolent Remnants.
5. Use Archmage Vargoth’s Staff, turn in [69] Krasus’s Compendium, get the follow up [69] Unlocking the Compendium.
Go back to the Violet Tower, turn in all quests, get the follows ups:
- [69] Potential Energy Source
- [69] The Annals of Kirin’Var
- [69] Master Smith Rhonsus
- [69] Torching Sunfury Hold
1. Go west to the blood elf camps outside of Manaforge Coruu (52,82). Gather 10 Energy Isolation Cubes
2. Go back to the Violet Tower, turn in [69] Potential Energy Source, get the follow up [69] Building a Perimeter.
3. Mount up, ride west, past Wizard Row, until you find a blue rune at this location (54,86)
Use your Rune Activation Device, this should activate the western rune.
4. Go back to the tower and then go to the town hall (60,87) which is right behind the tower. Go inside the town hall and kill Battle-Mage Dathric, loot the Annals of Kirin’Var and Dathric’s Blade. Right-click the blade to start the quest [68] Battle-Mage Dathric.
5. When coming out of the town hall, if you follow the path going northwest you should see the 2nd Kirin’Var Rune at (59,85). Use the activation device, this should activate the eastern rune.
6. Go to the smith-house (61,85), which is directly east of the rune. Kill Rhonsus.
7. Northwest of the smith-house you should see a bridge, go there, cross the bridge and make a sharp left turn at the end of it, go up the hill and you should find the last rune at (57,83). Activate the Northeastern Rune.
8. Northwest of this rune you should see Sunfury Hold (55,81). Go there. First, find and kill a Sunfury Flamekeeper, which should drop a Flaming Torch.
Use this torch while standing next to a Ballistas
and Tents
==Note== You can be lazy and burn the same ballista / tent 4 times, you just have to wait till it stops burning and you can use the torch again. However, you need to kill 10 Sunfury Archers in this area, so you might as well clear the place while looking for various ballistas and tents.
You also need to kill Spellweaver Marathelle, she walks about in the camp. Loot the Heliotrope Oculus from her. Kill the last few Sunfury Archers you need.
Once you’ve completed [69] The Sunfury Garrison, [69] Torching Sunfury Hold and [69] Unlocking the Compendium, move to the next step.
9. East of the Sunfury Hold you should find a cow called Bessy (59,79). Turn in [69] Needs More Cowbell, don’t get the follow up yet, read the next few lines before.
2 players are recommended for this quest, but it’s perfectly doable solo. After you accept the quest, the cow will head towards the bridge and go back to the violet tower. Before accepting the quest, clear the way towards the bridge as fast as you can, get back to full HP/mana, then start the escort. Also, make sure you let the cow infront of you, because if you get attacked, she won’t help you and will keep on moving.
When you’re ready, accept the escort quest [69] When the Cows Come Home.
At the end of the escort, you should be back at the violet tower.
Summon Archmage Vargoth, turn in [69] Unlocking the Compendium, get the follow up [69] Summoner Kanthin’s Prize.
Turn in all the other quests, get the 2 follow ups:
- [69] Down With Daellis
- [69] Searching for Evidence
No map needed for this next circuit.
1. Go to the small house which is directly southwest of the tower, inside this house you should find a Weapon Rack (57,87). Right-click Dathric’s Blade from your inventory while standing infront of the weapon rack.
2. Go further southwest, skip one house and in the next house in rubbles you should find a Dresser (56,88). Right-click Luminrath’s Mantle from your inventory.
3. From the dresser, face precisely northwest and run to another house in rubbles, next to the edge of wizard row, where you should find a Bookshelf (55,87). Right-click Belmara’s Tome.
4. Just southwest of the house with the bookshelf you should find a bigger house in rubbles, with a Footlocker inside (55,88). Right-click Cohlien’s Cap.
5. Go back to the tower. Turn in the 4 quests.
Hearthstone back to Area 52.
Turn in the two quests, get the 2 follow ups:
- [70] Kick Them While They’re Down (Scryers only)
- [70] Sunfury Briefings (Aldors only)
- [70] Shutting Down Manaforge Duro
Sell junk and repair.
Go to the pit southeast of Area 52 and turn in [69] Invaluable Asset Zapping, get the follow up [68] Dr. Boom!
You should be pretty close to level 70 now, but I’m gonna make a last little bonus circuit just in case.
1. Northeast of Area 52 you should find Dr. Boom (35,60). Find Boom’s Doom in your inventory and put it on one of your hotkeyed buttons.
You have to use those bombs to kill Dr.Boom while avoiding his bombs and his dynamties, but there’s a trick to make it really easy.
You just have to run in (while dodging bombs) and climb on top of that barrel, as shown on the picture below:
You might die once while trying to get up there, but the graveyard is close, and you can easily climb on top of the barrel as a ghost and then resurrect on top of the barrel safely. You’ll be 100% safe once you’re on this barrel.
Each bomb you toss should take out about 20% of Dr.Boom’s health, so you have to bomb him 5 or 6 times.
Ranged classes can also nuke Dr.Boom down, but it takes a lot more time and it’s less fun 😛
2. Go east/southeast until you find a bridge going to the next island, then go northeast to the Eco-dome Midrealm, and keep going east/northeast till you find Midrealm Post (47,57). Turn in the quests you have and get all the available quests.
3. First,go directly northeast of the camp and you’ll find Diagnostic Equipments (48,55).
Go back to the camp, turn in [68] Run a Diagnostic!, get the follow up [68] Deal With the Saboteurs.
4. Now do the following things, all of this is at the same place inside the dome:
- Kill Ripfang Lynx on your way and loot their pelts
- Kill Barbscale Crocolisks, they are in the pond in the middle of the dome.
- Gather 15 Ivory Bells
When you’ve finished all 3 quests, go back to Midrealm Post, turn them in and get all the follow ups.
5. Go southeast, just outside of the dome you should find a camp with Gan’arg Engineers and Mo’arg Doomsmithes in it (49,59).
Kill as much as needed for [69] In A Scrap With The Legion and also gather 10 Rel Reaver Parts, which are scattered all across this camp.
Go back to Midrealm Post, turn in and get the follow ups.
6. Go east/southeast to Manaforge Duro (57,64). Outside of it, you’ll find camps of blood elves. Look on the floor for Boxes of Surveying Equipment.
Scyers
Kill 8 Sunfury Conjurers, 6 Sunfury Bowmen and 4 Sunfury Centurions.
Aldors
Kill Sunfury Bowmen and Sunfury Centurion until one drops a Sunfury Military Briefing.
Kill Sunfury Conjurers until one drops a Sunfury Arcane Briefing.
Both
Centurions are mostly found guarding the gate to the manaforge.
You should also find Summoner Kanthin in the same area, keep killing elves around here until you find him. Kill him and loot the Stone of Glacius.
Summon Archmage Vargoth, turn in the quest and get the follow up [68] Ar’kelos the Guardian.
7. Further up at the next camp just south of this one you should find a named bowman called Master Daellis Dawnstrike (57,66). Kill him.
8. Go inside Manaforge Duro. Clear the way to the southeastern wing (60,68) and kill Overseer Athanel, loot the the Duro Access Crystal.
Go to the Duro Controle Console, start the emergency shutdown and kill the technicians as they come, you know the drill.
If you still need some Boxes of Surveying Equipment, gather them now. Then exit manaforge duro through the eastern gate.
9. Mount up, ride east until you find Cosmowrench (65,67), get the new flight path and the quest [69] Bloody Imp-ossible!
10. Go north of Cosmowrench where you should find a lot of Warp Chasers (66,63). Right-click Zeppit’s Crystal and start killing Warp Chasers. You must be very close (almost in melee range) to the warp chasers are they die, or the imp won’t gather their blood. Keep doing this until you have 8 Warp Chaser Blood.
Go back to Cosmowrench, turn in the quest.
11. Hearthstone back to Area 52. Turn in all the quests, get the follow ups. Don’t forget to turn in [68] Dr.Boom at the pit southeast of Area 52.
Congratulations on level 70!
I hope you enjoyed this guide. If you want to return the favor, please try to contribute.
See you in Northrend for the next chapter!
-Jame
Text formatting: Snowflake & Jame
© Copyrights www.wow-pro.com All Rights Reserved
Quests Going Green and GreyI have a level 80 DK, and I was doing Netherwing dailies in Shadowmoon recently–everything there is grey. I’m not sure, but quests in Borean Tundra and Howling Fjord might be grey–they do have a (low-level) next to them for my lvl 80 (I’m just going by the Wyrmrest daily in Coldarra as an example). But the other quests I have in Northrend are still green…I had some left for Grizzly Hills and Zul’Drak when I hit 80.
It seems odd if the early Northrend ones are grey at lvl 80, given that at level 70 you have a green-range of about 13 levels. At that range, quests should still be green all the way back to level 67! So even the late Outland quests should be green. Doesn’t really make sense to me.
anyway, don’t know if that helps or not. But there it is.
Wisemoon
add onsI haven’t played in a while, but have a 68 mage. I followed your suggested addons and my action keys/bars are small and grouped together in the middle of my screen. In addition, it doesn’t seem like I am able to access the area on talents that gives you some talent tree specs.