
 by Jame
Chapter II (31-41) – Journey from the Thousand Needles to Badlands
Changelog
This is v2.0 of the guide. It has been revamped as mentioned in this news post to adapt to patch v2.3 changes. You can still find the old version of the guide here. At the same time, many other improvements have been made:
- Introduction/Addons section has been updated
- Kill everything on your way rule has been lifted unless you lack experience compared to the progress described in the guide
- Both big grinding sessions at the start and at the end of the original guide have been removed and replaced by quest circuits
- Quests that aren’t elite anymore have been integrated
- New patch 2.3 content has been integrated
- Maps have been remade and a lot of errors have been corrected
- Detailed map for Shimmering Flats circuit has been added
- Dustwallow Marsh circuits have been added
- The guide now takes you to level 41.
- Overall grinding has been decreased and leveling should be possible at a faster pace than before
Big thanks to Subere for his beautiful map/picture editing 🙂
Introduction
This guide starts at level 31, if you need guides for any other level range (from 1-31 for example) please take a look at this page. This guide is a follow up of the previous chapter of my horde leveling guide, where a lot of pre-questing and flight-path gathering has been done already (especially for Blood Elves).
This guide is made for FAST leveling through the use of Optimized Quest Circuits. With this guide, questing will be very efficient and you’ll not waste any second running around and trying to figure out in which order to do your quests. Follow each instruction carefully and you will see for yourself. The quest choices and order to do them are optimal so that you run as few as possible while doing the most possible, turning several quests at the same time. It will be like grinding, because you’ll be killing stuff almost non-stop, besides you’ll also be completing a bunch of quests at the same time!
Everything described in this guide can be done solo (beside when I say otherwise). You can, of course, follow this guide while duoing, grouping, it’s not a problem, it works too.
DISCLAIMER: This guide does NOT take into account tradeskills, class specific quests or PvP. It’s 100% focused on getting the most experience possible in the shortest possible time while doing a lot of quests and enjoying as much content as possible. Any race/class combination can do this guide. Any complaints about PvP, tradeskills, or class specific issues will be ignored.
Basic rules
- Spend your talent points so that you kill things as fast as possible. (e.g: Priest should specialize in Shadow Talents, Warriors in Arms/Fury, etc.
- Don’t waste your time trying to find groups for questing, you can solo everything that is described in this guide unless I say otherwise. Only group with someone when it’s not gonna be a waste of time (e.g: meeting the person at the other end of the zone to show him the way to where your quest is, that is a waste of time)
- Try to always log out in an inn or in one of the major cities when you take a break.
- When I say you should make an inn your new home location, it’s for a good reason, and it will save you much time.
Useful Addons
To get the most out of my guide, you should get an addon which displays coordinates, because I use them to describe locations in my guide (x,y). You can use any addon you like, but here’s a very simple one I use.
Recommended
- DMiniCoords – A simple box which displays coordinates, left-click it to move it where you like.
Optional
Below is a list of other addons I use, this is 100% optional though, it’s mostly for people who are curious to know which addons I use:
- Bartender4 – A great action bar addon.
- X-Perl UnitFrames – Very nice, highly customizable unit frames.
- Quartz – The best casting bar addon out there, imo.
- Scrolling Combat Text – I just don’t like the default UI Floating Combat Text.
Side Note: In case you don’t know how to install add-ons, simply download an addon from one of the links above and unzip it. Then drag the unziped folder in your Addon folder (full path is c:\Program Files\World of Warcraft\Interface\Addons). Then, restart World of Warcraft and it should be working.
If it isn’t working, you might need to log out to your character selection screen and click on “Addons” in the lower-left corner. Tick the box that says “Load out of date Addons”. Re-launch WoW.
Shopping List
- 1x Strong Troll’s Blood Elixir – Needed at level 31 (almost right away), you can either buy it at the AH or buy 2x Bruiseweed 2x Briarthorn 1x Leaded Vial and tip an Alchemist to combine for you.
- 3 stacks of Silk Cloth
- OPTIONAL: 9 more stacks of Silk Cloth (you’ll probably get this along the way while hunting) This is for the cloth donation quests. When you get to one of the big cities (Thunderbluff, Undercity, Orgrimmar, Silvermoon) you can turn in 3 stacks for some exp. I won’t mention this directly in the guide (beside the Orgrimmar turn in) as it might vary strongly from person to person when you get the cloth and when you make a stop at the aforementioned cities. Once this quest is completed you can turn in Mageweave, Runecloth etc in the same way. This is also great to catch up on exp.Start checking early for these items, especially the Strong Troll’s Blood Elixir.
Color Code
- Quests
- Items
- Locations
- Quest objectives to kill
- NPCs
- Locs
The Guide
Level 31
Before we start, I highly recommend that you get your level 30 mount. There will be more and more traveling the higher in levels we get. It will save you a tremendous amount of time in the long run.
Let’s get started! Make sure you’re stocked on consumables (food/drink/potions) and fully repaired.
Set your hearthstone to Orgrimmar.
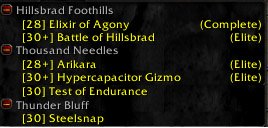
Your quest log should look like this if you followed Chapter I of my guide.
Fly to Freewind Post in Thousand Needles.
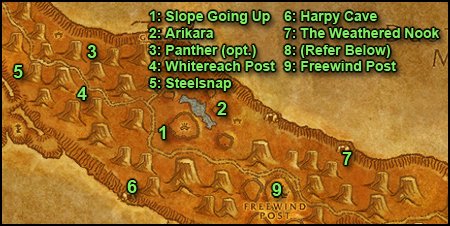
1. Get down the lift and follow the road west until Darkcloud Pinnacle, find the slope going up on the northwestern side of the peak (31,36). Go up and across 3 wooden bridges, you’ll end up at the top of a peak with 2 bridges, take the one on your left (going east), at the next peak there will be 2 bridges again, take the one on your right (going southeast).
2. You should arrive on a last peak, with a bonfire in the middle named “Sacred Fire of Life“. Clear everything on the peak, get back to full health/mana. Right-click the bonfire, it will summon Arikara, a level 28 mob.
Kill it and loot “Arikara Serpent Skin“.
Go back the way you came from, until you get off Darkcloud Pinnacle. Make sure your 5 minute special ability is up and that you have health pots ready etc. The next part is best done by 2 players so if you can group up with someone for the kill do so, solo it will be a bit hard, but try it anyway. I soloed this with my beastmastery specced hunter at level 31 using rapid fire and one mend pet.
3. Go northwest until you find a destroyed caravan (22,24) with a panther in a cage in the middle. Open the lock, kill the panther and loot the Hypercapacitator Gyzmo, then go south to Whitereach Post.
4. Go west to Whitereach Post (south if you did the enraged panther quest) (21,31). Turn in the quest [28+]Arikara and [30+]Hypercapacitator Gyzmo if you did it, if not you can abandon that quest.
5. Go west/northwest, we’re now gonna look for a named hyena named Steelsnap. Go to the area which is north of highperch, Steelsnap always passes by that spot. Just kill everything in the area while waiting for Steelsnap to show up. I generally find her at (13,28). She’s a level 30 hyena with two hyena guarding her. Just kill her quickly and run away, that’s the easiest option, but any class can manage it with a bit of strategy. Loot Steelsnap’s Rib.
6. Go southeast along the mountain until you reach the harpy cave called Roguefeather Den. Clear your way inside the cave until you reach the bottom, you should see some wooden crates in the corner. When you click them a named harpy will spawn. Kill it and loot Grenka’s Claw.
7. When that is done, travel east to the Weathered Nook (54,44), go up the slope and inside the cave to turn in the quest [30]Test of Endurance. Take the follow up.
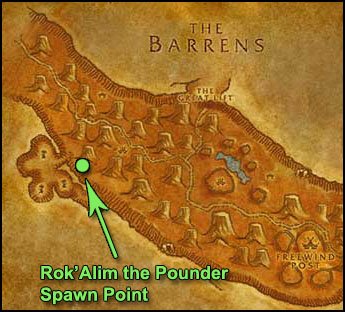
8. Go to the northwestern part of the zone to (17,37). Kill everything on your way. Rok’Alim the Pounder spawns at that point. Afterwards he roams around in that area a little. Search for him while killing stuff. Once you killed him, loot Fragments of Rok’Alim and go back to the Weathered Nook. Don’t get the follow up.
9. Run back to Freewind Post, fly to Thunderbluff. In Thunderbluff go south to the Hunter Rise and turn in the quest [30]Steelsnap, get the follow up [37]Frostmaw, you can destroy the Kodo Skin Scroll you just got from this quest.
Hearthstone to Orgrimmar, sell junk, restock, repair etc.
Be sure to have the Strong Troll’s Blood Elixir on you. If you can’t find any on the AH, just buy 2 Briarthorn, 2 Bruiseweed and 1 Leaded Vial and have an Alchemist combine it for you.
Take the Zeppelin to the Undercity. In the Undercity next to the Bat Handler you should find a quest [36]To Steal from Thieves, take it. Then go to the Apothecarium, find Master Apothecary Farell, turn in the quest [28]Elixir of Agony and get the follow up.
Fly to Tarren Mill, Hillsbrad.
Get [33] Helcular’s Revenge from Novice Thaivand.
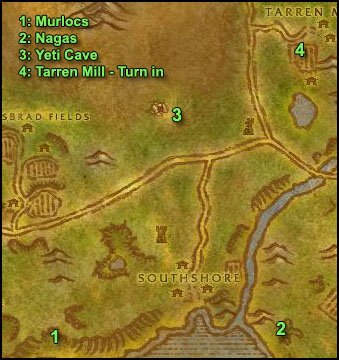
1. Head southwest until you hit the Western Strand (36,66) with the Murloc Camps. Kill murlocs until you get 5 Torn Fin Eyes.
2. Go east and across the river, until you find nagas at (58,64). Kill them until you have 5 Daggerspine Scales.
3. Go northwest to the Yeti Cave (46,30). Kill yetis until you get Helcular’s Rod, which is kinda rare, so just kill a lot of yetis. It might take a long time, so be patient. If it really takes more than 20 minute, try to log out and then back in. For some reason this worked for me a couple of times and the rod dropped on the first few kills after I logged back in, after a 20 minute yeti slaughter with no success.
4. Go back Tarren Mill and turn in:
- [30] Elixir of Agony, get the follow up [30] Elixir of Agony
- [33] Helcular’s Revenge, get the follow up [33] Helcular’s Revenge
Hearthstone to Orgrimmar.
You should be level 32 by now.
Level 32
Train, sell junk, restock, repair etc. Once you’re ready to go again, fly back to Freewind Post in Thousand Needles. Get the quest [35] Family Tree from Cliffwatcher Longhorn.
Get down off Freewind Post and go east until you reach the Mirage Raceway in the Shimmering Flats(80,77). Get the following quests there:
- [30] Hardened Shells
- [30] Salt Flat Venom
- [30] Load Lightening
- [31] Rocket Car Parts
- [31] Hemet Nesingwary Jr.
- [33] A Bump in the Road
- [36] Wharfmaster Dizzywig
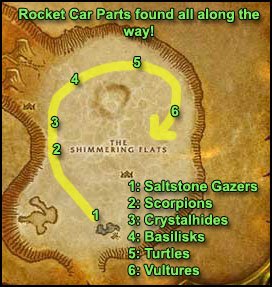
You can find everything needed to complete those quests around the raceway. For locations where the quest mobs are often particularly concentrated, please check the above posted map. (Thanks to Jimjimjimmy for the addition). Keep killing stuff at these locations until you complete all the quests and until you get 10 Turtle Meat.
Avoid the level 35 turtles, they are orange to you and might be a little too hard.
Don’t sell the Turtle Meat, put them in bank or somewhere in your inventory.
Turn in all the quests and get the follow up quests :
- [37] Goblin Sponsorship
- [35] Martek the Exiled
If you aren’t level 33 yet grind in this area (turtles, vultures, etc) until you hit level 33.
Level 33
Before we leave, go south and zone into Tanaris. Go to Gadgetzan and talk to the Wyvern Master in front of the gate to get the flight path. Fly to Ratchet, talk to Gazlowe (in one of the houses northwest of the wyvern landing spot)and get the follow up [37]Goblin Sponsorship. Go to the pier and talk to Wharfmaster Dizzywig, turn in the quest but don’t get the follow up. Then take the boat to Booty Bay.
In Booty Bay on the docks, talk to Wharfmaster Lozgil and get the follow up [37]Goblin Sponsorship. Go to the Booty Bay Inn, on the 1st floor, get the quest [35]Singing Blue Shards.
On the 3rd floor get the quests:
[32]Investigate the Camp
[35]Bloodscalp Ears
[36]Hostile Takeover.
Turn in the quest at Baron Revilgaz and get the follow up [37]Goblin Sponsorship.
Take the flight path if you haven’t already (we did this in Chapter I of my guide).
Get out of the inn by the other door on the 3rd floor, facing east. In the 3rd house to the left you should find another quest [31]Supply and Demand.
Hearthstone to Orgrimmar.
Repair, sell, restock consumables. Get out of Orgrimmar and take the zeppelin to Grom’gol.
In Grom’Gol get the following quests:
- [34]Bloodscalp Insight
- [34]Hunt for Yenniku
- [37]Bloody Bone Necklaces
- [37]The Vile Reef
- [37]Trollbane
From now on, whenever you kill something in Stranglethorn Vale, you might find “Green Hills of Stranglethorn” pages, make sure you keep one of each page.
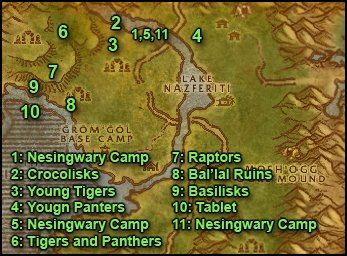
1. Exit the camp from the east side, follow the path until you reach the road. Follow this road north, cross the 1st bridge and keep going until you reach the 2nd bridge, don’t cross it, go directly north downhill until you find Nesingwary’s Expedition Camp, next to the river (35,10). Turn in [31]Hemet Nesingwary Jr. then talk to the other dwarf, get his quest, turn it in at Hemet again.
This should unlock several other quests. Get [31] Panther Mastery [31]Tiger Mastery and [34]Raptor Mastery. No need to get the Green Hills of Stranglethorn quest yet, it’s the page quest and you only need to take it once you have gathered enough pages to complete the chapters. Let’s start hunting!
2. Kill River Crocolisks which can be found all along the river in northern Stranglethorn Vale until you find 2
Large Crocolisk Skins. While you search for crocs you can also kill Young Tigers close to the river for Tiger Mastery.
3. Then kill 10 Young Tigers (or as much as you still got left)
Tigers can be found mostly south and around the Nesingwary camp.
4. Kill Young Panthers, they are mostly found on the other side of the river to the east (41,10).
5. Once you have finished the above quests, go back to Nesingwary’s Expedition. Turn in Tiger and Panther mastery, get the follow ups [33]Tiger Mastery and [33]Panther Mastery.
6. Go west until you reach a plateau (30,9). Up there you can find Panthers and Tigers. Kill 10 of each.
7. Further southwest on the plateau you should find Stranglethorn Raptors, kill 10.
8. Go south and down the plateau until you find the troll camp at Bal’lal Ruins (29,20).
It should take a while to get 15 Bloodscalp Ears, 9 Bloodscalp Tusks, 1 Bloodscalp Totem and 25 Bloody Bone Necklaces, but it is a nice grinding spot anyway. If you don’t have enough trolls there is another camp northeast at the Tkashi Ruins (33,15).
9. Once you’ve collected all of that, go west to the shore and move along the shore towards the north until you find Crystal Spine Basilisks. If you run short on Basilisks, there is more on the lower plateau to the east along the shore. If there aren’t any basilisks just go kill some trolls until they respawn. Kill basilisks until you get 10 Singing Crystal Shards.
10. After that go take a swim until you reach the loc (24,22), right under you should be some ruins guarded by murlocs. Against one of the outer walls of those ruins you should see a big tablet, if you put your pointer over it the cog should appear and it should say “Gri’lek the Wanderer” (it should also sparkle). Dive and click the tablet to loot the Tablet Shard, you should be able to do that without aggro’ing any murlock.
11. Go back to Nesingwary’s Expedition. Turn in the raptor, panther and tiger mastery quests, get the follow ups.
Go directly to Grom’gol base camp. Turn in:
- [34]Hunt for Yenniku, don’t get the follow up.
- [34]Bloodscalp Insight, get the follow up.
- [37]The Vile Reef (elite)
- [37]Bloody Bone Necklaces, don’t get the follow up.
You should be level 34 by now.
Level 34
Fly to Booty Bay. Turn in the 4 following quests:
- [31]Supply and Demand, get the follow up [36]Some Assembly Required
- [32]Investigate the Camp
- [35]Singing Blue Shards, don’t get the follow up
- [35]Bloodscalp Ears
Hearthstone to Orgrimmar, visit the class trainer, repair, sell, visit the auction, etc.
You should have the cloth stacks from the shopping list by now, if you don’t have them, buy as much as you still need from the AH. Go to the Horde Cloth Quartermaster Vehena in the Valley of Spirits in Orgrimmar. Turn in [60] A donation of Silk right away.
Another last thing before you go, if you don’t have the cooking profession yet, go learn it. Talk to a city guard and ask him for a cooking trainer. You don’t need to level cooking up, you just need to train the profession and to become an Apprentice Cook, it will unlock some cooking quests for easy XP. Grab the 10 Turtle Meat you saved when we were in the Shimmering Flats, and you’re finally ready to go again.
Take the Zeppelin to the Undercity.
Fly to Tarren Mill, Hillsbrad.
Get the following quests:
- [30] Humbert’s Sword (Elite)
- [32] Stone Tokens
- [32] The Hammer may fall
- [34] Infiltration
- [34] Prison break in
1. Go inside the Inn, and get the quest [31]Soothing Turtle Bisque from Christophe Jeffcoat, also buy 1x Soothing Spices from him. Turn in the quest immediately. While you’re inside the inn, set your hearthstone to Tarren Mill.
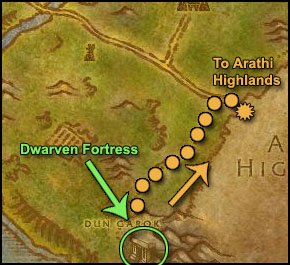
2. Go southeast to the Dwarven Fortress of Dun Garok (69,73). Your first task will be to make yourself a way inside the fortress and find a Keg of Shindigger Stout, they can mostly be found on the side rooms down the stairs.
Then you’ll need to find and kill Captain Ironhill, he can spawn a various locations:
- On the top floors, which is good because he can easily be pulled solo there.
- On the big middle room down the stairs.
After you’ve killed Captain Ironhill, keep killing dwarves in the fortress until you’ve completed the kill list of [30]Battle of Hillsbrad and gotten Humbert’s Sword, which is a rare drop from any of the dwarves.
3. Get out of the Dwarven Fortress, get back on the path going northeast and then east into Arathi Highlands.
4. Stay on the road for a while until the location (30,50), north of that point you should see a mound with
some ogres, this area is called Boulder’ gor. Kill ogres there until you complete the kill list from [32]The Hammer May Fall.
Note: Boulderfist Enforcers can only be found inside the cave, which can be entered from the east side of the mound.
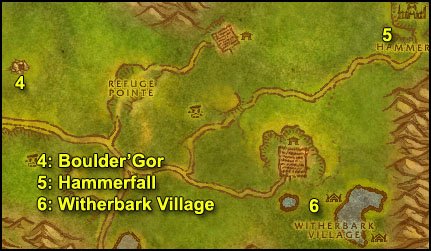
5. Get back on the road, follow it eastwards until you reach a crossroads, follow the smaller trail going northeast, until you reach Hammerfall, the horde outpost.
Further inside the village go up the stairs and turn in the quest [37]Trollbane, don’t get the follow up.
Turn in [32]The Hammer May Fall, get the follow up [32]Call to Arms.
Get the new flight path
Sell, repair, restock food/drink.
6. Head out, go south until you find Witherbark Village (69,60). Kill trolls in there until you finish the kill list of [32]Call to Arms and then grind here until you hit level 35 (if you aren’t 35 already). If you find a necklace named Pendant of Myzrael, click it to start the quest, and you may equip it too if you don’t have a better necklace.
Level 35
Hearthstone to Tarren Mill. Turn in the 3 quests, get the follow ups:
- [30] Elixir of Agony
- [32] Battle of Hillsbrad
- [30] Humbert’s Sword
Go to the inn, on the 2nd floor there’s a room with Captured Farmers inside, and a “Dusty Rug” on the floor. Click it and complete the quest for an extra 3650 exp.
Sell, repair, restock food.
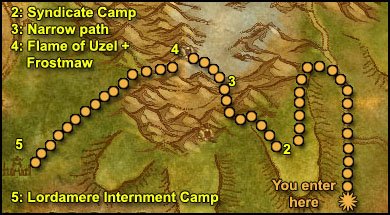
1. Head west to the Yeti Cave. Go inside the cave, and look for the 2 braziers named Flame of Azel and Veraz. Right click them to turn them off.
2. Get out of the yeti cave, go north and slightly northeast, find the plateau named Corahn’s Dagger (48,81). You’ll find a syndicate camp there, kill those humanoids until you get a Syndicate Missive.
3. Once you have the Syndicate Missive, go west, you should quickly stumble upon a camp with alliance npcs, don’t get too close or they will aggro you and you’ll die quickly. To the north you should see a narrow path to Alterac Mountains (42,77). Before you go through this pass, kill some lions in the area until you get a Fresh Carcass (if you didn’t get one already that is).
4. Once you have a Fresh Carcass, go through the snowy path, you should be able to locate a yeti cave soon at (37,68). Clear yourself a way inside the cave, then click the Flame of Uzel.
Get back to full health/mana, and check if your potion timer is ready, because we’re about to summon a level 37 yeti, Frostmaw. When ready, place the Fresh Carcass on the Flame of Uzel and wait a little bit, frotmaw should show up within the next 20 seconds. Kill it and loot “Frostmaw’s Mane“.
5. Exit the cave, go west back to the plains area in Alterac Mountains and then southwest until you find the Lordamere Internment Camp (21,82).
Kill everything in the camp, including the non agressive undead npcs. You can get stone tokens from the Dalaran Guards and Theurgists, and the Bloodstones from the undead npcs: Ricter, Alina, Dermot and Kergan Darkmar. Kergan is in the other house, on the 2nd floor. He’s guarded by a level 36 mob, Warden Belamoore so kill this one first, then kill Kergan and loot the last Bloodstone. You don’t need Belamoore’s Journal for anything, it is just lore, you may destroy it.
Once you got the 4 bloodstones and 10 Stone tokens, hearthstone back to Tarren Mill.
Turn in:
- [34]Infiltration, don’t get the follow up
- [34]Prison Break In, get the follow up
- [32]Stone Tokens, get the follow up [34]Bracers of Binding
6. Now is the time for one of those missions: impossible. Head southwest to the river and follow it until you have the alliance town of Southshore in view. Not too close or you’ll get aggro from the guards, they’ll see you from very very far. (55,52) is a good spot.
With maxed clip plane you should see Helcular’s grave, which is at the eastmost tip of the southshore graveyard. Wait till the 3 guards patrolling close to this area are as far as possible then sprint for the grave, right click it, complete the quest log which just showed up as quick as possible and then run for your life, back the way you came from. You will most likely get aggro and die, but that’s ok!
If you have troubles doing this part, I made a quick video of it here:
Helcular’s Revenge Video
Go to Tarren Mill.
Fly to the Undercity, go speak to Varimathras, he is in the same room as Sylvana, the banshee queen. This room is behind the Apothecarium, you have to use the gate of the Apothecarium to access it.
Turn in [32]Battle of Hillsbrad, also get the quest [42]Into the Scarlet Monastery if you plan on going to Scarlet Monastary later on.
Sell, repair, restock consumables. Fly back to Tarren Mill.
Go west and then north into Alterac Mountains, as if you were going to the Lordamere Internment camp.
However this time go further north towards those rubbles around the big purple dome of Dalaran (20,77). Kill elementals and the dalaran humanoids in this area until you complete [34]Bracers of Bindings and [35]Dalaran Patrols.
When done, hearthstone to Tarren Mill or run there if it’s still on cooldown. Turn in the 2 quests.
Sell/Repair, restock food/drink.
Fly to Hammerfall, Arathi Highlands.
In Hammerfall, turn in [32]Call to Arms and get the follow up.
This should make you ding 36 or you should be pretty close.
Level 36
Talk to the innkeeper and set your hearthstone here. If you have any important skills/spells that you’d like to learn, fly to Undercity and either train there or take the zeppelin to Orgrimmar. Afterwards come back to Hammerfall.
Get the quests:
- [33] Foul Magics
- [34] Hammerfall
- [37] Sigil of Strom
Turn in the quest [34] Hammerfall at Tor’Gan who is standing close to the exit of Hammerfall and take the follow up [34] Raising Spirits
**If you have 225/225 in first aid, you may want to go to the house which is to the left after entering the Hammerfall. The trauma surgeon there will give you a quest to become an artisan in first aid. The quest is done immediately, you have to bandage injured soldiers as fast as possible, prioritizing the most injured ones. It’s also an easy 5500 xp. If you fail it, abandon and re start the quest.**
Time to hunt!
Kill all the raptors you find on your way: you need 10 Highland Raptor Eyes.
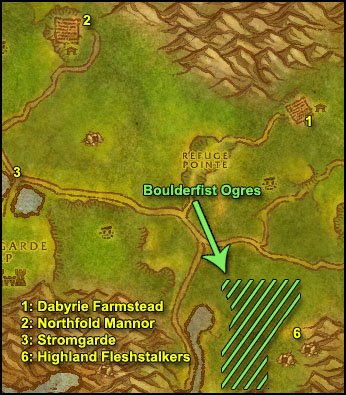
1. Head west to the Dabyrie Farmstead (57,41). Kill the following mobs:
Fardel should be around the field.
Marcel should be in the stables.
Kenata should be in the small house on top of the hill.
2. Once you’ve collected the 3 heads, head west to Northfold Manor (35,30). Kill the syndicates there until you have 10 Bloodstone Amulets.
3. Go south until you reach Stormgarde Keep. Kill Syndicates here until you get Sigil of Strom from one of them. Be careful not to get too many adds while you pull.
4. Head back to Hammerfall, make sure you get the last Highland Raptor Eyes you need.
Turn in the following quests:
- [33] Foul Magics, don’t get the follow up
- [37] Sigil of Strom, don’t get the follow up
- [34] Raising Spirits, get the follow up and go talk to Gor’mul in the northwest corner of the village, turn in the quest and go back to torgan, turn in the quest and get the follow up [37]Guile of the Raptor.
Sell, repair, restock food/drink.
**Kill any Highland Fleshstalker you might find on the way**
5. Head southwest to the opposite side of the zone till you find the Boulderfist Camp (52,72). Kill the Ogres there until you finish what’s on the kill list of [38]Call to Arms.
6. Then go to the plains north and west of the Ogre caves, all over that place you’ll find Highland Fleshstalkers, kill as many as you still need to get 12 hearts.
After that, go grind on Ogres or Trolls to the east, until you are about 20000xp from level 37.
7. Hearthstone back to Hammerfall, turn in [37]Guile of the Raptor.
Go to Gor’mul (the npc close to the forge), turn in [37]Guile of the Raptor. Wait a few seconds then he will have a quest up for you, take it and go back to Tor’Gan, turn in the quest [37]Guile of the Raptor again.
Go up the stairs in front of the inn and turn in [38]Call to Arms, don’t get the follow up.
Fly to the Undercity, when there, turn in the quest [36]To Steal from Thieves, right next to the Bat Handler.
Get out of the Undercity, go take the Zeppelin to Orgrimmar.
First thing you do when in Orgrimmar is set your hearthstone at the Innkeeper. Visit your trainer if you didn’t do that yet. Then go to the Cleft of Shadows, and find Craven Drok, an orc NPC who roams in between the two slopes there. Get the quest [30]Alliance Relations from him (it’s green so there will be no yellow question mark over his head).
Go to the western exit of Orgrimmar, in the last hut before the exit turn in this quest and get the follow up.
Sell/repair/restock consumables.
Fly to Thunderbluff, go to the Hunter Rise and turn in the quest [37]Frostmaw, don’t get the follow up.
This should make you ding level 37
Level 37
Your quest log should look like this at the moment:
[30] Alliance Relations
[42] Into the Scarlet Monastery (Dungeon) [optional for those who go to Scarlet Monastery]
[35]Tiger Mastery
[35] Family Tree
[36] An Unusual Patron
[36] Hostile Takeover
[36] Raptor Mastery
[36] Some Assembly Required
[38] Panter Mastery
[35] Martek the Exiled (Complete)
[37] Goblin Sponsorship
==Note== Before you move on to the next step, I recommend checking the auction house and buying 2 Elixirs of Water Breathing, unless your class has some sort of underwater breathing spell, or if you’re an undead. It will make some of the steps much easier.
Fly to Sun Rock Retreat in Stonetalon Mountains, and go to Desolace. If you don’t know the way, here is how:
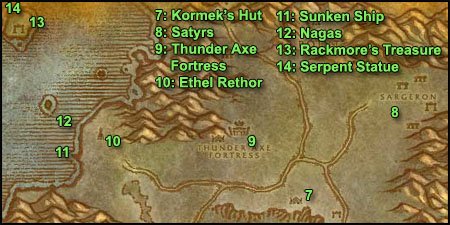
After entering Desolace, go south and slightly southeast to find Kormek’s Hut (62,38), get the quest [39] Bone Collector from Bibbly F’utzbuckle.
Go west to the big tower named Ethel’rethor, next to it you’ll find a human npc named Azore Aldamort (38,26), get his quest: [33]Scepter of Light.
Then go southwest of the tower, along the coast you should find a book on a barrel, the book is named “Rackmore’s Log” (36,30), click it and get the quest [36]Claim Rackmore’s Treasure.
Go southeast until Ghost Walker Post’s main entrance (56,56), a bit to the south you should find 2 NPCs next to a small hut, get the quest [33]Gelkis alliance and [35]Khan Dez’hepah.
A little to the north, turn in [35] Family Tree at Nakata Longhorn and get the quest [37]Catch of the day from him.
To the west you’ll find the last quest giver of Ghost Walker Post, Takata Steelblade, turn in [30]Alliance Relations, get the follow up as well as the other quest [33]Befouled by Satyr.
Talk to Maurin Bonesplitter who should be right behind you, turn in the quest [33]Alliance Relations and get the follow up [33]The Burning of Spirits.
Go south till you hit the road and then follow it until you get to Shadowprey Village (25,75).
Get the quest [38]Hand of Iruxos from Taiga Wisemane, who should be standing on top of an earth mound, to the right after a couple of huts. Go down to the pier and get the quests [36]Other fish to Fry and [35]Clam Bait.
Go to the end of the pier and get the new flight path.
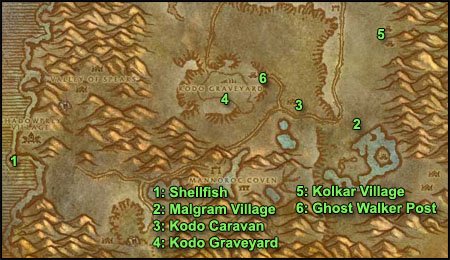
Start of XP Circuit:
1. From the pier, dive into the water. Use your Elixir of Water Breathing if you have one, it will make this step much easier. Look around at the bottom of the sea for Shellfish Traps
Keep doing this until you have gathered 10 Shellfish.
When you have 10 Shellfish go back up to the pier and talk to the troll named Jinar’Zillen, turn in 5 Shellfish twice to get 2 Bloodbelly Fish(put those aside in your bags, make sure you don’t eat them).
Sell, repair, restock food/drink. This is going to be a long circuit.
2. Get out of the village the same way you came from, follow the road eastwards until you reach Magram Village (66,68). Time to slaughter some centaurs! Kill Magram Centaurs until your reputation with the Gelkis Centaurs is Friendly. That means you need to kill 50 Magram centaurs, check your reputation tab (“u” key) to see your progression. Stop killing them once you are friendly with the Gelkis.
3. Go northwest to Scrabblescrew’s Camp (60,61), get the quest [34]Kodo Roundup. Find the Kodo Kombobulator Rod in your bags and put it on a hotkey. Go west to the Kodo Graveyard and use the rod on any Ancient, Aged or Dying Kodos, when you got one following you, bring it back to the goblin who gave you the quest, he will say something about you needing to inspect the beast, right click on the kodo you just brought and you should get a quest update. Repeat this step 4 more times and the quest will be complete. Turn in the quest.
4. Go back to the Kodo Graveyard, look for kodo skulls on the floor, they are labelled as “Kodo Bones” on your tooltip and they shimmer. Gather 10 kodo bones, watch out though, clicking the skulls sometimes spawns a Kodo Apparition, which are easy to kill at your level but just don’t click a skull if you are low on health.
5. Go east to the Kolkar Village and find their chief, Khan Dez’Hepah (73,47), who stands in one of those high tents. Kill him, loot his head.
6. Go to the horde camp just above and around the Kodo Graveyard, turn in [35]Khan Dez’hepah at Felgor Twocuts (56,59) and [37]Catch of the day at Nakata Longhorn just a bit further north.
7. Go northeast to Kormek’s Hut (62,38), turn in [39]Bone Collector.
8. Go northeast to the Satyr Village of Sargeron (75,28), kill all the satyrs you need to complete the quest [33]Befouled by Satyrs.
9. Go west to Thunder Axe Fortress and enter by the main gate (56,29). Look for a “Burning Gem” in your bags, and put it on a hotkey. When you kill the burning blade npcs in the fortress, use the gem on them when they are about to die (10-20% health left or so), you will gather infused burning gems that way. You need 15 burning gems in total, and you will probably gather them while we reach the
other objectives for other quests we have to do here.
Go inside the main building right infront of the main gate, clear the way to the central room, inside of it you should see a big red crystal. Clear the whole room before you touch it. Save your long cooldown abilities and have your potion timer ready too. When you are ready, click the crystal, a Demon Spirit will spawn, it’s lvl 37 but kinda hard for this level, so use everything you got if needed. Kill it and loot the Demon Box.
Get out of this building, and go to the guard tower just next to the main gate, clear the two npcs on each side of the hut on the top floor of the guard tower, then get full health before you go in, because 2 npcs are inside. Kill them both and loot the Rod of Light from the seer.
Before you leave the fortress, kill mobs until you get the remaining Infused Burning Gems you need for the quest [33]The Burning of Spirits. You should already have found a Flayed Demon Skin on one of the burning blade npcs you killed, if you haven’t stay in the fortress and kill everything until you get one. Right click it to start the quest [33]The Corrupter.
10. Get west to the tower of Ethel Rethor (38,27), turn in the quest [33]The Scepter of Light at the npc Azore Aldamort. Get the follow up [38]Book of the Ancients.
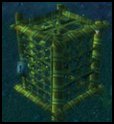
11. Go west to the shore, follow it south until you see the mast of a wrecked ship, sticking out of the water at (33,31). Use an Elixir of Water Breathing if you have one, take a swim, all around this ship you’ll find Giant Softshell Clams, open them to find clam shells, which you need to open to find meat inside.
You need to gather 10 Soft-Shelled Clam Meat that way. Also in the same area you’ll find those giant lobsters named Drysnap Crawlers and Pincers. Kill those until you find a Silver Key
(takes me 10 kills on average, depending on my luck).
12. Go north of the sunken ship until you find nagas, kill them until you find Rackmore’s Golden Key. The key can drop from any naga in the area, it takes me about 10 kills each time depending on my luck.
13. Once you’ve got the key, swim northwest, kill any Slitherblade Myrmidon, Naga or Sorceress you find on your way, this is a long swim. Keep swimming northwest until you reach Raznajar Isle, and step on the isle by the eastern side of it (30,9). You should find Rackmore’s Chest here, at the base of a tree.
Click on it and complete the quest.
14. Go to the northern tip of the isle, you should find a Serpent Statue. Clear the few nagas around it, get full HP/MANA then go click the statue, this will spawn Lord Kragaru, a level 38 naga. Kill him and loot the Book of the Ancients from him.
15. Swim southeast, back towards the tower of Ethel Rethor, kill the remaining Slitherblade you need on your
way back, make sure you complete the quest [36]Other fish to Fry. Go to Azore Aldamort (38,27) and turn in [38]Book of the Ancients.
This should make you ding level 38, or you should be close.
Level 38
16. Go southeast to Ghost Walker Post, find Maurin Bonesplitter and Takata Steelblade (52,53). Turn in the 3 quests, do NOT get the follow up from [33]The Corrupter, but get the other follow up: [33]Alliance Relations.
17. Go south, back on the road and follow it south then west, until Gelkis Village where you must find their chief: Uthek the Wise (36,79), turn in the quest, don’t get the follow up.
18. Go to Shadowprey Village, turn in the last 3 quests:
- [35] Clam Bait
- [36] Other fish to fry
- [38] Hand of Iruxos, don’t get the follow up.
Get the quest [31] Hunting in Stranglethorn from Roon Wildmane.
Hearthstone to Orgrimmar, go turn in [33]Alliance Relations at Keldran (in the last hut close to Orgrimmar’s west gate)
End of XP Circuit:
Go visit your class trainer, sell/repair, check the AH, restock consumables.
Take the Zeppelin to Grom’gol base camp. In Grom’gol, take the following quests:
- [36] The Defense of Grom’gol
- [37] Headhunting
- [38] Mok’thardin’s Enchantment
- [42] Split Bone necklace
Your quest log should look like this now:
==Note== You should also have [31] Hunting in Stranglethorn and [36] An Unusual Patron.
Time to hunt!
Start of XP Circuit:
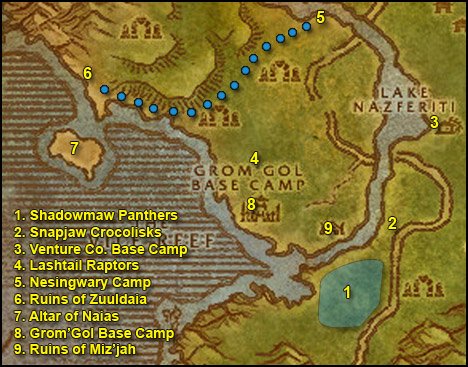
1. Go southeast, stop at (35,35), you should be close to the Master Tribal Leatherworker npc, all around this area you need to find Shadowmaw Panthers, they are stealthed. The best method is to run around killing everything in the area while hitting “tab” key alot to target any panther you find on the way. Keep doing this until you have 10 Shadowmaw Panther kills and 8 Shadowmaw Claws, and also a Pristine Tigress Fang. This may take a while so just kill everything in the area until you’re done.
2. Go northeast along the river, you’ll find Snapjaw Crocolisks soon (39,31). Keep going north along the river to find more crocs, kill them until you got 5 snapjaw crocolisk skin. If you run out of crocs to kill, you can go further to the north and kill the venture co. goblins while waiting for the crocoliks to respawn.
3. Go north to the Venture co. Base Camp, clear yourself a path to the top of the oil rig, which you can access at (42,18). Find Foreman Cozzle at the top of it, kill him and loot his key. Get off the oil rig and go to the small houses just a little south of where you are, inside you’ll find Cozzle’s footlocker (42,20)
Open it and get the Fuel Regulator Blueprints. Get out and kill Venture Co. Geologists until you have 8 Tumbled Crystals.
4. Go west/southwest to the area which is north of Grom’gol base camp (30,23), you’ll find plenty of Lashtail Raptors there. Kill 15.
5. Move north to the Nesingwary’s Expedition Camp, on your way you need to kill 10 Elder Stranglethorn Tigers (31,19). When done with that move further north/northeast until Nesinwary’s Expedition camp.
At Nesingwary’s camp, turn in the 3 mastery quests and get the follow ups:
- [37]Tiger Mastery
- [40]Panther Mastery (elite)
- [41]Raptor Mastery
Also turn in [31] Hunting in Stranglethorn.
6. Go southwest around the plateau and then west until you hit the coast. Continue northwest along the coast until you find the ruins of Zuuldaia (20,12). Kill every troll in the area until you have 20 Shrunken Heads.
7. Go southwest and swim towards the island with water elementals on it (20,22), find the Altar of Naias and use the Gift of Naias which should be in your inventory. Naias will spawn, kill it and loot the Heart of Naias.
8. Go back to Grom’gol base camp.
Turn in:
- [37]Headhunting, get the follow up [41]Bloodscalp Clan heads
- [36] The Defense of Grom’gol, get the follow up [37]The Defense of Grom’gol
- [36] An Unusual Patron
- [38] Mok’thardin’s Enchantment, get the follow up [41]Mok’thardin’s Enchantement
You should be level 39 by now.
Level 39
9. Go east to the Ruins of Mizjah (37,31), kill 10 Mosh’ogg Brutes and 5 Mosh’ogg witch doctors.
Go back to Grom’gol and turn in the quest [37]The Defense of Grom’gol.
Fly to Booty Bay, turn in the quests:
- [37]Goblin Sponsorship, get the follow up.
- [36]Hostile Takeover
- [36]Some Assembly Required, get the follow up [38]Excelsior
End of XP Circuit:
While you are in Booty Bay, check the AH to see if there is any Stranglethorn Lost Pages you miss for sale. The next time we come to Stranglethorn Vale will be the last, so you better make sure to have all 4 chapters complete as soon as possible:
1. Chapter I: page 1,4,6,8
2. Chapter II: page 10,11,14,16
3. Chapter III: page 18,20,21,24
4. Chapter IV: page 25,26,27
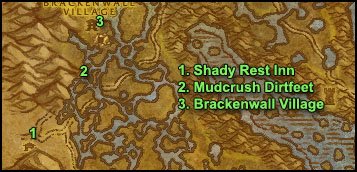
Sell/repair/restock consumables and take the boat to Ratchet. Once there, fly to Camp Taurajo. Get on the main road and go south until you reach (46,75). There the road should fork: go east and follow the road until you reach Dustwallow Marsh.
Start of XP Circuit:
1. Just as you enter the zone you should see a burnt down house called “Shady Rest Inn“. Take the three quests here:
- [35] Suspicious Hoofprints
- [35] The Black Shield
- [37] Lieutenant Paval Reethe
and follow the road northeast. After a while you should see an arrow on the mini map pointing you to Brackenwall Village.
2. Follow it until you reach the village. On the way at (35,38) you should see an ogre with a quest ([36] Hungry!). Take the quest and continue to the village.
3. Once there take the flight path. If you have First Aid, go to Balai Lok’Wein and buy your First Aid manuals there (if you haven’t got them already). Once that is done, make the inn your new home. Then go to Krog (right next to the inn) and turn in the three quests we took at the zone in. Take the follow up and also take [35] Inspecting the Ruins.
Go to Do’Gol and turn in [35] The Black Shield. Take the follow up. Now get the following quests:
- [35] Theramore Spies
- [36] The Hermit of Witch Hill
- [37] Check Up on Tabetha
- [37] Twilight of the Dawn Runner
- [39] Help Mudsprocket
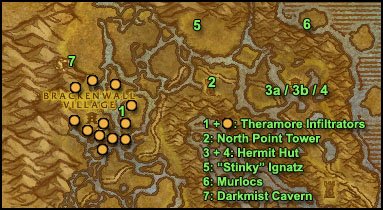
1. Exit the village and kill 9 Theramore Infiltrators all around the village (They are stealthed so put on track hidden as a hunter etc). If you have troubles finding the Infiltrators, just use tab while running around (they are non-aggressive so you have to find and attack them first).
A great suggestion from one of our readers:
Quote:
Along the road from Brackenwall Village to North Point Tower (we’ll go there in the next step) are two tents with Theramore guards. Right behind them are at least three (2 behind the first and one more behind the 2nd) Theramore Infiltrators, which I found way more easy to localize than the guards around Brackenwall Village. I killed only three guys around Brackenwall in 2 full circles(might be someone else was on the same quest though), then got annoyed and decided to skip, then found the other guys.
There are also 3 more infiltrators on a little island at (41,25) and 3 more around (38,26).
2. Once done, from Brackenwall Village, go east, slightly northeast to (46,24), where you should find North Point Tower. Fight your way inside where you should see a bloodelf NPC called Ithania. Speak to her and follow her dialogue to set her free.
Then fight your way to the top of the tower. There should be cargo lying around, looking like this:
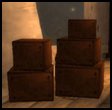
Loot it. Get off the tower.
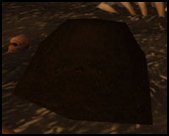
3a. Now go east to (55,26) where you should find “Swamp Eye” Jarl. Turn in [36] The Hermit of Witch Hill and get the follow up. There is also a loose dirt mound on the ground looking like this:
Right click it to get the quest [35] The Lost Report. Also inside the house or close you should find Mordant Grimsby. Take his quest: [36] What’s Haunting Witch Hill?. Now all around “Swamp Eye” Jarl’s house you’ll find Giant Marsh Frog critters.
Kill them while also killing Risen Husks or Risen Spirits. When they die, they’ll spawn spirits (in most cases) which will give you a quest update. Continue doing this until you finish both [35] Marsh Frog Legs and [36] What’s Haunting Witch Hill?.
3b. Once done go back to the hut and turn the quests in. Get both follow ups.
All around the hut you will see plants looking like this:

Loot 9 of them.
4. Once done go back to Mordant Grimsby and turn in [36] The Witch’s Bane. Get the follow up. Go right outside the hut and while standing on the dock, right click the torch Grimsby gave you. After a few seconds a level 36 demon will appear. Kill it and you should get a quest complete message. Go back to Grimsby and turn the quest in.
5. Go northwest to (46,17) where you should find “Stinky” Ignatz. Take his escort quest and follow him around while he does whatever. (This quest seems to be bugged sometimes and doesn’t work. If this is the case for you just skip it)
6. Once the escort quest is done you’ll be at around (48,24). Go northeast again and climb over the hill. On the other side of the hill you should see Dreadmurk Shore with a lot of murlocs. Kill those murlocs until you have 8 Mirefin Heads.
7. Once done, hearthstone to Brackenwall Village. Turn in all your quests, don’t take follow ups. Go northwest of the village to Darkmist Cavern and kill spiders there until you got 20 Unpopped Darkmist Eyes and 5 Acidic Venom Sacs.
8. After that is done go back to the village and turn in [37] The Black Shield. Take the follow up. Talk to Krog and complete the quest.
End of XP Circuit:
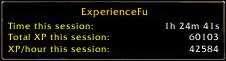
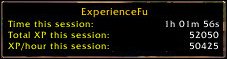
Unfortunately I misclicked and didn’t take the screenshot, but it was an amazing xp rate, it was approximately like this:
Time played this session: 1 Hour
Total EXP this session: 51000 XP
XP/Hour this session: 51000 XP/Hour
You should be level 40 by now.
LEVEL 40
Fly to Ratchet. Turn in [37] Stinky’s Escape at Mebok Mizzyrix then fly to Orgrimmar.
Train your new skills, sell stuff, repair, restock consumables and check the AH.
When done, fly back to Brackenwall Village.

Start of XP Circuit:
1. Mount up and ride southeast from the village to about (40,36). You should see an ogre there. Take his quest and escort him (a short way) to Reethe, a human npc. Be sure to be full mana/hp because once the ogre is done talking, you’ll have to fight off 4 level 35-37 npcs. The ogre can tank one, you’ll have to deal with the other three in some way. Use crowd control, potions and long cooldown skills.
2. When you are done, mount up. Go southwest, back to Mudcrush Durtfeet (35,38). Turn in [36] Hungry! then ride to the Shady Rest Inn (at the border to the Barrens) and turn in [35] Inspecting the Ruins at Inspector Tarem. (Just some extra exp)
3. Now ride southeast to (46,57) where you should find Tabetha. Turn in [37] Check Up on Tabetha. In the same house you should find Apprentice Garion. Get [38] The Grimtotem Weapon and [39] The Reagent Thief from him. Just outside the house you should find Apprentice Morlann. Get [39] Direhorn Raiders and [40] The Zeppelin Crash from him.
** From now on kill every Noxious Shredder and Darkfang Creeper on your way**
4. Open your map and take a look at the “island” you are currently situated at. It’s called “The Quagmire“. Stay on that island and search for Mottled Drywallow Crocolisks. Whenever you see a bunch of them together, right click your Captured Totem from your inventory. Now make sure that whenever you kill a croc, the totem is up or you won’t get a quest update.
There is a particular problem for hunters, mages and warlocks for this quest. The mob must have you in target when it dies, or it doesn’t work. For warlocks this is less of a problem, just summon an imp and tank yourself while dotting. For mages, just make sure the mob is not frost nova’d when you finish it. But for hunters it’s a little different especially if you are beastmastery specced and don’t have your weaponskill maxed. In that case, do the following:
Place your totem and stand next to it with your pet. Put your pet on: passive, stay and growl off. Pull a crocodile with distracting shot from as far as possible and try to hit it with as many shots as possible before it reaches you. Once it’s next to the totem and once you are meleeing it, sick your pet on it. Normally your pet shouldn’t take aggro and until the croc is dead. If it does get aggro though, just turn the pet’s attack off (click on the passive icon), move away a good distance, get aggro with distracting shot and finish it off either meleeing or with shots. You must have aggro first though.
5. When you are done move east towards (53,57). On the way you should find a few Noxious Shredders (kill as many as you still need). When you are there, talk to Moxie Steelgrille and turn in [40] The Zeppelin Crash. Take both [40] Corrosion Prevention and [39] Secure the Cargo! from her.
You’ve probably already noticed that blue lightning rays are being shot at you. Open your inventory and search for Ooze Buster. Put it on a hotkey. This is used to dissolve oozes all around the crashed zeppelin wreck. You can only use the buster while you energized by the blue rays though (which are being shot by power core fragments). The power core fragment next to Moxie always shoots energy at you so stay as much around that fragment and pull oozes to it. Once they are close use your Ooze buster on them. This will dissolve the oozes and you’ll get a quest update. You need to do this 10 times.
At the same time loot 8 Zeppelin Cargos in little boxes all around the floor. If you run out of oozes/boxes next to Moxie, just go to the other power core fragments around the crashed zeppelin. The only disadvantage with those is that they turn off and stop to shoot energy every 30 secs for 30 secs. So if your fragment isn’t shooting energy at you, wait a little until it switches on again, then dissolve your oozes. When done, return to Moxie and turn in both quests. Take the follow up [39] Delivery for Drazzit.
6. East of you should be some mountains. Follow those mountains north/northwest until you reach a tauren camp called Direhorn Post. Kill 12 Grimtotems here (any). While killing them you’ll stumble on an undead npc called Apothecary Cylla. Kill her and loot “Sealed Letter“.
Right click it for a quest.
7. When done, return to Tabetha’s house. Turn in everything you got. Mount up and follow the path south to Mudsprocket (new town, yay!). Take the flightpath there. Turn in [39] Help Mudsprocket and [39] Delivery for Drazzit. (No need to gather quests here now, we’ll come back in a bit)
8. Fly to Brackenwall Village. Turn in both quests and take [37] The Black Shield from Krog.
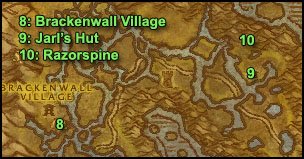
9. Mount up and ride back to the hermit hut at (55,26). There you should see another quest from the dirt pile. Take it and also turn in [35] Jarl Needs Eyes at Jarl. Take the follow up. Also get the quest [35] The Severed Head from the Loose Dirt.
10. Go north/northeast of the hut to the little passage-way that leads to the murlocs we killed earlier (57,19). Razorspine should be patrolling there. Kill him and loot his blade. Go back to Jarl and turn the quest in.
Hearthstone to Brackenwall Village. Turn in [35] The Severed Head and take the follow up. Fly to Thunderbluff.
Go to the Hunter Rise and turn in [37] The Black Shield. Take the follow up. Go to Melor Stonehoof and get the quest [45] Deadmire.
End of XP Circuit:
Fly to Orgrimmar.
Sell/repair/restock consumables, vist the AH. Make the inn your home again.
Take the Zeppelin to the Undercity, go to the Undercity and take a bat ride to Hammerfall, Arathi Highlands.
Get the following quests:
- [40] Call to Arms
- [40] Foul Magics
- [40] The Broken Sigil
- [40] The Real Threat
Mount up and ride to Stromgarde Keep. As you enter go left at the first occasion. Clear your way through until you reach a big dark house. Go behind the house and you should be at (29,63) approx. Marez Cowel spawns at that location, in front of the butcher table:

If she is not there, she can also be found on the second level, in a small square-shaped area above the above described spawn point.
Kill her and loot the Befouled Bloodstone Orb from her. Fight your way back to where you went left earlier and go right instead (still on the lower level). You should see two ways now. One going south and one going west. Go west and kill every Stromgarde Defender/Troll Hunter/Vindicator you come accross until you have 5 Sigil Fragments. (They don’t drop often, but when they drop you get like 3 at once or so)
Once that is done go back to the intersection from before and instead of going west, go south. You should see ogres and trolls there. Clear your way down then straight until you see a tower. Clear your way around the destroyed houses and search for Or’Kalar. Kill him then kill as many Boulderfist Shamans and Lords as you still need. Mount up and run back to Hammerfall.
You should be level 41 by now.
Level 41
At Hammerfall first turn in two quests at Tor’Gan, take the follow up [40] Sigil of Thoradin. Go to Zengu (on top) and turn the quest in. Don’t get the follow up. Also turn in [40] Call to Arms and [40] The Real Threat up top.
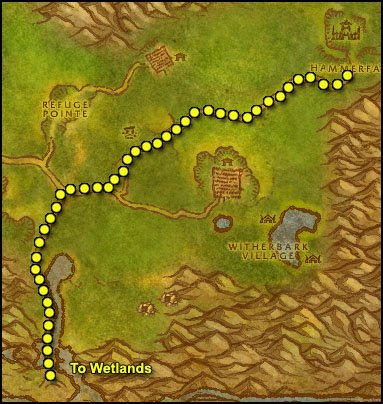
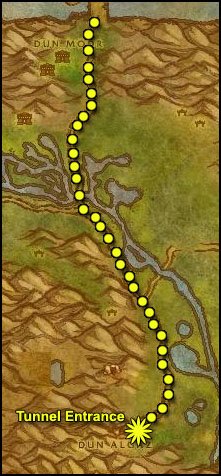
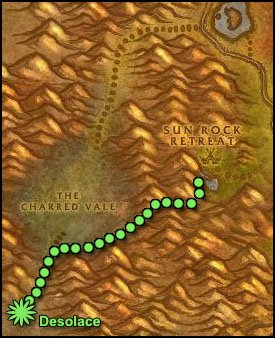
Our next stop is the outpost of Kargath in the Badlands, follow the map above to get there: first enter the Wetlands then go south to find the tunnel entrance of Dun Algaz (54,70), keep following the tunnels till you enter Loch Modan.
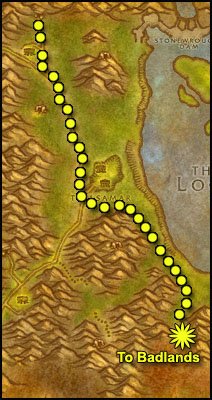
In Loch Modan follow the path shown on the map until you enter Badlands.
After entering the Badlands:
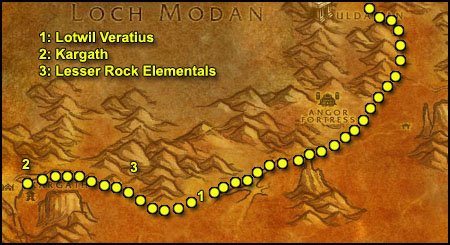
1. Go south, then southwest and then west while staying close to the mountain to your right-hand side. At some point you’ll find a very small camp with a few gnomes in it (25,45). Get the quest [37]Study of the Elements: Rock from Lotwil Veratius.
Go further west while killing every Lesser Rock Elemental on your way, until you find Kargath Outpost (4,44). Get the flight path, sell/repair.
2. Go back to the Lesser Rock Elementals just east of here and kill them until you have looted 10 Small Stone Shards.
3. Go to Lotwil Veratius, turn in [37] Study of the Elements: Rock, don’t get the follow up.
Get ready for the next chapter!
I hope you enjoyed this guide. If you want to return the favor, please try to contribute.
Original Author: Jame
Revamp & Text Formatting & Picture Editing: Snowflake
Picture Editing: Subere
© Copyrights www.wow-pro.com All rights reserved