
 by Krowa
- Quests
- Items
- Locations
- Quest objectives to kill
- NPCs
- Locs
Credits
I wanted to say thank you to Jame for his wonderful guides (mimicked this one after his). Also, a big fat thanks to my hubby for all his help with the maps in this guide. Couldn’t have done it without you.
Guide
Before we start, I highly recommend that you get your Flying Mount. It will save you time on getting places. If you followed Jame’s Horde Leveling Guide – Chapter VI (65-70), you should be at least level 70 by now.
==Note== I will be using the following color code for Aldors and Scryers.
In Lower City of Shattrath pick up Chief Apothecary Hildagard from Fantei (64,70) and Learning to Fly from Nutral (63,41).
After arriving in Shadowmoon Valley, head east to Shadowmoon Village. Turn in Apprentice’s Request to Dama Wildmane, Chief Apothecary Hildagard, and Learning to Fly.

Get the new flight path.

Go to the inn, make it your home location.
Outside the Inn pick up What Strange Creatures…, and A Haunted History. Also get:
- A Grunt’s Work…
- The Path of Conquest
- The Hand of Gul’dan
- The Sketh’lon Wreckage
Do not get the quest from the poster.
==Note== In Shadowmoon Valley, kill any Felfire Boars, Vilewing Chimaera, and Scorchshell Pincer you see. You can stop once you get enough to finish A Grunt’s Work….
1. Right outside the main gate get Besieged! from Blood Guard Gulmok.
Kill as many Infernal Attackers as you run into while doing other quests. You have to steal aggro from the Shadowmoon Scouts to get the credit for the kill.
2. Go South towards Magma Fields.
Kill Felfire Diemetradons while collecting Ever-Burning Ash all around the magma lake. Do a full circle around the lake. Kill any Felfire Boars you run into (found on the south and east side of the lake). Keep following the magma lake while heading toward the east side of Shadowmoon Village. Don’t worry about completing the quests.
==Note== Don’t fall into the magma, it burns and you will lose hp while in it, so don’t go after the ash that is in the green waters.
3. Once you get to the east side of Shadowmoon Village and run out of Ash and Diemetradons, head east to Sheth’lon Wreckage and kill mobs there until you get the three journal pages needed for The Sketh’lon Wreckage.
4. Hearthstone to Shadowmoon Village and turn in The Sketh’lon Wreckage, get the follow up.
5. Go outside the main gate and kill Infernal Attackers until done with Besieged! Turn it in at the entrance to Shadowmoon Village. Get the follow up.
1. Go to Legion Hold, southwest of Shadowmoon Village. Easiest way to do this is to fly up to the communicator at (23.6, 36.9). Try to position yourself between the wall and communicator. Put on the disguise (Box of Tricks in your bag) and listen to the conversation. Once it is done go back to Shadowmoon Village.
2. Ouside the main gate turn in To Legion Hold. Get the follow up.
3. Go back to Legion Hold. This time go to (22, 35) where you will find Fel Reaver Armor Plate on the ground (next to a huge fel reaver). Loot it.
Now go to (26, 41), green lake on map, and loot the Fel Reaver Power Core from the bottom of the lake.
4. Go back to main gate of Shadowmoon Village and turn in Setting Up the Bomb. Get the follow up.
5. Once again go to Legion Hold (22, 39). Activate the Fel Bomb while standing on a green circle in front of Prophetess Cavrylin. There is an elite named Morgroron that wonders in and out of the area. Wait for him to leave. You will probably have to kill Prophetess Cavrylin and then activate the bomb. Go back and turn in Blast the Infernals! Get the follow up.

Sell junk, repair, and get food.
1. Take the main road out of the village and follow it south. You should find Parshah walking between the first fork in the road and the letter D in
Deathforge. Turn in Find the Deserter when you find him and get the follow up.
2. Head east of the road to the Slag Watch (38.5, 38). On top of the building you will find Scout Zagran. Turn in The Deathforge. Get the follow up.
3. All around the building kill Deathforge Guardians and Deathforge Summoners. When done turn in Minions of the Shadow Council to Scout Zagran. Get both available quests – The Summoning Chamber and The Fate of Kagrosh.
4. Go out of the building and head northeast towards arch at (38, 35). Go down the hill into Deathforge (face east). Follow the road.
-
- At the bridge go into the first entrance on the right. Make your way to the room that is directly ahead.
- If you run into the Infernal and two tinkerers who path here, kill them. You should get the
Elemental Displacer from one of them.
- Once inside the room, stay to your right and follow it to end of tunnel. At (35, 40) you will find Kagrosh, search him and get his pack.
- If you still need the Elemental Displacer, kill Deathforge Smiths and Deathforge Tinkerers on the way out.
- Go out the way you came and at the bridge go into the second entrance. Go right at the end and follow that road down. You will see three Summoners and Summoner Skartax (within red circle) performing a ritual.
- Disrupt the ritual using the Elemental Displacer on Summoner Skartax. A Fire Elemental should appear and all summoners should die. Now fight the elemental to get the quest completed.
5. Go back to Scout Zagran and turn in the two quests. Get the follow up Bring Down the Warbringer!
6. Go back into the Deathforge. Go into the first entrance. This time go left once you get into the room with Mo’arg. Click on the gate and quickly go in. Go down following left side and soon you will come to a room with guards and Warbringer Razuun. You can pull each guard solo, and then kill Razuun. Loot the orders. Get out of Deathforge.
7. Go north to (40.5, 31.5) and wait for Asghar to walk by. Kill him and loot Asghar’s Totem.
8. Find Parshah and turn in Asghar’s Totem, get the follow up (Parshah walks between the first fork in the road from Shadowmoon Village and the letter D in Deathforge).
9. Head toward the magma lake. Don’t forget to kill things on the list. Pick up Ever-Burning Ash and kill Diemetradons if still needed.
10. Go towards main gate and turn in Bring Down the Warbringer! to Blood Guard Gulmok. Get the follow up.
Sell junk, repair, and get food.
Also turn in A Haunted History and What Strange Creatures…, get the follow ups.
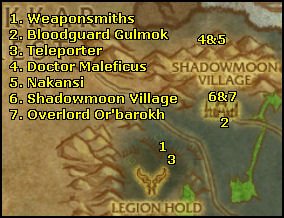
1. Go to Legion Hold (24, 34) and kill Weaponsmiths until you get a Legion Teleporter Control.
2. Go back to Blood Guard Gulmok and turn in Gaining Access. Get the follow up.
3. Go to Legion Hold (25, 36) and step inside the teleporter. You will be teleported to Nakansi. Turn in Invasion Point: Cataclysm. Get the follow up.
4. Go down the ramp and as you are coming around the curve, straight ahead you should see a sparkling chest with Doctor Maleficus next to it. Get rid of near by Gan’arg Technicians and while sticking to the right, sneak up from behind and you can solo pull the doctor. Kill him. Loot his key, then open the chest.
5. Go back to Nakansi and turn in The Art of Fel Reaver Maintenance. Before getting the follow up, read below.
-
- The moment you get a quest, a 5 minute timer starts up. Make sure to dismiss pets, ghouls, minions before starting.
- Run down the ramp and you will see three sparkling control consoles between two purple fire braziers.
Click on one to gain control of a Fel Reaver Sentinel. Pet bar will appear.

- # 1 use to kill Deathforged Infernals (lined up in a military formation in front of you). Use it every time it’s up.
- # 3 use to stun trash mobs
- # 4 gives a speed buff, use to run from Elites
- There are more Infernals up the stairs, you will need those (not enough at the main level)
- If you get kicked out of the reaver, just run up the ramp and take control again.
- After getting 60/60 Deathforged Infernals killed, dismiss your reaver and you will be at the control consoles. Run up to the quest giver and turn in the quest before the time runs out.
- If you die, you end up at the spirit healer east of Shadowmoon Village and you have to go all the way back to the Legion Hold transporter.
(I died just after getting 60/60 and had little over 2 min left on the timer. Ran back to transporter, retrieved my body and turned it quest with time left)
6. After you turn in The Fel and the Furious, get the follow up. Hearthstone back to Shadowmoon Village.
7. Get out of the inn and go up the hill. Turn in News of Victory to Overlord Or’barokh.
No map needed here
1. Put on the Spectrecles (it replaces your helm). You will see Shadowmoon Zealots all over the village. Kill 12 of them. Turn in Spectrecles, get the follow up. Don’t forget to put your helm back on.
Sell junk, repair, and get food.
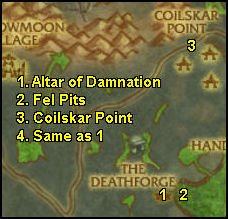
1. Go out the main gate and follow the road south until you come to the letter D in Deathforge. Head east towards (42, 45) and you will arrive at The Altar of Damnation (just under the G in Deathforge). Turn in The Hand of Gul’dan. Get the follow up.
2. Go east to Fel Pits. Kill the Enraged Earth Spirits and Enraged Fire Spirits close to the totem (use your Totem of Spirits). The totem will capture their spirits. Enraged Earth Spirits release Enraged Earth Shards when they die. Totem lasts for about 30 sec so don’t forget to refresh when needed. When done, go back to the quest giver and turn in Enraged Spirits of Fire and Earth . Get the follow up.
3. Go north to Coilskar Point. Use the totem on Enraged Water Spirits to capture them. You can find them in any body of water. Best spot is east of Coilskar Point at (50,26).
Aldors
Ride east to Altar of Sha’tar.
Get the new flight path.
Sell junk, repair, and get food.
Go to the Inn and make it your home.
Pick up quests:
- Tablets of Baa’ri from Anchorite Ceyla
- Karabor Training Grounds from Exarch Onaala
- The Ashtongue Tribe
Turn in any Marks of Sargeras for Aldor reputation to Harbinger Saronen.
Fly to Shadowmoon Village.
Both
4. Go to Altar of Damnation and turn in Enraged Spirits of Water. Get the follow up.
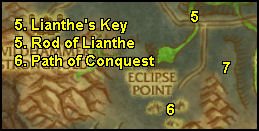
5. Head for the main road and take it east/southeast until you come to a bridge. Take a right just past the bridge and kill Eclipsion Archmages, Centurions, and Bloodwarders until one of them drops Lianthe’s Key.
6. Keep following the road to Eclipse Point. Once you get pass the main gate you can go either way. You will see stairs leading toward three Elites standing in a hut. To the left of them you will see a chest inside a big hut. Loot it to get The Rod of Lianthe.
7. Head out the way you came and follow the mountain to your right. Go to (51,63) and you should get a message, The Path of Conquest completed. Find a safe spot and fire your Kor’kron Flare Gun. Wait a few seconds and you will be able to turn in your quest to Kor’Kron Wind Rider (he flies to you). Get the follow up.
==Note== If you can get a group to help you, now would be a good time to do the follow up quest chain – Breaching the Path, When Worlds Collide, Tabards of Illidari, and Dissension Among the Ranks.
Scryers
Go to The Sanctum of the Stars.
Get the new flightpath.
Sell junk, repair, and get food.
Go to the Inn and make it your home.
Pick up quests:
- Tablets of Baa’ri from Arcanist Thelis
- Karabor Training Grounds from Larissa Sunstrike
- Ashtongue Broken from Varen the Reclaimer
Turn in any Sunfury Signets for Scryer reputation to Battlemage Vyara.
Both
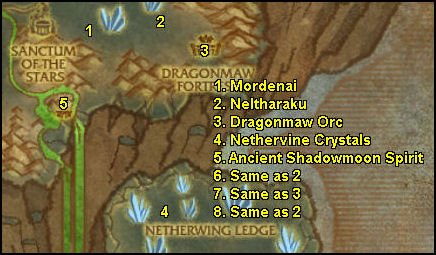
1. Go east of Sanctum of the Stars. In the field full of elite dragons flying around you will find Mordenai (around 59,60). Get his quest Kindness.
Two objectives to accomplish here:
- Stay in the area and kill Rocknail Rippers and Rocknail Flayers, then feed the Mature Netherwing Drakes by placing Rocknail Flayer Carcass on the ground. Do not attack the drakes, they will not harm you. Just let them feed and fly away. Do this 8 times.
- Capture Enraged Air Spirits using the totem we used before on enraged water, fire and earth spirits. They are pretty scattered so don’t forget to reset your totem each time you need it.
==Note== Rocknail Flayers drop Rocknail Flayer Carcass. Rocknail Rippers drop Rocknail Flayer Giblets, which you can combine 5 of to make a
Rocknail Flayer Carcass. Keep an eye out for Ruul the Darkener – lvl 71 elite humannoid riding a dragon in this area.
When done with Kindness, even if not done with the other objective, turn it in to Mordenai and get the follow up.
2. Fly up high until you find a dragon named Neltharaku (yellow ? on your map).
- Turn in the quest Seek Out Neltharaku. Get the follow up Neltharaku’s Tale.
- Click on the dragon again and listen to his tale. Turn in the quest and get the follow up. (see map below for Neltharaku’s route).
3. Go to the Dragonmaw Fortress and kill 15 Dragonmaw Orc (any of them). There are bunch on them outside the gates. When done turn in Infiltrating Dragonmaw Fortress to Neltharaku. Get the follow up.
4. Fly to Netherwing Ledge, south of Dragonmaw Fortress and collect Nethervine Crystals until done with To Netherwing Ledge!
5. Fly to Altar of Shadows (58,70) and turn in Teron Gorefiend – Lore and Legend. Get the three available quests from Ancient Shadowmoon Spirit.
6. Go back to Neltharaku and turn in To Netherwing Ledge! Get the follow up.
7. Go inside Dragonmaw Fortess. You will find Enslaved Netherwing Drakes with their captors next to them.
- Use the Enchanted Nethervine Crystal on the drake and wait a few seconds.
- The drake will turn friendly and will be fighting off it’s captor.
- Help the drake kill it’s captor.
- Once the orc is dead the drake will fly away and you will get an Enslaved Netherwing Drake freed message.
- Rinse and repeat 5 times.
8. Go back to Neltharaku and turn in The Force of Neltharaku, get the follow up Karynaku. Finish capturing Enraged Air Spirits if still needed.
==Note== If you plan on farming Netherwing reputation for the Nether Drake Mount, then find a group to do the Karynaku follow up quest Zuluhed the Whacked. This will allow you to get the Netherwing dailies.
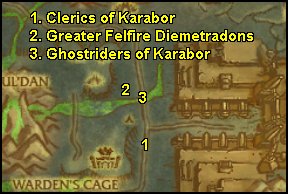
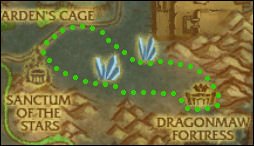
1. Go north to the road and follow it north to (63, 45). Put on the Spectrecles. Kill Clerics of Karabor till one of them drops Gorfiend’s Cloak.
2. At (62,40) you will find scorpions and control consoles next to bridge. Click on the control console. You will gain control of a scorpion for 5 minutes.
Use # 4 on the pet bar to tag Greater Felfire Diemetradons found in the lava river. Rinse and repeat 8 times.
3. Put on Specrtecles. Kill Ghostriders of Karabor till one of them drops Gorfiend’s Truncheon. Don’t forget to put your helm on once done.
==Note== There are four of them together and they make a full circle (on the main road) around The Hand of Gul’dan moving counterclockwise. You can wait here for them or go full circle in clockwise direction to run into them. They come around every five or so minutes.
Aldors
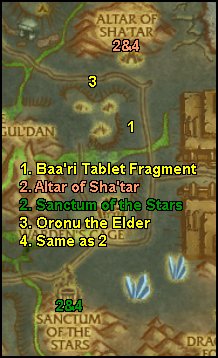
1. Go back to were you found the scorpions. There is an entrance at (61, 38).
- Collect Baa’ri Tablet Fragments from the ground or by killing
- While collecting Baa’ri Tablet Fragments, kill mobs you need for The Ashtongue Tribe (go up the hill to get to the mobs needed).
2. Go to Altar of Sha’tar and turn in The Ashtongue Tribe and Tablets of Baa’ri. Get the follow ups.
3. Go to (57,32). Kill Oronu the Elder. Loot Orders From Akama.
4. Go to Altar of Sha’tar and turn in Oronu the Elder, get the follow up.
Baari Tablet Fragment
Scryers
1. Go back to were you found the scorpions. There is an entrance at (61, 38).
- Collect Baa’ri Tablet Fragments from the ground or by killing Ashtoungue Workers.
- While collecting Baa’ri Tablet Fragments, kill mobs you need for Ashtongue Broken (go up the hill to get to the mobs needed).
2. Go to Sanctum of the Stars and turn in Ashtongue Broken and Tablets of Baa’ri. Get the follow ups.
3. Go to (57,32). Kill Oronu the Elder. Loot Orders From Akama.
4. Hearthstone to Sanctum of the Stars and turn in Oronu the Elder, get the follow up.
Both
Sell junk, repair, and get food.

1. Fly to Shadowmoon Village. Turn in Frankly, It Makes No Sense…, get the follow up.
2. Go out the main gate and follow the road south. When you find Parshah, turn in The Rod of Lianthe, get the follow up.
3. Go to Altar of Damnation (below G in Deathforge). Turn in Enraged Spirits of Air, get the follow up.
4. Go to (48,39). Kill Uylaru. He is where we killed Enraged Fire Spirits before. Disable totems, kill adds, then kill him. Loot Uylaru’s Medallion Fragment.
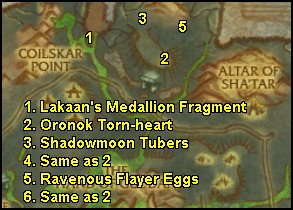
1. Go to (50,23). Kill Lakaan. He is on an island of the large lake in Coilskar Point. Disable totems, kill adds, then kill him. Loot Lakaan’s Medallion Fragment.
2. Go to Oronok Torn-heart (54,23). Turn in Oronok Torn-heart, get follow up. You can sell junk, repair, get food from him.
3. Go northwest and past two fire torches. In the field below you will find Shadowmoon Tuber Mounds.
- Stand next to the tuber and use Oronok’s Boar Whisttle when you see a Domesticated Felboar close by.
- Kill Ravenous Flayer to protect the Felboars.
- The felboar will come to the tuber mound and dig up a Shadowmoon Tuber which you can then loot.
- Rinse and repeat 10 times.
- If the felboar is too far when you whisttle, the tuber mound disappears.
4. Go back to Oronok Torn-heart and turn in I Was A Lot Of Things…, get the follow up.
5. Go to field with tubers and follow it to the end where you see a broken wagon on the ground. In the field ahead and to the right you will find Ravenous Flayer Eggs. Destroy 10 of them. Watch out for Ravenous Flayer Matriarch – level 70 Elite Humanoid roaming in the area.
6. Go back to Oronok Torn-heart and turn in A Lesson Learned, get the follow up.
Talk to him again and pick ”I’m ready to listen to your story, Oronok”. When done turn in The Cipher of Damnation – Truth and History. Get the three quests he has available:
- Borak, Son of Oronok
- Grom’tor, Son of Oronok
- A’tor, Son of Oronok
Sell junk, repair, and get food.
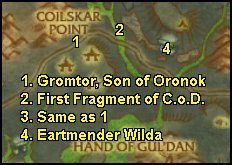
1. Go to Grom’tor, Son of Oronok (44,23). Turn in Grom’tor Son of Oronok, get the follow up.
2. Go east to Coliskar Point. Kill mobs here to get keys. Use the keys to open chests until you get the First Fragment of the Cipher of Damnation.
3. Go back to Grom’tor, Son of Oronok and turn in The Cipher of Damnation – Grom’tor’s Charge, get the follow up
4. Go to Coilskar Cistern (52, 26) and enter the cave.
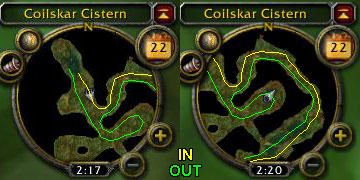
- Follow the right wall. You will come to where Earthmender Wilda is enclosed in a bubble.
- Go up and kill the Keeper of the Cistern to free Earthmender Wilda. She will have a quest for you now.
- Take the quest and escort her out. She makes a little detour, but she is pretty tough.
- See map for routes.
Aldors
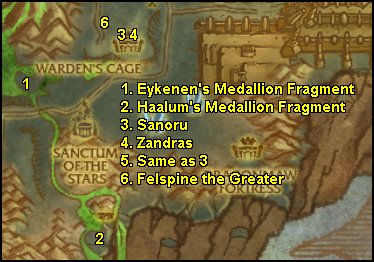
1. Go south to (51,52). Kill Eykenen. He is southwest of W in Warden’s Cage. Disable totems, kill adds, then kill him. Loot Eyekenen’s Medallion Fragment.
2. Go south/southeast to (57,73). Kill Haalum. He is southwest from Ancient Shadowmoon Spirit. Disable totems, kill adds, then kill him. Loot Haalum’s Medallion Fragment.
Hearthstone to Altar of Sha’tar and turn in The Ashtongue Corruptors. Get the follow up.
Scryers
Hearthstone back to Sanctum of the Stars.
1. Go north to (51,52). Kill Eykenen. He is southwest of W in Warden’s Cage. Disable totems, kill adds, then kill him. Loot Eyekenen’s Medallion Fragment.
2. Go south/southeast to (57,53). Kill Haalum. He is southwest from Ancient Shadowmoon Spirit. Disable totems, kill adds, then kill him. Loot Haalum’s Medallion Fragment.
Go to Sanctum of the Stars and turn in The Ashtongue Corruptors. Get the follow up.
Both
Sell junk, repair, and get food.
3. Go to Warden’s Cage (57,49). You will see what looks like a big gray slab in front of a demon. That is a staircase down to where Sanoru is. Turn in Warden’s Cage. Get the follow up.
4. Go up and take ramp/stairs up, entrance at (58, 49). Kill Zandras. Go back to Sanoru and turn in Proof of Allegiance. Get the follow up.
5. Go back down to were Sanoru is. Go down the hall and turn right at the end. Dive into the water and follow the underwater tunnel until you come out at the other end. Turn in Akama. Get the follow up Seer Udalo if you plan on going to Tempest Keep.
6. Go to (56, 44) and kill Felspine the Greater. Loot Felspine’s Hide.
Aldors
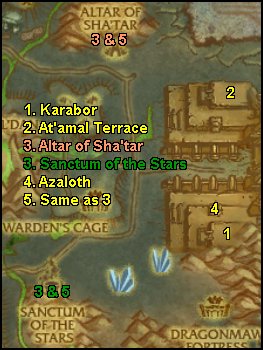
1. Fly to Karabor Ruins (71, 54), a corner of the landing at the top of the stairs, tucked in behind some crates and such. Kill Demon Hunter Initiates and Demon Hunter Supplicants until you get 8 Sunfury Glaives.
2. Go to At’amal Terrace (69, 34). Kill all the mobs needed for Reclaiming Holy Grounds. Watch out for the elites in this area.
3. Go to Altar of Sha’tar. Turn in Reclaiming Holy Grounds and Karabor Training Grounds. Get the follow up.
4. Go to Karabor Ruins. Kill the warlocks all around Azaloth (69,51). One of them should drop Scroll of Demonic Unbanishing. Use the scroll on Azaloth to free him. He will attack you. He is a level 70 Elite Demon with 27.9K HP.
5. Go to Altar of Sha’tar and turn in A Necessary Distraction. Get the follow up.
Scryers
1. Fly to Karabor Ruins (71, 54), a corner of the landing at the top of the stairs, tucked in behind some crates and such. Kill Demon Hunter Initiates and Demon Hunter Supplicants until you get 8 Sunfury Glaives.
2. Go to At’amal Terrace (69, 34). Kill all the mobs needed for The Great Retribution. Watch out for the elites in this area.
3. Go to Sanctum of the Stars. Turn in The Great Retribution and Karabor Training Grounds. Get the follow up.
4 Go to Karabor Ruins. Kill the warlocks all around Azaloth (69,51). One of them should drop Scroll of Demonic Unbanishing. Use the scroll on Azaloth to free him. He will attack you. He is a level 70 Elite Demon with 27.9K HP.
5. Go to Sanctum of the Stars and turn in A Necessary Distraction. Get the follow up.
Both
Sell junk, repair, and get food.
Fly to Garadar. Go west to (27, 43). Turn in Altruis.
(If you plan on doing the instance Shadow Labyrinth – do the three quests, otherwise you can skip them)
Get the three quests he has
- Against All Odds
- Against the Illidari
- Against the Legion
Go north to Zangarmarsh. Use the Imbued Silver Spear at the Portal Clearing (16, 40), west side of Marshlight Lake. Kill Xeleth.
Go to Zabra’jin and fly to Stormspire. Kill Wrath Priestess at Forge Base:Gehenna (42,20) till you get Freshly Drawn Blood. Use the blood and kill Avator of Sathal. The blood is on a 60 second timer so if you need to heal, do it before looting it.
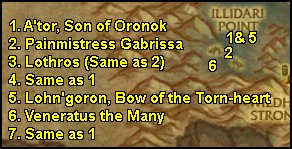
1. Fly to Shadowmoon Village. Go to Illidari Point (29, 50). Turn in A’tor, Son of Oronok to A’tor, Son of Oronok, get the follow up.
2. Go up the stairs and to the right. Kill Painmistress Gabrissa. Loot Crystalline Key.
3. In the same area you should also find Lothros. Kill him.
4. Go back to A’tor and turn in Demonic Crystal Prisons. He will die and next to him Spirit of A’tor will appear. Get the follow up from him.
5. Kill demons in the area till one of them drops Lohn’goron, Bow of the Torn-heart.
6. Go back to the Spirit of A’tor and turn in Lohn’goron, Bow of the Torn-heart. Before you get the follow up, read below.
- You will get a 10 min buff called Spirit Hunter
- Go south to (30, 57) and kill demons in that area
- Once you are in the area the Spirit Hunter will make Veneratus the Many appear
- Veneratus the Many is a level 71 mob with 22K HP
- Kill it and loot Second Fragment of the Cipher of Damnation
7. Go back to the Spirit of A’tor and turn in The Cipher of Damnation – Ar’tor’s Charge, get the follow up.
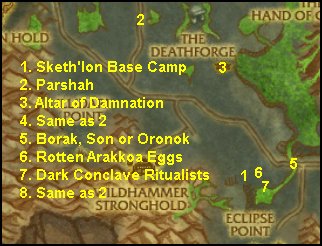
1. Go to Sketh’lon Base Camp (45, 57) and collect 8 Sketh’lon Feathers from the ground.
2. Turn in Sketh’lon Feathers to Parshah. Get the follow up.
3. Go to Altar of Damnations (42, 45) and turn in Escape from Coilskar Cistern. Equip the Unfinished Headpiece. Get close to Gul’dan and use the unfinished headpiece to imbue it.
4. Go back to Parshah. Turn in Imbuing the Headpiece, get the follow up.
5. Go to the main road and head east. Talk to Borak, Son of Oronok (47, 57) and turn in Borak, Son of Oronok. Get the follow up.
6. Go back to the Sketh’lon Base Camp and look for eggs. Loot them till you get a Rotten Arakkoa Egg.
7. Go to (41, 61) and kill Dark Conclave Ritualists, then use Staff of Parshah to end the ritual.
8. Go back to Parshah and turn in Thwart the Dark Conclave.
Go to Lower City in Shattrath and turn in Of Thistleheads and Eggs… to Tobias (64, 70). Get the follow up.
Sell junk, repair, and get food.
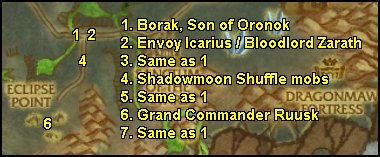
1. Go to Borak, Son of Oronok (47, 57) and turn in The Bundle of Bloodthistle. Get the follow up.
2. Go across the bridge and use the Bundle of Bloodthistle. Hide on side of bridge. Envoy Icarius and Blood Lord Zarath (level 71 Elite Hummanoid) will appear just up the road. Wait until the elite vanishes and Envoy Icarius will come toward the bloodthistle. Kill him and loot Stormrage Missive.
3. Go back to Borak and turn in To Catch A Thistlehead, get the follow up.
4. Go across the bridge and at the end go right towards Eclipse Point. Kill Eclipsion Archmages, Centurions, and Bloodwarders until you complete The Shadowmoon Shuffle.
5. Go back to Borak and turn in the quest. Get the follow up.
6. Go to Eclipse Point. Wear your disguise (looks like a mask). Stay clear of dragonhawks, they can see through the disguise. Talk to Grand Commander Ruusk (in a hut on top of stairs).
7. Go back to Borak and turn in What Illidan Wants, Illidan Gets…, get the follow up.
Go to Oronok Torn-hart and turn in The Cipher of Damnation – The First Fragment Recovered and The Cipher of Damnation –
The Second Fragment Recovered.
Go to Shadowmoon Village and turn in Felspine the Greater and A Grunt’s Work…(if you haven’t already).
Fly to Garadar. Go to Altruis in Nagrand. Turn in the three quests (if you did them). Get the follow up Illidan’s Pupil.
Talk to Altruis again and listen to his story. Turn in Illidan’s Pupil, get the follow up The Book of Fel Names if you plan on doing Shadow Labyrinth.
Thank you for using my guide. I hope it was helpful. If you find any errors or have suggestions, please let me know by leaving a post.
excellent job!When Northland launched, We went there, who thought to level up here in the shadowmoon Valley? You must be very catious!
Nice guide and some suggestionsWell done Krowa. I really like it. My suggestions though are directed to wow-pro admins. Why this guide is not in the Horde leveling guides page, it is completed and does not fit in “Needed guides” page. Any possibility to include this guide in the addon as well, in addition to Netherstorm (Hopefully Krowa will make it) guide. By this all outland reagins will be coverd in excellency.
Love the guide!Thanks for putting in the hard work. Shadowmoon has some great content and I enjoyed following it through your guide. My only suggestion is to throw in a couple hearthstones when travelling around in order to make it a little quicker. But that’s a minor quibble. It was a well-researched guide.
Sure. I guess I can doJiyambi. Let me know when you find out if the Netherstorm guide is being worked on or not. If you still need it done, I’ll be happy to tackle it.
Krowa
Hmm, I’ve heard nothing fromHmm, I’ve heard nothing from the person who was planning to write that Netherstorm guide. Are you still interested in doing one? If so, I can message them to be sure, and if they don’t respond (I suspect they have gone inactive), the guide is all yours.
I’m glad you found thisI’m glad you found this guide useful. I thought it made sense to follow a well laid out format that Jame had established with his guides. Good to see that the guide is being used.
Will fix. Thanks.
KrowaWill fix. Thanks.
Krowa
Thank you for your comment.Thank you for your comment. For right now I have no plans to write an Alliance guide. Maybe one day down the road if it isn’t done yet. Originally I was going to work on the Netherstorm Leveling Guide, but someone else had signed up for it, so that’s how I ended up writing the Shadowmoon guide instead.
Krowa
This is very, very, veryThis is very, very, [i]very[/i] good. For more than one reason.
[list=1]
[*]The guide is amazing. Very complex, nothings has to be added, great layout, so good to see that you’ve decided to follow Jame’s format! Really, it makes it alot easier to follow if all did the same!
[*]You’re helping Jame’s big task. This is probably the best. Jame got a lot of work with his Leveling Addon, and the rest of the Wrath of the Lich King guides.
[/list]
A huge thanks to your both for this hard work!
oops![quote]6. Go to Eclipse Point. Wear your disguise (looks like a mask). Stay clear of dragonhawks, they can see through the disguise. Talk to Grand Commander Ruusk (in a hut on top of stairs).[/quote]
Just a note to say that when in disguise and done talking tot he commander, DO NOT mount up again as it will break the disguise and you will be dispatched with haste. :jawdrop:
Wow!Excellent guide. This was as good as James guides and that is saying something. I had never been to shadowmoon valley until finding this guide and I really enjoyed it. Thank you so much for your time and effort.
Typo:
Go to Lower City inTypo:
Go to Lower City in Shattarath and turn in Of Thistleheads and Eggs… to Tobias (64, 70). Get the follow up.
Shattarath should be Shattrath.
Comment me on my blog. http://kostada.blogspot.com/
I can’t believe this. I’veI can’t believe this. I’ve been waiting for a Shadowmoon guide for a while. And for Jame to add it to his horde leveling guide? That’s fantastic.
Do you plan on writing an Alliance one anytime soon?
-Edit- And you even made different circuits for aldor/scryer? Awesome.
Comment me on my blog. http://kostada.blogspot.com/
Nice guide :)Really nice guide guys 🙂
Ripsaw pats around roughly in the front area of Legion Hold.
There is also another drop quest from Smith Gorlunk http://www.wowhead.com/?quest=10754 that I usually do while working on “Reclaiming Holy Grounds.”
On my later toons that I started taking through SMV, I began to combine the “Cipher of Damnation – Grom’tor’s Charge” with the Earthmender escort since I was killing the same mobs that drop keys & there are lots of boxes in there. Just a suggestion 🙂
In regards to the Netherwing dailies, I was able to two man Zuluhed with my buddy tanking (at the time he was a 77 DK). Just try to clear the bottom two rooms & pull him in to one so you avoid the archers. Then when Zuluhed puts up his portal to summon his elite demon, just have pull Zuluhed to the other room before his demon shows up (that you cleared prior to engaging him). If you continue on to do the Netherwing dailies (you need epic flying) the SMV achievement seems a guarantee. I have always got it, but I am not sure if I would have if I did not do these. But come on, Netherdrakes are cool mounts :p
If you do not do the Netherwing dailies & are looking for the SMV achievement might a suggest: http://www.wowwiki.com/Shadowmoon_Valley_quests
Hope this helps!
Thank you so very much.Thank you so very much. When I decided to make this guide, I never imagined I would be getting so many nice comments. This was my first guide ever so I’m very happy to hear that it is working out well.
Thank youImpressive. Most impressive.
Thank you for making the awsome guide. Looks just like one of Jame’s guides and I would say that is highest praise there is! Had to register on wow-pro just to comment.
Thanks for the info. FixedThanks for the info. Fixed typos and updated the coords. If you find more, let me know.
Couple small mistakes…I’m almost through the guide and have noticed a couple small errors. The first two are just spelling errors:
“Kill as many Infernal Attackers as you run into while doing other quests. You have to steel aggro from the Shadowmoon Scouts to get the credit for the kill.”
Should be “steal aggro”,
“==Note== Don’t fall into the magma, it burns and you will loose hp while in it, so don’t go after the ash that is in the green waters.”
Should be “lose hp”.
Finally, one of the coords is off.
“Go south/southeast to (57,53). Kill Haalum. He is southwest from Ancient Shadowmoon Spirit. Disable totems, kill adds, then kill him. Loot Haalum’s Medallion Fragment.”
Haalum is at (57, 73).
Great guide so far. Thanks a bunch!
Thanks for using this guideThanks for using this guide and for the comments. I’m happy to hear it works well. Do you remember at which point you killed the Overseer Ripsaw? Let me know and I can add it into the guide. 🙂
Very nice – get you closer to the Loremaster AchievementI followed this guide over the weekend and experienced excellent results. All steps worked as outlined. After completing the guide, I was 83 out of 90 quests completed towards the achievement. A few comment/suggestions here for those working on the Loremaster achievement.
1. Definitely complete the Gorefiend’s quests. There were three plus one more after the turn-in of 3 quests.
2. Kill Overseer Ripsaw and get the Illidari-Bane Shard, which will open up a small quest line and I was able to get over the 90 limit.
3. The visit to Altruis and the three follow-up quests do not count towards the Shadowmoon achievement. However, they do count for Nagrand achievement so just in case you are a few short for Nagrand.
In any case, this is a solid guide and thus highly recommended. Thank you very much, Krowa. 🙂
If you come upon anyIf you come upon any mistakes, please let me know. Otherwise I hope it is helpful when you get to using it. 🙂
Soon Well Right now I am level 68, but I hope to use your leveling guide at 70! It looks pretty good from what I’ve seen.https://www.wow-pro.com/sites/all/modules/smileys/packs/example/smile.png
Thanks a bunch. If you findThanks a bunch. If you find any mistakes or have any additions you think I need to incorporate when you are going through Shadowmoon Valley, let me know. I know there are quite a few group quests in this area that I did not include because it is so hard to find a group here. I plan on talking my guildies into helping me out with the “Zahulu the Wacked” so I can try out the dailies and add them in. This will also get us closer to having enough quests for the Shadowmoon Valley achievement as well as being able to increase the netherwing rep.
Wooo, this looks awesome. ImWooo, this looks awesome. Im currently leveling a Frost Mage, hes 62 at the moment, (4 days /played :<<< ) so i'll soon be around the right level, where i believe i should give this guide a try. Usually, im 69, nearly 70 when i start in Shadow Moon, but i reckon this will be a great help and probably take me to 71 or so, which will be good for when i start Northrend. So, id just like to say in advance to you, thanks alot for this awesome looking guide, congrats to your husband on clearly having what us gaming lads are after, and a massive thanks to Jame, for all your hard work, which has helped me so much over the years in leveling my Paladin, Hunter, Rogue, Priest, Death Knight and Mage.
Thanks. I tried veryThanks. 🙂 I tried very hard to follow your guidelines on how to write a guide. I love how your guides are well organized and easy to read, so I wanted to do the same here. This was my first guide ever and I’m glad I had your guides right there to model after. If you find any mistakes or have suggestions on adding other quests into the circuits, please let me know.
I’m speechless. I neverI’m speechless. I never expected this to happen. It looks like one of my guides, this is awesome 😉
I promise I’ll try the guide myself as soon as I get a character in that level range again!
Hahaha, wonderful She didHahaha, wonderful 😉 She did do an awesome job, that is for sure!
Ahhhh! My life is complete!Ahhhh! My life is complete! With the completion of this guide, my wife is now a full-fledged gamer!
What more could a guy ask for? 😀
<3 I love you, honey! You did a great job! <3
Thanks for the great reviewThanks for the great review and the edits. You are correct, this is horde side only. I’m not entirely sure about the Shadowmoon Valley achievement being covered here, but will look into it. If not, I will add an addendum to it.
Krowa
Wow, I’m really impressed. IWow, I’m really impressed. I haven’t read it in detail at all yet, just skimmed through it, but if I didn’t know better, it looks like one of Jame’s guides! I do have a question: will this guide get us the Shadowmoon Valley achievement? If not, would you be willing to add an addendum to it at a later time that will get us that achievement (including group quests and what-not)? I know a lot of folks are only doing these higher level Outland zones for achievement purposes.
Anyway, I’m definitely going to try out this guide and also put it into TourGuide form if you don’t mind. It looks great, thanks very much for the hard work, again I’m quite impressed!
Real quick edit: you should hide the picture (file attachments) at the bottom, you can do this by unchecking the option when you edit the guide. I’ll go ahead and do it for you this time, but now you know how to in the future 😉
Oh and it looks like this is just Horde, so I’m changing the title accordingly, correct me if this is wrong.