
 by SilverKnight
Introduction
Tired of trying to find Mankrik’s wife? Don’t want to deal with Blood Elves for another 12 levels? This is the guide for you!
WARNING: If you hate people with senses of humor, press your friendly neighborhood Back button now, and save yourself a lot of heartache. 😛
To totally steal from Jame (since trying to re-invent the wheel would be rather redundant):
This guide is made for FAST leveling through the use of Optimized Quest Circuits. With this guide, questing will be very efficient and you’ll not waste any second running around and trying to figure out in which order to do your quests. Follow each instruction carefully and you will see for yourself. The quest choices and order to do them are optimal so that you run as few as possible while doing the most possible, turning several quests at the same time. It will be like grinding, because you’ll be killing stuff almost non-stop, besides you’ll also be completing a bunch of quests at the same time!
Everything described in this guide can be done solo (beside when I say otherwise). You can, of course, follow this guide while duoing, grouping, it’s not a problem, it works too.
DISCLAIMER: This guide does NOT take into account tradeskills, class specific quests or PvP. It’s 100% focused on getting the most experience possible in the shortest possible time while doing a lot of quests and enjoying as much content as possible. Any race/class combination can do this guide. Any complaints about PvP, tradeskills, or class specific issues will be ignored.
Basic rules
- Spend your talent points so that you kill things as fast as possible. (e.g: Priest should specialize in Shadow Talents, Warriors in Arms/Fury, etc.
- Don’t waste your time trying to find groups for questing, you can solo everything that is described in this guide unless I say otherwise. Only group with someone when it’s not gonna be a waste of time (e.g: meeting the person at the other end of the zone to show him the way to where your quest is, that is a waste of time)
- Try to always log out in an inn or in one of the major cities when you take a break.
- When I say you should make an inn your new home location, it’s for a good reason, and it will save you much time.
(Thanks for that, Jame. :wink:)
Useful Addons
In order to use all of this to the best of your ability, having some sort of coordinate addon (be it DMiniCoords, TomTom, or an coord displayer baked into another addon like Titan or SimpleMinimap) is pretty much necessary, since much of the guide–and many, many online websites–rely on coordinates to give an accurate display of where certain items/NPCs may be.
I’ve also found QuestHelper or the free version of Carbonite Quest to be invaluable in speeding up questing route information.
=NOTE=: Those addons, while useful, have been known to use up a great deal of memory while enabled, so if you’re encountering undue lag or graphical issues, don’t use them. Instead, an addon like Map Notes (Fan Update) might be more useful.
Now, to steal from Jame again:
Color Code
- Quests
- Items
- Locations
- Quest objectives to kill
- NPCs
- Locs
Shorthand
- FP = Flight Point
- NW = Northwest
- SW = Southwest
- NE = Northeast
- SE = Southeast
Go-Go Gadget Guide!
Level 13
First thing’s first: Head to Brill in Tirisfal Glades and speak with Apothecary Johaan at (59,52). Accept [10] Delivery to Silverpine Forest. Then run southwest into Silverpine Forest.
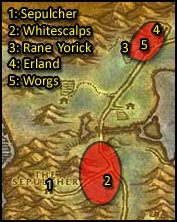
1. Head south until you reach the Sepulcher. Set your Hearthstone here. While here, grab all available quests, including:
- [10] Prove Your Worth
- [12] A Recipe for Death
- [12] Lost Deathstalkers
- [14] Border Crossings
- [14] The Dead Fields
Buy whatever food and water you need, then head east.
2. Kill five Moonrage Whitescalps, while killing whatever Ferocious Grizzly Bears that you see. =NOTE=: Make sure to avoid the woodland area directly west of the road, as level 21 elites like to path around and eat you. They apparently like the taste of lowbie in the morning. 🙁
3. Head north along the road until you reach (53,13). Speak to Rane Yorick and turn-in [12] Lost Deathstalkers. Accept [11] Wild Hearts.
4. Make certain to kill any and all Mottled Worgs that you see for their hearts while heading slightly North to (56,9). Speak with Deathstalker Erland and accept the (only-slightly) self-explanatory quest [11] Escorting Erland. He complains about Worgs coming out of the woodwork to attack him. This isn’t an exaggeration. Erland is also about as physically fit as an 82 year old cancer patient, so make sure he doesn’t wind up tanking more than one, or he goes squish and you wind up with a small army of angry dogs on you.
5. Whenever Erland finishes aggroing everything in a five mile radius, turn it in at Rane and accept [11] The Deathstalkers’ Report. If you aren’t done gathering hearts, head north and kill the furry little buggers until you collect the rest and/or your vengeance has been sated. Once you’ve done so, either hearth, deathwarp, or run back to the Sepulcher.
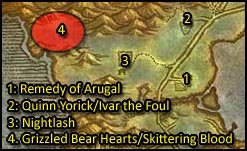
Turn in all available quests, and accept [11] Arugal’s Folly (1) and [11] Return to Quinn. While there, turn in [11] The Deathstalkers’ Report, get [12] Speak with Renferrel, then immediately turn that in at Apothecary Renferrel and accept [15] Zinge’s Delivery. Leave the Sepulcher and head North.
1. Go to (52,28) and head to the second floor of the building. Touch the Dusty Spellbooks and grab the Remedy of Arugal.
2. Head North to (53,12) and talk to Quinn Yorick to turn in [11] Return to Quinn. (Surprise, surprise.) Leave the building and speak with Rane again to get [12] Ivar the Foul.
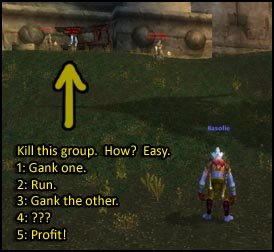
Head to the barnyard at the end of the field, picking off any undead that might decide to spit in your Cheerios by linking with another nearby mob. When you enter said barnyard, make sure to press your back against the wall and wait for a mob to path up to you:
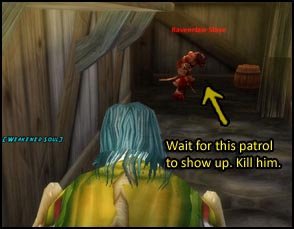
Kill him quickly, then proceed around the corner. Ivar the Foul has a nice little friend chilling easily within aggro distance, and there’s no way to pull solo. If worse comes to worse, focus down Ivar, loot him, and book. (OR, you could be stupid and do what I did: kill the add first, run away because Ivar has jacked you up, die to the mobs you forgot to kill outside the barn, then rez and kill everything in sight with extra prejudice. Twice.)
3. Once you’re done, turn in [12] Ivar the Foul, then head SW to the Dead Fields at (45,21). Nightlash might already be spawned, but if she isn’t, kill all the Rot Hide Gnolls you see until she does. Kill her, loot her essence, then continue NW.
4. Head to the (36,15)-ish area and kill whatever spiders and bears you see for their Skittering Bloods and Grizzled Bear Hearts. =NOTE=: Watch out for another Son of Arugal that likes to path around and ninja-gank unsuspecting adventurers. If you ever need a reason to go solo SFK, do so out of pure hatred for Arugal’s furry flunkies. I’ll give you cookies.
Once you’ve finished, either Hearth to the Sepulcher or deathwarp.
And here’s a word from our sponsors: DEATHWARP XXL!
“What is Deathwarping?” you ask. It’s a very easy process of killing yourself in order to spirit rez at whatever graveyard you pop up at. It sucks for repair bills, sure, but when you’re level 13, you don’t have to worry too much about breaking the bank because you thought it would be funny to punch that 21 elite in the head a few times out of spite. By and large, deathwarping can speed up travel time at lower levels. But read the warning label!
“WARNING: May inadvertently teleport you to an area completely different than where you wanted to go, depending on what graveyard may be closer to you. Talk with your doctor before use.”
Deathwarp XXL: Don’t leave home without it.
Oh, and you should have hit 14 by now.
Level 14
Turn in all your available quests, and accept [14] Argual’s Folly (2) and the [16] The Decrepit Ferry. Fly to Undercity. Head to (48,69) and turn in both [12] A Recipe for Death (1), and [15] Zinge’s Delivery. From both NPCs, accept [15] A Recipe for Death (2), and [15] Sample for Helbrim.
Make sure to train and do whatever else it is that you intend to do in main cities.
=NOTE=: From here, I head to the Barrens to continue questing for a while. If the thought of killing Zhevras again makes you physically ill (and it rightly should), you can continue in Snowflake’s Ghostlands Guide until you’re 16-ish. Anywho, on with the show.
Head out of Undercity and take the zeppelin to Orgrimmar. Grab the FP if you need, then head south of the city to Razor Hill. Accept the quest [12] Conscript of the Horde from Takrin Pathseeker at (50,43). Head West into the Barrens.
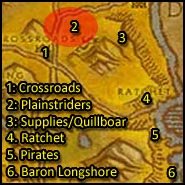
1. Enter the Crossroads and turn in [12] Conscript of the Horde and [15]Sample for Helbrim. Set your Hearthstone to the inn, and accept:
- [11] Wharfmaster Dizzywig
- [12] Plainstrider Menace
- [12] Disrupt the Attacks
- [13] Raptor Thieves
- [13] The Forgotten Pools
- [14] Supplies for the Crossroads
- [15] Fungal Spores
Grab food and water, head north.
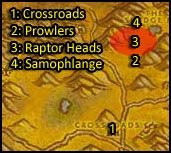
2. Kill every Plainstrider you see for their beaks. ALSO, start killing raptors whenever you see them for their Raptor Heads.
3. Continue heading NE, killing Thornweavers, Hunters, and Water-seekers until you get to (59,24). Grab the Crossroad Supply Crates, and continue killing whatever quillboars and Plainstriders you need.
4. Once you’ve finished that, head south into Ratchet. Turn in [11] Wharfmaster Dizzywig, but do not get the follow-up. From Sputtervalve accept [14] Samophlange (1). Proceed North to Gazlowe at (62,36), and accept [14] Southshore Freebooters. Then run to the nearby wanted sign and pick up [16] WANTED: Baron Longshore. Head south.
5. Kill Brigands and Cannonners while making your way to (62,47).
6. Wave to Baron Longshore. Then kill him and loot his head. =NOTE=: Occasionally, he spawns farther south, closer to Northwatch Hold; if he doesn’t show up at my noted spawn-point, try looking there, also.
You should hit 15 around this point.
Level 15

1. Return to Ratchet and turn in [14] Southshore Freebooters and [16] WANTED: Baron Longshore at Gazlowe. Accept [14] The Missing Shipment (1) and run to Wharfmaster Dizzywig. Turn it in, accept [14] The Missing Shipment (2). Continue to filch off of the laziness of Goblins and run back to Gazlowe again to turn it back in. Don’t take the follow up.
Fly to the Crossroads.
2. Turn in [12] Plainstrider Menace and pick up the much maligned [14] The Zhevra quest. Also turn in [12] Disrupt the Attacks and [14] Supplies for the Crossroads; accept [15] The Disruption Ends. Head East.
3. Kill Defenders and Geomancers while making your way to (58,27). Kill Kreenig Snarlsnout and loot his tusk. Occasionally there is a rare elite that spawns nearby him. As tempting as it is to want to smack said rare-elite up, don’t do it. It leads to badness and corpse walks. 🙁 Once finished, head West.
4. Enter the Forgotten Pools and get four Fungal Spores. Swim down to the base of the lake at (45,24) and complete [13] The Forgotten Pools. Head South.
5. Commence Operation: Zhevra Genocide. The WoW community at large will thank you for it, later. Should you take on this mission, you’ll need to kill every one you see until four hooves drop. You’d think that a quadruped horse would have four each, but alas…
1. Whenever you manage to finish, if you sanity lets you take it that far, head back to the Crossroads. Turn in [15] The Disruption Ends and [14] The Zhevra. Accept [15] Prowlers of the Barrens. Head North. Way, waaay north.
2. Run to around (55,16) and start killing Savannah Prowlers for their claws. It’s a 100% drop rate (thank God), so you should be done quickly.
3. Concentrate on finding the remainder of your raptors for their Raptor Heads. They’re all over the freaking area, so it might take a bit of hunting to manage the last 3-4 of them.
4. Once done, head to (52,11) and turn in [14] Samophlange (1). Accept [14] Samophlange (2), and turn off all the nearby valves. Return to the console, turn it in and accept [14] Samophlange (3), then head slightly East and kill Tinkerer Sniggles for his key. Then return to said console, turn in again and accept [16] Samophlange (4).
Hearth to the Crossroads. Turn in [15] Prowlers of the Barrens. Don’t get the follow-up. Fly to Ratchet, talk to Sputtervalve, and turn in [16] Samophlange (4). Don’t get that follow-up, either.
You should be 16 by now.
Level 16
Fly back to the Crossroads. Talk to Apothecary Helbrim and take the timed quest [15] Apothecary Zamah. You have 45 minutes to run from there to Thunder Bluff. If you already have the FP, just fly and save yourself the trouble. If not:
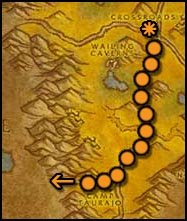
Make sure to grab the FP at Camp Taurajo while you’re there.
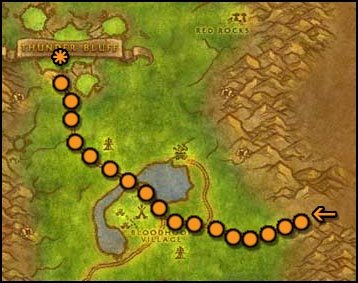
Enter Thunder Bluff. Run up to the Spirit Rise, and into the cave at (24,21). Turn the quest in. While you’re here, grab the FP, and train if you can manage it.
Fly to Orgrimmar, train here if you couldn’t there, and then take the zeppelin to Undercity.

1.From there, fly to the Sepulcher, and remember to SET YOUR HEARTHSTONE. Yes, in caps. (I’ve forgotten to every single time I came back. QQ)
Head NE.
2. Head to the Corpse Laden Boat at (58,35), and turn in [16] The Decrepit Ferry. Accept [16] Rot Hide Clues, and run South.
3. Kill Moonrage Gluttons and Moonrage Darksouls for [14] Arugal’s Folly (2).
4. Head way SW to (50,60) and click on the Dalaran Crate to turn in [14] Border Crossings and accept [14] Maps and Runes. You’ll have to kill most of the Dalaran Mages wandering nearby, just because they drop cool robes that have the Kirin Tor signet on it. Oh, and because they try to kill you if you get too close. Stupid Mages.
Hearth, deathwarp or run back to the Sepulcher. Turn in all your available quests, and accept all the new ones. Make sure your quest log looks something like this:
- [15] A Recipe for Death (2)
- [16] Arugal’s Folly (3)
- [16] Ambermill Investigations
- [16] The Engraved Ring
- [17] Rot Hide Ichor
Congrats, you should be 17.
Level 17
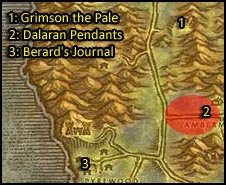
1. Fight your way to the back of the cave and kill Grimson the Pale for [15] Arugal’s Folly (3). Skinner/Miners rejoice. Run SE to Ambermill.
2. Kill every humanoid that moves for their Dalaran Pendants. The Protectors like to spawn level 1 critter adds that can be one shotted, but can be irritating. Kill them extra dead. Run SW to Pyrewood.
3. Fight your way through to (43,73) and click on Berard’s Bookshelf to get his journal. You also more than likely will have to kill Apothecary Berard to get to said bookshelf, since he’s all protective of his junk and…junk. Hearth or deathwarp back to the Sepulcher.
You know the drill. Turn in and then accept. =NOTE=: Ensure you have a lot of food and a lot of water, because the next two quests kind of suck. A lot.
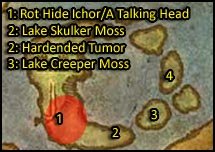
(I spelled ‘hardened’ wrong. Sigh.)
1. Kill every Rot Hide Gnoll you see for their Rot Hide Ichor. While doing this, try to make sure that A Talking Head drops, because it starts the quest [17] Resting in Pieces. If it still hasn’t dropped by the time all eight ichors have, continue on killing them for another 5-10 minutes. If it’s still a no-show, screw the severed head and come back for it later.
Oh yes, why we are coming back here later. My condolences ahead of time.
2. Head East and kill Lake Skulkers for Lake Skulker Moss (clever, ne?). Melee will hate these buggers, because of a debuff that randomly has you dropping your weapon whenever you attack. They also like to respawn quickly and beat you down while you’re bandaging. So much hatred. But I digress.
3. Kill murlocs for the Hardened Tumor. ‘Nuff said.
4. If you think anything but Lake Creepers drop Lake Creeper Moss, seek medical attention now. These guys have a similar debuff as their Skulker cousins, only instead of knocking your weapon out of your hand, they knock you down entirely.
Hearth to the Sepulcher. Turn in and accept all available quests, barring the SFK ones, because they’re a waste. (Can you tell I’m beginning to get a bit lazy with this? *whistles innocently*) Fly to Undercity. Run up to Brill, turn in [16] The Engraved Ring at (61,50). Accept the follow up, [16] Raleigh and the Undercity and head back into the Undercity.
Once there, turn in [17] Rot Hide Origins at Bethor Iceshard, and accept [16] Thule Ravenclaw. While mulling about, run to Raleigh, turn in his quest and get [20] A Husband’s Revenge.
You should’ve hit 18 by this point, and if you didn’t…bahaha, no upgrades for you! 😛
Level 18
Fly back to the Sepulcher. Turn in [16] Thule Ravenclaw, and accept [16] Report to Hadrec. Turn that in, and accept [20] Assault on Fenris Isle (told you that you’d be back!). Your quest log should look like this:
- [16] Arugal’s Folly (4)
- [20] A Husband’s Revenge
- [20] Assault on Fenris Isle
- [21] Beren’s Peril
- [22] The Weaver
WARNING!
A few of quests–namely Assault on Fenris Isle and The Weaver–are ridiculously difficult at level 18, so I recommend you skip them and make the experience up in the Ghostlands. Again, I’ll state, these last three quests are insanely hard and very frustrating, and as such, created this guide with skipping them in mind. Hell, I skipped them on my last head-through. However, it is a lot of exp to lose out on, so if you want to stick it out, you’re welcome to.
With that out of the way, onto the show.
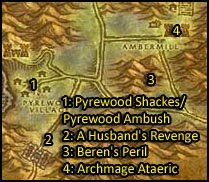
1. Now for the easy part. Head to Pyrewood and kill everything in sight until you get six Pyrewood Shackles. While there, head to (46,74), and accept the quest [15] Pyrewood Ambush. It’s a straight forward quest. It’s a semi-gauntlet of mobs–first one, then two, then two waves of three. I ignored it last trip down here because a few classes (coughPriestscough) would probably get destroyed at a lower level due to the number of mobs. But it should be easily handled at 18.
2. Head South–avoiding yet another Son of Arugal that likes to own you randomly–and find Valdred Moray pathing around the dozen or so NPCs near the Gilneas gate. It’s difficult to get to Moray without clearing an area for him to walk into. The best way is to find a small group of two mobs and kill them. It’s doubtful you can take two at once, so pick one off and run away until you drop combat to kill the other.
Once that’s done, wait for Moray to walk far enough away from other mobs to come solo, and used a ranged attack on him. (Sorry Pallies. :() He actually hits fairly hard, so don’t be afraid to pop cooldowns to survive. Once he’s dead, loot Valdred’s Hands and head NE.
3. Head into the fairly secluded cave and kill six Ravenclaw Drudgers and Ravenclaw Guardians. Another quest where you’ll have to be patient and grab mobs carefully from long range. Head North, when done.
4. Archmage Ataeric by himself isn’t ridiculously difficult–it’s the dozen or so mobs outside of his run down shack that will make your life unhappy. It’s yet another quest where you have to pick off mobs one at a time and hope one of the billion patrols don’t suddenly decide to play “Kill the Lowbie Horde”.
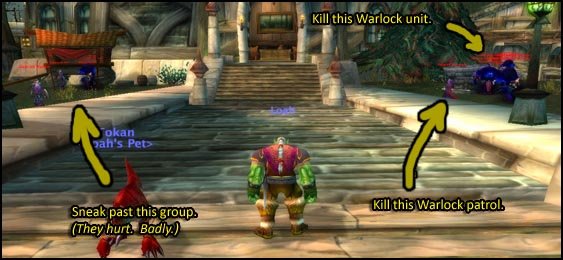
The best way is as shown above; pick off the patrols, and then kill that Warlock chilling out to the right of the entrance. The group to the left has three people (the Warlock’s pet pretty much counts as a third, since it hits hard enough), and is the reason why I have a bald spot now. 🙁 Once you find yourself inside the building, kill the two mobs in there, and make your way to Ataeric.
=NOTE=: Ataeric casts a ranged Frost Nova every 10 seconds or so, and has a ~2 second cast time. Melee classes must interrupt this spell if you don’t want to be rocked by a level 22 Frostbolt spamming Mage. If you want to drop this quest and move on, you’re well within your rights–I only beat him on my Rogue (on my third try, no less) by virtue of being stubborn and vindictive.
Once he’s dead, loot Ataeric’s Staff and head North to Fenris Isle.
You should have or be very close to 19.
Level 19
This. Quest. Sucks. Seriously, if you don’t want to deal with the hassle of facing down a crapload of undead Gnolls, abandon it and head to the Ghostlands. If you still want to take a crack at it, continue on. 😀
Once entering Fenris Isle, make sure you have [17] Resting in Pieces. If not, kill Gnolls until A Talking Head drops, and accept it. Head to (67,24) and turn this quest in at the dirt pile with legs known as the Shallow Grave. From it, accept [18] The Hidden Niche.
Travel into Fenris Isle keep, laying waste to everything in your path, because it’s fun. That and Gnolls path like crazy in there, and you can never be certain when something you don’t want to fight will respawn on top of you. In order to make it to the top:
– Head to the center of the building, and fight your way up the winding stairwell (try to take the doorway to your right when you enter–though it makes no real difference).
– From there, try to grab one or two of the Gnolls waiting at the top without aggroing the one or two Gnolls on the other side of the open doorway. This might take some timing and a lot of luck.
– When they die, go through the door on your left, clear up the sloping ramp, and into the main building at (65,23).
Wave at Thule Ravenclaw. Make sure you have Bethor’s Potion handy. Then nuke Thule down and loot him the moment he dies, so when you die shortly thereafter–and you more than likely will die–you won’t have to worry about him despawning.
(I told you this quest sucked.)
From there, head back into the previous hall, but travel up the tower stairs. Head to (65,24)–you can travel across the roof of the building if you’re at the wrong spot–and at the Dusty Shelf, turn in and accept [18] Wand to Bethor.
Hearth or deathwarp to the Sepulcher. Turn in all your quests. Fly to Undercity and train if you need. Run to Bethor Iceshard at (84,17) and turn in [18] Wand to Bethor. Return to Raleigh in the center of Undercity and turn in [20] A Husband’s Revenge.
Take the magical transportermalogical do-hickey to Silvermoon. Balk at its bright and cheery atmosphere despite it being a total ghost-town.
If you don’t have the Silvermoon FP, get it. If you have the Tranquillen FP, fly there. If not, run south along the Dead Scar until you hit Ghostlands.
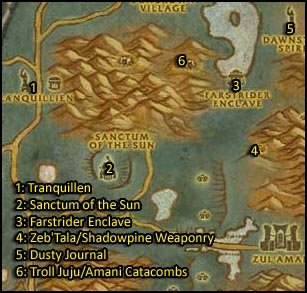
1. Get the FP, and set your Hearthstone. Accept the following quests:
- [17] Investigate the Amani Catacombs
- [18] Spinal Dust
- [16] Rotting Hearts
- [17] Troll Juju
- [20] The Sanctum of the Sun
Head SE to the Sanctum of the Sun.
2. Turn in [20] Sanctum of the Sun, and accept [20] War on Deatholme and [16] The Farstrider Enclave. Head NE to the Farstrider Enclave.
3. Turn in [16] The Farstrider Enclave, and accept all the following quests:
- [16] The Traitor’s Shadow
- [18] Shadowpine Weaponry
- [18] Attack on Zel’Tala
- [19] A Little Dash of Seasoning
- [14] Bearers of the Plague
4. Head South to Zeb’Tala. Kill Shadowpine Shadowcasters and Shadowpine Headhunters for both the Zeb’Tala destruction quest, and for the Shadowcaster Maces and Headhunter Axes they drop. Once that’s done, head NE.
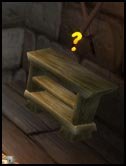
5. Fight your way to the top of Dawnstare Spire and touch the Dusty Journal to complete the quest. Accept [16] Hints of the Past and head West to the Amani Catacombs.
6. Burn the Mummified Troll Remains with the Blazing Torch, and head into the heart of the catacombs to get a complete message. While there, kill any trolls you see for their Troll Juju. Once those are done, speak with Ranger Lilathia at (62,32) to start the escort quest [16] Escape from the Catacombs. She’s a dumb little twit, so don’t expect her to avoid aggroing a bunch of mobs while you’re eating. Follow her back to the Farstrider Enclave and turn in all your quests.
You should have hit 20 around now.
Level 20
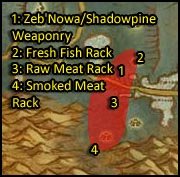
1. Head South to Zeb’Nowa and kill Shadowpine Catlords and Shadowpine Hexxers for [19] Assault on Zeb’Nowa, along with the Catlord Claws and Hexxer Staves for the latter half of [18] Shadowpine Weaponry. You should also be getting credit for [14] Bearers of the Plague from the Ghostclaw Lynx pets the Catlords have.
2. Poison the Fresh Fish Rack at (68,58).
3. Poison the Raw Meat Rack at (65,66).
4. Poison the Smoked Meat Rack at (63,74).
Once all this is done, Hearthstone to Tranquillen. Turn in [16] Investigate the Amani Catacombs, and [17] Troll Juju. Get food, water, and run SE.
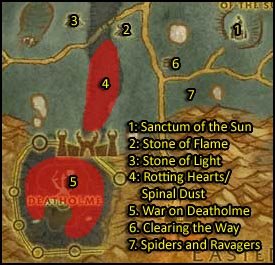
1. Head to the Sanctum of the Sun and turn in [16] Report to Magister Kaendris. Accept [17] The Twin Ziggurats. Head West.
2. Run into the Eastern-most Ziggurat and single pull the casters with line of sight:
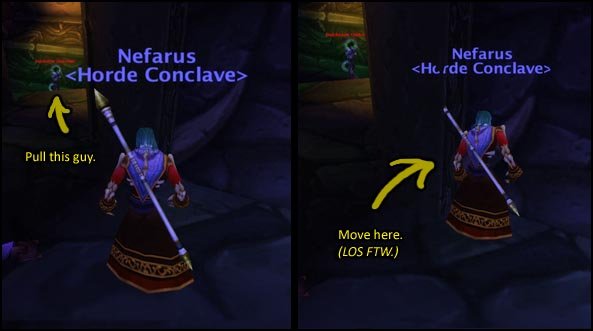
Paladins, your life really sucks for a lot of these quests. I’m sorry. 🙁 Kill all of the casters, and then loot the Stone of Flame from the coffer. Leave the Ziggurat and run further West.
3. Repeat the same process in this Ziggurat, and loot the Stone of Light from the chest. Run out and head down the Dead Scar.
4. Kill pretty much anything undead that you see: Dreadbone Sentinals and Sorcerers for their Spinal Dust, and Risen Stalkers for their Rotting Hearts. =NOTE=: Watch out for Lurzan, a 21 elite that patrols up and down the Dead Scar; he cannot be soloed at your level. And I tried repeatedly. Once you’ve gotten all that, run South.
5. Run into Deatholme and kill Eyes of Dar’Khan, Nerubian Centurions, and Wailers for [20] War on Deatholme. Watch out for these mobs, because pretty much every one has a fairly long-lasting damage-over-time effect that–if you rely on bandaging–can really screw up your day.
6. Run North to (46,56) and accept [18] Clearing the Way from Apprentice Vor’el. Run South.
7. Kill Greater Spindlewebs and Ghostclaw Ravagers for said quest you just grabbed in the nearby vicinity. Once finished, run back to Vor’el and turn it back in for some easy exp.
You should have hit 21 by now.
Level 21
=NOTE=: If you want to turn in what quests you have completed and head on to Jame’s 21-31 Horde Leveling Guide, then go for it. That’s all this guide was really meant to do. But, if you skipped those final quests in Silverpine, or you just want that little bit of extra exp, continue on.
Run North to Sanctum of the Sun and turn in [20] War on Deatholme. Accept [20] Dar’Khan’s Leiutenants and [20] A Restorative Draught. Run to Tranquillen and turn in [16] Rotting Hearts, [18] Spinal Dust at Magistrix Aminel, and [20] A Restorative Draught at Apothecary Renzithen. Accept [20] Captives at Deatholme from him. Use the draughts you were given from the Belfett for the upcoming quests in Deatholme; you’ll need them.
Head to Deatholme.
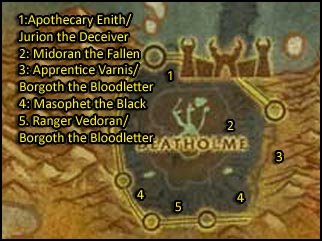
1. Head to the first Ziggurat to the right of the entrance. Speak with Apothecary Enith laying on the altar, and kill Jurion the Deceiver nearby. Leave and head SE.
2. Kill Midoran the Fallen in the center of the ampitheater-like building. Clear the Wailers out nearby if you need to; they tend to join in when you don’t want them to. Stupid banshees.
3. There’s a path that, at first, might be hard to notice. Clear your way up said path to the Ziggurat at (40,83) and rescue Apprentice Varnis. This is also one of the two spawn points for Borgoth the Bloodletter. If he isn’t here and doesn’t respawn after five minutes, head out and go SW.
4. Kill Masophet the Black in one of these two places. He isn’t very hard, but as always, adds are a problem when you don’t go Johnny the Homicidal Maniac on everything in the immediate vicinity. Head West.
5. Rescue Ranger Vedoran at (32,89). She seems the nicest of the three NPCs you saved from certain death. This is also the second spawn-point for Borgoth the Bloodletter. If you didn’t get to stab him dead last time, this should be where he is.
Once finished all these, run NE to Sanctum of the Sun and turn in [20] Dar’Khan’s Leiutenants and [20] Captives at Deatholme. Run further NE to Farstrider Enclave and turn in [19] Assault on Zeb’Nowa, [18] Shadowpine Weaponry, [14] Bearers of the Plague, and [19] A Little Dash of Seasoning.
You should have hit 21 now even without the final Silverpine quests, and be Friendly/Honored with pretty much every faction that currently counts, to boot.. If not, well, you might have to go grind on a few trolls nearby until you do ding.
Hearth to Tranquillen. Fly to Silvermoon. Teleport to Undercity, and take the Zeppelin to Orgrimmar. Train at whichever city you can first, get food, and water, repair, /dance on a mailbox, and head straight to Jame’s 21-31 Horde Leveling Guide for all your future leveling needs.
Thanks for reading this far! Hope I was helpful! 😀
(If anyone wants to use this on their website, they’re more than welcome to–just give credit where it’s due. :))
Sounds like a missing |Z|Sounds like a missing |Z| zone tag, I haven’t messed with this portion of the guide so hopefully someone who has will edit it.
Razor HillIn the addon version the step after getting Orgrimmar Flightpoint, it seems to report Razor Hill as being in the Barrens instead of Durotar.
Using version v0.5.2 and TourGuide version 3.1.0.51-Beta
Sounds goodSounds good, but I must warn that I’m no expert! 😉
I am, but I’m not veryI am, but I’m not very experienced with it. I think I’ll make the guide a wiki so that you can add to it if you think of something good, lunar 🙂
<3 GIMP!I love GIMP! I use it for everything. It can be a little hard to learn to use at first, though; but hey, it’s free! Lots of free tutorials on it can be found online. Oh, and I also heard that Jiyambi is working on a guide to using it! 😀
Hrm.I used Photoshop for the pictures, though I hear Gimp is a nice free alternative that does pretty much the exact same thing. 🙂
Picture editorHi, just wondering what picture editor our using cause it makes them look really good?
It’s the area.Silverpine really does suck that badly. It’s not very well laid out at all. I made the guide because the one I actually used assumed that you had to grind to 16 via RFC before even stepping foot in here, which I thought was rather dumb. I also mentioned that the latter quests in Silverpine were incredibly difficult to do at 18, and even took you skipping that section into account when I did the Ghostlands section.
Silverpine just sucks. I don’t blame you for never going there. However, if anyone is masochistic enough to try it, I’m hoping the guide I laid out makes it as painless as possible. 🙂
This guide… Is… Amazing!This guide… Is… Amazing! I demand that everyone writes their guides like this from now on! Either that or just let SilverKnight write them all… 😛
Layout and structure is fantastic, and it looks to be a very good overall guide – I’ll give it a run-through once my ISP pulls their fingers out of their arses and gives me a connection I can actually play WoW on…
And yes, if this guide is included in the Addon, then you must keep the origional comments! I keep re-reading it just for laughs 😛
This guide = Pure Win!
-Skumball
Hah, I’m pretty sure it’sHah, I’m pretty sure it’s the area. That zone really really bites, I will never try to level there again. Also, keep in mind that all the running around you did is mostly running around that you would have to do eventually, so it will save you time later. Without doing those quests in Crossroads, etc., it would be nearly impossible to level enough in Silverpine without grinding. It really sucks that much.
Oh god I hated this guide!Oh god I hated this guide! Seriously, Silverknight I respect your efforts but damn! Like 50% of the time you’re running between continents, cities and quests spread FAR apart. Some of the quests aren’t even planned for the most optimal route, and especially from lvl 17 and on in Silverpine it gets bad! Mobs are 1-2 levels higher than you, you miss often. Above all, Fenris Isle is a hell for al lvl 18/19! You should be at least lvl 22 to go here. There are billions of adds and patrols outside, when you get inside they are behind every corner. I was leveling as a frost mage here and I died like 10x. As soon as a mob gets too close to you, you want to frost nova him and get some distanced or else you are melee’d and pushbacked to death, but by doing so you will add 2 more mobs signing your deathwish. I finally got to the warlock for the quest, moving on to the tower with 4 more mobs at every corner.
Please people, go do ghostlands after lvl 12. Maybe it’s not Silvernkights fault and this area just sucks, I’ll never go here again!
Try Joan’s GuideHave you seen [url=https://www.wow-pro.com/leveling_guides/joan%E2%80%99s_1320_alliance_leveling_guide_darkshorewestfall]Joan’s Darkshore/Westfall leveling guide[/url]? It was written a while back, but it’s still useful, and easier to complete now that Auberdine and Stormwind are directly connected.
Also, I thoroughly agree that consistent formatting makes life easier for the reader. You guys have done a great job of ensuring that each guide starts where the last one ended, which again saves a lot of headaches.
TrueEh, the length of the paragraphs is a valid point. I DO ramble on, a lot, if I’m not careful. XD I toyed with the idea of having a quick link feature in there, with a much more short-hand version for at-a-glance purposes, but I’m both lazy and inept at advanced HTML coding. I’ll keep that in mind should I make another guide, though. Thanks! 🙂
If you do, add the authorsIf you do, add the authors additional comments – they’re priceless!
I really like this guide.I really like this guide. The choice of circuits are very thought through and you have written a guide which will provide fast and smooth leveling.
However!
As much as I appreciate the irony and sweet choice of words, I think it adds too much volume to the paragraphs and it makes the guide more difficult to read as you’re playing. A guide should throw the points in your face without the need of looking through paragraphs to find them. Always something to keep in mind for future guides. I gave you 5 stars nontheless.
Very, very nice job. ThumbsVery, very nice job. Thumbs up! 🙂
Charmazazz, level 80 Human Mage (Bloodhoof EU)
Awesome, seriously.
VeryAwesome, seriously.
Very nice work. I think i’ll add this to Tour Guide 🙂
Awesome guide!Awesome guide so far! Looks like it was written by Jame himself, the quality and lay-out of the guide are superb! Very good colour-coding. The pictures and maps are really helpful. And the steps are easy to understand and remember.
(And I like your sense of humour. ;))
I’m really looking forward to seeing more guides written by you. I will most definitely use them!
Kind regards,
Yokaij.
Great guideExcellent work 🙂
I like how you’ve wrote in the same format as Jame, aswell as having the same standard of spelling and grammar as him 😉
And how you’ve added another zone. Questing in darkness all day can bring you down.. >.<
I'd love to see you write the same quality guide for Alliance, perhaps for Darkshore, or Westfall? (Although, I have yet to see a Darkshore guide, so, that'd be nice).
Keep up the good work!
WowThat’s some very high quality there. Thumbs up!
I’ll try it as soon as possible 😉