
 by Snowflake
Introduction
This guide is written in the same vein as Jame’s leveling guides and, like them, is made for fast leveling through the use of optimized quest circuits. With the release of the 3.3.0 patch, quests are conveniently marked on your in-game map, making it easier than ever to quest without a guide. However, what this new functionality doesn’t do, is tell you in what order to do the quests, where to pick up extra quests in the same area and all the other tricks to really optimize your leveling speed. This guide will show you the fastest route to complete all the quests in the Zul’Drak and works for both Alliance and Horde.
In order to follow the guide, you will need an add-on which displays co-ordinates as they are used to describe locations in the guide (x,y). A very simple add-on that does this is DMiniCoords.
All the usual notes from Jame’s guides still apply:
- The guide does not take into account professions.
- You should spend your talent points so that you kill things as fast as possible.
- Always log out at in inn – although there are no inn buildings, the central area of Argent Stand and Zim’Torga count as inns.
Color Code
- Quests
- Items
- Locations
- Quest objectives to kill
- NPCs
- Co-ordinates
The Guide
Before we start, this guide assumes you are level 77, have a flying mount and cold weather flying. All the quests can be obtained at level 75 so you could start that early; just keep in mind that you will have to do a bit of meandering on the ground (unless you’ve obtained a Tome of Cold Weather Flight heirloom item). To get cold weather flying to fly in Northrend, train it at Hira Snowdawn near the flightmaster in Dalaran.
Optionally, before starting, pick up The Champion’s Call from Shifty Vickers who wanders Dalaran’s sewers for the start of the Ampitheatre of Anguish quest chain. This quest chain is like the Ring of Blood in Nagrand and you will need a tank and healer. Watch for groups forming for it in General chat and do it whenever you can join a group for it. You will need to do the Ampitheatre of Anguish chain (or at least some of it) in order to get the achievement The Empire of Zul’Drak for completing 100 quests in the zone. Otherwise turn in The Champion’s Call! whenever you are near the area (48,56). If you’re not starting in Dalaran though, you can skip this particular quest as it’s not needed to do the quest chain and gives only a small amount of experience.
To reach Zul’Drak, you can (optionally) pick up one of the breadcrumb quests: Into the Breach! from Crusader Valus in Dragonblight (84,26), Reallocating Resources from Captain Gryan Stoutmantle for Alliance in Grizzly Hills (59,26) or Shifting Priorities from Scout Vor’Takh for Horde in Grizzly Hills (65,47). All of these take you to the flightpath in Light’s Breach for the first step. If you’re already in Dalaran though, just fly (on your own mount) to the Argent Stand in Zul’Drak (39,66), get the quest First Things First from Commander Kunz and then go to Light’s Breach (32,75).
1.  Turn in whatever breadcrumb quest you took to Sergeant Riannah and acquire her flightpath.
Get all the available quests.
- This Just In: Fire Still Hot!
- Trolls Is Gone Crazy!
- In Search of Answers
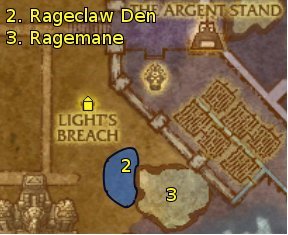
- Wanted: Ragemane’s Flipper
Most characters won’t be able to solo the group quest, Wanted: Ragemane’s Flipper, since Ragemane is immune to snares/roots, so try to get a group for it now – Ragemane is in the lake to the south-east (37,84). The quest rewards are very nice for tanks; other classes might skip it if they can’t solo or get a group for it.
2. Go to Rageclaw Den, the town to the south-east. Head for 34,83 (yellow question mark on the mini-map). On the way there we need to do two things:
 Use the Rageclaw Fire Extinguisher near hut fires to douse them (repeat using the extinguisher on a fire until you get quest credit).
- Kill trolls for their Lock Openers which you can use to free Captured Rageclaws.
When you get to 34,83 turn in In Search of Answers and get Orders From Drakuru. Continue here until you’ve freed 8 Rageclaws for Trolls Is Gone Crazy! and put out 15 fires for This Just In: Fire Still Hot!.
3. (Optional) Kill Ragemane in the lake (37,84), solo if you can, or with a group if necessary.
4. Return to Light’s Breach (32,75) and turn in
- This Just In: Fire Still Hot!
- Trolls Is Gone Crazy!
- Wanted: Ragemane’s Flipper (if you did it)
- Orders From Drakuru – get the follow-ups, The Ebon Watch and Crusader Forward Camp.
1. Go to the Crusader Camp (25,64), turn in Crusader Forward Camp and get the available quests:
- That’s What Friends Are For…
- Making Something Out Of Nothing
While doing the following steps, collect 10 Scourge Scrap Metal
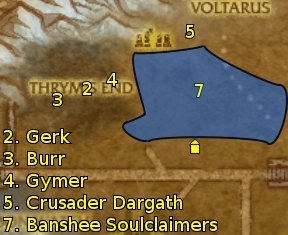
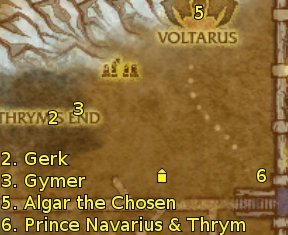
2. Find Gerk at 17,57 and get Light Won’t Grant Me Vengeance.

Along with your scrap metal collection, you should kill 15 Vargul during the following steps.
3. Find Burr at 15,59.
4. Go to Gymer, an imprisoned storm giant (19,56) and get A Great Storm Approaches.
5. Find Crusader Dargath at 25,51.
6. Return to the Crusader Camp (25,64) even if you haven’t finished Making Something Out Of Nothing and Light Won’t Grant Me Vengeance. Turn in
- That’s What Friends Are For…
- A Great Storm Approaches – get the follow-up Gymer’s Salvation.
7. Kill Banshee Soulclaimers to the north and north-east until you have 6 Banshee Essence.
1. Go to Ebon Watch at 14,73 and get the flightpath.
Turn in The Ebon Watch and get the follow-up Kickin’ Nass And Takin’ Manes. You should get a companion skeleton called Nass. If you lose Nass, talk again to Stefan Vadu at the Ebon Watch to get him back.
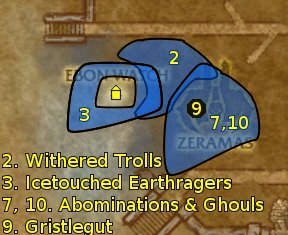
2.  East of Ebon Watch, kill Withered Trolls (avoiding the Icetouched Earthragers) while Nass is your companion and use Stefan’s Steel Toed Boot to collect 10 hair samples.
Either an Unliving Choker or a Writhing Choker should drop from one of the trolls. If not, keep on killing trolls until the choker drops. Now the two different chokers start the same quest chain but with quests with different names. Which names you get depends on whether you’ve completed the Cleansing Drak’Tharon quest chain from Grizzly Hills that ends in the dungeon Drak’Tharon. Since this involves a dungeon that most will probably miss while leveling, in this guide we will use the names that are used if you haven’t done that quest chain (and the alternate name will be provided in brackets).
 So now right-click on whichever choker you obtained and get the quest An Invitation, of Sorts… (Darkness Calling).
3. Then kill Icetouched Earthragers in the area around the Ebon Watch until you have 6 Diatomaceous Earth. Chances are Nass will die here as he is quite fragile – this shouldn’t be a problem if you’ve already collected all the hair samples you need.
4. Return to Ebon Watch (14,73) and turn in
- Kickin’ Nass And Takin’ Manes
- An Invitation, of Sorts… (Darkness Calling) – get the follow-up, Near Miss (Close Call).
5. Get the newly available quest, Taking a Stand from Bloodrose Datura. Then talk to her to complete Near Miss (Close Call).
6. Turn in Near Miss (Close Call) and get the follow-up, You Can Run, But You Can’t Hide (Silver Lining).
7. Go to the Reliquary of Agony (20,75) and kill Putrid Abominations for 5 Putrid Abomination Guts and collect 5 Gooey Ghoul Goo from the ground.
8. Return to Ebon Watch (14,73) and turn in You Can Run, But You Can’t Hide (Silver Lining) and get the follow-up, Dressing Down (Suit Up!)
9. Use Ensorcelled Choker to disguise yourself as a ghoul. Some warnings about this disguise – attacking any mobs will break the disguise, mounting will break the disguise (or polymorphing into flight form) and you should watch for Blightguards who can see through the disguise; also it falls off after a while, though you will get a warning when this is about to happen. Go to Gristlegut (19,75) and get his quest Feedin’ Da Goolz. Also buy Bitter Plasma from him.
10.  Use the Bowels and Brains Bowl quest item to feed 10 ghouls, then return to Gristlegut (19,75) and turn in the quest Feedin’ Da Goolz.
11. You can mount up (dropping the disguise) and return to Ebon Watch (14,73), turn in Dressing Down (Suit Up!) and get the follow-up, Infiltrating Voltarus.
1. Head back to the Crusader Camp (25,64), turn in Gymer’s Salvation and get the follow-up, Our Only Hope.
2. Head to Gerk (17,57) while killing off the the last Varguls and collecting the last Scourge scrap metal you need for Making Something Out Of Nothing and Light Won’t Grant Me Vengeance. Turn in Light Won’t Grant Me Vengeance at Gerk.
3. Go to the imprisoned Gymer (19,56), right-click on the enclosure holding Gymer to free him. Turn in Our Only Hope and get the follow-up, The Storm King’s Vengeance.
4. Before continuing, read the next few steps carefully since once you begin you’ll be under nearly constant attack from the Scourge.
Talk to Gymer and choose the last option, “I’m ready, Gymer. Let’s go!” This will mount him (like a vehicle) and, in addition to his substantial melee attack, you will have access to his 4 abilities, in order:
 Gymer’s Smash: AoE damage to all enemies within 12 yards. Use whenever you have the energy for it (and more than just a couple of mobs are around you).
 Gymer’s Roar: When the number of enemies grows large, face as many as possible, wait to accumulate 50 energy then use this before reverting back to the Smash. It will knock back all those enemies in front of you, buying you some time.
 Gymer’s Grab: As you wander the area, keep an eye out for the bluish Storm Clouds. When your health gets low, make a run for a cloud and use your Grab. This will rapidly regenerate Gymer’s health. Try to fight the mini-bosses near one of these clouds.
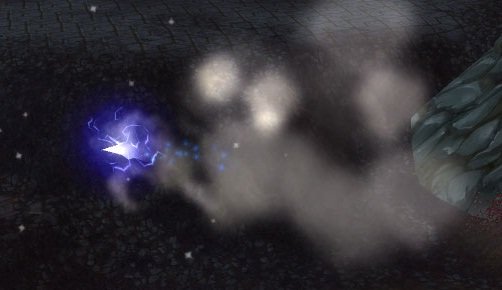
 Gymer’s Throw: Use if you accidentally pick up a mob with your Grab. It’s too tricky to use in combat otherwise.
If Gymer dies, simply return to him at 19,56. Talk to him again to remount and continue the quest.
5. Head for 31,49 and look out for Algar the Chosen who flies around this area. Before engaging him make sure to kill as many of the Scourge around you first. Individually they don’t hit for much (compared to Gymer’s substantial health pool), but there will be a lot of them. Once you’re ready, attack and kill Algar the Chosen (melee, Smash, if necessary Roar and Grab a cloud).
6. Go to 32,63 where you’ll find Prince Navarius. He’s a much smaller boss so you’ll have to look down for him. Attack him now, but hold off on your attacks whenever he uses his Soul Deflection ability.
When he’s dead, Thrym will spawn nearby – kill him.
7. Once you also have the 100 Scourge kills you need, dismount Gymer (no need to worry about any Scourge around you as they will phase out) and return to the Crusader Camp (25,64). Turn in:
- Storm King’s Vengeance
- Making Something Out Of Nothing
1. Head to the Argent Stand (41,64) and get the flightpath.
 If you want to, set your hearthstone here. Our travel distances aren’t large (by flying mount), so if you already have a hearthstone set to Dalaran you needn’t bother. If you do set your hearthstone here, whenever you’re told to return to the Argent Stand and your hearthstone is off cooldown, simply use it.
Turn in Taking a Stand and get:
- Defend the Stand
- Parachutes for the Argent Crusade
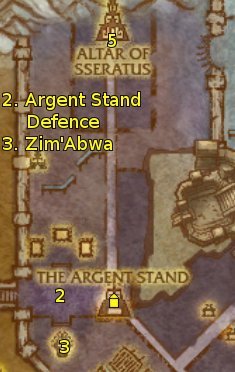
- The Blessing Of Zim’Abwa
2. In the battle area immediately to the west there are two things we need to do:
- Kill 10 Scourge.
 Use the Crusader Parachute on 10 Argent Crusaders or Shieldmen.
3.  You should easily have 10 Drakkari Offerings. Go south to 36,72 and turn in The Blessing Of Zim’Abwa.
4. Return to the Argent Stand (39,66) and turn in:
- Defend the Stand
- Parachutes for the Argent Crusade
Get the available quests:
- New Orders for Sergeant Stackhammer
- Pa’Troll
- Trouble at the Altar of Sseratus
5. Go to the Altar of Sseratus (40,39), just inside the main building, to complete Trouble at the Altar of Sseratus.
 Then kill any troll in the vicinity who should drop Strange Mojo which will start the quest Strange Mojo.
1. Head to Voltarus, the floating necropolis at the Reliquary of Pain (28,45).
Use the Ensorcelled Choker to disguise yourself. With the disguise, the same warnings apply as before – watch out for Blightguards, and you will get a short warning when your disguise is about to fall off. Each time you need to talk to NPCs in Voltarus or do quests for them make sure you are disguised – this will not be mentioned each time – if you can’t turn in a quest because the NPC is red, just use the Ensorcelled Choker! You can fly in to Voltarus from underneath it, but it’s probably easier to just use the transporter at the centre of the Reliquary of Pain.
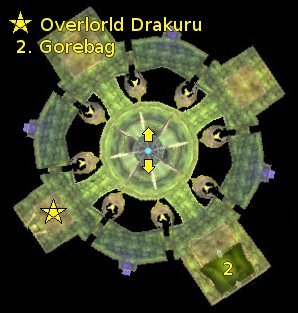
In Voltarus, find Overlord Drakuru straight ahead of you (south-west room) and get his quest Dark Horizon (Reunited).
2. Go anti-clockwise around the citadel to the south-east room. Talk to Gorebag to begin your tour. Nothing you need to do, just enjoy the ride!
When it’s finished, return to Overlord Drakuru and turn in Dark Horizon (Reunited).
3. Leave Voltarus by taking the transporter (the bottom glowing green circle in the middle of the citadel) back down.
 You can immediately summon Stefan Vadu using Stefan’s Horn. Turn in Infiltrating Voltarus and get the follow-up So Far, So Bad.
4. Return to Overlord Drakuru in Voltarus. Get the quest It Rolls Downhill.
5. Leave Voltarus via the transporter (to keep the disguise up). There are two things we need to do down here:
 Use the Scepter of Suggestion on a Blight Geist. Go to a nearby Crystallized Blight and use the Blight Geist’s Harvest Blight Crystal ability. Wait until you get the quest credit as the Geist turns the crystal in. Repeat until you’ve harvested 7 crystals.
 Look out for Blight Cauldrons. Add the Diluting Additive to 5 of them. Watch out for the Blightguards that spawn after you add the Diluting Additive. Just get out of the vicinity quickly to avoid combat. Note that you can repeat the same cauldron after a while.

Once you’ve completed both of these tasks, return to Overlord Drakuru in Voltarus and turn in It Rolls Downhill.
6. Leave Voltarus and summon Stefan Vadu. Turn in So Far, So Bad and get the follow-up Hazardous Materials.
7. Return to Overlord Drakuru in Voltarus. Get the quest Zero Tolerance.
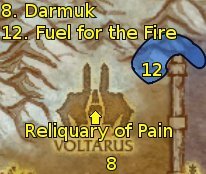
8. Leave Voltarus and go near Darmuk (30,49).
 Use the Scepter of Empowerment on a nearby Servant of Drakuru. Your new pet has three abilities Ferocious Enrage, Gut Rip and Stunning Force. Just use these abilities whenever they are off cooldown. Send in your pet to kill Darmuk.
9. Return to Overlord Drakuru in Voltarus and turn in Zero Tolerance.
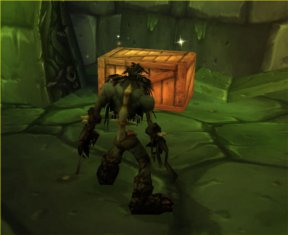
10. Look for 5 boxes of Harvested Blight Crystals within Voltarus. Just follow the corridor around the periphery and you’ll find them.
Once you have the crystals, leave Voltarus and summon Stefan Vadu. Turn in Hazardous Materials. Get the follow-up Sabotage.
11. Return to Overlord Drakuru in Voltarus. Get the quest Fuel for the Fire.
12. Leave Voltarus using your flying mount (your disguise will drop) and go to the Frigid Breach around 32,39.
 Reapply the disguise and use the Scepter of Command on a Bloated Abomination. Use your new pet to round up as many Drakkari as you can. Besides his melee attack, the abomination has 2 abilities you’ll need to use:
 Flatulate – use as you go to keep the trolls stunned. The more time they spend stunned, the less damage the abomination will take and so the longer he can keep going.
 Burst at the Seams – explodes the abomination, killing nearby trolls. Use when the abomination looks low on health but make sure there are no loose trolls because any survivors will turn on you. Aim to kill about 10 trolls each time so that you can do Fuel for the Fire in no more than 6 trips.
Return back to the entrance (32,39), and repeat (remembering to reapply the disguise if necessary). After 20, 40 and 60 kills, a Drakkari Chieftan will spawn. Don’t panic – a gargoyle will deal with them.
13. Once you’ve killed 60 Drakkari Skullcrushers (and 3 Drakkari Chieftain are captured) return to the Reliquary of Pain to the south and look for Scourgewagons.
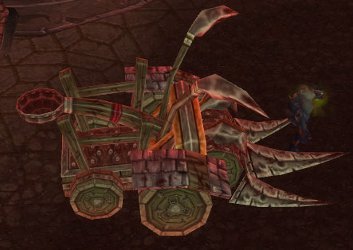
 Use Explosive Charges by the Scourgewagons until 5 are blown up.
14. Return to Overlord Drakuru in Voltarus, turn in Fuel for the Fire get the follow-up Disclosure. Go to the upper (blue) teleporter in the citadel’s centre. Right-click on the Musty Coffin in the room to summon Malmortis. If you want the rest of the lore surrounding Voltarus and Overlord Drakuru then follow him and he will eventually lead you to the teleporter back down. Alternatively, you can skip the tour and just jump down off the gallery area you’re in, and to the green teleporter circle in the room below.
15. Return to Overlord Drakuru and turn in Disclosure.
16. Leave Voltarus, summon Stefan Vadu, turn in Sabotage and get the follow-up Betrayal.
17. Read the next bit carefully before doing it. This is a group quest fight that can be soloed by any class if you follow the strategy given below.
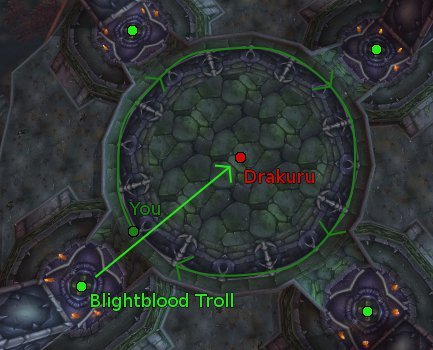
 Put the Scepter of Domination on an action bar. Return to Voltarus and talk to Overlord Drakuru. You will be teleported to the roof. As soon as the Blightbloods are summoned use the scepter on one of them to get it as your pet. You are going to use your Blightblood to tank Drakuru. For now only the Blightblood should be doing damage.
The Blightblood Troll has three abilities:
 Powerful Strike: Strong melee attack – use whenever it’s off cooldown.
 Concussion Blow: Stunning melee attack – use whenever it’s off cooldown.
 Blightblood Infusion: Heals you, the Blightblood’s controller – use whenever you’ve taken significant damage. Don’t use your own heals as you don’t want to gain any threat.
While attacking with the Blightblood, you should stay towards the edge of the circle. Drakuru will throw Blight Crystals at you. Dodge them and stay away from the blight area they leave behind.
The Blightblood Troll should be able to take Drakuru down to about 40% of his health. As the Blightblood Troll approaches death, position yourself near another one. As the first dies, uses the Scepter of Domination on the second and send it in to attack. You should have been doing nothing but dodging crystals and so should have no threat from Drakuru. The second Blightblood Troll should have no problem pulling aggro off of you. Use the second troll’s abilities like the first. Feel free to help attacking now to speed up the kill.
With Drakuru defeated watch events unfold for a nice story moment.
Loot Drakuru’s Skull, use Drakuru’s Last Wish to leave Voltarus and then summon Stefan Vadu. Turn in Betrayal.
1. Return to the Argent Stand (40,65). Turn in
- Trouble at the Altar of Sseratus
- Strange Mojo – get the follow-up Precious Elemental Fluids.
Also get The Drakkari Do Not Need Water Elementals! from Sub-Lieutenant Jax to the south (40,68).
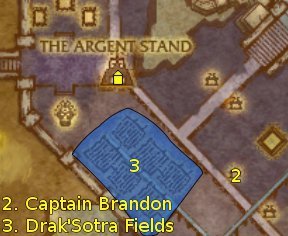
2. Go to Captain Brandon (48,78) and get Something for the Pain.
3. In the Drak’Sotra Fields to the west there are three things we need to do:
- Collect 5 Mature Water-Poppy.
- Kill 10 Drakkari Water Binders.
- Loot Water Elemental Links from Crazed Water Spirits. Whenever you get 3 of the links, use them to create a Tether to the Plane of Water, and use that item to summon a Water Elemental Lord. Kill it and loot a Precious Elemental Fluid. Do this until you have 3 Precious Elemental Fluids.
Once you’ve finished all of the above tasks, return to Captain Brandon (48,68) and turn in Something for the Pain.
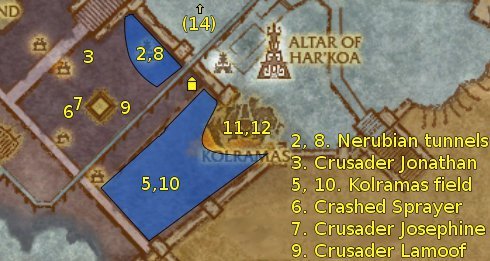
1. Go to Drak’Sotra (58,72) and get the following quests:
- Throwing Down
- Leave No One Behind
2. Now look for tunnel entrances to the north-west between 56,70 and 52,66.
 Use the High Impact Grenade on them until you have sealed 5 Nerubian Tunnels. You don’t need to worry about the adds that spawn when the tunnels are sealed.
3. Go inside the building at 50,69.
 Use the Crusader’s Bandage on the wounded Crusader Jonathan.
Go back to Captain Rupert (58,72) and turn in Throwing Down. Wait there for Crusader Jonathan; he’ll eventually catch up to you and you’ll get the credit for saving him.
4. Get the available quests:
- Cocooned!
- Death to the Necromagi
- Skimmer Spinnerets
5. Go to the Kolramas field to the south. Two things we have to do here:
- Kill 8 Hath’ar Necromagi.
- Kill Hath’ar Skimmers until you’ve looted 5 Intact Skimmer Spinnerets.
When done with both of these, return to Drak’Sotra (58,72) and turn in:
- Death to the Necromagi – get the follow-up Malas the Corrupter
- Skimmer Spinnerets – get the follow-up Crashed Sprayer; also get Pure Evil.
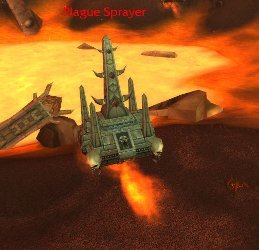
6. Go to 48,75 and right-click on the Crashed Sprayer to get the Plague Sprayer Parts.
7. In the building just to the north-east (49,74) is the wounded Crusader Joshephine.
Use the Crusader’s Bandage on her.
Go back to Specialist Cogwheel (58,72) and turn in Crashed Sprayer and get the follow-up A Tangled Skein. Wait there for Crusader Joshephine; she’ll eventually catch up to you and you’ll get the credit for saving her.
8. Now find cocoons in the area to the north-west (where we were closing Nerubian tunnels earlier). Destroy the cocoons (not using your pet if you have one) until you’ve freed 3 Captive Footmen.
9. Go inside the building at 53,75 and use the Crusader’s Bandage on the wounded Crusader Lamoof.
Return to Captain Rupert (58,72) and turn in Cocooned! then wait there for Crusader Lamoof. When you get the final quest credit, turn in Leave No One Behind at Dr Rogers.
10. Go back to the Kolramas field to the south and look for the Plague Sprayers floating in the air.
 Use your Tangled Skein Thrower to crash 5 of these Plague Sprayers.
11. Go to the Kolramas necropolis at the north-east edge of the field (60,79). Look inside it for 10 Chunks of Saronite. They are kind of small, so just look for the tell-tale golden sparkles.
12. (Optional) Once you’ve got all the Saronite you need, go to the top of the necropolis (using the passages inside the necropolis or just flying up there) and you’ll find Malas the Corrupter. He is a group quest boss – challenging but soloable by any class at this level.
He has three abilities you need to worry about:
 Burning Blaze – spawns a patch of fire; don’t stand in the fire! If you have a pet, keep your pet out of the fire too.
 Raging Shadows – shadow damage and stuns within 12 yards – ranged should stay out of range.
 Wavering Will – magic debuff that slows attacking, spellcasting and movement. Dispel it if you can.
He is immune to roots, but is vulnerable to some other types of crowd control, like stuns. Pet classes can tank him easily with their pet as long as they watch out for fire spawning underneath the pet. Ranged classes can try kiting him. Melee will have to use whatever tricks they can to keep alive – e.g. feral druid bash and heal. Healers should be able to outheal the damage they take. Don’t forget to use food, scrolls, elixirs and pots unless you normally breeze through these group quests.
If you’re having trouble killing him solo, try to find a group (casters especially will appreciate the quest rewards) or you can skip it as there are no follow-ups.
When you’ve killed him, remember to loot Head of the Corrupter.
13. Return to Drak’Sotra (58,72) and turn in:
- A Tangled Skein
- Malas the Corrupter if you did it.
14. Go to Zim’Torga (60,56) and get the flightpath. (Don’t worry about getting the quest available here.)
Take the flightpath to the Argent Stand and turn in:
- Precious Elemental Fluids – get the follow-up Mushroom Mixer; also get Gluttonous Lurkers from Apprentice Pestlepot nearby.
- Pure Evil
- The Drakkari Do Not Need Water Elementals!
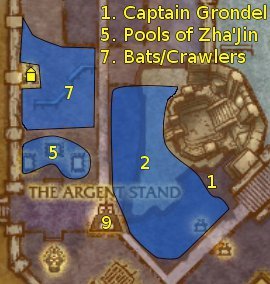
1. Go to Captain Grondel inside the building at 48,63 and get the quest Creature Comforts. (Now would also be a good time to turn in The Champion’s Call! if you’re not doing The Ampitheatre of Anguish group quest chain or you already have a group for it – 48,56)
2. In and around the watery area to the west, there are three thing we need to do:
- Collect 10 Muddlecap Fungus.
- Collect 20 Dead Thornwood.
- Look out for Zul’Drak rats. Pick them up (don’t kill them). When you have 5, use all 5 of them on a Lurking Basilisk to put the basilisk to sleep. Loot the basilisk for it’s crystal. Repeat this until you have 5 Basilisk Crystals.
When done with these, return to Captain Grondel (48,63) and turn in Creature Comforts.
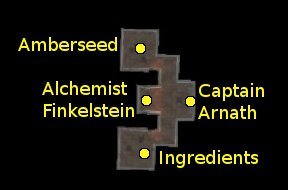
3. Go to the building at Heb’Valok (35,52), turn in Gluttonous Lurkers at Alchemist Finklestein and get Lab Work.
4. For this quest we’re going to collect 4 ingredients from Finklestein’s stores (inside this building). The ingredients expire after 30 seconds, but for the non-daily version of this quest, you don’t need to worry about that.
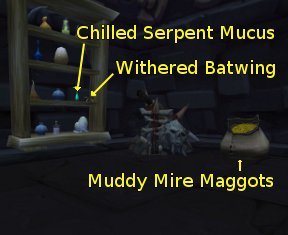
In the room to the south, loot the Muddy Mire Maggots from a sack there and the Withered Batwing and Chilled Serpent Mucus next to each other on the shelf on the east wall. In the northern room, loot Amberseed off any of the shelves. Once you’ve collected all the ingredients return to Alchemist Finklestein and turn in Lab Work.
From Captain Arnath get Siphoning the Spirits.
5. Go to the Pools of Zha’Jin (36,59) and kill Lost Drakkari Spirits until you have 5 Ancient Ectoplasm.
6. Return to Captain Arnath (35,52), turn in Siphoning the Spirits and get the follow-ups Clipping Their Wings and Stocking the Shelves.
7. In the area around the building, kill Zul’Drak Bats until you have 7 Unblemished Bat Wings and Trapdoor Crawlers until you have 7 Fresh Spider Ichor. The drop rates for these are surprisingly poor, so be patient.
8. Return to Captain Arnath (35,52) and turn in Stocking the Shelves and Clipping Their Wings.
9. Return to the Argent Stand (40,65) and turn in
- Mushroom Mixer – get the follow-up Too Much of a Good Thing.
- Pa’Troll
1. Go to Sergeant Stackhammer near the Altar of Sseratus (40,48) and turn in New Orders for Sergeant Stackhammer. Get the available quests:
- Argent Crusade, We Are Leaving!
- Mopping Up
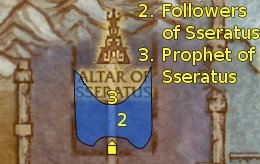
2. There are two things we need to do in the area to the north:
- Kill 10 followers of Sseratus (Champions of Sseratus, Priests of Sseratus or Drakkari Snake Handlers).
- Talk to 10 Argent Soldiers to give them their new orders. However, you can’t talk to soldiers in combat, so you’ll need to help them kill the trolls that they’re fighting. If every soldier is fighting a troll, you should be able to do both of these objectives simultaneously.
3. Go to the Prophet of Sseratus (41,43).
 Use the Modified Mojo on him and then, once he’s weakened, kill him.
4. Return to Sergeant Stackhammer (40,48) and turn in Argent Crusade, We Are Leaving and Mopping Up.
5. Return to the Argent Stand (40,65), turn in Too Much of a Good Thing and get the follow-up To the Witch Doctor.
1. Take the flightpath to Zim’Torga, turn in To the Witch Doctor and get:
- Breaking Through Jin’Alai
- The Blessing of Zim’Torga
- Just Checkin’
- The Leaders at Jin’Alai
Also, you should easily have another 10 Drakkari Offerings by now. Turn in Blessing of Zim’Torga. This blessing (+10% to all stats) is useful for all classes and easy to get. When the buff drops, next time you’re at Zim’Torga, turn in 10 more Drakkari Offerings to get the buff again. This is particularly useful if you want to solo the group quests later in this guide. Don’t use your last 10 offerings though, as there’s one other Blessing quest to come.
If you want to, set your hearthstone here – whenever you’re told to return to Zim’Torga and your hearthstone is off cooldown, simply use it.
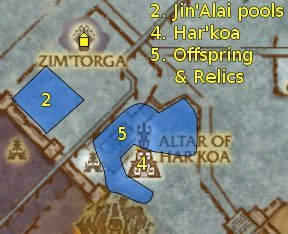
2. Go to the Jin’Alai pools to the south where we have two things to accomplish:
- Disturb the 4 cauldrons at 58,62 – 57,61 – 57,65 – 55,64 by right-clicking them.
- Kill 3 troll leaders. However we need to kill trolls in order for the leaders to spawn. Continue killing trolls while doing the previous objective and watch out for a leader’s yell when he spawns. Each leader spawns by his totem – Chulo spawns at 56,65; Kutube’sa spawns at 57,63 and Gawanil spawns at 58,62. When you kill a leader, make sure to loot the treasure that spawns seperately (not on his body). If there are others in the area and they kill one of the leaders, you can still loot the treasure to receive the quest credit.
3. Once you’ve disturbued all 4 cauldrons and looted all 3 leaders’ treasures, return to Zim’Torga (59,57) and turn in:
- Breaking Through Jin’Alai – get the follow-up To Speak With Har’koa. Also get Relics of the Snow Leopard Goddess from Chronicler To’Kini nearby.
- The Leaders at Jin’Alai – get the follow-up Sealing the Rift. Also get The Frozen Earth from Element-Tamer Dagoda nearby.
4. Go to Har’koa at the Altar of Har’koa (63,70), turn in To Speak With Har’koa and get the follow-up But First My Offspring.
5. There are two things to do in the area around the altar:
 Kill 7 Cursed Offspring of Har’koa and use the Whisker of Har’koa on their corpses.
- Collect 10 Har’koan Relics.
When you’ve accomplished both of these, return to Har’koa (63,70), turn in But First My Offspring and get the follow-up Spirit of Rhunok.
6. Return to Zim’Torga (59,57), turn in Relics of the Snow Leopard Goddess and get all the available quests:
- Plundering Their Own
- Tails Up
- The Blessing of Zim’Rhuk
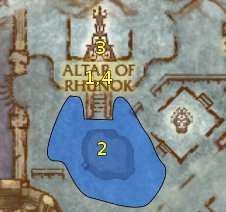
1. Go to the Altar of Rhunok (53,39), turn in Spirit of Rhunok and get the follow-up My Prophet, My Enemy.
2. In the area around the pool to the south, there are four things to do:
- Kill 7 Elemental Rifts.
- Kill Frozen Earth until you have 7 Essence of Frozen Earth.
- Kill the Prophet of Rhunok in the middle of the pool for the Arctic Bear God Mojo.
- Kill Priests of Rhunok until you have 7 Rhunokian Artifacts. If you run out of Priests of Rhunok to kill, you can head back north to the area around the Spirit of Rhunok and kill Drakkari Bear Trappers in addition to more Priests of Rhunok for the Rhunokian Artifacts that you need.
Once you’ve completed all of these tasks, return to the Spirit of Rhunok (53,39), turn in My Prophet, My Enemy and get the follow-up An End to the Suffering.
3. Kill Rhunok’s Tormentor (53,35) and loot Tormentor’s Incense. Kill any other Priests of Rhunok in the building so that you can safely fight Rhunok.
 Use the Tormentor’s Incense on Rhunok‘s body and then kill him.
4. Return to Spirit of Rhunok (53,39), turn in An End to the Suffering and get the follow-up Back to Har’koa.
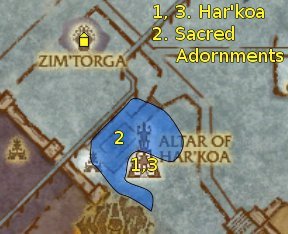
1. Return to Har’koa (63,70), turn in Back to Har’koa and get the follow-up I Sense a Disturbance.
Talk to Har’koa to begin a trip to the Altar of Quetz’lun. Nothing to do here; just enjoy the ride.
When the trip is completed, turn in I Sense a Disturbance and get the follow-up Preparations for the Underworld.
2. In the area around the Altar of Har’koa, kill the trolls (Har’koan Subduers and Claws of Har’koa) until you’ve looted 8 Sacred Adornments.
3. Return to Har’koa (63,70), turn in Preparations for the Underworld and get the follow-up Seek the Wind Serpent Goddess.
4. Return to Zim’Torga (59,57) and turn in:
- Plundering Their Own
- Sealing the Rifts – get the follow-up Scalps!
- The Frozen Earth – get Bringing Down Heb’Jin
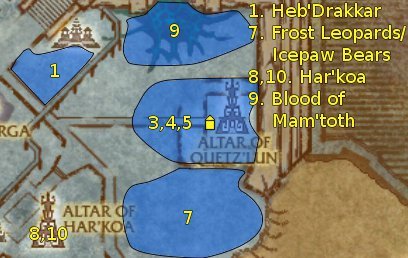
1. Go to Heb’Drakkar to the north-east and kill the Heb’Drakkar trolls.
 When you kill one, use Ahunae’s Knife on its corpse to scalp it.
Clear out the area around Heb’Jin’s Drum (64,52). Right-click the drum and Heb’Jin will come down and attack you. Kill Heb’Jin and his bat. Then continue scalping trolls in the area until you’ve scalped 10 trolls.
2. Go east to the Altar of Quetz’lun – you’ll leave your material body behind (it will appear like you are dead) as you enter a phased version of the area.
Go to Quetz’lun’s Spirit (75,58) and turn in Seek the Wind Serpent Goddess and get the follow-up Setting the Stage.
3. Look around the area for Underworld Power Fragments. They can only be found in the spirit world, so if you leave it (colours return) then you know you’ve wandered too far.
When you’ve collected 10 of them, return to Quetz’lun’s Spirit (75,58), turn in Setting the Stage and get the follow-up Foundation for Revenge.
4. Look for the Soul Fonts in the area. Pull Quetz’lun Worshippers and Serpent-Touched Berserkers near the Fonts before killing them.
Once you’ve done this 12 times, turn in Foundations for Revenge at Quetz’lun’s Spirit (75,58) and get the follow-up Hell Hath a Fury.
5.  Now go to each of the high priests, use Quetz’lun’s Hexxing Stick on them and kill them – High Priestess Tua-Tua is at 73,60; High Priest Mu’funu is at 74,57; and High Priest Hawinni patrols between 75,54 and 78,54.
6. Return to Quetz’lun’s Spirit (75,58), turn in Hell Hath a Fury and get the follow-up One Last Thing.
7. Head south, leaving the spirit world. Look for Frost Leopards and Icepaw Bears.
 Use To’Kini’s Blowgun on them. When they go down, “talk†to them to lift their tails and determine if they’re male or female. If they’re male you’ll have to fight them; if they’re female you’ll get quest credit for Tails Up. Repeat until you have recovered 3 females of each.
8. Go to Har’koa (63,70), turn in One Last Thing and get the follow-up Blood of a Dead God.
9. Go north to the Mam’toth Crater (72,51). Kill Blood of Mam’toth in and around the crater unril you have collected 7 Blood of Mam’toth.
10. Return to Har’koa (63,70), turn in Blood of a Dead God and get the follow-up You Reap What You Sow.
11. Go to the Altar of Quetz’lun (no entering the spirit world this time).
 Use Quetz’lun’s Ritual near the corpse of Quetz’lun (75,58). Then kill the Prophet of Quetz’lun when he’s been drained by Quetz’lun.
1. Return to Zim’Torga (59,57) and turn in:
- Tails Up
- You Reap What You Sow
- Bringing Down Heb’Jin
- Scalps!
Har’koa should have whispered you and is now present in Zim’Torga. If Har’koa hasn’t appeared, leave the Zim’Torga sub-zone and then return – this should correct the phasing issue and you should see Har’koa present next to Chronicler To’kini.
Get all the available quests:
- Wooly Justice
- Enchanted Tiki Warriors
- The Key of Warlord Zol’Maz
- Hexed Caches
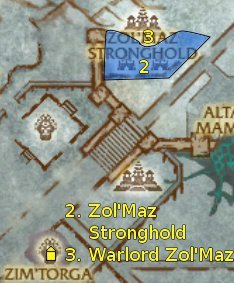
2. Go to Zol’Maz Stronghold (64,37). There are three things we need to do here:
- Kill 12 Enchanted Tiki Warriors.
- Collect 12 Zol’Maz Stronghold Caches. You may pick up curses as you loot the caches. If you’re not a decurser, you can use the Tiki Hex Removers which drop from the Enchanted Tiki Warriors to remove the curses.
- Kill each of Zol’Maz’s family members and loot their quest items. The family members are inside buildings in the area at 64,37 – 68,36 – 67,33.
3. Go to the main building at 66,33 and use any of the quest items from Zol’Maz’s family to combine them and create a Tiki Dervish Ceremony. Use it to summon a Tiki guardian which will result in the gate opening.
You will now fight Warlord Zol’Maz – he is quite tough so if you’re a healer you can let the Tiki tank for you. Make sure to pull him outside the building (or enter the building and fight him inside) since the gate will close when you kill him. Warning: if you die, you’ll have to regather the quest items and redo the ceremony.
Once you’ve killed Zol’Maz, loot the Key of Warlord Zol’Maz.
3. Once you’re finished here, return to Zim’Torga (59,57) and turn in:
- Enchanted Tiki Warriors
- Hexed Caches
- The Key of Warlord Zol’Maz – get the follow-up Rampage.
You can delete any leftover Tiki Hex Removers.
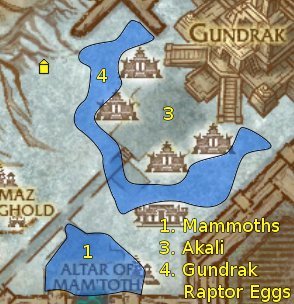
1. Go north-east past the Altar of Mam’Toth (73,40).
 Find an Enraged Mammoth and use the Medallion of Mam’toth on it. It should turn friendly – mount it and use your mammoth to kill Mam’toth Disciples in the area. It helps if you can get into combat with many of them at once because your main damage ability,
  Trample, damages up to 4 disciples at once. If your mammoth dies, tame another one.
2. When you’ve killed 12 disciples, dismount the mammoth and go north to Dubra’Jin (70,23).
Get the flightpath here.
Turn in Just Checkin’ (don’t worry about the follow-up) and get Eggs for Dubra’Jin.
3. As you head east to the Gundrak courtyard (78,24), look out for Gundrak Raptor Eggs around any group of trees and loot them.
If you can’t spot any more, just go to the centre of the courtyard. Around the Rhino god, Akali, are 4 Akali Chain Anchors. Kill the trolls and right-click on each of the Akali Chain Anchors to free Akali.
4. Then look for the remaining Gundrak Raptor Eggs in the area around the courtyard. They are found near the trees along the periphery.
Once you’ve collected the 12 eggs you need, return to Dubra’Jin (70,21) and turn in Eggs for Dubra’Jin.
1. Take the flightpath (or hearthstone) to Zim’Torga. Turn in:
- Wooly Justice
- Rampage – get the follow-up The Gods Have Spoken.
2. The end of the troll gods quest chain has two group quests now. Even if you couldn’t do the earlier group quests, you might still be able to solo these. However, if you can’t solo these quests and can’t find a group, just turn in the last Blessing quest below and move on to the next zone – there are no more solo quests left. If you are going to solo these quests, make sure to get the Blessing of Zim’Torga (from the repeatable quest) before you continue.
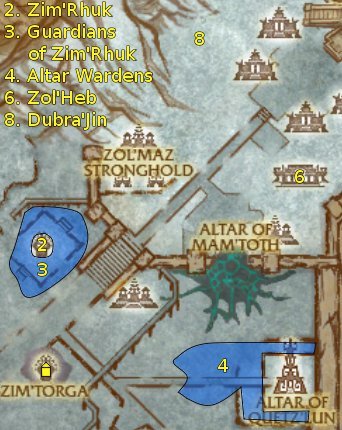
You should easily have 10 more Drakkari Offerings. Go north to Zim’Rhuk (59,44) to turn in The Blessing of Zim’Rhuk.
3. Kill the elite Guardians of Zim’Rhuk around the statue until one drops an Unblemished Heart of the Guardian. Although they’re elite, they are vulnerable to most forms of control such as roots and snares, and kiting them is quite possible. Just watch out for their very annoying Whammy ability which temporarily turns you into a frog.
4. Go south-east to the Altar of Quetz’lun (72,57) and kill the elite Altar Wardens until one drops Gusty Essence of the Warden. Like the previous elites, these are vulnerable to most forms of control. Kiting them without some form of control is difficult since they have a 25% movement speed buff – however if you’re a mage you can spellsteal the buff Whirling Winds and so easily kite them.
5. Return to Zim’Torga (59,57), turn in The Gods Have Spoken and get the follow-up Convocation at Zol’Heb.
6. Go north-east to Zol’Heb (77,36) and find the circle of power.
 Read the next bit carefully before you use the Prophet of Akali Convocation to summon the Prophet of Akali.
Unlike the elites we’ve just been fighting, the Prophet of Akali is immune to all forms of control. Burst down the first 30k quickly, after which there will be a short interlude in which Har’koa will join the fight. If you use abilities with cooldowns of about 1 minute during the first phase of the fight they’ll be ready again for the second phase.
After this, try to let Har’koa tank (use abilities like Feign Death to drop aggro). You’ll still steadily receive a stacking fire DoT so try to kill the Prophet of Akali as quickly as possible to avoid the DoT stacking too high. However, if you do die, Har’koa will continue the fight – just return to your corpse and respawn as quickly as possible.
7. With the Prophet dead, return to Zim’Torga (59,57). Turn in Convocation at Zol’Heb and get the follow-up Unfinished Business.
8. Take the flightpath to Dubra’Jin (marked as Gundrak on the flightpath map) and turn in Unfinished Business.
And that’s it for Zul’Drak. All that’s left are 3 quests for the dungeon Gundrak (available here) and the Ampitheatre of Anguish if you haven’t already done it.
When you’re ready, return to Dalaran as we start with Sholazar Basin.
Scoot mentioned that itScoot mentioned that it pretty closely matches his addon guide, so you can use that until one directly matching this is created.
Amazing…Excellent guide, Theos. It’s as close to Jame’s as you can be, and that’s one of the greatest compliments I can think of giving 🙂 . The formatting is superb, the guide itself helpful, and the maps clear. The directions are spot-on (as far as I noticed) and the entire thing is concise yet detailed. The only thing that’s missing is an addon version 😛
“As if you could kill time without injuring eternity.”
And I’m quite happy to pointAnd I’m quite happy to point them out to you 😛
It’s perfect.
I’m quite happy to haveI’m quite happy to have typos and inconsistencies pointed out to me. There’s only so much one set of eyes can see. 8) I’ll get these fixed up.
Amazing formatting!Just read through- there are a few minor inconsistencies in the colour coding, but nothing too noticeable.
In one of the pictures, you mispelt Drakuru as “Overlorld” Drakuru, but it’s probably not worth going back and changing the pic.
One fussy complaint (all I’ve got, sorry 🙁 )
The Blightblood Troll has three abilities:
* Powerful Strike: Strong melee attack – use whenever it’s off cooldown.
* Concussion Blow: Stunning melee attack – use whenever it’s off cooldown.
* Blightblood Infusion: Heals you, the Blightblood’s controller – use whenever you’ve taken significant damage. Don’t use your own heals as you don’t want to gain any threat.
[b]
Versus:[/b]
Besides his melee attack, the abomination has 2 abilities you’ll need to use:
* Flatulate – use as you go to keep the trolls stunned. The more time they spend stunned, the less damage the abomination will take and so the longer he can keep going.
* Burst at the Seams – explodes the abomination, killing nearby trolls. Use when the abomination looks low on health but make sure there are no loose trolls because any survivors will turn on you. Aim to kill about 10 trolls each time so that you can do Fuel for the Fire in no more than 6 trips.
—
In one situation, you used a hyphen without capitalisation, and in the other you used a colon and a capital.
Tut tut 😛
BUT WAIT! I’ve found a typo!!!!
7. In the building just to the north-east (49,74) is the wounded Crusader Jos[b]h[/b]ephine.
I feel so happy now
Of course not; thank you.Of course not; thank you. 🙂
Added the horde versionAdded the horde version myself Theos, I hope you don’t mind.