
 by Jame
Chapter I: The Library
Introduction
Scarlet Monastery is many people’s favorite instance. You will get to love it yourself too. One of the reasons people love it is because it is divided in 4 Mini instances instead a single big one. The advantages of that feature are numerous. The 4 mini-instances of Scarlet Monastery are The Graveyard, The Library, The Armory and The Chapel..
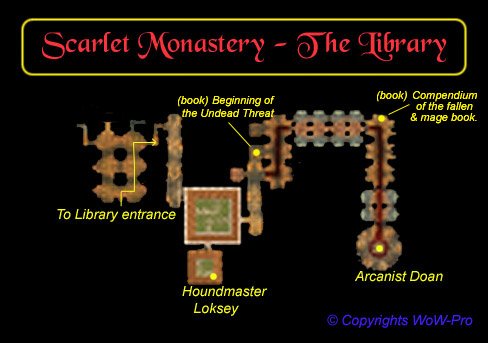
I will cover the graveyard instance shortly here (because there isn’t much to say about it), and then move on to the first important part of the instance, The Library. (see map above).
Quest Gathering
Horde:
- [42] Into the Scarlet Monastery (elite) – Most important quest (given by Varimathras in the Undercity, in the Apothecarium area.)
- [33] Hearts of Zeal (elite) (given by Aponthecary Faranell in the Apothecarium, Undercity) Pre-requisite for this quest is Going, Going, Guano!, a quest involving the instance Razorfen Kraul.
- [38] Compendium of the Fallen (Elite) (given by Sage Truthseeker in Thunder bluff, you can find him on the lower rise, in the house connected to the bridge taking you to the Spirit rise).
Note: Undeads do not get this quest. (for lore reasons) - [36] Test of Lore (elite) This is the follow up quest of a very long serie of quest, starting with [26] Test of Faith, given by Dorn Plainstalker, in the Thousand Needles, northeast of freewind post. It is up to you if you want to do this long quest or not.
Alliance:
- [40] In the name of the light Most important quest (given by Raleigh The Devout, in Hillsbrad Foothills, Southshore). This quest has pre-requisites: Starting with [39] Brother Anton (given by Brother Crowley in Stormwind city)
- [38] Mythology of the Titans (given by Librarian Mae Paledust, in the city of Ironforge)
Mages:
- [40] Rituals of Power (Elite) There is a mage only quest involving retrieving a book in the Library. The quest is given by Tabetha, in Dustwallow marsh, right in the middle of the zone, and a bit to the south. It is a follow up quest, you need to be at this point in your ‘mage only’ quest line before going to Scarlet Monastery.
How to get to SM
Scarlet Monastery is located in the Northeastern part of Tirisfal Glades.
After going up a long corridor you will be in a large room with pillars in the middle, filled with scarlet denizens all around. Clear your way to the opposite side of this hall, and you will reach the 4 entrances to the instance. The two middle doors are locked, they give access to the Armory and The chapel, you can’t access them yet. The blue portal on the left gives access to the Graveyard, the blue portal on the right gives access to the Library.
The Graveyard
The Graveyard part of the instance is through the Left blue portal, as explained above. It is totally optional. If you go there and clear the first corrider to the first room, you will be in a torture room, and an easy mini-boss will be there, he doesn’t drop anything worth it, but there is also a tortured prisoner there, who gives you a quest:
[33] Vorrel’s Revenge (Elite) (Horde only)
If you go to the end of the graveyard you will kill an easy named who drops blue loot sometimes, but really not worth it compared to what you can get in the other part of the instance. On the other hand, this part is easy and can be done by a low 30ish group.
Now on to the interesting stuff, to the library! Enter the blue portal to the right.
The Library
Group composition: lvl 35+ basic party. You need a tank, a healer (priest/druid), some crowd control against humanoid (Rogue / Mage / Warlock) and anything else.
The only real danger of this instance:
Runners. Every single mob (besides the hounds) in this instance runs away in fear when getting low on health. This is almost the only reason why parties can wipe there. So two things:
- Have someone on snare duty (by snare I mean movement slow effects such as Hamstring, concussive shot, etc, or even better, warlock’s curse of recklessness).
- Always pull way back, so you have room for errors.
The first corridor is a mix of Scarlet Gallants, Scarlet Adepts (priest type, so be ready to interupt their heals), and Scarlet Beastmasters (+Hound pet).
It’s easy if you follow the rules above. After clearing first corridor you will reach the Huntsman’s Cloister. Clear it entirely, then go south to the room where Houndmaster Loksey awaits you.
Houndmaster Loksey
Houndmaster Loksey deals quite a lot of damage for his level, so if your party is rather 35- than 35+, I suggest you take this fight seriously.
He is guarded by 3 hounds, which don’t do nearly as much damage as Loksey does. If you have a druid, put one dog to sleep, if you have mage, sheep one, as for the last one it’s up to you. Send the warlock or hunter pet on it, or even, ask the warlock to cast fear the whole fight. (if you cleared the previous room entirely, there’s no risk in doing that)
Kill Loksey first, and then finish the easy dogs. Congratulations, you just finished 1/4 of the main quest.
Get moving fast though, because respawn rate is quite fast in Scarlet Monastery.
On the way toward the final boss of this part of the instance, you will meet new mobs, a bit higher in level than the rest: Scarlet Chaplain (priest type), Scarlet Monk (deals high melee damage, but low defense), Scarlet Diviner (casts fireball a lot, interrupt it).
You will finally reach the Athenaeum, where you will find the books you need to complete the Test of lore and Compendium of the fallen (Horde) and Mythology of the Titans (Alliance) as well as the mage quest Rituals of Power. Check the shelves at the spot shown on map. Also, if you have the quest Test of Lore, you will have to clear one of the little side rooms before reaching the Athenaeum, the book is on a table inside of it. (see map)
Arcanist Doan
At the end of the library, you will find Arcanist Doan(lvl 37 Elite), he casts the following spells:
- Arcane Explosion, it’s an Area Effect spell, and he casts it a lot, so if you are not supposed to be meleeing him, stand away from it.
- AE Silence, he casts it from time to time, so make sure your casters are far away from him.
- Polymorph, sometimes he turns a group member into a sheep. If you have a Priest he can remove it with Dispel Magic, if you have a warlock, his Felhunter pet can remove it as well.
- Arcane Shield, he casts it once in the fight when you get a good chunk of his health down. He is immune to everything while this Shield is up, and it lasts about 10 seconds.
He is Immune to Stun, Silence, Shield bash, etc. But he is a caster and therefore doesn’t have much Hitpoints, even though he is a boss.
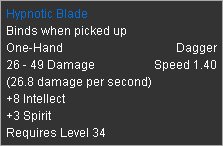
He can drop one of the following items:
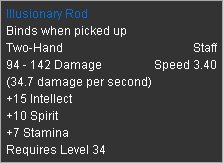
As well as the Mantle of Doan or the Robe of Doan, so-so green items.
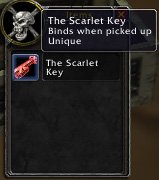
In the back of Arcanist Doan’s room, you will find a treasure box on the floor, open it, and you will aquire the key to the 2 last instance parts of the Scarlet Monastery.
Now on to the next step, the Armory.
__________________________
Chapter II : The Armory
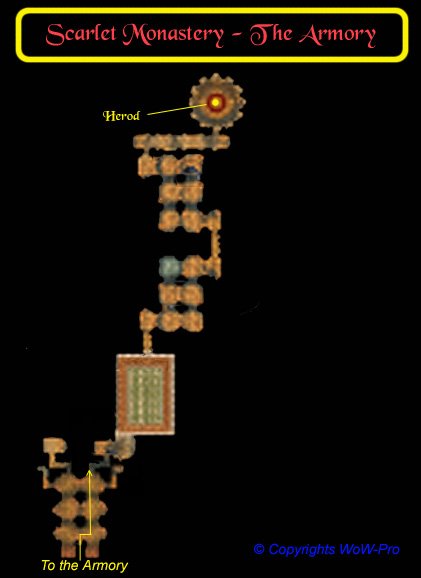
So you just entered the Armory. Now things get a bit more tough. First off, mobs are a bit higher level (highest being lvl 40, Herod himself). So I recommend your group is majorly lvl 36+
Secondly, most pulls are gonna be two or three mobs at a time. And there is also a few patrols, and of course, mobs have that annoying tendency to run away in fear. Things can get ugly quickly.
A few rules:
- Naturally, use every Humanoid crowd control spells / abilities your group has at disposal.
- Decide who is gonna be pulling (preferably the warrior, working together with the rogue (sap), if there is a rogue.)
- Pull WAY back, this is important, you need time to finish off mobs when they run away. People sometimes forget to snare on top…
- Decide who everybody will be Assisting (preferably not the warrior who will sometimes need to switch targets to taunt mobs off people)
- Kill casters first, they hurt the most. Scarlet conjurors have annoying Fire elemental as pets. They hurt but got low hit points. So if you don’t have a warlock in the group (who could banish them), kill them first right after the caster is dead.
- If there is no caster, kill Scarlet Myrmidons first, they do high damage, and they enrage when low on health, which turns them into killing machine, so finish them off quick when they enrage. The cool thing about them, is that they never run in fear.
- Scarlet Protectors are no harm, they are Paladins and can heal, but ONLY themselves, for some reason, they don’t heal other mobs. They have low dps, aren’t much of a threat, but take long to kill because of the self healing. So, save them for last.
- Be careful, there is about 4-5 patrols on the way to herod. You can pull every of those patrols solo if you are careful enough. So take your time and watch out for those.
- Respawn is fast, but still you have enough time to do everything carefully, so don’t be too hasty and wipe.
At the end of the armory is a big circle room, where Herod awaits his challengers.
Herod, The Scarlet Champion

Herod is tough, looks cool, and is a fun fight.
He hits pretty hard, and has a load of HPs. And some nasty abilities:
- Cleave – Hits an additional nearby target. This can be avoided if nobody else but the warrior is in close melee range.
Note: A Rogue can still be meleeing and avoid most cleaves if he is fighting Herod from behind, and at max possible melee range. - Whirlwind – Herod starts to spin, and every nearby player gets hurt every 3 second for about 200dmg+ , this lasts about 9 seconds.
When this happens, whoever is in melee range, must back off fast, even the warrior. When he is done spinning, you can go back at him immediatly.
Note: Herod is immune to magic while he is doing Whirlwind. - Immune to stun, silence, etc.
- When he is below 20% hit points, he enrages, and this is when he really hurts. So save up some mana / energy for this moment, and finish him off quickly.
- When Herod dies, about 20 Scarlet Trainees come into the room and try to avenge their fallen Hero. They are only lvl 30 and non-elite though. use AE to kill them all fast.
Congratulations, you cleared the Armory, and got your main quest 2/4 completed. Now only Scarlet Commander Mograine and High Inquisitor Whitemane are left on your kill list.
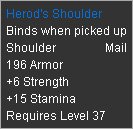
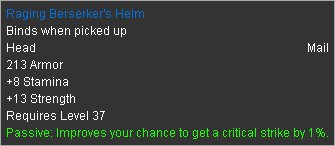
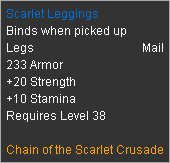
Herod can drop the following items:

Prepare for the last part of the instance now, The Chapel.
_________________
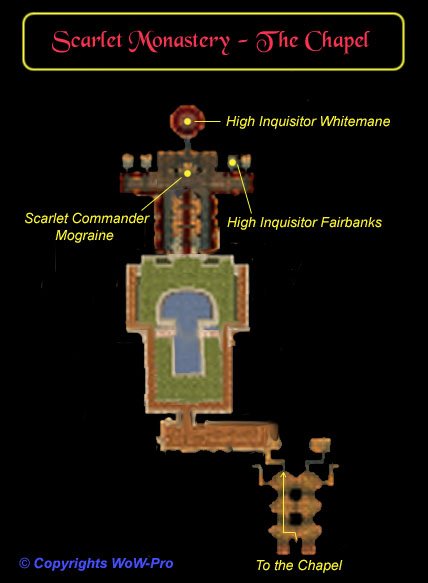
Chapter III : The Chapel
Introduction
I would recommend your group having an average of lvl 40+ for this last part of the instance. Simply because the last fight includes fighting Mograine and Whitemane at the same time. And they are both boss mobs, and both lvl 42 Elite. If you are lvl 39 or lower, they will be Orange to you, you will hit them less often, less hard. They will hit you more and harder. This is why lvl 40 or higher is a big advantage here.
Bestiary
New mobs:
- Scarlet Centurion – Melee type, casts Battle Shout.
- Scarlet Wizard – Casts Arcane Explosion (Instant AE) and Fire Shield III – Kill them fast.
- Scarlet Champion – Melee type, hits hard – Special High damage attack: Holy Strike.
- Scarlet Abbot – Priest type, casts Renew and Heal. Must be interrupted and killed fast.
On Your Way to The Chapel
You will first have to go through a garden with a pool in the middle. The fastest way through it seems to be clearing a straight path to the pool, then move your whole group there. Then when your whole group is safely sitting in the middle of the pool, you can start pulling either left or right, towards the stairs to the upper level of the gardens.
Once you have cleared a path safe enough to move up, tell your group to do so, and establish your new camp on the upper level pool, right next to the fountain. It’s safe spot, nothing aggros there.
Now start pulling towards the Chapel’s gate. Pull the mobs carefully, there are lots of roamers here, and fight them inside the pool, in the middle of it.
Warning: Be extremely careful with runners here, as you don’t have much room for mistakes.
Once the path to the gate is open, call your group to move up the stairs, but don’t move inside the chapel yet.
You will first clear the beginning of the Chapel by pulling it outside, to the stairs. When you feel that you have cleared enough inside so it is safe enough to move in, do so.
At the end of the chapel is Scarlet Commander Mograine. There is one thing you need to know about him before you go further: when you attack Mograine, he calls for help, and the WHOLE Chapel will come to his aid. So before you aggro Commander mograine, clear EVERYTHING that is inside the chapel, including the back rooms to the side. Check every little corner before you attack him, because the next fight is quite something.
Scarlet Commander Mograine & High Inquisitor Whitemane
Engage Mograine when your group is fully ready, and warn them about a few things:
- Mograine is a paladin type mob – He uses Hammer of Justice (3 sec stun), Crusader Strike (increases holy dmg on target), and Divine Shield (invulnerable for 10 seconds). He hits hard and can take a lot of pain. Thanks god though, he doesn’t heal.
- When Mograine dies, High inquisitor Whitemane comes and attack your group – Whitemane isn’t much of a threat – she doesn’t hit hard, casts Holy Smite mainly, until she pulls out her ”special”.
- At some point, Whitemane will cast Area Effect Sleep, putting the whole party to sleep for about 10 seconds, and there is nothing you can do about it, it is part of the script. While your party is sleeping, she goes and Ressurects Scarlet Commander Mograine, and fully heals him.
- Don’t panic, send your warrior on Mograine to offtank him, and the rest of the group on Whitemane. Kill Whitemane fast, she doesn’t have much hit points, she is a caster type boss. When Whitemane is down, jump on Scarlet Commander Mograine and this time kill him for good.
Congratulations for overcoming this battle.
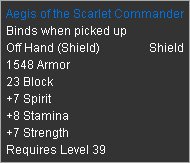
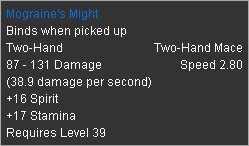
Scarlet Commander Mograine can drop the following:
He can as well drop the Scarlet Leggings, the same ones Herod drops.
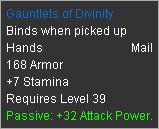
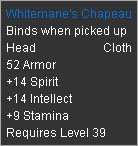
High inquisitor Whitemane can drop :
You are done with the main quest now, but before leaving the instance, go to the little side room on the right, there is a torch in a corner, which is actually a switch to a secret room. Inside this room is High Inquisitor Fairbanks, which turns out to be an Undead (so much about Holy crusade), he is sleeping but will wake up if you get very close.
Anyway, he is an easy boss, casts sleep and curse of blood (physical damage taken increased), and powerword:shield.
He drops 3 top of the line random green items.
Also, before leaving the Chapel, check out the circle room where Whitemane was before she came to attack you. There is a treasure chest there most of the time.
Now is the time for you to go and turn in your main quest, and enjoy the rewards, which are totally great for this level. 🙂
I hope you enjoyed this guide through the Scarlet Monastery!
-Jame
Copyrights WoW-Pro
Needs an updateWe are recently working on improving the quality of content here on WoW-Pro.com, both by limiting low ranked guides and by moving out of date guides into archives. For more information, see [url=https://www.wow-pro.com/node/3016]the full news post detailing this process[/url].
This guide needs an update to make sure it is current with patch 4.0. However it still has enough useful information that it will be left in it’s proper section as-is.
If someone else would like to adopt the guide, or if you have any questions about this process, feel free to comment here.
Reccomendation on money making in chapel (cath) :jawdrop: Reccomendation on money making in chapel (cath), well when i was being ran thru SM:Cath (-7minute runs) lvl 80..anyhow i was looting all best to make money is to pick up all the silk cloth, mageweave cloth, greens that drop, and the blues from the bosses “in total i did like 20-25 runs from lvl 28-40
i started it with ONLY 10 gold…at the end when i was lvl 40 i checked my inventory after selling the (soulbounds to vendors)..(binds on equipe) to AH (Autioneer helped with AH) i had 100 gold..thats 90 gold profit in just 20-25 runs…runner didn’t want to waste time so i only looted what was most valuable “autioneer helps with that(check profit sold to vendor / AH”mageweave should sell at AH “stacks”) silk cloth vendors 30s each stack mageweave = 50s each stack at vendors..AH depending on prices already there…the blues i was making 1g+ profit!!!…greens were 50s-95s profit its unbelieveable maybe but i am proof :jawdrop:
Thanks,Aldo :jawdrop:
Nice GuideThis is a very nice guide but I did manage to find one small error here. It’s about the quest:
[42] Into the Scarlet Monastery (elite) – Most important quest (given by Varimathras in the Undercity, in the Apothecarium area.)
Varimathras is inside the Royal Quarter which is inside the Apothecarium. Not a big error but I thought it was worth mentioning in case someone is wondering 😉
not so important..Hypnotic Blade, also gives 8-9 spell dmg (if I ain’t wrong…)
By the way, use Hypnotic Blade + the off hand from “Into the Scarlet Monastery” quest
this way you’ll have 20 intelect 5 stamina and 8(or)9 spell dmg…
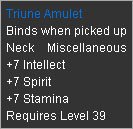
no need to take the neck, you can get a better one (triune amulet)
Cheers~!
nice :PWell, with my druid, i was tanking in the library, and we died at houndmaster,(at least 2dps and the healer did)
Although, we had a hunter with us, and i took 2 mobs on me (an elite and the boss) and the hunter took an other, and i stood up healing, reforming to take aggro again and fight while i had h.o.t.s’ 😛
Easy with a damage absorption trinket (Defilers)
God bless druids 😀
u will get reflexes..With my mages, when I am stuck and going to die, I always do Ice Block, 10secs are much time to think about what should I do(Plus the tank has plaenty time to get aggro back_or the healer to heal you and etc)
A mage is very difficult to die, and just for the record, You have the best survival skills 😉 }:)
This will help..!I did this with my friend on the library.
You will just need a druid..
Its quite simple, druid on bear form, he pulls all the instance behind him and you follow on some distance (cause otherwise mobs will come after you faster than the druid) go to the last boss, then simply die, druid will die too…
Then druid comes back to the instance (or soulstone resurect) stealth and come to you without pulling anything..
In the boss room, he can cast his rez, without a prob, he can cast it while in combat, but he will most likely not get in combat…
You rez, he kills the boss, loot, take the key, and be happy
The only problem, is that the rez has a 20min cd, so.. do it only once, or wait the expansion (druids will have normal rez too !yay!)
Dunno, you could do it in many ways, like get soulstone resurect, both die in the boss room and then resurect again… this way u wont have to wait 20 mins, or need a druid.. u can do it with other chars aswell the only prob is that you will need a warlock too 😛
You will probably be a mage, so if you take a rogue to boost you, after the pull, cast frost nova twice (with permafrost!, frost nova, after 8 sec, snap, nova), ice block, (u will have the aggro) wait till he kills the boss (i dont think he will_we tried this with the druid but it didnt worked[maybe cause he was resto :D] vanish, you loot (if you make it) then go out and do it again _ITS HARD_ you will die thats the only 100% sure thing unless if you are a rogue or a druid, (you wont it has caster rewards)
Balance druid, you will love it, you dont have to kill urself, simply take a rogue, he runs till the last room , <> Subtlety rogue, you need to shadowstep the mobs so you keep others in distance, then sprint , preparation, sprint again and shadowstep, you will take a lot of dmg thats sure
The druid will be in stealth, you DONT enter combat if you stay far from the rogue, just stealth in the end of the whole story,
CHEERS
I hope you understood what i mean, this can be done in several instances, save time, and twinks will love it!~!
Have fun guys, <3
Thank you, fixed it.Thank you, fixed it.
Great guide, but IGreat guide, but I discovered a small error:
[40] In the name of the light Most important quest (given by Raleigh The Devout, in Hillsbrad Foothills, Southshore). This quest has pre-requisites: Starting with [39] Down the Scarlet Path (given by Brother Anton in Stormwind city)
Brother Anton is actually in Nijels Point, Desolace. The quest starts at Brother Crowley in Stormwind Cathedral Square.
Greets..
Scarlet Commander MograineMy mage died under the fight as Mograine seemed to aggro on me. I had the aggro right as he died, but when Whitemane ressurected him, i had no chance. Our warrior desperately tried to get the aggro away from me, but he seemed to be stuck on me. 😕
So be VERY carefull who ever has got the aggro when Mograine dies… Because he will be stuck on YOU untill he’s killed for good! }:)
——————————————————————————
Do it like the best, and kill all the rest! xD }:)
Nope, wowwiki nicely copiedNope, wowwiki nicely copied on us. We are taking care of this and asking wowwiki to take down the copied guide.
Ehem??http://www.wowwiki.com/The_Scarlet_Monastery :jawdrop:
did you copy wowiki or they copied you? 😀
Well, at level 43, my lock could solo the graveyard, and …much of the library, but Houndmaster Loksey was just too much (when our group fell apart as people tried to reach the SM, I decided to do it solo. I really wanted the quest rewards and thought I could probably kill the houndmaster myself).
Really, really close though. sigh. But I used stoneskin potions and everything else and no joy. Ran lots of buffs, etc.
2 thingies i didn’t seeMaybe i read over them at some point but:
– When Arcanist Doan uses his Shield spell he’ll shout (so it’s a red text) “Burn in rigteous fire!” at that moment he casts a fairly long Fire Nova kind of spell witch hits pretty hard, so it would be wise to run out of it’s blas range as soon as he has casted the spell his shield will fade and you can continue to clobber him senseless.
&
– When Fighting Herod, the Scarlet Champion he’ll shout (Red Text again) “Blades of light!” at that moment it would be wise to cease attaking him cause he’ll be engulged with a pretty strong Damage Shield (he doesn’t seem to attack) if you got a very strong healer or one with a lot of mana it probably won’t make a difference if you keep hitting him or not but with a group thats barly within level range it could cause a whipe.
Again if i looked over these 2 things sorry for these comments, It’s a great guide to SM though. Well done Jame!