 by Jame
Chapter I (21-30) – Journey from the Barrens to the Thousand Needles
Changelog
This is v2.0 of the guide. It has been revamped as mentioned in this news post to adapt to patch v2.3 changes. You can still find the old version of the guide here. At the same time, many other improvements have been made:
- Introduction section shortened to contain the important info only
- Addon section updated
- Kill everything on your way rule has been more or less lifted, unless you lack experience compared to the guide’s progress
- Numbers in images now correspond to paragraphs
- Grinding sessions have been removed
- Guide doesn’t assume you did Hosho’s Barrens Guide before, neither does it assume you leveled in the Barrens before, it’s now perfectly usable for Blood Elves and people who leveled in Ghostlands etc.
- Quest from Blood Elf NPCs that were added with TBC have been integrated
- New quest circuits, new (clearer) maps and additional pictures were added
- Several minor errors have been corrected and patch v2.3 changes to simplify certain quests and encounters have been integrated
Big thanks to Subere for the beautiful picture/map editing!
Introduction
This guide starts at level 21, if you need guides for any other level range (from 1-21 for example) please take a look at this page.
This guide is made for FAST leveling through the use of Optimized Quest Circuits. With this guide, questing will be very efficient and you’ll not waste any second running around and trying to figure out in which order to do your quests. Follow each instruction carefully and you will see for yourself. The quest choices and order to do them are optimal so that you run as few as possible while doing the most possible, turning several quests at the same time. It will be like grinding, because you’ll be killing stuff almost non-stop, besides you’ll also be completing a bunch of quests at the same time!
Everything described in this guide can be done solo (beside when I say otherwise). You can, of course, follow this guide while duoing, grouping, it’s not a problem, it works too.
DISCLAIMER: This guide does NOT take into account tradeskills, class specific quests or PvP. It’s 100% focused on getting the most experience possible in the shortest possible time while doing a lot of quests and enjoying as much content as possible. Any race/class combination can do this guide. Any complaints about PvP, tradeskills, or class specific issues will be ignored.
Basic rules
- Spend your talent points so that you kill things as fast as possible. (e.g: Priest should specialize in Shadow Talents, Warriors in Arms/Fury, etc.
- Don’t waste your time trying to find groups for questing, you can solo everything that is described in this guide unless I say otherwise. Only group with someone when it’s not gonna be a waste of time (e.g: meeting the person at the other end of the zone to show him the way to where your quest is, that is a waste of time)
- Try to always log out in an inn or in one of the major cities when you take a break.
- When I say you should make an inn your new home location, it’s for a good reason, and it will save you much time.
Useful Addons
To get the most out of my guide, you should get an addon which displays coordinates, because I use them to describe locations in my guide (x,y). You can use any addon you like, but here’s a very simple one I use.
Recommended
- DMiniCoords – A simple box which displays coordinates, left-click it to move it where you like.
Optional
Below is a list of other addons I use, this is 100% optional though, it’s mostly for people who are curious to know which addons I use:
- Bartender4 – A great action bar addon.
- X-Perl UnitFrames – Very nice, highly customizable unit frames.
- Quartz – The best casting bar addon out there, imo.
- Scrolling Combat Text – I just don’t like the default UI Floating Combat Text.
Side Note: In case you don’t know how to install add-ons, simply download an addon from one of the links above and unzip it. Then drag the unziped folder in your Addon folder (full path is c:\Program Files\World of Warcraft\Interface\Addons). Then, restart World of Warcraft and it should be working.
If it isn’t working, you might need to log out to your character selection screen and click on “Addons” in the lower-left corner. Tick the box that says “Load out of date Addons”. Re-launch WoW.
Shopping List
- Deadly Blunderbuss (will be needed at level 26 for a quest). Buy it at the Auction House or bring the materials to an Engineer and ask him kindly to craft it for you.
Color Code
- Quests
- Items
- Locations
- Quest objectives to kill
- NPCs
- Locs
The Guide
Level 21
- If you followed Hosho’s Guide to the Barrens: You should be in Orgrimmar or Camp Taurajo. If you are in Orgrimmar, make the inn your home location before you do anything else. Fly to Camp Taurajo.In Camp Taurajo, get the quest [20] Cry of the Thunderhawk, get out of Camp Taurajo and look for a Thunderhawk, there are easy to find all around the camp, kill them until you get Thunderhawk Wings. Go back to Camp Taurajo, turn the quest in and get the quest [20] The Ashenvale Hunt.
Hearthstone to Orgrimmar, or fly there and set your hearthstone there.
If you haven’t turned in [19] Samophlange Manual and/or haven’t learned your new skills yet, do that. [19] Samophlange Manual is turned in at Rilli Greasygob in the Valley of Honor, in the engineer house.
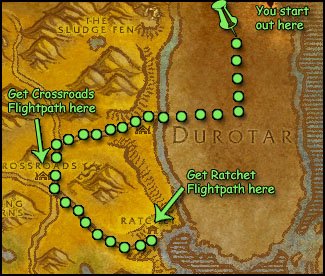
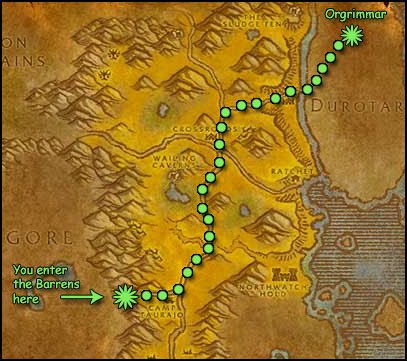
Fly to Ratchet.
- If you followed Snowflake’s Guide to Ghostlands: You should have [21] Envoy to the Horde, turn it in at Lady Sylvanas at Undercity and get the follow up (will allow us to catch up a little on exp). Take the zeppelin just outside the town. Go to Orgrimmar and set your hearthstone there and sell junk/train etc. Turn in [21] Meeting the Warchief at Thrall in the Valley of Wisdom. Get the follow up. Once done get the Crossroads then the Ratchet flight path:
- If none of the above is the case: Simply get to Orgrimmar:
From Undercity: Just north outside the town you can find a zeppelin tower. Take the zeppelin to Orgrimmar.
From Silvermoon: Use the translocation orb which you can find at Sunfury Spire in the northwestern part of the zone. You should be in Undercity. Follow the above mentioned instructions for Undercity.
From Thunder Bluff: Exit Mulgore to the east where you should zone into the Barrens. Follow this map: -
Once at Orgrimmar: Make the inn your home location, get the flight path, sell junk, restock on food/drink etc. Once done get the Crossroads then the Ratchet flight path:
At Ratchet: Speak to Sputtervalve who is right next to the flight master and get [21] Ziz Fizziks. Fly to Crossroads.
From there go west until you hit Stonetalon Mountains. Just about at the border you should see two quest givers. Get [19] Goblin Invaders from Seereth Stonebreak.
Follow the road further northwest to Sun Rock Retreat. On the way, at (59,75) you’ll see a wanted poster. Take the quest [21] Arachnophobia from it. Ahead of you there should be a little valley with spiders and spider eggs. Clear your way into it until you see a big orange spider called “Besseleth“. Kill it and loot its fang. Get out of the valley and continue northwest until you reach Sun Rock Retreat.
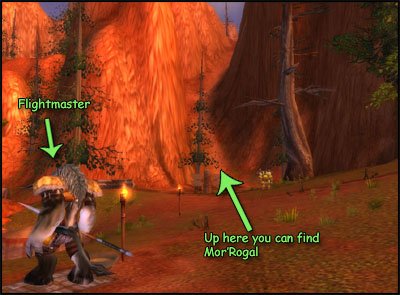
Turn in [21] Arachnophobia at Maggran Earthbinder. Get the flight path (if you don’t have it yet) and get [18] Boulderslide Ravine from Mor’Rogal. (He can be reached if you go up this path, looking from the Flight Master)
Once done, follow the main path southeast until you reach Windshear Crag. Before you enter though, at (59,62) you should find Ziz Fizziks. Turn in [21] Ziz Fizziks and get the follow up. Now in Windshear Crag, run to all machine thingies looking somewhat like this:

You’ll find Venture Co. Operators there. Kill them until you get Super Reaper 6000 Blueprints. On your way kill 15 Venture Co. Loggers. Once you have them fight your way back to Ziz Fizziks, turn in and get the follow up. Follow the path southeast back to the Barrens. On the way, at (67,88) there should be a little path going into the mountains. Follow it. When you open your map you’ll see two caves. Go to the northern one and fight your way through to it. Once you enter the cave you should see shiny purpal crystals on the wall. Gather 10 of them while going deeper into the cave. At approximately this point:

You will get a discovery quest message and you can head back out of the cave. Continue on the path to the Barrens. At the border to the Barrens turn in [19] Goblin Invaders at Seereth Stonebreak. Go straight to the Crossroads. Fly to Ratchet. Turn in [21] Further Instructions at Sputtervalve and don’t get the follow up. Now fly to Sun Rock Retreat. Go back to Mor’Rogal and turn in [18] Boulderslide Ravine.
- If you have the Splintertree Post (Ashenvale) flightpath: Fly there.
- If you don’t have it: Fly to Crossroads and follow the path north until you reach Ashenvale Forest. Go further north until the path forks, there go east until you reach Splintertree Post. Once there take the flight path.
- If you already have the quest [20] The Ashenvale Hunt, talk to Senani Thunderheart to complete it.
- If you don’t have it, Senani Thunderheart will have another quest also called [20] The Ashenvale Hunt. It is important that you PICK UP AND THEN TURN IN THIS QUEST IMMEDIATELY at Senani, clicking COMPLETE QUEST. If you don’t, quest items won’t drop in the next part of the guide when we kill Ursanguous, Shadumbra and Sharptalon.
- For those who have the Zoram Outpost flight path: Fly there.
- For those who don’t have it (yeah I know it’s a lot of running at the beginning but we need to get those flight paths, they are important and you will constantly rely on them, even in the future): Follow the road west. Once you see an Alliance Outpost (Astranaar) avoid it CAREFULLY. Continue west until you reach (25,31). There should be a little path leading off the mainroad, going west. Follow it until you see a beach. Follow the beach southeast until you see a little camp. Welcome to Zoram Outpost. Get the flight path.
At Zoram Outpost: Get [19] Naga at the Zoram Strand, ignore the other quests for now. Kill Nagas here on the beach until you have 20 Wrathtail Heads and until you are 1450exp away from level 22. Once that is done, go back to Zoram Outpost and turn in [19] Nagas at the Zoram Strand. To open the clam shells faster use [Shift + Right Click] on them (or tick the auto-loot option in your interface options). If you find any Shredder Operating Manual pages, keep them.
You should be level 22 by now.
Level 22
Hearthstone to Orgrimmar and get your new skills, sell / repair, restock food / drink and buy some healing potions. Put your Shredder Operating Manual pages in the bank.
Get out of Orgrimmar and take the Zeppelin to the Undercity. For those who never took the Zeppelin, just go left when coming out of Orgrimmar, you’ll find a tower with two goblins atop, talk to them to know which of the Zeppelins goes to the Undercity (the other one goes to Grom’Gol, in Stranglethorn Vale, a level 30+ zone).
Get off the Zeppelin in Tirisfal Glades and go to the Undercity if you don’t have the flight path (that will most likely be the case if you aren’t an Undead) and take it.
For Bloodelves: If you have the quest [21] Allegiance to the Horde, use the translocation orb to go to Silvermoon, turn the quest in and come back right away.
Once you have the Undercity flight path, get out and follow the road southwest. Follow it until you enter Silverpine Forest. In Silverpine follow the road until you reach a fork at (51,36), go west here and get the flight path at the Sepulcher, also get the quests [20] Journey to Hillsbrad Foothills from Apothecary Renferrel and [21] Beren’s Peril from Shadow Priest Allister.
Get back on the road, go south and follow the road until you are approximately at (58,77), at this point go northeast to Beren’s Peril, stay close to the mountain which should be on your left hand, kill any Dalaran dude in your way. You’ll quickly find a narrow path towards the mountain at (60,74), go this way and you’ll find the entrance to a cave as well as Ravenclaw Drudgers and Guardians, kill 6 of each to complete [21] Beren’s Peril.
When done, get back on the road, go east until you enter Hillsbrad Foothills.
In Hillsbrad Foothills, follow the road, you’ll quickly come across a guard tower to your right, get the quest [20] Time to Strike from Deathstalker Lesh there. Then get back on the road and keep going east until you get to another guard tower and a crossroad (57,36), go north to Tarren Mill. In Tarren Mill get the flight path, turn in the 2 quests we had and get the following quests:
[22] Elixir of Suffering
[24] Elixir of Pain
[24] Battle of Hillsbrad
[22] The Rescue
[22] WANTED: Syndicate Personel (from the poster infront of the church)
[28] Dangerous! (from the poster infront of the inn)
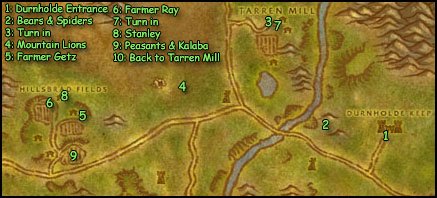
1. Head east/southeast, from now on kill every bear and spider you see on your way. You should soon find Durnholde Keep, the main entrance is on the south side of it at (76,46), go there. Inside the keep, clear the way over the bridge, then follow the small path up and then left. To the right you should see an orc npc in the distance named Thog’thar, he’s chained and needs a key to escape. You will have to find Jailor Marigen and kill him to get the key. Start killing everything in the area until you find Jailor Marigen, loot the key and free Thog’thar, you just need to right click the iron ball.
You should also find Jailor Eston in the area to get the key for the other prisoner, Drull, but if Jailor Eston isn’t there he is probably in one of the houses on the lower level of the fortress, and we’re going there now.
Once you are sure that Jailor Eston isn’t in the area (or have already found and killed him), move back down to the bridge and past it, if you look to your left and down you should see a few wooden houses in the lower court. Follow the ledge until the end and jump down there carefully and start clearing the way to the wooden houses, watch out, mobs run away here. Drull, the 2nd prisoner, is in one of the two wooden houses. Free him and then get out and start killing everything on your way out while also completing [22] Wanted: Syndicate Personnel.
2. Get out of Durnholde Keep and start going back towards Tarren Mill, kill as many bears and spiders as possible on your way. Keep doing that until you complete the quest [22] Elixir of Suffering. This might take a while, the Creeper’s Ichor is kinda rare. This should make you ding 23. If you aren’t 23 yet either grind on spiders and bears or in Durnholde Keep. If you don’t want to grind at the moment you can just continue with the guide but you should kill everything on your way.
Level 23
3. When done, go back to Tarren Mill and turn in the 3 quests. Take the follow up from [22] Elixir of Suffering and turn it in at the little frog named “umpi” right next to the Apothecary. Get [24] Elixir of Pain. Restock food/drink, sell junk, repair (there’s a weaponsmith on the other side of the field south of Tarren Mill).
4. & 5. Head west towards the Hillsbrad Fields, kill every Starving Mountain Lion you find on your way, don’t worry if you don’t get the 10 lion blood, we’ll finish this quest on the way back. We’ll first focus on the field which is to the northeast, you should see a small house, a tower-like structure and a medium sized house which looks like a barn. Before you start killing stuff, be mindful that every of those humanoids run in fear, so use snare abilities like hamstring when they get low on health.
5. & 6. Clear the way around the small house and inside you should find Farmer Getz, kill him (If Farmer Getz is not in his house, he’s either in the field right next to it or in the barn). Then go northwest towards the next field, next to this field you’ll find a medium sized house, with a dog named Stanley infront of it. Clear the way inside this house and on the 2nd floor you’ll find Farmer Ray, kill him (Farmer Ray can also be found on the first floor of his house, and also around it and in the field next to it). Now just go out and start killing Hillsbrad Farmers and Farmhands in the fields until you have the [24] Battle of Hillsbrad quest finished. Avoid Hillsbrad Footmen, they might be too difficult for your level.
7. Once that is done, head east back to Tarren Mill, and kill as much Starving Mountain Lions as you need to finish the quest [24] Elixir of Pain.
Go back to Tarren Mill, turn in [24] Battle of Hillsbard, get the follow up [25] Battle of Hillsbrad. Turn in [24] Elixir of Pain and get the follow up. Now a new quest should be available to you from Deathguard Samsa, [25] Souvenirs of Death.
8. & 9. Head back to the Hillsbrad Fields, to the house next to the northern field with the dog Stanley infront. Make sure you are full health before turning in the quest to Stanley. Kill Stanley once he transforms, you get 1100 xp or so just for killing him. Now we’re gonna head to the southern field, there are many Hillsbrad Peasants in it and also Farmer Kalaba. Kill 15 Peasants and Farmer Kalaba, be careful with runners. If anyone else is killing those peasants you should group up, as they don’t respawn that fast, better not fight over them. Don’t bother finishing [25] Souvenirs of Death, we’ll do that when we come back to Hillsbrad in a couple of levels. After leaving the farmstead you should be more or less level 24 (it depends on how many lions/farmers you had to kill in total to complete your quests). So if you aren’t 24 yet either grind here until you ding or continue with the guide and kill everything on your way until you’ve caught up.
Level 24
10. Go back to Tarren Mill, turn in [25] Battle of Hillsbrad, get the follow up [26] Battle of Hillsbrad. Get the new quest from Apothecary Lydon, [28] Elixir of Agony.
Take a bat ride to the Sepulcher, turn in [21] Beren’s Peril. Hearthstone to Ogrimmar. Learn new skills, check the Auction House, we’re gonna need that Deadly Blunderbuss soon. It’s also time to upgrade to bigger bags, 12 slots at least if you can afford them.
Time to go back to Ashenvale, go to the bank and get all the Shredder Manual Pages you have. First fly to Splintertree Post, get the following quests:
- [26] Satyr Horns
- [25] Stonetalon Standstill
Get out of the village, southwest until the guard tower where you will find more quests:
- [24] Ashenvale Outrunners
- [27] Warsong Supplies
Follow the road a bit further southwest, to the left you should see a small encampment, get the quest [30] The Lost Pages. Now you can bind chapters together when you have the right pages, it will free some bag space.
Go back to Splintertree Post and fly to Zoram’Gar Outpost.
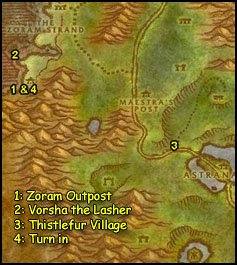
1. Take the quest [23] Vorsha the Lasher from Muglash, he’ll walk to the strand, follow him.
2. He’ll stop on a small island with a brazier atop. Click the brazier when he tells you to do so and get ready for 3 waves of monsters. You don’t have time to loot in between the waves, you just have enough time to drink/eat:
- 1st wave: 3 Nagas, they are green to you so not so hard, but it’s still 3. Let Muglash tank one while you kill them one by one. Muglash is level 25 and can easily take one or two on his own. Try to save your long cooldown abilites and potions for the last wave if possible. As soon as the 3 nagas are defeated, eat/drink fast before the 2nd wave.
- 2nd wave: 3 nagas again, one of them will be a naga priestess, kill that one first and try to interrupt her heals or you’ll be in trouble. Use potion/long cooldown abilities if you have to but try to keep it for the next wave. Let Muglash tank as much as possible again. eat / drink fast right after the nagas are dead.
- 3rd wave: a level 22 Hydra named Vorsha will spawn and attack you, the hydra hits rather hard for a level 22, so use everything you got. If you die don’t release, Muglash should be able to finish off the hydra if you did enough damage to it before dying. Wait until you get the (complete) message, then release and run back to your corpse.
Go to Zoram Outpost and turn in the quest. Get the quests [24] Between a Rock and a Thistlefur and [24] Troll Charm.
3. Time for a little walk, go to Thistlefur Village (30,45), follow the path shown on map.
Kill Furlbog Avengers and Shamans until you complete the first quest, then go north following the path inside the village and pass the wooden gate, then a bit futher along the path you’ll see a stone arch if you face north. Go through this arch and you’ll soon find the entrance to a cave. Enter the cave and explore it, kill stuff in there until you find 8 Troll Charm, which are in Troll Chests you can find scattered everywhere in the cave.

4. Once you have 8 troll charms head back to Zoram’Gar Outpost. Turn in the 2 quests, don’t get the follow up.
Fly to Splintertree Post.
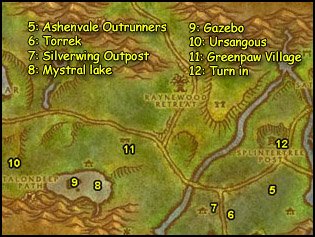
5. Go directly south of Splintertree Post, and on the other side of the road there’s an area with Rotting Slimes, that’s where you’ll hunt Ashenvale Outrunners. They are stealthed. So use abilities like track stealthed or use TAB key while running around to find them, they are mostly next to trees.
6. Once you are done with the [24] Ashenvale Outrunner quest, go west to (68,75), you should see an orc named Torek, with 3 raiders. DON’T take the quest now, just remember where he is.
7. Go further west on the other side of the road you should find a path to Silverwing Outpost (66,73). Kill all the nightelves on the path and inside the house, as soon as this is done, sprint back to Torek and start his quest. The way being clear, he’ll directly run to the house. When inside 4 elves will spawn – let the orcs tank them and focus on one, Torrek must survive so kill as fast as you can, and use all the abilities / consumables you have.
Note: If you are a healer this should be easy, you can buff and heal Torek (but only with heals which trigger a buff icon, such as Renew, Rejuvenate, Power Word: Shield).
Even if you die you’ll still get the complete message if torrek survives and wins the battle, so don’t release immediately if you die. If you fail the quest just wait for the NPCs to respawn and try again, it took me 2 tries to get it down with the first character I did it.
You should be level 25 by now. If you aren’t, either kill nightelves here until you ding or continue with the guide and kill everything on the way to catch up.
Level 25
8. Go west across the river, and further west until you hit Mystral Lake (52,70). Start killing Befouled Elementals there, be very careful with your breath as they like to frost nova you while you are under water, so stay close to the surface as much as you can and pull them with a long range attack. Besides killing 12 Befouled Water Elementals you must also find and kill Tideress, a level 27 elemental who roams from the island in the middle of the lake to the eastern tip of the lake.
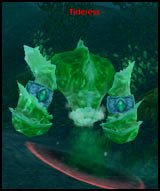
He’s slightly bigger than other elementals and is green instead of blue. Make sure you get him solo and have your cooldowns up or at least a potion ready. On Tideress’ corpse you will find a Befouled Water Globe, right click it to start the quest [27] The Befouled Element.
9. Go to the island in the mdiddle of Mysral Lake and walk around the gazebo structure until you get the objective complete message for [25] Stonetalon Standstill. Kill the remaining Befouled Water Elementals you need to complete the quest and then head to the western tip of the lake.
10. Now we’re gonna look for the named lvl 25 bear Ursangous, just go to the spot shown on map (40,65). Ursangous always roams around this area, so just kill bears and stags while waiting for him to show up. Kill him and loot his paw. Right click the paw to start a quest.
11. Now go east then slightly northeast (be careful to stay away from Silverwing Refuge’s Guards) until you reach Greenpaw Village.
==Warning== There’s a level 35 Elite Wandering Protector (some huge treant) roaming in this area, be careful.
Kill all the furlbogs on your way until you get a Logging Rope for the quest [27] Warsong Supplies, that’s if you don’t have it already.
12. Once that is done, get back on the road to Splintertree Post and turn in the quests:
[23] Ashenvale Outrunners
[24] Torek’s Assault
[24] Ursangous’s Paw
[25] Stonetalon Standstill
[27] The Befouled Element and get the follow up [27] Je’Neu of the Earthen Ring.
Fly to Zoram’Gar Outpost. Turn in the quest [27] Je’Neu of the Earthen Ring. Hearthstone to Orgrimmar.
Sell/repair, check the auction house. Buy the shredder pages you miss, they go for 15-20s buyout usually, and sell the extras.
Note: Be careful to bind your chapters before you put extra pages on sale, because let’s say you have page 8 on sale at the auction house you won’t be able to bind chapter 2 (page 5,6,7,8), since the game will try to use the page you have at the auction house instead of the one in your backpack.
Also check for a Deadly Blunderbuss, we’re gonna need it soon, if you can’t buy it, find an engineer who will do it for you, bring him the materials and give him a tip. Restock food/drink and potions and then fly to the Crossroads, take the quest [22] Egg Hunt.
- For those who have the Camp Taurajo flight path: Fly there.
- For those who don’t: From Crossroads follow the path all the way south until the road forks. Camp Taurajo is right between the two paths. Once there, get the flight path.
—————-
For people who didn’t level in the barrens before (Ghostlands etc.): At Camp Taurajo go to Mangletooth who sits in a cage just next to the main building. Take [21] Tribes at War. Go north of Camp Taurajo where you should see Bristlebacks. Now quickly kill 6 Water Seekers, 12 Thornweavers and 12 Geomancers. (The Thornweavers are a bit closer to the mountain and the Geomancers are a bit further to the north, close to the mountain) Once done, go back to Camp Taurajo (don’t sell your blood shards!) and turn in the quest. Take the follow up and turn it in right away. Now you can get [25] Betrayal from within from the NPC. Beside you can turn in your Blood Shards for useful buffs like runspeed.
—————-
Get the following quests:
[25] Betrayal from within
[24] Weapons of Choice
[27] Mahren Skyseer (Those who didn’t level in the Barrens can’t get this quest, it doesn’t matter though, we cought up for the exp already)
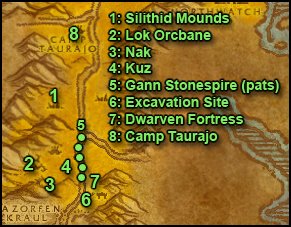
1. Head south to the field of giants, look for Silithid Mounds

Clear any bug around it and then click them to gather Silithis Eggs. Rinse and repeat until you have 12 eggs. Then head south staying close to the mountain on your right hand side until you stumble across some quillboar camps. You have to kill Razormane Warfrenzies, Seers and Stalkers until you get a wand, a shield and a backstabber. (The stalkers are stealthed but shouldn’t be hard to find at your level). Warfrenzies drop the shield, Seers drop the wand and Stalkers drop the stabber.
2. There’s also 3 nameds you must find, the first one is Lok Orcbane, and you can find him on top of a slope at (41,80). Kill him and loot his skull.
3. The 2nd one is Nak, he’s further south in between two mountains (43,83), kill him and loot his skull, be careful with all the stalkers in this area, they tend to add while you are fighting Nak.
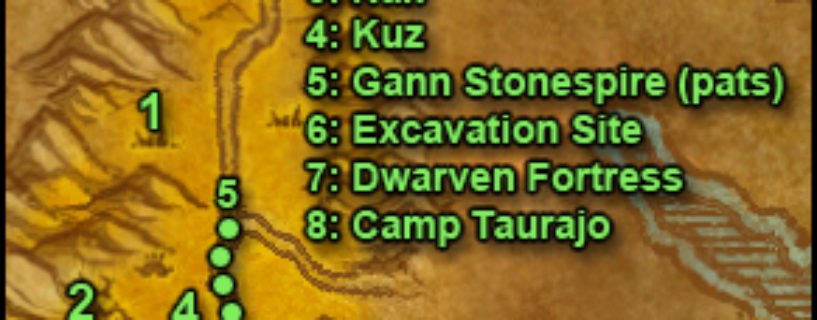
4. The 3rd and last one, Kuz, roams around the middle camp and a tree with a painted stone at (45,80), kill him and loot his skull.
5. When done with quests [25] Betrayal from within and [24] Weapons of Choice, go east until you hit the road. Then follow the road north and south until you find a tauren npc named Gann Stonespire, he walks up and down this road, from the fork that leads to Dustwallow marsh to Bael Modan, you should find him without problems, get his quest [23] Gann’s Reclamation.
6. Head southeast to Bael Modan. Enter the excavation site by the slope on the southern side of the site (46,84). Kill 15 Excavators, 5 Foremans and Prospector Khazgorm who should be at the far end of the excavation site, loot Khazgorm’s Journal.
You should be level 26 by now or close (those that have [27] Mahren Skyseer will catch up in a bit, don’t grind to catch up if you have that quest).
Level 26
Head out back to Gann, turn in the quest and get the follow up [26] Revenge of Gann.
7. This time head to the dwarven fortress which is just north of the excavation site. Kill dwarves there until you complete the [26] Revenge of Gann quest.
Once that is done, get back on the road and find Gann, turn in [26] Revenge of Gann and get the follow up. Go back to the excavation site, but this time your target is the Helipad with the Gyrocopter atop. The Helipad is midway down the slope going to the excavation site (46,85), go up the helipad and right click the Flying Machine to destroy it, then go back to Gann for the last time and turn in the quest.
8. Run back to Camp Taurajo and turn in the quests:
[24] Weapons of Choice, don’t get the follow up.
[25] Betrayal from within, get the follow up.
Fly to the Crossroads, when there turn in:
[22] Egg Hunt
[25] Betrayal from Within
Fly to Ratchet.
————–
For those who have [27] Mahren Skyseer: From Ratchet go south along the Merchant coast until you get to the area named the Tidus Stair, turn in [27] Mahren Skyseer and get the follow up [27] Isha Awak.
Go south along the merchant coast until the Northwatch Hold, take a dive and the Isha Awak (some big aquatic dinosaur) should be there underwater at (63,53). Isha Awak can also be found a bit south of Mahren Skyseer, around (66, 49). It should be an easy kill, loot his heart and run back to Mahren Skyseer, turn in [27] Isha Awak. Run back to Ratchet.
————–
Take the boat to Booty Bay. In Booty Bay, on the docks you should find a crate named “Warsong Axe Shipment” close to Wharfmster Lozgil, loot it. Then go get the Booty Bay flight path, it’s on the top floor of the Inn. Once you have the flight path, hearthstone to Orgrimmar!
Sell/Repair, check the auction house for missing shredder pages and take your Deadly Blunderbuss with you. Go learn new skills and restock consumables and food.
Fly to Splintertree Post.

1. Turn in the Deadly Blunderbuss at Pixel to get the Warsong Sawblades.
2. Go west on the road until you reach (56,59). At this loc, go north and then right until you stumble across an area with Laughing Sisters(Dryads) (58,55). Around this camp there is a named cat, Shadumbra. Clear your way around the camp, find and kill the cat then loot its head, right click it to start the quest.
3. From this point go northeast till approximately (64,43), where you’ll find a path leading you to Night Run. Go southeast until you find a camp of satyrs (66,56).
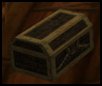
Kill satyrs there (be careful at this level though, pull cautiously so as to not get ads especially as there are stalkers around) until you finish [26] Satyr Horns and also find a Warsong Oil, they can be found inside various satyr camps and look like this:

If you’re unlucky and don’t find a Warsong Oil, there is an alternative: go east, cross the river and keep going east to Satyrnaar (81,52). You will most likely find a Warsong Oil there, but be careful, the satyrs here are a bit tougher than at Night Run.
Anyway, you’ll ding while killing those Satyrs which will make it much easier to finish these quests.
Level 27
4. Once you’re done, get back on the road south towards Splintertree Post but we have one last thing to do before going there, when you reach the fork close to Splintertree, go south to the Forsaken Camp (75,71). Now you’re gonna search around this camp like shown on the map for a level 31 Hyppogryph named Sharptalon. Yes you read correctly, it’s level 31. We theoritically can’t kill that. But there’s a trick. Once you spot Sharptalon keep him in sight and wait till he is close enough to the Forsaken Camp, pull him with the lowest aggro spell you have (a simple bow shoot or a rank 1 nuke) and bring him to the Forsaken Camp. Do nothing, let the npcs there aggro it and take it off you. Once they have Sharptalon down to 90% start attacking him again, you must do as much damage as possible but don’t use high aggro spells, help them finish it off. You should normally be able to loot him, and get his claw, which starts a quest if you right click it. Sharptalon roams but he always passes by the Forsaken Camp. If you don’t manage it the first time it’s ok, stay in the area, kill Oozes and Elves while waiting for Sharptalon to respawn (about 10 mins).
On your way back to Splintertree, pass by the small encampment at (70,71) to the west where you initially got the shredder manual quest. Turn in [30] The Lost Pages.
Also right before Splintertree turn in [27] Warsong Supplies.
At Splintertree Post, turn in the following quests:
[27] Shadumbra’s Head
[30] Sharptalon’s Claw and now Selani should have a new quest up for you named “The Hunt Completed“. Turn it in immediately.
[26] Satyr Horns
Fly to Sun Rock Retreat. Sell junk, repair and restock on arrows/food etc.
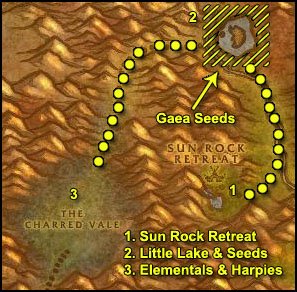
1. Get the following quests:
- [23] Cycle of Rebirth
- [25] Elemental War, from Tsunaman. He’s located at (47,64), to the south.
- [26] Harpies Threaten
- [28] Calling in the Reserves
2. Follow the path north out of Sun Rock Retreat. Continue north until you reach a little lake. All around the lake you should find seeds looking like this:

Gather 10 of them.
3. Once done follow the path going west from the lake to the Charred Vale. Just as you arrive you should start seeing Harpies and Fire Elementals. Kill them until both [25] Elemental War and [26] Harpies Threaten are completed. Also make sure you aren’t more than 5k away from the next level. Once done, go to the eastern side of the Charred Vale, where you’ll find a path leading back to Sun Rock Retreat (38,67). There, turn in all your quests. Don’t get follow ups.
You should be level 28 by now.
If you aren’t level 28 yet, here’s an optional mini-circuit:
Take the follow ups [26] Bloodfury Bloodline and [25] New Life. Go back to the Charred Vale and while going towards (31,62), search for dirt mounds on the floor and right click them (you’ll need to do this 10 times). At the aforementioned location you’ll find a Bloodfury Ripper. Kill it and loot its remains. Once you are done with planting seeds as well, go back to Sun Rock Retreat and turn in both quests.
Level 28
Hearthstone to Orgrimmar. Learn new skills, check the auction house, repair and restock consumables etc.
Get out of Orgrimmar, take the Zeppelin to Undercity. From the Undercity fly to Tarren Mill.
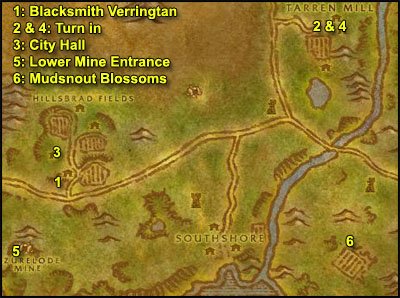
1. After landing, head west to the Hillsbrad Fields, this time go to the forge house, which is west of the southern field. Kill 4 Apprentice Blacksmiths and Blacksmith Verringtan, he’s inside the forge. Once the forge is clear go inside and loot the “Shipment of Iron“, which looks like a big crate. Once that is done, head back to Tarren Mill.
2. Turn in [26] Battle of Hillsbrad and get the follow up.
3. Go back to the Hillsbrad Fields, this time we’re gonna go to the City Hall (31,42), it’s right next to the forge. Clear your way to inside the house, and clear the first 2 rooms. First pull the 1 mob which is on the left inside the room, go back to the first room and hide behind a wall so that the Councilman cannot nuke you from a distance but instead come to you. Then go to the big room and kill Clerk Horrace Whitesteed. Get back to full health, and kill Magistrate Burnsidethen destroy the Hillsbrad Proclamation
and the Town Registry (a big blue book on the floor).
Clear your way out of the house, kill the remaining Councilmen you need for the quest, and also look for Citizen Wilkes if you haven’t killed him already. He wanders to the City Hall and the Forge, so kill stuff around those two areas until you find him. Also complete the [25] Souvenirs of Death quest if you haven’t already.
4. Walk back to Tarren Mill, turn in the quests [26] Battle of Hillsbrad, get the follow up.Turn in [25] Souvenirs of Death as well. Sell/Repair and restock up to 2 stacks of food/drink. Make sure that you’ve got the follow up of [28]Elixir of Agony, from Apothecary Lydon.
5. This time we’re gonna go to the mines which are just southwest of the Hillsbrad Fields, on the other side of the main road. There are two entrances to the mine, a lower one and an upper one. We’ll enter through the lower one (26,58). After a while you’ll see a fork, to the left are Foreman Bonds and Miner Hackett, but for now we’re gonna go right and kill the Hillsbrad Miners there so that we’ll have 9 or 10 kills of those. Note: Miner Hackett can spawn at various places in the mine, so if he’s not where I said check every other area of the mine, it’s a nice place to grind anyway so don’t worry if it takes some time to find him.
Then go back to the fork and this time go towards Miner Hackett / Foreman Bonds, you should find the remaining Hillsbrad Miners you need on your way to them. Miner Hackett can be pulled solo and is an easy kill, kill him first.
Foreman Bonds is a different deal, the problem is that at 20% health he summons 2 dwarves to guard him, those dwarves can stun and it’s very unlikely that you can kill all 3. If you are a rogue it’s easy, kill Foreman Bonds and then vanish. For other classes, clear the way behind you towards the exit right before engaging Foreman Bonds, finish him fast and then run for the exit, the 2 dwarves will eventually give up on you. If you die it’s not that bad, what counts is that you get the kill on Foreman Bonds.
6. Anyway, once you have killed 10 Miners, Foreman Bonds and Miner Hackett, get out of the mine and back on the road and follow it eastwards until you cross the bridge over the river which splits the zone in two. Right after the bridge turn south and head this direction until you find a field with Mudsnout Gnolls in it (65,60). You have to gather the mushrooms in that field, they’re called “Mudsnout Blossoms” and look like giant white/blue mushrooms. Gather 6 of them and then go back to Tarren Mill. Turn in the 3 quests and get the 2 follow ups: [30] Battle of Hillsbrad and [28] Elixir of Agony.
Hearthstone to Orgrimmar. Sell/Repair, restock food/drink and consumables.
When you’re ready to go again, fly to Camp Taurajo. Take the quest [30] Melor Sends Word. Go south/southeast until the Great Lift (32,22).
1. Turn in [28] Calling in the Reserves at Grish Longrunner and get the quest [25] Message to Freewind Post from Brave Moonhorn. (if you don’t manage access these NPCS don’t bother with this step and abandon [28] Calling in the Reserves)
Then go down into the Thousand Needles.
2. Follow the road south a little then go east, you should soon see a silver arrow on the minimap showing Freewind Post, following it until you reach it, there is a lift to access it on the east side of it.
In Freewind post turn in [25] Message to Freewind Post and take the follow up [25] Pacify the Centaur. Also take the quests:
[29] Wanted – Arnak Grimtotem from the Poster next to the Inn.
[28] A Different Approach
[26] Alien Egg
[29] Wind Rider
Don’t forget to take the new flight path.
3. Get back down off Freewind Post, go northwest until you find the Centaur Village. Kill centaurs there until you have the list of [25] Pacify the Centaur completed.
You should be level 29 by now.
Level 29
4. Go east, stay along the mountain to your left until you find a slope going up at (54,44). Up the slope you’ll find a cave, enter it and get the quest [26] Test of Faith from Dorn Plainstalker. He’ll teleport you to the top of a peak, look for two wooden planks and jump off from them. Don’t worry you won’t die from falling. You should re-appear next to Dorn, turn in the quest and get the follow up [30] Test of Endurance.
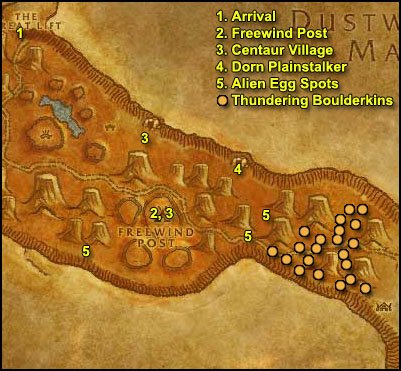
5. Now we’ll look for an Alien Egg

**While going to the 3 locations described below, search and kill 2 Thundering Boulderkins until you have 2 Purifying Earth.**
The egg can be at 3 different spots, and it’s always an area crowded by those weird flying serpents. The first one is directly south at (56,50). If it’s not there, the next spot is directly south, at the zone wall, you should find a weird hole in the wall, and if you’re lucky an Alien Egg close to it at (52,55). If the Egg is not there it will be further west against the zone wall at (38,55). Once you got an Alien Egg and 2 Purifying Earth, go back to Freewind Post.
6. Turn in [25] Pacify the Centaur, get the follow up [28] Grimtotem Spying
Turn in [26] Alien Egg, get the follow up [26] Serpent Wild
Sell/repair, get back up to 2 stacks of food/drink.
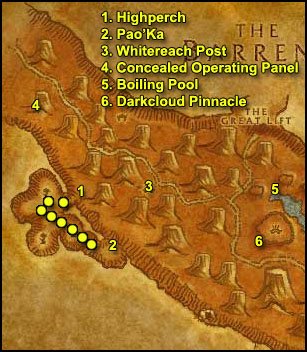
1. Get back down off Freewind Post, head west until you reach Highperch (12,32). Get up there and start killing Wyverns while searching for eggs. Keep doing this until you have 10 Highperch Wyvern Eggs.
2. Once you have done that, head to the southeastern corner inside Highperch, you should find a narrow path going up to another plateau, at the end of this plateau you should find a tauren named Pao’Ka with a quest. Take his quest [29] Homeward Bound and escort him out. It’s a pretty simple escort quest, shouldn’t be any problem.
==Warning== Sometimes there will be a rare-elite named Heartrazor there, and it will most likely be impossible for you to kill it and to do the escort if he’s there, unless you are duo’ing or got someone nearby willing to help. However, if you start the escort at the right moment, Heartrazor will be out of the way and the escort NPC will go through without getting Heartrazor’s attention.
3. After you complete the escort, go east to Whitereach Post (21,32). Turn in the 3 quests you have here and get the follow ups [27] Sacred Fire, [28] A Dip in the Moonwell and get the other quest [30] Hypercapacitor Gizmo.
4. Follow the road northwest until you reach the loc (12,18). Looking west you should see a slope going up one of those needles. Climb it like that:

Then continue around the needle until you reach a Concealed Operating Panel looking like this:
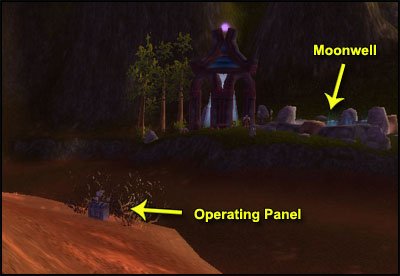
In your inventory you should have an item called Robotron Control Unit. Dismiss your current pet (if you have one) and right click that item. You’ll take control of a little robot looking like this:

Direct it into the moonwell just ahead of you and click pet’s ability called “Gather Water”. You should get a quest completed message. You can click off the buff icon that gives you control over the robot.
Go back to Whitereach Post and turn in [28] A Dip in the Moonwell. Take the follow up.
5. Go directly east to the small lake you can see on the map, called the Boiling Pool (33,34). Once you are there you must look for 10 plants named Incendia Agave,

they can also be found inside the water.
6. When done with that, get out of the lake and to the western side of the big peak marked on the map as “Darkcloud Pinnacle“, you’ll find a narrow path going up at (31,36). After crossing 3 wooden bridges you’ll be on a plateau with 2 choices, east or south. Go south, cross the bridge and you should be on a large plateau with a mini village with a big totem in the middle.
Go to the Northwestern edge of this plateau, where you will find another wooden bridge, cross it and you’ll reach a small plateau with a “document chest”
on it, this one contains the Secret Note #1.
Go back to the big plateau, now on the southern side of this plateau enter the main house and inside you should find another “document chest“, inside it you’ll find the Secret Note #2.
Finally go to the eastern side of this plateau and find another wooden bridge going east, you’ll reach a plateau with the last document chest inside a house, this on contains Secret Note #3.
Now get back on the big plateau, take the northern wooden bridge back to the plateau where we decided to go south last time. This time we are gonna take the wooden bridge going east. We’ll reach a plateau with another double bridge choice, we’ll choose the one going northeast this time. After crossing the bridge go left, there you should find Arnak Grimtotem, you normally should be able to pull him solo if you wait for the right moment, he will have another tauren close to him, so you might pull him with an add but this should still be manageable, use a health potion and long cooldown abilities if needed. Kill Arnak and loot his hoof.
Next to where you kill Arnak you should see a tauren named Lakota Windsong with a quest [29] Free at Last. You must escort her out. It shouldn’t be a problem, Lakota is level 30 and does almost fine on her own. The only risk is that 2 extra taurens spawn to ambush her everytime she reaches the middle of a plateau, so you’re safer if you pull the static spawns to her before she reaches the middle. Other than that, it’s an easy escort.
You should be level 30 at the end of the escort quest.
Level 30
Once you complete it, run back to Freewind Post.
Turn in all the quests you have, there are no follow ups.
Go to the northwestern part of Thousand Needles. On your way stop at (29,34) where the road should fork. Now patrol between the lift going to the Barrens and Whitereach Post until you stumble on Galak Messenger.

Kill him and loot his Assassination Note. Right click it for a quest. Go to Whitereach Post and turn the quest in right away, take the follow up once you are full mana/hp. Three centaurs will spawn and attack Kanati Greycloud. Help him kill them and then turn in the completed quest. Continue following the path northwest.
Enter Feralas and get on the road, be careful to stay as far as possible from wolves or bears in Feralas, they are way too high level for us. Follow the road until you reach Camp Mojache. Get the flight path.
- For those who have the Thunder Bluff flight path: Fly there.
- For those who don’t: Fly to Camp Taurajo. From there follow the path west into Mulgore. Continue following the path west until you reach Bloodhoof Village. Go northwest there all the way until you reach Thunder Bluff. Get the flight path.
Go to the Hunter Rise (southern plateau), turn in [30] Melor Sends Word and get the follow up [30] Steelsnap.
As last thing, go to the elder rise (eastern plateau), turn in [27] Sacred Fire and get the follow up [28+] Arikara.
Hearthstone to Orgrimmar, train new skills, check the auction house, sell/repair, restock consumables.
1. Fly to Splintertree Post. Make the inn your home. Take [30] Destroy the Legion from Valusha.
2. Follow the path southeast out of the town until you reach Felfire Hill. Kill everything there until:
- [30] Destroy the Legion is completed.
- you find Diabolic Plans drops. Right click it for a quest.
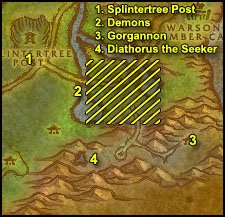
Once done, go back to Splintertree Post and turn everything in. Take the follow up [32] Never Again!. Go back to Felfire Hill but this time fight your way even more southeast until you reach Demon Fall Canyon.
You need to kill two bosses here: Gorgannon and Diathorus the Seeker. Let’s start with the easy one.
As you arrive, the path in the canyon will fork. Take the way leading to the east. Clear all the way to the end of the path until you see Gorgannon looking like this:
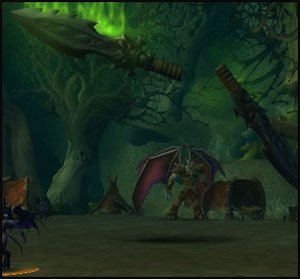
All the mobs around him can be solo pulled beforehand. Once that is done, get full mana and health and take him down. I (as a hunter) used rapid fire because I thought it would be tough but it wasn’t, it felt quite easy for a level 32 mob.
Once done go back to where the road forked earlier and go west. Clear everything until you reach a rune. Looking right you should see a slope with lightened stones:

Follow this slope to the top where you should see a camp. Clear to the house of the camp in the back. Once you enter the house you’ll see a cave structure. Diathorus the Seeker is somewhere inside. Just clear your way and search for him. Contrary to many comments I’ve read, he does have different spawn locations. Once you killed him and once you are less than 3350 exp away from level 31, hearthstone to Splintertree Post. Turn in [32] Never Again!.
Congratulations 🙂
End of this guide, stay tuned for chapter 2!
I hope you enjoyed this guide. If you want to return the favor, please try to contribute.
Original author: Jame
Revamp & Text formatting & Picture Editing: Snowflake
Picture Editing: Subere
© Copyrights www.wow-pro.com All Rights Reserved.