
 by 00ZER00
Değişiklik Listesi
Bu, rehberin v2.0 versiyonudur. Burada belirtildiği gibi v2.3 ile yapılan değişikliklerin adaptasyonu için yenilenmiştir. . Eski versiyon rehberi bu adresden bulunabilir. Bu versiyonla, aynı zamanda birçok yenilik eklenmiştir.:
- Giriş/addonlar bölümü yenilenmiştir.
- “Önünüze çıkan herşeyi öldürün” kuralı, eğer rehberde bahsedilen progresden geri kalmadıysanız kaldırılmıştır.
- Bütün büyük grinding bölümleri kaldırılmış ve quest turlarıyla değiştirilmiştir.
- Artık elite olmayan questler, rehbere eklenmniştir.
- Yeni patch 2.3 içeriği rehbere eklenmiştir.
- Haritalar yeniden hazırlanmış ve bir çok hata düzeltilmiştir.
- Shimmering Flat turunun detaylı haritası eklenmiştir.
- Dustwallow Marsh turları eklenmiştir.
Introduction
Bu rehber level 30’dan başlar, eğer diğer level grubu için rehbere ihtiyacınız varsa (1-30 arası mesela) lütfen bu sayfaya göz atın.. Bu rehber başka bir rehberin devamı değildir, ancak uçuş noktalarının öğrenilmesi açısından Boston’un levelling rehberini takip ettiyseniz sizin avantajınızdır. Boston’s Alliance Leveling Guide.
Bu rehber Optimize Quest Turları kullanılarak HIZLI level almak için yazılmıştır. Bu rehber sayesinde, Quest yapmak çok verimli olacak ve etrafta gereksiz koşturarak, hangi sırayla questleri yapmanız gerektiğini tasarlayarak vakit kaybetmeyeceksiniz. Quest seçimleri ve sıralaması optimal olarak ayarlanmış olup mümkün olduğunca az koşarak yapılabilecek en fazla questi bitirmek ve birçok questi aynı anda teslim etmek üzere tasarlanmıştır. Grinding yapar gibi olacaktır, çünkü bir sürü questi yaparken aynı zamanda! nerdeyse durmaksızın öldüreceksiniz.
Aksi belirtilmedikçe, bu rehberde tariflenen herşeyi solo (tek başınıza) yapabilirsiniz. Tabii ki isterseniz, burda belirtilenleri 2 veya daha fazla kişiylede takip edebilirisiniz, bu problem yaratmaz.
AÇIKLAMA: Bu rehber meslekleri, klaslara özel questleri ve PVP İÇERMEZ. Birçok questi yaparken, içerikten mümkün olduğunca keyif alarak %100 olarak en kısa sürede en fazla experience elde etmeye odaklanmıştır.
Temel Kurallar
- Talent puanlarınızı karşınızdakileri en kısa sürede öldürebilecek şekilde ayarlayın. . (örn: Priestler Shadow talentlere uzmanlaşmalı, Warriorlar Arm/Fury vb.)
- vaktinizi Quest yapmak için grup aramkla harcamayın, aksi belirtilmedikçe, bu rehberde tanımlanan herşeyi solo olarak yapabilirsiniz. Sadece sizin için zaman kaybı olmayacaksa birisiyle grup kurun (örn: Bir kişiye questinizin nerede olduğunu göstermek için, haritanın öbür ucunda buluşmak zaman kaybıdır.)
- Her zaman, ara verdiğinizde Bir inn’de (Han) veya büyük şehirlerde log out (oyundan çıkmak)olmaya çalışın.
- Ne zaman size bir inn’i home location yapmanızı söylersem, iyi bir nedene dayanmaktadır ve zaman kazanmanızı sağlayacaktır.
Yararlı Addonlar
Bu rehberden en iyi şekilde yararlanmanız için koordinatları gösteren bir addon yüklemeniz gerekmektedir.Çünkü yerleri tanımlarken koordinat sistemi kullanılmıştır. (x,y). İstediğnizi herhangi bir addonu kullanabilirsiniz ama işte benim kullandığım basit addon.
Önerilen
- DMiniCoords – Koordinatları gösteren basit bir kutu, sol klikleyerek istediğiniz yere taşıyabilirsiniz.
Opsiyonel
Aşağıda kullandığım diğer addonların listesini bulabilirsiniz, bu tamamen opsiyoneldir, hangi addonları kullandığımı merak edenler için yazıyorum.
- Bartender4 – Fevkalade bir action bar addonu.
- X-Perl UnitFrames – Çok iyi, ayarlanabilir kullanıcı arayüzü
- Quartz – En iyi casting (büyü yapma) addonu bana göre.
- Scrolling Combat Text – Sadece orjinal Combat textden hoşlanmadığım için.
Ara Not: Eğer addonları nasıl yükleyeceğinizi bilmiyorsanız, yukardaki linklerden addonu indirin ve zipini açın. Sonrada açılan folderı Addon folderı altına sürkleyip bırakın. (Tam adres c:\Program Files\World of Warcraft\Interface\Addons). Sonra World Of Warcraftı yeniden başlatın, çalışması lazım.
Eğer çalışmıyorsa, karakter ekranındayken sol alt köşedeki “Addons” yazısına klikleyip “Load out of date Addons” yazan kutucuğa klikleyip WOW u tekrar çalıştırın.
*Deget: Bu arada yüklemek istediğiniz addonun işaretli olduğuna emin olun.
Alışveriş Listesi
- Ne zaman Auction House (AH) yanından geçerseniz, aşağıdaki itemleri almaya çalışın:
- 3 balya Wool Cloth (Level 30’da ihtiyaç olacaktır.)
- 4 Lesser Bloodstone Ore (Level 32 den itibaren kullanılabilir ama level 43’e kadar işe yarar.) 2 g dan fazla harcamayın buna.
Bu itemler AH’da her zaman olmayabilir, dolayısıyla önceden edinmeye çalışın.
Renk Kodları
- Questler
- Itemler
- Lokasyonlar
- Quest için öldürülecek
- NPC’ler
- Koordinatlar
Rehber
Başlamadan önce, level 30 bineğinizi almanızı şidedtle tavsiye ederim. Fazla ve daha fazla oyun içinde seyahat etmeniz gerekecektir. Uzun seyehatlarda size inanılmaz zaman kazandıracaktır.
Level 30
İlk olarak Ashenvale’de Forest Song’a gitmemiz gerekiyor.Eğer hala Stormwind’deyseniz, limana gidin ve Auberdine’e giden gemiye binin. Sonra ya direk Forest Song’a uçun veya henüz uçuş planını öğrenmediyseniz, Astraanar’a uçup sonra ana yolu takip edip, Forest Song’u bulana kadar doğuya gidin. (86,47).
Oraya vardığınızda, şu questleri alın:
- [30] The Howling Vale
- [32] Vile Satyr! Dryads in Danger!
Ayrıca, uçuş planını öğrenin. (FP)
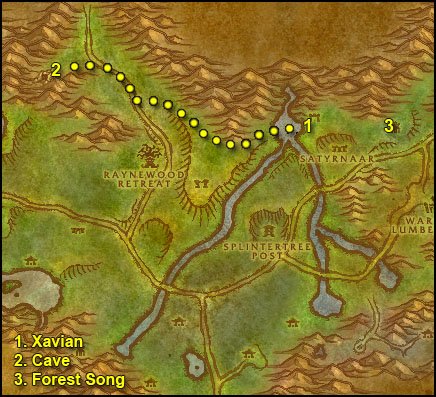
1. Forest Song’un batısına Xavian (78,45)’a ulaşana kadar ilerleyin. Orada Anilia’ı göreceksiniz, yerde yatan bir NPC. (Bilgisayar kontrolündeki karakter). an NPC lying on the floor. Etrafı dikkatlice temizleyerek questinizi verin ve takip edeni alın. NPC’nin kuzeyinde aşağıya doğru bir yol giden kapı göreceksiniz. Orada birkaç satyr ve öldürmeniz gereken NPC’yi göreceksiniz.Geltharis. Level 32 ancak endişelenmeyin, öldürmesi kolaydır ve solo olarak çekilebilir. Bunun için önündeki diğer 2 satyr’i temizleyin. Öldürün ve lootlayın. (sağ klik ve üzerindekileri alın)
2. Gölden batıya doğru gidin ve sonra haritada işaretli yolu takip ederek ana yola ulaşın. Yaklaşık (55,34)’e ulaşana kadar kuzeydoğuya gidin, oradan dağların arasından batıya gidebilirsiniz. (53,37)’de Terrowolves ‘un önünde durduğu bir mağara girişi görmelisiniz. İçeri doğru yolu temizleyin (mağara aslında bir geçiş yoludur) ve bir çeşit vadiye ulaşacaksınız. Aşağıya doğru yolunuzu temizleyerek kitaba ulaşın.:
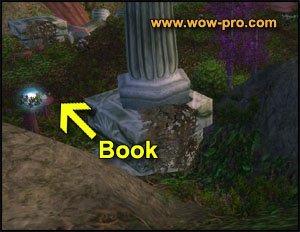
Sağ klikleyin.
Şimdi yeni bir uçuş planı alacağız. Kuzeye gidin ve Felwood’a girin. Felwood’da Emerald Sanctuary’e ulaşana kadar yolu takip edin. Yeni uçuş planınızı alın.
3. Forest Song’a geri uçun. Questleri verin ve devamlarını alın. [30] Velinde Starsong, Sentinel Melyria Frostshadow’dan.
Auberdine’e uçun. Eğer grindingden hoşlanmıyorsanız ve ielrideki opsiyonel grinding bölümünü atlamayı planlıyosanız, Auberdine’i eviniz yapın. Yok yapacağım diyorsanız devam edin.
Auberdine’den, kuzey rıhtımından Rut’theran Village’e giden gemiye binin (veya uçuş planını aldıysanız uçarak gidin.). Daranassus’a gidin ve Craftmen’s Terrace’a giden yolu takip edin. Burada ufak haritanızda sarı bir “!” göreceksiniz. Size önceden almanızı söylediğim Wool Cloth’larınızı experince ve şehir reputaion’ı için verebilirisiniz. Bunu diğer şehirlerde de yapabilirsiniz, exp’da geride kaldığınzıda yakalamak için kullanabilirsiniz. Bunu ilk sefer dışında rehbere koymadım çünkü pahalı bir yöntem.
Bitiridiğinizde, Thyn’tel Bladeweaver’a ulaşana kadar yolu takip edin ve questinizi verip, yenisini alın [30] Velinde’s Effects. Şimdi Tradesmen’s Terrace’a gidin.
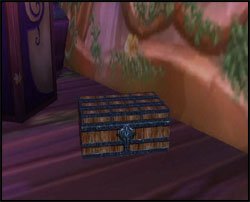
i](62,82)’de açmanız ve lootlamanız gerekengerken bir sandık bulacaksınız. Bir önceki NPC’ye giderek questi verin. Devamını alın. [30] The Barrens Port.
Bu noktada biraz seyahat/uçuş, ve quest karışımı yapacağız. Bu, bizlere rehberin geri kalanında işleri hızlandırmamızı ve grinding’i atlamamızı sağlayacaktır. Eğer etrafta koşmam istemiyorsanız, original rehberdeki grinding spotu kullanabilir. (aşağıdaki grinding döngüsünü kontrol edin.) ve level 31 olabilirisniz. Eğer rested bonusunuz varsa daha hızlıda oalbilir ama ilerde bazı uçuş noktalarına ulaşmanız daha uzun süre alacaktır.
Neyse, bundan önce, son uçuş planımızı öğreneceğiz.:
- Kısaca: Theramore’a botla gidin, Theraore’da yeni uçuş noktanızı öğrenin. Eğer grinding döngüsünü yapamayı planlıyorsanız , inn’e gidin, eviniz yapın. Değilse, HS’nizi Auberdine’e ayarlı tutun.Sonra Thousand Needles’a gidin.
- Detaylı: Darnassus’dan, Auberdine’e uçun, gemiyle Stormwind’e gidin..Deeprun Tram (tren) kullanarak Ironforge’a ulaşın. Sonra Menethil Harbor’a uçun. Eğer bilmiyorsanız, Menethil Harbor uçuş planını öğrenin. Sonra, Theramore’a giden gemiye binin. (Güney rıhtımından kalkan gemi). Theramore’dayken uçuş planını öğrenin.
Eğer grinding döngüsünü yapmayı planlıyorsanız , inn’e gidin. Eviniz yapın. Planlamıyorsanız, HS’niz (HeartStone) Auberdine’e ayarlı kalsın. -
Bundan sonra, Dustwallow Marsh’da kuzeybatıya doğru yolu takip ederek ve sonrada güneye doğru Barrens’e geçin. Barrens’deyken, güneye Thousand Needles’a gidin, büyük asansörle (Great Lift) aşağıya inin (gardiyana saldırmayın, yanından koşarak geçin e asansöre binin, sizi unutana kadar kaçın).
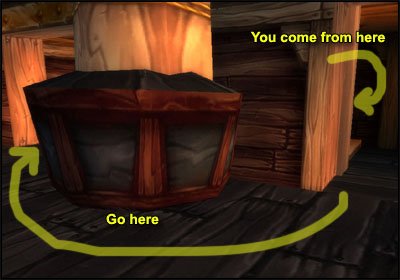
Great Lift’in dibinde, bir ceset göreceksiniz (31,24), lootlayın, Henrig Lonebrow’s Journal’ı alın, sağ klikleyerek [27] Lonebrow’s Journal questini alın.
Thousand Needles’da, Feralas sınırına ulaşana kadar batıya gidin, ve Akkiance karakolunu bulun: Thalanaar (5,17). [27] Lonebrow’s Journal questini verin, eğer Razorfen Kraul zindanını yapmayı düşünmüyorsanız devamını almayın.(gerçi şu anda yapmak için iyi bir levelldasınız)
Yeni uçuş planınızı alın.
== OPSİYONEL GRINDING DÖNGÜSÜ==
Eğer grinding yapmaktan hoşlanmıyorsanız bu döngüyü geçin. Diğer alternatif muhtemelen daha yavaş olacaktır, çünkü etrafta bir sürü koşturma gerektirecek. Karar size kalmış.
Güneydoğuya dağlara doğru gidin, Roguefeather Den’e (27,51), ulaşana kadar gitmeye devam edin. Grinding zamanı! Üzülmeyin, bundan sonra birçok quest oalcak ama şu iki hedefe ulaşana kadar harpies’leri öldürmeye devam edin:
- level 31+ olmanız
- 25 Vibrant Plumes elde etmeniz
Harpies’ler lvl 28-30 arası olup, para ve silk cloth düşürürler. Etrafta bir sürü var ve çok çabuk respawn (tekrar dirilme) oluyorlar. (aşağıdakilerle beraber tepede mağaraya kadar olanalrı öldürmeyi unutmayın) 25 Vibrant Plumes ile Darkmoon Faire’de 60 bilet alabilirsiniz. 50 ticket ile 14 slot çanta alabilirsiniz ki bu level için iyi bir artıdır (eğer twink değilseniz). Maalesef Darkmoon Faire her zaman aktif değil, Darkmoon Faire Necklace Guide bakarak Darkmoon Faire’nin ne zaman geleceğini öğrenebilir ve Vibrant Plumes’ları o tarihe kadar bankaya koyabilirisiniz. Eğer çantayı istemiyorsanız, plume’ları AH’ta satabilir veya ileride epic kolye için saklayabilirsiniz.
== OPSİYONEL GRINDING DÖNGÜSÜNÜN SONU (eğer opsiyonel grinding döngüsünü bitirdiyseniz, buradan level 31 kısmına atlayabilirsiniz.) ==
Eğer opsiyonel grinding kısmını yapmadıysanız, Auberdine’e HS yapın. Forest Song’a uçun. Köyden çıkıp güneye ve ana yolu takip ederek batıya (67,71)’e ulaşana kadar gidin, buradan yolu takip ederek güneye gidin. Barrens sınırında horde gardiyanına yakalanmadan koşup geçmeniz gerekmektedir:
Eğer sınırda sola doğru giderseniz, yıkılmış duvardan atlayıp kimseye görünmeden geçebilirsiniz.
Ratchet’e ulaşana kadar güneydoğuya gidin,, Crossroads’un etrafından geçmek için büyük bir daire çizdiğinize emin olun. Ratchet’de uçuş planını alın, rıhtıma gidin ve [30] The Barrens Port questini Warfmaster Dizzywig’e teslim edin, devamını, [30] Passage to Booty Bay alın
Gemiyle Booty Bay’e gidin. Burada [30] Passage to Booty Bay questini Caravaneer Ruzzgot’a teslim edin ve devamını [30] The Caravan Road alın. Uçuş planını öğrenin (Inn’e bakan binanın en üstünde) ve Darkshire’a uçun.
[30] The Caravan Road questini Clerk Daltry’ye verin ve devamını alıp Jonathan Carevin ile konuşup teslime dip, devamını [30] The Scythe of Elune alın. Eğer daha önce darkshire’da yeterli quest yaptıysanız Calor’dan [31] Worgen in the Woods questini alabiliyor olmanız lazım (Quest serisinin 3. adımı). Eğer alamıyorsanız ilerde 5000 exp grind etmeniz gerekecek (veya lvl 31 olmanız için gerekli miktarda, şu anda sahip olduğunuz xp miktarına bağlı olarak)
Şimdi güneye doğru yolu takip edin ve mağaraya doğru gidin. (73,75). Orada Worgens görmelisiniz, bir questiniz için gerekli. Öldürerek mağaraya doğru yolu temizleyin ama mağaraya yaklaştığınızda ÇOK dikkatli olun çünkü mağaranın içindeki Gutspill’in (level 32) çok büyük bir aggro menzili vardır, gardiyanıyla beraber gelir, bu nedenle etrafı iyice temizleyin ve full HP/Mana doldurun. Süreli özelliklerinizin açık olduğundan emin olun (Cooldown abilities) ayrıca imkanınız varsa içmek için potları hazırlayın ve içerdeki moblar için mağaraya gidin.
Şuna benzer birley görene kadar mağaranın dibine doğru temizleyin.:
Lootlatın ve mağaradan çıkana kadar mobları temizleyin, Darkshire‘a gitmeden önce [31] Worgen in the Woods için yeterli mob öldürdüğünüzden emin olun.(Ayrıca dinglemek için (level atlamak) 10k exp’den fazla kalmadığından emin olun) Eğer bu questi alamıyorsanız, burada level atlamanıza 5k Exp kalana kadar grinding yapın.
Darkshaire’da [31] Worgen in the Woods questini teslim edin ve Jonathan Carevin’a teslim edeceğiniz devamını alın. Sonra diğer questi teslim edin ve devamını [30] Answered Questions alın. Eğer HS’niz açıksa Auberdine’e dönemk için kullanın
Değilse, Stormwind’e gidin ve oradan gemiyle Auberdine’e geçin ve Darnassus’a uçun. Warrior’s Terrace’a gidin ve [30] Answered Questions questini teslim edin..
Level 31 olduğunuz için tebrikler.
Level 31
For those who are in Darnassus:
From Darnassus get back to Auberdine and take the boat to Stormwind.
Go to Ironforge and then fly to Menethil Harbor.
Then take the boat to Theramore, make the inn your home point
Sell, repair etc.
Fly to Thalanaar.
From there go east/southeast while following the road, all the way until you arrive at the Shimmering Flats. In the middle of that little desert you’ll find the Mirage Raceway.
For those who grinded on harpies:
Go east until you reach the Mirage Raceway in the Shimmering
Flats(80,77).
———-
Get the following quests:
- [30] Hardened Shells
- [30] Salt Flat Venom
- [30] Load Lightening
- [31] Rocket Car Parts
- [31] Hemet Nesingwary Jr.
- [33] A Bump in the Road
- [36] Wharfmaster Dizzywig
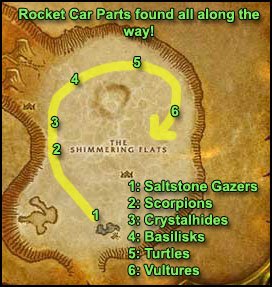
You can find everything needed to complete those quests around the raceway. For locations where the quest mobs are often particularly concentrated, please check the above posted map. (Thanks to Jimjimjimmy for the addition). Keep killing stuff at these locations until you complete all the quests and until you get 10 Turtle Meat.
Avoid the level 35 turtles, they are orange to you and might be a little too hard.
Don’t sell the Turtle Meat, put them in bank or somewhere in your inventory.
Turn in all the quests and get the follow up quests :
- [37] Goblin Sponsorship
- [35] Martek the Exiled
If you aren’t level 32 yet grind in this area (turtles, vultures, etc) until you hit level 32.
Level 32
Before we leave, go south and zone into Tanaris. Go to Gadgetzan and talk to the Gryphon master on the other side of the town to get the new flight path.
Hearthstone to Theramore, sell junk and repair.
If you have the Ratchet flight path, fly there, if not: get out of Theramore and follow the road northwest and then south to the Barrens. In the Barrens go north then east to Ratchet. Talk to Gazlowe in Ratchet, get the follow up [37] Goblin Sponsorship. Also talk to Wharfmaster Dizzywig on the docks and get the follow up [36] Parts for Kravel
Take the boat to Booty Bay. In Booty Bay on the docks, talk to Wharfmaster Lozgil and get the follow up. Then go to the inn in Booty Bay and make it your home location.
On top of the inn, just outside on the balcony you’ll find Baron Revilgaz. Turn in your quest and get the follow up.
Get all the quests you can from Booty Bay. Once that is done, go train new skills in Stormwind by gryphon ride (for rogues, there’s a trainer on the 1st floor of booty bay inn). Visit the Auction house, repair, sell, buy 4 stacks of food/drink.
Fly to Darkshire and follow the path south until you zone into Stranglethorn Vale. At (37,3) you should find a Rebel Camp. Get the flight path and all the quests available. Also turn in [32] Supplies to Private Thorsen.
Once done, follow the road south into Stranglethorn Vale until you cross a bridge. Just after crossing that first bridge, jump down to the northwest. You should already see the Nesingwary’s Camp (35,10). Turn in [31] Hemet Nesingwary Jr. Get the quest [30] Welcome to the Jungle from Barnil Stonepot and turn in it at Hemet Nesingwary Jr. This should unlock several other quests, get them all beside [40] The Green Hills of Stranglethorn.
You should have these quests:
- [31] Supply and Demand from Drizzlik in Booty Bay.
- [31] Panther Mastery From Nesingwary camp.
- [31] Tiger Mastery From Nesingwary camp.
- [32] Investigate the Camp From Krazek in Booty Bay.
- [33] The Second Rebellion From Sergeant Yohwa at the Rebel Camp.
- [34] Bad Medicine Sergeant Yohwa at the Rebel Camp.
- [34] Raptor Mastery From Nesingwary camp.
- [35] Bloodscalp Ears From Kebok in Booty Bay.
- [35] Singing Blue Shards From Crank Fizzlebub in Booty Bay.
- [36] Hostile Takeover From Kebok in Booty Bay.
- [36] Parts for Kravel From Wharfmaster Dizzywig.
- [37] Krazek’s Cookery From Corporal Kaleb at the Rebel Camp.
- [37] Goblin Sponsorship From the Baron Revilgaz on top of the Booty Bay Inn.
- [37] The Stone of the Tides From Baron Revilgaz in Booty Bay, prerequisite for this quest is given by Krazek in Booty Bay.
- [41] Scaring Shaky From “Sea Wolf” McKinley in Booty Bay.
No need to take the Green Hills of Stranglethorn quests (the one with the chapters), it will just encumber your quest log for now. You will complete each chapter when you get the right pages. So while you hunt always look out for these:
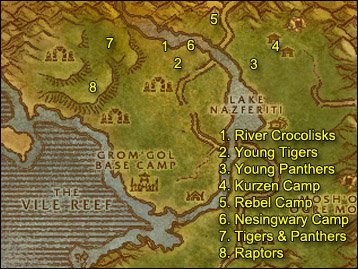
1. Kill River Crocolisks which can be found all along the river in northern Stranglethorn Vale until you find 2 Large Crocolisk Skins. While you search for crocs you can also kill Young Tigers close to the river for Tiger Mastery.
2. Then kill 10 Young Tigers (or as much as you still got left)
Tigers can be found mostly south and around the Nesingwary camp.
3. Kill Young Panthers, they are mostly found on the other side of the river to the east. (41,10).
4. Go further northeast to the Kurzen Camp (44,11) and kill 15 Kurzen Jungle Fighters as well as Kurzen Medecine Men until you get 7 Jungle Remedies (might take a while). Also you’ll need a Fern Extract from one of the piles of crates scattered around the Kurzen Compound.
5. Once all 4 quests are done go turn 2 of them in (besides Supply and Demand, which you will turn in later) at the Rebel Camp where you get the follow up: [38] Special Forces..
6. At the Nesingwary camp, turn in the other two and get the follow ups:
- [33] Tiger Mastery
- [33] Panther Mastery
7. Go west until you reach a plateau (30,9). Up there you can find Panthers and Tigers. Kill 10 of each.
8. Further southwest on the plateau you should find Stranglethorn Raptors, kill 10.
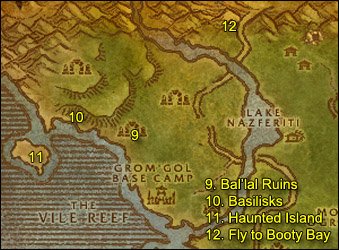
9. Go south and down the plateau until you find the troll camp at Bal’lal Ruins (29,20) Get 15 bloodscalp ears from the trolls here. Be careful though if you are a melee class, they enrage and start to really hurt towards the end. If you don’t have enough trolls there is another camp northeast at the Tkashi Ruins (33,15).
10. Go west until you hit the shore, and move along the shore towards the north until you find Crystal Spine Basilisks. If you run short on Basilisks, there is more on the lower plateau to the east along the shore. If there aren’t any basilisks just go kill some trolls until they respawn. Kill basilisks until you get 10 Singing Crystal Shards.
11. After that, take a swim westwards until you hit the island at loc (21,22), you will have to go towards the middle of the island so the quest [37] The Stone of the Tides is completed, but be careful with the lvl 37ish elementals on the isle.
Hearthstone to Booty Bay.
12. When in Booty Bay. Turn in:
- [31] Supply and Demand, get the follow up [36] Some Assembly Required
- [35] Singing Blue Shards on the ground floor in Booty Bay inn, get the follow up [41] Venture Company Mining.
- [37] The Stone of the Tides on the top floor of Booty Bay inn to Baron Revilgaz, get [37] Water Elementals.
- [37] Krazek’s Cookery, get [37] Favor for Krazek
- [35] Bloodscalp Ears, get [36] Hostile Takeover if you don’t already have it.
Repair, sell junk, buy 4 stacks of food/drink.
==Note== If you already have the 4x Lesser Blood Stone Ore (shopping list), you can turn in [37] Favor for Krazek and get the follow up [37] Return to Corporal Kaleb. If you don’t have it, it’s ok, keep checking the Booty Bay AH and the Stormwind AH everytime you get the chance. Don’t spend more than 2 Gold on this though. When you get the ore, don’t forget to turn it in during our next Booty Bay trip, get the follow up and turn it in at the Rebel Camp next time we go there. I won’t remind you, so don’t forget it. If at level 43 you still haven’t found the ores, just abandon the quest.
Fly to the Rebel Camp. From there go south to Nesingway Expedition Camp and turn all quests, get all follow ups:
- [33] Panther Mastery, get the follow up [38] Panther Mastery
- [33] Tiger Mastery, get the follow up [35] Tiger Mastery
- [34] Raptor Mastery, get the follow up [36] Raptor Mastery
Check if you completed any of the chapters of the Stranglethorn pages quests as well and turn them in if you did.
- Chapter I: page 1,4,6,8
- Chapter II: page 10,11,14,16
- Chapter III: page 18,20,21,24
- Chapter IV: page 25,26,27
You should be level 33 by now.
Level 33
Go back to the Rebel Camp and fly to Menethil Harbor.
==Note== If you followed Boston’s Guide, you should already have done the quests from the Dwarves at Dun Modr, so just skip the next 4 paragraphs and go straight to Refuge Pointe in Arathi Highlands.
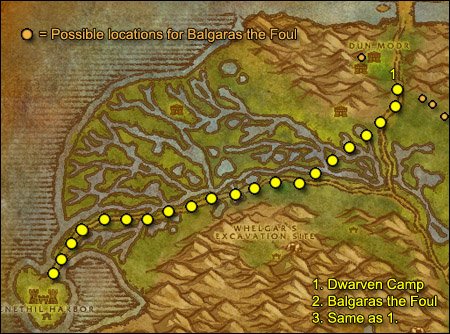
1. From there follow the road east until you get to an intersection, there go north until you see a camp with dwarves that have a few quests. Take all three quests and start clearing your way into the fortress before you. Right at the start you should find plenty of Dark Iron Dwarves. Inside the building you’ll find all the other mobs that you need.
2. Once [30] The Dark Iron War is completed, go southeast along the mountain until you get to a camp. You should found Balgaras the Foul in the camp which is the most to the southeast. Kill him and loot his ear.
3. Go back to the Dwarven Camp and turn in both quests.
Then go north over the bridge to Arathi Highlands and half way over the bridge you’ll see an entrance to the right. Enter and go down the stairs (be full health/mana). All the way on the bottom you’ll find a corpse with a question mark. Turn in your quest and get the follow up.
4. Run back to the Dwarven Camp and turn your quest in at Khag Garmason. Then go back to the bridge but this time cross it and then go right over a wooden bridge. You’ll see a camp with dwarves and in the middle a wagon with barrels looking like this:

Clear your way to the wagon and loot it, then run back to the Dwarven Camp in Wetlands, turn your quest in and take the follow up.
This time cross the bridge for good and follow the path north inside Arathi Highlands until you reach Refugee Pointe. Get the flight path here and turn in your quest.
Repair and sell junk then exit the camp and go back to the main road. Follow it west / northwest until you reach Hillsbrad Foothills. There follow the road going east / northeast until you get to the second intersection, there go south until you reach Southshore.
Get the two quests: [29] Missing Crystals and [30] Down the Coast.
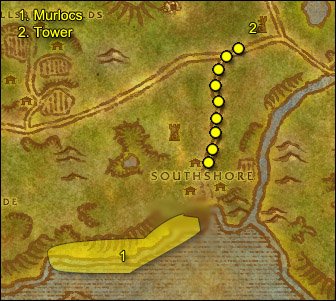
1. On the western side of the shore which is right next to Southshore you’ll find the murlocs needed for [30] Down the Coast.
2. Once you are done with murlocs, go back to Southshore and from there follow the path north until you get to an intersection. There go east until you get to another intersection where you should see a half-destroyed tower (56,36). Clear your way inside and loot the unopened crate.
Run back to Southshore and turn both quests in. Don’t get follow ups for now. You should be level 34 by now. Hearthstone back to Booty Bay.
level 34
Since you are lvl 34 now, go train if you wish to do so. Closest place to train is Stormwind by gryffon. (Unless you are a rogue, there’s a rogue trainer on the 1st floor of Booty Bay inn).
While you are on gryffon (or in Booty Bay), ask in general channel if anyone has any page you need, and trade your spare pages in exchange or just buy them, they go for 10-15 silver on average. You can also check the Booty Bay auction house for missing pages. I suggest you even buy them overpriced (Offer 20-30 Silver for a page and you should get it quickly). The sooner you complete the page collection, the better for your bag space :P. Anyway, time to hunt again!
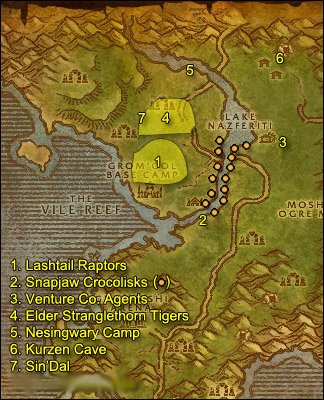
1. When you are done, fly to Rebel Camp. Run south/southwest towards the area north of Grom’Gol Camp. You should find plenty of Lashtail Raptors there. Kill them as much as needed for the quest [36] Raptor Mastery.
2 & 3. When done with raptors, you should hit the river to the east and search along the banks for Snapjaw Crocolisks. At the same time you can start heading to the Venture co. Camp next to Lake Nazferiti and kill Geologists there (44,20), they drop the “tumbled crystals” you need for [36] Hostile Takeover. You can find crocolisks on both sides of the river, all around Lake Nazferiti[ and all the way down to Mizjal Ruins. Keep killing Goblins and Crocolisks until you get both quests complete.
4. When done with that, head hwest until you hit the area in between Bal’al Ruins and Tkashi Ruins (33,15). There you wil find Elder Stranglethorn Tigers and kill 10 of them.
5. Once done, go to Nesingwary camp and turn in
- [35] Tiger Mastery, get the follow up [37] Tiger Mastery
- [36] Raptor Mastery, get the follow up [41] Raptor Mastery
Also complete any chapter to get rid of pages taking up bag space.
6. Go northeast until you hit the Kurzen Camp, this time go straight for the cave there and kill Commandos and Headshrinkers. Careful the Commandos are stealthers.
7. When done with that go southwest to find Sin’dall. Sin’dall is on top of a hill at (31,17) right in the middle of Bal’al and Tkashi ruins. It is definitely soloable at lvl 34, just make sure all your long cooldown abilities are up.
Go to Nesingway Expedition Camp and turn in [37]Tiger Mastery. Continue to Rebel Camp and turn in your quest as well, get the follow up as well as [38] Kurzen’s Mystery. Now hearthstone or fly to Booty Bay and turn in your quests as well, do not get follow ups. Get your turtle meat from the bank and fly to Southshore.
Gather all the quests in Southshore, you should have:
- [32] Farren’s Proof
- [33] Hints of a New Plague?
- [33] Syndicate Assassins
- [34] Costly Menace
- [36] Crushridge Bounty
And [31] Soothing Turtle Bisque which you can complete immediately because you already got 10 Turtle Meat. You can buy the soothing spices from the merchant in the first house to the right when entering Southshore from the north.
Don’t bother with [34] Bartolo’s Yeti Fur Cloak unless you are a Leatherworker or got a Leatherworker friend who can make a Hillman’s cloak. You can buy a Bolt of Woolen Cloth at the auction house or ask a tailor.
Once you are ready, go to the western shore and start killing murlocs again. Kill these until you:
- Get 10 murloc heads
- Are 3k exp (or less) away from level 35
When that is done go back to Southshore and turn the quest in, get the follow up. Speak with Marshal Redpath in Southshore, get the follow up and talk to Lieutenant Fahren again. Get the follow up [32] Stormwind Ho!.
Congratulations on level 35.
Level 35
Sell and repair (there’s an armorsmith behind a small house next to the inn).
In Southshore, go to the inn and make it your home location.
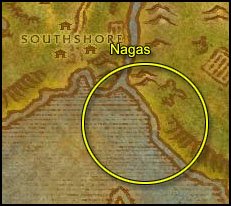
1. Time to hunt Nagas now. The ones you need are on the eastern shore, right next to the town. Kill 10 Daggerspine Shorehunters and 10 Daggerspine Sirens, go back to Southshore and talk to Lieutenant Farren again and get the follow up [32] Reassignment.

2. Now fly to Refuge Pointe (Arathi Highlands). In Refuge Pointe get the quest [36] Worth its Weigh in Gold from Apprentice Kryten.
3. Go southeast until you reach the Go’Shek Farm (60,53) and find the NPC named Quae, she is looking over the Go’Shek Farm from the northwest edge. Talk to her and take the follow up quest [36] Hints of a new Plague?. You need to find and kill a Forsaken Courier and loot a Sealed Folder from him.
4. In Short: The Forsaken Courier roams from the Go’Shek Farm all along the road up until the wall to Hillsbrad Foothils. He is lvl 35 and doesn’t have that much hit points, but he has 4 level 35 bodyguards. Find a way to kill and loot the Courrier. You can do it solo at level 35, I’ve done it with 5 different classes and I’ve heard about other players doing the same. For instructions on how to kill the courier with a certain class, see below.
In Details Now you need to find and kill the Forsaken Courier, he roams from the Go’Shek Farm all along the road up until the wall to Hillsbrad Foothils. He has 4 bodyguards, all level 35.
There are many ways to kill it though, even solo at level 35.
- Warrior: for exemple, charge the courrier, hit Retaliate, use Intimidating Shout, kill the courier fast, loot it and then run away.
- Mage: burn him down as fast as possible, start from max range with Pyroblast if you got it, use frost nova on the bodyguards, finish the courrier fast. Use a Health Potion if needed.
- Rogue: you can single the courier out. Use Distract so that only one guard stops while the rest keeps walking, then kill the guard solo, rinse and repeat until you get the courier solo. You can also just rush in the pack, hit Evasion and kill the courier quickly before evasion runs out.
- Warlock and Hunter: Send in the pet and burn the Courrier as fast as possible while your pet dies.
- Priest: Powerword:Shield and Renew yourself, be at max range, start with Smite, then a Mind Blast while the mobs run to you, then a Shadow Word:Pain. The bodyguards should be on you at this moment, use Psychic Scream, and keep on burning the Courrier with Mind Flay / Mind Blast.
- Paladin: Just go for the courier and use your invulnerabilities.
- Shaman: Check the following comment by Kenaimali for a way to do it as a shaman.
- Hunter: Drop a frost trap and kite them all around it while you kill the courrier, then just run away while the guards are still 60% slowed.
There must be a way for each class to solo this at level 35, use creativity, potions, and long cooldown abilities. If you don’t manage it, try to get a partner to duo it.
Once you got the Sealed Folder from the Forsaken Courier, go back to Quae (60,53). Turn in and get the follow up [37] Hints of a new Plague?, where you have to escort Kinelory.
For the escort, one word of advice: Let Kinelory be in the front, always walk behind her, when mobs aggro her, help her take them out one by one. And make sure they don’t run far. Kinelory is quite a tank and can also heal a bit. If you let her be in front and don’t let runners create trains, you will complete the quest easily.
5. When completed, talk to Quae and get the follow up. Then go southeast of Go’Shek Farm to the troll village (63,65).
Kill trolls until you get 10 Tusks. Kill Witch Doctors until you get 4 Medicine Pouches. Further inside the village and to the south (68,75) you will find a cave. Inside the cave you will find Witherbark Shadow Hunters and get the Hunter Knife you miss to complete the quest.
6. Once completed, run back to Refuge Pointe in Arathi and turn in the troll quest.
Hearthstone back to Southshore, and talk to Phin Odelic and complete the quest “Hints of a New plague”.
Sell and repair.
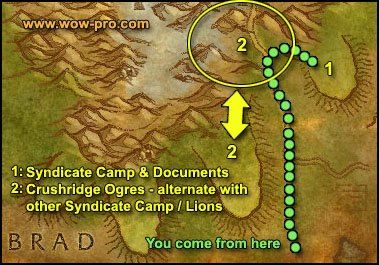
1. Go north and follow the road north until you zone to Alterac Mountain (96,47). A bit further up and to the right you will find Soferan’s Naze (58,67). Clear the Syndicate camp there, and in the middle of the camp on a table you should find parchments named “Syndicate Documents”. Right click one of them and get the two quests [34] Encrypted Letter and [34] Foreboding Plans.
2. Then go northwest towards the snowy mountains where you will find Crushridge Ogres, they drop the Dirty Knucklebones you need.
When you run short on ogres, you can go to the southwest where you will find the area called “Corrahn’s Dagger” (47,76). There you can kill Syndicate Footpads and Syndicate Thieves as well as Mountain Lions and Hulking Mountain Lions. I suggest you go back and forth from this spot to the ogres whenever you run short on mobs. Do this until the Ogre and Syndicate quests are completed. Then there’s more Lions further to the west at “The Headland” (38,85).
3. You should be close to level 36 now (not more than 5k exp away). If that is not the case, grind until you have that much exp then run back to Southshore.
Turn in the 5 quests in Southshore. Get the follow up [34] Letter to Stormpike from Loremaster Dibbs. Don’t get the other follow ups.
Congratulations on level 36.
Level 36
Take a gryphon ride to Ironforge, go to the hall of explorers northeast of the Gryphon master and get the quest from Roetten Stonehammer [33] Reclaimers’ Business in Desolace. Also turn in the quest [34] Letter to Stormpike at Prospector Stormpike in the Hall of Explorers, and get the follow up.
Take the Deeprun Tram to Stormwind.
Repair, sell stuff and train new skills. Also, go turn in [32] Reassignment, at Major Samuelson in Stormwind Keep. (72,16)
Check the AH for 4x Lesser Blood Stone Ores too if you haven’t finished that quest yet.
Fly to Rebel Camp.
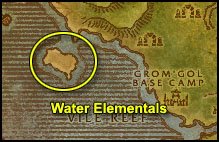
Run southwest and swim over to the island with water elementals that we’ve been too earlier in the guide. Kill Water Elementals there until you get 6 Water Elemental Bracers. When you are done run back to Rebel Camp and fly to Booty Bay. Turn the quest in at Baron Revilgaz on top of the Inn. Get the follow up [37] Magical Analysis. Hearthstone to Southshore.
At Southshore turn in [34] Further Mysteries at Magistrate Henry Maleb. Make sure you have the quest [36] Noble Deaths as well.
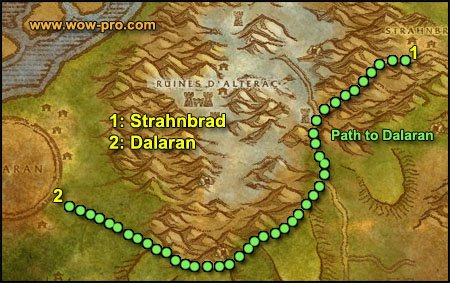
1. Run to Alterac Mountains and follow the path north then northeast at the first intersection. You should reach a village called Strahnbrad. Kill everything here until you get 7 Alterac Signets.
2. When done, follow the path marked on the map to get to Dalaran. At (18,75) you’ll find Archmage Ansirem Runeweaver. Turn in your quest and get the follow up then run back to Southshore. Turn in [36] Noble Deaths at Magistrate Henry Maleb and fly to Ironforge.
Make Ironforge your new home location.
Sell trash and restock on food/drink etc. When you are ready fly to Booty Bay. In Booty Bay, turn in the quest [37] Ansirem’s Key at Catelyn, she is on the 1st floor inside the Booty Bay inn. Get the follow up [39] “Pretty Boy” Duncan.
Take the boat to Ratchet. And then:
- In short: Go to Desolace.
- In detail: From Ratchet, follow the road to the west until you reach Stonetalon Mountains. In Stonetalon Mountains follow the road west/northwest until you are past Sunrock Retreat and reach Mirkfallon Lake, keep following the road until you can go west in between two cliffs. Follow this path, go south through the charred vale and you will arrive in Desolace.
When in Desolace, go to Nijel’s Point . To access it you have to go further southwest until loc (67,16).
Turn in [33] Reclaimers’ Business in Desolace.
Then get quests:
- [31] Centaur Bounty
- [33] Vahlarriel’s Search
- [33] Reagents for Reclaimers Inc.
- [35] Strange Alliance
- [39] Down the Scarlet Path
- [39] The Karnitol Shipwreck.
We are not taking the quest [35] Brutal Politics because we decide to be friendly with the Gelkis Centaur Tribe which involves lowering faction with the Magram Centaurs. It doesn’t really matter anyway if the Magram centaurs hate you.
Get the new flight path.
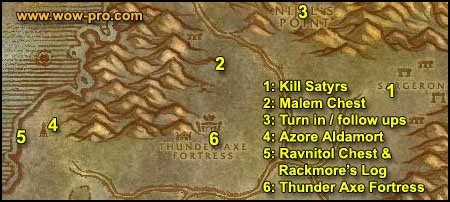
1. Let’s start with [33] Reagents for Reclaimers, kill Hatefury Satyrs in Sargeron, southeast of Nigel’s Point (75,20).
2. When you got 10 Hatefury Claws and 10 Hatefury Horns go west to the area just north of Thunder Axe Fortress (56,17) you will find a ruined caravan there. Look for Malem Chest. It’s not actually a chest, rather a crate. Open it, get the follow up.
3. Go back to Nijel’s Point and get the follow up. Turn in the Satyr quest as well but don’t get the follow up (huge time waste).
Sell and Repair.
4. Go southwest and past Thunder Axe Fortress. Then go west towards the sea until you see a big tower. Azore Aldamort is next to the tower just north of it down the cliff (38,27). Get the quest [33] The Sceptre of Light.
5. From there, go southwest to the shore towards (36,30), you should see the mast of a sunken ship. The Ravnitol Chest is on the shore at (36,30). Open it, and get the follow up quest. Right next to the chest is a black book named “Rackmore’s Log“. Click it and get the quest [36] Claim Rackmore’s Treasure. The Silver Key drops from Drysnap Pincer or Crawler. The Gold Key drops from any Slitherblade Naga.
Take a swim and kill Drysnaps around the ship until you get a Silver Key. It takes about 10 kills on average. Then further north go kill Siltherblade Nagas until you get a gold key. 10 kills on average as well to get a Golden Key.
You should be level 37 by now or close.
Level 37
6. Once you have both keys, go east to the Thunder Axe Fortress. Enter the fortress through the main gate (56,30), go kill the Seer (he has one guard) on top of the 1st watch tower to the left past the gates. Loot the Sceptre of Light.
Then go in the big building and talk to Dalinda, get the follow up quest [33] Search for Tyranis. Tyranis is in the other building (the smaller of the two), southwest of the main one. Kill Tyranis and loot the pendant.
Go back to Dalinda. Before you talk to her, clear the whole building. After you talk to her she will start to walk out of the fortress, escort her and make sure she doesn’t die. Once out of the fortress she will run away and you will get a “Quest Complete” message.
7. Go northeast and back to Nijel’s Point, turn in quests, get follow up [39] The Karnitol Shipwreck.
Sell and repair, next circuit is gonna be long!
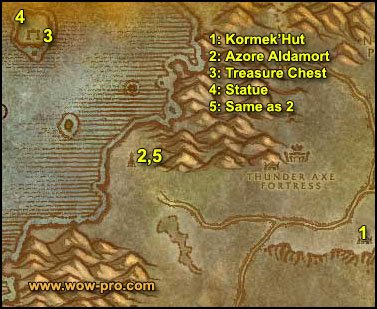
1. Go south to Kormek’Hut (62,38). Get the quest [39] Bone Collector (62,39) from Bibbly F’utzbuckle.
2. Then go west to the big tower and turn in your quest [33] The Sceptre of Light to Azore Aldamort. Get the follow up [38]Book of the Ancients
3. Go northwest and take a swim towards the Ranazjar Isle (30,9). Clear the eastern shore of the isle. You should find a chest in between a tree and the white building. Click it to complete [36] Claim Rackmore’s Treasure.
4. Then clear yourself a path through the Nagas so that you can reach the statue on the northwestern part of the isle (28,6). Clear the way around the statue, get full health/mana and go click the statue twice. Lord Kragaru will spawn, a lvl 38 Naga. Kill it (soloable at 37) and loot the Book of the Ancients.
Before you go, kill Slitherblade Tidehunters and Slitherblade Sea Witches until one of them drops Karnitol’s Satchel. Takes 15 kills on average (Took me only 4 once, and another time it took 29 kills).
5. Swim back to Azore Aldamort get your rewards.
6. Now go southeast towards the Kodo Graveyard (48,55). Gather 10 kodo bones there, kill the Carrion Vultures if they are in the way. When you loot a bone there’s a 50% chance a lvl 37-38 Kodo Apparition will pop up and attack you. You can run away or deal with it, up to you, they disappear after about 10 minutes.
7. Once you got 10 kodo bones, run east to Scrabblescrew Camp (60, 61) and get the quest [34] Kodo Roundup. Go back to the Kodo Graveyard and use the Kombobulator Rod on any Ancient, Aged or Dying Kodo. Once you have one tamed, run back with it to the goblin, then right-click on the tamed kodo. Rinse and repeat 5 times to complete the quest.
8. When done with that, go southeast to the Magram Village (70,70) and kill centaurs until you are friendly with the Gelkis (exactly 50 Kills, 46 if you are human). You can check your reputation with the Gelkis Centaur Clan by opening your character panel (“C” key) and clicking on the reputation tab or just directly press “U” key (or replace your exp bar with your reputation bar).
After those 50 kills you should also have 15 Centaur Ears by now, if you don’t, just kill some more centaurs.
9. Go southwest toward the big arch (63,79). Kill 30 Undead Ravagers there. Beware of the Outcast Necromancers, interrupt them when they cast their summon spell. If not, they summon an Undead Ravager. 😛
10. When done with the 30 Ravagers, from the big Arch, go west, stay close to the mountain on your left until you reach Gelkis Village. Then go northwest until you find Uthek The Wise (36,79). Turn in the quest [35] Strange Alliance, don’t get the follow up.
11. Take the road east / northeast and then north. Follow the road until you reach Kormek’s Hut (62,38) and turn in [39] Bone Collector.
12. Then go north to Nigel’s Point and turn in all the quests. Get the follow ups:
- [39] The Karnitol Shipwreck
- [40] Down the Scarlet Path
Titan Panel XP rate results:
This session started with the Satyr quest and finished right now after turning in all the quests in Nijel’s Point. That was done with a level 36 character with average gear, solo, on a new server (no twink). I’ve tried it with 3 different classes and it works just as well. And there is still two quests to turn in, that’s just to show how efficient the quest path of Desolace can be when done the right way. 🙂
Anyway you should be level 38 by now.
Level 38
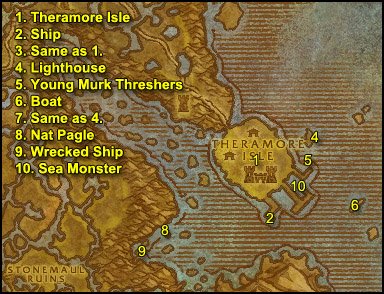
Warp to Ironforge, go to the Hall of Explorers and turn in the quest [39] The Karnitol Shipwreck. Train, restock food/drink, sell junk etc. When you are done fly to Menethil Harbor. On your way to the docks of the boat that leads to Theramore, accept the quest [35] James Hyal from Vincent Hyal. Take the boat to Theramore.
Make the inn your home point.
Turn in [35] James Hyal at Clerk Lendry in the big fortress and get all quests from Theramore:
- [35] Inspecting the Ruins
- [35] This Old Lighthouse
- [35] Traitors Among Us
- [37] Tabetha’s Farm
- [38] Mudrock Soup and Bugs
1. Run around in town and try to spot Deserter Agitators who mostly stand next to normal guards:
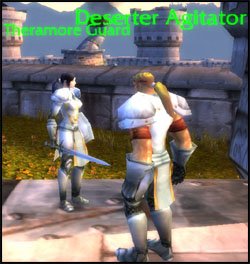
Talk to five of them and go through their dialogue. Be careful sometimes they turn aggressive and attack you. When you are done, turn the quest in at Calia Hastings and get the follow up.
2. Go to the ship which is furthest to the south of the Theramore docks and clear your way through it until you reach a room that looks like the captain’s cabin:
Loot the boxes there and clear your way out. Turn the quest in at Caila Hastings and wait until she performs a little script, then get here follow up.
3. Talk to 6 Theramore Guards and go through the dialogue with them. Go back to Caila and turn the quest in. Get the follow up.
4. Now first swim or waterwalk to the little island with the light tower (72,47), right east of Theramore. Turn in [35] This Old Lighthouse at Babs Fizzletorque and get the follow up.
5. Swim directly south to the docks of Theramore and dive under them. There you’ll see Young Murk Threshers. Kill them until you have 4 Thresher Oils.
6. When done, swim a little east to (76,55) where you should see a boat. Clear your way inside and go down the set of stairs which leads down from the deck. Instead of continuing straight, go down another set of stairs:
There you’ll find Gavis Greyshield along with a guard. Kill them both, Gavis won’t die but he’ll turn friendly at some point and you will get a quest complete message.
7. Swim back to the island with the light tower and turn your quest in and get the follow up. Swim to the Theramore docks. Turn in [35] Dastardly Denizens of the Deep at “Dirty” Michael Crowe, get the follow up [36] Is it Real?. Then turn in [37] The End of the Deserters at Calia Hastings.
Repair/sell junk.
8. When done swim southwest of Theramore to (58,60) where you’ll find Nat Pagle. Turn in [36] Is it Real?, get the follow up [37] Nat’s Bargain and look in your inventory for some fish paste, use it.
9. Swim southwest to a wrecked ship at (56,62). A lurking shark will attack you, kill it and return to Nat. Turn in your quest, get the follow up [37] Oh, It’s Real and return to Theramore. Turn in your quest at Major Mills. Now careful, when you get the follow up a script will start:
In front of you a sea monster will spawn and attack the city. You’ll have 12 marksmen helping you shoot the monster BUT you are not supposed to fire at him with your own weapons. At the docks you’ll see canons which will become useable once the monster attacks for real. Basically your only job here is to run between two of the 3 canons and alternatively fire them at the monster until it is dead. You should be able to get the monster down easily before the marksmen are dead. Be careful of his water stream though, it pushes you back and you’ll have to run back to the canons.
10. When the monster is dead (really nice script) you’ll get some fireworks and you can turn in your quest at Major Mills.
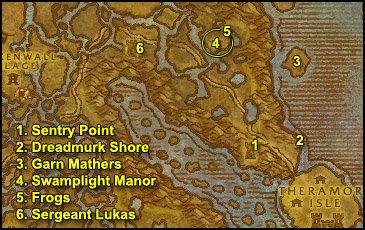
1. Get the new quest from Sergeant Amelyn as well as the one from Lieutenant Aden. Leave the village and follow the path until you get to Sentry Point (60,40). Enter the tower and turn in your quest, get the follow up.
2. Go east and climb over the hills to get to Dreadmurk Shore. Kill Mudrocks here until you get 8 Forked Mudrock Tongues. (The turtles can be found on the shore as well as in the water)
3. When you are done swim to the island at (63,27). Hover over the Defias here to see which one is Garn Mathers. Kill and loot him.
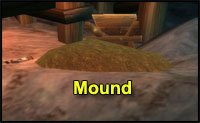
4. Run back to the main road and go northwest until you find Swamplight Manor (55,26). Turn in your quest at Jarl and get the follow up. Also right next to the house should be a rather large dirt mound with an exclamation mark. Get this quest. Inside the house is another quest, [36] What’s Haunting Witch Hill?, take it.
5. Quickly kill 10 Giant Marsh Frog critters around the house and then turn the quest in at Jarl. Get the follow up.
6. Now go straight west until you get to a tower at (46,23). Get the quest from Sergeant Lukas.
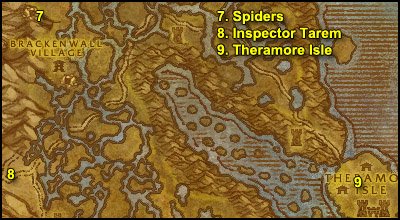
7. Continue going west until you reach a cave with spiders (35,24). Kill spiders here until you have 20 Unpopped Darkmist Eyes.
8. When done, make a big circle around Brackenwall Village and follow the path southwest, find Mudcrush Durtfeet (35,38), get the quest [36] Hungry!
9. Go further southwest towards the Barrens zone in. At (29,47) you should find Inspector Tarem. Turn in your quest and get the follow ups from the items around him. Hearthstone to Theramore.
Now, CAREFUL: Make sure to turn in all the green 35 quests first, as this turn in should make you ding and then you’ll get less exp from the 35 quests. Turn all quests in, take all follow ups. Some will require you to do some turning in right there in Theramore. Do that and get all follow ups. Your quest log should look like this:
- [35] Jarl Needs Eyes (Complete)
- [36] Hungry!
- [36] What’s Haunting Witch Hill?
- [37] Defias in Dustwallow? (Complete)
- [37] Raptor Captor
- [37] Tabetha’s Farm
- [38] The Deserters
- [39] Mission to Mudsprocket
- [40] … and Bugs
Level 39

1. Sell junk/repair/restock food etc.
Leave the town and go to Sentry Point. Turn in your quest and take the follow up.
2. Run to Swamplight Manor and turn in your quest. Get the follow up.
3. Kill Risen Spirits and Husks around the manor until you’ve gathered 10 pieces of information. Once done go back to the manor and get the follow up.
4. All around the manor you’ll find plants looking like this:

Loot 9 of them.
5. Go back to the manor and turn the quest in. Take the follow up. In your inventory you’ll find a torch. Get full mana/hp then go to the dock in front of the house and right click the torch. A gargoyle will spawn. Kill it and go back to the manor. Turn the quest in.
6. When you are done, go northwest until you see some raptors. Open your bag and search for an item called Sturdy Rope. Put it on a hotkey and whenever you attack a raptor and it gets to 20% hp, use the rope to capture it. You need to capture 6 raptors this way. While doing that walk towards (46,17).
7. At the aforementioned location you should find “Stinky” Ignaz. Take his quest and escort him. (When you turn in this quest later on in the guide, be sure to keep the Elixir of Fortitude for a quest in the next guide)
8. After the escort you’ll be at about (48,24). Go to the tower with Sergeant Lukas and turn your quest in there and get both follow ups.
9. Go northwest to (41,14) where you’ll see Blackhoof Village. Kill the Grimtotems here and free 5 Theramore Prisoners (the Grimtotems drop the keys needed). When you are done, search your inventory for a Raptor Bait and place it next to the little rotating mill that is in the center of the village (41,12).
10. Run back to Sergeant Lukas and turn both quests in.
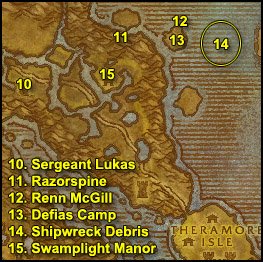
11. From the tower go east until you reach (57,19). You should see a named murloc there called Razorspine. Kill and loot it.
12. Go further east and jump into the water. Swim to the little island at (62,18). At the northern top of that island you should find Renn McGill. Turn in your quest in there and get the follow up [37] Secondhand Diving Gear.
13. Clear the Defias camp on the island nearby and loot the tools and the damaged diving gear you need for the quest. Go back to the NPC, turn it in and get the follow up [37] Recover the Cargo!.
14. Swim towards Alcaz Island. Look in your inventory for a kit that looks like a backpack. Open it and you should receive a Salvage Kit and a Repaired Diving Kit. Equip the diving kit to be able to breath under water. Now look for Shipwreck Debris looking like this:
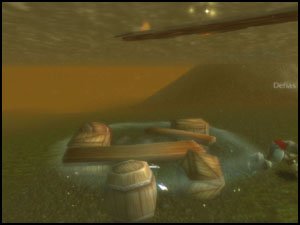
Look for these and use your salvage kit on them. Sometimes you’ll be lucky and you’ll get a Salvaged Strongbox. Sometimes you won’t be lucky and a mob will ambush you after your attempt. Continue doing this until you have 6 Strongboxes. When done, return to the Renn McGill, turn the quest in and get the follow up [37] Jaina Must Know.
Now kill murlocs around this area until you finish the quest [36] Hungry!
15. Run back to Swamplight Manor and turn your quest in. If your hearthstone is ready, use it, if not run back to Theramore. Turn in both [37] Stinky’s Escape and [37] Jaina Must Know. Take the follow up [37] Survey Alcaz Island.
Go to the gryphon master of Theramore and speak to the NPC next to hear called Cassa Crimsonwing. You’ll get a free ride and a quest complete message. Wait until you get back to Theramore then turn the quest in at Jaina. Take the follow up [37] Warn Bolvar!
Sell junk/repair etc.

1. Run all the way to the point marked as “Lost Point” on the map.
On the way, stop by Mudcrush Durtfeet (35,38) and turn in [36] Hungry!.
Clear your way into the tower and carefully pull so you can reach the inside. Balos Jacken will attack you immediately, bring him down to like 20% HPs and he’ll become friendly. Turn in your quest to him and get the follow up [38] The Deserters.
2. From the “Lost Point” ride directly east until you get to Tabetha’s farm. Turn in your quest here. If you are less then 3900 exp away from level 40 proceed to paragraph 3. If you still need some experience kill spiders around the farm until you have enough experience.
3. Follow the path west then south until you reach Mudsprocket. Here take the flight path and turn in your quest and fly to Theramore. Turn in your quest at Captain Garran Vimes. Take the follow up [38] A Grim Connection.
Go talk to Jaina and ask her to teleport you to Stormwind. Go to Stormwind Keep, find High Warlord Bolvar and turn in your quest, take the follow up [37] Return to Jaina. Train / Sell junk / Check the AH etc.
Congratulations on level 40. Whatever quests you might still have in the quest log, don’t worry, we are going to take care of all that in the next guide.
Level 40 – End of guide
I hope you enjoyed this guide. If you want to return the favor, please try to contribute.
Original Guide: Jame
Revamp: Snowflake
Copyright @ www.wow-pro.com