
 by Chrisser000
Rejsen fra Howling Fjord til Borean Tundra
Oversættelsen
Denne guide er oversat fra engelsk til dansk. Da forskellige ord ikke er nemme at oversætte, så vil der i denne guide være ord, som forbliver engelske:
Mob(s) = Slang for monstre.
Instance = Som regel et område, der kun indholder elite mobs. Dvs mobs, som kan være samme level som dig selv, men har langt mere liv/mana og kan være svære at klare alene. Instances skal oftes klares i gruppen af 5, 10 eller 25 personer samtidig.
Quest(s) = Opgaver som du skal løse og giver god XP (eXperience Points) når du indleverer dem igen.
Grind = Grind er et udtryk for, at slå en masse mobs ihjel. Man grinder for at stige i XP og til sidst stige i level.
Fligt Path (FP) = Flight Path har jeg valgt at oversætte til flyverute.
Hearthstone (HS) = Med din Hearthstone kan du teleportere til den by du har bundet din HS til. Du skal kun skifte din HS når det er beskrevet i guiden.
NPC = Non Player Character. En NPC er alle dem i spillet, som ikke bliver spillet af andre personer.
(Re)spawn = Respawn betyder genopstår.
Aggro = Hvis man kommer for tæt på et mob så det angriber en.
Achievement = En præstation. Vil ikke blive oversat. Du kan se dine præstationer ved at trykke “Y” i spillet.
Introduktion
Denne guide er lavet for HURTIG leveling ved hjælp af brugen af Optimale Quest Ruter. Med denne guide, vil questing blive meget effektiv, og du vil ikke spilde tid på at løbe rundt for at prøve at finde ud af, hvilken rækkefølge du skal lave dine quests i.
Følg hver instruktion grundigt og så kan du selv se det. Quest-valgene og rækkefølge at lave dem i er optimale, så du løber rundt så lidt som muligt mens du laver så meget som muligt, og afleverer flest quests samtidig. Det vil være ligesom grinding, for du vil dræbe noget næsten hele tiden, men du vil også klare en masse quests samtidig!
BEMÆRK: Ved at følge denne guide vil du få en Quest Achievement for Howling Fjord: I’ve Toured the Fjord. Faktisk, er 100% af questene i Howling Fjord inkluderet i guiden, eller i hvert falt nævnt som en mulighed.
Alt, der er beskrevet i denne guide, kan blive gjort alene (undtagen når det står i guiden). Du kan, selvfølgelig, følge denne guide med en anden eller en hel gruppe, det er ikke noget problem, det virker også.
VÆR OPMÆRKSOM PÅ: Denne guide tager sig IKKE af professioner, quests for en speciel class eller PvP. Den er 100% fokuseret på at få de mest mulige XP på det kortest mulige tid samtidig med at lave en masse quests og nyde selve spillet så meget som muligt. Enhver race/class kombination kan lave denne guide. Nogen klager over PvP, professioner eller problemer med en speciel class vil blive ignoreret.
Generelle regler
- Brug dine talent points så du dræber ting så hurtigt som muligt. (fx: Priest skulle specialisere sig i Shadow talents, Warriors i Arms/fury, osv.)
- Lad være med at bruge din tid på at prøve at finde grupper for quests, du kan solo alt, der er beskrevet i denne guide, medmindre jeg siger noget andet. Du bør kun gå i gruppe med nogen når det ikke tager for lang tid (fx: At mødes med en person i den anden ende af zonen for at vise ham hvor din quest er, det er spild af tid).
- Prøv altid at logge ud i en kro (inn) eller i en af storbyerne når du tager en pause.
Brugbare Addons
For at få det meste ud af min guide, bør du få et addon som viser koordinater, for jeg bruger dem til at vise steder i min guide (x,y). Du kan bruge hvilket som helst addon du kan lide, men her er et meget simpelt et som jeg bruger.
Anbefalet
- DMiniCoords – En simpel kasse som viser koordinater, venstre-klik for at flytte den hvorhen du vil.
Valgfri
Her er en liste af andre addons jeg bruger, det er dog 100% valgfrit, der er mest til folk, som gerne vil vide hvilke addons jeg bruger:
- Bartender4 – Et godt bar addon.
- X-Perl UnitFrames – Meget gode unit frames.
- Quartz – Den bedste casting bar addon der findes, efter min mening.
- Scrolling Combat Text – Jeg kan bare ikke lide det normale kamptekst.
Ekstra bemærkning: Hvis du ikke bed hvordan man installerer addons, download et addon fra et link ovenover og unzip det. Så flyt den unzippede mappe ind i din AddOn folder. Derefter, genstart World of Warcraft og det skulle virke.
Hvis det ikke virker, skal du nok logge ud til der hvor du vælger din character og klikke på “Addons” i den nederste hjørne til venstre. Check boxen, der hedder “Load out of date Addons”. Genstart WoW.
Indkøbsliste:
Tasker – Prøv i hvert fald at få 18-slot tasker. Vi skal på lange ruter, langt væk fra nogen sælger, så taskeplads er nødvendig. Hvis du ikke har råd til 18-slot tasker, så køb 16-slot tasker istedet for, de er meget billigere.
Farve Kode:
- Quests
- Genstande
- Steder
- Quest mål at dræbe
- NPC’er
- Koordinater
Guiden:
Tag til Howling Fjord. Tag luftskibet fra Undercity, der er et nyt luftskibstårn lige ved siden af det andet. Det vil flyve dig til Vengeance Landing.
 Tag den nye flyverute.
Tag alle quests:
- [71] The New Plague
- [71] Let Them Eat Crow
- [71] War is Hell
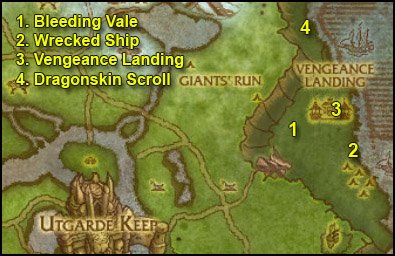
1. Gå sydvest til Bleeding Vale (75,33). Der vil du finde to ting vi har brug for:
 Forsaken Corpses / Alliance Corpses, klik på dem og højre-klik på Burning Torch.
 Højre-klik på Plaguehound Cage fra dine tasker. Det vil fremkalde en Plaguehound som dit pet.
 Brug dit pet’s Sic’em! for at hente Fjord Crows (der er masser af dem, som flyver rundt her). Og hjælp med at dræbe den.
Bliv i dette område indtil du har brændt 10 Fallen Combatant og samlet 5 Crow Meat op.
 Højre-klik på Crow Meat 5 gange.
2. Gå sydøst til et ødelagt skib ved (81,35).
Kig efter Intact Plague Containers.
De kan blive fundet på skibets dæk og også inde i skibets last. Loot 10 af dem.
3. Rid tilbage til Vengeance Landing. Indlever
- [71] The New Plague, få [71] Spiking the Mix
- [71] War is Hell, få [71] Reports from the Field
- [71] Let Them Eat Crow, få [71] Sniff Out the Enemy
4. Følg kysten nordpå mens du dræber Giant Tidecrawlers på vejen, de dropper Giant Toxin Glands som vi har brug for.
Bliv ved med at gå nordpå indtil du ser et gult “?” på dit minimap, der har navnet “Dragonskin Scroll” (77,20). Gå ind i grotten, højre-klik på papiret, indlever [71] Sniff Out the Enemy og få [71] The Dragonskin Map.
Gå derefter tilbage imod Vengeance Landing mens du dræber Giant Tidecrawlers indtil du har 3 Giant Toxin Glands.
I Vengeance Landing, indlever:
- [71] Spiking the Mix, få [71] Test at Sea
- [71] The Dragonskin Map, få [71] The Offensive Begins
 Flyt Plague Vials ned på din action bar. Vi vil bruge dem under bombemissionen vi skal til at lave. Den er en rimelig nem bombemission, så der er ingen grund til at forklare særlig meget. Flagermusen vil flyve dig syd til en flåde af allianceskibe, du skal bare bombe NPC’erne på de skibe med dine Plague Vials.
Gå hen og tal med flight masteren, der hedder Bat Handler Camille, gå af dit mount, og klik på teksten. Fuldfør bombemissionen.
Indlever [71] Test at Sea, få [71] New Agamand.
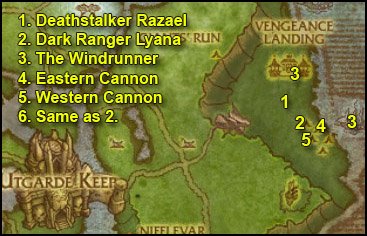
1. Rid syd/sydvest til Deathstalker Razael (78,35). Tal til ham og klik på teksten.
2. Gå omkring 200 yards sydøst til Dark Ranger Lyana (79,37). Hun er den eneste Blood Elf af alle de NPC’er og har glødende røde daggere, nem at finde. Hun løber nogen gange hen for at bekæmpe de fjendtlige NPC’er, men hun kommer tilbage hurtigt.
Snak med hende og klik på teksten.
3. Rid tilbage til Vengeance Landing, indlever [71] Reports from the Field, få [71] The Windrunner Fleet.
Gå hen og snak med Bat Handler Camille igen, klik på teksten, det vil flyve dig til the Windrunner. Indlever [71] The Windrunner Fleet til Captain Harker, få [71] Ambushed!.
Dræb 15 North Fleet Marines.
Gå tilbage til Captain Harker, indlever [71] Ambushed! og få [71] Guide Our Sights.
4. Svøm vest til Derelict Strand, gå til den østlige kanon (80,38 ).
 Højre-klik på Cannonneer’s Smoke Flare i dine tasker mens du er tæt på kanonen.
5. Gå sydvest langs barrikaderne og du vil finde den vestlige kanon (79,40). Brug signallyset.
6. Gå nord til Dark Ranger Lyana, indlever [71] Guide Our Sights, få [71] Landing the Killing Blow.
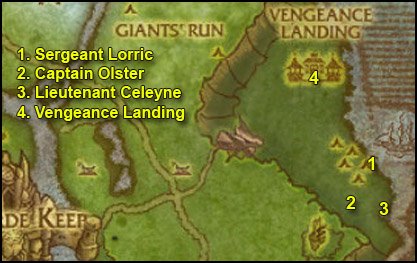
1. Gå sydøst forbi barrikaderne, følg kysten indtil du finder Sergeant Lorric (82,41), han står lige mellem to kanoner. Hvis han ikker er der, så er det fordi en anden har dræbt ham for nylig, så bare dræb noget i området mens du venter på, at han respawner.
2. Gå sydvest og du bør se en bakke. Gå derop og dræb Captain Olster (81,43).
3. Gå imod øst og du finder Lieutenant Celeyne (83,43). Dræb hende.
Samme sted finder du Apothecary Hanes, få hans quest [71] Trail of Fire og eskorter ham.
Det vil tage dig tilbage til Dark Ranger Lyana. Indlever [71] Landing the Killing Blow, få [71] Report to Anselm.
4. Rid tilbage til Vengeance Landing, indlever:
- [71] Report to Anselm, få [71] A Score to Settle
- [71] Trail of Fire
Sælg skrammel, reparer, køb mad/drikke.
Valgfri – Instance: Utgarde Keep
Nu kan du begynde at kigge efter en gruppe for instancen Utgarde Keep
Du har allerede questen [71] A Score to Settle.
Der er to andre quests:
- [71] Disarmament
- [71] Ingvar Must Die
De er begge to givet af Dark Ranger Marrah. Hun står inde i instancen, lige når man kommer ind.
Det er en meget hurtig instance for level 70-73 spillere, jeg kan anbefale den.
Hvis du ikke har lyst eller hvis du ikke kan finde en gruppe, så kan du opgive de 3 quests. De kan nemt samles op igen senere, hvis du skifter mening.
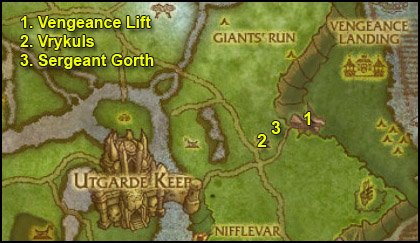
1. Rid sydvest tilVengeance Lift (73,35). Tag liften og rid sydvest til Horde Encampment ved (71,39).
Indlever [71] The Offensive Begins hos Sergeant Gorth, få [71] A Lesson in Fear.
Få også [71] Help for Camp Winterhoof.
2. Gå hen og dræb Winterskorn Defenders sydvest af blokaderne (69,39) og bliv ved med at dræbe dem indtil deres bosser spawner:
- Oric the Baeful (spawner i huset nord for dette område)
- Ulf the Bloodletter (spawner midt i dette område)
- Gunnar Thorvardsson (spawner ved siden af tårnet)
Det er kun når du dræber noget i dette område at bosserne kan spawne.
 Hver gang du dræber en af bosserne, højre-klik på Forsaken Banner ved siden af deres lig.
==Bemærk== Du kan faktisk sætte banneret i deres lig selvom andre har dræbt dem.
3. Gå tilbage til Sergeant Gorth, indlever [71] A Lesson in Fear, få de to næste quests:
- [71] Baleheim Bodycount
- [71] Baleheim Must Burn!
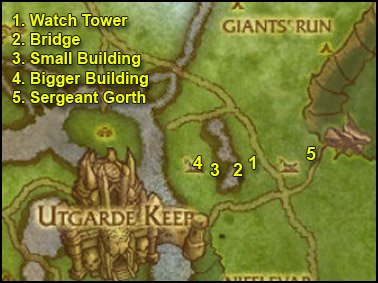
1. Rid direkte vest til Baleheim og gå til udkigstårnet ved (67,40).
Højre-klik på Gorth’s Torch.
==Bemærk== Dræb enhver Vrykul på vejen (Winterskorn Spearman, Skald, osv).
2. Gå bag tårnet og gå vest til broen (66,40). Brug Gorth’s Torch.
3. En smule mere vest forbi broen, burde du kunne se en lille bygning (65,41). Brug Gorth’s Torch.
4. Et par få meter nordvest burde du finde en større bygning (64,40). Brug Gorth’s Torch. Vær forsigtig så du ikke aggroer Bjorn Halgurdsson, elite-mobbet på en drage ved siden af denne bygning.
Dræb Vrykuls i denne by indtil du har dræbt 16.
5. Gå tilbage til Sergeant Gorth, indlever:
- [71] Baleheim Bodycount
- [71] Baleheim Must Burn!
Få opfølgeren, [71] The Ambush.
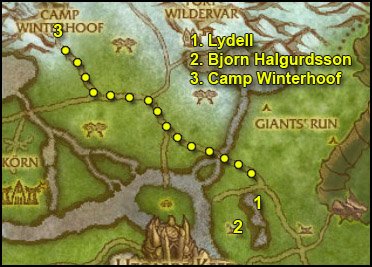
1. Rid vest/nordvest til Lydell (66,37). Indlever [71] The Ambush, få [71] Adding Injury to Insult.
2. Læs hele næste punkt før du gør noget.
Gå sydvest, mens du dræber alt på vejen, til Bjorn Halgurdsson (64,39).
 Tryk på ham, højre-klik Vrykul Insult og løb tilbage til Lydell.
Lad Lydell tanke, lad være med at gøre noget i starten. Hvis du har noget, som kan gøre din threat mindre, brug det. Det burde ikke være svært.
Hvis du klarer det, indlever [71] Adding Injury to Insult.
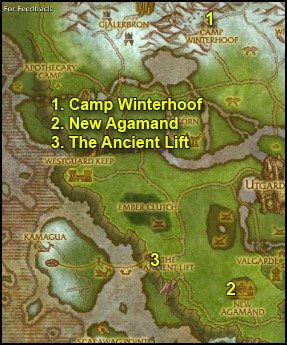
3. Følg vejen nordvest til Camp Winterhoof (49,12).
Indlever [71] Help for Camp Winterhoof og tag alle de quests du kan:
- [71] Hasty Preparations
- [71] Making the Horn
- [71] Suppressing the Elements
Tag den nye flyverute.
==Bemærk== Fra nu af, kig efter Spotted Hippogryph Down mens du går gennem de næste punkter.

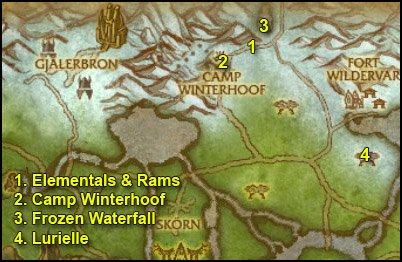
1. Gå til bakkerne med sne nordøst af Camp Winterhoof, dræb de følgende to ting:
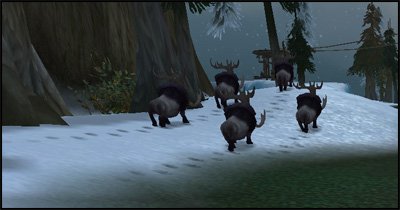
- Frosthorn Rams indtil du har samlet 6 Undamaged Ram Horns op.
- 8 Iceshard Elementals
2. Gå tilbage til Camp Winterhoof, indlever
- [71] Suppressing the Elements
- [71] Making the Horn, få [71] Mimicking Nature’s Call
Du burde kunne få en masse nye quests nu, tag dem alle:
- [71] The Frozen Glade
- [71] Keeping Watch on the Interlopers
- [71] The Book of Runes
- [71] March of the Giants
3. Gå nordøst til det frosne vandfald, samme sted hvor vi lige har dræbt rams og elementals (52,4).
 Højre-klik på Carved Horn fra dine tasker.
Dræb Frostgore.
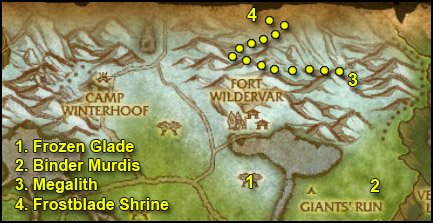
4. Rid sydøst til Frozen Glade hvor du vil finde Lurielle (62,23). Indlever [71] The Frozen Glade, få [71] Spirits of the Ice.
Dræb 15 Ice Elementals og saml 15 Icy Cores op. De er overalt i dette område.
Gå tilbage til Lurielle, indlever [71] Spirits of the Ice, få:
- [71] The Fallen Sisters
- [71] Wild Vines.
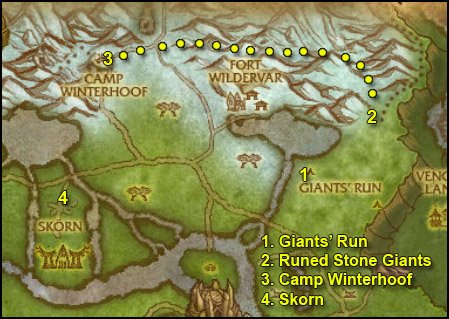
1. Rid øst til den anden side af floden, indtil du når Giant’s Run (67,24).
Dræb alle Iron Rune Stonecaller / Binder på din vej, de dropper Book of Runes Chapters, som vi har brug for. Bliv ved med at dræbe dem indtil du har Kapitel 1,2 & 3.
 Højre-klik så et af kapitlerne for at kombinere dem, og du vil få Book of Runes.
2. Lad os så finde Runed Stone Giants. De spawner på forskellige cirkler på jorden i Giant’s Run.
Derefter går de op imod de sneklædte bakker mod nord, og så forsvinder de. Det er nemmest at vente på dem, lige hvor sneen starter (72,16).
De er elite og slår meget hårdt, men kan nemt blive stunned og slowed. Melee classer vil nok have problemer med at solo dem, så de bør prøve at finde en gruppe. Du bør virkelig prøve at klare den quest, for den har mange opfølgere.
 Hver gang du dræber en Runed Stone Giant, loot den, tryk på dens lig, og højre-klik din Runeseeking Pick.
Når du har 4 Runed Stone Giant Corpse Analyzed, så gå videre til næste punkt.
3. Rid tilbage til Camp Winterhoof, indlever:
- [71] Mimicking Nature’s Call
- [71] The Book of Runes, få [71] Mastering the Runes
- [72] March of the Giants, få [72] The Lodestone
Få [71] Skorn Must Fall! fra Chieftain Ashtotem.
4. Rid sydvest til Skorn (44,26).
 Når du er i Skorn, højre-klik på Winterhoof Emblem i dine tasker.
En Winterhoof Brave vil dukke op. Indlever [71] Skorn Must Fall! og få de 3 quests, han har:
- [71] Towers of Certain Doom
- [71] Gruesome, But Necessary
- [71] Burn Skorn, Burn!
Gå ind i Skorn, dræbt alt på din vej.
 Hver gang du dræber en Vrykul, loot den og brug så The Brave’s Machete på deres lig.
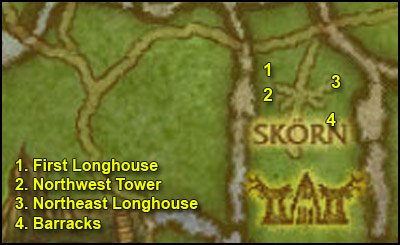
1. Gå en smule sydvest til det første lange hus på højre side (44,28 ).
 Gå ind i langhuset og højre-klik på Brave’s Torch.
2. En smule syd herfra bør du kunne se et tårn, du skal ikke komme for tæt på det, for ellers vil magene deroppe skyde på dig. Du skal bare være 90 yards fra.
 Brug din Brave’s Flare.
Hvis du er tæt nok på, så skulle du få en quest opdatering: “Northwest Tower Targeted“.
3. Gå øst til den modsatte side af landsbyen, hvor du vil finde Northeast Longhouse (46,28 ). Gå indenfor og brug din Torch.
4. Gå en smule syd og du vil finde Barracks (46,30). Gå indenfor og brug din Torch.
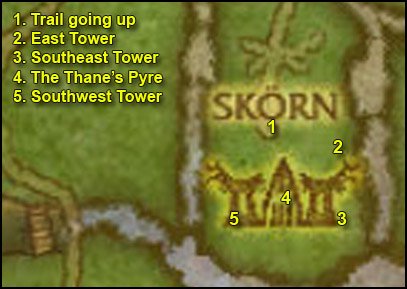
1. Gå sydvest og følg stien opad. Gå sydøst ved krydset.
2. En smule mere øst vil du finde East Tower (46,33). Brug din Flare.
3. Gå lidt sydpå og du vil finde Southeast Tower (47,36) Brug din Flare.
4. Bliv ved med at følge stien længere syd og gå så til højre og du vil finde The Thane’s Pyre (45,35).

På det her tidspunkt skulle du have fundet en Vrykul Scroll of Ascension fra en af de Vrykuls du har dræbt. Hvis ikke, dræb nogen flere Vrykul indtil den dropper.
 Højre-klik på Vrykull Scroll of Ascension og få questen [72] Stop the Ascension!
Stå ved siden af bålet, højre-klik på din Vrykull Scroll of Ascension og dræb Halfdan the ice-Hearted.
5. Gå sydvest, drej til højre og du vil finde Southwestern Tower (43,36). Brug Brave’s Flare.
Dræb alt på din vej indtil du har klaret [71] Gruesome, But Necessary.
Når du er tilbage ved indgangen til Skorn, brug dit Winterhoof Emblem for at fremkalde din Brave (det behøver du ikke hvis han stadig er med dig).
Indlever:
- [71] Towers of Certain Doom
- [71] Gruesome, But Necessary
- [71] Burn Skorn, Burn!
Få opfølgeren [72] The Conqueror of Skorn!.
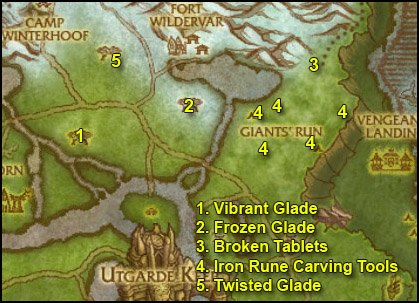
1. Gå øst til Vibrant Glade (51,26). Vi har 2 ting at gøre her.
- Dræb 8 Scarlet Ivy
 Få en Chill Nymph ned under 30% liv og brug Lurielle’s Pendant på den. Gentag 7 gange.
2. Rid øst/nordøst tilbage til Frozen Glade (62,23). Indlever:
- [71] The Fallen Sisters
- [71] Wild Vines
Få de 2 næste quests:
- [71] Spawn of the Twisted Glade
- [71] Seeds of the Blacksouled Keepers
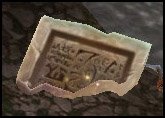
3. Rid øst og så nordøst til bage til det sted hvor vi kæmpede imod Rune Stone Giants. Et par få skidt syd for sneen skulle du kunne se en Broken Tablet (72,17).
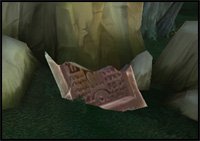
 Højre-klik på Rune Sample fra dine tasker mens du er tæt på Broken Tablet.
Kig på hvad der sker, og du skulle få en quest klaret beseked.
4. Gå syd tilbage til Giant’s Run og kig efter Iron Rune Carving Tools.
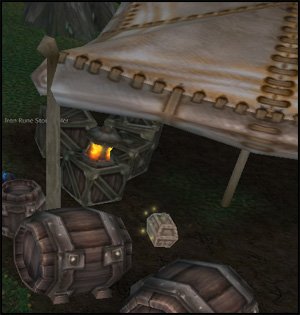
De spawner tilfældgit under et af de 5 telttage i Giant’s Run (68,23), (69,23), (73,25), (71,29), (67,29). Du bliver nok nødt til at checke dem alle sammen.
5. Rid vest/nordvest til Twisted Glade (55,19). Vi har også 2 ting at gøre her:
- Dræb 10 Thornvine Creepers
 Dræb 8 Spores og brug din Enchanted Ice Core på deres lig.
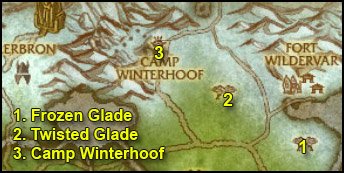
1. Gå tilbage til Frozen Glade (62,23). Indlever:
- [71] Spawn of the Twisted Glade
- [71] Seeds of the Blacksouled Keepers
Gå opfølgeren [71] Keeper Witherleaf.
2. Rid tilbage til Twisted Glade (ja, igen). Denne gang vil vi kigge efter en blå/grøn kentaur kaldet Keeper Witherleaf.
Dræb ham.
3. Gå tilbage til Camp Winterhoof, indlever:
- [71] Mastering the Runes, få [71] The Rune of Command
- [72] The Lodestone, få [71] Demolishing Megalith
- [72] Stop the Ascension!
- [72] The Conqueror of Skorn!
Nye quests skulle være tilgængelige, tag dem alle:
- [71] Dealing With Gjalerbron
- [71] Of Keys and Cage
- [71] Find Sage Mistwalker
Sælg skrammel, reparer og få nyt mad og drikke.
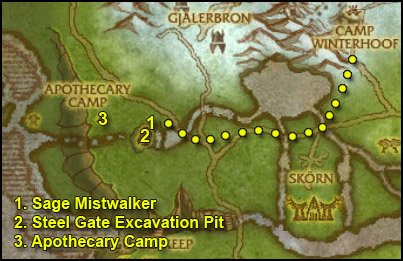
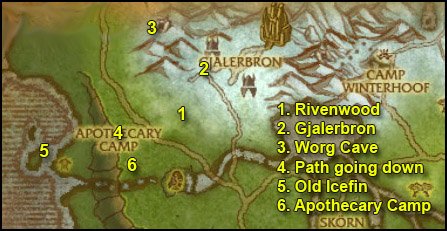
1. Gå sydvest indtil du rammer vejen, og følg den vestpå indtil du når Steel Gate (31,24). Indlever [71] Find Sage Mistwalker, få [71] The Artifacts of Steel Gate.
Tag også [72] Rivenwood Captives fra Longrunner Skycloud.
2. Gå ned i udgravningsminen og saml 10 Steel Gate Artifacts.
Når du er færdig, så gå tilbage til Sage Mistwalker, indlever [71] The Artifacts of Steel Gate, få [71] The Cleansing.
3. Rid vest til Apothecary Camp (26,24). Indlever [71] Keeping Watch on the Interlopers, tag alle de tilgængelige quests herfra:
- [71] What’s in That Brew?
- [71] Brains! Brains! Brains!
- [71] And You Thought Murlocs Smelled Bad!
Tag den nye flyverute.
Flyv tilbage til Camp Winterhoof.
1. Rid tilbage til Frozen Glade og indlever [71] Keeper Witherleaf.
==Bemærk== Det er din sidste chance for at klare [71] Hasty Preparations.
2. Rid øst til (72,25). Dér bør du finde Binder Murdis.
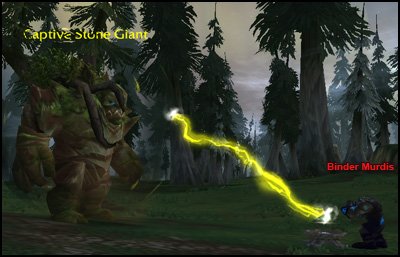
Dræb ham.
Gå en smule nordvest og du skulle finde en Stone Giant (71,23). Den ligner fuldstændig en Runed Stone Giant, bortset fra den ikke er agressiv.
Nu skal vi til at solo [71] Demolishing Megalith, en 3-spiller quest. For at gøre det, skal vi bruge den Stone Giant som vores pet. Læs slutningen af dette step OG step 3. for at finde ud af hvordan:
 På grund af den Rune of Command vi har fra den anden quest, kan vi lave denne Stone GIant til vores pet i 5 minutter.
3. Efter det, mount op, rid nord imod bakkerne med sne, mens du undgår at få nogen mobss efter dig. Gå hele vejen op, og ved (70,12) skulle du kunne se en sti gå nordvest (som vist på kortet). Rid af denne sti, og du skulle finde Megalith.
Lad så Megalith slå dig en gang og lad din Stone Giant tanke for dig. Giv ham tid til at få noget aggro, vent til Megalith er nede på cirka 60% liv, før du begynder at angribe. Med hjælp fra dit pet, skulle enhver class kunne solo Megalith.
==Bemærk== Hvis du ikke klarer det, kan du få en ny Stone Giant som pet og prøve igen, hvert femte minut.
Held og lykke.
4. Gå derefter vest gennem bjergene, mens du er så tæt som muligt på den nordlige side af bjerget. Hvis du gør det rigtigt, bør du ende oppe på en frossen sti ved (60,8 ).
Gå op af den frosne sti op af bjerget. Følg denne sti hele vejen op til toppen (jeg advarer dig, der er langt). Der vil du finde Frostblade Shrine.
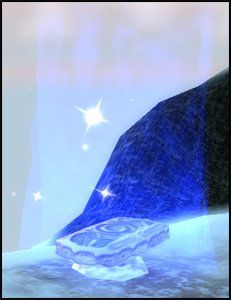
Højre-klik det, og nedlæg Your Inner Turmoil.
Mount op. Du har et 3 minutters levitationsbuff nu, så sigt efter Camp Winterhoof (Hold din mus på højre-klik, tryk “M” for at åbne kortet, og bare sigt efter Camp Winterhoof på kortet ved at flytte din mus). Så snart du peger imod Camp Winterhoof, så bare “flyv” dertil.
I Camp Winterhoof, indlever:
- [71] Demolishing Megalith
- [71] The Rune of Command
- [71] Hasty Preparations
Flyv til Apothecary Camp.
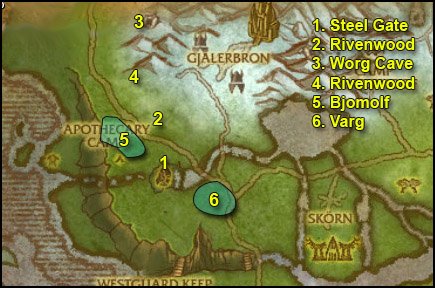
1. Rid til Steel Gate, indlever [71] The Cleansing, få [71] In Worg’s Clothing.
2. Rid nord/nordvest indtil du rammer Rivenwood (30,21). Mens du går gennem Rivenwood, kig efter Riven Widow Cocoons og ødelæg dem, det vil nogen gange befrie en Winterhoof Longrunner. Du skal dog ikke fuldføre questen nu, vi vil gå gennem denne skov flere gange.
Bliv ved med at gå nord mens du gør dette, indtil du kommer ud af skoven.
3. Når du er ude af skoven, mount op og rid nord til en grotte ved (30,6).
 Højre-klik på Worg Disguise i dine tasker.
Gå ind i grotten og indlever [71] In Worg’s Clothing, få [71] Brother Betrayers.
4. Gå ud af grotten, mount op og rid tilbage til Rivenwood. Åbn “cocoons” på din vej, gå sydøst indtil du rammer vejen.
5. Gå til skoven på den anden side af vejen, sydvest (27,21). Tryk på Worg Disguise og kig efter Bjomolf. Han er nem at finde, han er den enste agressive ulv her mens du har forklædningen på. Han er også større og har en anden farve. Dræb ham.
6. Rid øst indtil du rammer vejen, følg vejen sydpå og kryds floden, og du vil være i en skov (34,29). Tryk på Worg Disguise igen, og find Varg, dræb ham.
1. Gå tilbage til Rivenwood, åbn “cocoons” indtil du klarer [72] Rivenwood Captives.
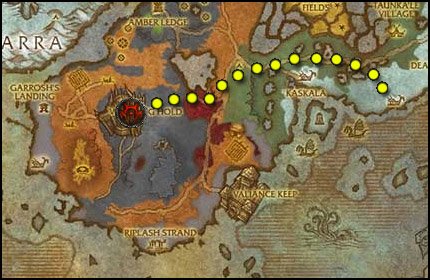
2. Gå nord indtil du kommer ud af skoven, gå til Gjalerbron (35,15). Dræb alle Vrykuls du ser på din vej, og loot deres nøgler. Åbn bure med de nøgler.

Hvis du er heldig, finder du måske en Large Gjalerbron Cage Key, som du kan bruge på Large Gjalerbron Cage ved (36,12). Du kan befrie op til 5 fanger på samme tid med det bur.
==Advarsel== En Sepulchral Overseer går rundt i dette område, undgå ham. Den er immun til stuns og slow og skader meget.
Bliv her indtil du klarer begge quests og finder Gjalerbron Attack Plans.
 Højre-klik på den for at starte questen [72] Gjalerbron Attack Plans.
3. Rid nordvest og så nord til grotten ved (30,6). Tag ulvekostumet på, gå ind i grotten, indlever [71] Brother Betrayers, få [71] Eyes of the Eagle.
4. Rid sydvest til (26,20), hvor du skulle kunne se en smal sti, der går ned imod kysten. Gå ned.
5. ==Bemærk== Dræb alle de murlocs/necrotechs/shades på din vej indtil en af dem dropper en Scourge Device.
 Højre-klik på den for at få questen [71] It’s a Scourge Device.
Gå vest/sydvest imod øen ved (20,22). Der skulle du finde Old Icefin. Få hans quest [71] Trident of the Son.
6. Gå tilbage til den smalle sti, gå op på toppen af klippen og rid syd til Apothecary Camp. Indlever [71] It’s a Scourge Device, få [71] Bring Down Those Shields.
Flyv til Camp Winterhoof.
Indlever:
- [72] Gjalerbron Attack Plans, få [72] The Frost Wyrm and its Master
- [71] Of Keys and Cage, få [71] The Walking Dead
- [71] Dealing With Gjalerbron, få [71] Necro Overlord Mezhen
Tag også [71] Sleeping Giants fra Ahota Whitefrost.
Sælg skrammel, reparer og køb nyt mad/drikke.
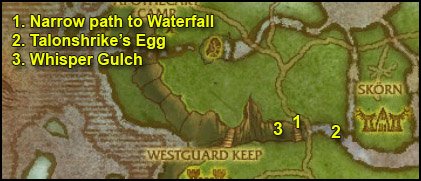
1. Rid sydvest til broen vest for Skorn (39,36). Der skulle du kunne se en smal sti, der går ned imod vandfaldet øst for broen.
2. Gå ned af denne sti og rid til vandfaldet, så skulle du finde Talonshrike’s Egg ved (41,38 ).
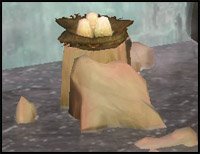
Højre-klik på ægget, og Talonshrike vil flyve ned og angribe dig. Dræb ham og loot Eyes of the Eagle.
3. Mount op, Gå tilbage, op af den smalle sti vi tog for at komme herned, bliv ved med at ride vest og du skulle kunne se en anden smal sti på den anden side af broen, som vil tage dig til Whisper Gulch (38,36)
I Whisper Gulch, er der to ting vi skal gøre:
- Find Dwarven Kegs og loot dem.
 Dræb Deranged Explorers, loot dem, tryk på deres lig og brug Grick’s Bonesaw på dem.
Gå rundt i Whisper Gulch indtil du klarer [71] What’s in That Brew? og [71] Brains! Brains! Brains!.
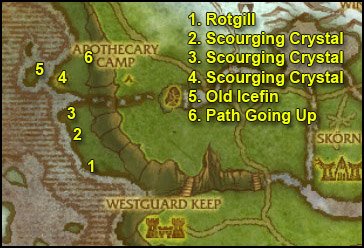
1. Hop ned i vandet, og svøm vest indtil du kan komme tilbage på land. Rid så nordvest indtil skibsvraget ved (23,35). Gå så nord langs kysten og kig efter Rotgill. Han går frem og tilbage mellem skibsvraget og murloccampen, der ligger nord ved (22,32).
Dræb Rotgill og loot Rotgill’s Trident.
2. Følg kysten nordpå og du burde finde en camp med en Scourging Crystal ved (23,32).
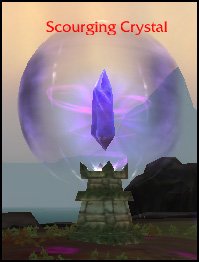
Cleary the way to the Scouring Crystal.
Get close to it and use the Scourging Crystal Controller.
This will destroy the shield protecting the crystal, destroy it.
==Note== Pet classes, make sure you destroy the crystal yourself. If your pet does it, you won’t get the credit.
3. Go northwest to the next Scourging Crystal (22,29), destroy it.
4. Further northwest across the water you’ll find another Scourging Crystal (21,24), destroy it.
5. Go west/northwest to Old Icefin, turn in [71] Trident of the Son.
Go back on the coast and kill stuff until you finish [71] And You Thought Murlocs Smelled Bad!.
6. Go east to the narrow path taking you up the bluffs (24,22).
Ride back to Apothecary Camp.
Turn in:
- [71] Brains! Brains! Brains!
- [71] And You Thought Murlocs Smelled Bad!
- [71] Bring Down Those Shields
- [71] What’s in That Brew?
1. Ride northeast to the cave at (30,6). Put on the Worg Disguise, go inside the cave, turn in [71] Eyes of the Eagle, get [71] Alpha Worg.
2. Go southwest and look for Garwal while being in the Worg Disguise. He patrols between (27,8 ) and (26,12) and (28,17). As shown on the map.
Kill him.
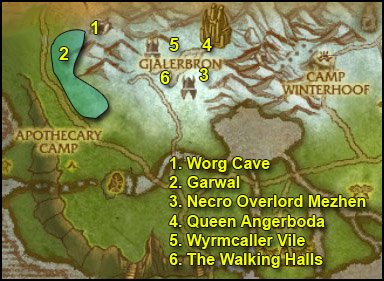
3. Go to Gjalerbron. Go up to the higher plateau and go northeast until you reach another higher plateau. Take a right turn and go up the slope, you’ll end up on the rear right platform (38,12).
==Note== Kill Deathless Watchers and Putrid Wights on sight from now on.
Kill the 5 Necrolords guarding Necro Overlord Mezhen, they can be pulled solo. Then kill Necro Overlord Mezhen and loot Mezhen’s Writings.
 Right-click them to start the quest [72] The Slumbering King.
4. Go to the big gate north of here. Enter the building and you should see a bunch of Necrolords trying to awake King Ymiron. Don’t worry, they can’t attack you. Clear the way around that platform and access it from the backdoor. There you should see Queen Angerboda. Kill her. You’ll see a little script involving Arthas.
5. Get out of this building and go west to the rear-west platform (37,8.).
==Warning== We’re about to attempt to solo an elite frost wyrm. It should be doable for every class with normal gear, provided you use everything you got.
Clear the platform and kill Wyrmcaller Vile last, loot the Wyrmcaller’s Horn.
 Right-click it and eat/drink quickly while the frost wyrm flies to you.
Glacion is immune to all forms of CC, you can’t even interrupt his spells. He hits for about 1000 on cloth and sometimes casts a frost breath which does about 800 damage. If you use all your cooldowns and a pot you should be fine. It might not even been needed depending on your class/gear.
If you can’t solo this one, try to find a friend. If all fails, just abandon the quest and come back to do it later or at level 80. It has no follow up, so no big deal.
In any case, before you go to the next step, you must have killed 10 Deathless Watchers and 2 Putrid Wights. You know where to find them, on the side platforms. There are two other side platforms southwest of the two we just visited, should you run short on Deathless Watchers.
6. Go back to the entrance of Gjalerbron. This time go inside the building right at the entrance. This will take you down to The Walking Halls (35,13).
Go down, turn either left or right. You should have several Awakening Rods already, at least 5. If you have less than 5, you’ll have to kill a few more Necrolords, and there are plenty in these halls.
 Use the Awakening Rod on a Dormant Vrykul.
Once you’ve awakened 5 Dormant Vrykuls and slain 4 Fearsome Horrors, get out of Gjalerbron.
1. Ride to Steel Gate (31,24). Turn in:
- [71] Alpha Worg
- [72] Rivenwood Captives
You should be level 71 by now.
Level 71
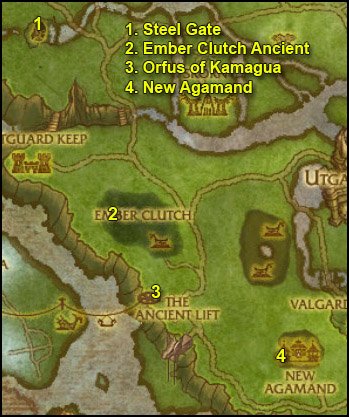
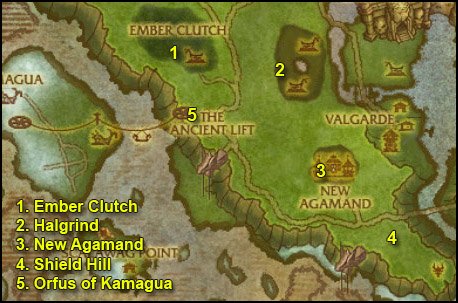
2. Ride south/southeast to the Ember Clutch (37,47). Find the Ember Clutch Ancient. It’s a big treant who patrols this area, he’s easy to find if you look for the yellow “!” on your minimap. Get his quest [71] Root Causes.
3. Ride further south/southeast to The Ancient Lift (40,60). Get [71] The Dead Rise! from Orfus of Kamagua.
4. Ride southeast to New Agamand (52,67).
Get the new flight path.
Turn in [71] New Agamand and get all the available quests from here:
- [71] A Tailor-Made Formula
- [72] Give it a Name
- [71] Shield Hill
- [71] Green Eggs and Whelps
Turn in [72] Give it a Name, do NOT get the follow up.
Sell junk, repair, re-stock food/drink.
1. Go west to Thorvald’s Camp (47,68 ). Kill Thorvald, loot the Dragonflayer Patriarch’s Blood.
Go back to New Agamand, turn in [71] A Tailor-Made Formula, get [71] Apply Heat and Stir.
 Right-click the Empty Apothecary Flask from your inventory while standing close to the Cauldron right next to the quest giver.
 Right-click the Flask of Vrykul Blood while standing close to the table on the other side of the quest giver.
Repeat these two steps until you obtain a Balanced Concoction.
Turn in [71] Apply Heat and Stir, get [71] Field Test.
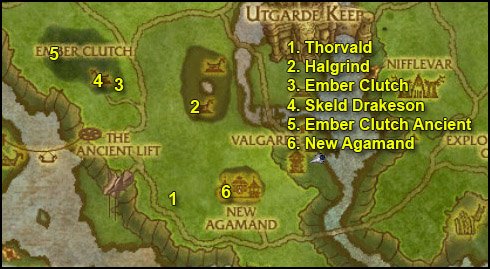
2. Get out of New Agamand and ride north to Halgrind (51,58 ).
 Use the Plague Spray on 10 Vrykuls.
3. Ride west/northwest to Ember Clutch (42,55).
Look for Proto-Drake Eggs while in the area.

 Target the egg, right-click Tillinghast’s Plague Canister.
This will spawn a Plagued Proto-Whelp, kill it and loot a Plagued Proto-Whelp Specimen. Repeat this step 10 times while doing the next steps.
4. In this area you should see a couple of buildings. Inside the southern one you’ll find Skeld Drakeson (42,53). Kill him.
Also kill 5 Dragonflayer Handlers.
5. Find the Ember Clutch Ancient (easy to spot with the minimap), turn in [71] Root Causes.
Now finish [71] Green Eggs and Whelps.
6. Go back to New Agamand. Turn in:
- [71] Green Eggs and Whelps, get [71] Draconis Gastritis
- [71] Field Test, get [71] Time for Cleanup
- [71] Time for Cleanup, get [71] Parts for the Job
==Note== From now on, kill every kind of Shoveltusk you see on your way, until you’ve looted 6 Shoveltusk Ligament.
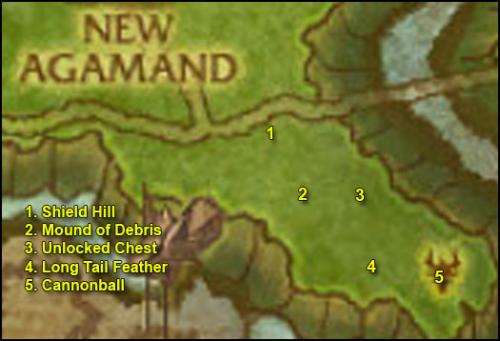
1. Ride southeast to Shield Hill (57,74). Kill every Risen Vrykul Ancestor on your way while going through the next step, until you’ve looted 5 Ancient Vrykul Bones.
2. First go southeast and look for a Mound of Debris inside a small pit at (58,77).
Right-click it and loot Fengir’s Clue.
3. Go about 100 yard east to another pit, look for an Unlocked Chest (60, 77).
Right-click it and loot Rodin’s Clue.
4. Go another 100 yard south/southeast to another pit. Look for a Long Tail Feather (60,80).
Right-click it and loot Isuldof’s Clue.
5. Go about 150 yards east to a last pit, look for a Cannonball (62,80).
Right-click it and loot Windan’s Clue.
Finish [71] Shield Hill before you get out of here.
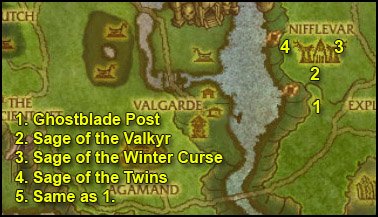
1. Cross the bridge east and then ride northeast to Ghostblade Post (67,61). Get the two quests:
- [71] Against Nifflevar
- [71] The Enemy’s Legacy
2. Go north to Nifflevar, kill everything on your way while following the next steps, until you complete [71] Against Nifflevar.
Go to the first building you encounter at (67,57). Inside you should find a scroll on the floor.
Right-click it and loot the Sage of the Valkyr.
3. Go north/northeast to the small building east of the bonfire (69,53). There you’ll find another scroll. Loot the Saga of the Winter Curse.
4. Go to the longhouse west of the bonfire (65,54). You’ll find the last scroll there. Loot the Sage of the Twins.
Finish killing what you need for [71] Against Nifflevar.
5. Go back to Ghostblade Post, turn in:
- [71] Against Nifflevar
- [71] The Enemy’s Legacy
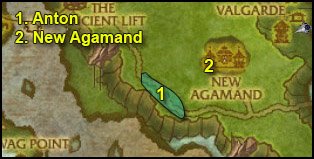
1. Go back across the bridge and follow the road west until you find Anton (47,70). Buy a Fresh Pound of Flesh from him.
By now you should have looted 6 Shoveltusk Ligaments, if you haven’t, go kill Shoveltusks until it’s done.
2. Go back to New Agamand. Turn in:
- [71] Shield Hill
- [71] Parts for the Job, get [71] Warning: Some Assembly Required
Go to the flightmaster and dismount.
Get the quest [72] To Venomspite!
This will fly you to Venomspite.
Get the new flight path.
In Venomspite, turn in [72] To Venomspite! and get [72] The Forsaken Blight and You: How Not to Die.
Also get [72] Funding the War Effort from Quartermaster Bartlett on your way out.
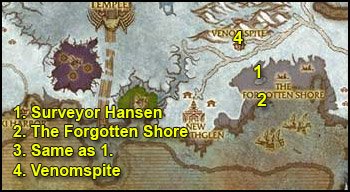
1. Go southeast to Surveyor Hansen (79,65). Get [72] Beachfront Property.
2. Go south to the Forgotten Shore (80,72). Kill ghosts in this area and also look for Forgotten Treasures.
Stay in this are until you finish:
- [72] Beachfront Property
- [72] The Forsaken Blight and You: How Not to Die
- [72] Funding the War Effort
3. Ride back to Surveyor Hansen, turn in [72] Beachfront Property.
4. Ride to Venomspite, turn in:
- [72] Funding the War Effort
- [72] The Forsaken Blight and You: How Not to Die, get [72] Emerald Dragon Tears.
We won’t do [72] Emerald Dragon Tears in this chapter, but keep the quest. It will be used in my Dragonblight Guide.
1. Fly to Camp Winterhoof, turn in:
- [72] The Frost Wyrm and its Master (if you did it)
- [71] Sleeping Giants
- [71] The Walking Dead
- [71] Necro Overlord Mezhen
- [72] The Slumbering King
2. Fly to New Agamand.
Sell junk, repair and re-stock food/drink.
3. Ride northwest to The Ancient Lift, turn in [71] The Dead Rise! and get [71] Elder Atuik and Kamagua.
Take the ancient lift (just stand on the Drakkar). This will take you to the Isle of Spears.
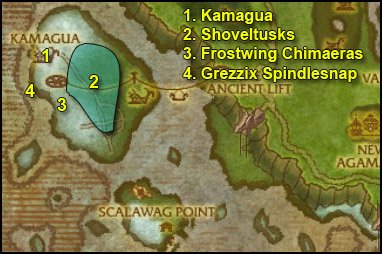
1. Ride north to Kamagua (25,58 ).
Get the new flight path.
Turn in [71] Elder Atuik and Kamagua, get [71] Grezzix Spindlesnap.
Also get the other quest [71] Feeding the Survivors.
2. Go southeast to the colored area. There you’ll find Island Shoveltusks and Spearfang Worgs. You have to kill both, because if you don’t kill the worgs, they’ll killsteal the Shoveltusks from you. You can find Shoveltusks anywhere on the grass area of this isle, as colored on the map. You can also try to find the Shoveltuk Herd, they walk up and down the snow line:
Kill stuff in this area until you have 6 Island Shoveltusk Meat.
Go back to Kamagua, turn in [71] Feeding the Survivors, get [71] Arming Kamagua.
3. Go to the snow hills south of the village (27,65). Kill Frostwing Chimaeras until you get 3 Chimaera Horns.
==Note== If this spot is crowded, there’s another spot with Chimaeras northeast of Kamagua at (27,55).
Go back to Kamagua, turn in [71] Arming Kamagua, get [71] Avenge Iskaal.
4. Swim southwest to a small boat with Grezzix Spindlesnap (23,63). Turn in [71] Grezzix Spindlesnap, get [71] Street “Cred”.
Talk to Lou the Cabin Boy and click on the text. He will ferry you to Scalawag isle.
Once you’re there, go north and find “Silvermoon” Harry under a tent, turn in [71] Street “Cred”, get the follow up [71] “Scoodles”.
Get [71] Forgotten Treasure from Handsome Terry.
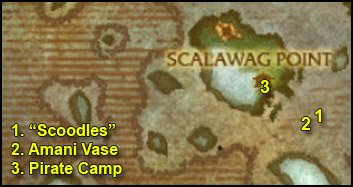
1. Swim southeast to (38,84). There you’ll find a big orca named “Scoodles”.
Kill it and loot the Sin’dorei Scrying Crystal.
 Right-click the Fish Bladder in your inventory.
This will make you breathe underwater, it has 3 charges too, so you can re-use it if needed.
Now dive down and you should see 3 Wrecked Ships under you, go to the middle one (the only one who still got a mast). Go inside the ship and loot the Eagle Figurine (38,85):
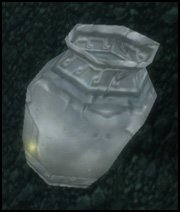
2. Swim to the other wrecked ship southwest of this one, go inside and loot the Amani Vase (37,85):
3. Go back to the pirate camp. Turn in:
- [71] Forgotten Treasure, get [71] The Fragrance of Money
- [71] “Scoodles”, get the 4 follow ups:
- [71] The Ancient Armor of the Kvaldir
- [71] The Frozen Heart of Isuldof
- [71] The Lost Shield of the Aesirites
- [71] The Staff of Storm’s Fury
Get the quest [71] Gambling Debt from Taruk.
Go back to “Silvermoon” Harry. Talk to him, click on the text, beat him. After he gives up, talk to him again, click the text.
Go back to Taruk, turn in [71] Gambling Debt, get [71] Jack Likes His Drink.
Go inside the wooden building, talk to Olga, the Scalawag Wench. Click on the text and give her 1 Gold. Watch her drunk Jack Adams, once he passes out, right-click him and click on the text.
Go back to Taruk, turn in [71] Jack Likes His Drink, get [71] Dead Man’s Debt.
Go a little east and get [71] Swabbin’ Soap from Scuttle Frostprow (38,80)
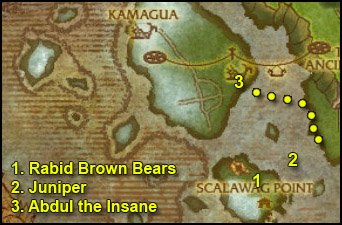
1. Follow the little path north, it will take you to a plateau with lots of Rabid Brown Bears (34,78 ). Kill them all until you have 4 Bear Musk (Drop rate is ~40%)
2. Swim northeast to a little isle with a ghost called Juniper on it (38,75). Wait for the boat there and get on it when it comes.
On the boat, turn in [71] The Lost Shield of the Aesirites, get [71] Mutiny on the Mercy.
Go down in the Ship’s Hold, kill 5 Mutinous Sea Dog and loot 5 Barrel of Blasting Powder off them.
Go back to Captain Ellis, turn in [71] Mutiny on the Mercy, get [71] Sorlof’s Booty.
Go to the other side of the ship where you should see The Big Gun.
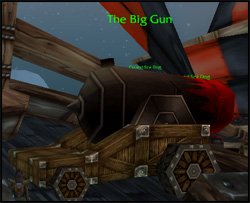
Wait for the ship to engage Sorlof and when it does, right-click The Big Gun repeatedly until Sorlof dies. Jump off the ship and loot Sorlof’s Booty.
3. Swim north/northwest towards the ship docked on the southeastern side of the Isle of Spears (35,65).
==WARNING== Before you get close to the ship, read the next paragraph.
There’s a tough elite called Abdul the Insane on the ship, he’s immune to cc. You just have to avoid him, wait for him to go to the top deck and go down in the ship’s hold, where you’ll find The Staff of Storm’s Fury.
Loot it.
Get out of the ship, run away from Abdul if he jumps you.
 Right-click the Horn of Kamagua. This will summon a tuskarr to help you kill those pirates.
Kill 8 Crazed Northsea Slaver.
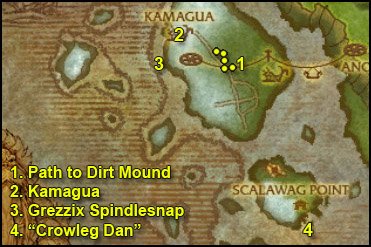
1. Go northwest and find the way up a plateau at (29,61), then cross the bridge east to the next plateau. On that plateau you should find a Dirt Mound.
Get full HP/mana before you right-click it, cause you’ll get attacked by 3 ghost pirates when you do.
When ready, righ-click the Dirt Mound, kill Black Conrad’s Ghost and loot Black Conrad’s Treasure.
2. Ride back to Kamagua, turn in [71] Avenge Iskaal.
A new quest should be up in the village, get [72] Travel to Moa’ki Harbor.
Sell junk, repair, re-stock food/drink.
3. Go southwest to Grezzix Spindlesnap (23,63) and once again talk to Lou the Cabin Boy and click on the text.
Back at Scalawag Point, turn in:
- [71] A Dead Man’s Debt
- [71] The Fragrance of Money, get [71] A Traitor Among Us
- [71] A Traitor Among Us at Zeh’gehn, get [71] Zeh’gehn Sez
- [71] Zeh’gehn Sez at Handsome Terry, get [71] A Carver and a Croaker
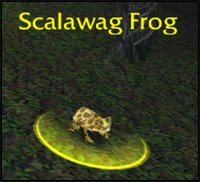
Look around for a Scalawag Frog and right-click it.
Go to “Silvermoon” Harry and buy a Shiny Knife.
Turn in [71] A Carver and a Croaker, get the follow up [71] “Crowleg” Dan
4. Go to the docked ship just south of here, you’ll find “Crowleg” Dan on the top deck (36,83). Talk to him and kill him.
Go back to Handsome Terry and turn in [71] “Crowleg” Dan, get [71] Meet Number Two.
Go to the top of the wooden building, turn in [71] Meet Number Two, get [71] The Jig is Up.
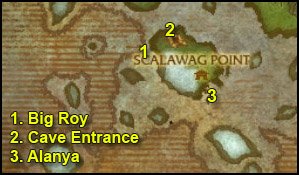
1. Follow the path north and then west to the other side of the isle. There in the water you should see Big Roy. Kill it and loot Big Roy’s Blubber.
2. Go northeast and you should find a cave entrance (33,75).
[71] The Jig is Up, one of the two quests we’ll do in this cave, can be easily soloed by classes who can kite or fear (like mages, warlock, hunter, maybe shadowpriests). It can also be soloed by melee classes with cooldowns/pots, depending on your gear and talent spec. It requires you to beat “Mad” Jonah Sterling down to 30% and then to kill Hozzer, a huge bear. They are both elite and hit kinda hard, but they can be slowed, stunned, feared. If you can’t solo it, try to find help. The rewards for this quest are:
Sailor’s Knotted Charm
First Mate’s Pocket Watch
Strike of the Seas
Don’t forget to loot Jonah Sterling’s Spyglass from Hozzer after you kill it.
If you can’t find help for this quest, just save it for later or abandon it, as you prefer. There’s no follow up.
We still have another quest to do in this cave, and it’s doable even if you can’t kill “Mad” Jonah Sterling.
Inside the cave, you just have to hug the left wall and you can go past “Mad” Jonah without aggroing him, don’t worry about Hozzer either, he’s sleeping, you can run past him and go to the end of the cave, where you’ll find The Frozen Heart of Isuldof.
Loot it and get out of the cave.
Ride back to Scalawag Point. Turn in [71] The Jig is Up if you did it.
3. Go south to Alanya (36,82). She stands on the docks next to the flying machine. Talk to her and click on the text.
This will fly you to a small isle with a ghost ship. Go down in the ship’s hold and loot The Ancient Armor of the Kvaldir.
Once you got it, go back to the flying machine fly back to Scalawag Point.
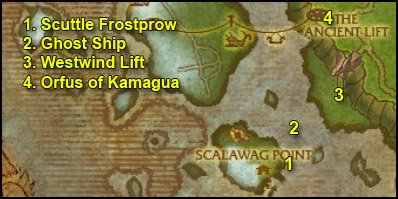
1. Go east to Scuttle Frostprow, turn in [71] Swabbin’ Soap.
2. Go northeast, swim to the small isle and wait for the ghost ship to come. Then turn in [71] Sorlof’s Booty, get the follow up [71] The Shield of the Aesirites and get off the ship.
3. Swim northeast to Sorlof’s Strand, mount up and ride further northeast to the Westwind Lift (42,68 ). Take the lift.
4. Once up top, ride northwest to the Ancient Lift (40,60). Turn in the 4 quests:
- [71] The Ancient Armor of the Kvaldir
- [71] The Frozen Heart of Isuldof
- [71] The Lost Shield of the Aesirites
- [71] The Staff of Storm’s Fury
Get the follow up [71] A Return to Resting
1. Ride north to Ember Clutch.
 Right-click Tillinghast’s Plagued Meat.
A Proto-Drake will fly down and eat it and you should get a quest complete message shortly after.
2. Go east to Halgrind.
 Right-click the Abomination Assembly Kit.
You’ll take control of an abomination. Use it to gather a bunch of Vrykuls (use Ability #2 everytime it’s up to ensure that they keep chasing you). Once you have a decent bunch (at least 5+), use Ability #1 to exterminate them.
Re-summon your abomination and repeat until you have exterminated 20 Plagued Vrykul.
3. Go south to New Agamand. Turn in:
- [71] Draconis Gastritis
- [71] Warning: Some Assembly Required
4. Go southeast to Shield Hill (58,77).
Visit the four ghosts we visited earlier . Besides this time, you have to stand next to their skeleton.
 And right-click the Bundle of Vrykul Artifacts.
Do this on at the 4 skeletons to complete [71] A Return to Resting.
5. When done, go back to The Ancient Lift, turn in [71] A Return to Resting, get [71] Return to Atuik.
Take lift down and ride to Kamagua, turn in [71] Return to Atuik.
A daily quest should be available now, we won’t do it in this guide because it can take a little too long to complete for what it gives. Feel free to do it if you aren’t in a hurry though: [71] The Way to His Heart…
In Kamagua, go to the docks and board the turtle for Moa’ki Harbor.
In Moa’ki Harbor, turn in [72] Travel to Moa’ki Harbor.
Get the new flight path.
Take a turtle ride to Unu’pe, Borean Tundra.
Get the new flight path in Unu’pe.
Mount up ride to Warsong Hold.
We’re done with this chapter. Don’t worry if you are not level 72 yet, you are not quite supposed to be there if you followed my guide without any rested bonus and without doing instances. It’s totally normal, just keep on following my guide.
Time to explore the Borean Tundra, go to the next chapter!
I hope you enjoyed this guide. If you want to return the favor, please try to contribute.
-Jame
© 2008 Copyrights www.wow-pro.com All Rights Reserved