Journey from Searing Gorge to Eastern Plaguelands
Introduction
This guide starts at level 51. However I hope that you followed the Previous Chapters of this guide as well. Because a lot of pre-questing and flight path gathering is done in it and we will need it for this chapter. If you didn’t, it’s not that bad, you’ll just have some more grinding to do to catch up.
This guide is optimized for FAST leveling with a minimum of grinding sessions. Quests are important, they give rewards and faction and are less boring than pure grinding, BUT sometimes some quests are really a time waste and we will be skipping those and replacing them by good grinding spots when it is necessary. Some people say that grinding is always faster than questing, this is true in theory when you don’t know which quests to take and which to avoid, and what is the best order to do them. With this guide, questing will be very efficient and much better than pure grinding. Follow each instruction carefully and you will see for yourself. The quest choices and order to do them are optimal so that you run as few as possible while doing the most possible and then turning several quests at the same time. This guide will be very useful for both veteran and novice players. I try to keep the amount of information as short as possible. So even the guide itself is optimized for the minimum reading possible, to save time! Let’s get started immediately then! Everything described in this guide can be done solo (besides when I say otherwise). You can of course follow this guide while duoing, grouping, it’s not a problem, it works too.
Basic rules
- Spend your talent points so you do the most damage possible. (e.g: Priest should specialize in Shadow Talents, Warriors in Arms/Fury, Rogues Combat/Assassination, etc).
- Don’t waste your time trying to find groups for questing, you can solo everything that is described in this guide. Only group with someone when it’s not gonna be a waste of time (e.g: meeting the person at the other end of the map to show him the way to where your quest is, that is a waste of time)
- Try to always log out in an Inn or in one of the major cities when you take a break.
- If I don’t mention a quest, it means I consider it a waste of time, so don’t take it thinking I forgot a quest here and there, I didn’t. Also don’t abandon a quest unless I say you should.
- Sometimes I will be making lists of quest you should have before starting with an area, that doesn’t mean I will list the whole quest log, JUST the quests that interest us for the moment.
- When I say you should bind (make an Inn your home location) somewhere it’s for a good reason, and it will save you much time. Don’t change your home location until I say so.
Useful Addons
- Titan panel: It is a great addon with many useful features. But mostly because I use locations in my guide with coordinates (X,Y), and Titan Panel shows these coordinates. It also shows your average XP/Hour rate among other things.
- MozzFullWorldMap: An Addon that completes all the missing parts of your in game maps (which you didn’t explore yet).
Side Note: In case you don’t know how to install add-ons, make a folder called Interface in your World of Warcraft directory (if it doesn’t exist already). Then you open it and create a folder called Addons inside the Interface folder (if it doesn’t exist already). Now every Addon you want to install goes directly into the Addon folder. For example you download and unzip Titan Panel, you drag the folder called TITAN PANEL (not Interface or Addons) into the new Addon folder you created. You restart World of Warcraft completely and it should be working.
If it isn’t you might need to log out to your login screen and click on “Addons” in the left lower corner. Tick the box that says “Load out of date Addons”. Relaunch WoW.
Shopping List:
- Every time you pass by an auction house, try to buy the following items:
- Level 51: 15x Silk Cloth
- Level 54: Mithril Casing – Made by Engineers. Components are 3x Mithril Bars
- Level 59 (but can equip it at level 52):: Your Dungeon Set 1 Bracers – Example:
Mages should buy Magister’s Bindings.
Druids should buy Wildheart Bracers. - Level 59: 2x Thorium Bars
These might not always be up for sale, so start checking early.
The Guide:
LEVEL 51
If you followed the previous chapters, you should have the following quests:
Now let’s get started with the guide!
You have two options:
1. Get a group together and go to Maraudon, follow my Maraudon Instance Guide.
2. Proceed to the next paragraph, we will have a grinding session later on to catch up with those who went to Maraudon.
Time to explore new areas! Repair, resupply food and drink (5 stacks), check the AH. Make Orgrimmar your homepoint. Buy 15 silk cloth if you don’t have that on you already. You’ll need them for a Searing Gorge quest.
In short (if you already know the way): Go to Searing Gorge.
In detail: Take a zeppelin to Grom’gol then fly to Kargath, then go south/southwest and you will find the entrance to the Searing Gorge on the western end of the Badlands at (3,61).
Inside Searing Gorge:
Follow the trail north and then west around the area named “The Cauldron” and find Kalaran Windblade (38,39). Get the quest [48] Divine Retribution then talk to Kalaran again and go through his dialogue. Turn in the quest and get the follow up [48] The Flawless Flame.
Go a bit further west and you should find a path going up the mountain to Thorium Point (32,33).
In Thorium Point, get the flight path.
Then find a “wanted poster” at (37,26). Right click it and get the quests:
1. [48] JOB OPPORTUNITY: Culling the Competition
2. [48] STOLEN: Smithing Tuyere and Lookout’s Spyglass
3. [50] WANTED: Overseer Maltorius (Elite)
Get the 3 quests from Hansel Heavyhands:
1. [49] Incendosaurs? Whateverosaur is More like It.
2. [49] Curse These Fat Fingers
3. [49] Fiery Menace!
and [50] What the Flux? from Master Smith Burninate.
Note: If you ever need to sell and repair, you should go to this NPC.
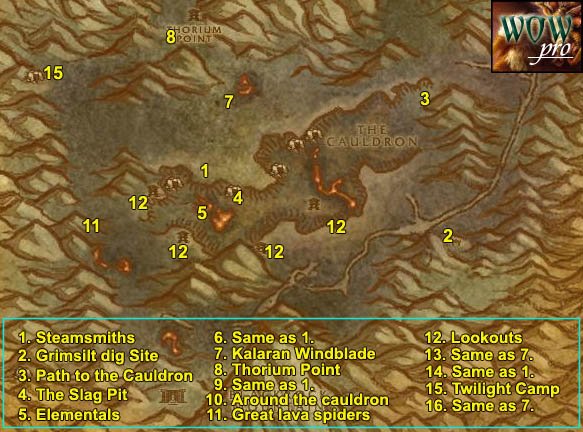
1. First, go south where you’ll find a big wheel (its part of a dark iron dwarven forge) and kill all the Dark Iron Steamsmith you find there (39,50), there should be 5 or 6 around here.
Hopefully one of them will drop the smithing tuyere you need. If not, lets just go on, we’ll come back here later.
2. Start heading east and kill any elemental or Heavy War Golem you find on the way. Also kill Dark Iron Taskmasters and Dark Iron Slavers on your way. Don’t wait for respawns, just kill them while going east. At (59,35) mount up and ride southeast to Grimesilt Dig site and find a little wooden house at (65,62) behind the dig site, which actually looks like some public toilet. Right click it and get the quest [45] Caught!.
Start killing the Dark Iron dwarves in the camp as well as the golems around here. After you have killed 8 Dark Iron Gelologists and got 15 silk cloth (if you don’t have them, kill more of those dwarves, they drop silk cloth), go back to the Wooden Outhouse and turn in the quest, don’t get the follow up though.
3. Ride north to the entrance of The Cauldron (63,38). Inside the Cauldron, kill all the Dark Iron dwarves and Elementals you find. The Blazing Elementals and the Magma Elementals drop the Hearts of Flame you need. Also kill any Heavy War Golem you find.
Note: If while killing dwarves you find a “Grimsite Outhouse Key”, right click it to start the quest [47] The Key to Freedom, we will turn it in later on.
4. Progress westwards inside the Cauldron until you find an iron slope going up at (46,53). Follow this slope until you find an entrance to the Slag Pit at (41,54).
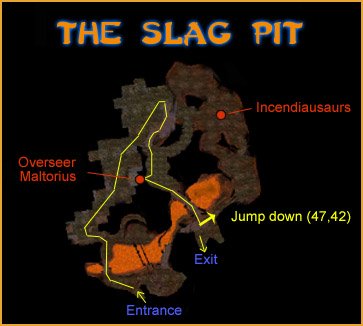
Inside the Slag Pit go across the bridge, on your left will be the Quarry Gate, go through it.
Work your way northwards until a bigger room where you’ll find Enslaved Archeologists and a big 52 Elite elite golem lying down (ignore it). Go up the iron slope, midway on the slope you have 2 options, straight or left. Go straight. You’ll soon enter a room with several pairs of taskmasters and slavers.
In this room further in and to the right you’ll find Overseer Maltorius and 2 Dark Iron Sentries. These are 3 elites so you can’t solo them. You can either try to find more people (I managed to duo it with mage + paladin) or just abandon this quest. What I usually do is grind in the Slag Pit while looking for people to kill Overseer Maltorius. However, behind these 3 elites you can find Secret Plans: Fiery Flux. And most classes can get those plans solo, with some tricks.
You need to click the plan and not be interupted for 6 seconds. So how do you do this? Well several classes can’t do it, Paladins for example. Some can, like mage:
Sheep the overseer, let the 2 sentries come to you, Iceroot them, run for the scroll and loot it fast, then jump down the ledge behind the scroll.
Or warlock, hunter: Send in the pet, quickly loot the scroll and jump down.
Or warrior: charge the Maltorius, and use intimidating shout. Loot the scroll quickly and jump down.
Engineers can probably make it too if they got a high level target dummy.
Anyway, that’s if you can’t find people to kill those 3 elites with you, so try to find people for it and in the meantime you can go on with the other quests inside the Slag Pit. Better try it with 2 other people, its a tough fight because Overseer is a mage and casts polymorph. If you got paladin or priest they can dispell it. Best is to sap/sheep Overseer and kill the 2 sentries first, then deal with the overseer alone.
From the same big room, go over the iron bridge which is on the opposite side of the 3 elites. On the other side of the bridge, jump down to the lower floor at the drop off spot indicated on the map. From this spot go east and you should find Incendosaurs, kill 20 of them.
5. When done with that, go back up the ramp and then get out of the Slag Pit, jump down back into the Cauldron and work your way westwards looking for Blaze Elementals until you get 4 Heart of Flame.
6. Then go to the iron slope you took previously at (46,53) Follow this slope but this time skip the first entrance to the Slag Pit, and get on the elevator (40,54). The elevator will stop at the 1st floor and 2nd floor but don’t get off. Wait until it’s on the 3rd floor from there you can get out of the Cauldron.
Kill every Steamsmith you find around the buildings infront and to the left of you after getting off the elevator (39,50). There is 5 Steamsmiths at this spot, pray that one of them drops a smithing Tuyere. If not don’t worry, we’ll kill more of these later.
7. Kill every Heavy War Golem around and go north to Karalan Windblade (39,38). Turn in the quest and get the follow up [48] Forging the Shaft
8. Go to Thorium Point and turn in the quests you have completed. When turning in [50] What the Flux?, Master Smith Burninate will open 3 new quests to you, but they are just to work on Thorium Brotherhood faction, so don’t bother unless you care about this faction.
9. Sell and repair, then go south to the big dwarven forge/wheel (39,50) and kill Dark Iron Steamsmiths again.
10. Then go west and then south, basically staying close to the cauldron but never going down in it. Kill every dwarf and golem on your way. Basically make circles around the cauldron.
11. Also make sure you kill any Greater Lava Spider on sight.
There is alot of them in an area west of the Cauldron (28,47).
12. While doing circles around the Cauldron, make sure you kill the Dark Iron Lookouts you can find at the feet of each of the 4 watch towers. They drop the spyglass you need for one of the quests.
13. Anyway, as soon as you got 8 Thorium Plated Daggers, go back to Kalaran Windblade, even if you didn’t finish the other quests yet.
Note: The Thorium Plated Daggers can drop on any Dark Iron Dwarf, it generally takes me a full turn around the Cauldron to get 8 of them.
Turn in the quest at Kalaran Windblade and get the follow up [50] The Flame’s Casing (Elite)
14. Go kill the 5 Dark Iron Steamsmiths again before you go, if you haven’t got the smithing tuyere yet.
15. Now you should ask use the LFG tool and see if anyone is interested in doing [50] The Flame’s Casing (Elite)
Certain classes (like hunter or warlock), can probably solo this quest, but many can’t. You can duo this quest easily though.
If you don’t find people to help you immediatly, just keep on doing circles around the Cauldron killing dwarves, giants and greater lava spiders while waiting on people to join your group.
Once you got yourself a group (or at least one level 48+ partner). Go west to the Twilight Camp at (24,34). Now all that is left for you to do is kill Twilight mobs (any of them) until you get aSymbol of Ragnaros
16. When you got this item, you can say goodbye to your group and go back to Kalaran Windblade. You can also go to Thorium Point for a quick sell/repair if necessary.
Turn in your quest at Kalaran Windblade and get the follow up [50] The Torh of Retribution. Turn it in, watch him craft the torch, then get the quest [50] The Torch of Retribution. Right click the stick surrounded by a green aura, complete the quest. Talk to Kalaran again, get the quest [50] Squire Maltrake.
Turn in the quest at Squire Maltrake and get the follow up [52] Set Them Ablaze! (Elite)
Luckily, this is one of the elite quests you can solo!
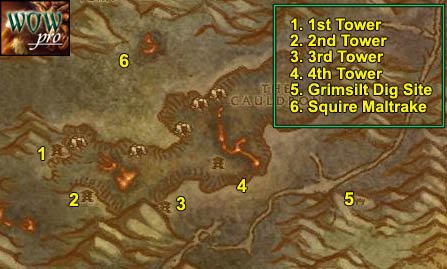
1. Go southwest to the first watch tower (33,52). Don’t forget to kill any mob you might still need on the way (golem, spider, dark iron steamsmith or lookout)
When you are at the 1st watch tower, clear any mobs guarding it (minus the elite inside of it), then search the Torch of Retribution in your inventory, equip it, and put it on a hotkey.
There is one elite Dark Iron Sentry on the tower, you don’t need to kill it, just run past it (or stealth past it if you are rogue/druid). If you can iceroot / sheep / fear it, do so, but you don’t have to. Just ignore it, quickly search for a small bowl on the floor named “Sentry Brazier” and right click it.
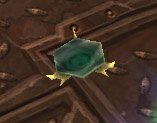
It will be instantly lit. Then jump down and run away to lose aggro on the elite.
2. Do exactly the same thing on the 2nd tower (35,59).
3. Then the 3rd tower (43,63)
4. And the 4th tower, which is accessible only through a bridge at (52,57).
Note: The 4th tower is the one with the most Dark Iron Lookouts, in case you didn’t get a Lookout’s Spyglass.
5. After you are done setting the 4th tower ablaze, go east to the Grimsite Dig Camp and go turn in [47] The Key to Freedom at the wooden outhouse.
6. Go back to Squire Maltrake (38,39), turn in the quest and watch Kalaran transform into a dragon, make his speech and then he’ll fly away. Right click the treasure chest named “Hoard of the Black Dragonflight” next to where he was, accept the quest [50] Trinkets…
Then click the chest againt and complete the quest. Look in your inventory for the red box named Hoard of the Black Dragonflight, open it and loot what’s inside of it (especially the Molt, which you will need later on for a quest)
You don’t need the Torch of Retribution anymore, you can destroy it or bank it.
Now there’s only one thing left for you to do: finish all the quests that you haven’t finished yet, and you already should know where all the mobs you need are. Once you have completed all these quests, go back to Thorium Point and turn them in.
For those who did Maraudon, this should make you ding level 52. For the others, time to grind! Go grind in the Slag Pit, on the dwarves or the Incendiosaurs, as you prefer.
LEVEL 52
Hearthstone to Orgrimmar, right after hearthstoning, get the quest [50]Assisting Arch Druid Runetotem from the innkeeper.
Go to “The Drag” and find Jes’rimon, he’s at the top floor of the alchemy building (55,34). Get his quest [52]Bone-Bladed Weapons.
Sell, repair, restock consumables, visit the class trainer.
Fly to Thunder Bluff.
In Thunder Bluff, go to the Elder Rise and talk to Hamuul Runetotem, get the follow up [50]Un’goro Soil.
Fly to Gadgetzan.
In Gadgetzan turn in [53]March of the Silithid and get the follow up [53]Bungle in the Jungle. Also get [54] Super Sticky from Tran’rek.
Your quest log should look like this at this point:
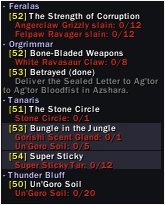
Buy 4 stacks of food/drink (if you don’t already have them ).
Ride southwest to the slope going down to Ungoro Crater (27,57).
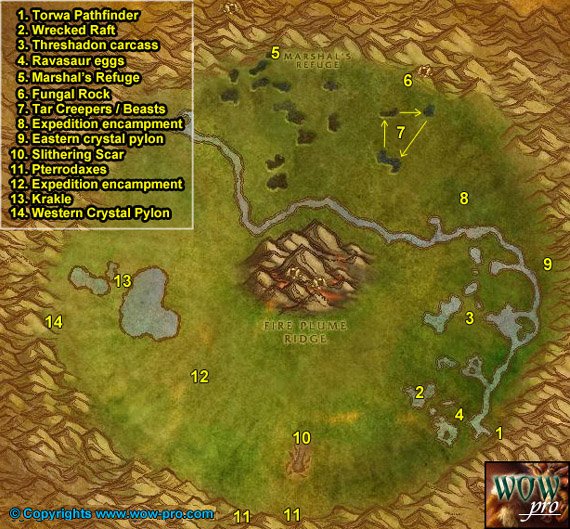
1. Go down the slope and find Torwa Pathfinder to the right up a small hill (71,75). Get the 2 quests:
1. [53] The Fare of Lar’korwi
2. [55] The Apes of Un’Goro
**From now on, while in Ungoro Crater look around for crystals. There is 4 types of crystals:
Red, Blue, Yellow and Green crystals. Loot them anytime you see them until you got 7 of each color. Also look for Ungoro Dirt Piles and loot the Un’goro soil from them. Un’goro soil also drops fairly often from most creatures in Un’goro crater, you should try to have at least about 50 Ungoro Soil before we leave Un’goro, because we will need extra soils for 2 other quests which will require you to transmuate Un’goro soils into Morrowgrain.**
**Kill every dinausaur you find on your way**
2. Go northwest until you find “A Wrecked Raft” at (63,68). Right click it and accept the quest [52] It’s a Secret to Everybody.
Take a dive right next to where the wrecked raft is and look underwater for yellow bag called “A Small Pack“. Click it, turn in and get the follow up. You should receive a small pack in your inventory but don’t open it for now, it will save you some bagspace.
3. Go northeast from here until (68,56), where you will find a big dinosaur carcass on the floor. Right click it to get the Piece of Threshadon Carcass.
The cog will be grey at most parts of the Threshadon’s Carcass. The only spot where you can get the yellow cog and loot the flesh is at the base of the neck, and only on the east side of the carcass. Once you have your “Piece of Threshadon Carcass”, go back to Torwa Pathfinder, turn in the quest and get the follow up [53] The Scent of Lar’korwi.
4. Go west back into the Marshlands until you find some purple eggs on the floor (67,73). Clear the ravasaurs around it, then step up on the egg pile, a Lar’korwi mate should appear and attack you, kill her and loot the Ravasaur Pheromone Gland (75% drop rate). Then go to the next pile of eggs north of this one (66,67), do the same thing. Go back and forth between these 2 egg piles until you got 2 Glands. Go back to Torwa Pathfinder and turn in the quest, don’t get the follow up. We’ll come back later for it.
Go back to the area with the Ravasaurs and grind there until you complete the following objectives:
- Gather 7 Power Crystals of each color
- Gather 8 White Ravasaur Claws
- Find a Mangled Journal, which is a rare drop from those Ravasaurs. Right click the journal and get the quest [50] Williden’s Journal.
5. Ride north then northwest to Marshall’s Refuge (46,13).
Get the following quests:
[52] Chasing A-Me 01
[51] Shizzle’s Flyer from Shizzle
[52] Larion and Muigin from Larion
[55] Beware of Pterrordax from the Wanted Poster next to Spraggle Frock.
[51] Roll the Bones from Spark Nilminer
Turn in [50] Williden’s Journal and get [53] Expedition Salvation from Williden Marshal and [52] Alien Ecology from Hol’Anyee Marshal.
Open the “small pack” in your inventory and loot all the items from it, then turn in [52] It’s a Secret to Everybody at Linken (he’s inside a tree trunk south of Williden Marshal), get the follow up [52] It’s a Secret to Everybody. You can destroy the throwing daggers and the faded photograph from your inventory.
Go inside the cave at Marshall’s Refuge and go to the end of it where you’ll find a little gnome named J.D. Collie.
Get her quest [53] Crystals of Power and turn it in. Then get the 3 follow up quests she gives you:
[53] The Eastern Pylon
[53] The Northern Pylon
[53] The Western Pylon
Get out of the cave and get the new flight path.
Sell, repair, buy food/drink up to 4 stacks.
Get out of Marshall’s Refuge and ride east along the wall until (54,13). At this spot go up the mountain and you should find the Northern Crystal Pylon. Click it, and examine it, you should get a “quest complete” message.
Further north of the crystal you should find some Pterrordax (3 of them normally), kill them.
**From this point on, kill the following mobs on sight:
1. Bloodpetals of any kind (those walking flowers)
2. Pterrordaxes
3. Diametradons
And also beware of the Tyrant Devilsaurs, there is a few of them roaming in Un’Goro. They are lvl 55ish elite, run fast and hit hard. So watch your back.**
6. Go east to Fungal Rock. You should find plenty of apes there outside and inside the cave.
Kill apes there until you get 2 un’goro gorilla, stomper and thunderer pelts. Inside the ape cave at the first fork go right until you find A-Me 01, turn in the quest but don’t get the follow up.
Be careful when fighting the Un’Goro Gorillas, they call for help when they get low health, and any other ape in a rather wide range will come to help. So, fight them away from other apes.
7. Go south until you find 3 black pools with Tar Creepers and Tar Beasts around them (60,26). Clear these 3 pools until you have 12 Super Sticky Tar (drop rate is about 25% per kill)
8. Go southeast until the Expedition Encampment (68,36) and loot the Crate of Foodstuffs.
9. Go southeast until you find the Eastern Crystal Pylon (76,48). Click it and examine it.
Go south to Torwa Pathfinder (71,75) and turn in [55] The Apes of Un’Goro, don’t get the follow up.
10. Go west to the Slithering Scar and clear yourself a path to the bug lair entrance at (50,76). Inside the bug lair at the first fork go left, clear the circular room and then stand in the middle of it, look in your inventory for a black vial named “Scraping Vial” and click it. If it doesn’t work try different spots in this room until you get a Hive Wall Sample.
At this point you might already have gotten a Gorishi Scent Gland. If you didn’t, keep on killing these bugs until one drops. It can drop from any of the bugs, inside or outside the lair, it doesn’t matter.
11. Go directly south of the bug lair and up the mountain (50,88). You should find 2 Pterrordax there, kill them.
A bit further to the west you should find another of those spots up the mountains with 4 or 5 Pterrordax there (44,87), kill them. Stay at this spot until you get your 10 Pterrodax kills, you can kill some bugs while waiting on respawns.
12. Then get on your mount and ride to the Expedition Camp at (38,66), try to avoid the aggros as much as possible because most mobs are too tough for you here. At the Expedition Camp, look for a pile of crates named “Research Equipment” and loot them. Then go northwest, run away from any aggro if you have to, the lake is pretty safe so I suggest you just swim through it.
13. Go northwest until you reach the big rock on the other side of the lake. Behind this rock you ‘ll find a little goblin named Krakle, get his quest quickly [55] Find the Source. (Quickly because a Devilsaur roams at this place every now and then. :P)
14. Go directly west and a bit to the south and you will find the Western Crystal Pylon (23,57). Click it and examine it.
Ride northeast back to Marshall’s Refuge and sell and repair.
If you haven’t finished [52] Muigin and Larion, go out and kill some more flowers until you complete it. Go to the area which is southeast of the black pools where we killed the Tar beasts. There are plenty there and they are the easiest flowers to kill (65,27).
Then go back to Marshall’s Refuge and turn in:
[52] Alien Ecology
[52] Muigin and Larion, Get the follow up [52] Marvon’s Workshop
[53] Expedition Salvation
[53] The Eastern Pylon
[53] The Northern Pylon
[53] The Western Pylon, get the follow up quest [53] Making Sense of it from J.D. Collie. Turn it in. You can bank the book you get as reward from this quest (it tells you how to combine crystals at the various pylons for some consumable crystals with effects like heal or damage shield, but nothing too great, so just bank the book to have more bagspace or destroy it).
Fly to Gadgetzan.
In Gadgetzan, turn in [54] Super Sticky and [53] Bungle in the Jungle, don’t get the follow up quest.
Fly to Thunderbluff, go to the Elder Rise and turn in [50]Un’goro Soil at Ghede, a tauren standing behind the big tent. Go to Arch Druid Hamuul Runetotem, he should have a new quest for you: [50]Morrowgrain Research
Go to Bashana Runetotem, she’s in the high tent next to the bridge. Turn in the quest and get the follow up [50]Morrowgrain Research.
**Search your inventory for something named “Evergreen Pouch“. From now on, click it everytime the timer is ready, it will create an “Evergreen Herb Casing“, open it and loot what’s inside. It can be various herbs but sometimes it will be Morrowgrain, and that’s what you need. You need 2 Ungoro Soil everytime you want to use the pouch, but you should still have about 20 left even after turning the quests.
You will need a total of 10 Morrowgrain. Once you got 10 Morrowgrain you can stop using the evergreen pouch. I personally sold the seeds and the un’goro soil I had left after obtaining my 10 Morrowgrain, and also destroyed the evergreen pouch, because I like having bag space :p. Don’t stand still and do nothing while waiting on the pouch timer though, go on with the next part of the guide! You can click on the evergreen pouch every now and then everytime the cooldown is refreshed, until you get 10 Morrowgrain.**
Hearthstone to Orgrimmar.
Go to “The Drag” and turn in the quest [52]Bone-Bladed Weapons.
Sell, repair, restock consumables (5 stacks food/drink).
Put the following quest items in your bank if you lack space:
Krakle’s Thermometer
Dinosaur Bones
Webbed Diemetradon Scales
Webbed Pterrordax Scales
I’ll warn you when we need to pick them up from the bank.
Fly to Splintertree Post and then follow the road northeast until Azshara.
Right after entering Azshara you’ll find Talrendis Point to the right (11,77). Stay away from the alliance npcs as much as possible and get the two quests from the tauren named Loh’atu:
[47] A Land Filled with Hatred
[47] Spiritual Unrest
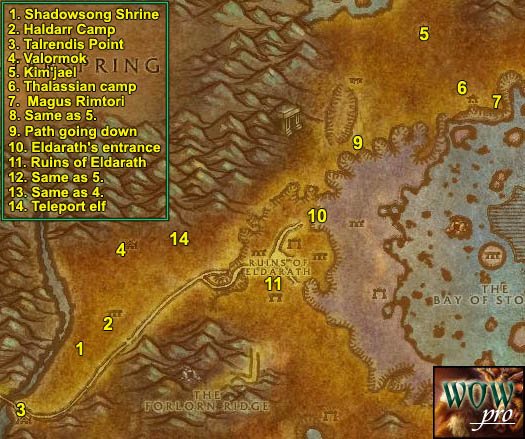
1. Go north on the other side of the road to Shadowsong Shrine (13,74). Kill 6 Highborne Apparitions and 6 Highborne Lichling. There’s more of them just a bit further to the northeast
2. When done with that, go further to the northeast until Haldarr Encampment, kill Satyrs there until you have [47] A Land Filled with Hatred complete.
3. Go back to Talrendis Point and turn in the two quests.
4. Ride north/northeast to the Valormok, the horde outpost. Turn in [53]Betrayed and get the follow up [53]Betrayed.
Also get the quest [52]Stealing Knowledge.
Get the new flight path.
5. Ride northeast, go around the ruins of Eldarath by the west side of it and keep going northeast. Avoid the Timbermaw Furlbogs, don’t kill any of them even if they attack you, just run away. Avoid the other timbermaw camp “ursolan”, go around it by the east side and keep riding northeast until you get to sharp hill at (53,21), get to the top of it, you can only access it from the north. Uptop you’ll find a goblin named Kim’jael. Get his quest [53] Kim’jael Indeed.
6. Just southeast of Kim’jael you’ll find Thalassian Base Camp (55,26).
Start killing Blood Elves, a lot of Blood Elves. This is a good grinding spot, rarely occupied. The elves have low hit points and can drop runecloth, and they respawn fast!
For those who aren’t already level 53, I suggest you grind until you are level 53 and 4 bubbles of exp in (approximately 25000 XP). Read the Next paragraph while you grind on those elves.
In the Blood Elf camp you’ll find several crates named “Kim’Jael’s Equipment” scattered around. Open them all, most of the time you’ll find food in it, but 25% of the time you’ll find Kim’Jael’s compass, scope, etc. Just keep opening crates until you have all of Kim’Jael’s items.
LEVEL 53
7. Once you have got all the Kim’Jael parts and completed the kill list of [53]Betrayed, go to the stone structure behind the elf camp, close to the sea (59,31). Click the altar there, turn in the quest and get the follow up [56]Betrayed. 3 Floating Crystals should spawn, right click one of them to destroy it, an elven defender should spawn. Move away from the stone structure and kill it. At some point Magus Rimtori should spawn inside the stone structure while you kill the defender, but since you moved away she won’t aggro you. Kill the defender, drink back to full HP/MANA and kill her and loot her head.
8. Go back to Kim’Jael, turn in the quest, get the follow up [53] Kim’Jael’s “Missing” Equipment.
9. Ride southwest and find the path going down to the Shattered Strand (45,37), it’s right next to Ursolan, southeast of it. Go down this path.
10. You’ll encounter some naga pretty soon, kill every naga on your way, go southwest, until you reach the Ruins of Eldarath by a path at (41,48).
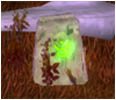
11. Once inside the Ruins of Eldarath, look for the tablets listed in [52]Stealing Knowledge. They spawn at random locations, so all you have to do is search through the entire ruins while killing everything. See this as a little grinding session. The tablets look like this:

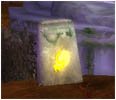
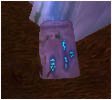
This is a good grinding spot, so stay there until you are about halfway through level 53.
Don’t forget to use the Evergreen Pouch every 10 minutes.
During your grinding session you should find “Some Rune” on one of the nagas, if you don’t you’re really unlucky, and you have to keep on grinding until it drops!
12. Find the slope taking you out of the Shattered Strand back on high ground at (46,39) and then ride northeast back to Kim’Jael, turn in the quest.
13. Ride southwest, back to Valormok Camp. Turn in [52]Stealing Knowledge, get the 4 follow up quests, which are Delivery quests. Turn in [56]Betrayed, get the follow up.
14. Ride east to find an elf with a blue question mark at (28,50). Turn in the quest Meeting with the Master and you’ll be teleported to another place. Mount up and follow the path up the mountain and then go to the top of the tower, find Archmage Xylem and turn in the quest.
[52]Delivery to Archmage Xylem, get the follow up [52]Xylem’s Payment to Jediga.
Hearthstone to Orgrimmar.
Sell, repair, restock consumables (4 stacks).
Go to “The Drag”, find Jes’rimon, that troll npc we already dealt with for an Un’goro quest. He’s on top of the alchemy building. Turn in [52]Delivery to Jes’rimon and get the follow up [52]Jes’rimon’s Payment to Jediga.
Go to Belgrom Rockmaul in the Valley of Honor, in front of the warrior’s building. Turn in [56]Betrayed.
Get out of Orgimmar, take a zeppelin to The Undercity. Go to the Apothecarium, find Andron Gant and turn in the delivery quest, get the follow up [52]Andron’s Payment to Jediga.
Also in the Apothecarium get the following quests:
[52]Seeping Corruption
[52]A Sample of Slime…
[56]…and a Batch of Ooze.
Ride out of the Undercity, take a zeppelin to Orgrimmar, fly to Thunderbluff. Go to the elder rise, find Magatha Grimtotem, turn in the quest and get the follow up [52]Magatha’s Payment to Jediga. In the tent next to Magatha turn in [50]Morrowgrain. You can destroy your Evergreen Pouch if you wish.
Fly to Valormok, Azshara. Turn in the 4 delivery quests.
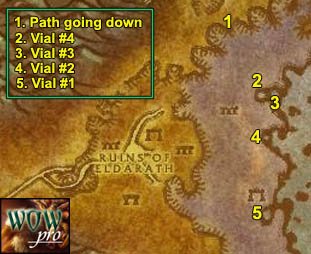
1. Ride northeast, to the same slope you used last time to go down (45,37).
2. This time keep going east until you reach the shore.
At (47,46) you should find a pool, close to the sea. Step inside the pool and right-click the “Empty Vial Labeled #4” from your inventory.
3. Just southeast of this pool, behind a white tower, you’ll find another small pool (49,48), fill up the Vial #3 there.
4. A little further south you should find another pool, very close to the sea (48,51), fill up the Vial #2 there.
5. Further south you’ll find the last pool, next to small mountain (48,60). Fill up the Vial #1 there.
At this point you should be about 25000XP away from level 54, stay on this beach and grind on Nagas until you hit level 54 and have your hearthstone ready, but rejoice, this is the last real grind session we’ll have in this guide!
LEVEL 54
Hearthstone to Orgrimmar. Put the four vials in your bank, we’ll turn in that quest later on.
Sell, repair and restock consumables (5 stacks)
Fly to Splintertree Post, Ashenvale. Follow the road to Felwood.
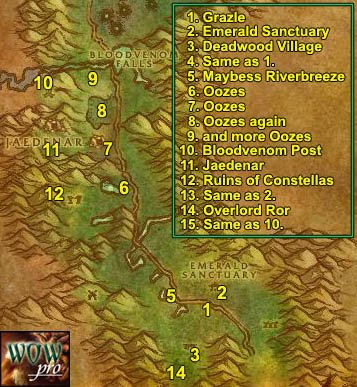
1. In Felwood follow the road until you find the Emerald Sanctuary, left of the road you’ll see a furlbog named Grazle (50,84), get the quest [48] Timbermaw Ally from him.
2. Go to the Emerald Sanctuary and get [51] Forces of Jaedenar from Greta Mosshoofand and [54] Verifying the Corruption from Taronn Redfeather.
3. Go southwest and you’ll find Deadwood Village (49,88), start slaughtering Furlbogs. Keep doing that until you complete [48] Timbermaw Ally
.
4. Go back to Grazle and turn in the quest, get the follow up [55] Speak to Nafien.
5. Get back on the road and ride west, at some point the road will turn north, look for a tauren npc named Maybess Riverbreeze next to a small green pool (47,83), get the quest [55]Cleansing Felwood from her.
6. Ride north following the road until (43,67), to the west should be a green pool, go there and kill Cursed Oozes. Kill all the oozes around that pool -there should be about 10- loot the Felwood Slime Sample off them, then get back on the road.
7. Ride north and after a while you should find another of those pools with oozes, next to Jaedenar (41,59). Kill all the oozes there, about 5 of them.
8. Just north of this pool, on the other side of the path to Jaedenar, you should find another of those pools, kill all the oozes there (40,56).
9. Ride north until you reach Bloodvenom River, you should find a lot of oozes on both sides of the river, kill them all while going west.
**You should normally have about 30 Felwood Slime Sample at this point, which is plenty to complete the quest [52]A Sample of Slime… even if you are unlucky. If you don’t have 30 samples, just kill any ooze you find on your way in Felwood.**
10. Keep going west along the river and then go south to Bloodvenom Post.
Get the quests:
[54]Well of Corruption
[56]Wild Guardians
[51]A Husband’s Last Battle
Get the new flight path, sell junk and repair.
11. Get back on the road and go south to Jaedenar (40,57), clear yourself a path westwards through Jadefire Hounds, Guardians, Adepts and Cultists until you are done with [51] Forces of Jaedenar.
12. Get back on the road, ride south and then go west to the Ruins of Constellas (38,69), clear the way west till you find a corrupted moonwell at (32,67). Step inside the moonwell and right-click the Hardened Flasket in your inventory.
13. Get back on the road, ride south to the Emerald Sanctuary (51,82). Turn in [51]The Forces of Jaedenar, get the follow up [52]Collection of the Corrupt Water.
14. Ride southwest, back to Deadwood Village, clear the way through the furlbogs and find their chief, Overlord Ror, at the southernmost camp of the furlbog village (48,94). Kill him and loot Overlord Ror’s Claw.
15. Ride back to Bloodvenom Post, turn in [54]Well of Corruption, get the follow up [54]Corrupted Sabers. Turn in [51]A Husband’s Last Battle.
Sell and repair.
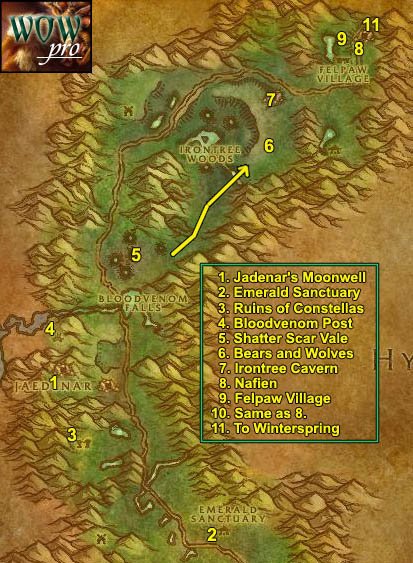
1. Ride to Jaedenar, clear the way west until you find a corrupted moonwell at (35,60), right click the Empty Canteen from your inventory.
2. Get back on the road and ride south to the Emerald Sanctuary, turn in [52]Collection of the Corrupt Water and get the follow up [52]Seeking Spiritual Aid.
3. Get back on the road and ride to the Ruins of Constellas, clear the way through the satyrs until the corrupted moonwell where we went earlier (32,67). Kill the satyrs around the well if there are any. Then step inside the well and right-click Winna ‘s Kitten Carrier from your inventory.
Clear the way out carefully, don’t die or you’ll lose your Corrupted Saber and will have to redo the quest.
4. Get back on the road and ride back to Bloodvenom Post while making sure the cat is always following you.
In Bloodvenom post go to Winna Hazzard, then righ-click the Corruptee Saber and choose to release it. Turn in the quest [54]Corrupted Sabers.
Sell and repair.
5. Get back on the road, ride north, shortly after the bridge go right into Shatter Scar Vale (39,44). Kill 2 Entropic Beasts, they are immune fire and deal fire damage. Walk around in the Shatter Scar Vale until you get the “Explore the craters” complete message. Further to the east and a bit to the north at the last crater you should find Entropic Horrors, they are just a bit higher level than the Entropic Beasts but still in your range. Kill two Entropic Horrors then get back on the road. If you don’t find Entropic Horrors, kill Entropic Beasts until Entropic Horrors respawn instead.
6. On the northeastern part of the Shatter Scar Vale you should find a narrow path going north, mount up and go through this path then go northeast until you cross a small river. On the other side of the river you should find an area with Angerclaw Grizzlies and Felpaw Ravagers(54,28). Kill as many as possible, then go further north to the Irontree Cavern and kill Warpwood Elementals while waiting for Grizzlies and Wolves to respawn, then go back and kill the remaining ones you need to complete [52]The Strength of Corruption.
7. Go to Irontree Cavern as shown on map (55,15). Kill Warpwood Elementals until you get 15 Blood Amber, they always drop.
8. Get back on the road and follow it going east and then north until the entrance of Timbermaw Hold, talk to Nafien, turn in the quest. Get the other quest [55] Deadwood of the North.
9. Turn towards the west and jump down, you should land in Felpaw Village.
Start killing Deadwood furlbogs until the kill list is complete, be careful with the Den Watchers, they call for help, fight them away from the others. Also check your reputation tab (press “U” key), you must be 150 reputation points away from “Unfriendly” before you go turn in the quest, so if you aren’t, kill some more furlbogs. If you find a Deadwood Ritual Totem, don’t click it, you can’t do the quest yet, as you need to be neutral with the timbermaw furlbogs, and since we are short on quest log space, just keep the totem in your inventory for now.
10. Go turn in the quest at Nafien, get the follow up [55] Speak to Salfa. You should now no longer be attacked on sight by the Timbermaw Furlbogs.
Note: if you get 5 deadwood headdress feathers, turn them in at nafien as well, it’s a repeatable quest for extra faction with the timbermaws. (You get +50 faction points per turn in)
**Optional: If you did Maraudon and have the quest [51]Seed Of life, inside timbermaw hold go under the bridge and to the north, keep going until you exit in Moonglade. In Moonglade go north straight to the shrine of Remulos (36,42), turn in [51] Seed of Life at Keeper Remulos. Go back to Timbermaw Hold**
11. Go inside Timbermaw Hold through the first tunnel, after the bridge keep going east. Right outside the tunnel to the right you’ll find Salfa, turn in the quest, get the other quest [58]Winterfall Activity.
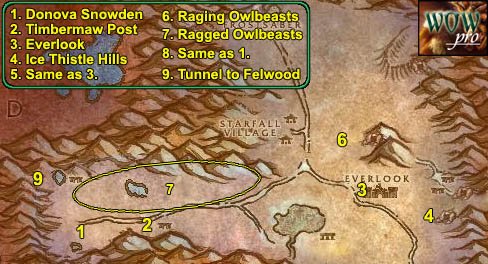
1. Ride south to Donova Snowden, turn in the quest [52] It’s a Secret to Everybody, let her do her speech, and then get the follow up [52] The Videre Elixir, get the other quest [56]Threat of the Winterfall.
**From now on kill any ragged owlbeast you see on your way, until you have killed 15.**
2. Go east to Timbermaw Post (40,44). Kill the furlbogs there until you have completed [56]Threat of the Winterfall and found an Empty Firewater Flask.
If this camp is too crowded, you can try the other one northwest of here at the Frostfire Hotsprings (31,37).
When you find the Empty Firewater Flask, right-click it to get the quest [56]Winterfall Firewater.
3. Ride east to Everlook (61,38), kill as many Ragged Owlbeast on your way as possible.
In Everlook get the quest [56]Are We There, Yeti?
Sell, repair, and restock food/drink (4 stacks)
You can put the Felwood Slime Samples in the bank, we won’t be needing them for a while.
Get the new flight path.
4. Go southeast of Everlook, to Ice Thistle Hills (65,42). Kill yetis there until you have 10 Thick Yeti Furs.
5. Go back to Everlook, turn in [56]Are We There, Yeti? Don’t get the follow up.
6. Go northwest of everlook, to the area shown on the map, you’ll find a lot of Raging Owlbeasts there. Kill everything in the area, I advise you to just kill all the aggressive creatures close to you, including bears. If you try to sneak past mobs to just kill Owlbeasts you’ll end up getting adds and things can get quite ugly in this area. Stay in this area until you have 15 Raging Owlbeasts kills.
7. Go to the area marked “7” on the map and hunt Ragged Owlbeasts until you have 15 kills.
8. Ride to Donova Snowden, turn in [56]Threat of the Winterfall and [56]Winterfall Firewater. Get the follow up [56]Falling to Corruption.
9. Ride northwest and go through the tunnel to Felwood.
In Felwood jump down to your right after you exit the tunnel.
Clear yourself a path to the camp which is on the upper level of Felpaw Village, northwest of the green pool. Clear the camp (which might be hard, so use everything you got if needed) and you should find a “Deadwood Cauldron” (60,5). Click it, turn in the quest and get the follow up [56] Mystery Goo.
Go back to Winterspring through Timbermaw Hold. Go back to Donova Snowden, turn in [56] Mystery Goo and get the follow up [56] Toxic Horrors. 3 Furlbog ambushers will spawn and attack you, run away from them.
Hearthstone to Orgrimmar.
Sell, repair, restock consumables (5 stacks of food/drink).
Get the following quest items from your bank:
Krakle’s Thermometer
Dinosaur Bones
Webbed Diemetradon Scales
Webbed Pterrordax Scales
Mithril casing (or buy it now if you don’t already have it)
Fly to Ratchet.
In Ratchet go to the small hut with the green roof, close to the sea (62,39). Turn in [52]Marvon’s Workshop.
If you plan to go to Sunken Temple later on then get the follow up [52]Zapper Fuel.
In any case get the quest [55]Volcanic Activity.
Just infront of the hut you should find Marvon’s Chest, loot the Stone Circle from it.
From Ratchet ride south along the merchant coast and go east to the Tidus Stair (65,43), right next to the ocean you should find Islen Waterseer next to a hut.
Turn in [52] Seeking Spiritual Aid, watch her summon a water elemental spirit and then take her follow up [54] Cleansed Water Returns to Felwood.
Ride back to Ratchet, fly to Shadowprey Village, Desolace.
Follow the road to Feralas.
Shortly after entering Feralas, just west of the road you should see some ruins with a gnoll – Miblon Snarltooth – infront of it (45,11). Get off your mount, and watch this video, it shows you how to get the Evoroot without buying the bait from Gregan. Thanks Laurens from Twisted Nether (EU) for the video!
Loot an Evoroot from one of the pedestals.
Go south to Gregan Brewspewer (45,25). Turn in the quest “The Videre Elixir“.
Get back on the road and ride to Camp Mojache.
In Camp Mojache turn in [52]The Strength of Corruption, then fly to Gadgetzan.
Ride directly south to Marvon Rivetseeker at the Broken Pillar (52,45), turn in [51] The Stone Circle, get his 2 follow ups if you intend to go to Sunken Temple later on.
[51] Into the Depths
[52] Secret of the Circle
This should make you hit level 55, or you should at least be very close.


