
 by rpotor
Introduction
This guide covers the worgen starter zone. As such it is of use for Alliance players only.
Please be aware that this guide is currently based on Cataclysm beta, but it should be fairly accurate when the servers come online on 07 December. As you all know, Cataclysm beta has ended, so the guide remains as-is until the launch of Cataclysm. As soon as the expansion hits the live servers I’m going to level a fresh worgen using this guide to double-check everything again.
I’m trying to explain where everything is in the guide, but most of the objective locations are quite straightforward. If you still get stuck somewhere, try using the built-in quest tracking on the world map, it’s absolutely awesome, it shows exactly where you need to go.
Thanks to Bitsem, coordinates for important locations and NPCs are now included in the guide through level 11 (more coords to come soon [TM]).
Anyway without any more wall of text, let’s go on with the actual guide. 🙂
Please post any feedback, errors, or suggestions as comments.
Color Code
- Quests
- Items
- Locations
- Quest objectives to kill
- NPCs
- Coordinates
The Guide
After creating your brand new worgen, you’ll find yourself as an ordinary human citizen in Gilneas City, currently under siege by worgen forces. Your first few levels will take place in an instanced area, similar to the Death Knight starting area.
Level 1
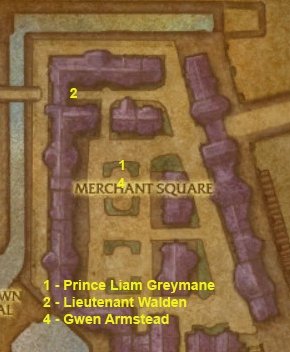
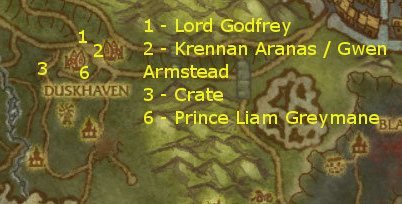
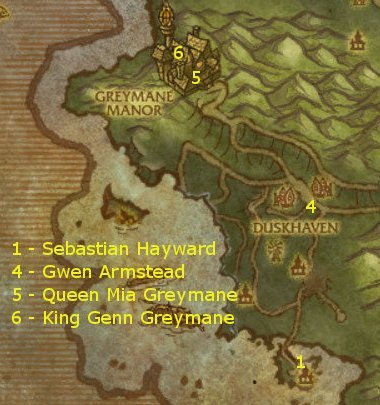
1. Get the quest [1] Lockdown! from Prince Liam Greymane (59.1,24.0)) right in front of you.
2. Go north and then west along the street to Lieutenant Walden (54.7,16.8 ) (corpse on the ground in front of a city gate) and turn in [1] Lockdown!, get [2] Something’s Amiss.
3. Go back to Prince Liam Greymane (59.7,22.1), turn in [2] Something’s Amiss, get the quests:
- [2] All Hell Breaks Loose
- [2] Evacuate the Merchant Square
4. Go a few steps south and get the quest [2] Salvage the Supplies from Gwen Armstead (59.6,27.0). It’s worth noting that there’s a mailbox in the middle of the square, so if you have a BoA item sent from a main character or an account-wide pet, this might be a perfect time to retrieve them.
5. Continue south down the street and start killing Rampaging Worgens. They are all over the place fighting with the city guards. While killing look for Supply Crates near the buildings and collect them.
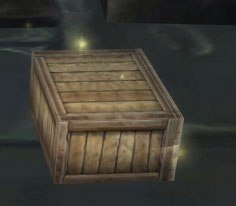
Also click on Merchant Square Doors.
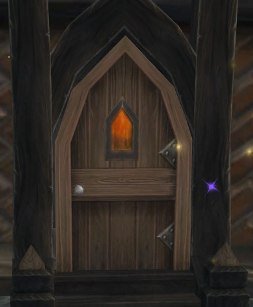
Do this until you kill 8 Rampaging Worgens, collected 4 Salvaged Supplies and opened 4 Merchant Square Doors.
Level 2
6. Go back north to Gwen Armstead (59.6,27.0), turn in [2] Salvage the Supplies.
7. Further north go back to Prince Liam Greymane (59.7,22.1), turn in [2] All Hell Breaks Loose and [2] Evacuate the Merchant Square. Get [3] Royal Orders.
Level 3
1. Go southeast across the Merchant Square, down some steps and through a bridge. Turn in [3] Royal Orders to Gwen Armstead (70.8,55.2) standing on the other side of the bridge. Accept the quest she offers you, which will guide you to your class trainer. The quest you get depends on your class:
- Warrior – [2] Your Instructor
- Rogue – [2] Someone’s Looking for You
- Warlock – [2] Shady Associates
- Hunter – [2] Someone’s Keeping Track of You (71.4,61.3)
- Mage – [2] Arcane Inquiries
- Priest – [2] Seek the Sister
- Druid – [2] The Winds Know Your Name… Apparently
2. Go south a few yards down the street, find your class trainer and turn in your quest. Get the follow up depending on your class:
- Warriors get [3] Charge from Sergeant Cleese
- Rogues get [2] Eviscerate from Loren the Fence
- Warlocks get [2] Immolate from Vitus Darkwalker
- Hunters get [2] Steady Shot from Huntsman Blake (71.4,61.3)
- Mages get [2] Arcane Missiles from Myriam Spellwaker
- Priests get [2] Flash Heal from Sister Almyra
- Druids get [2] Healing Touch from Celestine of the Harvest
3. Complete your training quest by purchasing the required ability from your quest trainer and turn the quest in to him/her.
4. Get [3] Safety in Numbers from your class trainer.
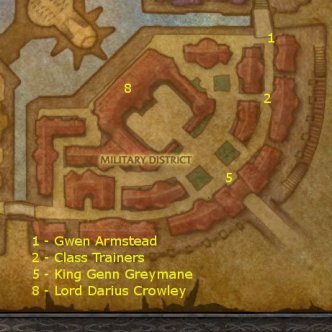
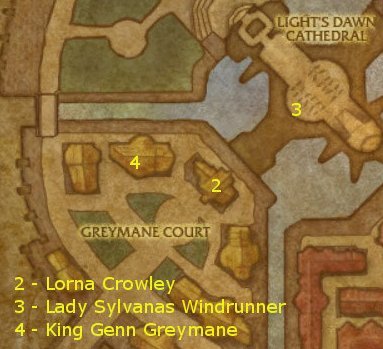
5. Continue further south on the street and turn in [3] Safety in Numbers to King Genn Greymane (65.9,77.6). Get [4] Old Divisions from him.
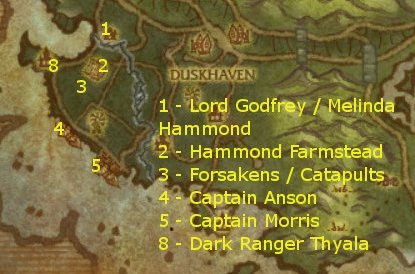
6. Get the quest [3] While You’re At It from Lord Godfrey (65.4,77.5) standing next to the king.
7. Go northwest towards the prison building (57.7,73.3) and kill 5 Bloodfang Worgens on the way.
8. Turn in [4] Old Divisions to Captain Broderick standing in front of the prison building (57.8,75.7). Get the quest [3] The Prison Rooftop from him. Go up the stairs behind Captain Broderick then continue along the walkway to the balcony.
Turn in [3] The Prison Rooftop to Lord Darius Crowley (55.2,63.2). Get the quest [4] By the Skin of His Teeth from him.
9. Worgen will attack you right after you accept the quest, keep killing them. After 2 minutes you’ll receive a message that you were successful and you can then turn in [4] By the Skin of His Teeth to Lord Darius Crowley (55.2,63.2).
10. Get the follow up quest, [3] Brothers in Arms from him.
11. Leave the balcony along the walkway, get down the stairs and go back southeast to King Genn Greymane (65.9,77.6).
12. Turn in [3] Brothers in Arms to the king and [3] While You’re At It to Lord Godfrey (65.4,77.5).
Level 4
13. Get [4] The Rebel Lord’s Arsenal from King Genn Greymane (65.9,77.6).
1. Go southwest along the road and turn north on the corner to find a cellar door (55.6,81.7).
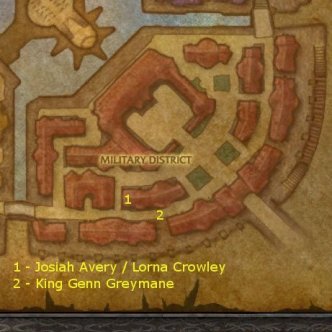
Click it and it will open, revealing a staircase. Go down the stairs to the cellar and turn in [4] The Rebel Lord’s Arsenal to Josiah Avery (56.8,85.1).
2. He will turn into a worgen and bite you. After that, Lorna Crowley (56.9,81.6) will spawn at the stairs behind you and shoot him for good. Get the quest [5] From the Shadows from her.
3. You’ll get a Gilnean Mastiff pet, which will follow you around. Go up the stairs out of the cellar.
 Use your pet’s Attack Lurker ability (found on the pet action bar). He will run away and reveal a Bloodfang Lurker. Help your dog kill it. Repeat this process six times until you complete your quest.
4. Go back down the stairs to the cellar and turn in [5] From the Shadows to Lorna Crowley (56.9,81.6). Get [5] Message to Greymane.
5. Go up the stairs out of the cellar, turn left and go around the building. King Genn Greymane (59.2,83.7) will be just around the corner behind a makeshift barricade. Turn in [5] Message to Greymane to him.
6. Get the quest [4] Save Krennan Aranas from King Genn Greymane (59.2,83.7).
A horse will spawn under you and start galloping on a scripted path along the streets with hostile worgen everywhere.
It will come to a stop under a tree where Krennan Aranas (66,62) is hanging from a branch and a message will pop up to use your mount’s ability.
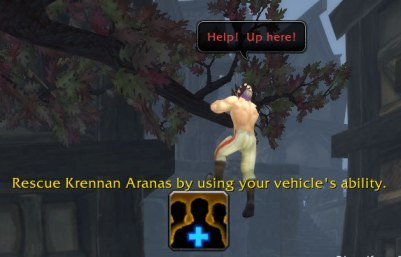
 Quickly click the Rescue Krennan ability on your mount’s action bar because the worgens will keep attacking you. When you click the ability the horse will take you back to the safe zone (56.5,78.1).
7. Go to your left and turn in [4] Save Krennan Aranas to Lord Godfrey (55.7,80.8 ). Get [4] Time to Regroup.
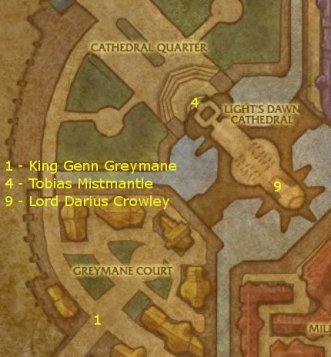
1. Go west, then south along the streets then through a bridge west into the Greymane Court district. Continue northwest along the street and turn in [4] Time to Regroup to King Genn Greymane (30.4,73.1).
2. Get [5] Sacrifices from Lord Darius Crowley (31.3,72.4), standing next to the king.
3. Mount Crowley’s Horse, standing next to Lord Darius Crowley. The horse will take you along a scripted path with worgens having fun on the streets all around.
 You’ll have to use your mount’s Throw Torch ability while riding.
A green targeting circle will appear when you use it. Target as many worgen as you can to get them to follow you.
Repeat this until you round up 50 worgens. Don’t worry if you can’t get enough by the time you reach the Light’s Dawn Cathedral, after you dismount you can mount the horse again and go on another round of worgen hunting.
4. Turn in [5] Sacrifices to Tobias Mistmantle (40.6,39.4), standing where you dismount your horse in front of the cathedral gates.
5. Get [5] By Blood and Ash from Tobias Mistmantle.
6.  Hop on one of the cannons positioned in front of the cathedral and blast away at the worgens all around using the cannon’s Rebel Cannon ability.
7. After you killed 100 Bloodfang Stalkers using the cannon, get out of it and turn in [5] By Blood and Ash to Tobias Mistmantle (40.6,39.4).
Level 5
8. Get [5] Never Surrender, Sometimes Retreat from Tobias Mistmantle (40.6,39.4).
9. Go inside the cathedral and turn in [5] Never Surrender, Sometimes Retreat to Lord Darius Crowley (48.8,52.6). Get [5] Last Stand.
10. Kill 8 Frenzied Stalkers inside the cathedral and turn in [5] Last Stand to Lord Darius Crowley.
After you do that, a movie will play (not in the beta as of this writing, just a placeholder yell by Darius Crowley) showing you turning into a worgen thanks to the bite you received earlier and when you get control back again, you’ll be in Duskhaven imprisoned in a wooden stock, unable to move.
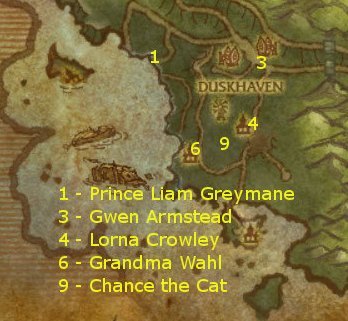
11. Get [5] Last Chance at Humanity from King Genn Greymane (36,61) standing right in front of you. After you do that, you will be released and you will be able to move around once again.
1. Get [5] Among Humans Again from Lord Godfrey (36.5,62.3).
2. Turn in [5] Among Humans Again to Krennan Aranas (37.4,63.3) (first house on your left to the south). Get [5] In Need of Ingredients from him.
3. Go southwest of Duskhaven and turn in [5] In Need of Ingredients at the Crate of Mandrake Essence (32.8,66.4).
Level 6
4. After a short cinematic, get [5] Invasion from the Slain Watchman (32.8,66.2) next to the crate. When you accept the quest, a Forsaken Assassin will attack you, so be ready!
5. Go back to Duskhaven and turn in [5] Invasion at Gwen Armstead (37.4,63.3) (she is apparently sharing a house with Krennan Aranas now…) Get [5] Kill or Be Killed from her.
6. Go out of the village and turn in [5] Kill or Be Killed to Prince Liam Greymane (35.9,66.1). Get both quests he has:
- [5] Hold the Line
- [5] You Can’t Take ‘Em Alone
7. Go south down the hill and start killing Forsaken Invaders. While killing them, also loot 4 Black Gunpowder Kegs (you can find them under the sheds and the windmills downhill).
Go close to a Horrid Abomination, target it and use a Black Gunpowder Keg from your inventory. Prince Liam Greymane will shoot the keg from afar and effectively blow up the abomination. Quite hilarious actually.
Kill 10 Forsaken Invaders and blow up 4 Horrid Abominations.
8. Go back to Liam Greymane up the hill and turn in your quests:
- [5] Hold the Line
- [5] You Can’t Take ‘Em Alone
Get the quest [5] Holding Steady from him.
9. Go back to the village and turn in [5] Holding Steady at Gwen Armstead (37.4,63.3). Get [6] The Allens’ Storm Cellar from her.
1. Leave the village on the road leading west, get to the Allen Farmstead (28.5,64.3) and turn in [6] The Allens’ Storm Cellar to Lord Godfrey (28.9,63.9) (he is in the cellar of the big building in the middle of the field).
Get the quests from Lord Godfrey
- [6] Unleash the Beast
- [6] Two By Sea
Get the quest [6] Save the Children! from Melinda Hammond (28.9,64.0) (standing next to Lord Godfrey)
2. Go a little bit south to the neighboring Hammond Farmstead and talk to the three children, Cynthia (29.6,69.3) (outside, southwest of the house, in front of a shed storing some barrels), Ashley (27.9,66.5) (upstairs in the house) and James (28.6,66.6) (just outside the house, next to a cart).
Level 7
3. From the house, go south towards the catapults stationed on the field. Kill Forsaken Footsoldiers on your way.
Get to one of the catapults and kill the Forsaken Machinist operating it.
4. Get into the catapult and aim it on the deck of the ship closer to you to the south. Pro tip: you can move around with the catapult to get closer to the ship for better aim.
 When you aimed it, use the catapult’s Launch ability to launch yourself onto the ship.
Go down the stairs and kill Captain Anson (23.9,75.0).
5. Get off the ship and kill the operator of another catapult, move into range of the other ship and launch yourself onto its deck. Go down the stairs and kill Captain Morris (27.2,80.0).
6. Kill more Forsaken Sailors on the ships or Forsaken Footsoldiers on the field where the catapults are located if you still haven’t completed [6] Unleash the Beast. When you’re done, go back north to the Allen Farmstead.
At Lord Godfrey (28.9,63.9), turn in:
- [6] Unleash the Beast
- [6] Two By Sea
Turn in [6] Save the Children! to Melinda Hammond (28.9,64.0).
7. Get [6] Leader of the Pack from Lord Godfrey (28.9,63.9).
8. Go west along the road to the house on the shore. Dark Ranger Thyala (23.9,67.4) stands in front of it on a horse. Target her and use your Mastiff Whistle. The dogs will tank her nicely, so you can kill her easily.
9. After you finished her, go back to the Allen Farmstead and turn in [6] Leader of the Pack to Lord Godfrey (28.9,63.9). Get [6] As the Land Shatters.
1. Get out of the basement and turn in [6] As the Land Shatters. to Prince Liam Greymane (29.1,64.9) standing outside on a somewhat changed shoreline… Get [6]Gasping for Breath from him.
2. Jump in the water and swim to a Drowning Watchman (they’re under the water’s surface).

Click on him and swim back to the shore. Repeat this 4 times to complete the quest.
Turn in [6] Gasping for Breath to Prince Liam Greymane (29.1,64.9). Get [7] Evacuation.
3. Go back to Duskhaven and turn in [7] Evacuation to Gwen Armstead (37.6,65.2). Get all her quests:
- [7] Grandma Wahl
- [7] The Hayward Brothers
- [7] The Crowley Orchard
4. Go south to the Crowley Orchard. Turn in [7] The Crowley Orchard to Lorna Crowley (37.8,72.8 ). Get [7] The Hungry Ettin from her.
5. Go southeast across the bridge (watch out for the 2-headed ettin, don’t aggro it) and hop on one of the Mountain Horses.
 Target a Mountain Horse and use your horse’s Round Up Horse ability to make it follow you.
Round up 4 horses and ride back to Lorna Crowley. Turn in [7] The Hungry Ettin to her.
Level 8
6, Go west to the Wahl Cottage (32.5,75.5) and turn in [7] Grandma Wahl. Get [7] Grandma’s Lost It Alright from her.
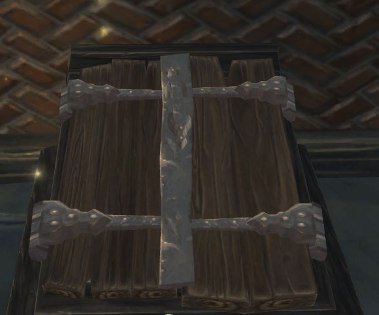
7. The book she wants is just outside to the east under some wooden stand covered with roses. Loot the Linen-Wrapped Book (33.9,77.3).
Get back to the house and turn in [7] Grandma’s Lost It Alright.
8. Get [7] I Can’t Wear This. Go outside, turn right and go around the corner. Loot Grandma’s Good Clothes (32.0,75.5) from the clothesline.
Go back into the house and turn in [7] I Can’t Wear This to Grandma Wahl (32.5,75.5).
9. Get [7] Grandma’s Cat. Go northeast from the house and “loot” Chance the Cat (35.1,74.9) (standing on a small rock).
Lucius the Cruel will spawn and attack you (he also likes cats, it seems). Start fighting him and soon Grandma Wahl will come to aid you… she really doesn’t like anyone messing with her kitty…
Loot Chance the Cat from the corpse of Lucius, get back to Grandma Wahl (32.5,75.5) and turn in [7] Grandma’s Cat.
1. Go southeast to the Hayward Fishery and turn in [7] The Hayward Brothers to Sebastian Hayward (36.9,84.3). Get his two quests:
- [7] Not Quite Shipshape
- [7] Washed Up
2. Kill 6 Forsaken Castaways on the shore.
Loot the Barrel of Coal Tar (37.5,85.9) located next to the second small storage building on the left of the house.
Inside the house loot the Shipwright’s Tools (37.4,87.1).
Get out of the house, turn left and loot the Planks of Wood (36.1,86.4) under the boat storage building.
3. Go back to Sebastian Hayward (36.9,84.3), turn in [7] Not Quite Shipshape and [7] Washed Up.
Get [7] Escape By Sea.
4. Go back north to Duskhaven, turn in [7] Escape By Sea to Gwen Armstead (37.7,65.2). Get [7] To Greymane Manor.
A horse will take you there as soon as you accept the quest.
5. Turn in [7] To Greymane Manor to Queen Mia Greymane (28.2,50.1) (inside the manor house). Get [7] The King’s Observatory.
6. Go up the stairs behind the queen, get out on the balcony, then go up to the observatory. Turn in [7] The King’s Observatory to King Genn Greymane (26.5,47.0). Get [7] Alas, Gilneas! After the short cinematic, get [8] Exodus.

1. Go down the stairs and get out of the manor house. Get on a carriage outside in the courtyard.
2. The carriage will take you to the Stagecoach Crash Site. Turn in [8] Exodus to Prince Liam Greymane (51.0,80,5) here.
Get [9] Stranded at the Marsh.
Level 9
3. Go north to the marsh and kill Swamp Crocolisks fighting with the Crash Survivors, to rescue them.
Rescue 5 Crash Survivors, then go back to Prince Liam Greymane (51.8,80.5) and turn in [9] Stranded at the Marsh.
Get [9] Introductions Are in Order.
4. Go southwest up to the top of the hills. Kill 4 Ogre Minions on the way.
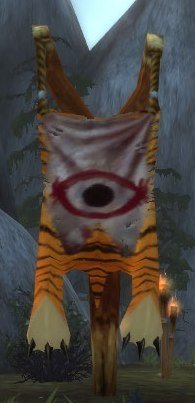
Loot Koroth’s Banner (46.7,83.4).
5. Get back to Prince Liam Greymane (51.8,80.5) and turn in [9] Introductions Are in Order. Get [10] Stormglen.
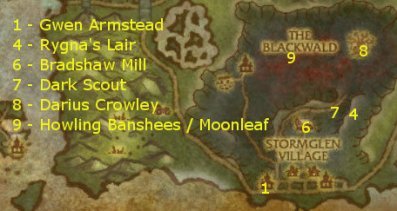
1. Follow the road southeast to Stormglen Village. Turn in [10] Stormglen to Gwen Armstead (59.9,91.8 ) (she is at the inn, first building to the left as you enter the village).
Get [9] Pest Control from her.
Get [9] Pieces of the Past from Lorna Crowley (60.2,91.8 ) (standing next to the innkeeper).
2. Go to the eastern part of the village and kill 6 Vilebrood Skitterers.
While killing them, be on the lookout for Old Journal Pages lying on the ground. Collect 6 of them.
3. Go back to Gwen Armstead (59.9,91.8 ) at the inn and turn in [9] Pest Control. Get [10] Queen-Sized Troubles.
Turn in [9] Pieces of the Past to Lorna Crowley (60.2,91.8 ) also at the inn.
4. Go northeast of the village to Rygna’s Lair (68.2,82.0). Kill Rygna (huge, black spider).
5. Go back to Gwen Armstead (59.9,91.8 ), turn in [10] Queen-Sized Troubles.
Get [11] The Blackwald from Lorna Crowley (60.2,91.8 ).
Level 10
6. Go north of the village to The Bradshaw Mill and turn in [11] The Blackwald to Belrysa Starbreeze (63.4,83.1).
Get [11] Losing Your Tail.
7. Jump down behind the mill to the road and start walking northeast. You’ll find the Dark Scout around here (64.0,81.1). Kill her. Her spawn location should be at (66.3,80.9).
(Note: This quest might be bugged at the moment because you’re supposed to use Belrysa’s Talisman when the Dark Scout casts Freezing Trap on you, but she never did that, I was able to just kill her without any problems. This might need further testing!)
Go back to the Bradshaw Mill and turn in [11] Losing Your Tail to Belrysa Starbreeze (63.4,83.1).
Get [11] Tal’doren, the Wild Home.
8. Go northeast into the Blackwald and turn in [11] Tal’doren, the Wild Home to Darius Crowley (68.7,73.4). Get [9] At Our Doorstep.
Get [11] Preparations from Vassandra Stormclaw (69.3,73.0).
9. Go west into the swamp and start collecting Moonleaf. Get 6 of them.
Also kill 6 Howling Banshees in this area.
10. Go back east to Lord Darius Crowley (68.7,73.4). Turn in [9] At Our Doorstep to him. Get [9] Take Back What’s Ours.
Also turn in [11] Preparations to Vassandra Stormclaw (69.3,73.0).
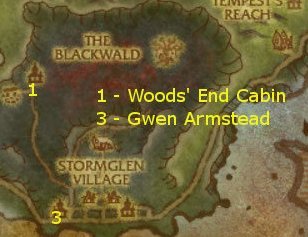
1. Go west back into the swamp to the Woods’ End Cabin (58.6,75.6) and use your Horn of Tal’doren there.
While the Rangers are busy fighting the worgens, run into the house and loot the Mysterious Artifact (57.6,75.7).
2. Go back east to Lord Darius Crowley (68.7,73.4) and turn in [9] Take Back What’s Ours. Get [10] Neither Human Nor Beast.
Click on the Well of Fury, the Well of Tranquility and the Well of Balance just behind Lord Darius Crowley.
Turn in [10] Neither Human Nor Beast to him. Get [10] Return to Stormglen.
3. Go southwest back to Stormglen Village and turn in [10] Return to Stormglen to Gwen Armstead (59.9,91.8 ) in the inn.
Get [10] Onwards and Upwards.
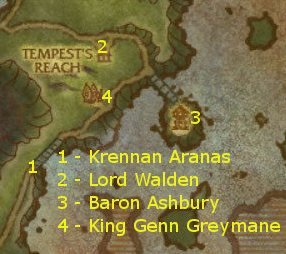
1. Follow the road northeast to Tempest’s Reach.
Turn in [10] Onwards and Upwards to Krennan Aranas (72.7,80.3) standing outside the village on the bridge.
Get [10] Betrayal at Tempest’s Reach from him.
2. Go through the bridge, drink your Krennan’s Potion of Stealth, get in the village, follow the road to the top of the hill and kill Lord Walden (79.2,64.9) (he patrols in and outside of the house).
Level 11
3. Walk down southeast on the road and through the bridge leading to a big house with a large tower. Kill Baron Ashbury (85.5,73.9) (he also patrols in and around the house).
4. Follow the road southwest and turn in [10] Betrayal at Tempest’s Reach to King Greymane (78.3,72.0) in Tempest’s Reach.
Get [10] Flank the Forsaken from King Genn Greymane.
Speak to Lord Hewell (78.3,71.9) standing next to the king to get a horse which will take you to the Livery Outpost.
1. Turn in [10] Flank the Forsaken to Lorna Crowley. Get [10] Liberation Day.
- Get [10] Last Meal from Magda Whitewall.
- Get [11] Slaves to No One from Marcus.
2. Go east and kill Brown Stags in this area until you get 10 Side of Stag Meats.
3. Go northeast to the Emberstone Mine.
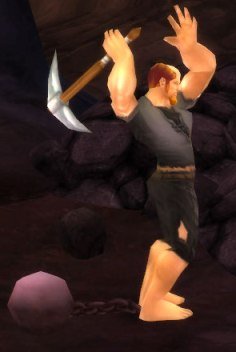
Kill Forsaken Slavedrivers in the mine and loot their Slaver’s Key. Using the keys, free 5 Enslaved Gilneans.
4. Fight your way through the mine and kill Brothogg the Slavemaster.
5. Get back to the Livery Outpost and turn in your quests:
- [10] Liberation Day to Lorna Crowley
- [10] Last Meal to Magda Whitewall
- [11] Slaves to No One to Marcus
Get [11] Push Them Out from Lorna Crowley.
6. Go northeast to Emberstone Village and kill 4 Forsaken Infantry.
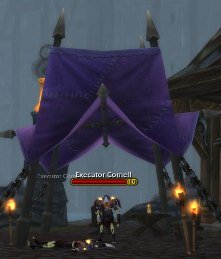
Kill Executor Cornell (southern part of the village, standing under a tent).
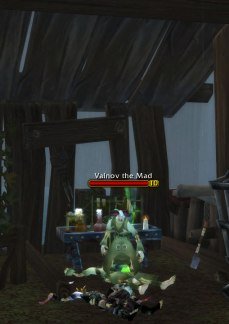
Kill Valnov the Mad (northern part of the village, standing in front of a lab table)
7. Go back southwest to the Livery Outpost, turn in [11] Push Them Out to Lorna Crowley.
1. Get [11] The Battle for Gilneas City.
Speak to Krennan Aranas standing at the bridge leading to the city.
2. You’ll be teleported inside Gilneas City. Go to the Greymane Court district. Unfortunately I couldn’t test the actual event yet, because it just completed half a minute after I entered the city. At this time in beta everyone and their neighbor’s cats, dogs, and those said cats’ and dogs’ relatives as well are doing worgen quests, so no surprise here. I’ll try to test this part more thoroughly once things settle down a bit.
Turn in [11] The Battle for Gilneas City to Lorna Crowley inside the inn. Get [11] The Hunt for Sylvanas.
3. Behind you will spawn Tobias Mistmantle. Follow him out the inn to the Cathedral Quarter and then into the Light’s Dawn Cathedral. Jump into the water next to him and listen to the conversation involving Lady Sylvanas until you get the quest complete message.
Go back to Lorna Crowley and turn in [11] The Hunt for Sylvanas.
Level 12
Get [11] Vengeance or Survival.
4. Go to King Genn Greymane in the neighboring house and turn in [11] Vengeance or Survival.
Get [11] Slowing the Inevitable from him.
Go outside and mount the Captured Riding Bat.
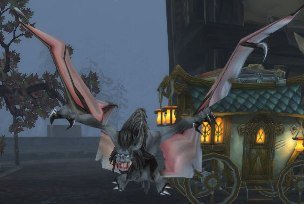
 Use your Iron Bomb ability to destroy 6 Forsaken Catapults and 40 Invading Forsakens.
 When you’re done with all the bombing, use your Fly Back ability to fly back to Gilneas City.
5. Turn in [11] Slowing the Inevitable to King Genn Greymane.
Get [11] Knee-Deep. Go down the stairs behind the king and run through the tunnel below.
 Put your Half-Burnt Torch on your action bar and spam it while running to keep the rats away from you.
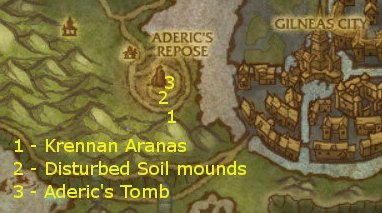
1. Turn in [11] Knee-Deep at the other end of the tunnel to Krennan Aranas.
Get [11] Laid to Rest.
2. Go northwest up the hill and look for Disturbed Soil on the ground.
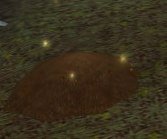
Loot 5 Unearthed Mementos from them.
Get back to Krennan Aranas and turn in [11] Laid to Rest.
Get [11] Patriarch’s Blessing.
3. Go back up the hill to a small shrine marked by a flag.
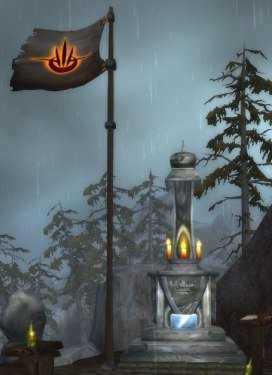
 Use your Blessed Offerings here to complete the quest.
4. Go back to Krennan Aranas and turn in [11] Patriarch’s Blessing.
Get [12] Keel Harbor.

1. Follow the road northwest to Keel Harbor.
Turn in [12] Keel Harbor to Lord Darius Crowley.
Get [12] They Have Allies, But So Do We.
2. Hop into a Glaivethrower and go west of the harbor up the hill.

 Using your vehicle’s Launch Glaive and Glaive Barrage abilities, kill 40 Orc Raiders, 8 Wolfmaw Outriders and 4 Orcish War Machines.
Go back to Lord Darius Crowley and turn in [12] They Have Allies, But So Do We.
3. Get [12] Endgame from Lorna Crowley standing behind Darius Crowley.
Get on a hippogryph behind her which will fly you up to the Horde gunship.
Follow Lorna Crowley downstairs, where she will plant some explosives. Hold off the spawning mobs until the explosives go off and destroy the gunship.
The hippogryph will then fly you back to the harbor.
Turn in [12] Endgame to Lorna Crowley.
Level 13
4. Get on the ship anchoring at the harbor and get [XX] Rut’theran Village from Professor Pumpernickel (Alpha Teleporter to Darnassus). 🙂
You are teleported to Rut’theran Village in Darnassus.
5. Get the quest [10] The Howling Oak from Krennan Aranas and do as the quest says. Take the portal to Darnassus (it’s a red glowing light beneath a large tree, you just have to walk into it to teleport) and seek out Genn Greymane at the Howling Oak in Darnassus.
6. Turn in [10] The Howling Oak to Genn Greymane. Get the quest [10] Breaking Waves of Change from him.
With this quest the worgen starter questline is done and you can continue with the night elf quests from here on. Please allow me to close this guide with the parting words of Genn Greymane: “I must travel to the distant city of Stormwind to meet with King Varian. I hope to see your face again very soon. Until then, a fond farewell.”
Re: Our arrow, not TomTom’s Gylin, I hate to contradict you, but I was referring to TomTom; and I got TomTom to work in both the Worgen and DK starting zones. The flaw is in WoWPro/WoWPro_Broker.lua, which was using the wrong API function in TomTom, which wll not work in instances or phased zones with different maps.PS: I made a cut for Duchess at https://github.com/downloads/Jiyambi/WoW-Pro-Guides/WoWPro%20v2.1.11Dutchess2.zip that yoiu are welcome to try. It has a modified guide for Worgens. The DK starter is a single zone, 502.
Our arrow, not TomTom’s Duchess, LM’s post was about our own arrow not TomTom’s. I’ll check out your issues later tonight and see if I figure out whats going wrong.
I just posted about this onI just posted about this on the community page for the addon. I cannot get the arrow working for my new worgen. Has this been fixed or is there a fix?
New Arrow TestingI’m going to redo my changes as they are too big. By this next weekend I’ll issue another build and you can test it!
Arrow testingAnything I can help you test, just give me a shout.
Arrows workin in the Worgen zone! (and DK started too)I got the arrow working in the worgen starting zone.Turns out that Blizzard yet again made things slightly inconsistent. It turns out that the mapping between map names and mad id’s is consistent for every map except for 3. There are 3 maps by the name “Gilneas_terrain1” which correspond to maps 545, 679 and 678.I’ll have to start a fresh worgen and see which ones are used and then trim down my changes.PS: Now the arrow has started working in the Scarlet Enclave. Woooot!
Zoneing outYeah, I was just going to punlish a list of map names and ID’s and then change the Z tag to be smarter and try a map ID if it was numeric, then try it as a map name and then try it as a zone name. Building the silly index table is not that expensive at startup time.Yeah, some of the Blizzard API function are bizzare beyond belief.Well, back to getting to level 85 before Easter!
Sure. I was just worriedSure. I was just worried about having guide writers know the map names/ids, but since nobody writes guide files manually these days, we can move to map names.
Just be careful with some APIs functions, they sometimes do funny things ingame. The API that returns the “current” mapID, for example, is linked to the map ingame. If you have the map opened in a zone different than where the player is in, it will give the ID of the opened map instead of the “current”.
On Maps .Vs. ZonesSince Blizzard has shifted away from the strictly geographical (Continent, Zone) pair to the (Map, Floor) system, I suspect we will be in better shape if we convert over. Besides, it is the only system consistent with instances, which do NOT have conformant mappings to the zones, even if they exist inside zones. Never mind the whole phased zone system, which is really map based.In most cases, the leveling module can get by by setting coordinates in the current map sans zone id. Only if you need to get to a different zone/map should you need to switch or specify a Z tag.Of course, we should also strive to be language independent. So we really ought to accept numeric map id’s to be completely kosher.
They are now probably usingThey are now probably using the same map library I was on my own arrow module addon (which I can’t work on it now). The problem is, for some zones, their usual names (as used in our guide files) do not match their “map names”, used by the library/TomTom’s functions.
In my addon, I fixed that with a built-in look-up table (for english guides), that could be copied into our _Mapping code file.
Floors were also confusing, with default value being either 0 or 1.
Way-points for the WorgenI played around with the current version of TomTom and was able to set way-points in the Worgen starting zone, much to my surprise.But the the Leveling guide was not able to set the way-point arrow properly.Turns out that TomTom’s author has completed a set of changes I was whining about back in January and that there is now a new API for setting way-points that we should probably convert to. The change involves changing from a (continent, zone, x, y) coordinate system to a (map, floor, x, y) coordinate system.As a side effect, it would also let us set way-points in instances and in subzones, like the cleft of shadow. However we would need to change the zone names to being the maybe-unique map names. In most cases they are the same, but not all.I’ll report back later on this.
It has to do with the factIt has to do with the fact that the starting zone for Worgen does not technically exist, except for being phased. So unfortunately the waypoints won’t work.
None of this guide seems toNone of this guide seems to work with Tom Tom’s waypoint arrow. As soon as my worgen hit the Darkshore guide, the waypoint arrow appeared, but all the way through levling in Gilneas, not one single arrow :(I dont think the actual waypoints were marked on the map either (but i maybe wrong about that.. can’t remember:S, sorry ).Other than that, spot on with the guide 😀
RE: Breaking Waves of ChangeIf you have “Hero’s Call: Darkshore!” you will be blocked from getting this quest.See http://www.wowhead.com/quest=26385#comments for more info.
Absolutely awesome, ty soAbsolutely awesome, ty so very much! Those little step locaitons make it such a breeze to go through! One question though, I am level 13 and am not able to get the final quest “Genn Greymane. Get the quest [10] Breaking Waves of Change”
Thanks to Bitsem,Thanks to Bitsem, coordinates are now included in the guide through level 11.
Om nom!Deeeelicious! Thanks! 😉
Awesome, sending some yummyAwesome, sending some yummy Karma points your way for that 😉
Poof!I’m a magician! :jawdrop: The coords through the beginning of Level 11 should be in your Inbox. Hope it helps a bit! Thanks for a nice guide! I’ll run through the rest if I get a chance. Now I’m off! *poof*
😉
Things I never thought I’d say…
“Don’t stretch your brother’s face like that!”
“Pointed sticks are NOT toys, regular sticks are fine.”
tarix, Bitsem, thanks fortarix, Bitsem, thanks for the insightful comments, all changes should now be incorporated into the guide, I just updated it.
Bitsem, if you have those coordinates handy, I’d be glad if you could share it with me so I could put them in the guide. I started going through the zone again, but IRL stuff has me going kinda slow, so it would be a major help for me if those coords could just somehow magically pop into my PM inbox here on wow-pro. 😀
Thanks very muchThanks very much 😀
Phasing bug by turning in “[5] Last Stand” workaround*I deleted my workaround, because in the latest patch those issues have been fixed*
———-
@rpotor: Pretty nice work on that guide 😀
Co-ordsIt’s me again. I have tested up to Lv. 8, and kept track of coordinates if you need them.
Also, found a few quest changes. Level 3, Step 8, Turn in “Old Divisions” at Captain Broderick at the bottom of the stairs (57.8,75.7). Then accept “The Prison Rooftop” from him. This is the quest turned in at Lord Darius Crowley (55.2,63.2).
Level 5, Step 10, “The Last Stand” now requires 8 Frenzied Stalker kills, not 10. This quest is still broken.
Level 7, Step 5, “Apparitions in the Orchard” is gone, and Lorna Crowley (37.8,72.8 ) gives you the quest “The Hungry Ettin” right away.
I’m sure there will be more changes in the future of the Beta, but hope this helps a bit.
TestI had already started my Worgen when I found this guide. I tested from Lv. 9 to the end and found it accurate. 🙂 The final quest does take you to Rut’theran Village, but I think that it is finished. You recieve the quest “The Howling Oak” from Krennan Aranas and after that, “The Breaking Waves of Change” from Genn Greymare in The Howling Oak. Basically you start the Night Elf quests, I believe. I only recently got my Beta key, so haven’t leveled any other races. Hope this helps. 🙂
For now, I thought I’d note that there are a few major bugs in the Worgen zone. Work arounds have been posted on You Tube and such. To get past “The Last Stand” I just attacked one of the bucks and let it kill me. That phased me to the graveyard in the next area. The race change option fixed the No Transform bug for me. Maybe this only happens if you create a female worgen? Just a thought.
Great to see so many people working to get these guides finished! You all rock!
1-5 has been checked in to1-5 has been checked in to GitHub in case you want to check it out. I’ll get to 6-12 before release, but it was broken last time I tried it and I started to get a bit sick of the worgen zone. :O
Tarix, thanks very much forTarix, thanks very much for these comments, I will update the guide sometime today. Also thanks for taking up the coding task, IRL got in my way and I couldn’t give as much attention to this project as I wanted to.
You can upload to filefrontYou can upload to filefront or something similar and post the link here, if you’d like me to include what you have so far 🙂
Level 1-5 has been coded forLevel 1-5 has been coded for the addon. I’m going to wait until 6-12 is a little less buggy before starting on that one.
New StepsIn Level 3 between step 8 and 9 there is now an additional quest called The Prison Rooftop. Basically you turn in Old Divisions at the bottom of the stairs, get The Prison Rooftop and then turn it in at the top of the stairs.
I’ve added it to the Addon version of this guide.
Right after acceptingRight after accepting “Salvage the Supplies” you should point out the fact that there is a mailbox in the middle of the square.
This is a great chance to pick up BoA items or account pets that might be sitting in your mailbox.
The recent beta buildThe recent beta build (12857) apparently fixed the worgen zone issues and so I was able to finish the guide.
We can now use addons in the beta, so I’ll add coordinates to the guide soon and when that’s done, I think I’ll start coding the addon version.
Oh, and a tip that might be useful to someone starting a worgen. In the last 2 beta builds I was unable to create new worgen characters. Whenever I selected a worgen in the character creation screen, the client crashed. However on the forums I found a solution: at the login screen, click on the “Options” button, then on the “Sound” button and disable the “Ambient Sounds” checkbox. Doing this fixed my issue and I was able to create worgens again without any problem. Also if there are issues with logging in, or with selecting existing worgen characters, you might try deleting the Cache folder in your WoW Beta folder and see if it solves the problem.
You’re welcome to releaseYou’re welcome to release what you have so far, if you like. It’s looking great! 🙂
Update on the guide progressThe guide is almost finished but unfortunately, the last beta patch brought some serious bugs. My worgen character is stuck at one of the next steps (The Hunt for Sylvanas). The quest is bugged out and there’s no way to continue since I cannot even abandon the quest. This seems to be not just an isolated case, since there are a lot of characters stuck there as well. I’ll try and create a new worgen, do it all over again and see if it bugs out at the same quest. However I hear that another worgen quest is also bugged (The Allens’ Farmstead) and you cannot access the quest giver NPC there.
So anyway, stay tuned but be warned that this guide might be on hold even until the next beta patch, if things stay this bugged.
Oh, you already checked itOh, you already checked it out? That’s fast! 🙂 I just made a comment on the Cataclysm guide sign up page. Anyways, glad you like it, so sure, go ahead and nail my name down on that list under Worgen Starter Guide. I’ll continue polishing this in the days ahead, I already written up the instanced part of the worgen start zone, but it needs formatting and some additional details, but I’m starting to get the hang of it. 🙂 I think I’m now off to sleep but I’ll try and format the existing writeup tomorrow, so expect this guide to grow in the near future. 🙂
Heh, looking nice so far,Heh, looking nice so far, glad someone picked up the project 🙂 Shall I add your name on the sign up page?