
 by Jame
Sunken Temple Walkthrough
Introduction:
The Sunken Temple is located in the Swamp of Sorrows, it is an instance designed for a 5-man party. It is definitly a place worth visiting when you are in the lvl 51-55 range, it is a really fun instance and the rewards are very good for this level. Make sure to check out the class quests at the bottom of the page (https://www.wow-pro.com/node/803).
Quests:
The quests marked in Orange are the ones you must have BEFORE you enter the Instance for the first time. The rest are follow ups or quests you get inside the instance.
Both:
- [53] Jammal`an the Prophet (Dungeon), given by the Atal`ai Exile, you can find him in the Hinterlands, Go to the southern part of Shadra’Alor. There’s a broken-down temple and the exile is on a platform on the left as you face it.
- [51] Into the Depths (Dungeon), given by Marvon Rivetseeker in Tanaris. You can find him in the middle of the desert, South of Gadgetzan. Before he gives you this quest you will need to go talk to Angelas Moonbreeze in Feralas (Alliance) or Witch Doctor Uzer’i in Feralas (Horde). They will send you to talk to Marvon Rivetseeker. He will give you quest[51] The Stone Circle, you will have to go get a Stone Circle in Ratchet at the Workshop (left when walking off the docks), the stone circle is in a box on the floor, at the shop. Once you got it, go back to Marvon Rivetseeker, and he will give you the quest [51] Into the Depths.
- [51] Secret of the Circle (Dungeon), you get this quest inside the instance, right after you complete [51] Into the Depths. It will be described in the walkthrough.
- [53] The God Hakkar (Dungeon), given by Yeh`Kinya in Tanaris (Steamwheedle Port). This is part of a serie of quests, the initial one is given by Yeh`Kinya as well : [44] Screecher Spirits, the follow up is [47] The Prophecy of Mosh’aru (Elite). You will need a lvl 45+ group to do this quest(or less than that if you are lvl 50+) the tablets can be found on two named Trolls, Hydromancer Veltha and Theka the Martyr, inside the instance Zul’Farrak. The follow up for that quest is [50] The Ancient Egg (Elite), the Egg is deep inside a cavern, on top of the temple of Jintha`Alor in the hinterlands. The mobs on the way up to the cavern are all elites, so go there with at least 2 or 3 lvl 50s (unless you are really higher level or really sneaky 🙄 ). After you get the Ancient Egg, go back to Yeh`Kinya, and he will finally give you [53] The God Hakkar (Dungeon). This quest is a lot of work especially if you didn’t do the first parts when it was of your level, but the final rewards are totally amazing for this level.
- [55] The Essence of Eranikus (Dungeon), this quest is started by right-clicking an item you get when looting the the corpse of Shade of Eranikus, the final and hardest boss mob in the temple. This will be described later in the walkthrough.
Horde:
- [50] The Temple of Atal’Hakkar (Dungeon), this quest starts with [43]Pool of Tears, given by Fel`Zerul in Stonard. You will have to gather Artifacts, you can easily find those underwater in the pool around the Sunken Temple entrance. Can be done solo. Then you will get the follow-up quest, you will have to go talk to the Atal`ai Exile, he will send you back to Fel`Zerul, and you will get the final quest: [50]The Temple of Atal`Hakkar. The Fetishes of Hakkar can be found on any Troll in the Sunken Temple. You will probably not finish this quest in one run, but you can come back and kill the Trolls outside of the instanced part of the Sunken Temple to get the last fetishes you need.
Alliance:
- [50] Into The Temple of Atal’Hakkar (Dungeon), given by Brohann Caskbelly in Stormwind City. This quest is obtained after completing a long serie of quests, to start it you must first talk to Brohann Caskbelly, he will give you the quest [43] In search of the temple, you’ll just have to find the temple and enter it. Then go back to Brohann, he will give you [43] To The Hinterlands . You will go to Aerie Peak outpost in the Hinterlands and talk to Falstad Wildhammer, and then talk to Griffon Master Talonaxe, who will give you the quest [43] Rhapsody Shindigger, Rhapsody can be found east of Aerie Peak, talk to him and he’ll give you a quest. That quest will send you gathering items in Tanaris and Feralas. Once completed, go back to Rhapsody, he will tell you his tale and give you a tablet. Go back to Brohann Caskbelly in Stormwind, he will finally give you the quest [50] Into the Temple of Atal`Hakkar. The Atal`ai Tablet can be found anywhere inside the Sunken Temple.
Walkthrough
Group composition:
- 1. Tank Warrior, Prot spec Paladin or Feral Druid
- 2. Healer Priest, Restoration Shaman, Holy Paladin or Restoration Druid
- 3. Crowd Control Mage, Warlock, Rogue, or even a Shadow Priest (Shackle undead helps a bit here)
- 4. DPS or Utility class (Shaman/Paladin)
- 5. DPS
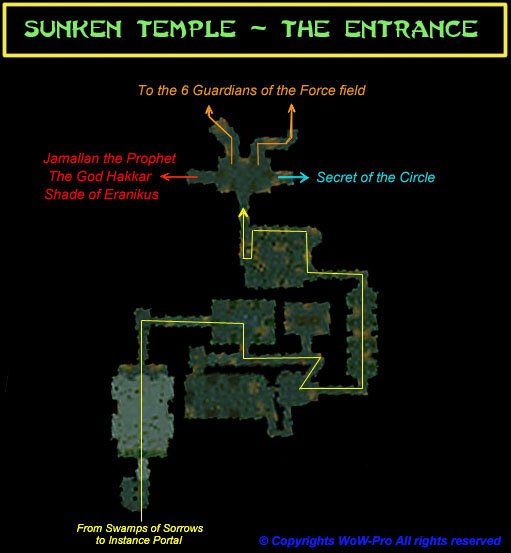
Where:
The entrance to the Temple of Atal’Hakkar is located in Swamp of Sorrows, in the southeast part of it. To reach the instance portal, follow the directions on the map below:
1. Secret of the Circle:
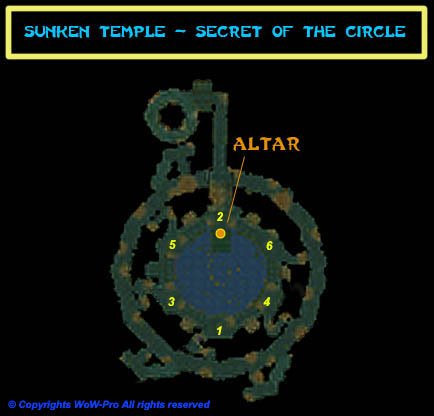
After entering the instance, go right. Go down the spiral stairs, then you will have a few pulls to deal with, and you will reach the Altar. Complete the quest [51] Into the Depths , you will get the follow up [51] Secret of the Circle. If you activate the altar, a serie of green lights will appear at different spots in the room, you have to memorize the order in which the lights appear, and reproduce it later on by activating statues on the upper floor of this room. If you have troubles with this part, check the following map, the order in which the Statues must be activated is shown:
Before activating the statues, you must first clear the pool down the stairs past the Altar. A boss mob will spawn there after you sucessfully click all the statues, so clear the pool.
At this point, you are probably wondering how the hell do you access those statues. 🙄 Go back up the spiral stairs, and take the next path to the right (marked as ”to the 6 guardians” on the first map). You will soon reach a room with 2 sets of stairs. One going up, the other going down. Go down! You will reach the Hall of Serpents. Clear your way through this Hall, and activate the Atal`ai statues one by one, in the order described in the above map.
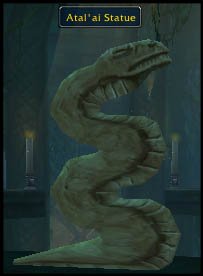
After clicking a statue, a green light should appear. Once you have activated all 6 statues in the right order, an Idol will appear in the Pool, and also a mini-boss guarding it. Jump down at the Altar and prepare for the fight. The boss is pretty easy and straight forward.
After defeating it, you will have access to the Idol, go click it and you will be rewarded with 3 good items. Go back up to the entrance and take the way ”To the 6 Guardians of the force field”. This time, take the stairs going UP.
2. The 6 guardians of the force field:
This area is kinda similar as the Hall of Serpents. You have to clear your way through a circle corridor, and the 6 guardians can be found in the side rooms. The pulls will be a mix of Humanoids and Undeads, so use Shackle Undead, Polymorph and Sap if you have that. Sometimes you will have to go down a flight of stairs to reach the named’s rooms. You can kill them in any order you like.
You can see them marked as green stars in the map below:
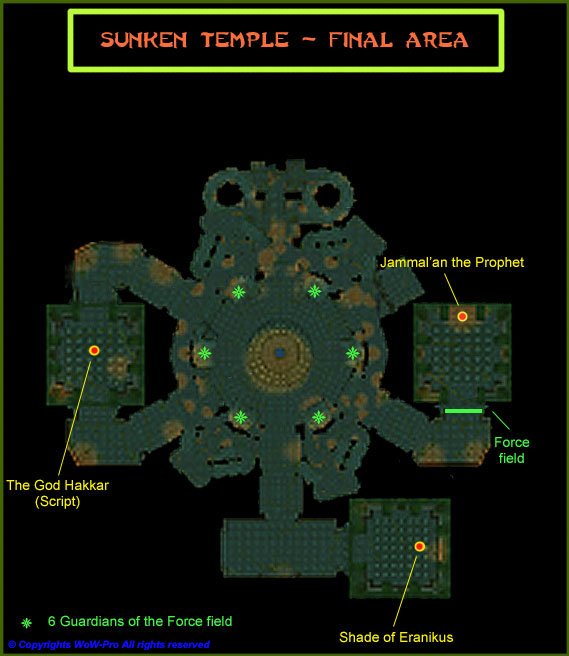
They are all quite easy to defeat but pay attention, some of them have annoying abilities. One of them especially, casts a totem, that spawns Skeletons every 2 seconds or so. Destroy that totem fast or you will end up swarmed. Besides this, they are really easy. Their names are: Zolo, Mijan, Hukku, Loro, Zul`Lor and Gasher. They mostly drop nothing, but very rarely drop green or blue items (5% chance) of low quality. So why kill them? You have to, for the simple reason that if you don’t kill the 6 of them, there will be a force field preventing you from reaching Jammal`an the Prophet. Take also note that the Shade of Eranikus isn’t targetable as long as Jammal`an is alive. So that’s two very good reasons to kill them, no matter how worthless they are.
Once the 6 guardians are dead, the force field will vanish. Go back to the entrance, and take the leftmost way, marked as ”To Jammal`an the Prophet… etc”.
3. Jammal`an the Prophet:
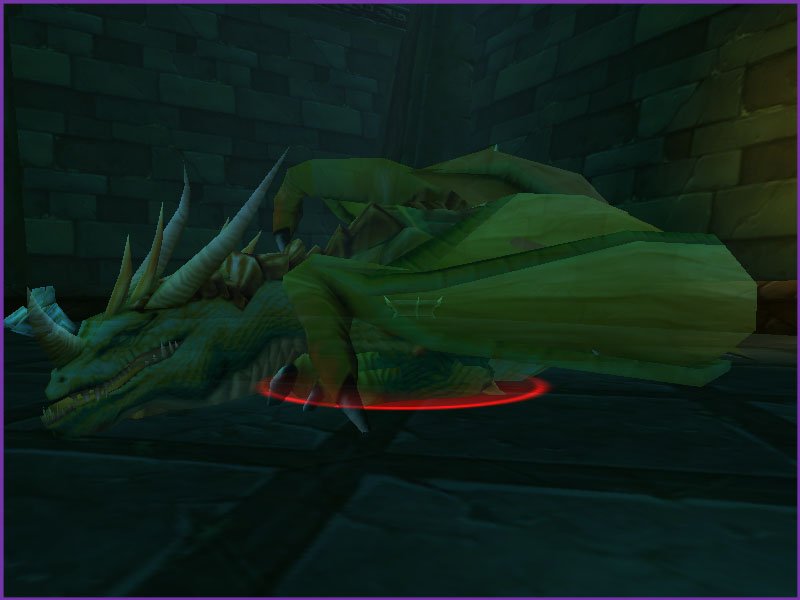
At the end of the stairs, you will find dragonkins. Pulls will consist mostly of 1 or 2 Elite dragonkins and a bunch of non-elite whelps. If you have a mage with instant arcane explosion, AE them. If you don’t, assist one person and kill them one by one. Have the warrior spam Demorilizing shout a few times and try to keep aggro on most dragons. Thorns or Imp pet fire shield helps a lot.
Note: Druids, don’t even bother casting Hibernate on those dragons; for some obscure reasons, they got extremely high resistance to it. It’s not worth it. (unless they changed resist rates on those since last time I went, which was a long time ago)
After a couple of pulls you will reach a large circle room, full of dragonkins. Look on the map above for Jammal`an the prophet and start clearing your way towards his chamber.
Once you reach his chamber, and before you start pulling, there are a few things you should know:
- 1. The room is full of trolls, most are undead.
- 2. They cast FEAR. So pull them WAY back to be sure nobody gets feared into more trolls.
- 3. Some of them when they die turn into specters, which start hitting on someone in your group. They are invulnerable and actually hit hard. But they move EXTREMELY slow and disapear after about 15 seconds. So run away from them until they vanish.
- 4. You must clear the WHOLE room before you attack Jammal`an, because they will come to his aid.
Once the room is clear, you will be left with two mobs: Jammal`an the Prophet and his buddy, Ogom the Wretched. Ogom is just an annoyance, have someone offtank it (a shaman, a paladin or a bearform druid, or even a warlock pet). The real threat is Jammal`an, who is a caster and hurts a lot, also, jammalan casts a curse which charms the target and makes him attack his group members. You cannot dispell this curse.
So basically, kill Jammal`an first and kill him fast, and be ready for a difficult fight.
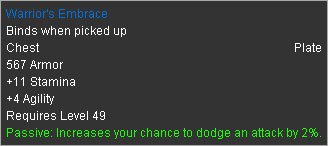
Jammal`an can drop very good cloth pants, decent cloth vest, or crappy cloth gloves. Each have about 30% chance to drop, so pray you don’t get the gloves at least 🙄
Also, don’t forget to loot his head, and you will complete the quest [53] Jammal`an the Prophet.
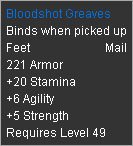
Killing Jammal`an triggers the spawn of two Dragons: Dreamscythe and Weaver. You will find them flying around in the big circle room. You can pull them one by one. They are rather easy and have a 30% chance to drop really good blue items.
Now before we start heading to the last big boss, Eranikus, let’s first finish your last important quest: [53] The God Hakkar.
5. The God Hakkar:
Clear your way through the dragonkins, and go to the room marked as ‘The God Hakkar’ on the map. You will enter a room with a summoning circle in the middle. Before you do anything, explain your group what is this script about:
- 1. When someone of your group will step inside the circle and click his Ancient Egg, the script will start and a bunch of mobs will spawn all across the room.
- 2. Set up your group in one of the corners, you can avoid most of the aggros this way.
- 3. The goal is to make the God hakkar appear. For that you need to put Hakkari Blood on each of the braziers in the 4 corners of the room. Hakkari Blood can be looted from the Hakkari Bloodkeepers, they spawn every now and then in the room during the script. So pull them and kill them as soon as you see them appear. You might have to counterspell or shieldbash them to make them come to your corner, as they are casters.
- 4. Nightmare Suppresors (Dragonkin) will come every now and then from the gates and try to interupt the summong of hakkar. They /yell something everytime they come, so you can’t miss them. You must send someone to pull them and bring them to the camp as soon as they appear, or they will interupt the summoning of hakkar and remove Hakkari Blood from one of your brazier.
- 5. Once you have put Hakkari Blood on each of the 4 braziers, the Avatar of Hakkar will appear. You will probably have a lot of mobs to deal with at the same time. So pull the Avatar of Hakkar to the corner where your group is, and let your warrior offtank it while you kill the thrash you have in camp. Once that is done, kill the Avatar.
When the Avatar of Hakkar dies, every other monster disapears, script completed sucessfully! Loot the Essence of Hakkar and right click your egg to fill it up the Essence of Hakkar — Quest Completed!
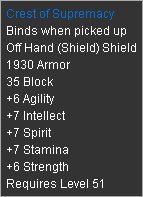
Also the avatar can drop quite good items, 6 different blue items, such as:
Now on to your last epic battle, the Shade of Eranikus!
6. Shade of Eranikus:
Eranikus has the best loot table in the zone, and he is also the hardest mob to defeat in the zone. Don’t bother if the average level of your group isn’t around lvl 53, because Eranikus is himself lvl 55. So anyone below lvl 53 will see him Orange, and it will be hard for anyone in this case to deal sufficient damage to him. This doesn’t apply to the healer of your group though, who can heal just fine no matter what level Eranikus is.
Anyway, there are a few tricks to this fight that I will reveal, so even if you feel your group is a bit low level, you can go and try.
First of all, you must kill EVERY single Dragonkin in the whole area. They come to the aid of Eranikus when you engage him.
Once you have the whole circle room and the corridors cleared, go toward the chamber of Eranikus, on the way you will find two other dragons: Hazzas and Morphaz. They share the same loot table as Dreamscythe and Weaver, and are about as hard. The only difference is that you have to fight those two at the same time, so this isn’t an easy fight. But if you managed Jammal`an and the Script of Hakkar, you should be fine.
After those two last dragons bite the dust, you will be left with only one challenge to accomplish: defeat the Shade of Eranikus.
How to:
-
- Eranikus hits fairly hard, about 400-500 on a well equiped defensive tank.
- He has a lot of hit points.
- Deep Slumber, this is his killer ability. It puts a target to sleep for 15 seconds. You cannot dispel it, you cannot do anything against it. And the worst is, he will most likely cast it on your tank, and then go hit your casters for 800-1000 dmg a pop.
To counter this, you need to have another person meleeing Eranikus (ideally a rogue, if not, a paladin, shaman, or even a druid in cat form), preferably someone you can afford being put to sleep for 20 seconds (basically anyone beside your tank and your healer).
So as soon as your tank engages Eranikus, have that other person go with him and melee and build some aggro. The ideal would be that this person has high aggro on Eranikus, but doesn’t overaggro your tank, or it could get uggly. And if you do this right, Eranikus will pick that person as target for Deep Slumber, and that way your tank will always be taking the hits.
- He also has some kind of annoying AE dmg + Knockback + Stun attack. So make sure everyone but the tank and the Deep Slumber decoy are at max healing / nuking range.
Note: It happens quite often that he sleeps your tank the first time he does it. A shaman, a paladin, or a rogue with evasion up can pull the aggro and survive Eranikus until your tank awakes and Taunts. Give your tank a few seconds to rebuild aggro before you start nuking Eranikus again, and let him pull it away from camp.
Normally if you did it right, he will not Deep Slumber your tank again, and will pick the other person meleeing him.
Once you have the Deep Slumber under control, the fight is pretty stable, but still mana intensive, because he hits hard. If you die it’s not an issue, you can quickly run back to the temple, take the leftmost path, and be back to his lair in 5 min for another attempt.
He is worth the trouble, drops at least 1-2 blue items, here are some of them:

And if you are really lucky (0.1% chance 🙄 ):
Also, you will find Essence of Eranikus on the corpse. Loot it and click it to start the quest. To finish the quest, just go to the brazier in the left corner of the room, and you will get experience and a trinket as reward. (keep this trinket in bank if you don’t use it, because it’s currently part of a greater chain of quest, but not completed yet)
This was all you needed to know about the Temple of Atal`Hakkar instance, and I hope you enjoyed this guide. If I forgot anything, if you want me to add something, or if you find any mistakes please say it 🙂
Thanks for reading!
-Jame
Copyrights WoW-Pro All rights reserved
Hi there to every body, it’s my first visit of this
webpage; this weblog carries remarkable and in fact good material
in favor of readers.
Thanks!Thanks for the links!—Ovidiu, team <a href=”https://www.traduceriautorizate.biz/“>traduceri</a>
This was a great walkthrough!This was a great walkthrough! Still usefull after so many years. Thank you!
That was life saving at theThat was life saving at the time 🙂
Needs an updateWe are recently working on improving the quality of content here on WoW-Pro.com, both by limiting low ranked guides and by moving out of date guides into archives. For more information, see [url=https://www.wow-pro.com/node/3016]the full news post detailing this process[/url].
This guide needs an update to make sure it is current with patch 4.0. However it still has enough useful information that it will be left in it’s proper section as-is.
In Cataclysm, the level of this dungeon will be significantly raised, and the guide will need to be updated by that point or it will be moved to the archives.
If someone else would like to adopt the guide, or if you have any questions about this process, feel free to comment here.
heyhey awesome walkthrough just one quick question:
when I die sometimes i can never seem to work out how to get back in cause the normal entrance is blocked by water and i cant seem to find any other ways in can u plz plz plz help me?
thanks
mightypowers
Paladin QuestGREAT Site as usual. Love ur guides. I found a quest for Paladins given by Mehlar at the Bulwark. It requires for u to kill Atal’ Alarion and recover a putrid vine. The reward is a scourgebane trinket with 15 Stamina and when used increase the attack power against undead and demons by 150. Thought u might want to know this.
What would these steps be?What would these steps be? You can ask them nicely to delete any copied material but if they don’t agree with that what else can you do?
__________________
Samuel Stanislas, part of the Traduceri autorizate team.
Nope, never authorized it.Nope, never authorized it. Thanks for the heads up, we’ll take the necessary steps.
Unauthorized use?Your guides are the best. Thanks also for the re-dos you are making. Awesome!
I’m writing because I googled for your site and found another site with your material. It’s
http://crazyarcher.com/node/225
If you have authorized this that’s fine of course but if not I wanted you to know.
lollol
Trolls of a Feather – WarlockJust like to add that the if you are a warlock then go to felwood and Talk to Impsy (41,44) to get the quest [b]Trolls of a Feather[/b].
Bring a total of 6 Voodoo Feathers from the trolls in sunken temple
Amber Voodoo Feather (2)
Blue Voodoo Feather (2)
Green Voodoo Feather (2)
Each one of the guardians (Zolo, Mijan, Hukku, Loro, Zul`Lor and Gasher) drop these feathers to complete the quest.
—————
[b]Rewards[/b]
You will be able to choose one of these rewards:
[b]Soul Harvester[/b]
Binds when picked up
Two-Hand Staff
118 – 178 Damage Speed 3.30
(44.8 damage per second)
+16 Stamina
Durability 100 / 100
Equip: Increases your spell hit rating by 8 (1.24% @ L50).
Equip: Increases damage done by Shadow spells and effects by up to 24.
[b]Abyss Shard[/b]
Binds when picked up
Trinket
Use: Casts your Summon Voidwalker spell with no mana or Soul Shard requirements. (30 Min Cooldown)
“Dark rituals are trapped in dark gems.”
[b]Robes of Servitude[/b]
Binds when picked up
Chest Cloth
75 Armor
+15 Stamina
+10 Intellect
Durability 80 / 80
Equip: Increases damage done by Fire spells and effects by up to 23.
Equip: Increases damage done by Shadow spells and effects by up to 23.
You will also receive: 1G 55S
—————
So if you gonna do Sunken Temple as a Warlock dont forget this quest…
Small error regarding the quests to collectQuote:
[i][51] Secret of the Circle (Dungeon), you get this quest inside the instance, right after you complete [51] Into the Depths[/i]
When you complete The Stone Circle (brings back the stone from Ratchet), Marvon gives offers these quests:
– Into the Depths
– Secret of the Circle
As you see, you don’t even have to enter ST to get the Secret of the Circle quest.
Hehe, I wish I had no life!Hehe, I wish I had no life! If it were the case I could release guides so much faster 🙁
Rogue questThere is another quest in the temple. It’s a rogue quest and the only thing you have to do is killing Morphaz and looting the Azure key from its corpse.
P.S.
All your guides are fantastic!! 🙂
James’You must have no life or you really love the game James’.. But I cannot thank you enough for your guides. They have helped me so many times, Especially this one.. ST was impossible to complete for me and I couldn’t find anyone that knew how to do the whole thing, We would always end up getting wiped. Thanks to this guide I have Conqured and made ST my bitch. 😀
Thanks James’ and keep up the good work.
Shortinstat
Dwarf, Pali
Draenor
Pally QestAll classes have a quest that sends them to ST. Horde pallys will get there’s from the pally trainer in UC.
Jinth’alorAs of patch 2.3 the mobs in Jinth’alor are no longer elites, so it’s far easier to get the ancient egg quest.
Forgot a questWitch Doctor Uzer’i in Camp Mjache, Feralas has [51+] The Sunken Temple. This takes you to Tanaris to get the follow up at Marvon Rivetseeker.
Mage QuestThere’s also a mage quest line that ends here with the quest Destroy Morphaz (http://www.thottbot.com/q8253); the quest line begins with the quest Magecraft (http://www.thottbot.com/q8250). Great job with all your guides, Jame – I picked up the alliance leveling guides at level 33 and they have been an invaluable aid to me, as have all of your instance guides.
Atal’ai HazeI noticed that the Atal’ai Haze quests are missing from the walkthrough:
Alliance: http://thottbot.com/q4143
Horde: http://thottbot.com/q4146
Most people will pick these quests up in the course of Un’Goro Crater questing, and if you’re doing the Secret of the Circle, you have to kill the mobs that drop the Haze anyway.
Hunter questThere’s a hunter chain that ends here as well, with a great trinket reward at this level. Starts with http://www.wowhead.com/?quest=8151 and ends in ST with http://www.wowhead.com/?quest=8232. Great guides!
There is another class qThere is another class q chain for this instance – for shamans now – it’s worth doing it, because trinket is quite interesting 😉 :
http://wow.allakhazam.com/db/quest.html?wquest=8410 (obtainable from any trainer, for Alliance in SW and Exodar)
http://wow.allakhazam.com/db/quest.html?wquest=8411
http://wow.allakhazam.com/db/quest.html?wquest=8412
http://wow.allakhazam.com/db/quest.html?wquest=8413
Some good items from the guardiansThanks for another great guide guys!! 😀
[url=http://wow.allakhazam.com/db/item.html?witem=10783]The Atal’ai Spaulders of… [/url]are really nice for (care)bear druids with 193 armor and if you’re lucky enough to get them with fire resistance you should keep them if you’re a rogue or druid (well, even shaman/hunter might be interested) since it’ll be hard to find better fire resistance for shoulders even inside Molten Core (Major Domo’s chest)…
—————————————————————
I know, if I were you I’d like to nerf me as well…
Thanks a ton Broc, addingThanks a ton Broc, adding 🙂
The last quest in the druidThe last quest in the druid chain is: A Better Ingredient which you can get from Torwa Pathfinder in the entrance of Un’Goro crater (at the bottom), the chain starts at you’re druid trainer.
The mage questseries starts with Archmage Xylem in azshara, the first is called Magic Dust, followed by The Siren’s Coral and ending in Destroy Morphaz.
Thanks a lot Shaulinn,Thanks a lot Shaulinn, adding 🙂
Rogue QuestThe rogue quest “The Azure Key” could be added to your list. This quest is attained at Level 50 from Archmage Xylem in Azshara. It is the last leg of a 4 part chain quest. The final chain quest is to kill Morphaz. Some very nice blue rogue gear and xp is well worth completion of this chain series.
Thanks – Very nice guide.
Thanks a lot Barett, addingThanks a lot Barrett, adding this 🙂
Paladin QuestPaladins should get the quest “Forging the Mightstone” from Commander Ashlam Valorfist at chillwind camp in the Western Plaguelands. This quest involves defeating the six guardians and collecting their feathers (Amber voodoo, Blue voodoo and Green voodoo – 2x of each) and returning to Commander Ashlam Valorfist to recieve some pretty good rewards including a great paladin ring ‘Chivalrous Signet’. Thanks alot for the guides Jame, you’re a champion.
Thanks to both of you forThanks to both of you for the additions, I’ve added them as a child page to this guide.
Warrior QuestWarriors should get the quest “Voodoo Feathers”; You’ll have to research the quest chain. Work towards this quest before going into the temple. The rewards are also pretty nice, especially for slow swinging warriors who depend on high crit%.
Priest QuestMake sure you pick the Quest “Cenarion Aid” if you are a priest. You can pick it up at the priest trainer in either Orgrimmar (Horde) or Ironforge (Alliance). It is a chain of quests, the first three are easy to solo but the last requires you to kill Morphaz in Sunken Temple.
Reward is good: Blessed Prayer Beads (http://www.wowhead.com/?item=19990). There are not too many good healing trinkets in the game so make sure you got this quest.