
 by Jame
Journey from Grizzly Hills to Zul’Drak
![]()
All the guides on wow-pro are FREE, there is no trick, they are just free and will remain free.
Enjoy and please contribute or Leave a tip!
70-80 WotLK Classic Leveling Guides
Alliance
- Jame’s Alliance Leveling Guide – Borean Tundra (70-72)
- Jame’s Alliance Leveling Guide – Howling Fjord (72-74)
- Jame’s Alliance Leveling Guide – Dragonblight (74-75)
- Jame’s Alliance Leveling Guide – Grizzly Hills (75-77)
Horde
- Jame’s Horde Leveling Guide – Howling Fjord (70-72)
- Jame’s Horde Leveling Guide – Borean Tundra (72-74)
- Jame’s Horde Leveling Guide – Dragonblight (74-75)
- Jame’s Horde Leveling Guide – Grizzly Hills (75-77)
1-70 Leveling Guides for World of Warcraft Classic
For guides covering levels from 1-70, please check this link:
1-70 Wow Classic Leveling Guides
Support my work
Question– Your guides really helped me out and I want to return the favor, what can I do to help?
Answer– Here’s how you can contribute:
1. Most important and easiest way to help: Spread the word. Tell people about my guide. Your friends, guildmates, boards you visit. Tell them that they are FREE and that they make you level much faster than other guides or questhelper.
2. When you try my guides, if you find any mistakes, leave a comment.
3. Post useful comments here. When people ask for advices and you know the answer, go for it and help them out, so I won’t have to do it myself 😛
4. And then of course, you can write a guide about an area of the game where you’re good. Direct message me on Twitter if you want to become an editor on Wow-pro!
5. You can also translate guides into other languages, if you are fluent in another language. Check our Guides in Other Languages section to see what has already been translated.
6. Leave a tip to the author of these guides : Donate!
Introduction
This guide is made for FAST leveling through the use of Optimized Quest Circuits. With this guide, questing will be very efficient and you’ll not waste any second running around and trying to figure out in which order to do your quests. Follow each instruction carefully and you will see for yourself. The quest choices and order to do them are optimal so that you run as few as possible while doing the most possible, turning several quests at the same time. It will be like grinding, because you’ll be killing stuff almost non-stop, besides you’ll also be completing a bunch of quests at the same time!
NOTE: Following this guide will get you the Quest Achievement for Grizzly Hills: Fo’ Grizzle My Shizzle. In fact, 100% of the quests of Grizzly Hills are included in the guide, or at least mentioned as optional.
The only one I didn’t include is a daily quest called [74] Riding the Red Rocket. For two reasons:
1. This quest is only available if your faction to control the Venture Bay lighthouse.
2. It’s rather annoying to do it without a flying mount. I recommend skipping this quest while leveling up and coming back to do it at level 80 and once you have your flying mount.
Everything described in this guide can be done solo (beside when I say otherwise). You can, of course, follow this guide while duoing, grouping, it’s not a problem, it works too.
DISCLAIMER: This guide does NOT take into account tradeskills, class specific quests or PvP. It’s 100% focused on getting the most experience possible in the shortest possible time while doing a lot of quests and enjoying as much content as possible. Any race/class combination can do this guide. Any complaints about PvP, tradeskills, or class specific issues will be ignored.
Basic rules
- Spend your talent points so that you kill things as fast as possible. (e.g: Priest should specialize in Shadow Talents, Warriors in Arms/Fury, etc.
- Don’t waste your time trying to find groups for questing, you can solo everything that is described in this guide unless I say otherwise. Only group with someone when it’s not gonna be a waste of time (e.g: meeting the person at the other end of the zone to show him the way to where your quest is, that is a waste of time)
- Try to always log out in an inn or in one of the major cities when you take a break.
Color Code:
- Quests
- Items
- Locations
- Quest objectives to kill
- NPCs
- Locs
The Guide:
If you followed my previous guide in Dragonblight, you should have the following two quests:
- [75] Into the Breach!
- [74] To Conquest Hold, But Be Careful!
If you don’t have them, it’s not a big deal, but they’re easily attainable. Just go to my Dragonblight guide and search for them with your browser’s search function (CTRL + F).
Time to go to Grizzly Hills.
Fly to Venomspite.
Ride east until you enter Grizzly Hills.
In Grizzly Hills, ride east to Conquest Hold (21,63).
Turn in [74] To Conquest Hold, But Be Careful, get [74] The Conqueror’s Task.
 Go to the inn and make it your home location.
Turn in [74] The Conqueror’s Task.
Get all the available quests from Conquest Hold BESIDES [75] The Magical Kingdom of Dalaran:
- [74] A Show of Strength
- [74] The Flamebinders’ Secret
- [74] Gray Worg Hides
- [74] Supplemental Income
 Get the new flight path.
==Note== Kill Graymist Hunters on the way.
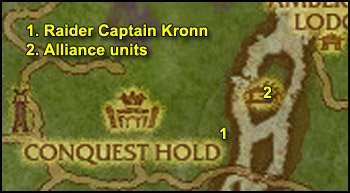
1. Get out of Conquest Hold by the southern gate.
Ride east to to Raider Captain Kronn (26.5,67).
==Warning== This is a PvP Daily Quest. It’s very quick, easy and rewarding, and there most likely won’t even be any PvP involved. So I suggest doing it. However, if you don’t want to have anything to do with PvP, you can skip this and go to the next circuit. This quest doesn’t count towards the zone quest achievement, but it does count for the Daily PvP Quest Achievement: Grizzled Veteran. So it’s up to you!
Get the quest [74] Blackriver Brawl.
2. Go to the isle northeast and kill 10 Alliance Units or Players.
Go back to Raider Captain Kronn, turn in [74] Blackriver Brawl.
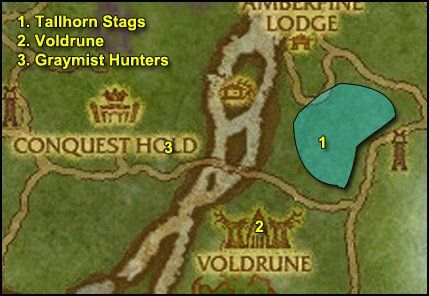
1. Southeast you should see a bridge.
Cross it and then go northeast to an area with a lot of Tallhorn Stags (34,65).
Stay there and kill Tallhorn Stags until you finish [74] Supplemental Income.
2. Ride southwest to Voldrune (31,75). Two objectives here:
- Kill 12 Dragonflayer Huscarls
- Kill Dragonflayer Flamebinders until you’ve looted 3 Flame-Imbued Talismans
3. Go northwest and cross the same bridge again.
Kill Graymist Hunters until you finish [74] Gray Worg Hides on your way back to Conquest Hold.
In Conquest Hold, turn in:
- [74] Supplemental Income
- [74] Gray Worg Hides, get [74] A Minor Substitution
- [74] A Show of Strength
- [74] The Flamebinders’ Secret, get [74] The Thane of Voldrune
==Warning== PvP Daily Quest Circuit. Skip this circuit and the next one if you don’t want any PvP. However please note that [74] Seeking Solvent counts for the zone quest achievement. Those quests are really quickly done and give 20K XP each, so I recommend doing them, even if you dislike pvp.
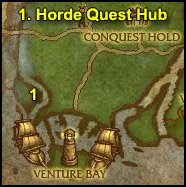
1. Ride southwest to Venture Bay. The horde quest hub is on the western side of Venture Bay (11,77).
Get the 4 daily pvp quests:
- [74] Seeking Solvent
- [74] Keep Them at Bay!
- [74] Smoke ‘Em Out
- [74] Crush Captain Brightwater!
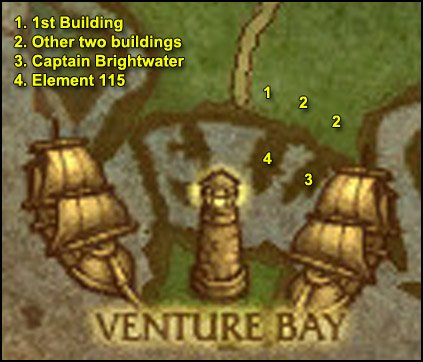
1. Go east to the area north of the docks in venture bay.
Enter the first building you encounter at (14,77).
Inside the building you should see Venture Co. Stragglers.
 Use the Smoke Bomb on them.
Tip: Just run in the building, gather them all in one bunch and then use the Smoke Bomb on them.
2. Go to the next two buildings to the east and do the same thing.
==Note== Kill Alliance Units & Players on the way
You should be done with [74] Smoke ‘Em Out very quickly if you bomb the 3 buildings.
3. Go to the easternmost ship. On the main deck you’ll find Captain Brightwater (17,81.5). He’s elite but should be easily soloable for any class. Just make sure you pull him solo.
HP: 30,000
Avg. Hit on Cloth: 800
Can be slowed, stunned, feared.
Now Finish [74] Keep Them at Bay! before going to the next step.
4. Go to the middle ship (16,80). It’s the same model as the boat from Booty Bay to Ratchet.
Go inside the cabin and clear the way to the last room.
==Warning== I really mean CLEAR the way. Kill all the Venture Co. in your way, even if you are a stealth class.
Once the way is clear, go to the last room where you should see the Element 115.
Loot it. You’ll get the following debuff:

That means it’s useless to mount or to sprint or anything like that. Just run straight back to the quest NPCs. You have only 3 Minutes to get there.
Go as fast as you can, avoid fights, and turn in [74] Seeking Solvent first.
Then turn in the other 3 quests:
- [74] Keep Them at Bay!
- [74] Smoke ‘Em Out
- [74] Crush Captain Brightwater!
Hearthstone back to Conquest Hold (or ride back if you’re HS is on cooldown).
1. Ride southeast, cross the bridge and go to Voldrune.
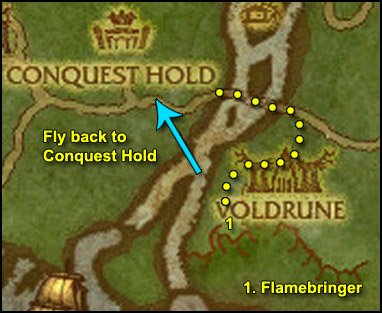
This time clear the way towards the southwestern part of Voldrune, where you should find a chained proto-drake called Flamebringer (26,80).
Now check out my video on how to do this quest, it will make it much easier, as it’s kinda buggy and tricky at the moment. The only difference is that you should fly back to Conquest Hold at the end of the video, instead of towards Venture Bay.
I recommend watching the video in High Quality.
Video: [74] The Thane of Voldrune
==Note== If the video was useful to you, please don’t forget to rate it! 😉
After having watched the video you should be more than ready.
Kill the thane and then fly to Conquest Hold.
Turn in [74] The Thane of Voldrune, get [74] Onward to Camp Oneqwah.
Also get [75] My Enemy’s Friend.
Sell junk, repair and re-stock food/drink.
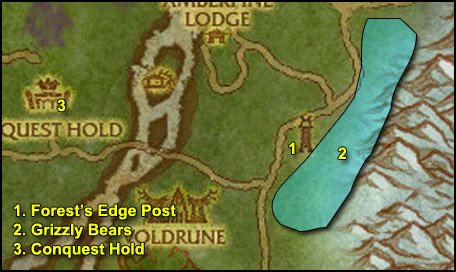
1. Ride southeast to the bridge and cross it again.
Then ride east to Forest’s Edge Post (36,67).
- Kill Vladek, he’s in the tower
- Kill 8 Silverbrook Hunters
- Keep on killing them until you loot Mikhail’s Journal
 Right-click it to start [74] Mikhail’s Journal.
2. All around the eastern and southern side of Forest’s Edge Post you should find a lot of Grizzly Bears, as shown on my map.
Kill Grizzly Bears until you finish [74] A Minor Substitution
3. Go back to Conquest Hold, turn in:
- [75] My Enemy’s Friend, get [74] Attack on Silverbrook
- [74] Mikhail’s Journal, get [74] Gorgonna
- [74] Gorgonna, get [74] Tactical Clemency
- [74] A Minor Substitution, get [74] Jun’ik’s Coverup
Mount up.
Go about 20 yards southeast to the merchant, buy a stack of 5 Simple Flour.
Go northeast across the conquest hold pit and buy 1 Coal from the NPC.
Get the following 2 quests:
- [74] Eyes Above
- [74] Good Troll Hunting
Turn in [74] Jun’ik’s Coverup, get [74] Delivery to Krenna.
Go inside the inn and turn in [74] Delivery to Krenna.
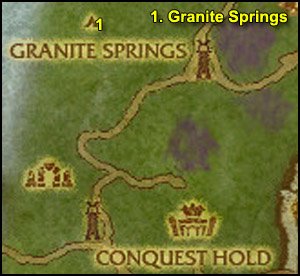
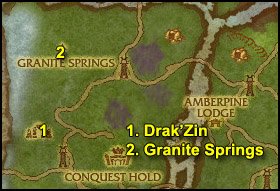
Ride northwest to Granite Springs (16,47.5).
Turn in [73] Good Troll Hunting! and get [74] Filling the Cages.
1. Talk to Budd, a human with a troll mask sitting in one of huts. Click on the text.
Mount up, ride southwest to Drak’Zin (14,58).
Find a SOLO troll.
 Use Budd’s Ability #4. This will put the troll to sleep for 15 seconds.
 Right-click the Bounty Hunter’s Cage on the troll (must be in melee range).
If you fail, you’ll have to go back to Granite Springs and talk to Budd again.
2. Go back to Granite Springs.
Turn in [74] Filling the Cages, get [73] Truce? from Drakuru.
Next to the cage you should find a Dull Carving Knife planted in a tree stump:

Loot it.
 Right-click the Dull Carving Knife from your inventory.
Talk to Drakuru and click on the text.
Turn in [73] Truce? and get [74] Vial of Visions.
Go to Ameenah, a troll female NPC selling , buy a stack of 5 Imbued Vials from her.
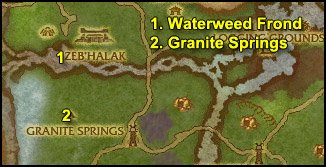
==Note== From now on, look for Hazelwood Bushes on the way and loot 3 Haze Leafs:
1. Go north/northwest to the lake at (15,39).
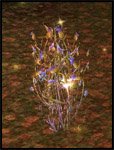
Dive in and loot a Waterweed Frond.
2. Go back to Granite Springs, turn in [74] Vial of Visions, get [74] Subject to Interpretation.
Get [74] Scourgekabob from Prigmon just a few steps northwest.
Loot a Scourged Troll Mummy.
Go southeast to Mack Fearsen, who stands in front of a bonfire with mummies burning.
 Right-click the Scourged Troll Mummy from you inventory.
Turn in [74] Scourgekabob, get [74] Seared Scourge.
Go back to Prigmon and get [75] Shimmercap Stew.
1. Ride southwest to Drak’Zin. Complete the following 2 objectives:
Kill Trolls until you’ve looted 5 Frozen Mojo
Kill Ice Serpents until you’ve looted 5 Ice Serpent Eyes
Go to Drakuru’s Brazier, which is up some ruined stairs in the middle of Drak’Zin (13,61).
 Right-click Drakuru’s Elixir.
Turn in [74] Subject to Interpretation, get [74] Sacrifices Must be Made.
2. Now go west towards the river, look for Shimmering Snowcaps, they can be found close to trees along the river bank:

Go north along the river bank and loot 5 Shimmering Snowcaps.
3. Ride further north to Zimb’bo’s Hideout (15,37). It’s the biggest hut on the western side of the Zeb’Halak.
Kill Warlord Zimb’bo and loot Zimb’bo’s Mojo.
==Note== From now on, loot Sweetroot on the way:

4. Clear the way to the top of the temple east (18,36).
Right-click the Seer of Zeb’Halak, click on the text. You’ll receive the Eye of the Prophets.
Go to Drakuru’s Brazier, which is a few steps west of the Seer of Zeb’Halak.
Right-click Drakuru’s Elixir.
Turn in [74] Sacrifices Must be Made, get [74] Heart of the Ancients.
Go back down and gather Sweetroots until you have 5.
1. Go north to Drak’Tharon Keep.
Go to the area west of the stairs and you’ll see many trolls running around (16,30):
 Throw Mack’s Dark Grog at them. It has a huge range, so you’ll probably need to back off a little.
Repeat until you finish [74] Seared Scourge.
2. Go east to Bonesnap’s Camp. Turn in [74] Tactical Clemency.
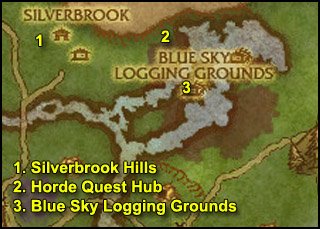
1. Ride east to Silverbrook Hills (26,31).
Kill 8 Silverbrook Defenders.
2. Ride east/northeast to the Horde Quest Hub at the Blue Sky Logging Grounds (34,33).
==Warning== There might be some PvP action involved in the following circuit. So if you want to avoid PvP at all costs, skip it. They don’t count for the zone quest achievement, but they do give nice XP and are quickly done.
Get all the quests from here:
- [74] Keep ‘Em On Their Heels
- [74] Overwhelmed
- [74] Making Repairs
- [74] Shred the Alliance
3. Go east to the central isle of Blue Sky Logging Grounds. Our main objective is to deliver 3 Shredders while completing as much as the other quests on the way:
- Kill 15 Alliance Units (NPCs and players both count)
 Use the Renewing Tourniquet on 10 Wounded Skirmishers
- Gather the following parts until you finish [74] Making Repairs:
Do that on the way while looking for a Broken-down Shredder:
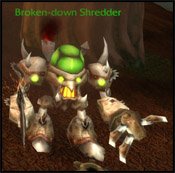
Jump into one, face toward the bridge west and use ability #3 to sprint.
If you get attacked:
Use Ability#1 to pushback your enemy.
Use Ability#2 to blind nearby enemies (must be in melee range)
Go back to the quest giver and use ability #5 to deliver the shredder.
Finish all 4 quests, go turn them in.
You should be level 76 or somewhere around it. If you are ahead, that’s great, keep following the guide normally, don’t skip anything. If you are behind, that’s not a problem either, just keep following the guide normally. You’ll catch up eventually and there will be a lot of extra circuits at the end anyway 😉
Level 76
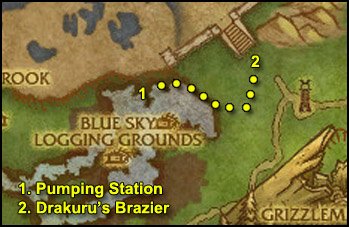
1. Go east to the pumping station at (37,32).
Clear the way to the top, go inside the cabin, turn in [74] Heart of the Ancients, get [74] My Heart is in Your Hands.
2. Go to the eastern point of the lake, and from there ride northeast to Drak’atal Passage (44,30).
Kill Drakkari Defenders and Injured Drakkari Refugees until you’ve looted 5 Desperate Mojo.
Go to Drakuru’s Brazier, found at the bottom of the big stairs.
Right-click Drakuru’s Elixir.
Turn in [74] My Heart is in Your Hands, get [75] Voices From the Dust.
Hearthstone back to Conquest Hold. (Or ride back there if your HS is on cooldown).
Turn in [74] Attack on Silverbrook, get [75] Ruuna The Blind from Gorgonna.
Also get the two quests from Windseer Grayhorn:
- [74] The Darkness Beneath
- [74] Vordrassil’s Fall
Outside of the Conquest Hold Pit, there should be a new quest available, but don’t take it yet.
Optional: [74] The Conquest Pit
[74] The Conquest Pit: Bear Wrestling! is the first step of a chain similar to the Ring of Blood quest chain in Nagrand.
So you will need a group for it. You don’t need a full group though, 3 player is more than enough:
1 healer, 1 tank or pet class and 1 DPS class to make it faster.
==Note== Certain classes might be able to solo the first 3 bosses depending on their gear (Death Knights, Hunters, Warlocks with Voidwalker tanking, Feral Druids, Paladins, Shamans with Earth Elemental Totem up), but not the last 2 quests in the chain.
So I recommend finding a group for it, it’s really much easier and faster that way.
Proceed with the guide and keep on looking for a group for this quest chain.
Once you have a group, have your tank accept the quest first (that way, he’ll get the initial aggro), and check the info below about the bosses you’ll have to fight:
1st boss: Ironhide. Easy tank and spank battle.
2nd boss: Torgg Thundertotem. Do NOT destroy the Fire Nova Totems. They do 8K damage if you destroy them, so leave them alone and MOVE AWAY from them before they explode. The Furbolg can be interrupted and stunned.
3rd boss: Rustblood. Simple tank and spank. Knockbacks and attacks the 2nd person highest on the threat list. So make sure your tank is awake.
4th boss: Horgrenn Hellcleave. He charges people which are out of his melee range randomly. So have everyone stay close to him and he won’t charge anyone. However, he also does a Whirlwind, quickly move away from him when he does that. When he’s done with Whirlwind, go back in close melee range.
5th boss: Krenna. This one is actually easier than the previous two bosses. It’s a simple tank and spank fight and you also get help from Gorgonna.
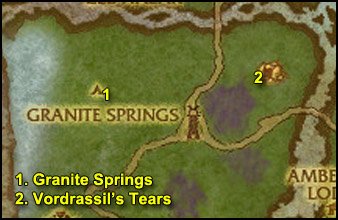
1. Ride northwest to Granite Springs (16,47.5). Turn in:
- [74] Seared Scourge, get [74] Search and Rescue, don’t get the daily quest
- [75] Shimmercap Stew, get [74] Say Hello to my Little Friend
2. Ride east/northeast to Vordrassil’s Tears, you’ll find a cave entrance at (28,45).
Kill Entropic Oozes on the way and loot Slime Samples off them.
Clear the way to the bottom of the cave until you find an area with black smoke.
 Right-click the Geomancer’s Orb from your inventory.
Get out of the cave.
==Note== From now on, look for Imperial Eagles on your way:
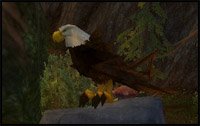
 Target them and use the Silver Feather from your inventory.
We’re not in any hurry to finish that quest, so just do it on the way, don’t go looking for them.
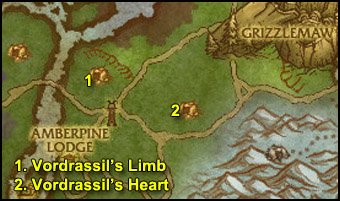
1. Ride east to Vordrassil’s Limb (33,49).
Clear the way to the bottom of the cave.
Right-click the Geomancer’s Orb from your inventory.
2. Ride east/southeast to Vordrassil’s Heart
Clear the way to the bottom of the cave.
Right-click the Geomancer’s Orb from your inventory.
Now kill Entropic Oozes until you’ve looted 6 Slime Samples.
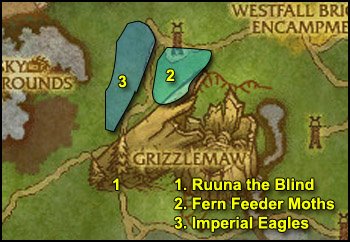
1. Ride east to Ruuna the Blind (44,48).
Turn in [75] Ruuna The Blind, get [75] Ruuna’s Request.
2. Go to the area north/northeast I colored on the map.
Kill Fern Feeder Moths until you’ve looted 4 Gossamer Dusts.
3. Also finish [74] Eyes Above, there are a lot of Imperial Eagles just west of the area I colored.
Ride back to Ruuna the Blind.
Turn in [75] Ruuna’s Request, get [75] Out of Body Experience.
 Right-click the Gossamer Potion.
Watch the scene until you get a complete message, then cancel the “Out of Body Experience” buff.
Turn in [75] Out of Body Experience, get [75] Fate and Coincidence.
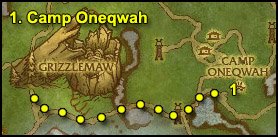
1. Follow the road east and then northeast to Camp Oneqwah (65,47).
Turn in [74] Onward to Camp Oneqwah. Gather all the available quests from here:
- [75] An Expedient Ally
- [75] The Horse Hollerer
- [75] The Unexpected ‘Guest’
Get the new flight path.
==Note== Kill Silvercoat Stags on the way from now on.
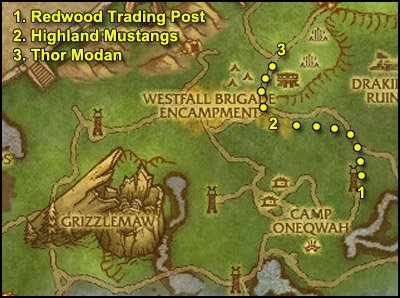
1. Go northeast to Redwood Trading Post (69,40).
Get [75] A Bear of an Appetite.
2. Go north until you hit the Path of Iron. Then go northwest to an area where you’ll find Highland Mustangs.
 Use the Flashbang Grenade on them.
You’re not supposed to finish this quest now, just do this on the way.
3. Keep following the path of iron until you arrive in Thor Modan.
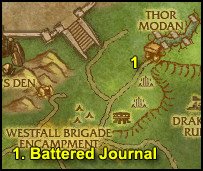
1. Go a little northeast and you’ll find a Battered Journal on the floor (64,20).
Get the quest [75] The Damaged Journal.
Gather 8 Missing Journal Pages off the ground:
 Right-click the Incomplete Journal.
Hearthstone back to Conquest Hold. Turn in:
- [74] The Darkness Beneath
- [74] Vordrassil’s Fall
- [74] Eyes Above
Get the 2 follow ups:
- [74] A Possible Link
- [75] The Bear God’s Offspring
Sell junk, repair and re-stock food/drink.
Fly back to Camp Oneqwah. Turn in [75] The Damaged Journal, get [75] Deciphering the Journal.
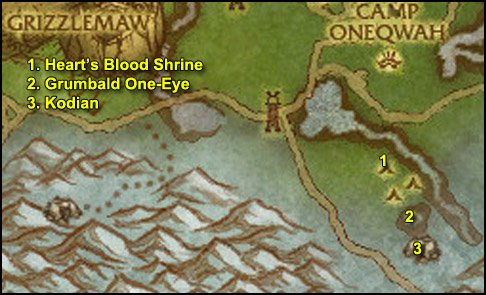
1. Ride south to Heart’s Blood Shrine (64,55).
Kill Redfang Hunters on the way and loot Crazed Furbolg Blood.
2. Clear the way southeast and you’ll find Grumbald One-Eye (66,59).
Kill him, loot a Spiritsbreath.
3. Go a little further southeast to a cave at (67,62).
Talk to Kodian, go through his text and you’ll get the quest update “Kodian’s Story“.
==Reminder== Kill Silvercoat Stags on the way.
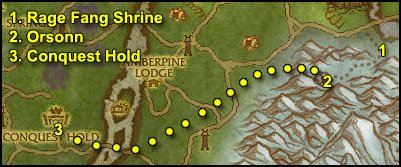
1. Ride west/northwest to to Rage Fang Shrine (55,53).
==Note== Kill Frostpaw Warriors and Frostpaw Shamans on the way and loot Crazed Furbolg Blood off them.
2. Clear the way southwest to the cave where you will find Orsonn (48,59).
Go through his text and you’ll get the quest update “Orsonn’s Story“.
Now finish killing Frostpaw Warriors/Shamans until you’ve looted 8 Crazed Furbolg Blood.
3. Behind the cave where you found Orsonn, you should see a small snowy path going west. Take it and ride back to Conquest Hold.
Turn in:
- [74] A Possible Link
- [75] The Bear God’s Offspring
Get the two follow ups:
- [74] Vordrassil’s Seeds
- [75] Destroy the Sapling
Fly to Camp Oneqwah.
Turn in [75] Deciphering the Journal, get the two follow ups:
- [75] Pounding the Iron
- [75] The Runic Prophecies (becomes available 20 seconds later)
1. From the northeastern exit of Camp Oneqwah, go straight north, kill Silvercoat Stags on the way.
Keep going north until you reach the Path of Iron.
2. Follow the Path of Iron until you reach the intersection.
==Reminder== Don’t forget to use the Flashbang Grenade on Highland Mustangs on the way.
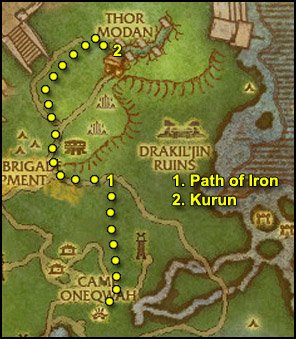
From there follow the dots on my map and you’ll find Kurun, who stands at the very top of the hill above Thor Modan (65.5,18).
Turn in [75] An Expedient Ally and get [75] Raining Down Destruction.
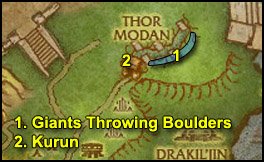
1. Northeast of Kurun you should see Giants throwing boulders down in the trench below.
Look for a Boulder:
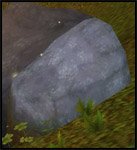
Loot 5 of them.
Go to the edge of the trench.
 Right-click the Boulder from your inventory and aim for a dwarf down in the trench.
Repeat 5 times.
In this area you should also find plenty of Silvercoat Stags. Now is the time to finish [75] The Unexpected ‘Guest’.
2. Go back to Kurun. Check this very short video to see how to get back up to Kurun:
Video: Way Back Up to Kurun
Turn in [75] Raining Down Destruction, get [75] Rallying the Troops.
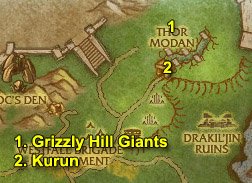
1. Go to the area north of the trench (68,11).
Target a Grizzly Hill Giant (it doesn’t work on the giants throwing boulders from the side, you have to find a giant fighting in the middle of the field)
 Right-click the Shard of the Earth on the Grizzly Hill Giant.
An Iron Rune Avenger will come out of the ground and attack you. Kill it.
Repeat 5 times.
After that, go finish [75] The Horse Hollerer. There are many Highland Mustangs just west of here.
2. Go back to Kurun, turn in [75] Rallying the Troops, get [75] Into the Breach.
Now we’re gonna jump down in the trench, check out this very short video to see exactly where I want you to jump down:
Video: Into the Breach Shortcut (horde)
No map needed for the following circuit.
1. You should find Iron Thane Argrum (70,13) right next to where we jumped down in the video.
Kill him.
2. Cross the small bridge, go a few paces south and you’ll find the Second Rune Plate (70,14.5).

Righ-click it.
3. Go a few paces southwest to the other side of the bridge, you’ll find the First Rune Plate (69,14.5).
Right-click it.
4. Cross the small bridge south and you should find the Third Rune Plate (68.5,16).
Now clear the way out while finishing [75] Pounding the Iron.
==Note== If you already got a flying mount, fly out of the trench, fly to Kurun and turn in [75] Into the Breach, get [75] Gavrock.
If you don’t have a flying mount, clear the way out (or ride out if you feel like taking a risk).
Then go turn in [75] Into the Breach, get [75] Gavrock.
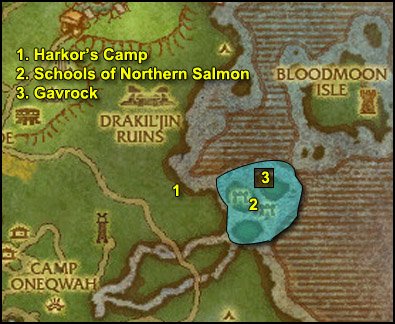
1. Go southeast to Harkor’s Camp (74,34).
Turn in [74] Say Hello to my Little Friend, get all the available quests from here:
- [75] Nice to Meat You
- [75] Therapy
- [75] It Takes Guts…
2. Go southeast to the isles called the Ruins of Tethys (78,37).
Once you’re on the isles, look around for a School of Northern Salmon:
 Get very close to it and right-click the Fishing Net.
Repeat this until you have 6 Northern Salmon. You can find more Schools of Northern Salmon all around those isles.
Tip: The water is shallow here, so you can mount up while looking for schools.
3. Go northeast to Gavrock (80,34).
Turn in [75] Gavrock, get [75] Runes of Compulsion.
==Note== From now on, kill Duskhowl Prowlers and Longhoof Grazers on sight.
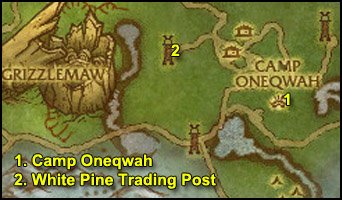
1. Go southwest, back to Camp Oneqwah. Turn in:
- [75] The Unexpected ‘Guest’, get [75] An Intriguing Plan
- [75] The Horse Hollerer
- [75] Pounding the Iron
- [75] The Runic Prophecies, get [75] In the Name of Loken
2. Go northwest to White Pine Trading Post (57.5,41).
Turn in [75] Fate and Coincidence, get the 2 follow ups:
- [75] Sasha’s Hunt
- [75] Anatoly Will Talk
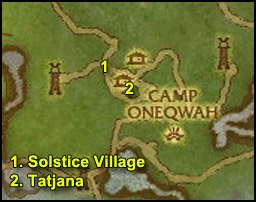
1. Go east to Solstice Village (60,40).
Kill Solstice Hunters and Duskhowl Prowlers on sight.
2. Once you’ve killed 12 Solstice Hunters, go to the center of the village.
A few paces south of the bonfire you should see Tatjana on her horse:
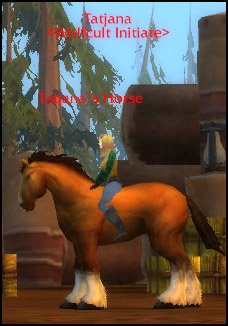
 Target Tatjana and right-click the Tranquilizer Dart.
Right-click the horse and you’ll be taken back to Sasha.
Turn in:
- [75] Sasha’s Hunt
- [75] Anatoly Will Talk, get [75] A Sister’s Pledge
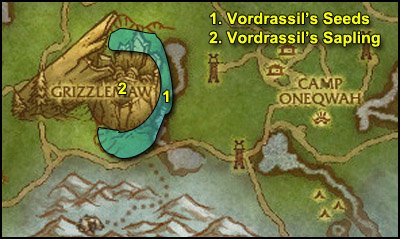
1. Go west to Grizzlemaw.
Look for Vordrassil’s Seeds:
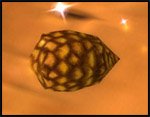
They can be found lying around in the furbolg camps all around the huge tree.
Gather 8 Vordrassil’s Seeds.
2. Find the slope taking you inside the tree and ride all the way down.
You should see a small tree down below:
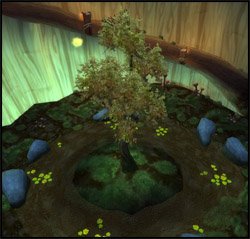
Go next to this tree.
 Right-click the Verdant Torch from your inventory.
Hearthstone back to Conquest Hold. Turn in:
- [74] Vordrassil’s Seeds
- [75] Destroy the Sapling
Get the follow up [75] Ursoc, the Bear God.
Fly to Camp Oneqwah.
Optional: [75] Ursoc, the Bear God.
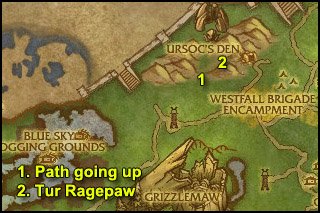
1. From Camp Oneqwah. Ride northwest until a narrow path going up at (51.5,27).
2. Follow this path up and you’ll find Tur Ragepaw (52,24).
Now before you talk to him, read the following paragraph.
Despite being a 3-man group quest, [75] Ursoc, the Bear God is soloable for tank and healer classes if you use the help of Tur Ragepaw correctly.
- If you are a tank or pet class (Protection Warrior, Paladin, Feral Druid, Death Knight, Hunter, Warlock). Tell Tur Ragepaw “We could use a healer“. He will heal your tank or your pet through the fight.
- If you are a healer class, tell Tur Ragepaw “Assume your druidic bear form, Tur.” And he will tank for you as long as you keep him alive with your heals.
- For other classes/specs it might be too difficult to solo the quest. With my mage in quest greens I couldn’t do it. It might be possible for rogues and dps warriors if they ask Tur Ragepaw to assume the role of a healer, depending on gear.
If you can’t solo it, try to look for a group. Duo’ing this quest should be easy.
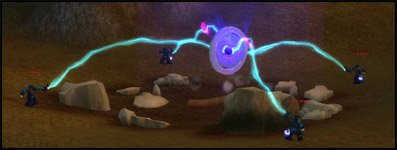
==WARNING== During the fight, Ursoc will release a small black sludge called Blood of the Old God. Kill it ASAP, it only has 2K HPs, but it’s very annoying (does 1K damage + stun every 5 seconds or so).
 After the fight is over, target Ursoc’s corpse and use the Purified Ashes of Vordrassil.
==Note== You can also use the Purified Ashes of Vordrassil on the corpse even if someone else killed Ursoc.
If you can’t find a group, just save this quest for when you reach level 80.
Go turn in [75] Ursoc, the Bear God whenever you’re close to Conquest Hold or when your hearthstone is ready. I won’t tell you when to turn it in in the guide, so it’s up to you.
Go back to Camp Oneqwah.
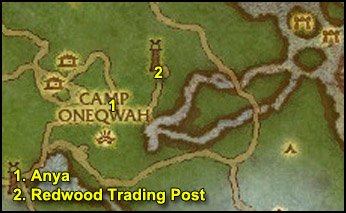
1. Go north of Camp Oneqwah and you’ll find a cave (65,43).
Go inside and you’ll find Anya.
Turn in [75] A Sister’s Pledge.
Sasha will come, get her quest [75] Hour of the Worg.
2. Go northeast to Redwood Trading Post, turn in [75] A Bear of an Appetite.
Talk to Hugh Glass, click on the text saying “Calm down, I want to ask you about the Iron Dwarves and Loken”
Let him speak until you get a quest update.
==Reminder== Kill Duskhowl Prowlers and Longhoof Grazers on sight.
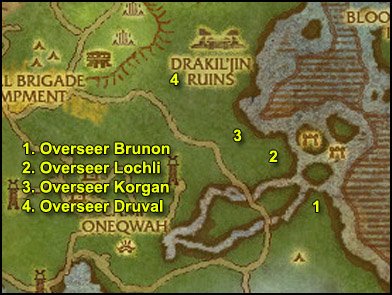
1. Go east/southeast to a summoning circle with 4 dwarves Iron Rune-Weavers channeling (79,44):
Kill the 4 Dwarves, Overseer Brunon will spawn. Kill him.
2. Go northwest to another summoning circle (75,37).
Kill the 4 Dwarves, Overseer Lochli will spawn. Kill him.
3. Go northwest to another summoning circle (72,34).
Kill the 4 Dwarves, Overseer Korgan will spawn. Kill him.
4. Go northwest to another summoning circle (68,30).
Kill the 4 Dwarves, Overseer Druval will spawn. Kill him.
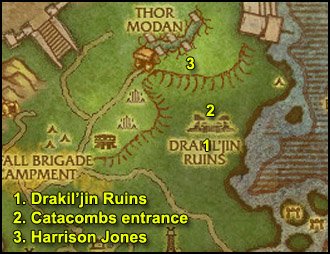
1. Go northeast to Drakil’jin Ruins (71,27).
==Note== Kill Drakkari Protectors and Drakkari Oracles on the way while going north.
2. Further north you’ll find an entrance to the catacombs at (71.5,23).
Look for Drakkari Canopic Jars:

Loot 5 of them.
3. Go deeper in the catacombs until you see a yellow “!” on your minimap (69.5,17.5). If there’s no “!” on the minimap, it means someone else is doint the escort quest, so you’ll have to wait a little.
Go to that room and you’ll find Drakkari Tablets in a corner:
Loot the Drakkari Tablets.
Now talk to Harrison Jones and start the escort quest [75] Dun-da-Dun-tah!
It’s an easy escort quest as long as you let Harrison Jones tank the elite snake for you.
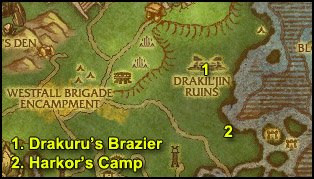
1. After the escort. Kill trolls in the ruins until you’ve looted 5 Sacred Mojo.
Then go to the middle of the Drakil’jin Ruins and find Drakuru’s Brazier, up some broken stairs (71.5,26).
Right-click Drakuru’s Elixir.
Turn in [75] Voices From the Dust, get [75] Cleansing Drak’Tharon.
Now kill trolls around Drakil’jin Ruins until you finished [75] Therapy.
Optional – Instance: Drak’Tharon Keep.
Now we’ve got all the quests for Drak’Tharon Keep:
- [74] Search and Rescue
- [75] Cleansing Drak’Tharon
So from now on, if you feel like it, you should look for a group for Drak’Tharon Keep. It’s a very nice instance for level 74-76 players, I recommend it.
If you don’t feel like it or if you don’t find a group, you can abandon [74] Search and Rescue, it can easily be picked up in the future at the Granite Springs, if you change your mind. However, do not abandon [75] Cleansing Drak’Tharon, as it’s rather annoying to get that quest again if you abandon it.
2. Ride southeast back to Harkor’s Camp. Turn in:
- [75] Therapy
- [75] Dun-da-Dun-tah!
- [75] It Takes Guts…, get [75] Drak’aguul’s Mallet
Optional: [75] Hour of the Worg
This group quest is supposedly soloable by certain classes (Death Knights, Paladins, Hunters, Warlocks, Druids, etc). But it’s of course much easier to get a 2 or 3-man team for it.
So look for a group while following the rest of my guide, and when you find a group, come back to this section.
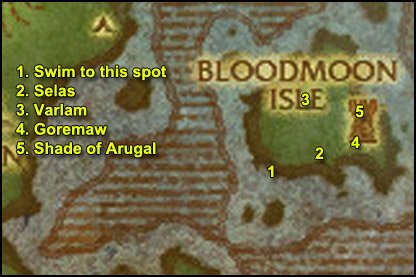
1. Swim northeast to Bloodmoon Isle (83,28).
2. Follow the path up and there will be a camp to your right, where you should find a big worgen called Selas (85.5,27.5). Kill it.
3. Get back on the path and further up to your left you’ll find another camp, where you will find Varlam (85,24). Kill him.
4. Once you reach the top of the hill, go around to the tower towards the southern side and you’ll find a big worg called Goremaw. Kill it.
5. Enter the tower, fight your way to the top. There you will find the Shade of Arugal.
Shade of Arugal Strategy
HP: 107,000
Phase 1: Shadowbolts for ~1500 dmg. Goes to Phase 2 at 75-70% HP.
Phase 2: Becomes invulnerable and summons 3 adds. Kill the adds to go back to Phase 1. When he hits 50% HP, he goes to Phase 3.
Phase 3: Becomes invulnerable again. Mind controls a party member which you’ll have to bring down to 35% health.
Once you break the Mind Control, Arugal goes back to Phase 1.
Bring him down to 25% HP and he’ll go to Phase 4.
Phase 4: It’s just like Phase 2, but with 9 adds instead of 3.
Kill the adds, then kill Arugal.
Sasha will show up and help you finish him off during the last phase. After the fight is over, turn in [75] Hour of the Worg.
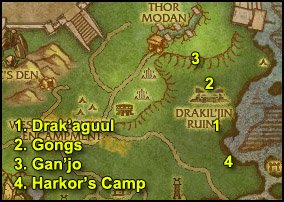
1. Now look for Drak’aguul. A big troll who spawns at (74,30) and patrols on the path towards Drakil’jin Ruins.
Kill him, loot the Drakil’jin Mallet.
Go back to Harkor’s Camp, turn in [75] Drak’aguul’s Mallet, get [75] See You on the Other Side.
2. Ride to Drakil’jin Ruins, go to the gongs infront of the catacombs entrance (71.5,25):
 Right-click the Drakil’jin Mallet while being very close to the one of the gongs.
You’ll die shortly after, it’s normal.
3. Go inside the catacombs and go deeper until you find Gan’jo.
Turn in [75] See You on the Other Side, get [75] Chill Out, Mon.
Right next to Gan’jo you should see Gan’jo’s Chest:
Right-click it and loot the Snow of Eternal Slumber.
Talk to Gan’jo and ask him to return you to the living.
Go back to the previous room.
 Target an Ancient Drakkari Warmonger or Soothsayer and right-click the Snow of Eternal Slumber.
Follow the Ancient Drakkari when it starts to run and then loot the Drakkari Spirit Particles after its mummy burns.
Repeat this 5 times.
4. Get out of the ruins, mount up and ride back to Harkor’s Camp.
Turn in [75] Chill Out, Mon, get [75] Jin’arrak’s End.
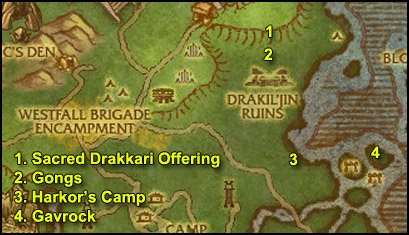
1. Ride to the Drakil’jin Ruins again.
Go inside the catacombs and look for a Sacred Drakkari Offering in the first room:

Loot it.
 Right-click the Drakkari Spirit Dust from your inventory.
2. Get out and go to the gongs just ouside the catacombs.
 Right-click the Infused Drakkari Offering from your inventory.
3. Go back to Harkor’s Camp. Turn in [75] Jin’arrak’s End.
Sell junk at the merchant here.
4. Go east to Gavrok, turn in [75] Runes of Compulsion, get [75] Latent Power.
Talk to Gavrock and click on the text saying “What can you tell me about Loken and the Iron Dwarves?”
Let him speak until you get a quest update.
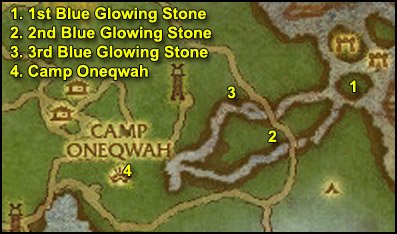
1. Go south/slightly southwest to an isle with a stone surrounded by a blue glow (79,40).
 Right-click the Shard of Gavrock.
==Note== Don’t forget to kill Longhoof Grazers on sight if you still need them for [75] Nice to Meat You.
2. Go southwest to another of those blue glow stones (74,44).
Right-click the Shard of Gavrock.
3. Go northwest to another of those blue glow stones (71,39.5).
Right-click the Shard of Gavrock.
4. Go southwest to Camp Oneqwah.
Turn in [75] In the Name of Loken, get [75] The Overseer’s Shadow.
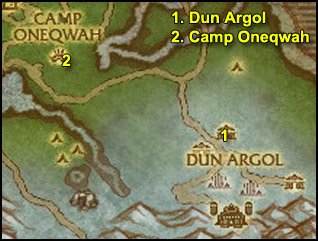
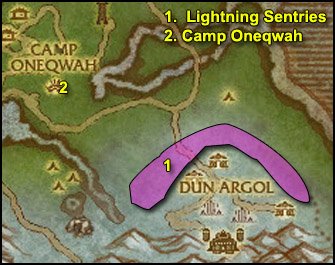
1. Go southeast to Dun Argol (75,55).
Complete the following 2 objectives:
- Kill Iron Rune-Smiths until you’ve looted the Golem Blueprint Section 1, 2 and 3
- Kill an Iron Rune Overseer, loot an Overseer’s Uniform
They’re mostly inside the buildings.
2. Go back to Camp Oneqwah, turn in:
- [75] The Overseer’s Shadow, get [75] Cultivating an Image
- [75] An Intriguing Plan, get [75] From the Ground Up
No map needed for this circuit.
1. Go back to Dun’Argol.
Two objectives again:
 Kill a dwarf, loot it, target the corpse and use Rokar’s Camera from your inventory. Repeat 8 times
- Gather 8 War Golem Parts
2. Go back to Camp Oneqwah, turn in:
- [75] Cultivating an Image, get [75] Loken’s Orders
- [75] From the Ground Up, get [75] We Have the Power

1. Mount up.
Ride back to Dun’Argol.
 Once in Dun’Argol, right-click the Overseer Disguise Kit. Yes, it works while mounted, and only if you are already mounted!
2. Ride up to the next tier with the two dwarven buildings.
First, go to the building on your right-hand side. You should find Rune-Smith Durar inside (75,57).
Cancel the Iron Rune Overseer Disguise buff. Kill Rune-Smith Durar, loot Durar’s Power Cell.
3. Use the Overseer Disguise Kit again.
Get out of the building and go straight ahead, towards the next building (77,59).
Kill Rune-Smith Kathorn, loot Kathorn’s Power Cell.
4. Get out of the building.
Mount up.
Use the Overseer Disguise Kit again.
Go about 20 yards north and you should see a path going east.
Follow this path until you reach the easternmost dwarven building (81,60).
Inside the building, right-click Loken’s Pedestal, listen to Loken’s speech and you’ll get a quest udpate.
Get out of the building.
Mount up.
Use the Overseer Disguise Kit.
Ride back to Camp Oneqwah.
==WARNING== Do NOT turn in [75] Loken’s Orders. The disguise will be very useful for the rest of the quests.
ONLY turn in [75] We Have the Power, get [75] … Or Maybe We Don’t.
1. Ride to the snowy hills surrounding Dun’Argol (73,55)
 Right-click the Golem Control Unit from your inventory.
Kill 10 Lightning Sentries, your golem should reach Charge level 10.
Go back to Camp Oneqwah.
Turn in [75] … Or Maybe We Don’t, get [75] Bringing Down The Iron Thane
2. Ride back to Dun’Argol.
Use the Overseer Disguise Kit again.
Ride to the very top of Dun’Argol and go inside the big dwarven building.
Take one of the elevators going down, you should find Iron Thane Furyhammer and The Anvil in this room.
Now right-click the Golem Control Unit.
Go next to Iron Thane Furyhammer.
Now do this:
1. Use Ability #2
2. Cancel the Overseer Disguise buff.
3. Target Iron Thane Furyhammer and use Ability #1 whenever it’s up. Also use Ability#2 again whenever The Anvil recovers from the EMP.
4. Once Iron Thane Furyhammer is dead, stay in the Golem Suit and run away until they give up on following you. Don’t bother killing The Anvil. (Please note that you take no falling damage in the suit, so you can jump off high cliffs too to escape).
Once they’ve given up on you, mount up and ride back to Camp Oneqwah.
Turn in the 2 quests:
- [75] Bringing Down The Iron Thane
- [75] Loken’s Orders
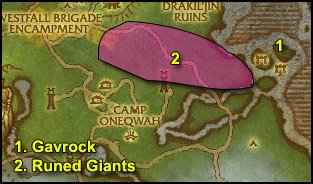
1. Ride northeast to Gavrock, turn in [75] Latent Power, get [75] Free at Last.
2. Ride southwest to a plains area at (72,37).
 Look for Runed Giants and use Gavrock’s Runebreaker on them.
- If it works, the giant will become friendly and you’ll get a quest update
- If it doesn’t work, the giant will attack you but will be in a much weaker state. So you’ll just have to re-use Gavrock’s Runebreaker until it works. Meanwhile, try to stun or to kite the giant until the item cools down.
Keep doing this until you’ve 4 Runed Giants Freed.
While you’re here, also kill Longhoof Grazers and Duskhowl Prowlers until you finish [75] Nice to Meat You!
No map needed for this part.
1. Ride to Harkor’s Camp. Turn in [75] Nice to Meat You!
2. Ride to Gavrock. Turn in [75] Free at Last.
You should be level 77 or somewhere around it. If you are ahead, that’s great, keep following the guide normally, don’t skip anything. If you are behind, that’s not a problem either, just keep following the guide normally. You’ll catch up eventually and there will be a lot of extra circuits at the end anyway 😉
Level 77
We’re done with Grizzly Hills! If you still haven’t done the group quests, now is your last chance to do them. If you can’t find a group though, it’s not a big deal, just save these quests for level 80.
It’s time to go to Zul’Drak. Please follow my guide to Zul’Drak!
I hope you enjoyed this guide. If you want to return the favor, please try to contribute.
-Jame
© 2008 Copyrights www.wow-pro.com All Rights Reserved
Mileage varries, but I knowMileage varries, but I know during the beta Jame was getting ridiculous times. Personally with my pally (who admittedly is OP) I probably could level once every 3 hours, at least at the early levels. I’m not really certain though because I wasn’t really keeping track, and took breaks to do instances.
Eventually we will have completed our speed testing runs (which are worst-case scenario sort of things) and can give you better info.
Level timesHey could anyone please tell me how long you took using this guide level during the 70-80, so like how long per level please? thanks in advance
Feedback.So, finally, after a 3 months pause from WoW , I came back to play 🙂 Firstly I decided to begin from scratch zero but – then – I’ve decided to level my level 78 rogue to 80 and see what to do. Anyway, I used the addon version and I’ve found no bugs or problems. The guide was extremely easy to follow, expecially when I got the cold weather flying skill and I flew over the plains of Grizzly Hills (60% mount but it was anyway better than the epic ground mount). I did every quest except the DTK quests (no party at all…) and 2 other group quests (the first is Ursoc, the bear god and Hour of the worg, only the last boss – the other 3 dudes were pretty much pwned by me). Did all in rested and I ended 40% into level 78. Then I did some quests in Zul’Drak (about 90, didn’t get the achievement), ~20 quests in Sholozar Basin, finaly hit 80, 450 mining and skinning.
Anyway, back to the feedback. It was all extremely fun, and surprisingly fast. I thought that at those high levels experience was hard to raise, but this guide changed my mind: it was faster from 78 to 80 than in the mid 60s! Thanks Jame, hope to see some nice updates before the summer hits the world 😀
TypoJame just a little typo i found. You have a quest as
[74] Overwhelmed its really [74] Overwhelmed! no big deal i know but thought i would let you know 😀
QuestOk Jame I love the guides. But i skipped the Dragonblight one because I am a little high and at the beginning it says we should have a quest called [74] The High Executor Needs You. I went back to dragonblight and did the beginning of it but it doesnt seem to come up for me.. is this quest really needed or can i just skip those parts?
TypoEdit – never mind – didn’t follow the guide right.
Thanks Jame! 🙂
another suggestion“1. Go south/slightly southwest to an isle with a stone surrounded by a blue glow (79,40).
Right-click the Shard of Gavrock.”
maybe add the item Shard of Gavrock as clickable via the add-on like the “Infused Drakkari Offering” was in the earlier step:)
Fixing the typo,Fixing the typo, thanks.
Sure you can collect the Snow Caps there but you have to take the way along the river to the north in any case, so it doesn’t really matter if you collect them on the way or while killing ice serpents 🙂
question and typo :)“Go to Drakuru’s Brazier, which is up some ruined stairs in the middle of Dark’Zin (13,61).” should be Drak’Zin 🙂
and thent he question, While doing the step gathering the Ice Serpent Eyes for the above step, I came to araound 11,62 close to the river where the snow starts, there are like 5-6 “Shimmering Snow Cap”‘s here and some serpents flying by, why not get the Snowcap’s at the same time as you are there?:) just a suggestion tho,
Thanks for a wonderfull guide, not only for levling, but also for Loremaster achivement:)
This should be posted underThis should be posted under the TourGuide pages instead of here 😛
Okay i found out theOkay i found out the problem.
In the addon version you never tell us to DO or TURN IN the quest “Attack on Silverbrook”. It was the only one i had left after finishing the rest of the guide and after doing it the quest with the bear and all of the quests of grayhorn became available. so please fix that one
except that great guide!
Great, as alwaysJames, your guide is great, as always.
I’m guessing to be 80 by the end of this guide but i hope there will be a next 1 so i can follow it for the achievements en quest mony 😛 .
So if there comes a next 1, you got any idea of a date for it to be released?
thx anyway,
Arondina
lvl 80 Blood Elf protection paladin
(EU-Terenas)
I’ using the addon versionI’ using the addon version and i get along really fast (I’m level 79 now with epic flying mount, i did the whole of SMV first at level 70).
Two Problems til now:
I think it’s the second time you do PvP Quests, but before the one with the shredders. There are 4 Questgivers two of them standing near to each other in the hut and the other two outside. The addon tells you to accept one outside, the next one inside, then again outside and finally the last inside, same with the turning in. Since its addon i didnt know if you should accept every quest so i had to do the running around.
Second thing, which is worse:
Windseer Grayhorn doesn’t offer neither The Darkness Beneath nor Vordrassil’s Fall to me, even after completing Eyes Above.
But it’s really nice except that 😉
keep it up you really helped me so much with my leveling already
Shade of Arugalhey jame,
u didnt mention it to go after him without pet, he reseted 3 times after mind control (if ure pet die u are friendly to him and he reset).
Dont know how its about hunter/warlock pet but ithink its the same.
Latent Power In the TG addon it says that you need to rightclick the stone, infact you need to use an item in your inventory while standing close to the stones.
Greetz from Germany
Warrior Leveling SpecsWell, it depends on how you look at it, each spec has its strengths.
In example,
Fury = Fastest Leveler
Prot = Most Survivability
Arms = Second Fastest Leveler (More PVP Orientated)
Cool, I’ll add thatCool, I’ll add that 😉
Small upgrade to “Raining Down Destruction”“==Note== You can only carry one Boulder at a time”
Looks like they changed that, you can carry as many as you need. So just loot 5 and than go to the trench and throw them. No biggy, just to let you know.
Thanks for another great guide.
Sky
The Magical Kingdom of DalaranThe quest The Magical Kingdom of Dalaran starts in Agmar’s Hamer, or am I wrong? Because I picked it up in Agmar’s Hamer…
When Jame has a date forWhen Jame has a date for releasing it, he’ll post the date for everyone to see.
Zul drakWhen is the zul drak guide coming out??
Tanking specsI found so far my pally does better with tank spec. She was a kara geared tank before woltk though and her ret set is less desirable. Also the player being use to being prot might affect it.
Most pallys around 40-50 flip to prot to solo though too…
Please, Excuse my ramblings 😕
Thanks for the guide its always eagerly awaited and wonderfully executed. Can never express the gratitude for so much detailed work available to the public. 🙂
Delillah, Undead Priestess…
Group QuestsI ve found that the Group Quest with Arugal is quite easily soloable with any ranged class, if you use the following strategy:
Prepare Mana/HP pots and Bandages, you will need them.
Start at the stairs so you can cast at Arugal, but you can quickly run down. Use your strong-long to cast nuke to pull him, place any DoTs on him(if you can) and continue casting until he starts to cast Shadowbolt on you, then run out of his Line of Sight(=down the stairs), but return immeadiately after he aborts his cast(so he doesnt run down, but starts castin another spell).
Renew DoTs, use fast casting time spells, or instants but keep LoSing his Shadowbolts so you dont take much dmg.
When he is too close, just run further down, to the lower level of the Tower and keep LoSing him.
Also, the adds he summons wont attack you if you are at the lower floor and Arugal wont reset and they will despawn shortly after(but this may be a bug) – it worked for me when he summoned 3 adds, but not when he summoned 9 of them, but I wasnt paying attention to my positioning, so I was probably too close.
Bandage/Pot when necessary and watch for respawn of normal mobs 🙂
_____________________________________________________
Another thing I ve found is when trying to solo Ursoc, if you are hybrid class that can heal(Ele Sham, Moonkin, Shadowpriest) it is better to tell the NPC helper that you need a healer and tank yourself.
Ive tried to act as a healer(as a Moonkin) and died four times because I ve run out of mana(and I was fully buffed with Scrolls, Food, etc and I ve also had Mana Pots).
Then I ve tried to act as a tank(at that momment I ve run out of Scrolls/Food and had no pots left) and killed him at my first try.
Levellingim having a major problem levelling in these zones 🙁
i find if i rest for days, i get mega xp from mobs and when handing in quests, than i do when im unrested
awesome guide!!I followed your WotLK guides up to this point and with the help of alot of rested xp and a near constant wintergrasp xp buff I dinged 79 at the end of this guide and got my last lvl through instances. Now I have 4 totally untouched zones filled with gold compensation, and I can’t wait do Zul’Drak and the others with your guides to be sure I don’t miss i single quest.
Nice guide Jame, one error INice guide Jame, one error I found though is at Blue Sky Logging Grounds PvP part. You said “Gather the following parts until you finish [74] Pieces Parts:” the Horde quest is [url=http://www.wowhead.com/?quest=12280]Making Repairs[/url]. Other than that it looks great 😉
Oops, indeed
Thanks!Oops, indeed 😉
Thanks!
Found a pretty criticalFound a pretty critical error. You tell us:
[i]Do that on the way while looking for a Broken-down Shredder:
Jump into one, face toward the bridge east and use ability #3 to sprint.[/i]
The bride is to the west, if i’m not mistaken.
Fixed!Fixed!
Fixed, thanks!Fixed, thanks!
Again a great guide, just 1Again a great guide, just 1 remark 😉
Quote:
Then go turn in [75] Into the Breach, get [75] Gavrock.[b][/i][/b]
I think that mustn’t be there 😉
The quest [73] Truce?? isThe quest [73] Truce?? is only with one “?”, so “Truce?” :))
Indeed! Fixing it, thanks!Indeed! Fixing it, thanks!
Good Troll Hunting, not Troll SeasonHi I noticed that in the guide it says to turn in “Troll Season”, actually the Horde version is Good Troll Hunting.
Thank you, fixed!Thank you, fixed!
Much welcome! Please keepMuch welcome! Please keep using my guide and giving feedback, I appreciate that!
Correction# [74] The Darkness Beneath
# [74] Vordrassil’s Fall
These 2 quests are from Windseer Grayhorn, not Gorgonna
Also, its worth noting that the last step in Pit of Conquest you fight multiple mobs, not just Krenna.
A Big Thank You!Jame, just wanted to thank you for your guides.
Because of rl stuff such as work and family I haven´t as much time to play as I´d like, but with your guides the playtime I have is really efficient.
Finished the Dragonblight-guide two days ago, halfway through lvl 77 since I´ve been fully rested during the whole time I´ve played, and today I see that your Grizzly Hills-guide is up. Keep up the good work, you have my eternal gratitude.
nice :)My dk is lvl 80 already(4 days 14 hours /played I think)
Just started on your dragonblight guide with my 76 shaman, Grizzly hills should take me to 80 I think:)
Really? Damn that’s justReally? Damn that’s just plain wrong if it’s true ^^
Just a big THANK YOU for theJust a big THANK YOU for the guide, i’ll enjoy every bit of it 😀
down with captain zorma, crush captain brightwaterThe Horde version is called [Crush Captain Brightwater!]
Jame, great guide, as usual.Jame, great guide, as usual. I for the most part just skimmed over it, seeing as I’m getting a bit tired at this point. It’s too bad I already spent my time getting the achievement on my own on my warrior. I probably did many inefficient quests, haha. I’m glad to have read about there being a quest hub near venture bay, though. Should make my alt easier to level when it comes up to Northrend.
By the way, unlike the start of your guide says, right now it is popularly believed that protection is the best leveling spec (For warriors). In the very least, I know it is the cheapest, haha.
Looks good, too bad my toonsLooks good, too bad my toons are already 80 XD
I’m currently lvling up a shaman as no healers exist anymore on my server….
Thanks for the guide 🙂
Ahh, thanks, fixing!Ahh, thanks, fixing!
[74] Down with Captain Zorma!I think you’ve made a mistake in the first PvP circuit.
You tell us to take this quest: [b][74] Down with Captain Zorma![/b].
Which is alliance side only :).
I can’t remember the name of the horde quest but I just wanted to let you know.
And also, i wanted to say big Big BIG THANKS for your guides. Must take a hell lot of time, which I don’t have much, so your guides are like a redemption for me. Thanks Thanks Thanks!
Thank youI just wanted to say thank you for the hard work.
Created an account just toCreated an account just to say
“Thank you, Jame!
For another one brilliant guide” =)
And THIRD! =))
Bah, second.
Guess it’sBah, second.
Guess it’s your connection, mine loaded in 5 seconds 🙂
First!
Also, the guide tookFirst!
Also, the guide took FOREVER to load. Is it just my internet connection or…?
________________
Have no fear, from this day forward you too can experience the overwhelming amounts of power and superiority that my beloved [url=http://www.wowhead.com/?spell=34692]iWin button[/url] can bring you!
You are just one click away.