 by Sven
Introduction:
Welcome to my Leveling Guide to Bloodmyst Isle. This guide is intented to bring you from level 12 to 20 as fast with as few grinding sessions as possible. It should be useful for both novice and experienced players. I tried to put the quests in a special order to finish as many quests as possible without much travelling, turning in all finished quests in the end of each circle for a nice experience boost. Most parts should be possible to solo, if I think a quest might be hard, I’ll tell you.
It’s recommended that you do the Azuremyst quests before, as there are two quests with prerequisites, you might also not be able to talk to the furbolgs (do the quest from Cryptographer Aurren in Azure Watch (Azuremyst 49,51) to learn their language), but you won’t have a real big disadvantage by coming here without having quested in Azuremyst before.
A guide I would recommend for Azuremyst is Snowflake’s Draenei Guide.
While a few quests can only be accepted by Draenei, it’s also possible to quest here with other races.
Here are a few pros and cons for leveling in Bloodmyst:
pros:
- You can quest in a fairly nice designed and interesting area
- You can avoid the alternatives you might have seen too often (like Darkshore, Westfall, Loch Modan)
- There are more quests (~75 quests – 9 you can’t take = 66) here than in the alternative areas
- Many quests give nice item rewards so you will start out your 20’s fairly well equipped
cons:
- Some classes don’t have a trainer in Azuremyst / Exodar
- You can’t accept the final 5 quests, so this ends a bit earlier for you
- You don’t get the Deadmines quest prerequisites, but you don’t need to do DM before 20 with this
Classes that have a trainer in Azuremyst / Exodar:
Druid, Hunter, Mage, Paladin, Priest, Shaman, Warrior
Classes that don’t have a trainer in Azuremyst / Exodar:
Rogue (closest trainer is in Darnassus), Warlock (closest trainer is in Ratchet (?))
So if you want to come here to quest, either take a boat from Auberdine in Darkshore or better try to find a kind mage in Ironforge or Stormwind to make you a portal to the Exodar.
Once there, get the flight point outside of it (Azuremyst 68,63), and then follow the road north until leaving Azuremyst Isle. Welcome to Bloodmyst Isle!
Basic Rules: (copied from Jame’s Alliance Leveling Guide)
- While traveling, kill everything that is on your way and gives experience (yellow mobs preferably).
- Spend your talent points so you do the most damage possible. (e.g: Priest should specialize in Shadow Talents, Warriors in Arms/Fury, Rogues Combat/Assassination, etc).
- Don’t waste your time trying to find groups for questing, you can solo everything that is described in this guide. Only group with someone when it’s not gonna be a waste of time (e.g: meeting the person at the other end of the map to show him the way to where your quest is)
- Try to always log out in an Inn when you take a break.
- Sometimes I will be making lists of quest you should have before starting with an area, that doesn’t mean I will list the whole quest log, JUST the quests that interest us for the moment.
Also don’t abandon quests or throw away quest items unless I say so. I recommend reading each circle completely before starting it and then rereading step by step.
AddOns:
There are 5 addons I can recommend which help your faster leveling as they are huge time savers:
- Titan Panel – For coords and exp/hour etc
- Automaton – Mainly for the auto sell trash loot
- Cartographer – Mainly for the full world map
- CT_MailMod – Mass mail stuff to your AH alt
- MonkeyQuest – easier quest tracking
Links:
- Bloodmyst Quest Information (if you need additional info to a quest):
- Allakhazam
- Thottbot
- Wowhead
- Thottbot Class Information (to look up new spells (if visiting your trainer is worth it) and class quests):
- Druid | Hunter | Mage | Paladin
- Priest | Shaman | Warrior
The Guide:
Circle 1 – Level 12-14:
- Travel to Kessel’s Crossing (63,87), hand in [11] Elekks Are Serious Business (the last open quest from Azuremyst) at Vorkhan the Elekk Herder and get the followup [11] Alien Predators.
Also get [12]A Favorite Treat from Aonar. Before you get the other quest, read the whole next paragraph. When you’ve done that, take the quest [12] Kessel Run from Kessel. - After you take the quest, Kessel will give you an Elekk speed buff for 15 minutes, avoid getting it into water or into buildings, also stay out of the Stillpine Hold cave. Otherwise you’ll auto-unmount and lose much time. Ride back to Azuremyst. No map for this part!
The objective NPCs for [12] Kessel Run don’t have extra quest marks on them, talking to them is enough to get the quest updates.
First stop is High Chief Stillpine at Stillpine Hold (46,20):
Just talk to him for [12] Kessel Run, but also accept [11] Warn your people (which is only available when you did all other Stillpine Hold quests but this, otherwise just ignore this step).
Then ride on to Azure Watch (47,50), talk to Exarch Menelaous and also turn in [11] Warn your people.
Final stop is Odesyus’ Landing (47,70), talk to Admiral Odesyus to complete [12] Kessel Run and then ride back to Kessel’s Crossing (63,87) on Bloodmyst Isle.
Note that you have to do the turnin next step before the quest timer is up..
Druids: You won’t get the speed buff if you’re in bear form or any other form. - At Kessel’s Crossing, turn in [12] Kessel Run and get the followup [13] Declaration of Power.
- Ride northwest to Blood Watch (55,55), you might auto-unmount on the way but that doesn’t matter. Quickly restock food/drink/arrows (I once forgot the arrows on my hunter, very painful), sell trash loot and send the other stuff to your AH alt to free up more space.
Bind your Hearth Stone to Blood Watch, also get the flight path! - Accept the following quests:
- [14] Mac’Aree Mushroom Menagerie from Jessera Mac’Aree
- [13] Catch and Release from Morae
- [11] Learning from the Crystals from Harbinger Mikolaas (in the tower)
- Head southeast to Wrathscale Lair (66,69), remember to kill everything on your way and pick up a Blood Mushroom before crossing the river.
- Fight your way to the top, pick up a Ruinous Polyspore on the way, then kill Lord Xiz (68,67) and don’t forget to slam your Draenei Banner into his corpse to complete [13] Declaration of Power.
- From now on, look for Sand Pears on the ground near trees, as you need 10 of them. Head south until you find Princess Stillpine (68,81). Get the Quest [13] Saving Princess Stillpine from her (as stated in the introduction, you have to have done this questline on Azuremyst before you can talk to her, otherwise just skip this quest), then grind your way through the furbolg camps, until High Chief Bristlelimb announces his spawn with a yell. Eventually he’s already there, find him at the northwestern camp (64,76), slay him and loot The High Chief’s Key. Return to Princess Stillpine, open her cage and then grind on the furbolgs until you finished collecting 10 Sand Pears.
- Head east until you hit the coast (70,86), kill 10 Bloodmyst Hatchlings, then get back to Kessel’s Crossing and turn in
- [11] Alien Predators at Vorkhan the Elekk Herder
- [12] A Favorite Treat at Aonar
- [13] Declaration of Power at Kessel, get the followup [13] Report to Exarch Admetius
- Move on northwest, find the Impact Site (58,83) and use your Crystal Mining Pick on the Impact Site Crystal.
- Swim through the blood river to the northwest, pick up an Aquatic Stinkhorn in it, then go west, you”ll find the last mushroom, a Fel Cone Fungus, around (43,83).
- Now move south to the coast. Use your Murloc Tagger on 6 Blacksilt Scouts (make sure not to aggro them as you can’t tag them in combat).
- Find, kill and loot Cruelfin (orange murloc), then start the quest [12] Cruelfin’s Necklace from the Red Crystal Pendant.
- Once you killed Cruelfin and got enough scouts tagged, grind on the murlocs until you’re less than 4.800 XP away from level 14.
- Hearth to Blood Watch and turn in the quests
- [12] Cruelfin’s Necklace and [13] Catch and Release at Morae, get the followup [14] Victims of Corruption
- [14] Mac’Aree Mushroom Menagerie at Jessera of Mac’Aree
- [11] Learning from the Crystals at Harbinger Mikolaas, get the followup [14]The Missing Survey Team.
- [13] Saving Princess Stillpine at Stillpine Ambassador Frasaboo
- [13] Report to Exarch Admetius at Exarch Admetius and get [15] What Argus Means to Me
- [15] What Argus Means to Me at Vindicator Boros, get the followup [15] Blood Watch

Optional Circle: (Draenei only)
- Note that you might have [10] Beds, Bandages and Beyond from Caregiver Topher Loaal. Turn it in at Laando the Hippogryph Master and get the followup [10] On the Wings of a Hippogryph.
- Now anytime after a levelup when you think your new skills are worth learning them (check your thottbot class page), take the flight to the Exodar.
- Once there, turn in [10] On the Wings of a Hippogryph at Nurguni (57,50) inside the Exodar, get the followup [10] Hippogryph Master Stephanos.
- Visit your class and/or profession trainers, learn the new skills, then get back out of the Exodar and turn in [10] Hippogryph Master Stephanos at Stephanos (68,63 in Azuremyst).
- Get the followup [10] Return to Topher Loaal, take the flight back to Blood Watch, and turn it in at Topher Loaal at the Blood Watch inn.
Circle 2 – Level 14-15:
- Repair, vendor trash loot and restock food/drinks/arrows etc.
You should now have the following quests:- [14] The Missing Survey Team
- [15] Blood Watch
- Leave Blood Watch to the northeast until you find the Ruins of Loreth’Aran (61,48). Turn in [14] The Missing Survey Team at the Dreanei Cartographer lying on the ground and get the followup [14] Salvaging the Data.
- Now grind on the Nagas until you got the Survey Data Crystal from one of them.
- Now move west until you find Sunhawk Spies in Bladewood (49,47). Slay 10 of them, then return to Blood Watch.
- Turn in
- [14] Salvaging the Data at Harbinger Mikolaas, get the followup [14] The Second Sample
- [15] Blood Watch at Vindicator Boros, get the followup [16] Intercepting the Message
- You might also already have 10+ Irradiated Crystal Shards, then get the quest [15] Irradiated Crystal Shards from Vindicator Boros and turn it in, which will unlock the repeatable quest [15] More Irradiated Crystal Shards, where you can turn in stacks of 10 more shards for some nice litte buff stuff.
Circle 3 – Level 14-16:
Map located at Circle 2.
- Make sure you got [14] Victims of Corruption from Morae and [14] Know Thine Enemy from Vindicator Aalesia, then leave Blood Watch to the southwest.
- Slay any Corrupted Treants you find on the way (there’s a nice spot at (49,73)), until you got 6 Crystallized Bark.
- When you reach Nazzivian (41,77), find Tzerak (felguard look), kill him and loot Tzerak’s Armor Plate, right click it to start [14] Signs of the Legion and continue killing the Satyrs and Felsworns in this place, as they are now on your kill list.
If you can’t find Tzerak, get the Monument Glyph first (Tzerak might be there, too) and grind on the Satyrs. When you see Tzerak yell something, that means he just spawned at the summoning circle (38,82), so get there quick. From there, he patrols west to the monument.
- Also find the Nazzivus Monument (36,71) in the northern part of it, loot the Nazzivus Monument Glyph and then finish your 8 Nazzivus Satyr and Nazzivus Felsworn kills each.
- Hearthstone to Blood Watch and turn in
- [14] Signs of the Legion and [14] Know Thine Enemy at Vindicator Aalesia, get the followup [18] Containing the Threat
- [14] Victims of Corruption at Morae
Circle 4 – Level 15-16:
Map located at Circle 2.
- Repair, vendor trash loot and restock food/drinks/arrows etc.
- Make sure you got [14] The Second Sample and [16] Intercepting the Message.
- Leave Blood Watch to the northwest until you’re in Bladewood (49,47) again. Kill Sunhawk Spies and hope to find the Sunhawk Missive on them. Locate the Altered Bloodmyst Crystal (45,47) and get an Altered Crystal Sample using your Crystal Mining Pick.
- Grind on the Sunhawk Spies until you find the Sunhawk Missive.
- Now you’ve got two options:
- a) Grind on the Sunhawk Spies or the naga at the ruins until you are less than 3.300 XP away from level 16, then return to Blood Watch. (this way you can skip the trip to Darkshore and maybe save some time)
- b) Grind until you are less than 10.000 XP away from level 16, return to Blood Watch and accept [15] Newfound Allies from Anchorite Paetheus.
Then proceed with this circle and afterwards do the optional Circle in Darkshore.
- In Blood Watch, turn in
- [14] The Second Sample at Harbinger Mikolaas, get the followup [18] The Final Sample
- [16] Intercepting the Message at Vindicator Boros, get the followup [16] Translations…
- [16] Translations… at Interrogator Elysia, get the followup [16] Audience with the Prophet
- Take a flight to the Exodar, and turn in [16] Audience with the Prophet at Prophet Velen (32,54 in the Exodar). Get the followup [16] Truth or Fiction.
- If you chose option a): Congrats on level 16! Go to your class trainer, maybe visit your professions trainer, learn new spells and if your Hearthstone is up, portal back to Blood Watch, otherwise take a flight back. Now continue with Circle 5.
- If you chose option b): Go on with the optional circle in Darkshore.
Optional Circle in Darkshore – Level 15-16: (6.700+ bonus XP)
- Repair, vendor trash loot and restock food/drinks/arrows etc.
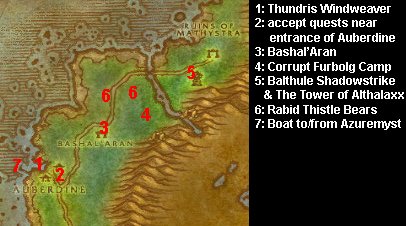
- Leave the exodar to the south and find Huntress Kella Nightbow (24,54). Turn in [15] Newfound Allies and get the followup [15] The Way to Auberdine.
- Take a boat to Darkshore at (29,28). Once there, turn in [15] The Way to Auberdine at Thundris Windweaver (37,40) and get his quest [12] Bashal’Aran.
- Next stop is the house at the entrance of Auberdine (38,43). Get the quests
- [14] Plagued Lands from Tharnariun Treetender (outside)
- [14] How Big a Threat? from Terenthis (inside)
- [18] The Tower of Althalaxx from Sentinel Elissa Starbreeze (upstairs)
- Now leave Auberdine and go northeast until you find Asterion (44,36) in Bashal’Aran. Turn in [12] Bashal’Aran, don’t get the followup (I think the mobs are too low)
- Then go east and find the furbolg camp (50,34), you should get a „Find a corrupt furbolg camp“ message.
- Go further northeast (although you might see the Rabid Thistle Bears, don’t use your trap yet), across the river and find Balthule Shadowstrike (55,25). Turn in [18] The Tower of Althalaxx and get the followup [18] The Tower of Althalaxx.
- You should already see the tower southeast of him, kill Dark Strand Fanatics until you have 4 Worn Parchments (avoid the level 17 mobs, they might be tough).
- Return to Balthule Shadowstrike, turn in [18] The Tower of Althalaxx.
- On your way back to Auberdine, search for a Rabid Thistle Bear. Once you found one, search Tharnariun’s Hope in your bags (looks like Shiny Bauble), right click it and then pull the bear onto the trap you just set. It should turn friendly and follow you.
- Return to Auberdine and turn in
- [14] Plagued Lands at Tharnariun Treetender
- [14] How Big a Threat? at Terenthis
- This should have made you ding 16. If you consider your new spells worth learning, take a boat (the one in the middle) back to the Exodar, otherwise just hearth back to Blood Watch.
Circle 5 – Level 16-17:
- Back in Blood Watch, turn in [16] Truth or Fiction at Vindicator Boros, and get the followup [16] I Shoot Magic Into the Darkness.
- Repair, vendor trash loot and restock food/drinks/arrows etc, this will be a long circle.
- Make sure you got the following quests:
- [15] Constrictor Vines and [16] The Bear Necessities from Tracker Lyceon
- [17] Explorers’ League, Is That Something for Gnomes? from Prospector Nachlan
- [17] WANTED: Deathclaw from the Wanted Poster in front of the inn
- the followup you just accepted, [16] I Shoot Magic Into the Darkness
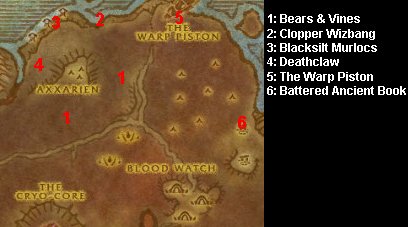
- Leave Blood Watch to the northwest, until the road forks. Ahead, you should see plenty Mutated Constrictors and Elder Brown Bears east and south of Axxarien (which is at 41,34). Grind on them until you collected 6 Thorny Constrictor Vines and 8 Elder Brown Bear Flanks. This might take a while as the latter seem to drop pretty badly. But nevermind, it’s still nice grinding XP here.
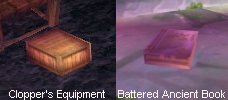
- Once finished, pass Axxarien to the east. When you reach the coast, look for a large turtle shell (42,21). In there hides Clopper Wizbang, turn in [17] Explorers’ League, Is That Something for Gnomes? and get the followup [17] Pilfered Equipment as well as the other quest, [17] Artifacts of the Blacksilt.
- Now start grinding on the Murlocs while moving west, you need 3 Crude Murloc Idols from the Seers and 6 Crude Murloc Knives from the Warriors and Shorestrikers. (try not to pull two seers at once, this might end painful)
Also look for a box called Clopper’s Equipment near any of the murloc huts. - At the western end of the beach, you’ll find Deathclaw (37,30). Kill him and loot Deathclaw’s Paw. Then continue on the murlocs heading back east.
- Once you got enough Crude Murloc Knives and Idols and also got Clopper’s Equipment, return to Clopper Wizbang and turn in [17] Pilfered Equipment and [17] Artifacts of the Blacksilt.
- Right Click the Weathered Treasure Map you just got as quest reward to start [16] A Map to Where?.
- Move east until you reach The Warp Piston (52,20), kill 5 Void Anomalies and walk near the entrance to get the „Portal Site discovered“ message.
- Now slay your way through the moonkins southeast, until you reach the northern part of the Ruins of Loreth’Aran (61,41). Climb the ruined thing and find the Battered Ancient Book on the ground, then right click it to complete [16] A Map to Where? and get the followup [16] Deciphering the Book.
- Hearthstone or travel back to Blood Watch and turn in
- [15] Constrictor Vines and [16] The Bear Necessities at Tracker Lyceon, get the followup [16] Culling the Flutterers
- [16] I Shoot Magic Into the Darkness at Vindicator Boros, get the followup [17] The Cryo-Core from Vindicator Kuros standing next to him
- [16] Deciphering the Book at Anchorite Paetheus, get the followup [16] Nolkai’s Words
- [17] WANTED: Deathclaw at Harbinger Mikolaas
Circle 6 – Level 17-18:
- Repair, vendor trash loot and restock food/drinks/arrows etc.
- Make sure you got the following quests:
- [18] Searching for Galaen from Morae
- [17] The Cryo-Core from Vindicator Kuros
- [16] Culling the Flutterers from Tracker Lyceon
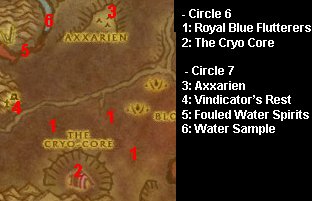
- Leave Blood Watch to the west, heading to the Cryo-Core (38,60). On the way there, slay every Royal Blue Flutterer you find.
- At the Cryo-Core, loot the Medical Supplies both from the ground and from the blood elves (watch out for adds, their fire balls are nasty) on your way while heading straight into the building.
- In there, find Galaen’s Corpse (37,61) to turn in [18] Searching for Galaen and get the followup [18] Galaen’s Fate as well as [18] Galaen’s Journal – The Fate of Vindicator Saruan from Galaen’s Journal next to him.
- Now grind on the blood elves around the Cryo-Core until you found Galaen’s Amulet on one of them and also finished collecting your 12 Medical Supplies.
- Travel back to Blood Watch and finish your 10 Royal Blue Flutterer kills on the way. Don’t hearth back to Blood Watch, as your way isn’t that long and your cooldown might not be up again at the end of the next circle.
- Once arrived back in Blood Watch, turn in the quests
- [16] Culling the Flutterers at Tracker Lyceon
- [18] Galaen’s Journal – The Fate of Vindicator Saruan at Vindicator Kuros, get the followup [18+] Matis the Cruel
- [17] The Cryo-Core at Vindicator Kuros, get the followup [18] Don’t Drink the Water from Vindicator Aesom
- [18] Galaen’s Fate at Morae
Circle 7 – Level 17-19:
Map located at Circle 6.
- Repair, vendor trash loot and restock food/drinks/arrows etc.
- Make sure you got the following quests:
- [18] Talk to the Hand from Harbinger Mikolaas
- [18] Don’t Drink the Water from Vindicator Aesom
- [18] The Final Sample from Harbinger Mikolaas
- [18] Containing the Threat from Vindicator Aalesia
- [19] Fouled Water Spirits from Defender Adrielle (behind the tower, (51,52))
- Leave Blood Watch northwest, heading to Axxarien (41,34).
- At Axxarien, kill 5 Shadowstalkers and 5 Hellcallers (you will have to pull 2 mobs most of the time) while looting 5 of the Corrupted Crystals standing around. Also kill Zevrax (41,29), he’s lvl 18 and might be a bit tough.
- Also use your Crystal Mining Pick at the Axxarien Crystal (41,30) to pick up an Axxarien Crystal Sample.
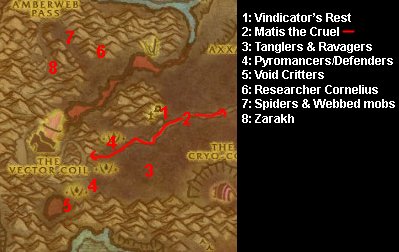
- Then move southwest until you find Vindicator’s Rest (30,46) and turn in [18] Talk to the Hand at Scout Jorli.
- Move a little north, you’ll find another blood river and Fouled Water Spirits roaming it. Kill 6 of them, make sure your Hearthstone is up and you’re less than 4.000 XP away from level 18, otherwise grind on some more elementals or (the easier) satyrs until it is and you are.
- Jump down the waterfall and use your Water Sample Flask at the bottom of it (34,33) to take a Bloodmyst Water Sample.
- Hearth to Blood Watch and turn in
- [18] Containing the Threat at Vindicator Aalesia
- [18] The Final Sample at Harbinger Mikolaas
- [18] Don’t Drink the Water at Vindicator Aesom, get the followup [18] Limits of Physical Exhaustion
Circle 8 – Level 18-19:
- If you’re not a Draenei, you can’t accept the following quests, just go on with point 4 of this circle.
- Accept [20] What We Know… from Vindicator Aesom. Turn it in at Exarch Admetius and get the followup [20] What We Don’t Know….
- Run to the prison (54,54) and talk to the Captured Sunhawk Agent. Click through the dialogue, then return to Exarch Admetius. Turn in [20] What We Don’t Know… and get the followup [20] Vindicator’s Rest.
- Repair, vendor trash loot and restock food/drinks/arrows etc, this will be a long circle.
- Make sure you got the following quests:
- [18+] Matis the Cruel from Vindicator Kuros
- [18] Limits of Physical Exhaustion from Vindicator Aesom
- [18] Oh, the Tangled Webs They Weave from Defender Adrielle (behind the tower, (51,52))
- [19] The Missing Expedition from Achelus
- Leave Blood Watch, travel back towards Vindicator’s Rest. You should spot Matis the Cruel along the road. Don’t kill him! Use your Flare Gun from range on him, wait until the spawning NPC attacks him and then help dps him a little until he falls unconcious (emote).
- At Vindicator’s Rest, turn in [20] Vindicator’s Rest and [19] Fouled Water Spirits at Vindicator Corin and get the quests
- [17] Cutting a Path from Scout Jorli
- [18] Critters of the Void from Scout Loryi
- Leave Vindicator’s Rest heading south, across the road. Slay 8 Mutated Tanglers and 10 Enraged Ravagers, then go west.
- Move on, grind your way through the Sunhawk Defenders and Pyromancers until you reach the Sun Gate (19,62). Kill 12 Void Critters (use tab key to target them, some are bugged and you aren’t credited every kill, so make sure you get 12 kills awarded).
- Now head north, finishing your 10 Defender and also 10 Pyromancer kills on the way. Avoid aggroing the elite mobs guarding the Vector Coil (23,54).
- You’ll reach the blood river again, cross it and find Researcher Cornelius (24,34) hiding behind a spider net. Accept his quest [19] They’re Alive! Maybe…, then fight your way up the Amberweb Pass (22,36).
- I recommend killing the Myst Leechers and Spinners in front of you first, then range shoot to open the Webbed Creatures behind you as you won’t aggro the spawning mobs if there’s no Expedition Researcher inside and the mobs will despawn after a short time.
- Fight your way to the top (18,37) kill Zarakh, then finish your 8 Myst Leecher and Spinner kills each as well as the 5 rescued Researchers.
- Return to Researcher Cornelius (24,34) and turn in [19] They’re Alive! Maybe….
- Then return to Vindicator’s Rest and turn in [17] Cutting a Path and [18] Oh, the Tangled Webs They Weave.
- If your hearthstone is up, hearth to Blood Watch, otherwise either travel there or grind on the elementals or spiders until it is and hearth then. At Blood Watch, turn in
- [18+] Matis the Cruel at Vindicator Kuros
- [18] Critters of the Void and [18] Limits of Physical Exhaustion at Vindicator Aesom, get the followup [18] The Sun Gate
- [19] The Missing Expedition at Achelus
Circle 9 – Level 19-20:
- Repair, vendor trash loot and restock food/drinks/arrows etc, this will be a long circle.
- You might want to make a trip to the Exodar and learn your spells up to level 18 if you haven’t already as well as Journeyman Skinning if you’re a Skinner, because you’ll have to fight a (fairly weak) level 20 elite dragon at the end of this circle and also kill/grind on level 18 dragon whelps (require 80 Skinning to skin).
- If you did the quest series at Odysseus’ Landing (47,70) in Azuremyst prior to this guide, Messenger Hermesius will have the quest [18] Urgent Delivery. Accepting (and thus completing) it will have a letter appear in your mailbox. Loot and right click it to accept the quest [18] The Bloodcurse Legacy.
- If you skipped that quest series, you’ll have to visit Admiral Odysseus (47,70) in Azuremyst and you might be able to accept [18] The Bloodcurse Legacy there.
- Make sure you also got the quests [16] Nolkai’s Words from Anchorite Paetheus and [18] Ysera’s Tears from Jessera of Mac’Aree in Blood Watch.
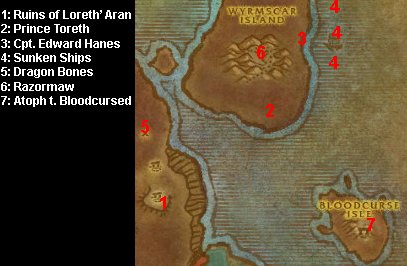
- Leave Blood Watch heading northeast, stop at the southern part of the Ruins of Loreth’Aran, find the Mound of Dirt (61,49) and turn in [16] Nolkai’s Words. There’s no quest relevance for Nolkai’s Band (one of the quest rewards) yet, but you might want to follow the discussion on thottbot.com before throwing it away.
- Move on northeast, until you hit Wyrmscar Island and find Prince Toreth (74,33) at the southern end of it. Accept [18] Restoring Sanctity.
- Move northeast until you find Captain Edward Hanes (79,22), turn in [18] The Bloodcurse Legacy and get the followup [18] The Bloodcursed Naga.
- Kill Bloodcused Naga in the water east of him, then return to Captain Edward Hanes, turn in [18] The Bloodcursed Naga and get the followup [18] The Hopeless Ones….
- Search the sunken ships ((83,12), (83,22) and (81,29)) for Bloodcursed Voyagers and loot their Bloodcursed Souls. Once you got 4 of them or killed all Voyagers, instead of waiting for the respawn return to Captain Edward Hanes, but DON’T TURN IN [18] The Hopeless Ones… yet!
- Instead, ask him to renew the waterbreathing and swimspeed buff (“Can you cast the spell to help me breathe and move underwater?“), then swim back to the main island, to the wildkins (60,34) and collect 8 Dragon Bones.
- Return to Wyrmscar Island, turn in [18] Restoring Sanctity at Prince Toreth (74,33) and get the followup [19] Into the Dream.
- Now kill 5 Veridian Whelps and Broodlings each.
- Also loot 2 Ysera’s Tear mushrooms from the ground.
- Turn in [19] Into the Dream at Prince Toreth and get the followup [21+] Razowmaw.
- Move to the top of the hill (72,20), clear it of the whelplings and prepare to fight. Then right click the ever-burning pile and wait for Razormaw to descend. Some hints for the battle:
- He flame breaths from time to time for ~100, can be interrupted.
- He fears once or twice.
- He can be feared and stunned.
- You can maybe kite him by jumping down a little.
- Don’t forget you got your Gift of the Naaru.
- Check thottbot.com Razormaw comments on hints how to solo him with your class.
- If you die, abandon the quest and reaccept it to gain a new Bundle of Dragon Bones.
- If you really can’t take him down, just skip the quest. You’ll miss out 1650 XP and the nice chest reward.
- Once he’s dead, return to Prince Toreth and turn in [21+] Razowmaw.
- Visit Captain Edward Hanes (79,22), renew the swim buff, then get the rest of your 4 Bloodcursed Souls if needed and before turning in [18] The Hopeless Ones… renew the buff again (can’t do it anymore after completing that quest). Turn in the quest and get the followup [19] Ending the Bloodcurse.
- Swim south to Bloodcurse Isle, fight your way to the top (85,54), clear it and get to full health/mana. Then right click the statue, wait for Atoph the Bloodcursed to spawn and kill him.
- Swim back to Captain Edward Hanes, turn in [19] Ending the Bloodcurse and then grind on the whelplings until you are less than 1.350 XP away from level 20.
If you feel strong enough for the final battle, you might also go there at level 19. Read the next circle and then decide if you want to skip grinding or do it to give you the edge you might need for those quests. - Hearth back to Bloodwatch and turn in [18] Ysera’s Tears at Jessera of Mac’Aree. Congrats to level 20!

Circle 10 – The Final Battle – Level 20:
If you’re not a Draenei, you can’t accept the following quests at Vindicator’s Rest, just abandon [18] The Sun Gate and go on with the part “Final Steps“.
- Repair, vendor trash loot and restock food/drinks/arrows etc.
- Fly to the Exodar, learn your new class spells and if you want, do your class quests if there are any new, then fly back to Blood Watch.
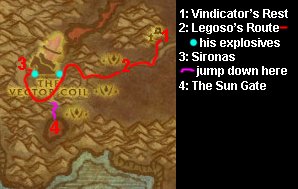
- Make sure you still have the quest [18] The Sun Gate from Vindicator Aesom, then travel to Vindicator’s Rest (30,46).
- Read carefully before you accept the following quests:
- You will be escorted by a level 20 elite Shaman NPC.
- He will deal lots of damage, put totems and in most cases heal both himself and you if necessary.
- He might sometimes overpull if he runs into a patrol, so try to pull for him.
- He also stops 2 times ((18,55) and (15,53)) to plant explosives, in this time he won’t care about any adds, so you should stop pulling.
- Fenissa the Assassin, a rare mob might spawn while doing this quest. You might have already seen her at the Cryo-Core, just make sure you do more than 50% of the damage to her to loot your free greenie.
- You have to do at least 50% of the damage to a mob to be able to loot it and be credited the kill for your quest. So make sure you dps the NPCs target a lot, as he will also tank for you most of the time.
- You need 8 Sunhawk Agent and Sunhawk Saboteur kills each, so focus on either if you already got enough kills of the other ones.
- Stay calm if he overpulls, just sheep / heal or whatever you can do to help him, but don’t heal him too early as you might gain aggro of too many mobs.
- Also make sure to do enough damage to be awarded Sironas‘ kill.
- Have fun with those quests, they’re really unique
- If you can’t push enough damage to get the kills awarded, you have 4 options:
- The best way is to skip [20+] Clearing the Way and just do [20+] Ending Their World, as this is the far more important one (followup for tabard, ring etc)
- Try to focus the target he is not focussing, but make sure you stay alive (they hit quite hard)
- Try to find a group for [20+] Clearing the Way (might take too long)
- If you managed to get half of the kills you needed, abandon [20+] Ending Their World, then restart it and get the final kills for [20+] Clearing the Way on the second run
- Accept [20+] Clearing the Way from Vindicator Corin and then [20+] Ending Their World from Demolitionist Legoso, then follow him and do as you just read.
- Once both quests are finished, jump down the hill step by step (18,59) on the southern side, find the Sun Gate (18,63), right click the 4 portal controllers and then the Sun Gate itself.
- Travel back to Vindicator’s Rest, turn in [20+] Clearing the Way at Vindicator Corin, then hearth or travel back to Blood Watch.
- Turn in [18] The Sun Gate at Vindicator Aesom.
- Prepare for one of your most unique moments in WoW and turn in [20+] Ending Their World at Exarch Admetius.
- Enjoy the party on the outside (they all got their special words to tell you, just talk to them), but also make sure you accept and turn in [20] The Unwritten Prophecy at Prophet Velen, otherwise you’ll have to visit him again in the Exodar (32,54) if he despawns before..
Final Steps:
- So, whats left to do for the hero of Bloodmyst Isle?
At first, you should turn in all your remaining Irradiated Crystal Shards. - If you skipped the Optional Circle in Darkshore, there’s still a quest that was left untouched:
[15] Newfound Allies from Anchorite Paetheus. Accept it, fly to the Exodar, travel northeast and find Huntress Kella Nightbow (24,54). Turn in [15] Newfound Allies and get the followup [15] The Way to Auberdine. - From Azuremyst Isle, take a boat to Darkshore at (29,28). Once there, turn in [15] The Way to Auberdine at Thundris Windweaver (37,40).
- You might also want to get the flight point at (36,45).
- New adventures await you, I recommend either:
- Visiting the Deadmines, have a look at Jame’s The Deadmines Guide, as you can complete the prequest now pretty fast with your new lvl 20 mount
- Go on leveling from 20-30 with Boston’s Level 20-30 Alliance Leveling Guide
Final Words:
Thank you for using my -Bloodmyst- Leveling Guide 12-20
I hope you had fun on Bloodmyst Isle and proceeded through the guide and your levels quickly!
Feel free to post suggestions or reviews in the comments.
Have fun, thanks, see you.. ..in the World of Warcraft!
If you played through this, please post a review!
Thanks Sven!
I don’t knowThanks Sven!
I don’t know if you were around when I joined the site. If not, nice to meet you! If so, well I’m sorry for not remembering and welcome back!
you’re right, I fixed thatyou’re right, I fixed that in the guide now
Ok,Thank you very much.Ok,Thank you very much.
It looks like Youri’s guideIt looks like Youri’s guide was put into “work in progress” mode because it’s out of date. I suggest you use [url=https://www.wow-pro.com/leveling_guides/boston%2526%2523039%3Bs_20-30_alliance_leveling_guide]Boston’s Leveling Guide (20-30)[/url] instead.
Youri’s Level 20-30 When i click on the link to “Youri’s Level 20-30” the page comes up “Access Denied
You do not have permission to access this part of the site. If you think this access restricion is a mistake, please send a private message to Snowflake.
“
Simply AmazingGreat stuff!!! made level 20.5 in 8 hours
Map NumberingGreat guide 🙂 but like someone said below it would be great if the numbers on the map matched up with the numbers on the guide – sometimes it takes a while to find where I am!
Excellent GuideJust wanted to say thankyou for writing this guide. I have just finished it for the first time on my Draenei Shaman and found it easy to use and made the area fun to level in. The only problem I found was that in a couple of places you tell us to go in the wrong direction but I’m sad and have questhelper so this wasn’t really too much of an issue for me.
Thanks again!
AMAZING TYVM!!!omg this is a great guide it helped me alot i finished it in 7hrs on tleloc now a 32 paladin! i thank you ALOT!
Awesome guideJust used this guide to level two night elfs (hunter, druid). This worked great, very accurate. Saved us tons of time wandering around.
I’m level 18 in the level 17I’m level 18 in the level 17 circle, but completed all of the Satyr quests in Axxarien (didn’t turn them in), so let’s see where that leaves me. I want to say that this guide is EXCELLENTLY done! I’ve never leveled a Dranei before, and I’m very happy I decided to. I was a little hesitant about using a guide, but I have to say, I am having a ton of fun with this guide. I would’ve never known how FAST I could level in Bloodmyst. Great job!
I do have one thing to recommend though. I must’ve killed about 30-40 Blood Elves at the Cryo-Core before Galaen’s Amulet dropped. Unless I was running into some horrible odds, mention that the drop rate is very low for this item. I’ll post again when I’m finished on Thursday!
Just got done doing this andJust got done doing this and reached 21 in 14 hours, awesome guide. :jawdrop:
Grab All Quests“When going to a new quest hub, just gather all the quests that you will ever need, rather than saying you need certain quests at a certain point.”
That works pretty well in the starting areas, but less so after that. Sometimes taking one quest locks you out from others, or throws you onto a Gryphon and sends you into a whole ‘nother area.
Still, when applicable, the guide might flow a little better if it read “take all the available quests:” followed by a list, rather than “take the following quests:”. That way we don’t have to ALT+TAB back and forth to see if we’re taking a quest we shouldn’t.
Decent GuideA few comments for improvement.
I honestly wouldn’t bother with the Draenei Youngling quest, it’s just not worth it and is a pain in the butt.
When going to a new quest hub, just gather all the quests that you will ever need, rather than saying you need certain quests at a certain point. Makes it take longer I think.
Quest to kill the boss guy at Nazzivian is bugged. He doesn’t spawn sometimes, may want to mention that.
Spacing out the steps would help to not lose your place as you are going through it.
Again overall a decent guide. I got my Draenei hunter from 1-20 with this guide, and with Snowflakes guide in less than 9 hours. Thanks for the guide.
~Rob
Well all i can say is awesome!This guide is awesome i got to 20 in 3 days bout 5 hours played in those three days uhh like its already been said Tzerak’s quest needs to be deleted, and uhh… i never got past 13 wit a draeni befor till now, and definantly not a draeni hunter well yah there might be a few bugs here and there but over all this is an Awesome! guide!
~If i were president id be PRESIDENT!~
A few visual design tweeks needed.Good guide, aside from the Tzerak comment already made there are some painful design issues involved.
One being that you don’t have the map numbering matching the steps. Every time we alt+tab and look at our next destination we have to find which step we are on in the guide. It makes the numbering of the steps redundant and ultimately they don’t serve the purpose of clarity.
Secondly is that you put the images for found quest objects at the end of each segment of your guide, so as we play through, and have finished all the quests we go “Oh, so those were the things that I’ve already found” this is once again redundant and fails to serve as an informational aid to the guide. This would be quite simply and easily solved by moving the images to the top of the segments.
On the plus side it’s great that you put page breaks between each segment. It really helps the viewer’s eyes focus on the current goals.
(Yeah, I’m a design student. I make posters, informational illustrations and the such while I’m not playing WoW, so these little issues would have driven me nuts if I didn’t state them, heh.)
Great Guide This is an excellent guide, and much more viable for Ironforge and Stormwind folk since patch 3.0.2. I just ran through this guide with a Night Elf Hunter on a new server (no twinking, no help from alts or friends); 12 – 20 took ten hours /played (17:30 from 1 – 20) with almost no rested bonus (did 1 – 12 on Saturday, 12 – 20 Sunday). I finished the guide about an hour later, and dinged 21 while turning in the final quests. If I were solely focused on leveling, I probably could have gone a little faster, but I had to make several trips to the Exodar to sell herbs and buy larger bags.
Benhir: I had the same experience; I waited several minutes for Tzerak, and I saw summoners appear to perform the ritual, but he never appeared. With any significant amount of rested bonus, it shouldn’t be a problem. Just skip it.
Also, Kella Nightbow didn’t have any quests for me. Either that quest has a prerequisite, it’s draenei-only, or it’s been scrapped. All she said was “Hello [class].”
Review.So, I’ve just finished this guide with a Shaman.
The guide was simple to read and to follow. The formatting is ok but I think that you could add more images for the circuits. The circles are very good for xp/hr and I had loads of fun while leveling there.
When I finished the last step I was 50% into level 21, which is awesome. I’m going to use Boston’s 20-30 guide and then Jame’s ally guides ^^.
Nice guide, I would give it 8/10.
Ok.Well I am almost at the end of the guide and I confirm that this bug does not matter. It’s only a few xp points that you loose, I’m ahead of the guide without that quest :P.
Tomorrow, as I’ll end the guide, I’ll post final thoughts about this guide.
Patch 3 bugI was following the guide and then suddenly stopped when looking for Tzerak. Wowhead and Thottbot confirm that he is bugged and will not spawn.
So, before going on with the guide, what should I do instead of this quest and the follow up? Other than that I am a little behind the guide and I think that I’ll end far behind in xp terms,
bye 🙂
Terrific guide! I had suchTerrific guide! I had such an awesome time playing through it and leveled very quickly. 😀
good guide. If it had moregood guide. If it had more maps and if the maps were synchronized with the points in the circles (ie. point 1 in the writing referred to point 1 in the map, like it is in Jame’s and Boston’s guides), it would be perfect.
Great GuideGreat guide. 12-20 in one sitting… I actually hit 20 as soon as I collected all the dragon bones.
Not badI’m lvling my second character using guides and this is not bad compared to the other guides, definitely the best 12-20 guide. I completed the guide in about 10 hours playtime and the xp rate beats anything you’ll find in the normal zones. A couple of points:
*Even after doing the optional section at lvl 15 I was still 1/2 a lvl short of lvl 16. More quests in darkshore needed.
*The guide asks you to grind to finish lvl 14, I was barely 4 bars into lvl 13 at this point so I didn’t bother grinding an entire lvl. Hence, more quests in darkshore plz 🙂
*Circle 9 falls over badly. Although I finished the circuit with just 2k xp to ding I spent 45 minutes trying to figure out which quests I cant do because of the quest series not mentioned until now, could you mention at the start of the guide that you need to do the quests in Odysseus’ Landing or rephrase circuit 9 to indicate whats optional!?
Overall, an enjoyable guide that I’m sure will become an essential part of pre-Jamie 🙂
Good GuideThis was a great guide, it reduced my /played time by alot. However, I found that I ended up 1 entire level ahead of the guide, due to the extremely low drop rate on the Elder Brown Bears, other than that it was a good guide, and I did quests I never knew existed.
WoWThis is a totally excellent guide. Got me from lvl12 to 20 very quickly, nicely worked out and well formatted. Thanks.
It took me about 7 hours for 8 levels, not all in the same day but very little rested bonus used. Excellent, im back for the next set. Onwards to lvl70 !!!
thanksThank you all for the positive feedback and hints to improve this.
I am currently playing through this again on a mage and will add your stuff into it when I’m done.
edit; just saw that snowflake and jame already fixed a couple of those things, thank you 🙂
No, I hadn’t done the followNo, I hadn’t done the follow up, and that fixed the issue. Thanks for the input!
Have you done the follow upHave you done the follow up of the Furlbog Language quest line? [color=#cc9933][b][10] Stillpine Hold[/b][/color]
Pretty sure it’s a prerequisite too 😛
For some reason, I can’t getFor some reason, I can’t get the quest “Saving Princess Stillpine” with my gnome rogue. Before going into Bloodmyst, I’d read that I’d need to do the Learning the Language questline first, so I did. I still couldn’t get the quest from the princess, and from what I’ve seen on Wowhead and Allakhazam, I’m not alone. Perhaps an occasional glitch?
Good workJust finished running through this with a Human warlock, and it was great.
Just 1 small comment – the closest warlock trainer is probably in Ironforge, not Ratchett. Ratchett is really far from Auberdeen (even if you fly), whereas the flight from Menethil to Ironforge is pretty short. You just have to wait for another boat first. And warlocks coming to Bloodmyst will have to pass through Ironforg on their way there, so picking up the flight path is not a problem.
a few typo’s (east/west)A few times you say “southeast” or “northeast” when you mean “southwest” or “northwest” — for example:
* Under Circle 3
Make sure you got [14] Victims of Corruption from Morae and [14] Know Thine Enemy from Vindicator Aalesia, then leave Blood Watch to the ******southeast******.
* Under Circle 4
Leave Blood Watch to the ******northeast****** until you’re in Bladewood (49,47) again.
Nice work thanks for the guide!
Excellent guide!Great job Sven. This guide is well put together, and in a format that is very easy to read, track, and execute without consulting any other sources. I would recommend this to anyone planning to level in this area. (5 stars!)
Notes/Comments:
Circle 2
Step 3: Now grind on the Nagas until you got the Survey Data Crystal from one of them.
– Most likely this was my poor luck of the draw, but “grind on the Nagas” was a huge understatement as I literally had to kill between 70-80 before the lone data crystal dropped.
Circle 10
Step 5: Accept [20+] Clearing the Way from Vindicator Corin and then [20+] Ending Their World from Demolitionist Legoso, then follow him and do as you just read.
– The suggestion to abandon ‘Ending Their World’ halfway through and then re-getting it to rack up kills for ‘Clearing the Way’ is brilliant. I would add though that even so ‘Clearing the Way’ will most likely be impossible to solo for most classes that do not have some method of healing. Although quite buff, the quest NPC will eventually take on more then he can handle, and you will find yourself without a friend, on top of a hill, surrounded by elites.
– I eventually completed with another lvl 21 mage. (end boss is easy, most fights are easy, just as stated above, sometimes NPC just charges in on 3-4 elites)
Final Steps:
Step 2: If you skipped the Optional Circle in Darkshore, there’s still a quest that was left untouched:
[15] Newfound Allies from Anchorite Paetheus. Accept it, fly to the Exodar, travel northeast and find Huntress Kella Nightbow (24,54). Turn in [15] Newfound Allies and get the followup [15] The Way to Auberdine.
– Kella Nightbow is southwest of Exodar, not northeast. Coordinates are correct, but might want to add that she is right next to the docks where the boat to Auberdine leaves from.
Overall an excellent guide, and I look forward to more of your work.
Currently I am now working on [url=https://www.wow-pro.com/node/899]Youri’s Level 20-30 Alliance Leveling Guide[/url] and although the format looked cringingly rustic I am already quite impressed with the progression of quests chosen. With a little dose of thottbot seasoning it appears to be very good so far.
Cheers.
The above post points out aThe above post points out a nice improvement. Swimming east of the quest giver, past the ships, and down to the bottom of the underwater cliff u will find a bunch of Bloodcursed Voyagers. The only annoying thing is you are rather far away from “land” or any dry spot you could use to sit and eat/drink for mana or health.
I managed to do ok as a lvl 20 frost mage and did not need to rest for mana or health, but your experience may differ. Drop rate was around 40~50%. FYI, since I read this post before getting to this stage I actualy skipped killing any of the Bloodcursed Voyagers in the boats and went directly to the “new” spot. Even so, I was not even close to clearing more then 30% of the area of target mobs.
Good find whoever posted this.
Cheers!
Nice work!Thanks a lot for a great guide! Being the first time using one, it was a great experience!
I have one thing to add though… Circle 9, step 10: It’s better to look for the Bloodcursed Voyagers a little further east of the coast – down a “cliff” or “hill”, right before the fatigue-water starts. There are lots of them there. That way you don’t have to wait for them to respawn. I don’t remember the cords though.
I hope I’ll see more guides from you in the future!
Great guideThanks for this great guide Sven!
It really helped my draenei getting from 10 to 20+ in no time.
Everything is very clear, I don’t have to read all the quest texts, and I didn’t need to get to thottbot each time because I couldn’t find something
The maps you included in the guide are really helpful, and the “circles” of quests are also helpful, so you don’t have to get to a place two times.
Thanks again!
Killerbees
Nice job :)Very nice job with the guide :). I’d have to add – I leveled as a druid for these quests. With the additional druid quests (Cure Poison @ 14 and Aquatic Form @ 16) I managed to just ding 21 with the final quest turn-in (Ysera’s Tears). I also did the optional circle in Darkshore (as I was there doing the druid quest at 16 anyway – it fit in nicely at that point. /played time = 21 hours.
Thanks!
Great guide!I got my Night Elf Druid through this guide and it worked wonderfully. I wanted to get some Exodar rep and experience some of the Draenei areas (can’t be a Draenei Druid though :[). Also needed to get to level 20 fast so I could level with friends. I don’t think I could have leveled nearly as fast without it. Thanks Sven!
Finished it today and haveFinished it today and have nothing more to add. Was a great guide and I had a lot of fun leveling up to 20 in Bloodmyst.
-Snowflake
WoW-Pro Admin
thanksthanks to your hints as well as the much positive feedback from the others 🙂
fixed the other stuff, although I already mentioned the furbolg language thing in the introduction, I now clearified it near the princess quest.
didn’t notice I forgot to tell to get the flight path, other than that the additions just clear things up, but they are good additions. thanks.
Great Guide!I just completed this guide using my first draenei character, and it was a fantastic experience…excellent guide, everything ran smoothly and efficiently. I leveled very quickly and had a blast doing it. You should write more guides! 🙂 Thank you
Ok, I did this guide with aOk, I did this guide with a ”’Gnome”’ rogue and there are a few things that I think should be mentioned/changed:
* Kessel Run: The quest NPCs that you are to warn don’t have a question mark over the head, you can still speak to them and get the quest update.
* Maybe mention that it’s not enough to run to the NPCs and warn them for Kessel Run but that you actually need to turn in the quest at Kessel’s Crossing before the time runs out.
* Tell people to get the flight path in Blood Watch.
* You can’t rescue princess Stillpine if you didn’t do [http://www.wowhead.com/?quest=9538 this questline] (At Cartographer Aurren in Azure Watch/Azuremyst) that teaches you to speak Furbolg. I actually went back to Azuremyst and did it. Best tell people to do it on the way to Bloodmyst isle.
* At level 14 you can’t get [18] Ysera’s Tears yet. (Requires level 15)
* “until you ”’found”’ the Sunhawk Missive” –> “find”
I’m currently at level 16, will write about the rest tomorrow. (Other than the things I mentioned, the guide works very well)
-Snowflake
WoW-Pro Admin
n1Great job! Dinged 20 in less than 17 hours using this guide, new record! And my way to 12 wasn’t even that good.
Couldn’t have done it better myself 😛
Thanks alot Sven, keep it up! 😉
Well, I finished the guideWell, I finished the guide with a Night Elf rogue, everything went smoothly (ofcourse skipped some spots, added some of my own quests that didn’t fit in with the guides (as I usually do)). But all in all, great guide, had lots of fun. Only got dissapointed that I couldn’t get that Tabard or do the most fun quest with that shaman…
Awesome!Just used it for a druid because I was bored of Darkshore and it was awesome. 🙂
Thanks so much for writing it!
Very Nice GuideI haven’t gone through the whole guide yet but so far it’s been great. I’ve looked through the rest of the guide briefly, and having levelled in Bloodmyst before it looks like a great guide. I’ve also noticed a few quests I’ve missed before so it will be nice to try those. The presentation is excellent, it must have taken a lot of effort. 🙂 I’ll comment again when I’ve done the guide, but great work.
comments?Would love to see this reviewed by people who used this.. 🙁
having no feedback after putting in so much work sucks 🙁
:)Thank you. 🙂
Just compeleted adding the rest of the maps / imagery.
Would be great if you added this to your “1-60 Alliance & Horde Leveling Guides!” page 🙂
I consider it complete now, might edit it again after some feedback though.
The guide truly looksThe guide truly looks amazing. The formatting is well done and tomorrow I’m going to take some time to read through it in detail.
Being from Germany myself I think that your English is exceptional and so far I haven’t spotted any grammatical errors yet.
-Snowflake
WoW-Pro Admin
about the guideI did Bloodmyst with a Gnome Warlock (duo with a friend), then did it solo with a Hunter.
Then I created this guide.
Now I test played it with a Shaman:
Worked quite well, barely had to grind at the points I mentioned, doing the optional circles was fine.
Only thing is that the “final battle” was a bit tough to solo with the Shaman, although it was easy as hell with the hunter (thought it would be that way before anyway).
Stuff to add tomorrow:
maps, screenshots of stuff like mushrooms, sand pears etc.
PS: I’m not native english. It’s possible that there are minor grammar mistakes 🙂