 by Bitsem
Journey Through Durotar
This guide is a work in progress. Please leave comments for needed improvements, especially after Cataclysm goes live. Thank you!
I used Jame’s Guide Writing Guide, Wkjezz’s Making a uniform header for guides, Jiyambi’s Creating Maps and Graphics with GIMP and Brune’s Colour Guide, so thanks to them as well!
I also have to give a huge THANK YOU to kayeich for his editing prowess and the rockin’ maps! In the words of our fair Jiyambi ”That was simply epic of you to do!” 🙂
- Quests
- Items
- Locations
- Quest objectives to kill
- NPCs
- Coordinates
These guides are also available in addon form here! They are amazing!Try them out!
Level 5 and 6
1. If you followed Troll Starting Zone (1-5), you should have the quest Sen’jin Village. Run and turn in the quest to Master Gadrin in Sen’jin Village (56.02,74.71). Accept the quest Breaking the Chain from him.
Accept Cleaning Up the Coastline from Bom’bay. (55.77,75.3)
Get the Sen’jin Village flightpath at Handler Marnlek. (55.40,73.40)
2. On your way Southwest, kill Surf Crawlers for handfuls of Crawler Mucus.
Around (51,81) you should see Northwatch Lugs carrying Northwatch Supply Crates. Destroy 3 of the Crates and kill 10 of the Lugs. If you still need Mucus, finish killing Surf Crawlers on your way back to the village.
3. Turn in your quests and accept the following:
- Never Trust a Big Barb and a Smile from Bom’bay. (55.72,75.39)
- Purge the Valley from Master Gadrin. (55.95,74.80)
- The War of Northwatch Aggression from Lar Prowltusk. (55.46,75.04)
You should be around level 6 by this point.
4. Head to the Southwest. While completing the following step, kill Northwatch troops and place the Poison Extraction Totem near Clattering Scorpids until you have 6 samples of venom.
You’re going to destroy the three sets of Attack Plans in Northwatch Foothold (they look like scrolls.). The first one is located at (47.9,77.6). Follow the canyon to (46.41,78.86) for the second. Finally go back toward the entrance to (49.7,81.6) for the third.
When you have these three quests completed, head back to Sen’Jin Village and turn them in.
You should be around level 7 by this point.
Level 7
Accept Riding On from Master Gadrin and train your new skills if necessary.
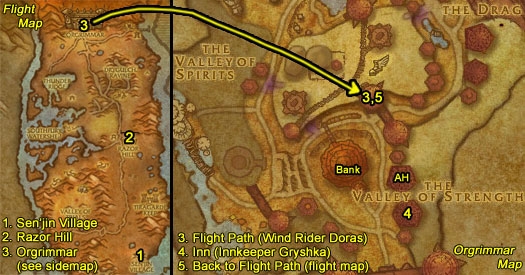
1. Talk to Raider Jhash (55.96,74.80) for a free ride to Razor Hill. Get the new flight path and turn in Riding On to Gar’Thok (51.92,43.48).
2. Accept the following quests:
- From Bad to Worse from Gar’Thok.
- Exploiting the Situation from Gail Nozzywig.(53.05,43.12)
- Meats to Orgrimmar from Grimtak. (50.76,42.78)
Set your Hearthstone at the Inn. (Innkeeper Grosk (51.61,41.65))
The following profession Trainers are available here: Rawrk-First Aid Trainer (54.1,42.0), Runda-Profession Trainer (52.9,41.9).
Repair and Restock if necessary.
Accept
Ride to Orgrimmar from Burok. (53.07,43.59)
3.When you get to Orgrimmar, go down the lift at (50.87,62.61) and turn in Ride to Orgrimmar to Innkeeper Gryshka (53.44,78.85). Accept Doras the Wind Rider Master from her.
Do any training, auctioning, etc. you need to do and head back up the lift.
4. Turn in Doras the Wind Rider Master and accept Return to Razor Hill.
5. Fly back to Razor Hill and turn in Return to Razor Hill to Grimtak.
1. You should now be back in Razor Hill.
2. Head Southeast to Tiragarde Keep. Collect 6 pieces of Kul Tiras Treasure while killing Northwatch Marines, Northwatch Sharpshooters, and Lieutenant Palliter. (57.45,55.24)
Lieutenant Palliter who is on the top floor of the big building in Tiragarde Keep. (59.5,58.2)
3. Run back to Razor Hill and turn in your quests. Accept the following:
- Storming the Beaches from Gar’Thok. (51.89,43.52)
- Shipwreck Searching from Gail Nozzywig. (53.06,43.12)
You should be around level 8 by this point.
4. Head East (58.96,49.79)to kill 11 Foaming Sea Elementals and collect four sets of Gnomish Tools.
When you come across an Injured Razor Hill Grunt, talk to them and accept the quest Loss Reduction.
While hunting Elementals and collecting Tools, rescue four Injured Razor Hill Grunts.
Level 8
1. When you finish these quests, turn them in back at Razor Hill. Accept the following:
- Thonk from Gail Nozzywig. (53.10,43.18)
- The Burning Blade from Orgnil Soulscar. (52.27,43.09)
2. Exit Razor Hill from the east, and follow the canyon’s eastern ridge to Dustwind Cave (51.85,26.27). Kill members of the Burning Blade until you have 6 Burning Blade Spellscrolls.
3. Hearth or run back to Razor Hill and turn in The Burning Blade to Orgnil Soulscar. (52.26,43.05)
We’re headed on a longer circuit, so repair, restock, train, etc.
4. Head to the top of the Guard Tower Northwest of town (49.58,40.16) and turn in Thonk to, well, Thonk. Accept Lost in the Floods from him. Use Thonk’s Spyglass four times to search for survivors. Then turn it in to Thonk.
OPTIONAL CIRCUIT
*The next circuit requires a lot of running (time), but some cool storyline and good rewards, including an eight slot bag. I don’t recommend it, but skip it if you wish and jump ahead to accepting The Dranosh’ar Blockade
You should be around level 9 by this point.
Level 9
1. Accept Watershed Patrol from Thonk and head out to help the flood victims.
2. First go West to Raggaran and accept Raggaran’s Rage (42.67,49.86).
Kill four Razormane Quilboar and four Razormane Souts, then turn in back at Raggaran. Accept Raggaran’s Fury and go kill five each of Razormane Dustrunners and Battleguards. Turn in at Raggaran yet again.
3. Our next charity case is Zen’Taji (35.87,41.37). Accept Unbidden Visitors and then attack a Wayward Plainstrider until it flees toward the Barrens. Do this twice more then turn it in.
Accept That’s the End of That Raptor and hunt down Screamslash (around 36.05,32.00). When he’s dead, turn in back at Zen’Taji.
4. Now we need to find Misha Tor’kren to the North (43.30,30.58) and accept Lost But Not Forgotten.
Kill crocolisks/toothgnashers until you obtain 250 Crocolisk Teeth. Then return to Misha and Turn in.
5. Now head to Grandmatron Tekla (40.71,35.01). Accept Spirit’s Be Praised and escort her to Raggaran (42.65,49.92). Turn the quest in to him.
You should be around level 10 by this point.
Hearth back to Razor Hill, or just run East back to the Guard Tower. Turn in Watershed Patrol to Thonk.
END OF OPTIONAL CIRCUIT
Level 10
1. *Accept |The Dranosh’ar Blockade from Orgnil Soulscar and head North out of Town toward Orgrimmar.
2. On the West side of the road, you will run into Rezlak (46.36,22.99). Accept:
3. Head South and East to Razorwind Canyon (54.00,27.37). Kill 12 Durotar Harpies of any kind and Collect five Sacks of Supplies from the ground.
4. Return to Rezlak and turn in your two quests.
5. Continue North to Orgrimmar and set your Hearthstone there. (I chose Miwana in the Valley of Wisdom (39.03,48.57). Feel free to choose another Inn if it’s more convenient for you.)
1. Go back out the South gate and turn in The Dranosh’ar Blockade to Gor the Enforcer. (44.97,14.74) Accept the following quests:
- Fizzled from Gor the Enforcer. (44.97,14.74)
- Thunder Down Under from Gor the Enforcer. (44.97,14.74)
- The Wolf and The Kodo from Shin Stonepillar. (44.94,14.78)
Speak to Shin, and ask him to tell his story. When “wolfed”, run East and a bit South until you find fighting kodos. (55.24,13.99) Wait for story to finish, then turn in back at Shin Stonepillar.
Now you can accept Ignoring the Warnings from Gor the Enforcer.
2. Head West and kill 12 Warring Elementals. You may slay either Furious Earthguards or Teeming Waterguards. (37.39,19.46)
3. Now South and East to Thunder Ridge. (40.71,30.06) Take a dive into the lake and find a Thunder Lizard on the bottom. Activate eight of them while avoiding their shock waves.
4. Go to (42.11,26.69) and dive again to Fizzle. Loot the Orb from him.
You should be around level 11 by this point.
Level 11
1. Now either Hearth or run back to Gor the Enforcer outside of Orgrimmar (44.98,14.76) to turn in your quests. Accept Margoz. Also accept Beyond Durotar if you plan on going to Azshara as your next zone instead of Northern Barrens.
2.Margoz is to the East (56.39,20.17). Turn in your quest. Accept the following:
- Skull Rock from Margoz. (56.39,20.17)
- Sent for Help from Vek’nag. (6.39,20.17)
3. Head East and report to Spiketooth at Deadeye Shore in Durotar. (58.81,23.14) Turn in Sent for Help. Accept all his quests:
Speak to each of the NPC’s and challenge them to combat. After defeating all three, turn in quests to Spiketooth.
You should be around level 12 by this point.
Level 12
4. Head North to Skull Rock (53.42,10.20) and kill cultists until you have 6 Searing Collars.
5. Run back to Margoz and turn in Skull Rock. (56.41,20.05) Accept Neeru Fireblade there.
6. Hearth or run back to Orgrimmar and bring the Example Collar to Neeru. (58.50,54.34)
1. If you plan on going to the Northern Barrens next, accept Ak’Zeloth from him, and accept Warchief’s Command: Northern Barrens! from the sign in the Valley of Strength. (49.7,76.6)
2. If you are headed to Azshara, exit through Orgrimmar’s rear gate and turn in Beyond Durotar to Ag’tor Bloodfist. (26.84,77.00 in Azshara)
Not sure where to go next.I just finished this part of the guide and I’m not sure whether to go to Azshara or Northern Barrens. Does anyone have a preference? Does one lead to faster leveling. Or one have more, “Cataclysm effects”. Thanks. c:
Bits, I seem to be unable toBits, I seem to be unable to find the correct file the one in the source code here still seems to have those quests in the wrong order. I tried to fix it but I’m unfamiliar with the questing flow there, perhaps you could take a look at it when you have time? Thanks 🙂
Thank you! This has beenThank you! This has been fixed and will be uploaded in the next update. 🙂
Guide correctionNot sure if this is the right place to comment (my first post) but I think there is an error in the Durotar guide in the add-on. The quest “The Dranosh’ar Blockade” is set to accept right after the step to “Level 9”. It does not become available until after I complete “The Burning Blade”.
Fixed. I think I found themFixed. I think I found them all. (I had double bolded them.) Der! Thanks as usual kayeich! 🙂
Bah! How did I manage that!?Bah! How did I manage that!? lol. Will fix it now. (If I can. :))
There’s a couple of placesThere’s a couple of places where the [ b ] and [/ b ] tags have not gone through as bbcode, just plain text.
No problem! Don’t tellNo problem! Don’t tell anyone, but I find learning new things fun. 😛
Looks awesome Bits ThanksLooks awesome Bits 🙂 Thanks for all the hard work!
CompleteThis guide is now formatted, edited and complete. I may decide to change one of the circuits later, but it’s fine the way it is. May just cut off a bit of time if I switch it around later.
Safe to edit now?Is it safe to edit this now? I don’t want to mess up my formatting, but would like to Bold the rest of the colored text. lol. Trying…to…resist…fun…new…site…layout…Must…finish…Ashenvale…..
I make all of my colored textI make all of my colored text bold 😀
Darn! Just realized that IDarn! Just realized that I forgot about Gylin’s suggestion for making all the colored text bold. I’ll probably do that if I change the level 10 circuit.
Unless there’s a site preference to keep them as close to Jame’s guides as possible? That’s probably a question for Jiya, I’ll ask her before making the change, as she’s been a bit busy. *extreme understatement* lolol!
Ready for useI’ve made a few more changes, mostly aesthetic, and this guide should be ready for use. I may change one of the circuits to save some time, but it’s a small circuit and is functional as is. Thanks all for your help and support.
Again, thank you kayeich forAgain, thank you kayeich for your editing and suggestions! I believe I have all the numbering issues fixed and all the links added. I think that I corrected all the typos you found and have the formatting issues straightened out.
You are probably correct about changing the order of the level 10 circuit. I don’t know if I’ll change that now, or after I finish coding the Ashenvale zone. (I haven’t even recorded it all yet, much less figured out efficient circuits. lol.)
Your help has been absolutely invaluable to me as this is my first paper leveling guide. Thank you, thank you, thank you.
Please let me know if you find any more errors! After looking at it for so long, it’s all kind of blended together. 😛 You rock!
Still a few errors.
1)Still a few errors.
1) First thing to note though, in relation to numbers on the maps: You shouldn’t repeat a step number while referring to same map.
As an example, first part you go step 1-2-1-3-4. It should just go:
step 1 (grab quests)
step 2 (do quests)
step 3 (hand/grab quests)
step 4 (do next quests)
step 5 (return to sen’jin/hand in quests)
Generally, last step isn’t on map (though I did sometimes put it in). This is roughly how I numbered steps.
So I may have added a few steps from what you currently have, or removed some, or just renamed them.
2) “Never Trust a Big Barb and a Smile” from Bom’bay. crocolisk/toothgnasher (crocolisk is misspelled, but also there is another name for the crocs in the area, the toothgnasher. Both mobs are there, but crocolisks are level 10, while tg’s are 8-9).
5) I just realized, since there are now more flight points, it’s actually more efficient at level 10 to fly to Org after accepting Dranosh Blockade, set your hearth, run out, hand in that quest and pick up follow-ups, then do the goblin/harpy quests, then do the blockade followups.
You’ll waste time running from razor hill to the goblins, as well as running from goblins to org then back out again for the blockade quests. Doing it as above, you save yourself some running time, and also speed things up a bit by getting to use flying mount for a bit.
This would require some map manipulation admittedly… >_>
Almost thruI’m almost finished with this guide. I think. lol.
I believe I’ve fixed most of the issues, I just need to add the rest of the links from about level 9 on.
Definitely had some freaky stuff going on after the site update, but it should be straightened out now.
The guide is looking awesome,The guide is looking awesome, you two! Kayeich, making those smaller maps really helped clean things up. That was simply epic of you to do 🙂
Great work, both of you, love to see cooperation like this 🙂
Eep!You’re right again kayeich. lol! I have no idea how they got broken so badly. I guess that’s what happens when you edit during a complete site update. 😛 Luckily, I had saved most of it in Notepad++, so I could copy/paste it back in.
The color changes on the site have made some of my links orange instead of black, etc. but I’ll just have to go through and change those individually. I still have typos to fix and I’m sure there will be other things too, but I finally got the maps working! Thanks again! 🙂
Thank you so much kayeich!I was in the middle of implementing a bunch of your suggestions when the site was updated! lol. I need to go through and see which changes made it and which didn’t.
The maps you did are amazing and would have taken me awhile! My photo manipulating experience is all with Photoshop from years ago when I did ad design for a newspaper. GIMP is great, but I’m just not familiar with it yet. I sooooo appreciate the fact that I could just unzip that beautiful file and load ’em up! Awesome!
I totally agree with your comments and had most of them fixed, but I’m pretty sure they didn’t all get saved. Again thank you for the insightful comments! And thanks to all the people who have helped make my guides better!
Some of your formating seemsSome of your formating seems to have broken. You have a lot of broken bb code tags all over the place, not sure if it’s from the site update or not.
Epic feedback is epic!Epic feedback is epic! Seriously, thanks for this kayeich, I really appreciate people taking the time to read through eachother’s work and help out, and I know Bits will too 🙂
Misc other comments: 1) IMisc other comments:
1) I personally don’t like how you keep reusing numbers. An example is the sheer number of ‘step 4’ in the guide. It happens in other spots too, but still, it’s off-putting. I understand that we’re going to Razor Hill continually, but I’d rather see it show up as a new number each time. If you’re using various map images, then this isn’t too hard.
2) I personally think you should have a a step 0 before step 1 stating where you get to sen’jin, as you can get there from either valley of honors (orcs) or echo isles (trolls). Here’s the quest that sends you there from the orc side: “Report to Sen’jin Village” http://cata.wowhead.com/quest=25133
3) For step 1, the quest name is mispelled. Sin’jin -> Sen’jin
4) Step 3: samples is misspelled. samlpes -> samples
5) In step 3, you also have a double period which looks a bit weird: (they look like scrolls.).
6) I know that you just transcribed from the addon, but I would actually recommend doing step 6 before step 5. The only requirement to head to org is to be level 5, and you’d be level 7 at this point.
7) I would also add a map of org for step 6. Remember, not everyone uses coordinates.
8) I think you need to better separate/highlight steps 10-13 as being an optional circuit, where it starts/ends so people skipping it (not sure why one would, but since you suggest it as such) know where to jump back into the guide.
9) Again, I know you just transcribed from recording guide but…In regards to the optional circuit, I also find it silly to do step 12 before step 13. If step 12 is an escort quest going to point 10…isn’t it better to do step 13 first, go back to step 12, head to point 10 and from there back to razor hill? Less running around.
10) Your coordinates look wrong for step 11’s quest “Warchief’s Command: Northern Barrens!”. According to wowhead, it should be (49.7,76.6). I’d also pick it up along the way to Neeru. Who is also a guy, not a girl (you said ‘her’ in guide).
Since you’ve stated difficulty with image manipulation, I split up the maps based on your steps, but notably also my comments (so step 6 before step 5, and step 13 before step 12, and warchief’s command before neeru). If there -is- a reason for doing them in that order, I can switch it back up, however.
I couldn’t upload pics with comment, so I zipped them up and tossed them over in mediafire. It has 9 pictures:
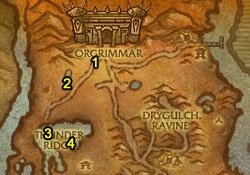
Map 1:
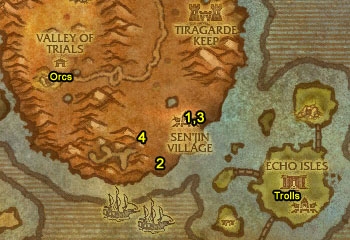
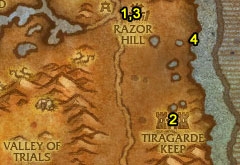
1) Steps 1-3
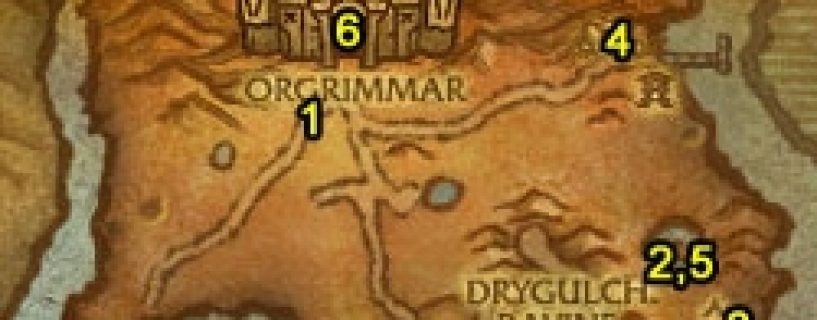
2) Step 4 & 6 (Flight paths/Org quest map)
3) Steps 4-5 & 7
4) Steps 4, 8-9
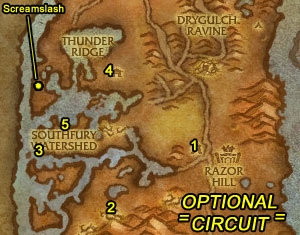
5) (Optional Circuit) Steps 9-13 (with step 13 before step 12)
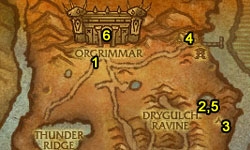
Map 2:
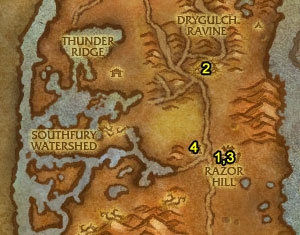
6) Steps 1-4
7) Steps 5-8
8) Steps 5, 9-11, Step 4
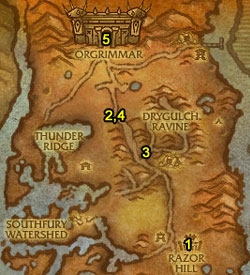
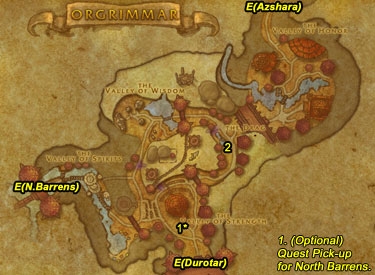
9) Orgrimmar map (Quest locations and exits)
Tables are the way to go,Tables are the way to go, unfortunately. Any attempt to reposition images for me failed outside of tables. That said, tables aren’t going to be the best option in this case.
I wouldn’t recommend putting text next to pictures with 400 pixel width as I recall that you once had trouble with sidescrolling because one of wkjezz’s pics was too long on your laptop. I’ve had similar issues on mine.
Roughly, you should estimate for a picture or table not being longer than about 600-625 pixels.
With a 400 pixel picture, that leaves only about 200-225 pixels for text, which leaves it really smooshed if you use fixed positioning width. You can use relative positioning, but that can easily throw off formatting, especially if you want text to wrap around the bottom of the picture.
How are you inputting theHow are you inputting the code, out of curiosity? Are you putting a pound sign before the number?
I would suspect you’re doing it without it, and the formating bar is accustomed to removing the pound sign, hence why it removes the first character. However if it’s coded to remove the first character instead of specifically a pound sign, there goes the first number. Then when it detects a missing character (since it should have six characters), it either leaves the number with five characters, or adds an f at the end (hence why you got green that one time).
I don’t use the formating bar myself, so I can only guess, but I’ve seen that sort of error happen before. Basically, check how you’re putting the hex number in. Are you putting the pound # sign before the number? If you are, try without it, and if you’re not, try with it!
In terms of putting picturesIn terms of putting pictures next to text – yes, you can do this. BUT it requires HTML, and that’s not so nice as BBCode. You can end up really screwing with the layout of your guide if you mess it up.
There are two ways to do it – tables, which are a big pain and you’d have to manually figure out how much text you wanted next to the image, BUT they are pretty easy in terms of the code and they function 100% properly on the site.
The other way is to use a floating image, but I’ve seen this go wonky here on the site when I tried to do it in the past. However, it’s pretty simple if it works and doesn’t generate extra work for the author like a table does.
I will consider making a guide for how to use these two methods for guide formatting, but for now it’s probably better to focus on other aspects of the guide 🙂
Also, when giving a list ofAlso, when giving a list of quests to pick up, I’d use a BBCode list (remove the spaces that are inside the brackets):
[code]
[ list ]
[ * ]Quest 1
[ * ]Quest 2
[ /list ][/code]
This would produce:
[list]
[*]Quest 1
[*]Quest 2
[/list]
Which IMO looks a little nicer than:
Quest 1
Quest 2
But that’s a pretty minor thing 🙂
You kids and your newfangledYou kids and your newfangled formatting bars. Honestly I have no clue what might have gone wrong – I just type BBCode strait into the editor :O
A note: You can hide the file list at the bottom of your file. In the place where you do your file attachments, just uncheck Display.
More color problelms?A bunch of my colors codes changed. I put in the code 993300 and they all changed to 9330 and all of the 33cc00 I put in changed to 3cc0. I’ve changed them all back, but have no idea what happened. lol.
Any ideas? I hate having to go back and redo something so silly. 😛
Thanks GylinThanks for the input Gylin!
I’ve been having trouble with my colors going wonky. First the code for NPCs kept changing itself, now all of the green for the locations have disappeared. Grrr! I have no idea how I did THAT. lol!
I’m not sure how to fix the map and numbering issue yet. I wanted to get the guide out quickly, so just put in two, as my GIMP knowledge is pretty minimal. They take me awhile. lol. Probably smaller maps is the way to go. I’ll implement that when I can as I have no idea how to put them next to the text. Without Jiya’s GIMP guide, I would have been completely lost. 😉
I do plan on adding the links to everything, NPC’s, etc. at some point. I figured the quests were the most important, in case my guide isn’t clear. 😛
I messed around with wkjezz’s guide for a header. I must have made a mistake somewhere, as it seems kind of narrow, but still looks nice I think.
Keep the tips coming! Please. 😀
It looks quite good Bits, IIt looks quite good Bits, I did notice a couple of things that I think would improve the guide however, but nothing major.
Your text colours within the guide don’t always seem to match your key. This could just be me that’s reading you wrongly though.
To make the important information really leap out at readers I’d personally make all the coloured text bold, I would leave the cords as they are however. Yes I know that isn’t how Jame’s format is, but again it’s a personal thing.
The only other thing is the numbering of your steps confuses me, I know they link to your map, but that then requires scrolling back up to the map all the time. They would be fine if the text was next to the map, so that both are visible at the same time. I don’t know if that’s possible within the coding of the site, I would of thought so, but how to do it, I haven’t a clue. Maybe more, smaller maps just showing a few steps at a time.
Wowhead links are great btw, you going to add them to everything in it?
Color GuideThe NPC color from Jame’s Leveling Guide seems to be wrong. I used 4169e1, but it’s green, not blue. Any suggestions? I can just pick a blue, but wondered why only that color seems off. Thanks!
Edit: Nevermind. Got it taken care of. Thanks for checking the color code for me kayeich! 🙂