 by Jame
Chapter III (50-60) – Journey from the Hinterlands to the Plaguelands
Changelog
This is v2.0 of the guide. It has been revamped as mentioned in this news post to adapt to patch v2.3 changes. You can still find the old version of the guide here. At the same time, many other improvements have been made:
- Introduction/Addons section has been updated
- Kill everything on your way rule has been lifted
- Grinding sessions removed and instances aren’t part of the leveling process anymore (no dependancy on groups), they are optional
- Quests that aren’t elite anymore have been integrated
- New patch 2.3 content has been integrated (Mudsprocket quests etc.)
- Maps have been remade and a lot of errors have been corrected
- Leveling should be possible at a faster pace than before
Introduction
This guide starts at level 50. However I hope that you followed the 2nd chapter of this guide as well. Because a lot of pre-questing and flight path gathering is done in it and we will need it for this chapter. If you didn’t, it’s not that bad, you’ll just have to figure out yourself where to start, and if you are behind in XP, there will be optional circuits you can do to catch up. If you need guides for any other level range (from 1-41 for example) please take a look at this page.
This guide is made for FAST leveling through the use of Optimized Quest Circuits. With this guide, questing will be very efficient and you’ll not waste any second running around and trying to figure out in which order to do your quests. Follow each instruction carefully and you will see for yourself. The quest choices and order to do them are optimal so that you run as few as possible while doing the most possible, turning several quests at the same time. It will be like grinding, because you’ll be killing stuff almost non-stop, besides you’ll also be completing a bunch of quests at the same time!
Everything described in this guide can be done solo (beside when I say otherwise). You can, of course, follow this guide while duoing, grouping, it’s not a problem, it works too.
DISCLAIMER: This guide does NOT take into account tradeskills, class specific quests or PvP. It’s 100% focused on getting the most experience possible in the shortest possible time while doing a lot of quests and enjoying as much content as possible. Any race/class combination can do this guide. Any complaints about PvP, tradeskills, or class specific issues will be ignored.
Basic rules
- Spend your talent points so that you kill things as fast as possible. (e.g: Priest should specialize in Shadow Talents, Warriors in Arms/Fury, etc.
- Don’t waste your time trying to find groups for questing, you can solo everything that is described in this guide unless I say otherwise. Only group with someone when it’s not gonna be a waste of time (e.g: meeting the person at the other end of the zone to show him the way to where your quest is, that is a waste of time)
- Try to always log out in an inn or in one of the major cities when you take a break.
- When I say you should make an inn your new home location, it’s for a good reason, and it will save you much time.
Useful Addons
To get the most out of my guide, you should get an addon which displays coordinates, because I use them to describe locations in my guide (x,y). You can use any addon you like, but here’s a very simple one I use.
Recommended
- DMiniCoords – A simple box which displays coordinates, left-click it to move it where you like.
Optional
Below is a list of other addons I use, this is 100% optional though, it’s mostly for people who are curious to know which addons I use:
- Bartender4 – A great action bar addon.
- X-Perl UnitFrames – Very nice, highly customizable unit frames.
- Quartz – The best casting bar addon out there, imo.
- Scrolling Combat Text – I just don’t like the default UI Floating Combat Text.
Side Note: In case you don’t know how to install add-ons, simply download an addon from one of the links above and unzip it. Then drag the unziped folder in your Addon folder (full path is c:\Program Files\World of Warcraft\Interface\Addons). Then, restart World of Warcraft and it should be working.
If it isn’t working, you might need to log out to your character selection screen and click on “Addons” in the lower-left corner. Tick the box that says “Load out of date Addons”. Re-launch WoW.
Shopping List
- Level 50: 15X Silk Cloth
- Level 53: 1X Mithril Casing — If you can’t find them on the auction house, find an engineer willing to do it for a small tip.
- As soon as possible : 16 or 18 slot bags, which you can buy from the auction house. We’ll go on long circuits sometimes and junk will quickly fill up your bags, so having a lot of space is a must.
These items might not always be available at the AH, so start checking early.
Color Code
- Quests
- Items
- Locations
- Quest objectives to kill
- NPCs
- Locs
The Guide
Level 50
So you just finished the previous chapter? That means you should be in The Hinterlands right now, and your quest log should look like this:
- [47] Food for Baby
- [49] Rise of the Silithid
- [49] Sprinkle’s Secret Ingredient
- [51] The Stone Circle
- [43] Rhapsody’s Kalimdor Kocktail
- [52] It’s a Secret to Everybody
- [53] The Eastern Pylon
- [53] The Northern Pylon
- [53] The Western Pylon
- [55] The Apes of Un’Goro
- [56] The Bait for Lar’korwi
If you did Zul’Farrak, you should also have:
- [50] The Ancient Egg
- [51] Saving Sharpbeak
If you did Uldaman, you should also have:
- [50] Return to Ironforge
So let’s get started!
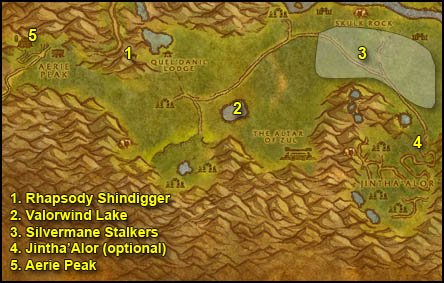
1. Get out of Aerie Peak by the small path to the east and go to Rhapsody Shindigger. (26,48)
Turn in [43] Rhapsody’s Kalimdor Kocktail. Watch him get drunk and then get the quest [43] Rhapsody’s Tale.
2. Ride southeast to Valorwind Lake at (40,60). Dive in and look for some white/red mushroom named Violet Tragan. Loot one. (Don’t right click it when its in your inventory!)
3. Ride northeast towards the area in between Shaol’Watha and Jintha’Alor (65,50). At this spot and widely around it you should find Silvermane Stalkers. They are level 47-48 wolves and they are stealthed. Run circles in the area I described among the trees, hit tab while looking around. You should find them quickly, they drop the stuff you need 40% of the time. Keep doing this until you got 5 Silvermane Stalker Flanks.
(Warlocks: Buff yourself with detect invisibility)
4. If you did NOT do Zul’Farrak and do not have the following quests, just skip to paragraph 5.
- [50] The Ancient Egg
- [51] Saving Sharpbeak
If you got those quests, go to Jintha’Alor (66,66). Fight your way to the top of Jintha’Alor, then go to Vile Priestess Hexx (59,78). She has one guard, you can wait till the Priestess wanders in the cave and get her guard solo. Then get the Priestess solo, kill her and loot the Hexx’s key from her. Also don’t forget to forge the Mallet of Zul’Farrak, just click your Sacred Mallet while being next to the Altar. Go inside the cave behind where you fought the Vile Priestess. Follow this path to find the Ancient Egg:
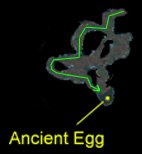
You’ll find Hitah’ya the Keeper and 2 guards patrolling around the Ancient Egg. Kill Hitah’ya the Keeper first, use your cooldowns and pots if necessary. Get the Ancient Egg.
Once you have the Ancient Egg, clear the way out of the cave back to the Altar, from there go north towards the other cave at (56,68). Kill the two trolls guarding it’s entrance. Then go through the cave and on the other side of it you’ll find Sharpbeak in it’s cage. Free Sharpbeak and watch him fly away with his parents.
5. You are done, hearthstone back to Aerie Peak.
Turn in the quest [47] Food for Baby and get the follow up [48] Becoming a Parent. Turn it in, congratulations on your new pet. It’s useless but it’s cute (and wasn’t a waste of time XP wise).
Turn in [51] Saving Sharpbeak.
Fly to Ironforge. If you didn’t do the Uldaman instance, skip to the next paragraph. If you did Uldaman, go northeast to the Hall of Explorers, turn in
- [50] Return to Ironforge at Historian Karnik, get the follow up
- [50] A Future Task. Turn it in at High Explorer Magellas.Go to the Deeprun Tram and take the tram to Stormwind, go to the Dwarven District and find Brohann Caskbelly (64,21). turn in [43] Rhapsody’s Tale, get the follow up [50] Into the Temple of Atal’Hakkar if you plan to do this instance in the future.
Take the tram back to Ironforge.
Visit the AH, sell junk, repair and re-stock consumables.
==Optional== If you want, you can go to Maraudon, it’s a nice little instance.Follow this guide I wrote about Maraudon. If you do Maraudon, don’t turn in the quest [51] Seed of Life though, it’s in Moonglade and we’ll make a stop there later on.In Ironforge, go to the inn and make it your home location.
Go to the AH and buy 15 Silk Cloth if you don’t have that on you already. You’ll need them for a searing gorge quest.
In short: Go to Searing Gorge.
In details: From Ironforge, fly to Thelsamar, then go south to Badlands. In Badlands you can find the entrance to the Searing Gorge on the western end of the Badlands, south of Kargath (the horde outpost) at (3,61)Inside Searing Gorge:
Follow the trail north and then west around the area named “The Cauldron” and find Kalaran Windblade (38,39). Get the quest [48] Divine Retribution then talk to Kalaran again and go through his dialogue. Turn in the quest and get the follow up [48] The Flawless Flame.
Go a bit further west and you should find a path going up the mountain to Thorium Point (32,33).
In Thorium point, find the wanted poster at (37,26). Right click it and get the quests:
- [48] JOB OPPORTUNITY: Culling the Competition
- [48] STOLEN: Smithing Tuyere and Lookout’s Spyglass
- [50] WANTED: Overseer Maltorius
Get the 3 quests from Hansel Heavyhands:
- [49] Incendosaurs? Whateverosaur is More like It.
- [49] Curse These Fat Fingers
- [49] Fiery Menace!
and [50] What the Flux? from Master Smith Burninate.
Note: If you ever need to sell and repair, you should go to this NPC.
Get the flight path.
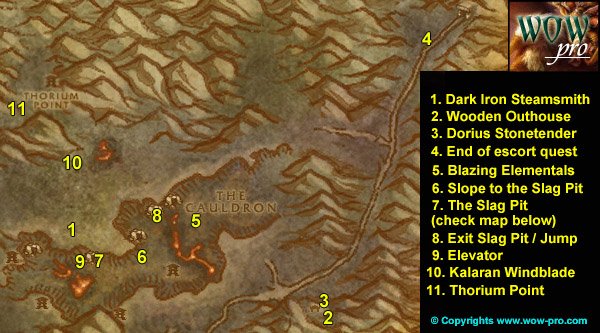
1. First, go south where you’ll find a big wheel (its part of a dark iron dwarven forge) and kill all the Dark Iron Steamsmith you find there (39,50), there should be 5 or 6 around here.
Hopefully one of them will drop the smithing tuyere you need. If not, lets just go on, we’ll come back here later.2. Start heading east and kill any Elemental or Heavy War Golem you find on the way. Also kill Dark Iron Taskmasters and Dark Iron Slavers on your way. Don’t wait for respawns, just kill them while going east. At (59,35) mount up and ride southeast to Grimesilt Dig Site and find a little wooden house at (65,62) behind the dig site, which actually looks like some public toilet. Right click it and get the quest [45] Caught!.
3. Start killing the Dark Iron dwarves in the camp as well as the golems around here. After you have killed 8 Dark Iron Gelologists, go back to the Wooden Outhouse and turn in the quest, don’t get the follow up though.
Now go back to the digsite, and clear it entirely, especially the northern part. Get full HP/Mana and get the quest from Dorius Stonetender [46] Suntara Stones. Escort him.
At (66,44) he will stop to catch his breath and will get ambushed by 2 lvl 43 Dark Iron Steelshifter. Easy fight.
4. At (74,19) he will get assassinated (you can’t help it) and a parchment will appear on the floor next to him.
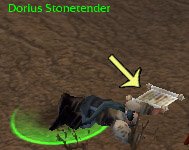
Click it and turn in the quest, get the follow up [48] Suntar Stones.
5. Ride southwest to the entrance of The Cauldron (63,38). Inside the Cauldron, kill all the Dark Iron dwarves and Elementals you find. The Blazing Elementals and the Magma Elementals drop the Heart of Flame you need. Also kill any Heavy War Golem you find.
Note: If while killing dwarves you find a Grimsite Outhouse Key, right-click it to start the quest [47] The Key to Freedom, we will turn it in later on.
6. Progress westwards inside the Cauldron until you find an iron slope going up at (46,53). Follow this slope until you find an entrance to the Slag Pit at (41,54).
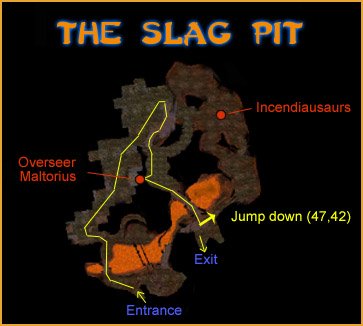
7. Inside the slag pit go across the bridge, on your left will be the Quarry Gate, go through it.
Work your way northwards until a bigger room where you’ll find Enslaved Archeologists and a big golem lying down (ignore it). Go up the iron slope, midway on the slope you have 2 options, straight or left. Go straight. You’ll soon enter a room with several pairs of taskmasters and slavers.In this room further in and to the right you’ll find Overseer Maltorius and 2 Dark Iron Sentries. Kill Overseer Maltorius and loot his head. I recommend killing Maltorius first, he hurts the most but is a caster and doesn’t have much armor.
Behind him on the ground you should see Secret Plans: Fiery Flux. Loot them.
On the opposite side of the alcove where you found Overseer Maltorius you should see an iron bridge. On the other side of the bridge, jump down to the lower floor at the drop off spot indicated on the map. From this spot go east and you should find Incendosaurs, kill 20 of them.
8. When done with that, go back up the ramp and then get out of the Slag pit, jump down back into the Cauldron and work your way westwards looking for Blaze Elementals until you get 4 Heart of Flame.9. Then go to the iron slope you took previously at (46,53) Follow this slope but this time skip the first entrance to the slag pit, and get on the elevator (40,54). The elevator will stop at the 1st floor and 2nd floor but don’t get off. Wait until it’s on the 3rd floor from there you can get out of the Cauldron.
Kill every Steamsmith you find around the buildings infront and to the left of you after getting off the elevator (39,50). There is 5 Steamsmiths at this spot, pray that one of them drops a smithing tuyere. If not don’t worry, we’ll kill more of these later.
10. Kill every Heavy War Golem around and go north to Karalan Windblade (39,38). Turn in the quest and get the follow up [48] Forging the Shaft
11. Go to Thorium Point and turn in the quests you have completed. When turning in [50] What the Flux?, Master Smith Burninate will open 3 new quests to you, but they are just to work on thorium brotherhood faction, so don’t bother unless you care about this faction.
==Note== Dark Iron Dwarves sometimes drop Dark Iron Scraps, don’t sell them. We’ll need them for a plaguelands quest much later in the guide.
You should be level 51 by now.
Level 51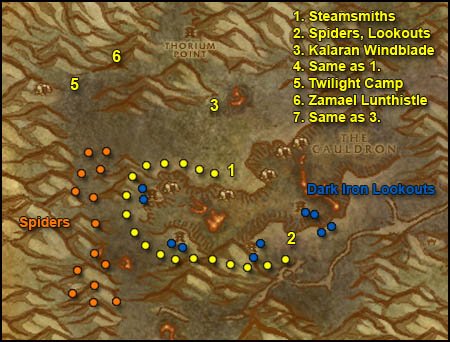
1. Sell and repair, then go south to the big dwarven forge/wheel (39,50) and kill Dark Iron Steamsmiths again, if you still need the Tuyere.
2. Then go west and then south, basically staying close to the cauldron but never going down in it. Kill every dwarf and golem on your way. Basically make circles around the cauldron. Also make sure you kill any Greater Lava Spider on sight.
There is alot of them in an area west of the cauldron (28,47).
While doing circles around the cauldron, make sure you kill the Dark Iron Lookouts you can find at the feet of each of the 4 watch towers. They drop the Lookout’s Spyglass you need for one of the quests.
3. Anyway, as soon as you got 8 Thorium Plated Daggers, go back to Kalaran Windblade, even if you didn’t finish the other quests yet.
Note: The Thorium Plated Daggers can drop on any dark iron dwarf, it generally takes me a full turn around the cauldron to get 8 of them.
Turn in the quest at Kalaran Windblade and get the follow up [50] The Flame’s Casing
4. Go kill the 5 Dark Iron Steamsmiths again before you go, if you haven’t got the smithing tuyere yet.
5. Go west to the Twilight camp at (24,34). There is a cavern with Twilight mobs further to the west but don’t go there.
6. First you should go up a narrow path up the mountain. When you are up the path, you should face your first twilight mobs. Clear through them eastwards until you reach a small pool of lava. (27,26)
The pool of lava might look too crowded, but actually you can get solo pulls if you know the trick. Out of the 6 mobs at this lava pool, 3 of them are Twilight Idolaters, and they don’t assist if you pull a mob that is next to them, they are busy performing a ritual. They will only attack if you attack them directly.
So first you must pull the other mobs one by one and then the idolaters. Once you go the lava pool cleared, you can go get the quest from that captured elf, Zamael Lunthistle. After taking his quest, talk to him again and go through his dialogue, then turn in the quest and get the follow up: [50] Prayer to Elune.
- Now all that is left for you to do is kill Twilight mobs (any of them) until you get :
- Symbol of Ragnaros
- Prayer to Elune
7. When you got both these items, go back to Kalaran Windblade.
Turn in your quest at Kalaran Windblade and get the follow up [50] The Torch of Retribution. Turn it in, watch him craft the torch, then get the quest [50] The Torch of Retribution. Right click the staff surrounded by a green aura, complete the quest. Talk to Kalaran again, get the quest [50] Squire Maltrake.Turn in the quest at Squire Maltrake and get the follow up [52] Set Them Ablaze!
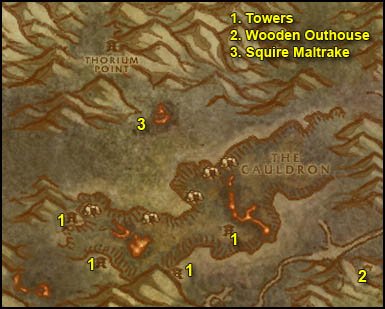
1. Go southwest to the first watch tower (33,52). Don’t forget to kill any mob you might still need on the way (golem, spider, dark iron steamsmith or lookout)
When you are at the 1st watch tower, clear any mobs guarding it, then search the Torch of Retribution in your inventory, equip it, and put it on a hotkey.
Climb up the tower and search for a small bowl on the floor named Sentry Brazier and right-click it.
This should light up the brazier.
Do exactly the same thing on the 2nd tower (35,59), the 3rd tower (43,63) and the 4th tower accessible only through a bridge at (52,57).
Note: The 4th tower is the one with the most Dark Iron Lookouts, in case you didn’t get a Lookout’s Spyglass.2. After you are done setting the 4th tower ablaze, go east to the Grimsite Dig Camp and go turn in [47] The Key to Freedom at the wooden outhouse.
3. Go back to Squire Maltrake (38,39), turn in the quest and watch Kalaran transform into a dragon, make his speech and then he’ll fly away. Right-click the treasure chest named “Hoard of the Black Dragonflight” next to where he was, accept the quest [50] Trinkets…
Then click the chest again and complete the quest. Look in your inventory for the red box named Hoard of the Black Dragonflight, open it and loot whats inside of it (especially the Molt, which you will need later on for a quest)You don’t need the Torch of Retribution anymore, you can destroy it or bank it.
4. Now there’s only two things left for you to do:- Finish all the quests that you haven’t finished yet, and you already should know where all the mobs you need are
- Kill Dark Iron Dwarves (Taskmasters, Slavers, Lookouts, Steamsmiths) until you have 30 Dark Iron Scraps
Once you have completed those two objectives, go back to Thorium Point and turn them in.
We’re done here, hearthstone back to Ironforge.
Sell junk, repair, visit the AH, re-stock food/drink.
Go to the bank and put the 30 Dark Iron Scraps there, I’ll tell you when to pick them up.Go to the Hall of Explorers, turn in [46] Suntara Stones, don’t get the follow up.
In the Hall of Explorers, find Laris Geardawdle (75,23), get the quest [52] A Little Slime Goes a Long Way and [52] Passing the Burden from Historian Karnik.
Go to the Mystic ward, turn in the quest and get the follow up [52] Arcane Runes from Tymor, also get [52] An Easy Pickup from him.
Go to the Military Ward, turn in and get the follow up [52] Signal for Pickup. Turn it in immediately so you receive a Standard Issue Flare Gun.
Go to Stormwind and take the boat to Auberdine, then fly to Rut’theran Village, go to Darnassus and find the Temple of the Moon.
Turn in [49] Rise of the Silithid, get the other quest [53] March of the Silithid.
Turn in[50] Prayer to Elune.==Note== If by any chance you have a Swim Speed Potion somewhere in your bank, grab it, there will be a long swim soon.
Go back to Rut’theran Village, fly to Astraanar, or if you don’t have that flight path, fly to Auberdine, then keep following the road until you hit Astraanar (36,49).
Get the flight path if you don’t already have it.Then fly to Forest Song. If you don’t have that flight path, keep going east following the road until (87,48). When you’re there don’t forget to get the flight path.
From Forest Song, go east and stay on the road until you zone into Azshara (92,46).
Right after entering Azshara you’ll find Talrendis Point on your right-hand side (11,77). Get the new flight path. Get the two quests from the tauren named Loh’atu:
- [47] A Land Filled with Hatred
- [47] Spiritual Unrest
1. Go north on the other side of the road to Shadowsong Shrine (13,74). Kill 6 Highborne Apparitions and 6 Highborne Lichling. There’s more of them just a bit further to the northeast.
2. When done with that, go further to the northeast until Haldarr Encampment, kill satyrs there until you have [47] A Land Filled with Hatred complete.
3. Go back to Talrendis Point and turn in the two quests. You should be level 52 by now. If you’re not, don’t worry, there will be an optional circuit soon.
Level 52
4. Get back on the road and ride northeast. Go around the ruins of Eldarath by the west side of it and keep going northeast. Avoid the Timbermaw Furbolgs, don’t kill any of them even if they attack you, just run away. Avoid the other timbermaw camp “ursolan”, go around it by the east side and keep riding northeast until you get to sharp hill at (53,21), get to the top of it, you can only access it from the north. Uptop you’ll find a goblin named Kim’jael. Get his quest [53] Kim’jael Indeed.
5. Just southeast of Kim’jael you’ll find Thalassian Base Camp (55,26).
Start killing Blood Elves, in the blood elf camp you’ll find several crates named Kim’Jael’s Equipment scattered around. Open them all, most of the time you’ll find food in it, but 25% of the time you’ll find Kim’Jael’s compass, scope, etc.6. Once you got the Kim’Jael quest complete, go back to Kim’jael, turn in the quest, get the follow up [53] Kim’Jael’s “Missing” Equipment.
1. Ride southwest and find the path going down to the Shattered Strand (45,37). Simply follow the yellow dots on the map. You’ll encounter some naga pretty soon, kill every naga on your way, go southwest, until you reach the Ruins of Eldarath by a path at (41,48).
2. Go southwest and at (39,50) you’ll find a Pillar named Rune of Jin’yael.
Clear the 2 ghosts guarding it and any naga close to it. Right-click the pillar and you’ll receive the Rubbing: Rune of Jin’yael.
3. A bit further to the south, at the central point of the Ruins of Eldarath you’ll find the Rune of Beth’Amara (36,53). Right-click it and get the rubbing.
4. Just southeast of this spot is the Rune of Markri (39,55), get the rubbing.
5. And the last one is much further to the south and a bit to the east, at (42,64) you’ll find the Rune of Sael’hai, get the rubbing.
Grind your way through nagas back from where you came from until the path leading to the Shattered Strand at (45,47).
You should find “Some Rune” on one of the nagas on the shattered strand, keep killing Spitelash sirens and myrmidons until one drops “Some Rune”.
6. Find the slope taking you out of the Shattered Strand back on high ground at (46,39) and then ride northeast back to Kim’jael, turn in the quest.
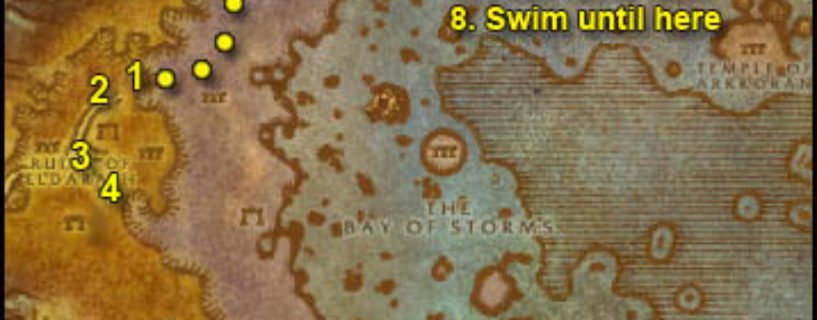
7. Ride back to the Shattered strand by the same path (45,37). This time don’t kill the nagas, just ride along the shore directly south, avoiding nagas as much as possible and keep going until you hit a spot where you can’t go further without having to swim (58,73).
8. Swim east and then south to the island marked on the map (77,91), just be careful to avoid the elite giants that walk at the bottom of the sea. Anything else is manageable.
Get on the Helipad and use your Standard Issue Flare Gun from your inventory. After a few seconds a gyrocopter will land and Pilot Xiggs will come out, turn in the quest [52] Arcane Runes and get the follow up [52] Return to Tymor (don’t worry there is still 11000 xp to come from turning that one, I didn’t make you cross the ocean for peanuts 😉 ) You can destroy the Flare Gun.
Hearthstone back to Ironforge. Go to the Mystic Ward, find Tymor and turn in [52] Return to Tymor.
Sell, repair and resupply food/drink up to 4 stacks. Train your new skills.
You should be about halfway through level 52. If you are not, here is a little optional circuit you can do:
==Optional Circuit==
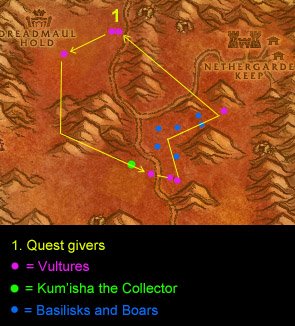
Fly to Nethergarde Keep (Blasted Lands).
Ride out of Nethergarde Keep, go west / northwest until you find the two Blood Elves at (50,14). Get all their quests:
- [50] A Boar’s Vitality
- [50] Snickefang Jowls
- [50] The Basilisk’s Bite
- [50] The Decisive Striker
- [50] Vulture’s Vigor
Start killing directly from here, you can find all the animals you need to kill for theses quests in the upper part of Blasted Lands. Avoid the area around the Dark Portal and the Tainted Scar. Avoid anything that is level 52 or above.
Kill pretty much everything on your way until you have all the quests completed. Beware of the big drake flying around named Teremus the Devourer. Besides this, just kill everything 😛 What you’ll need to kill the most though are vultures and basilisks, so here is a path you should follow, listing every possible Vulture spawn (there’s also a few vulture roamers but you’ll run into those too from time to time) so try to get all of them every cycle.
Completing all the quests will take a while, but here are a few tips:
- Melees: As soon as possible try to finish the quest [50] The Decisive Striker and go turn it in, you’ll get a +25 AGI buff for 1 Hour. When that buff wears out, go turn in either Snickerfang Jowls (+25 STR buff) or A Boar’s Vitality (+25 STA buff) depending on your preferences.
- Casters: As soon as possible try to finish the quest [50] A Boar’s Vitality and turn it in for a +25 STA buff. Later on after your sta buff wears off, try to finish [50] The Basilisk’s Bite for a +25 INT buff.
These buffs will help you to kill faster.
While killing mobs in Blasted Lands you might loot an Imperfect Draenethyst Fragment on one of them. Go to Kum’Isha the Collector (51,35). Get the quest [55] Everything Counts in Large Amounts and turn it in. No need to get the follow up quest unless you get another Imperfect Draenethyst Fragment.
If you are extremely lucky you’ll find a Flawless Draenetyst Sphere In that case get the other quest from Kum’Isha and turn it in.
Turn in all the other blasted lands quest when they are done, don’t get the follow ups (they are repeatable if you want to get more of those consumable buffs later on).
Hearthstone back to Ironforge, sell junk, repair, etc.
==End of Optional Circuit==
Go to Stormwind, take the boat to Auberdine.
Fly to Emerald Sanctuary. If you don’t have that flight path, simply follow the road from Astranaar to Felwood, and then keep going north until you find Emerald sanctuary (51,81).
In Emerald Sanctuary, get the following quests:
- [51] Forces of Jaedenar
- [54] The Corruption of the Jadefire
- [54] Verifying the Corruption
Go south, on the other side of the trail you’ll find Grazle, get his quest [48] Timbermaw Ally.
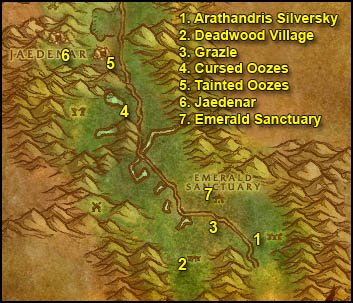
1. Go southeast till you find Arathandris silversky (54,87). Get her quest [55] Cleansing Felwood.
2. Go west and you’ll find Deadwood Village (49,88), start slaughtering Furbolgs. Keep doing that until you complete [48] Timbermaw Ally
3. Go back to Grazle and turn in the quest, get the follow up [55] Speak to Nafien.
4. Ride north following the road until (43,67), to the west should be a green pool, go there and kill Cursed Oozes. Each time you kill one, and after looting it, target the corpse and click on an Empty Cursed Ooze Jar from your inventory (you get these by opening the Package of Empty Ooze Containers you should have in your inventory).Fill up 6 Cursed Ooze Jar in the same fashion.
5. Get back on the road and ride north until (41,59), just a bit before Jaedenar, on the left side of the road is a small green pool with tainted oozes. Fill up 6 Tainted Ooze Jar. If you lack oozes there is more just north, on the other side of the path leading to Jaedenar.
6. Go to Jaedenar (40,57), clear yourself a path westwards through Jadefire Hounds, Guardians, Adepts and Cultists until you get to the green moonwell at (35,60), then go back out of Jaedenar and you should be done with [51] Forces of Jaedenar normally. If the area is crowded, you’ll find more stuff to kill inside the cave at the beginning of Jaedenar.
7. Go back to Emerald Sanctuary. Turn in the quest and get the follow up [52] Collection of the Corrupt Water from Greta Mosshoof. You should be level 53 by now. If you are not, no worries, keep going, there will be more optional circuits in the future.
Level 53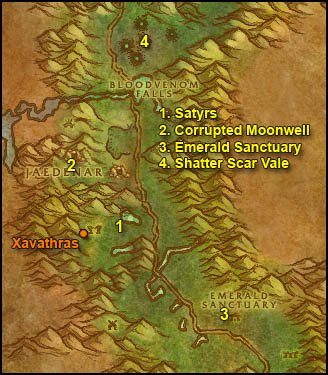
1. Ride north on the road until (42,69), which is just before the green pool where you killed the Cursed Oozes. Go west until you find Satyrs among the ruins (38,69). Kill whats on the kill list of [54] The Corruption of the Jadefire. Shadowstalkers are stealthed but you can see them from far enough. Work your way westwards through the satyrs until you reach a green moonwell. Xavathras should be to the left of it with a guard. I killed the weak guard first quickly and then killed Xavathras. Use long cooldown abilities if needed. Then get the last kills you need to complete the quest on your way out.
2. When [54] The Corruption of the Jadefire is complete, get back on the road, go north and then west back into Jaedenar, once again clear the way up to the green moonwell where you already went to when you did [51] Forces of Jaedenar.
Get close to the moonwell and click the Empty Canteen you should find in your inventory.
3. Get out of Jaedenar and ride back to Emerald Sanctuary. Turn in [52] Colleciton of the Corrupt Water and get the follow up [52] Seeking Spiritual Aid. Turn in [54] Corruption of the Jadefire and get [54] Further Corruption.
4. Get back on the road, ride north and this time past bloodvenom falls. Shortly after the bridge go right into Shatter Scar Vale (39,44). Kill 2 Entropic Beasts, they are immune fire and deal fire damage. Walk around in the Shatter Scar Vale until you get the “Explore the craters” complete message. Further to the east and a bit to the north at the last crater you should find Entropic Horrors, they are just a bit higher level than the Entropic Beasts but still in your range. Kill two Entropic Horrors then get back on the road. If you don’t find Entropic Horros, kill Entropic Beasts until Entropic Horros respawn instead.
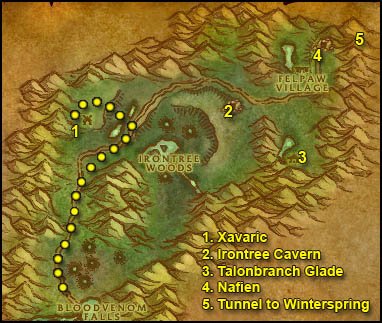
1. Ride north until the road curves to the right, just a bit further after the curve at (42,23), go north on a trail going up to Jadefire Run.
In Jadefire Run clear yourself a path towards the west, and then take a narrow path towards the southwest.
At the end of that path you’ll find Xavaric (39,22), he is surrounded by 2 other satyrs and he moves from one to the other. You can actually pull each of the guards solo, if you wait for Xavaric to be away enough from one of them. Kill Xavaric, he’s an easy fight if pulled solo.
Loot the Flute of Xavaric and right click it to get the quest [54] Flute of Xavaric.
Keep killing Satyrs in Jadefire run until you get 5 Jadefire Felbind (they can drop from any of the satyrs in Jadefire run) and complete the kill list of [54] Further Corruption.
2. Get back on the road and ride until Irontree Cavern as shown on map (55,15). Kill Warpwood Elementals until you get 15 Blood Amber, they have a 100% drop rate.
3. Get back on the main road, go east and then south to Talonbranch Glade (62,24). Get the new flight path, sell and repair.
4. Get back on the road and ride north until the entrance of Timbermaw Hold, talk to Nafien, turn in the quest. Get the other quest [55] Deadwood of the North.
5. Go inside Timbermaw Hold, after the bridge keep going east until you exit into Winterspring.
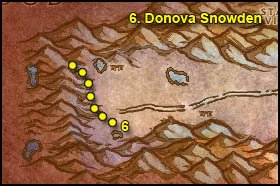
6. In Winterspring, ride south to Donova Snowden, turn in the quest [52] It’s a Secret to Everybody, let her do her speech, and then get the follow up [52] The Videre Elixir, don’t get the other quest.
If you didn’t go to Maraudon and/or if you don’t have the quest [51] Seed of Life, skip the next paragraph. Go back to Talonbranch Glade, fly to Feathermoon in Feralas.
If you have the quest [51] Seed of Life,go back to Timbermaw Hold, this time in the tunnels, go under the bridge and to the north, keep going until you exit in Moonglade. In Moonglade go north straight to the shrine of Remulos (36,42), turn in [51] Seed of Life at Keeper Remulos. Then go south/southeast to the Hyppogryph master at (49,67) and fly to Feathermoon in Feralas..
10 minute break while on the Hippogryph!
In Feathermoon, go to the inn and make it your home location.
Go to the house southeast and get [50] The Stave of Equinex from Troyas Moonbreeze.

1. Take the boat to Feralas.
2. Mount up and ride east towards the road, then follow it north until you reach the “o” from the Twin Colossals. At this point go northwest till (42,21), where you will find a stone giant named Rockbiter. Get the quest [49] The Giant Guardian from him.
3. Get back on the road and go north until you see some white ruins just west of the road, with a gnoll – Miblon Snarltooth – infront of it (45,11). Get off your mount, and watch this video, it shows you how to get the Evoroot without buying the bait from Gregan. Thanks Laurens from Twisted Nether (EU) for the video!
Loot an Evoroot from one of the pedestals.
4. Then go directly southwest to the Ruins of Ravenwind. We’re now gonna do the quest [50] The Stave of Equinex.
There are level 48-50 Harpies everywhere in those ruins. Be careful with runners.Go southwest to some big ruined arch (40,12).
The Flame of Samha is on the top of it in the middle. To get there you have to get behind the building and jump from stones to stones until you can reach the flame of Samha. Right click it and loot the Samha Essence.
Then go back and jump down the building, directly northeast of it and on slightly higher ground among ruins you will find the flame of Imbel (39,9.5). Loot the Imbel Essence.
Then go southwest (ignore Shay Leafrunner for now if you see her) until (37,11). The Flame of Lahassa is under a dark brown gazebo.
Loot the Lahassa Essence.
Then go south to (38,15), next to a thick square tower you’ll find another dark brown gazebo, inside of it is the Flame of Byltan, right-click it. Loot the Byltan Essence.
5. Now that you have all 4 essences, go north to the Equinex Monolith (38,13).
Clear some space around it, then go to it, search your bags for Troyas’s Stave. Right-click it to charge the stave, then right click the monolith, complete the quest, get the follow up [50] The Morrow Stone.
6. Get out of the Monolith area and then clear yourself a path northwest to Shay Leafrunner.
Before you take the quest, here is the trick :
After taking the quest you must loot the bell from the chest next to Shay. Make a hotkey of that bell. Now here is the problem with Shay, she wanders off every now and then, she always says something like “oh what a beautiful flower” and goes away. When she does that you are supposed to ring the bell and she will run back to you. The problem is that the bell has a rather long cooldown so she ends up wandering off too often.
The trick is that as soon as you ring the bell, she will run to you, so you should start running southeast / south towards Rockbiter (42,21) and she will keep running after you until she catches up. When she catches up she will say something like ‘I wandered off again, sorry”. But the cooldown on the bell will be reset already.In short: When she wanders off, ring the bell and run away, don’t let her catch up to you. Even if you get aggroed by mobs keep running. Only stop if Shay herself gets attacked, then you will have to defend her. You can run and look behind you by holding your mouse’s left click and moving the mouse, to make sure she’s still running after you.
Once at the giant, turn in the quest.
7. Go southeast to Gregan Brewspewer (45,25). Turn in the quest [52] The Videre Elixir.
Hearthstone back to Feathermoon. Turn in [50] The Morrow Stone.
Fly to Gadgetzan, make it your home location.
Turn in [49] Sprinkle’s Secret Ingredient, get the follow up [49] Delivery for Marin. Turn it in at Marin Noggenfogger on the other side of the town. Take his follow up, wait 5 seconds and turn it in.
Now you’ll be able to buy Noggenfogger Elixir from Marin as much as you want.
(Kudos to the original artist, whose name I don’t know unfortunately)
Turn in [53] March of the Silithid, get the follow up [53] Bungle in the Jungle.
Ride south to Marvon Rivetseeker (53,46) and turn in [51] The Stone Circle. Get the two follow up quests if you plan to do the Sunken Temple instance.
==Optional== For those who have the quest [50] The Ancient Egg, go turn it at Steamwheedle port, and get the follow up quest [53] The God Hakkar (Dungeon) if you plan to do the Sunken Temple instance.Fly to Ratchet. Get the quest [55] Volcanic Activity from Liv Rizzlefix.
From ratchet ride south along the merchant coast and go east to the Tidus Stair (65,43), right next to the ocean you should find Islen Waterseer next to a hut. Turn in [52] Seeking Spiritual Aid, watch her summon a water elemental spirit and then take her follow up [54] Cleansed Water Returns to Felwood.
==Note== For those who want to do the Sunken Temple instance, now would be a good time to do it, you have almost all the quests available (minus your class quest, which you can easily get) and it’s a fun instance. Follow my Sunken Temple Guide and have fun.
Go back to Ratchet, fly to Emerald Sanctuary, Felwood.
Turn in:
- [54] Cleansed Water Returns to Felwood, get the follow up [55] Dousing the flames of Protection
- [54] Flute of Xavaric, get the follow up [54] Felbound Ancients
- [54] Further Corruption
- [54] Verifying the Corruption
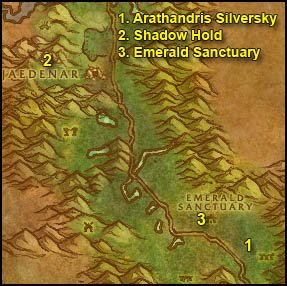
1. Ride southeast to Arathandris silversky (54,87), turn in [55] Cleansing Felwood. Talk to her and ask her for a Cenarion beacon. From now on when you kill stuff in Felwood you can get Corrupted Soul shards, which you will turn in later for cenarion plant salves. With those salves you can cure corrupted plants in felwood and get consumables in return. I personally like the Songflower buff a lot (+70 Crit rating and +15 to all stats for 60 min).
Don’t get any of her quests, you can get the quest items without having them in your quest log. If you have gathering skills (like Herbalism, Mining, Skinning), you will be able to complete extra quests with her, for some decent exp reward.
You should be level 54 by now, or at least pretty close.
Level 542. Get back on the road, ride to Jaedenar (40,57). in Jaedenar clear the way towards the corrupted moonwell you already went to before to fill up the vial. Enter the Shadow Hold at (35,58).
At this point if you can find people to group it will be much easier. Dousing the Flames of Protection is doable solo (but kinda hard), on the other hand there’s an escort quest which is difficult solo, at least for most classes. It also depends on how crowded the area is, if there’s lots of people farming in the shadow hold already, it’s much easier to solo it.
Clear your way down the first tunnel, in the first room you’ll find a captured elve named Arko’narin. This is the NPC that gives the escort quest, but to get it you first need to find a Blood Red Key from one of the mobs inside Shadow Hold, click it and get the quest [55] A Strange Red Key. You have to turn this quest at Captured Arko’narin later. The follow up will be the escort quest.
In the same room you can find the 1st and 2nd brazier (the 2nd one is on the slope going to the next tunnel), click them to turn them off.
If you are in a group (at least a duo of lvl 54 people), and get a Blood Red Key (the whole group can loot it if it drops), tell everyone to turn in the first quest at the captured elf but to NOT take the follow up until everyone turned in the first quest. When everyone has turned in the first quest [55] A Strange Red Key, one person should start the follow up, which is the escort quest.
Note: You have to click on the elf through the cage. Some people try to click the cage itself, but that doesn’t work.Escort Arko’Narin to her equipment. Right after she gets her equipment, she’ll do something reckless, charge into 3 of those big demons. That’s the big fight of the escort, use your cooldowns and pots on this one. If you manage it you should be fine, the rest isn’t too difficult. In the same room where her equipment is you’ll find the 3rd and 4th Brazier, turn them off too. At the exit you’ll get attacked by Trey Lightshadow, this should be an easy kill.
Defeat it and then Arko’narin will leave and you’ll get the quest complete message.3. Once you are done with both [55] Dousing the flames of Protection and [55] Rescue From Jaedenar, go back to the Emerald Sanctuary. Turn in both quests, get the follow ups [57] Retribution of the Light and [58] A Final Blow.
Fly to Talonbranch Glade, go through the timbermaw cave to Winterspring and ride south to Donova Snowden. Turn in [52] The Videre Elixir, get the follow up [52] Meet at the Grave.
Go back to Talonbranch Glade, fly to Rut’theran Village, get the quest [55] Moontouched Wildkin and [56] Starfall (55,92).
Go to Darnassus. Go to the Temple of the Moon and fill up Eridan’s Vial at the pool (39,84).
Go to Ironforge, train your new skills. Visit the AH, we need the Mithril Casing now, so buy it or pick it up from your bank if you alrady bought it. If you really can’t find a Mithril Casing, don’t sweat it, it’s just one extra quest, not a big deal, move on.
In Ironforge, go to the Hall of Explorers, turn in [52] A Little Slime Goes a Long Way, get the follow up.
When you’re ready to go again, hearthstone to Gadgetzan.
In Gadgetzan, get the quest [54] Super Sticky from Tran’rek.
Go to the Gadgetzan grayveyard, just east of Gadgetzan (53,28). Drink the Videre Elixir, you’ll die, but don’t worry, no durability loss from this, it’s normal. Release spirit but don’t resurrect, go directly north from the Graveyard and up the mountain, you should soon see the yellow “?” on your minimap, go to it and talk to Gaeriyan, turn in and get the follow up [52] A Grave Situation. Go back to the graveyard, resurrect and click the gravestone named A Conspicuous Gravestone, complete the quest and get the follow up [52] Linken’s Sword. You can destroy the other Videre Elixir.
Fly to Marshall’s Refuge in Un’Goro Crater. Turn in [52] Linken’s Sword, get the follow up, [52] A Gnome’s Assistance.
Get all the quests available here, your quest log should now look like this:
- [54] Felbound Ancients
- [57] Retribution of the Light
- [58] A Final Blow
- [54] A Little Slime Goes a Long Way
- [55] Moontouched Wildkin
- [56] Starfall
- [53] Bungle in the Jungle
- [54] Super Sticky
- [55] Deadwood of the North
- [51] Roll the Bones
- [51] Shizzle’s Flyer
- [52] A Gnome’s Assistance
- [52] Alien Ecology
- [52] Muigin and Larion
- [53] Chasing A-Me 01 (from Karna Remtravel, south of Marshall’s Refuge)
- [53] Expedition salvation
- [53] The Eastern Pylon
- [53] The Northern Pylon
- [53] The Western Pylon
- [55] Beware of Pterrordax
- [55] Lost!
- [55] The Apes of Un’Goro
- [55] Volcanic Activity
- [56] The Bait for Lar’korwi
24 Quests. That’s a lot, so let’s clear some up right away. This will be a very long circuit, so make space in your bags and re-stock up to 3 stacks of food/drink.
==Note== From this point on, kill the following mobs on sight:
- Bloodpetals of any kind (those walking flowers)
- Diametradons
- Pterrordaxes
Also, don’t destroy or sell the following items:
- Un’goro Soil (Needed for [53] Bungle in the Jungle)
And also beware of the Tyrant Devilsaurs, there is a few of them roaming in Un’Goro. They are lvl 55ish elite, run fast and hit hard. So watch your back.
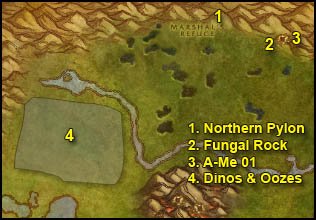
1. Get out of Marshall’s Refuge and ride east along the wall until (54,13). At this spot go up the mountain and you should find the Northern Crystal Pylon. Click it, and examine it, you should get a “quest complete” message.
Further north of the crystal you should find some Pterrordax (3 of them normally), kill them.2. Go southeast to Fungal Rock. You should find plenty of apes there outside and inside the cave.
Kill apes there until you get 2 un’goro gorilla, stomper and thunderer pelts. Be careful when fighting the Un’Goro Gorillas, they call for help when they get low health, and any other ape in a rather wide range will come to help. So, fight them away from other apes.
3. Once you got all the pelts, go back inside the cave, at the first fork go right and you’ll find A-Me 01, turn in the quest, get the follow up, which you can turn in right away if you have the Mithril Casing. Get full HP/Mana and get the follow up, escort A-Me all the way back to Karna Remtravel, turn in [53] Chasing A-Me 01.
4. Go southwest until you hit the river (40,27). On the southern side of the river you’ll find plenty of Dinos and some Oozes.
In this area, kill every Frenzied Pterrordax, Elder Diametradon, Bloodpetal Trapper and Ooze you find. Open the bag of empty ooze containers from your inventory and put the 10 Empty Pure Sample Jar on a hotkey. Everytime you kill an ooze, loot it and then target the corpse and click the jars to fill them up. You can stop killing Oozes once you got 10 Pure Samples.
Keep doing this until you complete:
- [51] Shizzle’s Flyer
- [51] Roll the Bones (they drop from the Elder Diametradons approximately 25% drop chance)
- [54] A Little Slime Goes a Long Way
- 15/15 Frenzied Pterrordax kills
This might take a while but this is decent grinding since there’s quite a lot of mobs, and you are completing 4 quests at the same time.
==Warning== Be careful, 2 devilsaurs roam this area from time to time.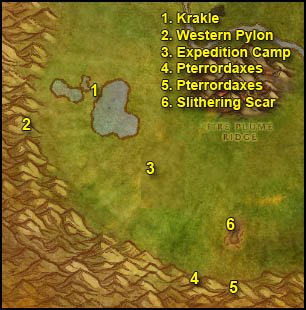
1. Go south to (31,50) and you’ll find a little goblin named Krakle, get his quest quickly [55] Find the Source.
2. Go directly west and a bit to the south and you will find the Western Crystal Pylon (23,57). Click it and examine it.
3. Go southeast to the Expedition Camp at (38,66), try to avoid the aggros as much as possible because most mobs are too tough for you here. At the expedition camp, look for a pile of crates named Research Equipment and loot them.
4. Go southeast and you should find a spot up the mountains with 4 or 5 Pterrordax there (44,87), kill them.
5. A little further east and up the mountain (50,88). You should find 1 or 2 Pterrordax there, kill them. Go back and forth between this spot and the previous one until you get your 10 Pterrodax kills. Feel free do the next step while waiting for the respawns, they are pretty long (sometimes over 20 minutes).
6. Go north to the Slithering Scar and clear yourself a path to the bug lair entrance at (50,76). Inside the bug lair at the first fork go left, clear the circular room and then stand in the middle of it, look in your inventory for a black vial named Scraping Vial and click it. If it doesn’t work try different spots in this room until you get a Hive Wall Sample.
At this point you might already have gotten a Gorishi Scent Gland. If you didn’t, keep on killing these bugs until one drops. It can drop from any of the bugs, inside or outside the lair, it doesn’t matter.
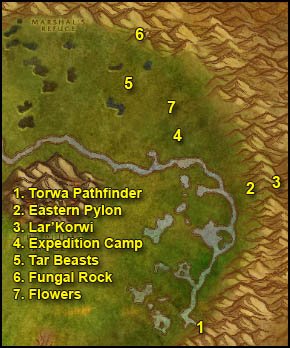
1. Go east to Torwa Pathfinder (72,76). Turn in:
- [55] The Apes of Un’Goro, get [55] The Mighty U’cha
2. Go north until you find the Eastern Crystal Pylon (76,48). Click it and examine it.
3. Go further east and you should see some huge dinosaur skeletons at (80,49). Be full health/mana and ready to face a level 56 mob. Open Torwa’s Pouch in your inventory, loot the Preserved Threshadon Meat and the Pheromone Mixture, right click the meat, and then right click the Pheromone, Lar’korwi will appear, kill him. He’s rather easy, I had no problem to solo it at all at level 54. Loot Lar’korwi’s Head.
4. Go northwest until the Expedition Encampment (68,36) and loot the Crate of Foodstuffs.
5. Go northwest until you find 3 black pools with Tar Creepers and Tar Beasts around them (60,26). Clear these 3 pools until you have 12 Super Sticky Tar (drop rate is about 25%)
6. Ride northeast to Fungal Rock (63,16). Enter the cave, at the fork take the narrow path in the middle, then go right and keep going until you hit the end of the cave.
You should find a room with a puddle of water and a rock in the middle. There should be U’cha, lvl 55 Gorilla. There’s another gorilla in the same room but you can pull it solo if you wait for U’cha to be away. Then pull U’cha solo, kill it and loot U’cha’s Pelt.
7. Get out of Fungal Rock. If you haven’t finished [52] Muigin and Larion, go out and kill some more flowers until you complete it. Go to the area which is southeast of the black pools where we killed the Tar beasts. There are plenty there and they are the easiest flowers to kill (65,27).You should be level 55 by now.
Level 558. Go back to Marshall’s Refuge. Turn in:
- [51] Shizzle’s Flyer
- [52] Muigin and Larion, don’t get the follow up
- [55] Beware of Pterrordax
- [51] Roll the Bones
- [52] Alien Ecology
- [53] Expedition salvation
Go inside the cave, turn in:
- [52] A Gnome’s Assistance, get the follow up [54] Linken’s Memory
- [53] The Eastern Pylon
- [53] The Northern Pylon
- [53] The Western Pylon
Get [53] Making Sense of it. Turn it in. You can bank the book you get as reward from this quest (it tells you how to combine crystals at the various pylons for some consumable crystals with effects like heals or damage shields, but nothing so great, so just destroy the book, you can check wowhead for the combines anyway).
Get out of the cave, sell junk (but don’t sell all your Un’goro Soils, you will need 5 for the quest [53] Bungle in the Jungle. Re-stock food/drink.
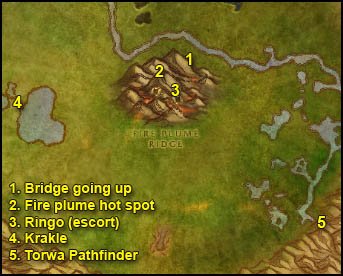
1. Go southeast to Fire Plume Ridge, climb the mountain from the northeastern side (53,43). Find your way to the top of Fire plume ridge. Kill every fire elemental on your way.
2. When at the top of Fire Plume Ridge, next to the lava pool you should see a conic stone named Fire Plume Ridge Hot Spot. Search your inventory for Krakle’s Thermometer, right-click it next to the conic stone, this should complete the quest [55] Finding the Source. Now kill more elementals until you finish [55] Volcanic Activity.
3. Go down to the southern side of the mountain and find the cave where Ringo is (52,51). Turn in the quest [55] Lost! and get the follow up [55] A Little Help from my Friends. Search your inventory for Spraggle’s Canteen and put it on a hotkey. Everytime Ringo faints, click the canteen while being next to him. Get off the mountain by the eastern side, then go north, run to Marshall’s Refuge while making sure Ringo always follows you, try to avoid mobs as much as possible. Run inside Marshal’s Refuge until Spraggle Frock, you’ll get the quest complete message. Turn in [55] A Little Help from my Friends.
4. Mount up, ride southwest to Golakka Hotsprings and find Krakle behind the geyser hill (30,50). Turn in the quest and get the follow up [55] The New Springs.
5. Ride east/southeast to Torwa Pathfinder (71,76). Turn in the 2 quests:
- [55] The Mighty U’cha
- [56] The Bait for Lar’korwi
Hearthstone to Gadgetzan. Turn in:
- [54] Super Sticky
- [53] Bungle in the Jungle, don’t get the follow up.
Fly to Ratchet, turn in [55] Volcanic Activity.
Your quest log should look like this now:
- [54] Felbound Ancients
- [57] Retribution of the Light
- [58] A Final Blow
- [54] A Little Slime Goes a Long Way
- [55] Moontouched Wildkin
- [56] Starfall
- [55] Deadwood of the North
- [54] Linken’s Memory
- [55] The New Springs
Fly to Emerald Sanctuary, Felwood. Turn in:
- [54] Felbound Ancients, get the follow up [54] Purified!, which you can turn in immediately, and you should receive the Flute of the Ancients
- [54] Linken’s Memory, get the follow up [54] Silver Heart
You should be level 56 now or pretty close. There will be optional circuits at the end of the guide, so if you’re behind, don’t worry, keep going.
Level 56Go south to Arathandris silversky (54,86). Turn in the salve quests you completed there (if you don’t have any gathering skill, you will only have Salve via Hunting completed). These quests are repeatable but only the first turn-in gives XP. On the other hand you get Cenarion Plant Salves which you can use to cleanse corrupted plants in Felwood and get buffs or consumables from them. Check this guide for more details. I personally recommend finding a Songflower and getting the nifty +5% crit +15 All stats.
Go back to Emerald Sanctuary and fly to Talonbranch Glade.
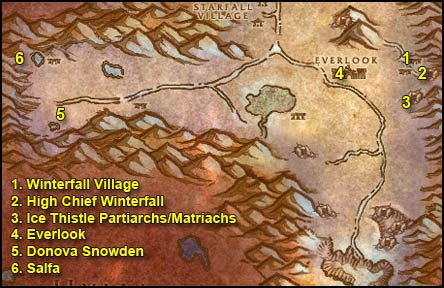
Go through Timbermaw Hold. On the other side of the tunnel, get the quest [58] Winterfall Activity from Salfa.
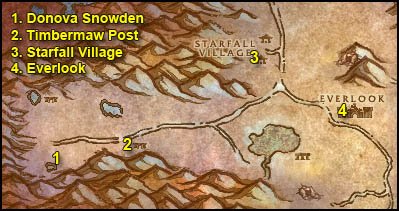
1. Ride south to Donova Snowden, turn in [55] The New Springs, get the follow up [56] Strange Sources.
Also get the other quest [56] Threat of the Winterfall.From now on, throughout winterspring look for big white/blue feathers on the floor named Moontouched Feather, you need 10 of these.

2. Ride east to Timbermaw Post (39,44). Kill 8 Winterfall Pathfinder, Den Watcher and Totemic there. If you find a Winterfall Ritual Totem, right-click it and get the quest [56] Winterfall Ritual Totem. If you don’t find one, don’t worry, we’ll kill more of these later on.
Keep killing these Furlbogs until you also get a Empty Firewater Flask, click it and get the quest [56] Winterfall Firewater.
3. Get back on the road and ride east until a crossroad (53,34). Go north to Starfall Village (51,30). Turn in [56] Starfall, get the follow up. Talk to Jaron Stoneshaper, turn in the quest [56] The Ruins of Kel’Theril and get the follow up [56] Troubled Spirits of Kel Theril. Also get [59] Enraged Wildkin.
4. Get back on the road, go south to the crossroads, when you are there go southeast this time until Everlook.
Go to the inn, get the quests:
- [52] Duke Nicholas Zverenhoff
- [52] The Everlook Report
- [55] Sister Pamela
Make this inn your home location.
Go to the opposite building, you’ll find a banker in it. Bank The Everlook Report and Studies in Spirit Speaking. I’ll say when to get them back from the bank later in the chapter.
Sell and repair, resupply food and drink (3 stacks), get the flight path (it’s on the eastern side of Everlook.)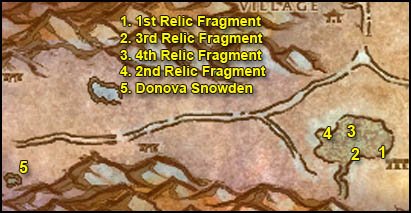
1. Go west to the Lake of Kel’Theril. Look around for blue runes amidst the floor named “Highborne Relic Fragment”.

Watch out before you pick any of them though, be full health/mana, because 2 lvl 55 spawn and attack you each time you click one. You can either kill them or run away.
The 1st Relic fragment is at (55,43).
2. The 3rd Relic fragment is just west of it at (53,43)
3. The 4th Relic fragment one is directly north of the 3rd at (52,41)
4. The 2nd Relic fragment one is west of the 4th one at (51,41)
5. Ride west back to Donova Snowden (31,44) while getting as many Moontouched Feather as possible on the way.Turn in [56] Threat of the Winterfall and [56] Winterfall Firewater, get the follow up [56] Falling to Corruption.

1. Ride north, back to Timbermaw Hold, go through the tunnel to Felwood. As soon as you exit in Felwood, jump down west in Felpaw Village. Clear yourself a path to the camp which is on the upper level of Felpaw Village, northwest of the green pool.
Clear the camp and you should find a “Deadwood Cauldron” (60,5). Click it, turn in the quest and get the follow up [56] Mystery Goo.
2. Now stay in this area and kill furbolgs until you finish [55] Deadwood of the North and find a Deadwood Ritual Totem, which can drop from any of these furbolgs. Right-click it to start the quest [55] Deadwood Ritual Totem. You should also have gathered 5 Deadwood Headdress Feathers by now, if not, kill a few more furbolgs.3. Go back to Nafien, turn in [55] Deadwood of the North, get the follow up [55] Speak to Salfa. Also turn in [55] Feathers for Nafien. It just gives Timbermaw reputation.
Go through the tunnel, on the other side turn in [55] Speak to Salfa.
Ride south to Donova Snowden, turn in [56] Mystery Goo, get [56] Toxic Horrors.
If you haven’t gathered your 10 Moontouched Feathers yet, do it now.
Go back to Felwood through the timbermaw tunnel.
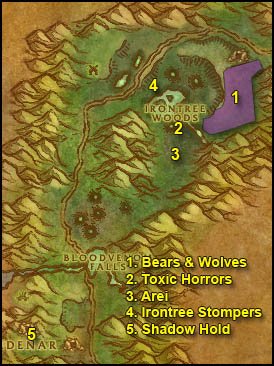
1. In Felwood, go southwest to the area marked on the map where you will find bears and wolves. Keep killing those until you have 11 Silvery Claws.
2. Go southwest to the crater at (49,27), you’ll find plenty of Toxic Horrors there, kill them until you got 3 Toxic Horror Droplet. There’s more Toxic Horrors all around the big green pool just north of this crater.3. Go south to the ruins at (49.5,31) and click the Flute of the Ancients from your inventory. Some treant spirits will appear, especially one huge treant named Arei. If he’s not there, it means someone else is already escorting him. Go kill some treants and elementals while waiting. Get his quest [56] Ancient Spirit and escort Arei. He will do a full turn around the green pool, so I suggest you clear the toxic horrors around the crater before you start the escort. Let him be infront and get hit first or he won’t assist. The good thing is that he is quite a tank so you can let him tank a bit when there is multiple mobs. He will get back on the road after having done a full circle around the pool, 3 irontrees will ambush him at this point. Kill them fast one by one while Arei tanks the others. You will get a quest complete message normally.
4. Normally, while doing the escort, you should have killed a few Irontree Stompers and got an Irontree Heart. If not, go back down and kill some more Irontree Stompers till you get one. This should complete [54] Silver Heart.
5. Mount up and ride to Jaedenar. Go inside the Shadow Hold. Clear inside the hold further than when you doused the last 2 flames, past the red pool. Just a bit further down a slope you should find a room with an altar in it’s middle, 4 warlocks/darkweavers arouned it, channeling a ritual, and a succubus named Rakaiah infront.
You can pull Rakaiah solo, the 4 warlocks might be aggro on you but won’t attack as long as you don’t directly attack them. After you got rid of Rakaiah, you might still be locked in combat mode because of the 4 warlocks, to lose combat mode you just have to run back some distance away from them until they forget you. Basically they never attack you unless you directly attack them. However the warlock’s imp pets will attack you and you should kill them.
Kill the 2 warlocks/darkweavers which are in front of the altar.
Then pull the mob on the right side of the room. He should also come solo.
After that, kill the 2 warlocks which are behind the altar. When the room is clear, click on the Remains of Trey Lightforge on the altar, choose your reward and complete the quest [57] Retribution of the Light, get the follow up |57] The Remains of Trey Lightshadow.
Go past the altar room and down a spiral, after a couple of pulls you’ll be facing a small bridge going up straight ahead and a slope going down to your left.
Go left and keep going in that direction until you reach a big room where you’ll find Shadow Lord Fel’dan and his two succubus guards.
It wasn’t an easy fight to solo, I basically used everything I had with the mage and rogue. I sheeped Shadow Lord Fel’dan and killed the two succubus fast. Same with rogue, I sapped the shadow lord and killed it last. With the warrior I used retaliation. If you can’t cc Fel’dan, kill him first. Don’t forget to loot Shadow Lord Fel’dan’s Head.
This part of the dungeon is just much easier with a group, you can try it solo but I recommend at least finding a person to duo it with.
Hearthstone back to Everlook.
Fly to Forest Song, Ashenvale. Turn in [56] Ancient Spirit at Kayneth Stillwind (85,44). 10550xp on that quest, which is just as good if not better than what you get from most Outland quests. That’s why I always recommend to finish the old world quests before goign to Outland. You’ll see, there are more quests like this one.
Fly to Emerald Sanctuary, Felwood. Turn in:
- [57] The Remains of Trey Lightforge
- [58] A Final Blow
- [54] Silver Heart, get the follow up [54] Aquementas
Fly to Rut’theran Village (5 min break). Go to the house west of the hyppogryph landing spot, turn in [55] Moontouched Wildkin. Get the follow up [57] Find Ranshalla.
You should be level 57 by now, or pretty close.
Level 57Go train your new skills, sell stuff, visit the AH and re-stock food/drink.
When you’re ready to go again, go back to Everlook (hearthstone if it’s up, boat/flight if not).
Get the following quests:
- [56] Are We there, Yeti?
- [56] Ursius of the Shardtooth
- [60] Luck Be With You
Go to the bank and put the four Relic Fragments there, we won’t be needing them for a while. Destroy the Flute of the Ancients. You can also bank or destroy your corrupted soul shards, we won’t be hunting in felwood anymore so they won’t be much of a use now. Same goes for your Cenarion Beacon. You can destroy it and get a new one if one day you wish to get those consumables, for whatever reason.
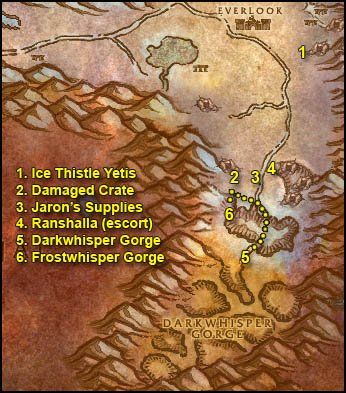
1. Go southeast to Ice Thistle Hills (65,41). Kill Ice Thistle Yetis there until you have 10 Thick Yeti Fur.
2. Get back on the road, ride south until (62,60), where you’ll find a small trail going west, just a bit further you’ll find a camp named Dun Mandarr (59,59). Kill the owlbeasts in it so that you can access the “Damaged Crate” in the camp.
Click on the Damaged Crate, turn in the quest and get the follow up.
3. Go east and you’ll find a wagon with a keg atop at (61,60) just west of the road. Right-click it, turn in and get the follow up [59] Enraged Wildkin.
Next to the wagon you should see a crate half burried in the snow, called Jaron’s Supplies. Loot it.
4. Get back on the road, go north a little and at (63,59) you’ll find Ranshalla, she is on the east side of the road at in front of the entrance to Owl Wing Thicket. If she’s not there, someone is probably doing the escort quest already, so go kill some owlbeasts while waiting for her to return. When you find her, turn in the quest [57] Find Ranshalla and get the follow up [59] Guardians of the Altar.Escort her to the cave, inside the cave she’ll start to cast a spell, while she does, click on the stave infront of her named “Fire of Elune” and it will be lit. You can drink/eat while she is channeling her spell, you don’t have to light the torch immediately.
Always let her in front and get the first hit. Escort her inside the 5 caves and light the 5 torches. Then she will go to the altar of elune, which you will have to click too. Then a beautiful scene will happen and you will have the quest complete message at the end of it.
While escorting her you should have normally looted the Blue-Feathered Amulet you need for the other quest. If you didn’t, keep killing these owlbeasts until one drops.
5. Get back on the road and ride south, go over the ice bridge and keep going south until you discover Darkwhisper Gorge and get the complete message for [56] Strange Sources.
6. Go backwards, cross the bridge again, then go west till (59,62), where you’ll find a path going down to Frostwhisper Gorge. Look for Frostmaul Shards.
You can gather all 4 without having to fight a single giant. If you aggro one just run away, they don’t run fast and they leash quickly. If you don’t manage it it’s ok, there’s no follow up, just abandon the quest.
Hearthstone back to Everlook.
Turn in:
- [60] Luck Be With You, don’t get the follow up
- [56] Are We there, Yeti?, get the follow up [58] Are We There, Yeti?
Sell junk and repair.
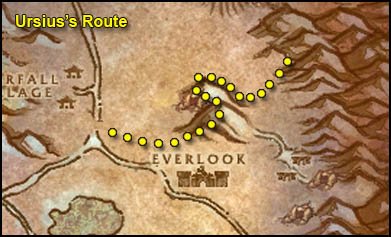
1. Now we’re gonna hunt Ursius.

Just follow the route marked on the map below, it’s very accurate (yes I actually followed that stupid bear for 20 minutes just for you guys). He walks very slowly and he tries to walk as close to the top of each mountain as possible.
2. Ride west/northwest to Starfall Village and turn in [59] Enraged Wildkin.
3. Go west/southwest to Donova Snowden, turn in:
- [56] Strange Sources
- [56] Toxic Horrors, get the follow up [57] Winterfall Runners
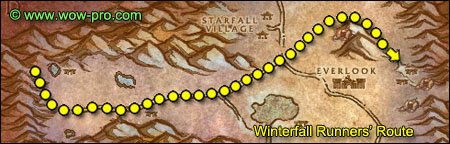
Now we’re gonna hunt for the Winterfall Runners, check the map below to see their route. When you find the 3 Winterfall Runners (lvl 57), you don’t have to kill all 3. Just kill one fast and run away, come back and loot the Winterfall Crate. They all drop it.
Once you have the crate, go back to Donova Snowden.
==Warning== When you turn in the quest, she will walk to the lake and then 3 Furbolgs will spawn and attack you. So just stand back, wait for Donova to come back and get the follow up [59] High Chief Winterfall. If you aggro any of those furbolgs, just run away, killing them is pointless.Go back to Everlook. Turn in [56] Ursius of the Shardtooth, don’t get the follow up.
1. Go east of Everlook to Winterfall Village (66,33), kill 8 Winterfall Shamans and 8 Winterfall Ursa there. There are more of them up the mountain in the southern part of the camp. If you run out of mobs to kill you can do the next step while waiting.
2. Go to the southeastern part of the camp, up a small path that leads to a cave (69,38). In that cave you’ll find High Chief Winterfall, along with one guard. Use your cooldowns and pots if necessary. In the worst case solo down the chief fast, loot him and run away (watch out for Winterfall Runners, they might gank up on you if they happen to pass by).
While looting High Chief Winterfall you should find an item called Crudely-written Log. Loot and right-click it to start the quest [59] The Final Piece.
If you still haven’t found a Winterfall Ritual Totem by now (which is very unlikely), kill some more furbolgs until one drops.
3. Once that is done, go south over the mountain to Ice Thistle Hills (65,41). This time enter the cave further to the east up the hills (68,42) and kill Ice Thistle Matriachs/Patriachs until you get 2 Pristine Yeti Horn.
4. Clear the way out, go back to Everlook. Turn in [58] Are We There, Yeti? and get the follow up.
Find a goblin named Legacki, she stands to the left of the inn. Target her and right click Umi’s Mechanical Yeti from your inventory.5. Ride west to Donova Snowden. Turn in [59] High Chief Winterfall and [59] The Final Piece. Get the follow up [59] Words of the High Chief.
6. Ride north to Salfa, turn in [58] Winterfall Activity. Now you should be either Neutral with the Timbermaw or pretty close. If you still need a bit more reputation, go kill some furbolgs in the nearby camps until you have 5 Winterfall Spirit Beads. Then go back to Salfa and turn them in and this should be enough. If it’s still not enough, well, this means you’re a very sneaky person, and also that you need to kill some more furbolgs until you’re neutral.
Once you’re neutral with the Timbermaw, enter the tunnel. Find a furbolgs named Kernda, he’s in the middle tunnel going north. Turn in [55] Deadwood Ritual Totem and [56] Winterfall Ritual Totem.
Go to Felwood through the tunnel. Go to Talonbranch Glade, fly to Emerald Sanctuary. Turn in [59] Words of the High Chief.
You should be level 58 by now.
Level 58Fly to Gadgetzan (10 Min break). Find a goblin named Sprinkle (she’s close to the horde exit). Scare her away with the mechanical yeti.
Ride to Lost Rigger Cove (68,41), inside lost rigger cove go south to the other side of the pirate camp and then west until you find a stone circle (70,49).
Open the blue bag named Eridan’s Supplies, loot everything from it. Then step inside the circle and click the Book of Aquor. Aquementas, a lvl 54 elemental, will come to the circle and attack you. You don’t have to kill it, just have to stand in the stone circle and let him attack you once. If you want to kill it, just know that he is immune to frost and deals frost damage (mages use Frost Ward). He should be a cakewalk at level 58.
You should now have the Silver Totem of Aquementas. If you do, you can destroy the “Book of Aquor”, the “Silver Claws” and the “Irontree Heart”.Ride back to Gadgetzan. Fly to Marshall’s Refuge in Un’goro Crater.
Find the goblin named Quixxil and scare him with the mechanical yeti.
Go inside the crystal cave and talk to J.D. Collie, turn in [54] Aquementas and get the follow up [54] Linken’s Adventure. Go to Linken and turn it in, don’t get the follow up unless you got a few people to help you. You’d need at least a healer and a tank type. Blazerunner is a lvl 56 Elite fire elemental and he hits for 400.
Anyway here is how to defeat Blazerunner, the last boss of the long quest chain “Linken’s Adventure”. Go to the top of fire plume ridge, clear all the elementals around to make sure they don’t add during the fight. Equip the Silver Totem of Aquementas and put it on a hotkey. Click it to dispel Blazerunner’s aura right at the start and everytime it reappears. Blazerunner is somewhat invincible when his aura is on, he keeps knockbacking people and every damage he takes is divided by 10. So be sure to always keep that aura dispelled.
Another thing, fight him inside his cave with your back facing the walls, so if he knockbacks you when the aura appears again you won’t end up being tossed off the mountain or into adds.
He’s a tough fight, I did it with a level 57 Priest, a level 55 Paladin and me (lvl 57 rogue) and it wasn’t easy. On the other hand I soloed it with my lvl 57 frost mage, thanks to kiting, it took time and several attempts though. So I recommend saving that quest for when you are level 60 and have time to spend on it, unless you got enough people to help you immediately. Anyway if you do manage to kill Blazerunner, you must also go loot the Ornate Chest in his cave. Then turn in the quest at Linken.Hearthstone back to Everlook, turn in [58] Are We There, Yeti?
Fly to Rut’theran Village, go to the house west of the Hyppogryph landing spot, turn in [59] Guardians of the Altar, get the follow up [57] Wildkin of Elune. Go inside Darnassus, go north to the Cenarion Enclave and find Arch Druid Staghelm (35,10), he’s on the top floor. Turn in [57] Wildkin of Elune.
Go train your new skills.
Go to Ironforge, go to the Hall of Explorers, turn in [54] A Little Slime Goes a Long Way.
Your quest log should look like this now:
- [55] Sister Pamela
- [52] Duke Nicholas Zverenhoff
- [52] The Everlook Report
- [56] Troubled Spirits of Kel’Theril
So you are level 58 now. Many people ask if they should just go to Outland at level 58 and never go back to the old world. This is in my experience a mistake. As we’ve seen in this chapter, we’re already getting 10K+ Exp for certain quests already in Felwood and Winterspring. The Plaguelands circuits are just as good, it would be a shame to miss that. Not to mention, if you go to Outland at level 58, you won’t have access to all quests, there are some quests with a level 61+ requirement already in Hellfire Penninsula. So yes, that’s really not the most efficient way.
However what I recommend is:Go to Outland and do the first few quests to get some nice gear upgrades, unlock your tradeskills past 300 and get the flight path to Shattrath. Open up my 60-65 alliance guide, follow the guide until step 7. when you arrive at the Temple of Telhamat, get the flight path (buy the first aid book if you wish), then ride to Shattrath (infos on how to do that are somewhere in the guide, use the search function to find it). Get the flight path in Shattrath, then take a portal back to Ironforge and get back to the guide 50-60 guide.
This is optional, it’s entirely up to you. If you just want to keep following this guide until the end before going to Outland, that’s fine. If you just want to go to Outland and never come back to this guide, it’s up to you, it’s not the most efficient way to do it, but it will still work out in the end.
Now with that said, let’s get started with those plaguelands circuits!
Sell and repair, check the AH, resupply food and drink (4 stacks).
Get the following quest item from your bank:
Everlook Report
Take the tram to Stormwind.
1. Go to Stormwind Keep and get the quest [62] The First and the Last from King Varian Wrynn.
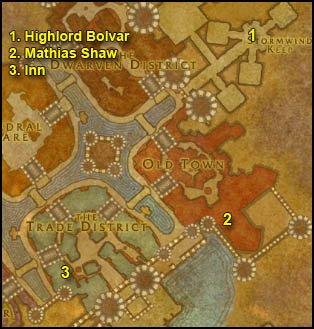
2. Go talk to Mathias Shaw in the Old Town, he’s on the first floor of the big building named SI:7.
Turn in the quest [62] The First and the Last, get the follow up, turn it in and get the follow up [62] Flint Shadowmore.
3.
Go to the inn and make Stormwind your home location.Fly to Aerie Peak, Hinterlands. Follow the road southwest to Hillsbrad Foothills.
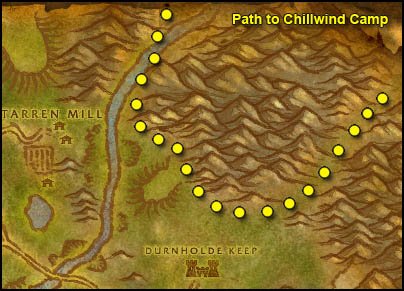
Go west/northwest along the mountain until you hit the river. Follow the river north towards Chillwind Point, then go straight north to Western Plaguelands until you find Chillwind Camp (43,85).
Get the flight path. Turn in [62] Flint Shadowmore and get the follow up [62] The Eastern Plagues.
Get [52] Clear the Way from Commander Ashlam Valorfist(the quest won’t appear over his head, so just find him).
Turn in [52] The Everlook Report at Argent Officer Pureheart, also complete the quest Argent Dawn Commission, you will receive a trinket.
When you kill undeads while having this trinket equiped, you can collect Scourgestones from their bodies. I suggest equiping it from now on everytime you kill undeads in eastern and western plaguelands.Turning in these Scourgestones at Argent Officer Pureheart gets you reputation increases with the Argent Dawn and a token. These tokens are the only way to raise your faction with the Argent Dawn at a certain point in reverred, so save them until then. Check blizzard’s official homepage to see what rewards you get at the different faction levels. It is also rumored that the Argent Dawn reputation will be used in the Wrath of the Lich King expansion, so that’s one more reason to do those plaguelands circuits.
Don’t get the other quests.
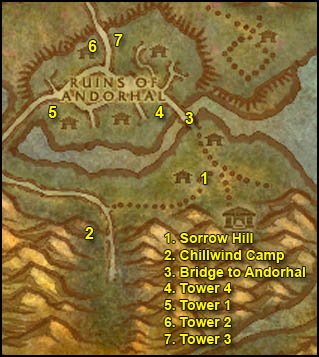
1. Take the eastern path to Sorrow hill (46,81). Kill 10 Skeletal Flayers and 10 Slavering Ghouls.
2. Go back to Chillwind Camp and turn in [52] Clear the Way, get the two follow up [53] The Scourge Cauldrons and [56] All Along the Watchtowers.
Go to High Priestess MacDonnell and turn in [53] The Scourge Cauldrons. Get the follow up [53] Target: Felstone Field.
3. Go back through Sorrow Hill and enter the Ruins of Andorhal by the south gate (49,73).
In Andorhal try to avoid the roads as much as possible, as level 56 elite abominations patrol them. So just clear yourself a path through the destroyed houses. Also avoid the middle of the town of course, there’s a huge bunch of mobs there and Araj the Summoner (lvl 61 elite).
4. Go to the Fourth Watch Tower (46,70). Clear what’s in your way. You can drop the torch at the entrance of the watch tower without aggroing the Skeletal Warlord if you just get close to it without being in it’s line of sight. Look for the Beacon Torch in your inventory and click it while standing next to the tower’s door.5. Go to the Tower One which is direclty to the west (40,71). It’s close to the western entrance to Andorhal. Mark it with the torch just like you did for the previous tower.
6. Go to Tower Two, northeast of tower one (42,66). It’s close to the northern entrance to Andorhal. Mark it.
7. Tower Three is right behind tower two, northeast of it. Be careful of the scarlet patrol and abomination patrol when you go there (44,63). Mark tower three. You can destroy the Beacon Torch.
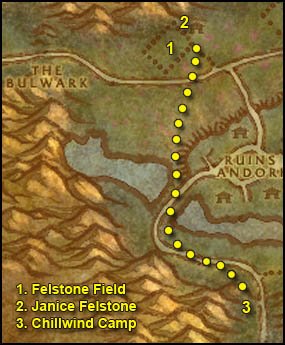
1. Get out of Andorhal by the north gate then go northwest to Felstone Field (37,58).
Clear yourself a path to the Cauldron in the middle of the field, when you get close, Cauldron Lord Bilemaw will spawn, kill it and loot the Felstone Field Cauldron Key from him, then go to the cauldron and click it, turn in the quest and get the follow up [53] Return to Chillwind Camp.
2. In the Felstone Field, go to the houses on the north side of the field, enter the one which is the most to the west (37,54).
On the 2nd floor of the house you’ll find Janice Felstone, get the quest [52] Better Late than Never.
Go to the next house at (38,55) and find Janice’s Parcel inside it. Click it, turn in the quest, then click it again and get the follow up [52] Better Late Than Never.
3. Ride back to Chillwind Camp, avoid Andorhal this time.
Turn in [56] All Along the Watchtowers. Get the follow ups [55] Scholomance and [60] Alas, Andorhal.
Turn in [55] Scholomance at Alchemist Arbington and get the follow up [57] Skeletal Fragments.
Turn in [53] Return to Chillwind Camp, get the follow up [55] Target: Dalson’s Tears.
Also get the quest [58] The Mark of the Lightbringer from Anchorite Truuen.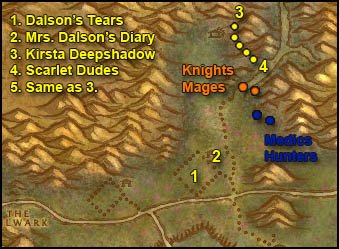
1. Go north, around Andorhal and then east to Dalson’s Tears (45,52), it’s the field directly east of Felstone Field. Clear yourself a path to the Scourge Cauldron, when you get close Cauldron Lord Malvinious will spawn, kill it and loot his key, go to the Cauldron and click it, turn in the quest and get the follow up [55] Return to Chillwind Camp.
2. Go to the houses on the north side of Dalson’s Tears, enter the eastern one (47,51). Clear what’s inside and look on the floor for Mrs. Dalson’s Diary, click it and choose “complete quest”.
==Note== As of last patch, the outhouse (48,49) is sometimes bugged, it’s impossible to interract with it, making it impossible to kill Farmer Dalson and to get the cabinet key. If you can’t interract with the outhouse, just forget this quest and move on to step 3.
Get out of the barn and look around for a Wandering Skeleton, there is only one of this kind and he roams around the barn, so keep killing stuff around the barn until you find it, kill it and loot “Dalson Outhouse Key”. Go behind the barn, you’ll find an Outhouse (48,49). Open it, kill Farmer Dalson, loot Dalson Cabinet Key.
Go to the other house now (47,50), on the 2nd floor of it you’ll find a “Locked Cabinet”, click it and turn in the quest.
3. Go straight north to the Northridge Lumbermill, when you are next to the lumbermill, go northeast of it, follow a trail going down to a destroyed wagon. You’ll find Kirsta Deepshadow there (51,28), get the quest [56] Unfinished Business.
4. You can find the Scarlets Knights and Mages you need to kill for the quest just southeast of Kirsta, on the road to Hearthglen. For the Hunters and Medics go to the camp southeast (51,44).
5. When you completed the kill list, go back to Kirsta and turn in [56] Unfinished Business, get the follow up.
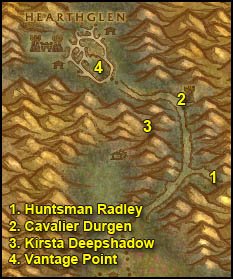
1. Go back on the road just east of Kirsta. And head north, at (54,34) the road forks off to the left and right. Go right and up the slope you will find Hunstman Radley (57,35). She can be pulled solo if you wait for the right moment: when the mage close to her goes far enough.
2. Get back on the main road and this time at the fork go left, keep going north until you hit the watch tower (53,24). Kill the 2 guards infront of it, clear the 1st floor of the tower carefully, then wait for Cavalier Durgen to show up. He goes to the top of the tower then walks back to the entrance. Wait for him to come down, you can’t kill him when he’s on top, he has 3 guards with him there.
After killing Durgen, clear the way to the top of the tower, there are 2 scarlet mages on top of the tower, you can actually pull just 1 if you take your time and body pull carefully. After you have cleared the top of the tower, you should find a Holy Coffer, right-click it and loot the Mark of the Lightbringer.
==Warning== Sometimes there is a high-level rare elite on top of the tower in addition to the above mentioned mobs.3. After this, go back to Kirsta Deepshadow by going southwest and jumping down in the crater where she is. Turn in the quest [57] Unfinished Business, get the follow up.
4. Mount up and ride to Hearthglen (46,18), trying to avoid most mobs on your way. When you are at the entrance, open your map and search the following location with your cursor: (45,18). Now clear your way to that location, where you should see a tower. Kill the two guards at the entrance and climb up the tower. Run around on the top floor until you get a quest complete message.
5. Exit the tower, mount up and get back to Kirsta. Turn the quest in.
Hearthstone to Stormwind, go to the Cathedral Square and inside the City Hall (48,32) on the 2nd floor. Turn in [52] Better Late than Never.
Now try to find Ol’Emma, she wanders in between the Cathedral Square and the Trade district. Shouldn’t be hard to find because you’ll see the yellow “?” on the minimap. She makes a stop in a house bordering the canals close to the Cathedral district too (52,41).
When you find her turn in [52] Good Natured Emma. Get the follow up [52] Good Luck Charm.
You should be level 59 by now or close.
Level 59
==Note== You should have a few Bone Fragments in your inventory, don’t sell them, we’ll need them for a quest later on.
Sell junk, repair, re-stock consumables.
Get the following items from the bank:
- Studies in Spirit Speaking
- 30 Dark Iron Scraps
Fly to Chillwind Camp.
In Chillwind Camp, turn in [55] Return to Chillwind Camp, get the follow up [55] Target: Writhing Haunt.
Now get ready for an escort quest, it’s rather easy. When you’re ready, turn in [58] The Mark of the Lightbringer, get the follow up [58] Tomb of the Lightbringer. Do the escort until you get the complete message.
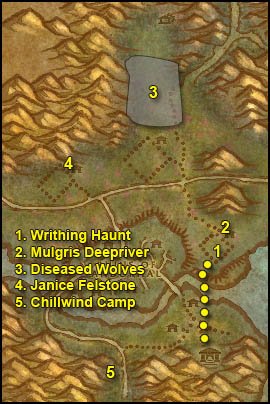
1. Go north/northeast, swim across the river and go to the Writhing Haunt (52,66). Clear a path to the scourge cauldron, when you get close to it, Cauldron Lord Razarch will spawn, kill it and loot the key. Clear what’s around the Cauldron and go click it, turn in the quest and get the follow up [55] Return to Chillwind Camp.
2. Directly north of the cauldron in a small house you should find a tauren lying down on the floor, Mulgris Deepriver. Get his quest [54] The Wildlife Suffers Too.
**From now on kill any Diseased Wolf you find on your way until you have completed [54]The Wildlife Suffers too**
3. Go north/northwest to an area just north of Dalson’s Tears (45,40), where you will find plenty of wolves to complete the quest. Kill everything in this area until you have 8 Diseased Wolf Kills. Also note that the spiders in this area are placeholders for wolves, so you have to kill spiders too if you need more wolves.
4. Go southwest to the Felstone Field, go into the left house (38,54) on the 2nd Floor. Turn in the quest [52] Good Luck Charm at Janice Felstone and get the follow up [54] Two Halves Become One.
Get out of the house and look for a Jabbering Ghoul.

This ghoul wanders the area in front of the barn. If it’s not there just keep the area clean until it respawns. Kill it and it will drop a “Good Luck Other-Half-Charm”.
Once you have the other half charm, go back to Janice Felstone, right click on the other-half-charm in your inventory. Turn in the quest.
5. Go back to Chillwind Camp.
Turn in:
- [55] Return to Chillwind Camp and get the follow up [58] Target: Gahron’s Withering.
- [58] Tomb of the Lightbringer
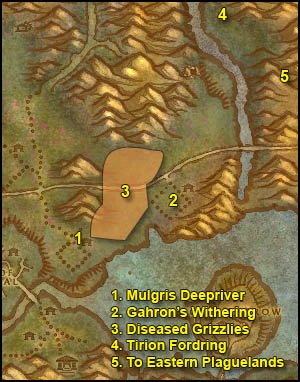
1. Ride east through Sorrow hill, then northeast, across the river and to the Writhing Haunt. Clear the way to the house with the tauren lying down on the floor, turn in [54]The Wildlife Suffers too, get the follow up [56]The Wildlife Suffers Too.**From now on kill any Diseased Grizzly you see until you have killed 8**
2. Go east to Gahron’s Withering (62,57). Clear a path to the Scourge Cauldron, when you get close Cauldron Lord Soulwrath will, appear, kill it. He’s harder than the other cauldron lords, he knockbacks and silences, so be careful where you fight him. Loot his key then go to the Cauldron, turn in the quest and get the follow up [58] Return to Chillwind Camp.
3. Go to the area which is in between Garon’s Withering and the Writhing Haunt. There should be plenty of grizzlies there. If not, kill spiders, they are placeholders for grizzlies. Kill everything in this area until you have 8 Diseased Grizzly Kills, then go turn in [56] The Wildlife Suffers Too at the Writhing Haunt. Don’t get the follow up unless you are a mage (teleport), it requires a trip to Darnassus and we won’t be going anywhere near it in the guide. It’s 8450 xp reward and a decent cape, so it’s up to you if you wanna make the trip to Darnassus or not.
4. Ride northeast until you hit Thondroril River, go north along the river bank, then cross the river so you are on the eastern bank and ride north until you find a house. In front of it you’ll see Tirion Fordring, get his 3 quests:
- [56] Demon Dogs
- [56] Blood Tinged Skies
- [56] Carrion Grubbage
From now on, kill on sight the following:
- Plaguehound Runt
- Carrion Worm
- Plaguebat
5. Go south along the river and then east into Eastern Plaguelands.
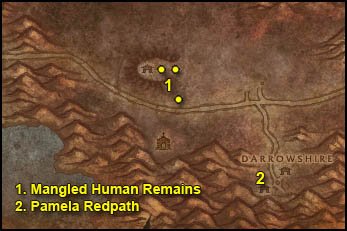
1. Go southeast while killing everything on the way. Find the Marris Stead but don’t get close to it! There’s a lvl 62 Elite NPC there, hits like a truck. Go around the Marris Stead so that you are on the east of it (29,74).
Just a bit closer to Nathanos lightcaller you’ll find “Mangled Human Remains” (28,74). Loot the SI:7 Insignia (Turyen) from it.
Go a bit closer to Nathanos, on a small mound right infront of him you should find other human remains (27,74). Loot Fredo’s Insignia from it. This is as close as you can get to Nathanos without aggroing it, and you should get the “Blightcaller Uncovered” (Complete) message. Go backwards a bit and then south, you should find the last human remains close to the road (28,79). Loot Rutger’s Insignia.2. Go southeast to Darrowshire, keep killing everything on sight that you need for quests, there should be plenty.
Inside Darrowshire, find a small destroyed house on the western side of Darrowshire. You should find Pamela Redpath there, turn in the quest [55] Sister Pamela and get the follow up [55] Pamela’s Doll.
Now you must find the 3 parts of pamela’s doll, they can be in any of the other houses in Darrowshire, mostly on the 2nd floor of it. Look on the floor for some brown objet. Everytime you get close to one of the doll parts, a level 55 ghost spawns and attack you.
Once you have Pamela’s Doll’s Left Side, Right Side and Head. Right click them in your inventory to combine them. Go to Pamela and turn in the quest. Get the two follow up quests:
- [56] Uncle Carlin
- [56] Auntie Marlene
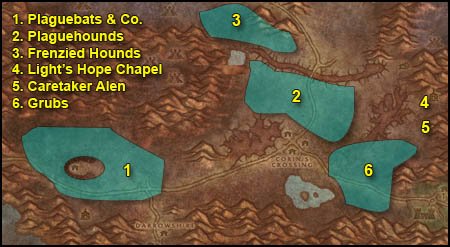
1. Go back towards the Marris Stead and keep doing wide circles around it killing everything until you got 30 Plaguebat and 20 Plaguehound Runts slain. This is the best area to find them.
2. Go east to the area north of the infectis scar and Corin’s Crossing. Kill everything around until you have 5 Plaguehound Kills. Focus on Carrion Grubs as well.
3. Once you got 5 Plaguehound kills, go to the area which is north of Blackwood Lake (51,41). You should find Frenzied Plaguehounds around this area, also kill Carrion Devourers in the way.
4. Once you have 5 Frenzied Plaguehound kills, go southeast, around the Pestilent scar by the north of it and then go southeast to Light’s Hope Chapel (81,59).
Get the new flight path.
Turn in:
- [52] Duke Nicholas Zverenhoff
- [56] Uncle Carlin, get the follow up [55] Defenders of Darrowshire
Go inside the chapel, get the quest [60] Binding the Dreadnaught from Korfax, Champion of the Light. Turn it in immediately, since you already have the 30 Dark Iron Scraps.
5. Just a bit south of Light’s Hope Chapel find Caretaker Alen (79,63). Get the quests [55] Zaeldarr the Outcast and [60] The Restless Souls from him.
6. Check how many “Slab of Carrion Worm Meat” you need, then go kill in the area south and southwest of Light’s Hope Chapel until you got your 15 Carrion Worm Meat.
Go back to Light’s Hope Chapel, fly to Chillwind Camp.
Turn in [58] Return to Chillwind Camp, go to Commander Ashlam Valorfirst and complete the quest “Mission Accomplished!”
Turn in [62] The Eastern Plagues at Flint Shadowmore, get the follow up [62] The Blightcaller Cometh.
Hearthstone to Stormwind, go to Stormwind Keep and turn in [62] The Blightcaller Cometh at King Varian Wrynn, don’t take the follow up.
You should have dinged level 60 by now. Congratulations, you are ready to go to Outland. However, if you like it here, you can do the following additional circuits, I actually recommend it. It’s nice to go to Outland already close to level 61, this means you probably won’t ever have to do any instances or grind to keep up with the guide’s recommended level, or better, you’ll be ahead of the guide in levels and will ding level 70 with a lot of quest circuits left to do, which is a very nice way to make gold at level 70.
However, it’s entirely up to you, going now to Outland is more than fine.==Warning== Due to time constraints, I haven’t been able to revamp the optional circuits yet. It should be done in the coming months though.
Level 60
Go to Tiron Fordring and turn in the following quests:
- [56] Demon Dogs
- [56] Blood Tinged Skies
- [56] Carrion Grubbage
I still haven’t had the time to work on my additional circuits, so you should still have these quests in your log:
- Defenders of the Darrowshire
- Zaeldarr the Outcast
- The Restless Souls
- Skeletal Fragments
- Alas, Andorhal
- Troubled Spirits of Kel’Theril
You can either abandon them or try to finish them on your own, then simply move on to my Outland guides.
I hope you enjoyed this guide. If you want to return the favor, please try to contribute.
-Jame
Text formatting: Snowflake & Jame© Copyrights www.wow-pro.com All Rights Reserved
All Along the Watch Towers changeThe ALl Along the Watchtower quest now requires that you return with the beacon – in your guide you say you can destroy it. Do this, and you’ll have to do the quest over again.
Ohh good idea, totallyOhh good idea, totally forgot the fronds 🙂 Thank you.
I hear you. I’ll try to fixI hear you. I’ll try to fix this 🙂
I’ve got a lot of badI’ve got a lot of bad feedback on those quests. People getting bad luck with the morrowgrain and having to go back to Un’goro for extra soils. I finally decided to remove it altogether. The morrowgrain quest really fills up your bags with junk too, and picking all those soils up actually takes a lot of time if you combine everything.
savage frond“7. Get out of Fungal Rock. If you haven’t finished [52] Muigin and Larion, go out and kill some more flowers until you complete it”
Sorry Jame – adding comments as I come across them, should have done all at once. Noticed levelling another alt that you’re planning a bonus mission for LHC frond/scrap etc. hand in. Picked up 20 savage fronds in this circuit in Un’Goro and that’s another thing to mention to keep (along with the soil).
Muigin and Larion“7. Get out of Fungal Rock. If you haven’t finished [52] Muigin and Larion, go out and kill some more flowers until you complete it. Go to the area which is southeast of the black pools where we killed the Tar beasts. There are plenty there and they are the easiest flowers to kill (65,27).”
You almost certainly will have to do this unless you’ve actively gone after them – the opposite route you have now doesn’t take you across enough. Suggest you get people to grind on them between 2 and 4 on your map and then at 4 (the other expedition site) until they’re done.
Pterrordax“5. A little further east and up the mountain (50,88). You should find 1 or 2 Pterrordax there, kill them. Go back and forth between this spot and the previous one until you get your 10 Pterrodax kills.”
Think I hate this quest the most in Un’goro (though that hideous grind zone has some competition) because of the awful respawn rate. Might be worth mentioning if you’re still not done, there are another 6-7 Pterrordax at 56,88 which you can kill on your way to Torwa.
Un’Goro Soil==Note== From this point on, kill the following mobs on sight:
1. Bloodpetals of any kind (those walking flowers)
2. Diametradons
3. Pterrordaxes
Might also want to specify to keep Un’Goro soil for bungle in jungle. You do say not to sell it later but bags are so full on this new grind that people who don’t know about it might delete it before they read that bit.
Side note – out of interest why did you take outthe un’goro soil quest/morrograin – i picked up over 50 soils just doing the frezied/ooze grind so you’re still getting enough soil even if the quests are green at that point.
Ungoro how we love it“3. Go southeast to the Expedition Camp at (38,66), try to avoid the aggros as much as possible because most mobs are too tough for you here.”
Used to be in your old guide, now they’re the same mobs you’ve just been grinding against. It’s the nasty elite spiked Stegadons and thunder lizards you want to avoid – though they have a tiny agro range.
Done!Done! 😉
Mats for Caught!Could you add 15x[Silk Cloth] for the Caught! quest to the shopping list?
This will be included in theThis will be included in the optional circuits 🙂
I think you should replaceI think you should replace some of the early quests w/ a couple quest circuits in Western Plaguelands, to allow for reaching Friendly w/ Argent Dawn by the time you hit lvl 55. Once you’re both 55 & friendly w/ the Argent Dawn, you can turn in 30xCrypt Fiend Parts, 30xDark Iron Scraps, 30xSavage Fronds, 30xBone Fragments, & 30xCore of Elements at Light’s Hope Chapel. Each of these turn-ins will get you around 10K XP, and all the mats can be purchased from the Auction House.
Ah yes, that’s normal. It’sAh yes, that’s normal. It’s because I still haven’t added the rest of the circuits for the plaguelands. They will be added soon though, check the release dates on the front page 🙂
Some missing turn ins?I did a text search of the duides, but there seems to be some missing quest turn ins? Demon Dogs, the carrion grubbage, blood tinged skies, etc. One I finish with the old world and move on your lvl 60 guide, is it safe to say I can run around turning in all the old world quests?
Wow, thanks I’m alreadyWow, thanks :p
I’m already working on the WotLK guides, so I’m actually hoping that I’ll be able to finish them before the release. Of course, there will probably be a lot of things changed at the release, so I’ll have to quickly adapt my guides, but I’m confident I’ll be able to pull it off, especially with the help from the wow-pro community.
Your Daily Praise =)JUST in case you haven’t gotten your daily, heartfelt thanks from the millions of WoW fans, I’m here to say what everyone thinks of you. You are an ABSOLUTELY HOLY FLIPPING WHAT THE HELL AWESOMEST person I have EVER known. You provide us with such efficient guides that you put the GOD OF GUIDES to shame. Not only that, you give it to us FOR FREE! I had just received an e-mail today about some guide that costs 30 bucks. I laughed and pressed the delete button. ^^ Again thank you SO much for being awesome. You have changed WoW and WoWers forever.
If you say plz because it is shorter than please, then I will say no because it is shorter than yes.
There are people that are awesome, people that radiate awesome, and then there’s…….James!!!
P.S. I have a question about your soon coming WotLK Guides. How long do you estimate until you can produce an Alliance WotLK Guide?
Thanks for the suggestion.Thanks for the suggestion. I’ll keep it in mind.
Yes, it’s normal, it’sYes, it’s normal, it’s because I haven’t finished the additional circuits yet, and that’s where those quests are done.
Yes, it’s the first thingYes, it’s the first thing I’m going to do. I expect it should be out before the end of the week. Release dates will be posted on the news page tomorrow.
This is a good idea really,This is a good idea really, I might add it in my future guides (the class specific ones). For the moment, I’d rather not add anything pvp related and let people decide for themselves what they want to do with pvp stuff, because well, some people just hate pvp.
Thanks for your comment.Thanks for your comment. I’ll add a line about the muigin and larion quest 🙂
In that case, just skip theIn that case, just skip the whole searing gorge circuit.
If you haven’t doneIf you haven’t done Ungoro’Crater, start there (it’s in the upper part of the guide). Make sure you get the linken quest chain started (it starts at a broken raft in Ungoro). Then you can move on to Felwood/Winterspring, plenty of XP to get from there.
They will be added, noThey will be added, no worries, it was all planned 😉
Ah well, now that I went toAh well, now that I went to the trouble of making a cool map showing the winterfall runners’ pathing, no way I’m changing this :p
But thanks for the tip though, I might include it in future guides (like my class specific leveling guides).
Hmm nope, it’s in thereHmm nope, it’s in there 🙂 You’ll quickly find it if you use the search function. (CTRL + F)
I’m working on theI’m working on the additional circuits. I’m hoping to release the first batch (plaguelands) before the end of the week. Check the front page for relese dates, they will be posted soon.
Thank you very much, IThank you very much, I really appreciate it, especially coming from someone with such a good writing style 🙂
Yes, it’s the first thingYes, it’s the first thing I’m going to do. I expect it should be out before the end of the week. Release dates will be posted on the news page tomorrow.
The circuits will be W.The circuits will be W. Plaguelands, E. Plaguelands and Silithus. I’ve decided to leave Burning Steppes out this time, it’s just not as good as the other zones and there’s already more than enough exp given from other zones.
And I’m glad to see that you share my opinion about skipping old world zones to get to Outland faster. I just wish more people would try both methods and see for themselves 😛
Additional CircuitsHey Jame, I was just wondering if you’re still planning on adding the additional circuits to the end of this guide. My new character’s getting close to 60 and I’d prefer to be a little higher, possibly even 61, by the time I go to Outland.
PS. I love these guides. This will be the 4th character leveled to 60 with them, and probably the 3rd to 70. Thank you 😉
Added a little warning.Added a little warning. Thanks for pointing this out 🙂
When I calculate the amountWhen I calculate the amount of xp needed for each level I always add a little extra buffer to make sure people don’t fall behind, and I do that with zero exp bonus. So it’s perfectly normal that people are ahead of my guide.
What surprises me is that a few people sometimes say that they fall behind, so I guess playstyle and drop rates make a big difference 😛
Extremely AppreciativeJame,
I’ve been using your guides now for quite some time, leveling 5 chars to 70 with such rapid and fluid pace thanks to you. I found these guides immensely helpful when I first got back into WoW and really needed some guidance through the 30-60 area. These guides allowed me to still enjoy the rich questing Warcraft has to offer as you take us through both the popular and more remote quest lines — all while maximizing xp/hour. After many level 70 chars and learning the game inside and out, I STILL find your guides immensely helpful, using them to this day. Sure, I know where to level, quest, and grind but not even close to the efficiency that your routes offer.
Just to emphasize just how fast your guides are, I was able to go from 1-60 on a newly created shaman in just over 4 days played.
What makes your guides truly stand out over the rest (and I read them all before coming across yours) are a couple things:
1. You effortlessly establish your authority and credibility with top-notch analysis and guidance within World of Warcraft (allowing us to completely trust and follow your guides)
2. You have excellent writing skills, allowing you to [i]concisely[/i] guide us through the leveling process with as little reading (downtime) as possible
3. The guides are utterly complete.
4. The guides are virtually error free in every sense.
5. You offer these guides for FREE! (something he does not have to do, considering these are far better than guides you have to pay for)
So I just wanted to post all my thanks for the great deal of time you guys here at wow-pro put into these guides — the effort really shows, making these in my opinion the best leveling guides out there. Period. Look forward to Jame’s Alliance 70-75 and 75-80! 🙂
–Necter Kel`Thuzad Alliance
Additional CircuitsThis is a sweet guide. Any word on the additional circuits? I remember the old guide had burning steppes, but this didn’t?
Thank you!I used your Horde guide to get to 70 and am using it again for an alt…I used this page on my death knight in beta, it’s very good. The one thing I noticed though is you tell people to take quests and then they’re never used, as well as the Tirion quests are never turned in. But again, thanks for these, I leveled 5 Alliance to 70 on my own but had no idea how to do Horde, and your guide made it easy!
SalutationsSalutations. Just wanted to drop some praise for your guides. I’ve levelled four characters to 60+ using them. Honestly, one time casually through the game is enough. Now I just want to be 70 and get on with it.
Anyways! I have a suggestion for you. At the start of the level 56 circuit, the same mobs that spawn at the Timbermaw Hold also spawn up at the Frostfire Springs starting at about 33, 38 and going north-west (in Winterspring). I recommend possibly flagging it with a 2 as well, as the Denwatchers that spawn at Timbermaw Hold are a shared spawn with Totemics. And if you have even one other person there, you can spend a considerable amount of time waiting around and grinding on them; which I personally find very frustrating.
Keep up the great work. 🙂
Additional Quest(s) at Level 51 + Nice WeaponFirst of all, and even though I’m sure you’ll slowly grow tired of it… thanks a lot for writing up these guides, they’re excellent. I would like to suggest a short trip to Alterac Valley at level 51 for the following reasons:
Quest: Hero of the Stormpike (http://thottbot.com/q8271)
Not only does this quest and the other Alterac Valley related ones (capture a tower, mine, graveyard – all of which can be done “on the fly”) reward excellent experience (game won: ~10600 at level 51, towers etc. ~7000), but also does the Hero of the Stormpike quest reward really nice weapons that, at least in my case as a hunter, will last me until I hit Outland. Although the quest says that you have to kill Drek’Thar, it is sufficient to just win the game.
I didn’t read all comments to see whether this has been suggested before, but I think it would fit in exceptionally well after the Searing Gorge quest circuits have brought you to level 51. If you fit in Ironforge between Searing Gorge and Alterac Valley, you can even grab “The Sovereign Imperative” (http://thottbot.com/?qu=7261) there, which rewarded me with another 5k worth of EP just for turning it in at the Alterac Valley quest givers.
So far,
Greetings from Germany,
Thidias
lvl 54 un’goroHey james 🙂 first of all i’d like to say i’d like to thank you for making awesome guides. they really helped me alot 😀
and then second, in the lvl 54 part of un’goro u say this:
“. Go southwest until you hit the river (40,27). On the southern side of the river you’ll find plenty of Dinos and some Oozes.
In this area, kill every Frenzied Pterrordax, Elder Diametradon and Ooze you find. Open the bag of empty ooze containers from your inventory and put the 10 Empty Pure Sample Jar on a hotkey. Everytime you kill an ooze, loot it and then target the corpse and click the jars to fill them up. You can stop killing Oozes once you got 10 Pure Samples.
Keep doing this until you complete:
[51] Shizzle’s Flyer
[51] Roll the Bones (they drop from the Elder Diametradons approximately 25% drop chance)
[54] A Little Slime Goes a Long Way
15/15 Frenzied Pterrordax kills ”
maybe you should also say that “muigin and larion” can be completed in this area aswell :)?
also
the quest roll the bones can be completed much faster and easier by going to the area around 30.77 wich u tell us to go in the next step anyway.. 🙂
well thats all.. cya 😀
Jame the guide is awsome! IJame the guide is awsome! I know that being ahead of the guide is supposed to be good and all but im doing the level 50 searing gorge circut and im level 54 and while im doing most of these quests the mobs are grey and im getting no exp. and the quests are low level so im not getting that much exp. from them either. Wat do i do?
My Hunter is level 55 andMy Hunter is level 55 and I’ve done everything in WPL , Searing Gorge , and Burning Steppes
Where should I start? I looked at the level 55 place and it seems your returning quests and starting chains
Another great XP boostWhen I was leveling my last character (think it was my priest, but doesn’t matter), I found another HUGE XP-boost in the Eastern Plaguelands, which is not in this guide (yet).
In the patch in which Naxxramas was added, a few repeatable quests for reputation with Argent Dawn were added. The “repeats” only give rep, but the first hand-ins give almost 10K XP each. If you make sure you have 30 Bone Fragments, Savage Frond, Dark Iron Scraps, Crypt Fiend Parts and Core of Elements, you can get close to 50K XP in a few seconds.
I got a useful tip offI got a useful tip off somebody (can’t remember their name) while levelling my druid (Must be 4th or 5th character using your guides ;)) Anyway, on the Winterfall Runners quest, nine times out of ten it’s faster to go back to the cauldron in felwood where you’ll find a lone Winterfall runner, instead of searching along the whole road.
Keep up the good work Jame, hope to see your WotLK guides in the works! 😛
Super Sticky?I was delivering my quests in Gadgetzan, I think the Super Sticky (after Un’Goro long part, lvl 55) quest isn’t mentioned in the guide, but it says you need to deliver it. Could it be possible you forgot to mention to do this quest too?
Extra quest.Hey, I wanted to add in that there is a quest you can get from the innkeeper right after the Searing Gorge circuit. If you pick that up, you can go to Darnassus (where we’re going to anyway) and then the follow up is a Un’Goro Soil quest. Just wanted to add that in 🙂
Additional Circuits?Hi Jamie.
Thanks for a great guide, I enjoy using it between 30-60, because it keeps me from thinking too much, and that stretch is by far the most boring part of leveling a new alt. It’s very effective, and takes you through some of the important stuff which is great. And no insane grinds, or instance runs. Very nice job.
I would like to see the additional circuits soon, though. It’s just that I try to level HH (or the horde equivalent) rep to honored via Ramparts and Blood Furnace before questing in Hellfire Peninsula, since you can get pretty close to exalted that way – and it takes a while getting groups together, so it would be nice to be able to level in the old world instead! 🙂
Additional CircuitsHey Jame.
I’m not asking this to push you by any means, but simply to ask a question about the additional circuits you have planned for the future.
Are these circuits within Eastern and Western Plaguelands, or are are these also going to include Burning Steppes and Silithis as well? I noticed that both of these areas are missing from your current guides. Of course, I am not sure if they are even worth the effort as you would probably only gain XP for completed quests, but I am not sure.
Thanks once again for the time you took to develop these guides, and thanks to everyone who has contributed to making it look good. And to anyone who is worried about being too far ahead of the guide near the end, just continue through. It is not that much more to work through, and it is better to go ahead and finish it than not. Trust someone who has done it both ways now. I took my shaman into Outlands at level 60 originally instead of completing the old world. I think I lost out on quite a lot that way. This time, my hunter has been about four levels ahead of the guide consistently throughout, and now I am level 61 and closing in on the end of the guide. I’m hoping to be level 62 before I touch Outlands.
Thanks again!
3 mobs jumping youHey!
First of all, great guide, I’m a terrible leveler and now in just three weeks, which is amazing for me, I’m level 60. 😉
Although, I thought you might want to add that 3 level 57 mobs will jump you when you hand in Winterfall Runners. I had killed all three of them close to Donova Snowden, so when I handed it in I didn’t expect yet another three mobs to kill me (I kinda rushed back to Donova and had a low amount of hp). Anyway, I thought you might want to add that 😛
Awesome guide, thanks for all the hard work!I just leveled my third character to 60. I used the guides on wow-pro starting at level 1. I made a Draenai Hunter and my total played time from 0 to 60 is 6 days 11 minutes. I did a few hours of pvp and got ganked quite a few times, I also did Maraudon for a few hours, but that was it. All things considered I enjoyed it a lot.
I found that I was consistently about 1.5 levels higher than the guides once I hit level 30 or so. I would even jump ahead in the guide periodically to the level that I was at and I would still end up getting ahead again. I don’t understand how, because I didn’t stray very far from the guide, and I can’t imagine that my drop rates were so horrible that I grinded for an extended period.