 by Jame
Welcome to my 100% Walkthrough for Elden Ring.
This is Part 8 of my Walkthrough, I’ve decided to split it into several pages to make it more readable.
Other pages of my walkthrough:
Elden Ring 100% Walkthrough – Part 1 for Episodes 01 to 20
Elden Ring 100% Walkthrough – Part 2 for Episodes 21 to 40
Elden Ring 100% Walkthrough – Part 3 for Episodes 41 to 60
Elden Ring 100% Walkthrough – Part 4 for Episodes 61 to 80
Elden Ring 100% Walkthrough – Part 5 for Episodes 81 to 100
Elden Ring 100% Walkthrough – Part 6 for Episodes 101 to 120
Elden Ring 100% Walkthrough – Part 7 for Episodes 121 to 140
TABLE OF CONTENTS
Walkthrough Presentation
The Build
The Guide Format
FAQ
Character Creation
Walkthrough episodes (Part 8):
EPISODE 141
EPISODE 142
EPISODE 143
EPISODE 144
EPISODE 145
EPISODE 146
EPISODE 147
On this page you will find:
- A very compact text version of my guide that you can use as a roadmap
- A very detailed Video Format, with timecodes for every key step and chapters to skip the parts which you don’t feel like watching. So I recommend to give it a try and to subscribe to my YouTube channel if you want to get the latest info first.
This is a REAL 100% Walkthrough. I’m well over 1500+ hours of preparation for this guide to make sure not a single item was missed and to complete 100% of Elden Ring as efficiently as possible!
In this guide, I will of course show you how to unlock ALL Elden Ring Trophies / Achievements, but also:
- Acquire ALL Items
- Acquire ALL Weapons
- Acquire ALL Armor
- Acquire ALL Spells
- Complete all the side quests
- Expore every dungeon
- Defeat every Boss and mini boss
But I will also provide many advice to become better at the game:
- Basic Combat Mechanics and Tips
- Advanced Combat Tips
If you enjoy this format, please check my other 100% walkthroughs:
- Final Fantasy 7 Remake 100% Walkthrough
- Cyberpunk 2077 100% Walkthrough
- FF7 Intermission 100% Walkthrough
The walkthrough
This is the ultimate guide to complete 100% of Elden Ring
This is more than just a Platinum Trophy guide, we’ll get everything.
- All 42 Trophies including the Elden Lord platinum trophy
- All 7 Great Runes
- All Quest Lines, every NPC dialogues until the end of their quest lines
- All 32 Flask of Wondrous Physiks Tears
- All 20 Cracked Pots
- All 10 Ritual Pots
- All 10 Perfume Bottles
- All 8 Memory Stones
- All 3 Talisman Pouches
- All Ashes of War
- All Spirit Ashes
- All Weapons
- All Shields
- All Bows and Crossbows
- All Armor Sets
- All Talismans
- All Sacred Tears
- All Golden Seeds
- All 8 Somber Ancient Dragon Smithing Stones (to upgrade 8 Unique Armaments to the Max)
- All 15 Ancient Dragon Smithing Stones (to upgrade 15 Normal Armaments to the Max)
- All Stonesword Keys (we’ll finish our 1st playthrough with 34 spare Stonesword Keys after opening every possible Imp Statues)
- All 3 Mending Runes (for the alternative endings)
- All Keys and Medallions
- All 18 Larval Tears (for respec)
- All 24 Nomadic Warrior’s Cookbooks
- All 7 Armorer’s Cookbooks
- All 8 Glintstone Craftman’s Cookbooks
- All 7 Missionary’s Cookbooks
- All 4 Ancient Dragon Apostle’s Cookbooks
- All 4 Perfumer’s Cookbooks
- All 3 Fevor’s Cookbooks
- All 2 Frenzied Cookbooks
- All 6 Whetblades
- All 19 Maps
All incantations:
- 6 Bestial Incantations
- 4 Blood Incantations
- 14 Dragon Communion Incantations
- 12 Dragon Cult Incantations
- 13 Erdtree Incantations
- 4 Fire Giant Incantations
- 9 Fire Monk Incantations
- 5 Frenzied Flame Incantations
- 6 Godskin Apostle Incantations
- 9 Golden Order Incantations
- 4 Servants of Rot Incantations
- 15 Two Fingers Incantations
All sorceries:
- 2 Aberrant Sorceries
- 10 Carian Sorceries
- 3 Crystallian Sorceries
- 5 Death Sorceries
- 2 Full Moon Sorceries
- 20 Glintstone Sorceries
- 5 Gravity Sorceries
- 2 Loretta’s Sorceries
- 4 Magma Sorceries
- 7 Night Sorceries
- 3 Primeval Sorceries
- 5 Snow Witch Sorceries
Basically, we’ll farm everything, every Golden Rune, material or consumable will be found and looted if you follow this guide. You’ll finish your first playthrough with plenty of materials to do anything you want in your New Game+ or Co-op / PvP game after.
I’ve planned this guide to do everything in the most efficient order, so that we never hit difficulty walls and complete the full game with as little deaths as possible. Every upgrade that can help will be obtained at the right moment, you’ll be warned in advance of every ambush and trap, there will be an optimal strategy for each of the 170 bosses in Elden Ring.
- If you’ve never played a souls game before, I guarantee you will Platinum this game without any problems if you follow my guide.
- If you’re a casual gamer or 70+ year old with bad reflexes, I guarantee you will Platinum this game too.
- If you’re a veteran souls player, I guarantee you won’t regret following this guide, it will save you a lot of time and you’ll probably learn a few tricks and hidden game mechanics.
We’ll start the game with a few basic combat mechanics, get some early upgrades and progressively add more tools to our arsenal and explore some advanced combat tactics as well as new game mechanics which only exist in Elden Ring.
The Build
We’ll start with a very simple quality build and keep it that way in the early game. We’ll be very powerful and kill our first two Shardbearers that way.
Then we’ll use a single Larval Tear to respec and go a different route. We’ll be go heavy in INT and switch to one of the strongest weapons in the game, Moonveil, which will not only make us extremely strong in melee, but also have access to a range of Sorceries which will make us even more powerful and versatile.
About midway through our adventure, we’ll also acquire the most iconic weapon in all souls games: the Dark Moon Greatsword, which will make us even stronger. That’s the general path we’ll take, but there will be many other surprises and upgrades we’ll pick up along the way. We’ll of course use Summons, Ashes of war, Shields and strong counters. We’ll also use a bit of crafting in certain situations to use pots. And we’ll use Perfumes, which are incredibly underrated.
One of my goals was to showcase a very strong yet versatile character build, instead of a one-trick pony type of character. I wished I could have included more variety, such as Incantations and Dragon Communion Incantations, but it would’ve required more respecing to make this viable and keep our power curve above the enemies we encounter. So I kept it simple and focused primarily on making this build simple, efficient and most importantly: get us through Elden Ring without any painful hurdles such as dying 10+ times to the same boss or difficult area.
The Guide’s format
This is a double format Guide. There is a full video walkthrough AND a very compact text walkthrough.
The video walkthrough will contain more detailed combat tips, so I suggest you check them out.
Each video will have a list of timecodes with all the important moments in the episodes:
- Timecode for each Item obtained
- Timecode for each Combat tip and boss strategy
- Timecode for each Important info given
- Timecode for each Trophy obtained
All cut scenes and NPC dialogues will be included, but if you want to skip them it will be quite easy to do so: each video will be spilt into chapters, with clear labels so you can skip the parts you don’t want to watch or would rather watch on your own.
The text version of my Elden Ring walkthrough should also be quite useful, it is very compact, and whenever the direction or explanation isn’t detailed enough, you can always check the video to get a clearer direction.
FAQ
Q: Will I get all trophies, including the platinum, if I follow your guide?
A: Yes of course. But much more than that. You’ll get everything you can possibly get in one playthrough. All items, weapons, spells, etc. Everything.
Q: Do I have to follow your character build exactly ?
A: No. You can follow this guide and do your own build and you’ll be fine. However, this is a very optimized guide and I believe the builds I use are extremely fun and powerful. Some strategies in the later part of the game are specific to my build, so you’ll have to find your own strategies if you don’t have the same skills / spells.
Q: Can I follow your guide if I’m on PC / PS / Xbox?
A: Yes. This guide works for ALL platforms.
Q: I love your guides! How can I support your work?
A: There are many ways to help me become a full time guide writer:
- ✅Subscribe to the channel
- 👍Like and comment every video
- 📢Share this walkthrough to your communities / forums / friends
- 💖Leave a tip: https://www.tipeeestream.com/james-guides/donation
Q: Is there a way to get the Gesture: The Ring if I didn’t preorder the game?
A: Yes. You have to play co-op and defeat a boss with someone who preordered the game.
Q: Why don’t you enable the Martyr Effigy?
A: Because it’s a personal choice. Many players don’t want to play Elden Ring (or other Souls games) online, no co-op and no PvP. Once you enable a Martyr Effigy, there is no way to disable it. So it’s really a matter of preferences. If you don’t want to PvP or to co-op at a specific location, you should never enable that Martyr Effigy. Also, this guide is 100% focused on PvE. It’s not a PvP guide or a co-op guide. It’s actually everything but that.
Q: Are you also covering rare drops from farmable enemies?
A: No. The guide would be way too long. The only exception will be the Brass Shield because we’ll use it in our build and it’s probably the best shield in the game in terms of weight / strength requirement to Guard Boost ratio. None of the other farmable rare drops are necessary, because the best items in the game are guaranteed drops.
Character creation
Origin: Samurai
You can pick a different origin if you like, especially if you want to take a different path for your character build.
But in the end it doesn’t really matter, at high level those starting attributes won’t matter at all.
Let me tell you why Samurai is a good starting class:
- Katana is an amazing weapon with great stats, innate bleed buildup and one of the best Ashes of War in the game
- Samurai starts with a Longbow, which will be quite useful early on
- The starting stats spread is perfect for our quality build and the unique weapon we’ll switch to soon.
Keepsake: Lands Between Rune is the best choice, it gives us some early runes to spend to have an easier start
- Why not pick the Golden Seed? Because we’ll get plenty Golden Seeds early and reach the maximum amount of flask charges regardless. We’ll finish the game with 12 extra Golden Seeds, so it’s useless to pick this keepsake.
- Why not pick the Stonesword Key? Because we’ll finish our first playthrough with 34 Stonesword Keys to spare, and that’s after opening every single imp statue.
- Why not pick any other other item? Because we’ll get them all during our first platythrough anyway.
EPISODE 141: ELDEN RING 100% WALKTHROUGH
EPISODE 141: CHECKLIST AND TIMECODES
ACHIEVEMENT
3:56 Achievement: Maliketh the Black Blade
Total Trophies Unlocked: 36/42
13:15 Trophy progression: Legendary Talismans 8/8
Achievement: Legendary Talismans
Total Trophies Unlocked: 37/42
ITEM LIST
3:54 Remembrance of the Black Blade
13:12 Erdtree’s Favor +2
15:08 Crimson Amber Medaillon +2
19:19 Mending Rune of the Fell Curse
19:46 Omen Armor Set
COMBAT TIPS
1:02 Prepare for boss: Beast Clergyman
1:31 Beast Clergyman Strategy
3:05 Maliketh Strategy
11:22 Buff Up and Pull
IMPORTANT INFO
0:15 Mix Wondrous Physick
6:35 Level up
6:48 Switch to Mage Mode
7:46 Boc is Still here
10:54 Death Pit
12:20 Normal Mode
17:42 LOL
19:23 So Long Dung Eater
NPC DIALOGUES
17:57 Talk to Dung Eater “Use the Seedbed Curse”
SITES OF GRACE DISCOVERED
6:27 Leyndell, Capital of Ash
7:41 East Capital Rampart
CHAPTERS
00:00 Preparations for Maliketh
01:00 BOSS: Beast Clergyman
01:43 CUT SCENE: Enter Maliketh, The Black Blade
02:58 BOSS: Maliketh, The Black Blade
04:03 CUT SCENE: Rune of Death Unbound
06:22 Leyndell, Ashen Capital
08:04 Final Legendary Talisman
14:02 Crimson Amber Medallion +2
15:19 Dung Eater’s Finale
20:04 Episode End
EPISODE 141: COMPACT TEXT GUIDE FORMAT
- Remembrance of the Black Blade
- Erdtree’s Favor +2
- Crimson Amber Medaillon +2
- Mending Rune of the Fell Curse (another alternative ending)
- Omen Armor Set
EPISODE 142: ELDEN RING 100% WALKTHROUGH
EPISODE 142: CHECKLIST AND TIMECODES
ACHIEVEMENT
19:34 Trophy Unlocked: Hoarah Loux, Warrior Total Trophies Unlocked: 38/42
ITEM LIST
2:27 Somber Ancient Dragon Smithing Stone
3:53 Corhyn’s Bell Bearing
3:54 Flail
3:55 Corhyn’s Robe
4:06 Rune Arc
6:58 Scepter of the All-Knowing
6:59 All-Knowing Armor Set
8:32 Mending Rune of Perfect Order
8:48 Goldmask’s Rags
8:49 Gold Bracelets
8:50 Gold Waistwrap
10:25 Erdtree Heal
19:38 Remembrance of Hoarah Loux
COMBAT TIPS
5:27 Prepare for Boss: Sir Gideon
6:08 Sir Gideon Strategy
10:46 Prepare for boss: Godfrey the First Elden Lord
13:04 Godfrey is Badass
13:25 Godfrey’s Shockwaves can be jumped over
IMPORTANT INFO
3:43 Goodbye Corhyn
4:54 Gear changes
7:19 Level up
8:25 Another Ending
9:39 Uh Oh
10:12 Re-allocate Flasks
15:31 Run away
15:45 Hoarah Loux moveset showcase
17:25 Enough messing around
NPC DIALOGUES
3:00 Talk to Brother Corhyn
5:11 Talisman Changes
SITES OF GRACE DISCOVERED
7:08 Erdtree Sanctuary
10:06 Queen’s Bedchamber
20:01 Elden Throne
CHAPTERS
00:00 MINIBOSS: Twin-Blade Gargoyle
02:36 Brother Corhyn’s Final Words
04:07 BOSS: Sir Gideon Ofnir, the All-Knowing
07:34 Noble Goldmask’s Final Silence
09:11 To the Elden Throne
10:44 Preparations for Boss Fight
10:59 CUT SCENE: Enter Godfrey, the First Elden Lord
12:52 BOSS: Godfrey, the First Elden Lord
13:55 CUT SCENE: Enter Hoarah Loux, Warrior
15:31 BOSS: Hoarah Loux, Warrior
17:13 BOSS: Godfrey, the First Elden Lord (Round 2)
18:35 BOSS: Hoarah Loux, Warrior (Round 2)
20:10 Episode End
EPISODE 142: COMPACT TEXT GUIDE FORMAT
- Somber Ancient Dragon Smithing Stone
- Corhyn’s Bell Bearing
- Flail
- Corhyn’s Robe
- Rune Arc
- Scepter of the All-Knowing
- All-Knowing Armor Set
- Smithing Stone [6]
- Mending Rune of Perfect Order (this is to unlock another ending)
- Goldmask’s Rags
- Gold Bracelets
- Gold Waistwrap
- Erdtree Heal
- Remembrance of Hoarah Loux
EPISODE 143: ELDEN RING 100% WALKTHROUGH
EPISODE 143: CHECKLIST AND TIMECODES
ITEM LIST
12:32 Elden Remembrance
COMBAT TIPS
2:31 Gear changes
2:51 Hotkey Items
3:27 Prepare for Boss
5:48 Radagon Strategy
6:02 The Plan
6:16 Kill and Buff Up
ELDEN BEAST STRATEGY GUIDE
8:03 Strong start
8:18 Elden Stars
8:34 Elden Beast
8:45 Left-Right Slash
8:58 Right-Left-Right Combo
9:23 Elden Rings
9:54 4-Hit Combo
10:15 Elden Orb
10:40 Lock-On / Unlock
11:00 Showing you the moves
11:10 Elden Rings
11:23 4-Hit Golden Arcs
11:54 Weak Spot
12:06 Long Stagger
12:15 Golden Breath
12:22 Time to End It
IMPORTANT INFO
0:13 Last Preparations
1:37 Level Up X
1:46 Close to one more
13:10 Grace
PC SAVE IN ELDEN RING
13:31 PC Save Guide
13:53 PC Save Step 1
14:12 PC Save Step 2
14:37 PC Save Step 3
14:47 PC Save Step 4
15:05 There you go
NPC DIALOGUES
0:33 Talk to Hewg
“About Yourself”
SITES OF GRACE DISCOVERED
13:14 Fractured Marika
CHAPTERS
00:00 Spending Runes and Leveling Up
02:31 Final Battle Preparations
03:50 CUT SCENE: Marika & Radagon
05:29 BOSS: Radagon of the Golden Order
06:37 CUT SCENE: Enter the Elden Beast
08:03 BOSS: Elden Beast
12:50 How to do all Endings in one Playthrough
13:30 How to Make a Save in Elden Ring
15:14 Episode End
EPISODE 143: COMPACT TEXT GUIDE FORMAT
-
Radagon
-
Elden Beast
- Elden Remembrance
-
How do I back up & restore my save file on PS4/PS5? – Console Settings > Saved Data Management > Saved Data > Console Storage > Upload your save to PS+ Cloud [PS5/PS4] or USB flash drive [PS4 only]. If using PS+ cloud (only option on PS5) make sure you have automatic save sync uploads disabled or else it could automatically overwrite your cloud save (PS5 Settings > Saved Data and Game/App Settings > Saved Data PS5 > Sync Saved Data > Auto-Sync Saved Data = Disabled). To copy it back: Console Settings > Saved Data Management > Saved Data > Cloud Storage / USB Drive > Copy to Console > Overwrite console saves.
-
How to back up & restore saves on PC? – For Steam it should be C:\ Users\ [username]\ AppData\ Roaming\ EldenRing – but also back up the other Steam folder to be safe – C:\ Program Files (x86)\ Steam\ userdata. Copy and paste these into another folder where you can find it later. To restore the save, paste it back and overwrite. If you don’t see the AppData folder in your C:\ Users\ [username]\ , you need to go to Folder Propertises and tick the show Hidden Folders option.
-
How to back up & restore saves on Xbox One/Xbox Series? – disconnect yourself from the internet > move around in-game whilst disconnected from internet for a few seconds > reconnect yourself back to the internet > now it will force a cloud save > (double-check that it really uploaded to the cloud) > do what you need without exiting the game (exiting the game may overwrite cloud save) > when done, press Home-Button > scroll down to Elden Ring > press Options > Manage Game > Saved Data > click Gamertag > Delete Saved Data > Delete from Console > if it still shows the save, delete it again until it’s gone > press Home-Button and restart the game > it will now sync/download your backup save from cloud.
EPISODE 144: ELDEN RING 100% WALKTHROUGH
EPISODE 144: CHECKLIST AND TIMECODES
ACHIEVEMENT
2:38 Trophy Unlocked: Elden Lord
Total Trophies Unlocked: 39/42
IMPORTANT INFO
0:10 Save File
0:18 Age of Facture Ending requirements
2:56 Credits
4:22 Reloading Save
5:03 Fashion Changes
5:15 Age of Order Ending
8:00 Reload Save
8:08 Age of Duskborn Ending
10:38 Reload Save
10:51 Blessing of Despair Ending
NPC DIALOGUES
3:15 Talk to Roderika
CHAPTERS
00:00 1ST ENDING: AGE OF FRACTURE
03:09 Talking to Roderika one last time
04:25 Reloading an Elden Ring Save
05:02 2ND ENDING: AGE OF ORDER
08:07 3RD ENDING: AGE OF DUSKBORN
10:45 4TH ENDING: BLESSING OF DESPAIR
13:26 Episode End
EPISODE 144: COMPACT TEXT GUIDE FORMAT
EPISODE 145: ELDEN RING 100% WALKTHROUGH
EPISODE 145: CHECKLIST AND TIMECODES
ACHIEVEMENT
3:06 Trophy Unlocked: Age of the Stars
Total Trophies Unlocked: 40/42
IMPORTANT INFO
0:09 Age of the Stars Ending
3:21 A few Surprises
3:32 Episode 147
3:45 Episode 148?
3:58 End Credits
CHAPTERS
00:00 ENDING: AGE OF THE STARS
03:21 What’s Coming Next
04:11 Credits Roll
11:09 Episode End
EPISODE 145: COMPACT TEXT GUIDE FORMAT
EPISODE 146: ELDEN RING 100% WALKTHROUGH
EPISODE 146: CHECKLIST AND TIMECODES
ACHIEVEMENTS
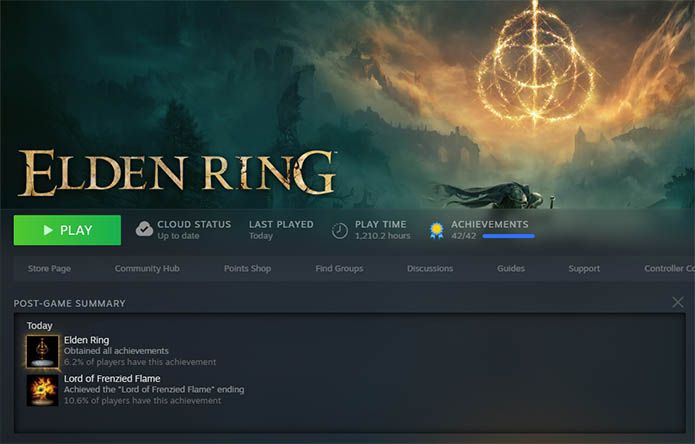
15:56 Trophy Unlocked: Lord of Frenzied Flame
Total Trophies Unlocked: 41/42
Platinum Trophy Unlocked: Elden Ring
Total Trophies Unlocked: 42/42
ITEM LIST
0:58 Yellow Ember
1:40 Nomadic Merchant Armor Set
1:46 5x Grace Mimic
1:48 Yellow Ember
2:22 5x Eye of Yelough
2:36 Yellow Ember
2:44 Golden Rune [11]
3:05 Frenzied’s Cookbook [2]
3:22 3x Hefty Beast Bone
3:25 Yellow Ember
5:04 Inescapable Frenzy
5:18 Fingerprint Stone Shield
6:26 Note: Miquella’s Needle
12:41 Frenzied Flame Seal
12:42 5x Frenzyflame Stone
IMPORTANT INFO
0:11 What Now?
1:06 Don’t kill this guy
3:29 The Worst Parkour
4:04 Deathcount 7
5:23 Fingerprint Stone Shield
5:31 Kick This Merchant
6:31 Miquella’s Needle
8:11 Strip
12:42 Frenzied Flame
13:12 Goodbye Hyetta
16:24 Why so dark?
16:48 Removing Frenzied Flame
18:01 Begone yellow eyes
NPC DIALOGUES
7:33 Talk to Hyetta
10:20 Talk to Hyetta
“Touch Hyetta”
Talk to Hyetta 2x
SITES OF GRACE DISCOVERED
7:15 Frenzied Flame Proscription
CHAPTERS
00:00 Way to Fingerprint Stone Shield
04:11 Worst Parkour Ever
06:53 To the Frenzied Flame Proscription
08:20 CUT SCENE: Receiving the Frenzied Flame
10:05 Hyetta’s Quest End
13:29 6TH ENDING: LORD OF THE FRENZIED FLAME
15:51 PLATINUM TROPHY UNLOCKED: ELDEN RING
16:35 Removing the Flame of Frenzy
18:15 Episode End
EPISODE 146: COMPACT TEXT GUIDE FORMAT
- Yellow Ember
- Nomadic Merchant Armor Set
- Yellow Ember
- 5x Grace Mimic
- 5x Eye of Yelough
- Yellow Ember
- Golden Rune [11]
- Frenzied’s Cookbook [2]
- 3x Hefty Beast Bone
- Yellow Ember
- Inescapable Frenzy
- Fingerprint Stone Shield (best shield in the game, can reach 100 Guard Boost when fully upgraded + Greatshield Talisman – But very high STR requirement and very heavy too)
- Note: Miquella’s Needle
- Frenzied Flame Seal
- 5x Frenzyflame Stone
EPISODE 147: ELDEN RING 100% WALKTHROUGH
EPISODE 147: CHECKLIST AND TIMECODES
ITEM LIST
3:18 Witch’s Glintstone Crown
7:24 Aspect of the Crucible: Breath
7:32 Consort’s Set
8:02 Ronin’s Set
COMBAT TIPS
7:30 Crashed!
8:50 Poke & Bleed
10:31 Shield Grease
14:14 Redirections!
IMPORTANT INFO
0:10 Last Episode
0:24 The Build
0:31 Cross-Naginata
0:44 Armor
1:17 NG+ Checklist
1:39 Ash of War Setup 1
1:54 Ash of War Setup 2
2:25 Talismans
3:33 Purchases
3:53 Respec Time
4:30 Extra Points
5:00 Hotkey Shield Grease
5:21 Allocate Flask Charges
5:29 Wondrous Physick Mix
6:31 Pre NG+ Checklist
8:15 Build showcase
9:10 Revenant Lane
11:18 Not convinced?
16:53 Diallos
18:10 Main Gate
20:08 Godrick the Grafted
21:28 Great Runes
21:43 Goodbye For Now
22:08 What’s Next
NPC DIALOGUES
16:56 Diallos (Missed dialogue in 1st Playthrough)
CHAPTERS
00:00 Fingerprint Stone Shield Crash Blood Build
03:05 Rebirth
05:00 Flask, Wondorus Physick & Consumables
05:52 Fashion
06:30 Killing Tanith & her Crucible Knight
07:49 Shabriri’s End
08:23 Build Showcase: Revenant Lane Slaugther
11:37 Begin Journey 2
12:55 Hi Varré
13:18 Erdtree Sentinel
14:12 Shield Crash Steering
15:07 Hi Melina
15:33 Night Rider
16:03 Margit, the Fell Omen
16:44 Roundtable Hold: Diallos
17:45 Through Stromveil’s Main Gate
19:54 Godrick the Grafted
20:52 Restoring the Great Rune
21:26 Final Words
EPISODE 147: COMPACT TEXT GUIDE FORMAT
-
Go to Raya Lucaria Academy in Rennala’s Room (Grace: Grand Library), Sorceress Sellen should be morphed into a ball of mage faces and there will be an item to loot next to it: Witch’s Glintstone Crown
-
Purchase all Spells from Sorceress Sellen (who will now be a giant ball of Sorcerer faces)
-
Make sure you’ve offered all your Bell Bearings to the Twin Maiden Husks, they carry over through New Game+
-
Purchase all Spells and Incantations (from Mirel and from the Twin Maiden Husks various shops)
-
Purchase all Ashes of War (from the Twin Maiden Husks, Bernahl’s Shop)
-
Purchase all the Dragon incantations from the Dragon Communion Shrine in Caelid
-
Use all 7 Wandering Mausoleums to duplicate Remembrances
-
Trade all your Remembrances at the Finger Reader Enia in Roundtable Hold or Sell Them for Runes
-
Kill Tanith and her Crucible Knight to get Aspect of the Crucible: Breath
-
Loot Tanith to get the Consort’s Set
-
Go to Shabriri at the Zamor Ruins Grace to get the Ronin’s Set
-
Nepheli Loux Puppet (give her Seluvis’s Potion then after Ranni kills Seluvis and Pidia, loot Pidia’s corpse and Nepheli Loux Puppet will be there)
-
Dung Eater Puppet (give her Seluvis’s Potion instead of giving it to Nepheli. But that means you’ll have to do NG+2 to ge the other Puppet)
-
Side with Jerren at the end of Sellen’s Quest Line, you’ll hear other dialogues and be rewarded with an Ancient Dragon Smithing Stone
-
Millicent’s Prosthesis – Instead of finishing her Quest Line, just kill her when you see her in Windmill Heights or at any of the locations you see her after that.
Please consider supporting my work with one of the options below. Any help is greatly appreciated!
For episodes 01 to 20: Elden Ring 100% Walkthrough – Part 1
For episodes 21 to 40: Elden Ring 100% Walkthrough – Part 2
For episodes 41 to 60: Elden Ring 100% Walkthrough – Part 3
For episodes 61 to 80: Elden Ring 100% Walkthrough – Part 4
For episodes 81 to 100: Elden Ring 100% Walkthrough – Part 5
For episodes 101 to 120: Elden Ring 100% Walkthrough – Part 6
For episodes 121 to 140: Elden Ring 100% Walkthrough – Part 7
If you want to support my guides, feel free to:
- 💖Leave a tip
- ✅Subscribe to my Channel
- ➡️Follow me on Twitter
- 🐦Like and retweet my post: https://twitter.com/Jamewowpro/status/1576544777805656064
@Jack Yes! I’ll write a full guide for Shadows of the Erdtree, but no ETA yet.
Doing DLC anytime soon?
@Jame thank you so much for taking the time to write up this guide. I’ve just achieved platinum trophy today through the near perfect text guide 🙂
I hope you’ll be back to write one up for the DLC
Thanks again!
You’ll have to do a 2nd playthrough to get the other endings and their related Trophies.
I highly advice you double check that your save works before you finish the game.
Save game didn’t work on pc am I just screwed now?
@Peter Thank you very much for the kind words! I highly recommend going for the platinum on FF7R, it’s so worth it! Also if you play on PS5, make sure to use synergy materia + Fire materia or Lightning Materia on Aerith as much as possible, it’s incredibly OP in the intergrade update, and I don’t mention that in my guide because it was recorded on the old version.
Jame, incredible effort here. I don’t think I would have had the wherewithal to get the platinum without you putting things together so clearly and helpfully. Thinking about trying to (finally) beat FF7R hard mode since I see you have a guide for that too! Best wishes and see you in the DLC if not sooner.,
@Juan Thanks! I’m glad you enjoyed my guide and got all the goodies 😉
Wanted to say thanks for all your time and effort. I used it on my ng+ to get 100% on stuff I missed and messed up.
@Dave Thanks for this great feedback! I’m truly glad my guide has been such a postive experience for you and that you got the Platinum Trophy 🙂
Just wanted to leave my thanks for an excellent guide!
I was bouncing off Elden Ring hard, despite being a huge fan of prior Souls games. It was just too unfocused, overwhelming. As a last ditch attempt to enjoy it, I decided to use a guide, and so stumbled on yours. And I’m so glad I did!
Your guide was detailed where it needed to be, brief where detail wasn’t needed. It provided just enough to get you through. Having the videos as a backup reference to the text was invaluable.
I was utterly amazed how trivial your build made the bosses. I’m generally a fairly average Souls gamer, with each boss taking me many attempts. With this setup, I had no trouble at all with anything… Melania (3 attempts), Gideon (1 attempt), Godfrey (1 attempt), Elden Beast (2 attempts). The Darkmoon Sword/Mimic Tear combination was just too powerful.
Thanks again!
Awesome guide! I took a long break and just got back to it. Finally finished. I really appreciate all of the hard work you put into this guide. Truly excellent work. Thanks!
@Quinn You’re welcome! Thanks for leaving a comment 😉
Almost done! Thanks for the guide.
@Average Dark Moon GS Enjoyer: Thank you for leaving this nice comment! I’m glad you enjoyed Elden Ring to the fullest with my guide, stay tuned for my future projects 😉 Nice nickname btw haha
Astonishing work, just fantastic! Thank you very much for making the guide, it was super easy, fun and enjoyable to complete the game with your help!
The build was very good and it always felt super strong against the monsters and bosses I was fighting against and I didnt die more than around 5 times to a single boss, even the radagon+beast was like a walk in the park haha.
Would definitely recommend this guide to anyone that wants to beat the game and leave no stone unturned, much love!
@ERL Thank you very much for taking the time to leave a comment and give me your feedback. It’s much appreciated and I’m really happy my Elden Ring guide was such a positive experience for you!
After my initial playthrough completion, I decided to follow this guide in order to witness the whole glory of Elden Ring’s content.
Wow, just wow… This has been the most detailed playthrough I have ever followed for any game.
All instructions were on-point and the complementary video was extremely helpful for tough situations.
The guide is very well thought out and the research and planning this must have undergone is exceptional.
Great work once again!
@Justin Congratulations on completing 100% of Elden Ring mate!
And yes, it took me a lot of hours to do this both in written and video format, thousands of hours to be honest haha.
Thank you for leaving a nice comment and I hope you’ll stay tuned for my future projects. 😉
Hey Jame,
That’s me done too. VERY well done again. I was suitably nervous about the savegame/offline vs. online procedure in order to witness all three endings… but it worked out fine.
It’s amazing the way you combined both video and written instructions/guides. I can only imagine how many hours you poured into this endeavour.
Best of luck in your new ventures!!
FBF
@Sadeyr Thanks a lot for this very nice comment! I hope you’ll sub to my YouTube channel or follow me on Twitter to get updated on my next guides 😉
Amazing work! This guide has been absolutely central to my full run of the game. Incredibly useful all the way through!